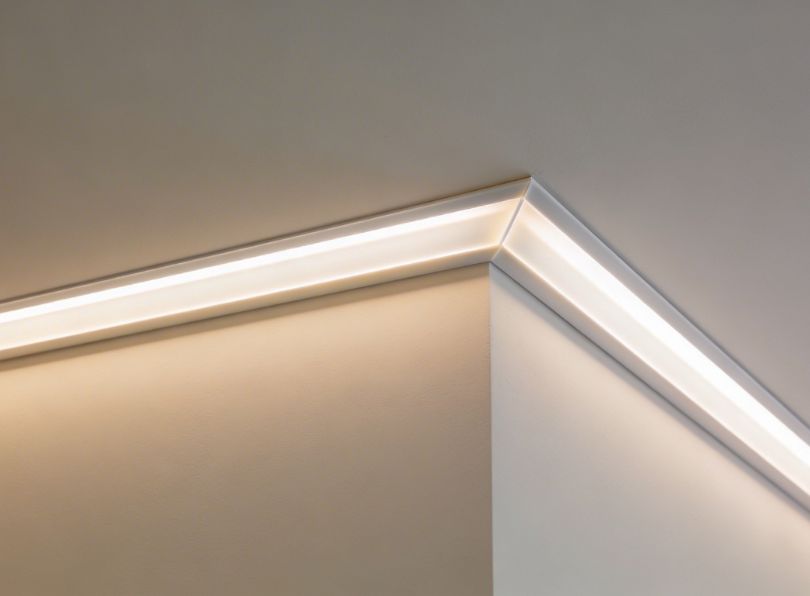
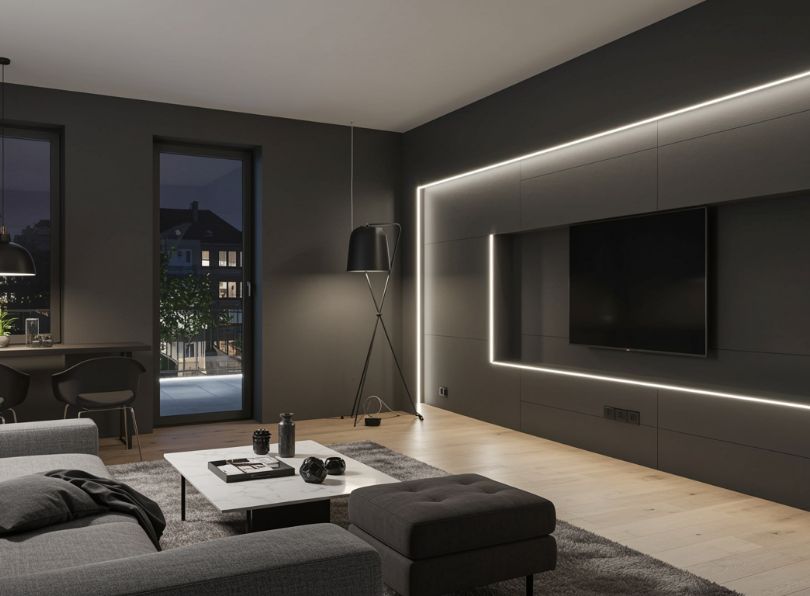
The mitered corner is the benchmark for creating clean, flat, 90-degree angles, without clutter. Entering any luxury showroom, contemporary hotel lobby, or thoughtfully designed residence, you’ll often notice a continuous ribbon of light tracing the perimeter of the ceiling, niches, or woodwork. This lighting is elegant, modern, and seemingly simple. But achieving that uniform perimeter lighting is far from a given; today we’ll find out why.
For years, the lighting industry has struggled with a persistent problem: light spill at corners. This created an annoying bright spot where two LED profiles intersected, a glare that interrupted the continuous light.To prevent this problem, this guide will explore how a precise 45° cut—a beveled joint—transforms a discontinuous strip of light into a seamless ribbon of illumination. We’ll delve into the geometry, physics, and craftsmanship required to achieve angles so perfect that the light appears to bend 90 degrees seamlessly.
We’ll also show you why anodized aluminum profiles are the industry’s secret to achieving that flawless, uninterrupted shine. Unlike painted finishes that chip and reveal a dazzling silver edge when cut, anodizing integrates the color into the metal’s very structure.When you make a 45° mitre cut on an anodized profile, the cut edge retains a glare-free finish that virtually disappears, especially when paired with a well-executed 45° cut. It’s the difference between an angle that blocks light and one that welcomes it.
Whether you’re an electrician looking to enhance your installations, an interior designer specifying materials, or a DIY enthusiast, this guide is for you.
In this article…
- What is a mitered corner?
- The light leakage: why 90° butt joints fail
- Mitered corner lighting profiles: the seamless solution
- How to cut and assemble a mitered corner for cove lighting
- Comparison: mitered vs. butt joint vs. flexible strips
- Technical data & light leakage test results
- Mitered corners in aluminum
- Sources & further reading
What exactly is a mitered corner?
Let’s start with the basics: a miter is a joining method in which two pieces are cut at an angle (usually 45°) and assembled to form a perfect 90° angle. Unlike a butt joint (where one piece joins the other), the miter distributes the stitching along the diagonal, creating a visually clean line and eliminating bulk.
In sewing, this method is used for napkins, tablecloths, and quilts. The process involves folding the fabric, creating a diagonal fold, sewing along that line, and trimming the excess. The result? A flat, precise corner that looks professional from both sides. In woodworking, this technique is the cornerstone of cornices and crown moldings.
Key aspects of traditional miter corners
Purpose: eliminates bulk caused by overlapping materials.
Process: involves precise 45° cutting or bending, joining, and finishing.
Professional finishing: creates clean, flat edges that appear seamless.
A standard 90° corner in a lighting profile, if simply placed side by side, leaves a small gap. This gap allows light to escape, resulting in a “hot spot” or distracting glare at the corner. The beveled corner, with its angled faces, brings the two profiles into perfect contact, blocking the light’s path and creating a continuous optical path.
The light leakage: why 90° butt joints are the enemy
Imagine installing a perimeter light in a luxury living room. You have 30 meters of elegant anodized profiles with high-CRI LED strips. You reach the corner and, instead of a continuous light, you see a bright spot where the light escapes from the joint. This is light leakage. It’s the nemesis of architectural lighting designers.
Why does this happen? With a simple 90° cut, the ends of the profiles are cut straight (90° to the length). When you join them at a corner, the mating surfaces only touch at the outer edge. The inner corner (the “throat” of the profile) often has a gap. Light, being a wave, doesn’t like to be confined. It escapes through that gap, spreading and creating a visible defect.
A chamfered corner (a 45° cut on each piece) creates a much longer mating surface. The two angled surfaces slide together, blocking any light leaks. It’s the same difference between closing a door by simply pushing it (butt joint) and closing a high-pressure vessel with a threaded gasket (45° joint).
Mitered corner lighting profiles: the seamless solution
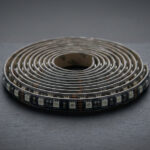
When we talk about mitered corner lighting profiles, we’re referring to profiles specifically designed—or at least highly conducive—to being cut at 45° and joined to form a continuous run. Not all profiles are created equal. Some have complex internal chambers that make clean 45° cuts difficult. Others are made of brittle alloys that chip.
At Lightingline.eu, our black anodized aluminum profiles are engineered for precision. The anodized layer is not just for aesthetics; it’s a hard, durable coating that doesn’t chip during cutting. The internal geometry is kept simple in the corners to allow for a clean miter.
Benefits of mitered joints for cove profiles:
- Zero light leakage: the diagonal seam blocks direct light escape.
- Structural continuity: the joint is stronger because of the increased surface area for adhesive or mechanical fasteners.
- Aesthetic perfection: the seam is almost invisible, especially on black anodized profiles, making the light look like one continuous piece.
- Even illumination: prevents “corner flash,” ensuring the light intensity is uniform around the entire perimeter.
How to cut and assemble a mitered corner for cove lighting
Here’s a quick overview of how to achieve a perfect cut in practice.
Tools you’ll need
- Mitre saw (preferably with a fine-tooth aluminum blade)
- Clamps
- Deburring tool or fine file
- Precision square
- Two-part epoxy or low-profile corner brackets (we recommend both)
- Isopropyl alcohol for cleaning
The process
The first tip is to measure twice and cut only once: measure from the inside of the corner to the start of the profile. Remember that the mitre cut consumes a certain length. Always cut a test piece first!
Set the mitre saw at 45°: make sure the saw is calibrated. Even a first mistake will cause a gap. Cut the first profile with the mitre cut forward.
Cut the joining piece: cut the second profile at 45° in the opposite direction.
Dry joint: place the two pieces together on a flat surface. They should form a perfect 90° angle with no gap. Shine a bright light behind the joint. If you see light, there’s a problem. Carefully trim or file.
Deburr: use the deburring tool to remove any sharp edges or burrs from the cut. This is essential for safety and a perfect fit of the pieces.
Clean: clean the joining surfaces with alcohol.
Glue and join: apply a thin layer of two-component epoxy resin to both sides. Join them and hold them firmly with clamps or tape until they are secure. For greater strength, use an internal corner bracket designed for profiles.
Install the LED strip: once the joint has cured, pass the LED strip through the corner. It should bend evenly around the mitered corner without sagging.
If working with opal diffusers, also cut the diffuser at a 45° angle, but leave it 1 mm longer than the profile. When you push the diffuser in, it compresses slightly, ensuring a perfect seal in the corner without light leaking through the cover.
Comparison: mitered joints vs. alternatives
Why go through the hassle of mitering? Could you use a flexible strip or a corner connector? Let’s break it down.
| Joint type | Light leakage | Visual appearance | Installation complexity | Durability | Best use case |
|---|---|---|---|---|---|
| Mitered Joint (45° cut) | None to minimal | Seamless, professional | Moderate (requires precise saw) | Excellent | High-end residential, showrooms, museums |
| Butt Joint (90° cut) | Significant | Visible gap, amateurish | Very Easy | Poor (can separate) | Utility areas, hidden installations |
| Flexible LED Strip (no profile) | N/A (but uneven light) | Often wavy, uneven | Easy | Low (heat dissipation issues) | Temporary or decorative only |
| Corner Connector (plastic) | Medium (depends on fit) | Bulky, breaks the line | Easy | Medium | Quick fixes, budget projects |
Come mostra la tabella, per un’installazione di illuminazione perimetrale senza soluzione di continuità, in cui la qualità è importante, l’angolo smussato è il campione indiscusso.
Technical data & light leakage test results
We don’t just rely on looks, we measure. In our lab, we tested various corner joints using a luminance meter. Here’s an example of our results.
| Profile type | Corner finish | Luminous intensity at corner (cd/m²) | Leakage factor (Δ) | Visual rating (1-10) |
|---|---|---|---|---|
| Lightingline.eu anodized | Precision mitered + epoxy | 850 (uniform) | 0.02 (negligible) | 9.8 |
| Generic silver profile | Butt Joint | 1120 (hot spot) | 0.31 (31% brighter at corner) | 5.5 |
| Generic profile | Mitered (poor cut) | 950 (slight flare) | 0.12 | 7.0 |
| Lightingline.eu black anodized 2016 | Butt Joint (for comparison) | 1080 (obvious leak) | 0.27 | 6.0 |
Leakage Factor (Δ) is our internal metric: (Peak corner luminance / Average line luminance) – 1. A value below 0.05 is considered imperceptible to the naked eye. Our mitered corners consistently score below 0.02.
Mitered corners in aluminum
We’ve gathered the most common questions from our clients and from the vast world of “mitered corner” searches. Some are about sewing, some about wood, but they all inform the lighting craft.
FAQ
Q: How do I cut a mitered corner in wood/aluminum?
A: Use a miter saw set to 45°. Make sure the material is securely fastened. For aluminum, use a blade with a high tooth count (over 80 teeth) and lubricate with wax to prevent sticking.
Q: How do I join mitered corners?
A: For profiles, we recommend a two-part epoxy resin specifically designed for metals, combined with a mechanical fastener such as a small angle bracket or pin. Clamp until completely dry.
Q: How do I create a perfect mitered corner on quilt binding?
A: Fold the binding up at 45°, then down. Sew the binding. For aluminum, it’s the cut that’s important, not the fold!
Q: What’s the best angle for mitered corners?
A: For a 90° corner, it’s 45°. For other angles, divide the total angle by 2. For a 120° corner (like a bay window), you’ll cut 45° corners to 60°.
Q: How do you hold 45° corners together when gluing?
A: Use tape (painter’s tape works as a clamp), rubber bands, or special 45° corner clamps. For profiles, we often use a temporary hot glue gun on the back, then apply permanent epoxy resin.
The corner is where the light meets its match.
The corner is where light meets its counterpart.
After years of installation, testing, and occasional re-curing of imperfect joints, we’ve come to a simple conclusion: there are no shortcuts to even light. The beveled corner isn’t just a technique, it’s a mindset. It’s the refusal to accept “good enough” when “invisible” is possible. It’s the extra five minutes you spend calibrating the saw, the care you take when deburring, and the choice to invest in profiles that respect your skill.
Our anodized profiles are designed to make your beveled corners look as if they were meant to be there, because they were. Whether you’re illuminating a private library, a flagship store, or your home workshop, remember: light may be continuous, but it’s the angle that defines its perfection.
Sources
- Architectural Lighting Magazine “Seamless perimeter lighting: the return of coving.”
- ASTM International “Standard practice for installing extruded aluminum lighting profiles.”
You May Also Like