There is a particular quality of light found in the finest rooms (hotel lobbies, heritage museums, Michelin-starred restaurants) that is impossible to pin to any single fitting. It emanates from nowhere visible, wraps the ceiling in a warm luminous wash, and transforms the entire character of the space. This is the hallmark of expert indirect LED coving uplighting, and it is now fully accessible to residential and commercial interiors of every scale and period.The transformation of LED coving from a specialist architectural technique to a mainstream design strategy has been driven by three converging developments: the dramatic improvement in LED strip density and quality, the proliferation of precisely engineered aluminium profiles designed specifically for cornice and coving applications, and the collapse in price of high-quality LED components over the past decade.
What once required custom plasterwork fabrication and specialist electrical contractors can today be achieved by a skilled DIY installer or a lighting-aware decorator with the right components and knowledge.This guide is written for the full spectrum of people who need to understand, specify, design and install LED coving and cornice lighting systems: the interior designer specifying a townhouse renovation; the Victorian property owner who wants to honour and illuminate the original plasterwork without damaging it; the architect creating a shadow gap ceiling detail in a contemporary loft; the electrician calculating driver sizes for a 20-metre continuous cornice run; and the smart home enthusiast who wants their led coving to respond to circadian rhythms and media playback. For each audience, this document provides the depth, precision and actionable guidance that separates excellent lighting from ordinary.
In this article…
- Coving vs. cornice: understanding the architectural difference
- A brief history of coving and cornice in British interior architecture
- Why LED coving is transforming modern and period interiors
- Types of LED profiles for cornice and coving uplighting
- Choosing the right LED strip for indirect uplighting
- Diffuser covers: matte, opal, clear and satin
- LED coving in period interiors: victorian, georgian, and edwardian homes
- LED coving in contemporary and minimalist interiors
- Step-by-step installation guide
- Dimming and control systems
- Smart home integration: DALI, Tuya, KNX, Lutron
- The art of indirect uplighting: professional profiles and components from LightingLine
- Advanced design strategies
- Maintenance, dust management and strip replacement
- Market context: LED coving trends and ROI data
- Cost guide: surface mount, plaster-in and retrofit LED coving
- Frequently asked questions
- LED coving and cornice: the most significant advance in domestic lighting design
Coving vs. cornice: understanding the architectural difference
The terms “coving” and “cornice” are frequently used interchangeably in everyday conversation, but they describe architecturally distinct elements that have significant practical implications for LED lighting installation. Understanding the difference is not merely semantic it directly affects which LED profile you should specify, how you manage the viewing angle of the light source, and whether you require a diffuser cover.
What is coving?
Coving is a plain moulding, typically concave (coved) or angled, used to create a smooth junction between the wall surface and the ceiling. It has no decorative profiling and is characterised by its simplicity. Standard coving sections are commonly 90mm or 127mm deep and are produced in plaster, polystyrene, or polyurethane. In contemporary architecture, the term “coving” has been extended to describe any concealed linear slot or recess at the wall-ceiling junction designed to house an LED strip, even where no traditional moulding is involved, hence terms like “LED coving profile” and “LED coving channel” in the lighting trade.
For LED uplighting purposes, coving profiles are typically shallow and geometrically regular, making them relatively straightforward to specify and install. The consistent geometry means that calculating the viewing angle and choosing the correct diffuser are predictable exercises.
What is cornice?
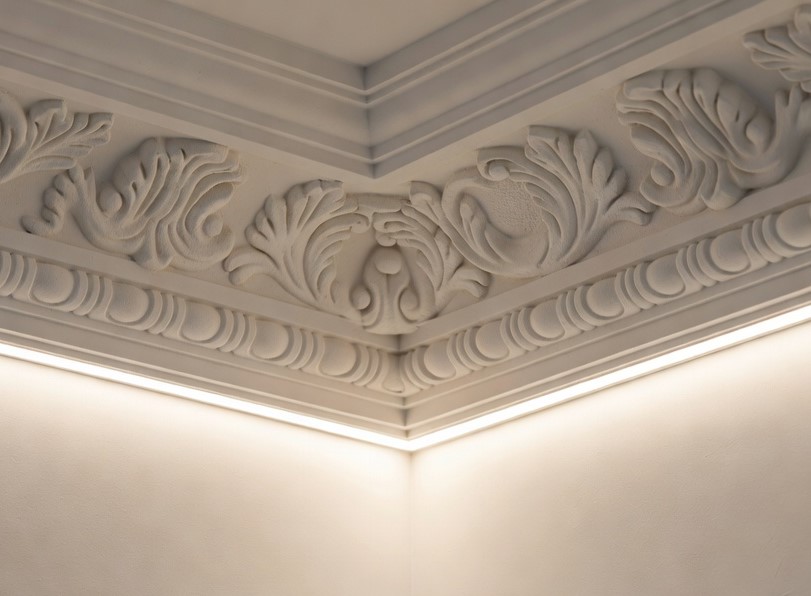
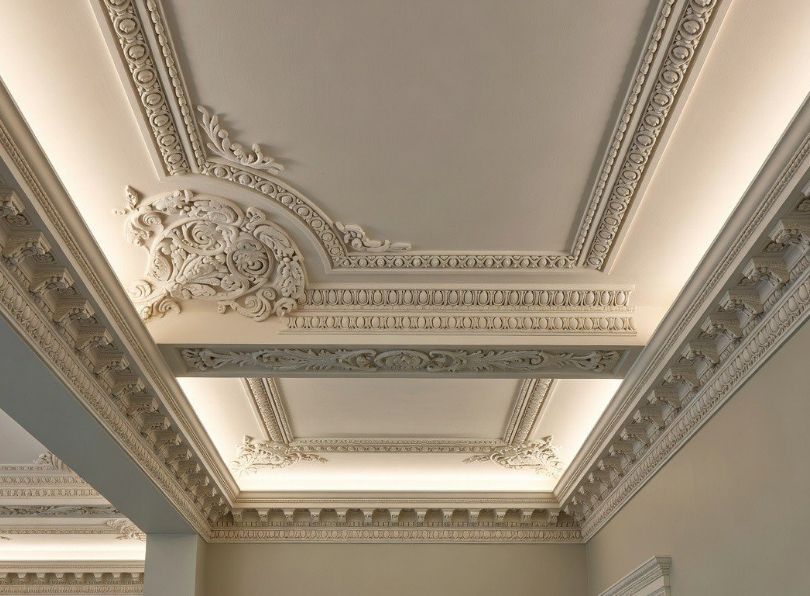
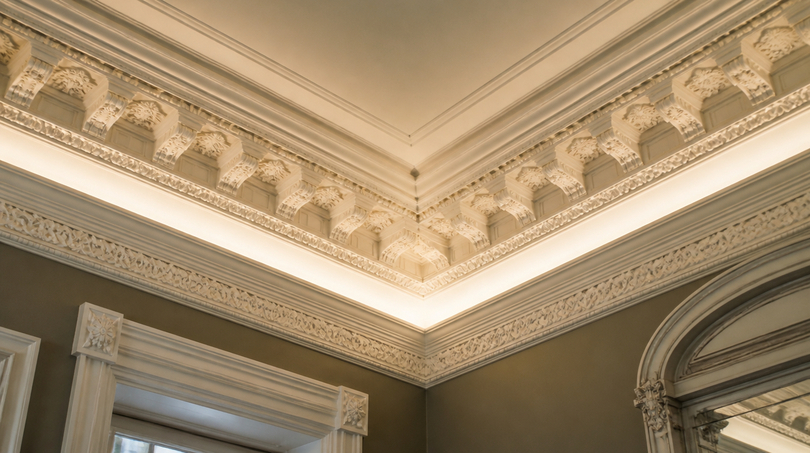
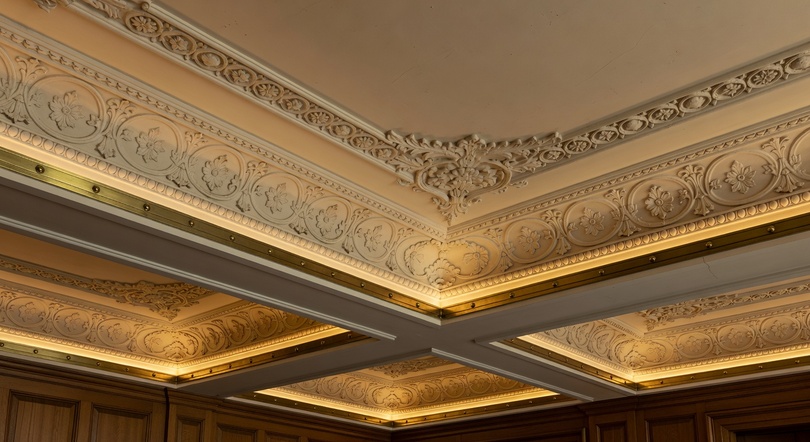
A cornice, by contrast, is an architecturally enriched moulding that forms the top section of an entablature or the junction between wall and ceiling in a traditional interior. In British domestic architecture from the Georgian period onward, cornices range from relatively simple stepped profiles (common in modest terraced houses) to elaborately modelled confections featuring egg-and-dart borders, dentil courses, acanthus leaf scrollwork, and multiple projection planes. The architectural complexity of a cornice is both its greatest visual asset and its principal challenge for LED integration.
A typical Victorian cornice in a London townhouse living room might project 200–300mm from the wall face and have a vertical drop of 150–250mm from ceiling to the lowest decorative element. This creates potential for concealing an LED strip on the upper horizontal face of the cornice — but the multiple convex curves and ornate relief patterns mean that any visible light hotspot or strip line will be readily apparent in the reflected light on the plasterwork and ceiling above.
Indirect light cornice vs. coving: key technical differences
| Feature | Plain coving (contemporary) | Decorative cornice (period) |
|---|---|---|
| Typical projection depth | 50–120mm | 100–350mm |
| LED concealment potential | Moderate (may need extended pelmet) | High (large horizontal ledge) |
| Hotspot risk | High if shallow, use COB or dense SMD | Moderate-high, reflected in carved relief |
| Diffuser requirement | Strongly recommended | Essential for ornate profiles |
| Profile fixings | Adhesive or clip to plasterboard | Adhesive on cornice shelf, avoid drilling |
| Strip angle to ceiling | 30–60° typical | 30–45° ideal, limited by cornice height |
| Ideal LED type | COB or 240 LED/m SMD | COB 480+ or Sunlike high-CRI strip |
| Wire concealment | In plasterboard or trunking | Behind cornice void, reversible only |
The practical implication of these differences is that the same LED profile that works perfectly in a contemporary shadow-gap coving detail will not necessarily perform well when retrofitted to a Victorian cornice. Each context requires independent specification, and this guide will address each in detail throughout the following sections.
A brief history of coving and cornice in British interior architecture
To specify LED coving systems appropriately for period properties, it is invaluable to understand the architectural context in which the original mouldings were created. British interior cornices and covings are not merely decorative additions, they are the physical record of successive periods of artistic, technical and social aspiration. Each period has its own typical cornice geometry, its own characteristic projection and relief depth, and its own relationship between the wall, the moulding and the ceiling plane, all of which directly affect how an LED uplighting system should be designed and installed.
Georgian cornices (1714–1830)
The Georgian period is defined by its classical restraint and mathematical precision. Georgian cornices, particularly in the Adam style, feature delicate low-relief patterns (paterae, fluting, swags, and running anthemion borders) executed at relatively small scale on cornices that typically project 150–250mm and drop 80–150mm. The classical tripartite entablature (architrave, frieze, cornice) is often referenced even in modestly proportioned domestic rooms. For LED uplighting in Georgian interiors, the priority is subtlety and the highest possible colour rendering index, since the fine plaster relief demands light that models the surface accurately without washing it out.
Regency cornices (1811–1830)
The Regency period introduced bolder, more theatrical plasterwork. Regency cornices often feature deeper projections and more emphatic Greek Revival motifs. The increased projection of Regency cornices (commonly 200–300mm) creates excellent horizontal ledge space for housing an LED profile, and the deeper relief of the decorative elements tolerates a slightly less diffused light source. Regency rooms are among the most rewarding for LED coving uplighting because the architectural confidence of the period translates beautifully under warm artificial light.
Victorian cornices (1837–1901)
Victorian cornices are the most commonly encountered in British domestic renovation projects, and the most variable in quality and character. At their finest (in first-floor reception rooms of a substantial London townhouse or a provincial merchant’s villa) Victorian cornices are elaborately moulded, deeply projected (250–350mm is common in upper-grade properties), and richly detailed with naturalistic flora, acanthus scrolls, egg-and-dart mouldings, and multiple projection planes. In more modest Victorian terraced housing, the cornice is typically a simplified three-member arrangement with a modest 80–150mm projection. This range of Victorian cornice types demands careful individual assessment before specifying any LED coving system.
Edwardian cornices (1901–1910) and arts & crafts
Edwardian domestic architecture introduced a more relaxed approach to classical ornament, often combining simplified cornices with built-in picture rails, dado rails and inglenook details. Arts and Crafts interiors deliberately rejected elaborate plasterwork in favour of plain or simply coved ceilings. For LED coving, Edwardian and arts & crafts interiors are the most flexible, since the simpler ceiling geometry reduces the risk of exposed LED lines and makes installation more straightforward.
Interwar and mid-century (1920–1970)
The interwar period produced two contrasting ceiling treatments: Art Deco interiors with geometric plasterwork suitable for dynamic LED effects, and the plain skimmed ceilings of the modernist movement that anticipated today’s shadow gap coving. Mid-century domestic architecture largely abandoned cornices entirely, creating a new challenge for LED coving where no traditional ledge exists, the lighting designer must create one through built-in joinery or plasterboard detailing. This context gave rise to the contemporary shadow gap LED coving profile that is now a standard tool in the modern interior architect’s repertoire.

Why LED coving is transforming modern and period interiors
The shift from downlighting to indirect uplighting as the primary ambient light source in residential interiors represents one of the most significant design movements in domestic lighting over the past two decades. LED coving is at the heart of this shift, offering a combination of architectural integrity, visual comfort, energy efficiency and design flexibility that no previous lighting technology could deliver. Understanding why LED coving has achieved this prominence helps designers and installers make the case to clients and specify systems with confidence.
Visual comfort and the science of indirect light
Direct downlighting (whether from recessed spots, pendant fittings or surface-mounted ceiling lights) creates stark contrasts between illuminated and shadowed zones. The human eye is highly sensitive to glare from exposed light sources within the field of view, and multiple downlights in a domestic ceiling create repeated glare points that cause unconscious visual fatigue over extended exposure. By contrast, indirect uplighting from LED coving illuminates the ceiling as a large, diffuse reflective surface. The light reaching the room is entirely indirect, reflected from a painted or plastered ceiling with typical luminance values of 80–100 cd/m², far below the threshold of discomfort glare (approximately 500 cd/m² for the average observer in domestic conditions).
Architectural sympathetics: respecting and enhancing period detail
For period properties, indirect LED coving offers something that no other contemporary lighting strategy can match: the ability to use light to frame and celebrate the room’s original architecture without imposing any new visual element on it. When correctly installed behind or above an original cornice, the light source is entirely invisible. The ceiling is washed in a warm luminous glow that enhances the three-dimensional relief of the cornice from above, deepening the modelling of carved plaster details and giving the room a sense of luminous depth that closely replicates the effect of candle-lit chandeliers in the original era, but with full dimming control and far superior energy efficiency.
Energy performance and sustainability
Modern LED strips for indirect uplighting operate at typical efficacies of 120–160 lm/W, compared to 10–12 lm/W for the incandescent sources they replace in period properties and 80–100 lm/W for early LED generations. A full perimeter LED coving installation in a Victorian reception room (approximately 18 linear metres of cornice) using 600 lm/m output strips at 8W/m would consume approximately 144W total, less than two standard 75W incandescent bulbs, while providing a dramatically superior quality of ambient illumination covering the entire ceiling plane.
| Lighting system | Typical efficacy (lm/W) | Power for 2000 lm ambient (18m room) | Annual energy cost (8 hrs/day) | Glare rating |
|---|---|---|---|---|
| Incandescent chandelier | 10–12 | 180W | ~£52 (at £0.30/kWh) | High (direct) |
| Halogen recessed spots (6 × 50W) | 22–25 | 300W | ~£87 | High |
| LED downlights (6 × 10W) | 80–100 | 60W | ~£17 | Medium |
| LED coving uplighting (COB strip) | 130–160 | 14–18W | ~£5 | None (indirect) |
Property value and rental premium
Property developers and renovation professionals increasingly recognise that quality LED coving uplighting adds measurable value to a property, particularly in the period property conversion market. Estate agents specialising in Victorian and Georgian period properties in London and other major UK cities consistently report that thoughtfully illuminated reception rooms achieve faster sales and higher price-per-square-foot ratios. A 2023 survey by Rightmove and the Association of Lighting Designers (ALD) found that 67% of property buyers rated interior lighting quality as “important” or “very important” in their purchase decision, with indirect ceiling lighting cited as the most desirable lighting feature in high-value residential properties.
Types of LED profiles for cornice and coving uplighting
The aluminium LED profile is the structural, thermal and optical foundation of any LED coving or cornice lighting installation. It serves as the housing for the LED strip, provides critical thermal management through heat conduction away from the LED chips, determines the angle and distribution of the emitted light, and in conjunction with the diffuser cover controls whether the light source is visible to the eye. Selecting the correct profile type is arguably the single most important decision in any LED coving specification, and the range of profiles available from LightingLine’s catalogue is deliberately comprehensive to address every architectural context.
Surface-mount aluminium profiles
Surface-mount profiles are the most versatile and widely used profile type for both period property retrofits and new-build LED coving applications. They are extruded aluminium channels, available in lengths of 1m, 2m or 3m, designed to be fixed directly to a surface — the top of an existing cornice, a plasterboard pelmet, a timber shelf, or directly to the wall, using screws, clips or structural adhesive. The profile contains one or more channels designed to accept a standard LED strip, with the strip held in place by the self-adhesive backing tape and optionally secured by a retaining clip.
The primary advantage of surface-mount profiles is their accessibility for maintenance. A diffuser cover that clips or slides into place allows the LED strip to be replaced without disturbing the profile fixing or any surrounding plasterwork. This is a critical consideration for property managers and developers who need systems that can be maintained by a general contractor rather than a specialist.
For cornice uplighting applications, the most effective surface-mount profiles are those with an angled base or an internal reflector that directs the LED output upward at a pre-determined angle. Profiles with a 30° to 45° upward tilt from horizontal produce the most even ceiling wash in rooms with ceiling heights between 2.4m and 3.5m.
Recessed plasterboard (trimless / plaster-in) profiles
Recessed or trimless plaster-in profiles represent the premium architectural solution for LED coving, particularly in contemporary interiors where no visible hardware is acceptable. These profiles are designed to be installed during first-fix construction, with their flanges extending into the surrounding plasterboard or lime plaster, which is then finished flush over them. The result is a ceiling or wall-ceiling junction from which light appears to emerge seamlessly, with no visible profile edge or hardware.
The installation of trimless profiles is more demanding and less forgiving than surface-mount systems. The position must be determined before any plastering takes place, requiring close coordination between the lighting designer, the electrical contractor, and the plastering team. Access for LED strip replacement in a plaster-in profile typically requires cutting the plaster finish, which makes the choice of a high-quality, long-life LED strip at first installation particularly important.
However, when executed well, plaster-in profiles produce results that are simply not achievable by any other means: a continuous luminous slit in the ceiling that appears to be an integral part of the architecture rather than a fitting added to it. This technique is the standard specification in high-end hospitality, luxury residential, and premium commercial interiors.
The DW series is specifically designed for this application, featuring extended plaster flanges and pre-drilled mounting points that allow precise first-fix installation in plasterboard partitions, timber-framed ceilings, and traditional masonry substrates with plaster finish.
Wall-mounted uplight profiles
Where no existing cornice or coving is present, as is the case in many mid-century, interwar and 1970s–1990s residential properties, wall-mounted uplight profiles provide an effective method of creating indirect ceiling illumination without any traditional moulding architecture. These profiles are fixed directly to the wall face at ceiling height (typically 50–100mm below the ceiling plane) and direct their LED output upward to wash the ceiling above.
The WL series (including the WL01 and WL04) represents the state of the art in wall-mounted uplighting profiles, offering both single-emission (upward only) and bi-emission (upward and downward simultaneously) options. Bi-emission profiles create a particularly sophisticated effect in contemporary interiors: light washes both the ceiling and the upper section of the wall simultaneously, creating the impression of a room that is lit from within the architecture itself rather than from a conventional fitting.
Wall-mounted profiles are also the preferred solution for listed buildings where no work may be carried out to original ceiling plasterwork, since the profile is fixed entirely to the wall surface (which is usually plain plaster, not enriched) using reversible adhesive fixings, and all cabling can be routed down the wall in surface-mounted trunking.
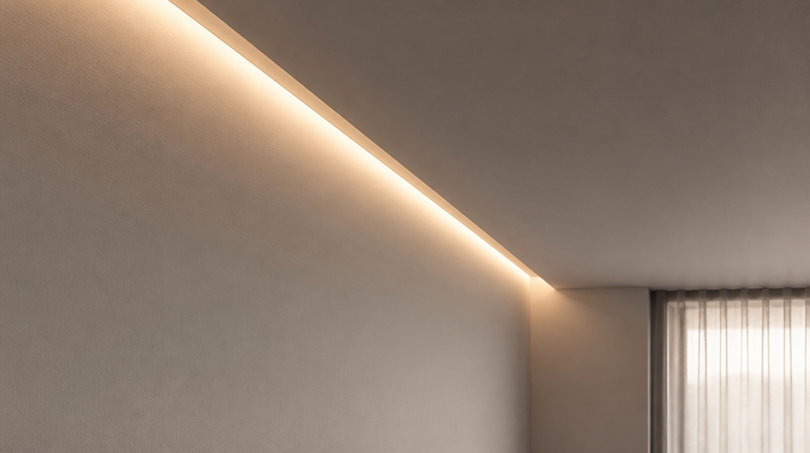
Shadow gap LED profiles
The shadow gap coving detail is a defining feature of contemporary minimalist architecture and represents LED coving at its most architecturally pure. Rather than introducing a positive moulding element at the wall-ceiling junction, the shadow gap creates a deliberate negative, a precisely controlled dark recess between the wall surface and the ceiling plane, from which light emerges upward to wash the ceiling. The visual effect is of a ceiling that floats above the walls, supported not by solid construction but by a fine plane of luminous light.
Shadow gap profiles are typically installed during first-fix, with the profile fixed to the wall top plate and the ceiling plasterboard then applied to leave the specified gap (usually 10–25mm) between the ceiling board and the profile’s upper edge. The LED strip is positioned inside the shadow gap, angled upward. The gap is wide enough to allow the light to escape upward but narrow enough to prevent the LED strip from being visible from any normal viewing angle within the room.
The critical dimensional relationship in a shadow gap LED coving detail is the ratio between the gap width, the ceiling height, and the viewing angle. For a 15mm gap at a ceiling height of 2.7m, the LED strip will be invisible to any observer standing more than 1m from the wall which covers virtually all normal viewing positions. For ceiling heights below 2.4m, the gap should be reduced to 10mm or the profile angled more acutely to maintain concealment.
Pelmet and valance LED profiles
In rooms where the existing ceiling detail is complex or where adding a structural profile to the cornice is not feasible, a purpose-built pelmet or valance shelf, combined with a dedicated LED pelmet profile, provides an alternative architectural solution. The pelmet shelf is a horizontal board fixed below the cornice (or in place of a cornice in rooms that lack one), creating a visual ledge that hides the LED strip from direct view while allowing light to escape upward.
The DW16-03 profile from the LightingLine range is specifically designed for pelmet applications, with a geometry optimised to direct the maximum proportion of LED output upward rather than forward, critical for maintaining a clean ceiling wash without forward spill light that could create uncomfortable glare at eye level. This profile is explored in detail in the professional components section below.
Choosing the right LED strip for indirect uplighting
COB vs. SMD: the critical decision for hotspot-free uplighting
The single most important quality decision in any LED coving specification is the choice between COB (Chip on Board) and SMD (Surface Mount Device) LED strip technology. This choice determines whether the ceiling above the cornice will be illuminated by a smooth, continuous wash of light or will display the characteristic “pearls on a string” pattern of individually visible LED chips reflected in the ceiling surface.
SMD LED strips
Traditional SMD LED strips use individually packaged LED chips (2835, 5630, or similar) spaced along a flexible PCB substrate. Even at high densities of 120 LEDs/m or 240 LEDs/m, the individual chips remain optically distinct at close range, and their periodically distributed output creates visible brightness variations (hot spots) when reflected from a close, smooth white ceiling. For indirect uplighting in cornices where the ceiling surface is within 300–600mm of the LED strip, standard SMD strips are generally unsuitable for high-quality applications.
However, ultra-high-density SMD strips (480+ LEDs/m) significantly reduce hot spot visibility, and in profiles with a good diffuser cover and adequate ceiling distance, they can produce acceptable results in secondary applications.
COB LED strips: the professional standard
COB (Chip on Board) technology places multiple LED chips directly on the PCB substrate, covered by a continuous phosphor coating rather than individual lens packages. The result is a strip that appears as an uninterrupted line of light: no individual chips, no periodic bright spots, no hot spot patterning in the ceiling reflection. COB strips are now universally regarded as the professional standard for indirect uplighting in any premium application.
The practical advantages of COB for LED coving applications include:
- seamless light line: no visible chip pattern at any viewing distance or angle;
- efficient light production: no lens losses, direct phosphor emission;
- better performance in shallow profiles: even a 5mm ceiling distance shows no hot spots;
- compatible with opal diffusers: the already-diffuse COB output is further smoothed by the diffuser without significant lumen loss;
- reduced thermal stress: continuous chip arrangement spreads heat more evenly than discrete packages.
The COB series from the LightingLine catalogue, represents the current state of the art in COB strip technology for indirect uplighting. These strips deliver seamless, perfectly homogeneous light output even at the close ceiling distances encountered in low-ceiling period properties, and are the first choice for any cornice or coving uplighting application where quality is non-negotiable.
| Parameter | Standard SMD (120 LEDs/m) | High-Density SMD (240 LEDs/m) | COB (480+ chips/m) |
|---|---|---|---|
| Visible hot spots at 200mm distance | Yes, pronounced | Reduced but visible | None |
| Hot spots at 400mm with opal diffuser | Some visible | Minimal | None |
| Typical efficacy (lm/W) | 100–120 | 110–130 | 120–160 |
| Typical CRI range | 80–90 | 80–90 | 90–97+ |
| Suitability for period cornices | Poor | Acceptable (secondary use) | Excellent |
| Recommended for high-end residential | No | Marginal | Yes |
Colour temperature: 2700K vs. 3000K in period and contemporary rooms
Colour temperature, measured in Kelvin (K), is the single variable in an LED coving specification most immediately noticed by occupants and most closely associated with the perceived atmosphere of the room. For indirect uplighting, the choice of colour temperature has far-reaching consequences that extend beyond mere preference, affecting how plasterwork, paintwork, furnishings and artworks are perceived in the illuminated space.
2700K: the heritage standard
2700K produces a warm, slightly amber-tinged white light that closely replicates the output of traditional incandescent lamps and is the reference standard for all heritage, period and traditional interior applications. On a white-painted or off-white plaster ceiling, 2700K LED coving creates a luminous warmth that feels intimate, inviting and architecturally sympathetic. For Victorian, Georgian, Edwardian and Arts & Crafts interiors, 2700K is the unconditional first choice.
2700K is also the preferred colour temperature for:
- Dining rooms and reception rooms where ambience is paramount;
- Bedrooms and dressing rooms where relaxation is the priority;
- Libraries and studies with dark timber joinery and leather furnishings;
- Any room with warm-coloured paint schemes (terracotta, ochre, burgundy, forest green);
- Hospitality environments: restaurants, hotel rooms, bars and lounges.
3000K: the contemporary warm standard
3000K offers a noticeably crisper white than 2700K while remaining within the “warm white” category. On a clean white ceiling, 3000K LED coving produces a bright, clean luminous wash that is modern in character while avoiding the clinical quality of daylight or cool-white sources above 4000K. 3000K is the most widely used colour temperature in contemporary residential LED coving applications, particularly in new-build properties, loft conversions, and open-plan living spaces.
Tunable white: the Designer’s choice
For clients who want maximum flexibility, tunable white LED strips (which allow the colour temperature to be adjusted across a range (typically 2700K–6500K) using a compatible controller) are increasingly specified for premium LED coving installations. This allows the same coving installation to provide 2700K warmth for evening relaxation and 5000K daylight simulation for morning work or circadian health protocols. The Skydance control systems described in Section 12 below offer comprehensive tunable white support with logarithmic dimming curves optimised for residential use.
CRI and Ra: why colour rendering matters in cornice uplighting
The Colour Rendering Index (CRI), also referred to as Ra, is a measure of how accurately a light source renders the colours of objects compared to natural daylight (CRI = 100). For indirect LED coving, this metric has implications that are less immediately obvious than for display or accent lighting, but are equally important in the context of period interiors. When light from a cornice washes the ceiling and walls, every painted surface, gilded detail, tapestry, artwork and fabric in the room is rendered under that light. Low CRI means those surfaces are rendered with colour distortions that, while often subtle, rob the room of the tonal richness that makes period decoration so compelling.
For residential and hospitality LED coving applications, the recommended minimum CRI values are:
- CRI Ra ≥ 90 — minimum standard for high-quality residential indirect uplighting
- CRI Ra ≥ 93 — recommended for conservation and heritage lighting, fine art collections
- CRI Ra ≥ 97 — the Sunlike standard; recommended for the most demanding period interior applications
The Sunlike series LED strips achieve CRI Ra > 97 by using a phosphor formulation that closely matches the spectral distribution of natural sunlight. In period interiors with original plasterwork, period fabrics, and oil paintings, the difference between Ra 80 and Ra 97 is plainly visible to the unaided eye: the Ra 97 source renders the subtle variations of aged plaster and hand-woven textile with a fidelity that the lower CRI source simply cannot match.
Lumen output per metre: specifying the right brightness
The lumen output required from an LED coving strip is a function of several interacting variables: the ceiling height, the room’s surface reflectance values, whether the LED coving is the primary or supplementary light source, and the desired ambience. Over-specifying is as problematic as under-specifying: too many lumens from a cornice will create harsh, flat ceiling illumination that eliminates the subtle modelling of ceiling surface and plasterwork that is one of the primary aesthetic goals of indirect uplighting.
| Ceiling Height | LED coving as primary light source | LED coving as supplementary/mood | Notes |
|---|---|---|---|
| 2.2m – 2.5m | 400–550 lm/m | 200–350 lm/m | Lower ceilings require reduced output to avoid glare wash-out |
| 2.5m – 3.0m | 550–800 lm/m | 300–500 lm/m | Most common residential range; install dimming as standard |
| 3.0m – 3.5m | 800–1100 lm/m | 400–650 lm/m | Typical for period ground-floor reception rooms |
| 3.5m – 4.5m | 1000–1400 lm/m | 600–900 lm/m | Grand Victorian or commercial spaces; use high-power drivers |
| Above 4.5m | 1400–2000 lm/m | 700–1200 lm/m | Consider high-efficiency Fx2 series with supplementary accent lighting |
All lumen output specifications above assume a ceiling surface reflectance of 80–85% (typical for white or light cream paint or plaster). Rooms with darker ceiling finishes or textured surfaces that absorb more light will require proportionally higher strip output.
IP Ratings for humid environments
In standard residential rooms (living rooms, bedrooms, hallways), an IP20 LED strip within an enclosed aluminium profile is entirely adequate. However, for bathrooms, en-suite shower rooms, orangeries with glass roofs, or any space where condensation or steam may reach the ceiling zone, a higher IP rating is essential.
IP44 rated LED strips (splash-proof) are suitable for bathroom zone 2 applications and for any cornice where incidental moisture contact is possible. For shower rooms or pool environments where direct water contact may occur, IP65 or IP67 rated strips (fully sealed silicone sleeve) are required. Note that IP-rated strips are slightly wider than standard strips and require confirmation that the chosen profile channel can accommodate the additional thickness of the silicone sleeve.
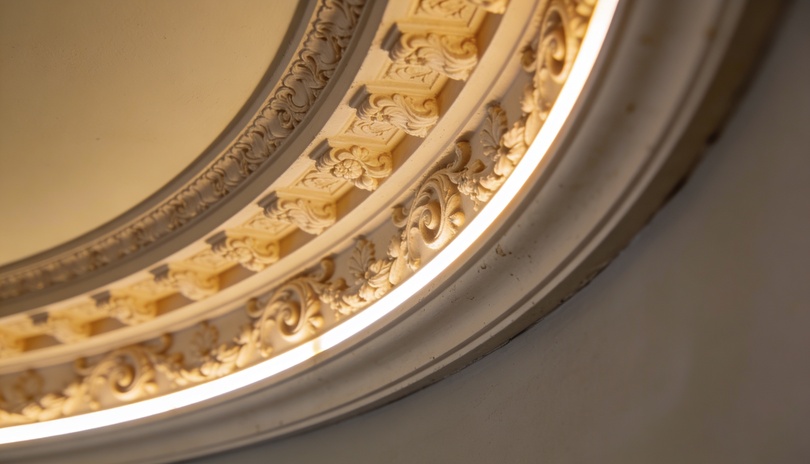
Diffuser covers: matte, opal, clear and satin
The diffuser cover of a LED coving profile performs two critical functions: it mechanically protects the LED strip from dust, physical damage and moisture ingress and it optically controls the distribution and character of the emitted light. For indirect uplighting applications, the diffuser is not an optional accessory but an integral optical component that determines whether the final result looks professional or amateurish. The choice between matte, opal, clear and satin diffusers has significant implications for both aesthetics and photometric performance.
Clear (transparent) diffuser
A clear or transparent diffuser provides near-maximum light transmission (95–98%) while offering physical protection for the LED strip. It does almost nothing to diffuse the light output: individual LED chips remain visible through the cover, and any hot spot pattern present in the bare strip will be equally visible through a clear diffuser. Clear diffusers are appropriate for display lighting, under-cabinet applications, and indirect installations where the strip is at significant distance from any reflecting surface — but they are generally not recommended for close-range cornice uplighting in period properties or any installation where the ceiling surface is smooth and white.
Frosted (matte) diffuser
A frosted or matte diffuser is the standard choice for indirect LED coving applications. The fine surface texture of the diffuser scatters the emitted light in all directions, completely eliminating the visibility of individual LED chips and any hot spot pattern. The light output is smooth, even and professional-looking. The trade-off is a light transmission penalty of typically 15–25%, meaning the strip’s lumen output is reduced by approximately one-fifth. In practice, this is easily compensated by selecting a slightly higher-output LED strip or accepting the modest reduction in the overall specification.
Opal (milky) diffuser
Opal diffusers are a denser variant of the frosted diffuser, with a milky white appearance that makes the diffuser face uniformly bright when lit. The opal diffuser provides the highest degree of chip masking and produces the most even, “luminous bar” effect of any diffuser type. Opal is the preferred diffuser for any installation where the diffuser face itself is partially visible, such as open-top wall profiles or wide shadow gap details. It is also the standard choice for colour-mixing applications using RGBW strips, where thorough optical mixing of red, green, blue and white channels is required before the light exits the profile.
Satin (semi-matte) diffuser
Satin diffusers offer a compromise between the high transmission of a clear cover and the complete chip masking of a frosted cover. They are available from selected profile manufacturers and are appropriate for installations using ultra-high-density COB strips, where the light output is already so even that only partial diffusion is needed. With a COB strip of 480+ chips/m, a satin diffuser typically provides adequate chip masking while retaining 85–90% of the strip’s lumen output, a meaningful efficiency advantage in large installations.
Diffuser specification summary
| Diffuser type | Transmission | Chip masking | Best application |
|---|---|---|---|
| Clear / Transparent | 95–98% | None | Display, under-cabinet, distant ceiling (>1m) |
| Satin / Semi-Matte | 85–90% | Partial | COB strips, high-distance coving |
| Frosted / Matte | 75–85% | Complete | Standard cornice and coving uplighting |
| Opal / Milky | 55–70% | Complete + uniform luminous face | RGBW mixing, wide profiles, visible face applications |
LED coving in period interiors: Victorian, Georgian, and Edwardian Homes
Period property owners and their architects face a fundamentally different LED coving challenge from those designing new-build or contemporary renovation interiors. The existing plasterwork is irreplaceable, often fragile, and of significant architectural and financial value. Any intervention that damages, obscures, or aesthetically compromises original period cornices is unacceptable, both from a heritage perspective and in purely practical terms, since damaged period plasterwork is expensive and often impossible to repair with complete fidelity to the original. The fundamental principle of LED coving in period properties is that the installation must be entirely reversible: it must be possible to remove every component of the lighting system and return the interior to its pre-installation condition without any trace of the work having been carried out.
Victorian cornice uplighting
Victorian cornices (particularly those in first-floor reception rooms of larger properties built between 1850 and 1900) represent the most demanding but also the most rewarding context for LED indirect uplighting. The generous projection of a quality Victorian cornice (commonly 200–300mm) creates a substantial horizontal shelf on the upper face on which a surface-mount LED profile can be fixed with adhesive mounting without any damage to the plasterwork. The deep, three-dimensional relief of ornate Victorian plasterwork is transformed by warm uplighting, which dramatically deepens the shadow modelling of the carved elements and gives the room a richness and depth that is simply not achievable with direct overhead lighting.
Assessment protocol for Victorian cornice
Before specifying any LED coving system for a Victorian cornice, the following assessment should be carried out:
- Measure the projection of the cornice from the wall face to the outermost decorative element. This determines whether a surface-mount profile can be positioned far enough from the wall to achieve adequate LED concealment.
- Measure the upper horizontal face width: this is the surface on which the profile will be mounted. In standard Victorian cornices, this is typically 40–80mm.
- Assess the structural condition of the cornice: cracks, detachments, or previous repairs indicate that the plaster is fragile and that any fixings must use the gentlest possible method (adhesive only, no mechanical fixings).
- Measure the ceiling height: to determine the appropriate lumen output and the viewing angle from which the LED strip will be seen from normal standing positions.
- Note the existing decorative finish: paint, distemper, or bare plaster respond differently to warm LED uplighting and may affect the choice of colour temperature.
Recommended LED coving system for Victorian cornice
For a typical upper-floor Victorian terrace room with 2.8m–3.2m ceilings:
- Profile: slim surface-mount angled aluminium channel, 8–12mm height, fixed to cornice upper face with silicone adhesive (no screws).
- LED strip: COB 2700K, Ra ≥ 93, 500–700 lm/m at 2.8m ceiling / 700–900 lm/m at 3.2m ceiling.
- Diffuser: frosted matte clip-in cover.
- Driver: Mean Well constant voltage 24V, PWM dimmable, sized at 1.2× connected strip wattage.
- Control: Skydance logarithmic PWM dimmer, compatible wall panel.
For grand Victorian reception rooms with ceiling heights above 3.5m and elaborate plasterwork, the specification should be upgraded to a Sunlike series strip (Ra > 97) to honour the quality of the original plasterwork and ensure that any paintings, tapestries or gilded details in the room are rendered with maximum fidelity.
Georgian plasterwork and cornice profiles
Georgian interiors present a unique LED coving challenge: the classical restraint and precise geometry that define Georgian plasterwork demand an equally precise lighting response. Unlike Victorian cornices, which tolerate (indeed celebrate) dramatic light and shadow, Georgian plasterwork requires a more measured approach in which the uplighting enhances the delicacy of the low-relief work without overwhelming it with excessive brightness.
The key specification decisions for Georgian cornice LED coving are:
- Colour temperature: 2700K without exception: Georgian rooms were designed to be seen by candlelight, and 2700K is the closest contemporary equivalent. 3000K or above will read as cold and anachronistic in a Georgian interior.
- Lumen output: conservative: Georgian rooms rarely have ceilings above 3.5m, and the fine plaster relief is most beautifully rendered by a gentle, low-level ceiling wash rather than a bright flood of light.
- CRI: Ra ≥ 95 minimum: Georgian colour schemes (Wedgwood blues, Pompeian reds, stone whites) are strongly affected by the spectral quality of the light source, and low CRI will flatten and grey these carefully chosen tones.
- Profile: minimum footprint: Georgian cornices, while projecting significantly (150–250mm), have relatively narrow upper shelves compared to Victorian examples. A slim profile (maximum 8mm height) is essential to maintain concealment.
Edwardian interiors: the transitional challenge
Edwardian domestic architecture (1901–1910) sits between the ornate excess of the Victorian period and the spare elegance of the Arts & Crafts movement. Edwardian cornices vary enormously: the finest Edwardian houses retain elaborate plasterwork comparable to the best Victorian examples, while more modest Edwardian suburban housing features simple, elegant cornices with a shallow projection of 80–120mm. The primary challenge with shallow Edwardian cornices is concealment: an 80mm projection may not be sufficient to hide even a very slim LED profile from all viewing angles.
Where the existing Edwardian cornice projection is insufficient for LED concealment, the options are:
- Extend the cornice with a matching plaster or polyurethane enrichment added to the face of the existing moulding, increasing the projection to 120–150mm. This approach requires skilled craftsmanship to match the existing finish but produces a seamless result.
- Add a slim painted timber pelmet board below and slightly in front of the cornice, creating a deeper visual ledge that conceals the LED profile. The pelmet board should be profiled to echo the cornice geometry.
- Use a wall-mounted uplight profile (PR-WL series) positioned on the wall face immediately below the cornice, directing all light upward past the shallow moulding.
Listed buildings and conservation areas
For properties in England and Wales with Grade I, Grade II*, or Grade II listed building status (and their equivalents in Scotland (Category A/B/C) and Northern Ireland) any works to historic fabric must receive listed building consent (LBC) before proceeding. The installation of LED coving in a listed building requires careful assessment of whether the proposed work constitutes “alterations which affect the character” of the building, which is the legal threshold for consent.
In practice, the reversible, adhesive-fixed surface-mount LED profile systems described in this guide are very unlikely to require formal consent, since they do not affect the original fabric and are entirely removable. However, for absolute certainty, the following practices are recommended:
- Consult the local planning authority’s conservation officer before commencing work
- Prepare a method statement describing all fixings, adhesives and cable management methods and confirming reversibility
- Use only archival-quality adhesives that can be reversed with gentle solvents without surface damage
- Document all cable routes with photographs for future reference
- Avoid any penetration of original plaster, lime render or historic masonry
For buildings in conservation areas (as opposed to listed buildings), exterior-visible works are regulated but internal lighting changes generally do not require consent, provided they do not involve structural alterations.
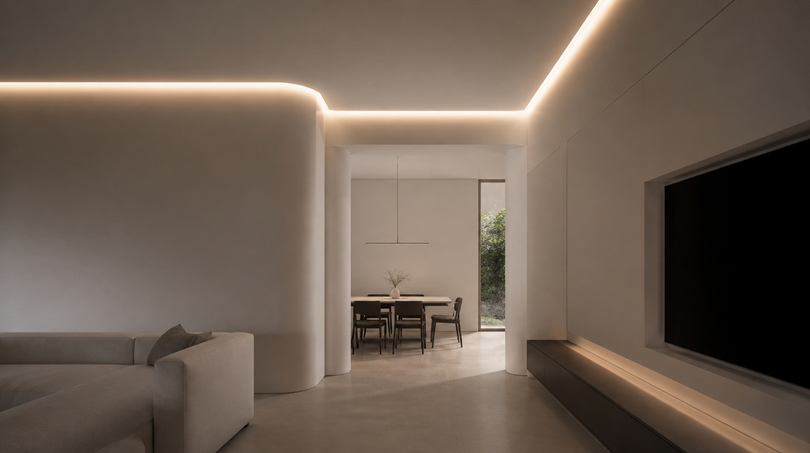
LED coving in contemporary and minimalist interiors
Contemporary architecture has developed LED coving into an entirely different design language from the period property applications described above. Where period property LED coving is characterised by invisibility, sensitivity to existing fabric, and the enhancement of pre-existing architectural detail, contemporary LED coving is often the architectural detail itself, the defining geometric gesture that gives the ceiling plane its character and differentiates the space. The shadow gap LED coving profile, the continuous luminous slot, and the bi-emission wall profile are tools that contemporary architects use to create spatial qualities impossible to achieve with conventional fittings.
Shadow gap profiles for modern architecture
The shadow gap ceiling detail (in which a deliberate dark recess is created at the wall-ceiling junction) has become one of the most widely used devices in contemporary interior architecture. When combined with a LED uplighting system, the shadow gap becomes both a compositional device (the dark line gives the ceiling a crisp, defined edge) and a light source (the illuminated gap washes the ceiling with an even, source-free glow). The shadow gap LED coving profile is the defining specification choice for minimalist contemporary interiors, and it is available in the LightingLine catalogue in multiple geometric configurations to suit different ceiling heights and architectural contexts.
The dimensional and structural requirements for a professional shadow gap LED coving installation are specific and unforgiving:
- Gap width: 10–20mm is standard, below 10mm the LED strip may be partially visible,above 25mm the shadow gap begins to read as a deliberate reveal rather than a refined detail
- Ceiling board thickness: standard 12.5mm plasterboard is adequate, 15mm board is preferred in premium installations for its flatter, more rigid surface
- Profile fixing: the profile must be fixed to the top plate or structural ceiling before boarding commences, it cannot be retrofitted without removing the ceiling board
- LED strip angle: the strip must be directed at 45–60° from horizontal to maximise the proportion of output reaching the ceiling rather than the wall face
- Ceiling paint finish: for maximum effect, a flat (matte) white paint at 85–90% reflectance is ideal, eggshell or semi-gloss will reveal LED texture even with COB strips
Low-ceiling solutions: LED coving for ceilings below 2.5m
Low ceilings present the most demanding test for indirect LED coving systems. When the ceiling is below 2.5m, the angular geometry of the room means that the cornice or coving zone is clearly within the normal field of view from standing position, making LED concealment critical. Simultaneously, the shorter distance between the LED strip and the ceiling surface means that any hot spot pattern in the LED output will be very visible in the ceiling reflection. In a low-ceiling Victorian flat, the most common challenging context for period property LED coving in urban Britain, every element of the specification must be optimised for hot spot elimination and source concealment.
Recommended practices for low-ceiling LED coving:
- Always use COB LED strips: no SMD strip will produce acceptable results at the close ceiling distances involved
- Always use a frosted or opal diffuser cover: even with COB strips, a matte diffuser eliminates any residual texture at close range
- Keep lumen output conservative (350–500 lm/m maximum): a bright low ceiling is deeply uncomfortable
- Always specify dimming: at low ceiling heights, the ability to reduce the coving output to 15–30% of maximum is essential for evening ambience
- Select the minimum-height profile available: a profile more than 15mm deep in a room with 2.3m ceilings will be clearly visible and reduce the sense of ceiling height further
- Position the profile as high as possible on the cornice face to maximise the ceiling-to-strip distance
Open-plan and loft interiors
In open-plan residential environments (kitchen-dining-living spaces, warehouse conversions, and contemporary loft apartments) LED coving serves the additional function of zone definition. By running a continuous coving profile around the perimeter of the entire space but lighting different zones on separate circuits with different colour temperatures or dimming levels, the designer can use the ceiling wash to delineate functional areas without introducing any physical partitioning or change of ceiling height.
For loft conversions with exposed brick or concrete ceiling surfaces, the light-scattering properties of the rough ceiling texture create a particularly beautiful diffused light quality that cannot be replicated on a smooth plasterboard ceiling. The inherent roughness of the surface diffuses the light in three dimensions, creating a soft overall glow rather than a directional ceiling wash. In this context, even a high-output LED strip (800–1000 lm/m) may be required to achieve adequate ceiling brightness due to the lower reflectance of untreated brick or concrete compared to white paint.
Step-by-step installation guide
The success of any LED coving installation depends as much on the quality of the installation process as on the quality of the specified components. Professional lighting results require professional installation practices, and the most common failures in LED coving (visible hotspots, voltage drop causing colour inconsistency, exposed wires, and profile corners that don’t align) are almost always avoidable with the correct tools and a disciplined methodology. This section provides a complete, step-by-step installation guide applicable to both surface-mount and trimless profile systems in period and contemporary settings.
Tools required
Before beginning any LED coving installation, assemble the following tools and materials:
| Tool | Specification | Purpose |
|---|---|---|
| Mitre saw or mitre box | Adjustable 0–45° both directions | Cutting profiles for internal and external corners |
| Fine-tooth hacksaw blade | Minimum 32 teeth per inch (TPI) | Cutting aluminium profiles cleanly |
| Deburring tool / flat file | Fine-cut flat and half-round | Smoothing cut ends to prevent LED strip damage |
| Tape measure | 5m minimum, 1mm graduation | Measuring room perimeter and profile lengths |
| Spirit level | 600mm and 1200mm | Ensuring profiles are level throughout installation |
| Pencil / marking knife | — | Marking cut lines on profiles |
| Structural adhesive | Neutral-cure silicone or MS polymer | Bonding profiles to cornice/plasterboard |
| Caulking gun | Standard cartridge type | Applying adhesive precisely |
| Wire stripper / crimping tool | 0.5–2.5mm² capacity | Preparing LED strip connections and driver wiring |
| Multimeter | DC voltage measurement | Checking voltage at strip ends to detect voltage drop |
| Soldering iron (optional) | 25–40W, fine tip | Soldering LED strip joints for maximum reliability |
| Heat shrink tubing | 3mm and 6mm diameter | Insulating soldered joints |
| Corner connectors | Matching profile series | Joining profile sections at internal/external corners |
| Flexible LED connectors | 4-pin and 2-pin, matching strip width | Connecting strip segments without soldering |
| Step ladder | Platform height appropriate to ceiling | Safe working at ceiling height |
Cutting LED profiles for corners
Corner treatment is the most technically demanding aspect of LED coving installation and the area where amateur installations most visibly differ from professional work. A poorly cut or badly fitted corner creates a visible break in the light line that draws the eye and destroys the seamless perimeter effect that is the primary aesthetic goal of cornice uplighting. The following protocol produces reliable, professional corner results.
Internal corners (room corners)
Internal corners are the junctions where two adjacent walls meet inside the room. The profile sections meeting at an internal corner must each be cut at 45° in opposite directions so that their cut faces meet flush at the corner. The correct sequence is:
- Measure from the last fixed point to the corner: measure at the back of the profile channel (the longest measurement), not at the face
- Set the mitre saw to 45° cutting left (for the first section): the cut should run from back-long to face-short
- Cut the first section and dry-fit to check the angle: the profile should sit flush against the wall with no gap
- Set the mitre: saw to 45° cutting right (for the second, joining section)
- Cut the second section: matching the first, and dry-fit both together at the corner
- Deburr: all cut edges before fitting LED strip
External corners
External corners (where a wall protrudes into the room, creating an outward-facing junction) require 45° cuts in the opposite orientation to internal corners. External corners are more demanding because any gap or misalignment at the corner joint will be visible from multiple viewing angles in the room. Use the same methodical measurement and dry-fitting protocol as for internal corners, and if the room geometry creates a corner angle that is not precisely 90°, adjust the mitre angles accordingly (for a 92° corner, cut each section at 46° rather than 45°).
Using corner connectors and flexible joints
Many aluminium LED profile ranges include purpose-made corner connectors that eliminate the need for mitre-cutting entirely. These connectors clip into the profile channel ends and create a precise 90° (or other specified) angle join. Corner connectors are the preferred solution for DIY installations and for any installation where the mitre cut quality cannot be guaranteed. The trade-off is a visible mechanical joint at the corner rather than a seamless mitered join, which is usually acceptable in period property installations where the cornice moulding itself already creates natural shadow lines at corners.
Fixing methods: adhesive, clip and plaster
Adhesive fixing (period properties and retrofit)
For period property installations where no mechanical fixings (screws, nails) may be used in original plasterwork, structural adhesive is the primary fixing method. The recommended adhesive is a neutral-cure (non-acetic) silicone sealant or MS polymer adhesive, applied in a continuous bead along the back face of the profile. Neutral-cure silicone is essential, acidic-cure (vinegar-smell) silicone can attack the thin oxide layer of aluminium profiles and damage adjacent lime plaster over time.
Application protocol:
- Clean the cornice upper face and profile back face with isopropyl alcohol to remove dust, oils and any release agent
- Apply a 5–8mm bead of neutral-cure silicone in a continuous line along the profile back, avoiding the LED channel area
- Press the profile into position firmly and hold for 30 seconds to allow initial adhesion
- Use masking tape to hold the profile in position until the adhesive cures (typically 2–4 hours)
- Remove masking tape and clean any adhesive squeeze-out with a silicone solvent before it cures fully
Mechanical fixing (contemporary applications)
In new-build and contemporary renovation contexts where the substrate is plasterboard, timber or concrete, mechanical fixings (stainless steel screws, plasterboard anchors, or powder-actuated fixings into concrete) are the preferred first-fix method for trimless and shadow gap profiles. The profile must be positioned and fixed before any plastering or ceiling boarding takes place.
Connecting LED strips
Reliable LED strip connections are critical to long-term system performance. The majority of LED coving system failures in the field are attributable to poor electrical connections, either at the strip-to-connector interface, at the driver output, or at the joints between strip sections. The following practices eliminate the most common failure modes.
Strip-to-connector connections
When using push-in or clip-in connectors (the most common method for DIY installations), the following protocol prevents connection failures:
- Cut the LED strip only at marked cut points (typically indicated by a scissor icon every 25–50mm, depending on the strip design)
- Ensure the cut is clean and straight, a diagonal or ragged cut will prevent the connector contacts from making reliable contact with all pads
- For 24V strips, identify the polarity clearly before inserting, most connectors are polarised and inserting backwards will not damage modern strips (which have reverse-polarity protection) but will result in no light output
- Insert the strip end fully into the connector until the contact click is felt, a partially inserted strip will have high contact resistance causing voltage drop and potential overheating
- Verify the connection by briefly powering the strip section before fixing in the profile
Soldered connections
For professional installations and any run exceeding 5 metres, soldering the inter-section connections produces significantly more reliable results than push-in connectors. Use 60/40 rosin-core solder with a fine-tip iron at 300–320°C. Work quickly (maximum 3 seconds per joint) to avoid damaging the PCB or dislodging the LED chips adjacent to the solder pads. Cover all soldered joints with heat-shrink tubing to prevent short circuits.
Managing voltage drop over long runs
Voltage drop is the most significant technical challenge in LED coving installations covering long perimeter distances. In a room with a 20-metre perimeter, feeding the LED strip from a single point at one end will result in measurably lower voltage at the far end of the strip and therefore a visible reduction in brightness (and a slight shift in colour temperature for warm-white strips). A professional LED coving installation must address voltage drop explicitly, as visible brightness variation between the near and far ends of a cornice run is one of the most common quality failures in amateur LED coving work.
The voltage drop across a strip run can be calculated:
Voltage Drop (V) = 2 × (L × I × R/m)
Where: L = run length in metres; I = current in amps; R/m = resistance per metre of the PCB track (typically 0.08–0.12Ω/m for standard 10mm PCB)
For a 20-metre run at 24V with a 10W/m strip drawing 0.417A/m: Total current = 8.33A. Voltage drop over 20m = 2 × (20 × 8.33 × 0.1) = 33.3V which would be catastrophic on a 24V system. This illustrates why feeding from both ends (splitting the 20m run into two 10m sections fed from a common driver) is the standard professional approach for any run longer than 5–7 metres on a 24V system.
Additional voltage drop mitigation strategies:
- Use 24V rather than 12V systems: voltage drop is proportionally halved for the same wattage due to lower current
- Use amplifier/booster modules: at intervals of every 5–7 metres on very long runs (e.g., 30m+ continuous corridors)
- Increase cable cross-section: use 1.5mm² or 2.5mm² supply cables rather than the minimum 0.75mm² for long supply runs to the driver
- Position the driver centrally: in the perimeter run rather than at one end, to reduce the maximum single-direction run to half the total perimeter.
Hiding wires in period properties
Wire management in period properties requires both practical skill and an understanding of the constraints imposed by the original construction. The guiding principle is that all cabling associated with the LED coving system must be as invisible as possible during normal use, and must be routable and removable without any damage to original fabric.
The following cable management hierarchy, from most preferable to least preferable, applies to period property LED coving installations:
- route cables inside existing hollow voids: behind plasterwork accessed through a purpose-cut access hatch, inside existing picture rail voids, through the hollow back of a built-in bookcase or wardrobe fitted against the cornice wall;
- use matching mini-trunking: slim surface-mounted trunking in a colour matched to the wall paint (or white, if the walls are white) provides a clean, paintable cable management solution that is fully reversible and does not require any penetration of the original fabric;
- route down inside the cornice void: in period cornices with a hollow back face, cables can often be routed vertically down the wall inside the cornice void without any surface damage, emerging at low level behind a skirting board or architectural detail;
- surface route with matching decorative trunking: as a last resort, purpose-designed decorative trunking in white, cream or a colour matched to the existing scheme can be surface-mounted on the wall face. This is entirely reversible but must be accepted by the client as a visible element.
Driver sizing and placement
The LED driver (power supply) converts mains AC power (230V in the UK, 220–240V in Europe) to the DC voltage required by the LED strip (typically 24V or 12V) and regulates the current to protect the LEDs from fluctuations. Selecting and positioning the driver correctly is essential for both the longevity of the LED strip and the performance of the dimming system.
Driver sizing protocol:
- Calculate total system wattage: strip wattage per metre × total metres of strip;
- Add 20% safety margin: driver rated output = total wattage × 1.2;
- Verify voltage match: always match driver output voltage (12V or 24V) to strip specification;
- Check dimming protocol compatibility: if using PWM or DALI dimming, confirm the driver supports the chosen protocol;
- Verify power factor correction (PFC): for drivers above 25W, PFC is required for building regulations compliance in commercial applications.
For a 15-metre perimeter at 10W/m: 150W total × 1.2 = 180W minimum driver rating. A Mean Well 200W 24V driver would be the appropriate specification.
Driver placement for period properties: drivers are most effectively concealed in the nearest available accessible void, inside a built-in wardrobe cupboard on the same wall, inside a ceiling rose access panel, or in the space above a suspended ceiling section. Never place an LED driver in a completely sealed, non-ventilated void — drivers generate heat in operation and require minimum air circulation to maintain operating temperature within specification. Maintain a minimum clearance of 30mm around all sides of the driver housing.
Dimming and control systems
Dimming capability is not merely a convenience feature in LED coving systems, it is an architectural and experiential necessity. A cornice uplighting installation that cannot be dimmed is a limited tool: it can create one lighting scene and no more. Dimming transforms a single LED coving installation into a system capable of providing everything from a subtle, barely-there ambient wash for cinema viewing to a full bright uplighting scene for formal entertaining, and every nuanced gradation in between.
PWM dimming
Pulse Width Modulation (PWM) dimming works by switching the LED strip on and off at high frequency (typically 1–10 kHz), varying the ratio of on-time to off-time (the “duty cycle”) to change the perceived brightness. PWM is the most commonly used dimming method for residential LED coving because it is simple to implement, maintains colour consistency across the dimming range, and is compatible with a wide range of smart home protocols.
The key specification for PWM dimming is the switching frequency: below approximately 1 kHz, some people can perceive the on-off cycling as flicker, particularly under conditions of eye movement or in peripheral vision. For residential applications, a minimum PWM frequency of 1 kHz (1000 Hz) is recommended; frequencies of 2–10 kHz eliminate all risk of perceived flicker for the vast majority of users.
TRIAC (leading/trailing edge) dimming
TRIAC dimming uses phase-cutting of the AC mains supply to reduce the effective voltage reaching the driver. It was the original dimming method for incandescent lamps and remains widely used in retrofit LED installations where existing rotary or push-button dimmers are being retained. Not all LED drivers are compatible with TRIAC dimming, and compatibility must be verified before specification. TRIAC dimming can cause audible buzzing from the driver at certain dimming levels, which is unacceptable in quiet residential spaces.
DALI-2 dimming
Digital Addressable Lighting Interface (DALI-2) is the professional standard for commercial and high-end residential lighting control. Each DALI-compatible driver has a unique address on the DALI bus, allowing individual circuit control from a central processor. For multi-room period property renovations or large residential developments, DALI-2 offers the most flexible and scalable control architecture, allowing independent dimming of cornice circuits in multiple rooms from a single control panel, with pre-set scenes, scheduled automation, and integration with building management systems.
The Skydance TD series DALI-2 master panels provide a professional DALI-2 control solution specifically optimised for LED strip driving applications, with support for up to 64 independently addressable circuits per panel and a library of pre-set lighting scenes for hospitality and high-end residential applications.
Logarithmic vs. linear dimming curves
The human eye’s response to light intensity is non-linear, it follows a roughly logarithmic curve, perceiving equal apparent changes in brightness across a range from 1% to 100% of maximum output only if the actual lumen output changes proportionally to the logarithm of the percentage value. A linear dimming curve (where 50% of the control range = 50% of maximum output) produces a dimming experience in which the first 30% of the control range appears to make little visible difference, and the final 10% produces a dramatic plunge from moderate brightness to near darkness. This makes precise control at low brightness levels very difficult.
Professional dimming controllers implement a logarithmic dimming curve that maps the control range to the perceived brightness curve of the human eye. With a logarithmic curve, each step of the control dial produces an equal apparent change in brightness, giving precise control at all levels including the 5–20% range that is most used for evening ambience and cinema modes. The Skydance V1 and WT-SPI controllers implement proprietary logarithmic dimming curves proven in residential and hospitality applications.
Smart Home Integration: DALI, Tuya, KNX, Lutron and Home Assistant
The integration of LED coving systems into comprehensive smart home platforms is one of the most rapidly evolving areas of residential lighting design. For interior designers and architects specifying high-end residential projects, the ability to offer clients an LED coving system that integrates seamlessly with their chosen smart home platform, whether Lutron Caséta, KNX, Control4, Apple HomeKit, or open-source platforms like Home Assistant, is increasingly a differentiating factor in specification decisions.
Tuya / Smart life platform
The Tuya ecosystem (which underpins a huge range of consumer smart home devices under various brand names) provides a straightforward entry point to smart LED coving control via Wi-Fi. The Skydance V1 and W1 series controllers support Tuya protocol natively, allowing LED coving scenes to be controlled via the Tuya Smart or Smart Life apps on any smartphone, and enabling voice control via Amazon Alexa, Google Home, and Apple Siri. For residential clients who want smart control without the complexity and cost of a professional installation, Tuya-compatible Skydance controllers are the most accessible entry point.
KNX integration
KNX (Konnex) is the European standard for building automation and the professional specification choice for large residential developments, commercial buildings, and high-end hospitality projects. KNX-compatible LED drivers and dimmers integrate fully with any KNX building management system, allowing LED coving lighting to be programmed into comprehensive room scenarios that control heating, blind positioning, security, and audio-visual systems simultaneously. The KNX protocol is standardised, manufacturer-independent, and supported by hundreds of hardware manufacturers worldwide.
Lutron Caséta and RadioRA Integration
For American and internationally oriented clients, Lutron’s Caséta (residential) and RadioRA 3 (professional residential) systems represent the gold standard in LED dimming quality. Lutron’s proprietary Clear Connect RF protocol provides exceptionally reliable, low-latency wireless communication and supports precise dimming to 1% or below. LED drivers specified for Lutron integration must carry explicit Lutron compatibility certification — standard LED drivers may not operate correctly at the low end of the Lutron dimming range without audible buzz or visible flicker.
Home assistant / WLED for enthusiasts
For technically sophisticated homeowners using open-source smart home platforms, WLED (an open-source firmware for addressable LED controllers) combined with Home Assistant provides extraordinary flexibility in LED coving control. WLED supports hundreds of dynamic lighting effects, circadian rhythm automation, synchronisation with music and film, and integration with virtually any smart home sensor or actuator. For RGBW cornice uplighting systems in cinema rooms or entertainment spaces, WLED running on an ESP32 microcontroller inside the LED coving profile void is a cost-effective and highly capable solution.
The art of indirect uplighting: professional LED profiles and cmponents from LightingLine
Creating indirect LED coving lighting that reads as genuinely architectural rather than merely decorative requires components that match the technical demands of the application with precision. The selection of materials must balance visual comfort, thermal management, and seamless integration. Whether restoring a period ceiling or designing a contemporary interior, the combination of professional aluminium profiles and advanced control systems is essential. LightingLine’s curated product range, developed in collaboration with the lighting engineering expertise of Ledpoint, addresses every layer of this technical specification.
Structural integration: LightingLine aluminium profiles
The profile serves as both a heat sink and an optical housing to direct light toward the ceiling without creating visible hot spots.
Cove-specific solutions
For modern plasterboard pelmets or coves, the DW16-03 profile is specifically designed for “velette” (pelmets), allowing the light source to be hidden while directing the beam effectively upward. This profile’s geometry ensures that the angle of light emission is optimised for ceiling wash in rooms with standard 2.4m–3.0m ceiling heights, making it the default specification choice for new-build LED coving installations in contemporary residential projects.
Wall-mounted elegance
In spaces without existing coving, the WL series (including the WL01 and WL04) offers wall-mounted housings that provide bi-emission or single-emission uplighting. These are ideal for contemporary interiors where the profile itself acts as a sleek architectural element, providing both the structural housing for the LED system and a visual design statement that contributes positively to the room’s architectural composition.
Trimless architectural integration
To create a seamless transition where the light appears to emerge directly from the wall, the DW series (including the DW07-01) allows for “invisible” mounting by plastering over the aluminium flanges. This is the specification choice for shadow gap LED coving in high-end contemporary projects where no hardware of any kind should be visible in the finished interior.
The perfect glow: COB and high-CRI LED strips
Indirect lighting requires a continuous, soft line of light to avoid the “dotted” reflection on polished or white ceiling surfaces. The LED strips specified for LightingLine coving systems are selected specifically for their performance in this demanding optical context.
Seamless COB technology
COB (Chip on Board) LED strips, are highly recommended for indirect applications. These strips create a perfectly homogeneous line of light even in shallow coves where traditional LEDs might show individual points of light, making them the technical foundation of any professional LED coving specification.
Period Interior Authenticity
For historic settings where the full tonal richness of original plasterwork, period fabrics, and fine art must be preserved under artificial light, the Sunlike series provides CRI Ra > 97, mimicking natural sunlight and ensuring that textures of plasterwork and fine art are rendered with maximum fidelity. This is the specification standard for heritage buildings, private art collections, and any period interior where the quality of colour rendering under artificial light is a non-negotiable requirement.
High efficiency for large volumes
In grand halls, high-ceiling period rooms, or large commercial spaces where the volume of luminous output required exceeds the capacity of standard LED strips, the Fx2 High Efficiency series (>140 lm/W) ensures powerful illumination with significantly reduced energy consumption compared to previous generations of high-output LED technology. This series is the appropriate specification for grand Victorian or Georgian reception rooms with ceiling heights above 3.5m where the cornice is the primary ambient light source.
Atmosphere control: Skydance dimming systems
Indirect lighting is most effective when it can be adjusted to suit different times of day or moods. Skydance’s intelligent control systems are specifically optimised for the logarithmic dimming response demanded by professional residential and hospitality applications.
Logarithmic dimming for visual comfort
Skydance controllers utilise a proprietary logarithmic dimming curve. This ensures that the decrease in brightness perceived by the human eye is smooth and linear throughout the dimming range, which is critical for maintaining a relaxing atmosphere in residential and hospitality settings, and for preventing the “sudden plunge to darkness” effect that characterises inferior linear-curve dimmers at low output levels.
Smart and wireless control
Systems like the Skydance V1 and WT-SPI controllers allow for management via the Tuya Smart app, voice commands (Alexa, Google Home, Siri), or elegant wall-mounted touch panels such as the T1-K. These systems provide the residential market’s most accessible entry point to genuine smart LED coving control.
Centralised DALI-2 integration
For professional installations covering multiple rooms and requiring centralised control, the Skydance TD series DALI-2 master panels allow granular control of multiple zones, enabling the user to recall pre-set lighting scenes with a single touch. This is the professional specification for luxury residential projects, boutique hotels, and any installation where room-by-room independent lighting scene management is required.
Reliable power: Mean Well drivers
The longevity and performance of the entire LED coving system depend ultimately on the stability and quality of its power supply. Mean Well drivers are the industry standard for professional LED lighting applications, and LightingLine specifies them as the default driver for all professional LED coving projects.
Flicker-free performance
Mean Well drivers (including the PWM and XLG series) provide stable, flicker-free DC output at all loads and dimming levels, which is essential for visual comfort and for high-quality photography and video in contemporary interiors. The low ripple current output of Mean Well drivers also extends LED strip life significantly compared to budget drivers with high-ripple outputs.
Energy efficiency
Mean Well drivers feature low standby power consumption (<0.5W), ensuring that an LED coving system with multiple circuits remains environmentally responsible even when all circuits are off but drivers remain energised for instant-on response. In a large residential installation with 10 or more LED coving circuits, total system standby consumption is kept below 5W, negligible by any measure.
By pairing LightingLine’s specialised cove profiles with high-fidelity COB strips and Skydance’s intelligent dimming, designers can transform any interior with the sophisticated glow of indirect uplighting. B
Advanced design strategies
The LED coving systems and installation techniques described so far provide the technical foundation for professional indirect uplighting in any architectural context. But the difference between a technically correct installation and a truly memorable lighting design lies in the application of advanced design strategies that go beyond the basic specification of profile, strip and driver. This section explores the techniques that distinguish expert lighting designers and give their LED coving installations an extraordinary quality of light.
Lumen calculations for indirect uplighting
The precise calculation of required lumen output for an indirect LED coving system is more complex than for direct lighting because the light reaching the room has been reflected from the ceiling (losing 15–20% in each reflection) and is distributed across the entire ceiling area rather than directed at a task plane. The following calculation methodology provides a reliable starting point for professional specifications.
Simplified lumen method for LED coving
Step 1: determine target illuminance on the ceiling surface (typically 100–200 lux for ambient residential use; 200–400 lux for task-supporting indirect lighting in office or kitchen contexts).
Step 2: calculate ceiling area (length × width in m²).
Step 3: calculate required lux × area = required lumens on ceiling surface.
Step 4: divide by ceiling reflectance factor (0.80 for white paint, 0.65 for cream) = total lumens from strip required.
Step 5: divide by perimeter length of cornice = required lm/m specification.
Circadian rhythm and tunable white LED coving
The growing body of scientific evidence linking artificial lighting to human health and wellbeing has introduced the concept of circadian-supportive lighting into residential design. LED coving, as the primary ambient light source in a well-designed room, is uniquely positioned to implement circadian-supportive lighting programmes because it illuminates the ceiling (the largest reflective surface in the room) and therefore has a dominant influence on the perceived colour and brightness of the entire space.
A circadian LED coving system uses tunable white LED strips (typically capable of transitioning between 2700K and 6500K) controlled by a schedule-driven automation system. The typical programme is:
- Morning (6:00–9:00): gradual increase from 0% to 80% at 5000–6500K (high colour temperature stimulates cortisol production and supports alertness)
- Daytime (9:00–17:00): maintain 70–100% at 4000–5000K (sustained alertness, supplementing daylight)
- Evening transition (17:00–20:00): gradual reduction to 60% at 3000K (preparation for relaxation, reducing blue light exposure)
- Night (20:00–bedtime): 20–40% at 2700K (warm, low-intensity light supporting melatonin production and sleep preparation)
Tunable white LED strips for cornice uplighting are available from the LightingLine range in both standard CCT-switching formats and full continuous tuning formats compatible with 0-10V or DALI-2 tunable white drivers.
RGBW addressable strips for dynamic uplighting
For cinema rooms, entertainment spaces, and technologically adventurous residential clients, RGBW (Red, Green, Blue, White) addressable LED strips in cornice profiles offer lighting experiences that extend far beyond the capabilities of single-colour or tunable white systems. With an RGBW cornice uplighting system, the ceiling of a room can be transformed into a dynamic light surface: slowly shifting through sunset palettes, synchronising colour with music or film playback, or implementing immersive lighting effects that complement the architectural character of the room.
For period property rooms, RGBW is a more complex proposition. The key design principle is that in a period room, colour dynamics should be subtle, slow, and warm-palette constrained. A Victorian drawing room can beautifully support a slow transition between warm amber (2700K equivalent) and a deep rose gold over the course of an evening, but the same room will look absurd if the cornice uplighting is cycling through a RGB rainbow at high saturation. The presence of RGBW capability does not mandate its aggressive use, and professional lighting designers always calibrate the dynamic range of RGBW systems to the architectural character of the space.
LED coving uplighting vs. recessed ceiling spots
One of the most frequently debated questions in residential lighting design is whether LED coving uplighting should replace recessed ceiling spots, supplement them, or coexist with them as separate lighting layers serving distinct functions. The definitive answer depends entirely on the specific room, its uses, and the quality of the design intent — but the following general principles apply across the majority of residential contexts.
| Criterion | LED coving uplighting | Recessed ceiling spots |
|---|---|---|
| Architectural sympathy (period rooms) | Excellent, no ceiling penetration | Poor, requires drilling of original ceiling |
| Glare comfort | Excellent, no direct source visible | Moderate, multiple bright sources in field of view |
| Colour modelling of room surfaces | Excellent, uniform, high-CRI wash | Variable, creates differential illumination zones |
| Task illumination (kitchen, reading) | Supplementary only | Excellent (with appropriate beam angles) |
| Energy efficiency | Very high (140+ lm/W, zero ceiling losses) | Good but with ceiling aperture thermal losses |
| Acoustic performance (ceilings) | No impact on ceiling acoustic mass | Multiple apertures reduce acoustic performance |
| Installation complexity | Moderate (wiring, profile, strip) | High (ceiling boarding, wiring, fitting) |
| Dimming performance | Excellent with correct driver/controller | Variable, some spot types perform poorly at low dim |
| Property value contribution | High, premium presentation feature | Moderate, neutral or dated perception in some markets |
The professional recommendation for period rooms is unequivocal: LED coving uplighting as the primary ambient source, with supplementary task lighting from recessed spots over specific work areas only (e.g., over a kitchen island or reading chair). For purely reception and relaxation rooms in period properties, LED coving alone — with appropriate dimming and scene control — can provide complete lighting functionality without any recessed spots whatsoever.
Maintenance, dust management and strip replacement
The maintenance requirements of LED coving systems are significantly lower than those of conventional fittings, but they are not zero. A well-designed and well-installed LED coving system will provide 50,000+ hours of reliable service (equivalent to over 17 years at 8 hours per day), but only if the LEDs and electronics are protected from the two main threats to LED longevity: thermal stress and dust accumulation.
Dust management
Dust accumulation inside open-channel LED profiles is the most common maintenance issue in LED coving systems. Dust reduces LED efficiency (by absorbing emitted light), can trap moisture that promotes oxidation of electrical connections, and in extreme cases can create a thermal blanket over the LED strip that increases operating temperature and accelerates lumen depreciation. The following maintenance practices are recommended:
- Annual inspection and cleaning: once per year, remove the diffuser cover (on clip-in systems) and blow out the profile channel with compressed air. Wipe the diffuser cover with a soft, dry cloth to remove accumulated dust from both inner and outer surfaces.
- Use enclosed profiles: the most effective dust prevention measure is choosing profiles with clip-in diffuser covers that enclose the LED channel, rather than open-top profiles. Enclosed profiles virtually eliminate dust accumulation on the LED strip itself.
- Kitchen and cooking areas: in rooms where cooking occurs, grease-laden air can create a sticky film inside open profiles that traps dust and is much harder to clean than dry dust. IP44-rated enclosed profiles are strongly recommended for all kitchen coving applications.
LED strip replacement
When an LED strip reaches the end of its useful life (typically defined as lumen depreciation to 70% of initial output (the L70 point) usually achieved at 50,000–70,000 hours for quality LED strips), replacement is straightforward on clip-in profile systems:
- Remove the diffuser cover by pressing the clips or sliding it from the channel
- Disconnect the LED strip from the power connector (or cut the supply cable if a solder connection was used)
- Peel the old LED strip from the profile channel — the adhesive will have aged and should release with gentle, even pulling
- Clean any adhesive residue from the profile channel with isopropyl alcohol
- Install the new LED strip, confirming polarity before connecting power
- Refit the diffuser cover
For plaster-in or trimless profiles, strip replacement is more complex and may require a specialist. This is the most significant operational disadvantage of trimless plaster-in LED coving compared to surface-mount systems, and it is why premium-quality, long-life LED strips should always be specified for plaster-in applications at first installation.
Driver and controller maintenance
Mean Well LED drivers have a rated MTBF (Mean Time Between Failures) of 200,000+ hours under standard conditions, making driver failure rare in typical residential applications. However, drivers operating in excessively hot or poorly ventilated locations will fail earlier. Annual inspection of all driver locations to confirm adequate ventilation and check for signs of overheating (discolouration, burning smell) is recommended for installations where drivers are housed in confined spaces.
Market context: LED coving trends and ROI data
The LED coving market is one of the fastest-growing segments of the architectural lighting industry, driven by a convergence of consumer demand for quality residential lighting, the accelerating adoption of smart home technologies, and a growing awareness of the unique capabilities of indirect uplighting in period property contexts. For property developers, renovation professionals, and lighting specifiers, understanding the market context and ROI data for LED coving investments provides the commercial justification for what is often perceived as a premium specification.
UK market size and growth
The UK architectural LED profile market was estimated at approximately €445 million in 2024, with residential applications accounting for approximately 45% of total market value. Within the residential segment, indirect ceiling lighting (of which LED coving is the dominant application) was the fastest-growing category, with compound annual growth of approximately 18% between 2020 and 2024. Industry analysts forecast continued growth of 15–20% per year through 2027, driven primarily by:
- Increasing consumer exposure to indirect lighting through premium hospitality and retail environments.
- Growing awareness of LED coving’s energy efficiency advantages relative to incandescent and halogen equivalents.
- The expansion of smart home technology adoption creating demand for controllable LED systems.
- The period property renovation boom in UK cities, driven by home improvement investment during and after the COVID-19 pandemic.
European and international market trends
Across continental Europe, the adoption of LED coving in residential settings is led by Italy, Germany, France and the Benelux countries, where a strong tradition of architectural lighting design in the residential sector creates more sophisticated consumer demand than in the UK. Italian interior design in particular has pioneered the integration of LED coving and cornice uplighting in both contemporary and period residential contexts, with manufacturers in the Veneto and Lombardy regions leading innovation in aluminium LED profile design for architectural applications.
The LightingLine catalogue reflects the growing internationalisation of the European LED architectural lighting market, offering European lighting professionals access to a comprehensive and carefully selected range of LED profiles, strips and control systems for cove lighting, from a single, reliable source.
Cost guide: surface mount, plaster-in and retrofit LED coving
The cost of an LED coving installation varies significantly depending on profile type, LED strip quality, control system specification, and installation complexity. The following cost guide provides realistic budgets for each category of LED coving project, based on current UK market prices for materials and professional installation labour as of mid-2025, converted from GBP to EUR (1£ = 1,17€). All prices are exclusive of VAT.
Component costs
| Component | Economy specification | Standard specification | Premium specification |
|---|---|---|---|
| Surface-mount aluminium profile | €5–9/m | €9–18/m | €18–29/m |
| Trimless plaster-in profile | N/A | €23–35/m | €35–59/m |
| SMD LED strip (2700K, Ra80) | €4–7/m | — | — |
| COB LED strip (2700K, Ra90+) | — | €9–16/m | — |
| Sunlike/High-CRI COB (Ra97+) | — | — | €21–35/m |
| Mean Well driver (per circuit) | €29–53 | €53–94 | €94–176 |
| Basic wall dimmer | €18–35 | — | — |
| Skydance smart controller | — | €47–94 | — |
| DALI-2 professional system | — | — | €234–702+ |
Total project cost ranges
| Project type | Room size | Materials | Installation labour | Total (approx.) |
|---|---|---|---|---|
| DIY retrofit (surface mount, economy) | 15m perimeter | €211–374 | €0 (DIY) | €211–374 |
| Professional retrofit (surface mount, standard) | 15m perimeter | €374–679 | €468–819 | €842–1.498 |
| Professional retrofit (surface mount, premium) | 18m perimeter | €761–1.287 | €585–1.053 | €1.346–2.340 |
| New build (trimless, standard) | 18m perimeter | €878–1.404 | €936–1.638 | €1.814–3.042 |
| High-end (trimless, Sunlike, DALI) | 20m perimeter | €1.638–2.808 | €1.404–2.340 | €3.042–5.148 |
| Multi-room period property (4 rooms) | 70m perimeter total | €3.276–6.552 | €3.510–5.850 | €6.786–12.402 |
Frequently asked questions
| LED Coving & Cornice Lighting — FAQ |
|---|
What is the difference between coving and cornice for LED uplighting?
Coving is a plain, curved or angled moulding forming a smooth wall-ceiling junction, typically with no decorative profiling. Cornice is an architecturally enriched moulding with decorative detail (egg-and-dart, dentil courses, acanthus scrollwork) and generally a larger projection. For LED uplighting, coving profiles are shallower and more regular, making specification more predictable. Ornate cornices create greater concealment potential but present more risk of visible hotspots due to the multi-plane reflective surfaces. For period properties, the distinction critically affects which LED profile you specify, what strip technology you use (COB is almost always required on ornate cornices), and whether a diffuser is essential (it is).
Which LED profile works best for Victorian cornice uplighting?
For Victorian cornice uplighting, a slim surface-mount angled aluminium channel placed on the upper horizontal face of the cornice is the standard professional approach. The profile height should be 8–12mm maximum to maintain concealment beneath the cornice projection. For fine ornate plasterwork, combine the profile with a COB 2700K Ra≥95 strip and a frosted diffuser cover. The WL series or slim angled channel profiles are specifically appropriate for this application.
Can I use standard LED strips with any coving profile?
Not all LED strips suit all coving profiles. You must match the strip width (8mm, 10mm or 12mm) to the profile’s channel dimensions. More critically, for indirect uplighting in cornices where the ceiling surface is close, standard SMD strips cause visible hotspot patterning. Always specify COB strips for period cornice or shallow contemporary coving applications. Check the LightingLine catalogue for confirmed strip-profile compatibility before ordering.
What depth of cornice is needed to hide an LED strip completely?
As a general rule, the cornice projection (horizontal distance from wall to outermost decorative element) should be at least 60–80mm to fully conceal a standard LED profile from normal viewing angles. For rooms with ceilings above 3.5m, the projection can be slightly less. If the existing cornice is shallower, add a slim painted timber pelmet board or a wall-mounted uplight profile (WL series) fitted below the cornice level to achieve concealment.
How to install LED coving profiles without damaging period plasterwork?
Use neutral-cure (non-acetic) silicone adhesive or MS polymer bonding adhesive, never screws or nails in original plaster. Clean both surfaces with isopropyl alcohol before bonding. Apply adhesive in a continuous bead along the back of the profile and press firmly into position. Secure with masking tape during curing (2–4 hours). The installation is fully reversible: the adhesive bond can be released with a thin wire or spatula and any residue cleaned with silicone solvent. Never use mechanical fixings in original period plaster.
Do I need a diffuser cover for indirect uplighting on ornate cornices?
Yes, on ornate cornices with polished or painted white surfaces, a frosted or opal diffuser is essential. Even COB strips can show slight texture variation at very close distances on highly reflective white surfaces without a diffuser. A matte frosted cover eliminates all hotspot risk and produces the smooth, professional ceiling wash characteristic of high-quality indirect uplighting. The light output reduction (typically 15–20%) is easily compensated by using a slightly higher-output strip.
How to hide LED wires when using cornice profiles in a listed building?
In listed buildings, use only reversible, non-damaging methods: route cables inside existing hollow voids (behind plasterwork via an access hatch, inside a hollow cornice void), inside slim surface-mounted mini-trunking glued (not screwed) to the wall, or within built-in joinery (wardrobes, bookcase surrounds). Place LED drivers inside ventilated voids or built-in furniture. Document all cable routes photographically. Never penetrate original plaster or historic masonry without formal LBC consent.
What tools are required to cut LED coving profiles for corners?
Essential tools: mitre saw or mitre box (adjustable to 45°), fine-tooth hacksaw blade (32+ TPI for clean aluminium cuts), deburring tool or flat file, tape measure, pencil, and corner connectors matching your profile series. Always dry-fit sections before final fixing. For non-90° corners, measure the actual angle with a digital angle gauge and adjust the mitre cut accordingly.
How to avoid LED hotspots when using shallow cornice profiles?
Five strategies: (1) Use COB LED strips (480+ chips/m) rather than SMD. (2) Fit a frosted or opal diffuser cover. (3) Increase the distance between strip and ceiling if possible, even 10mm more makes a significant difference. (4) Use high-density strips (224+ LEDs/m if SMD is unavoidable). (5) Angle the strip more acutely toward the ceiling. All five are available from LightingLine’s professional product range.
What colour temperature looks best on period ceilings — 2700K or 3000K?
For Victorian, Georgian and Edwardian period properties, 2700K is the unconditional first choice. It replicates the warm glow of traditional incandescent sources, enriches aged plaster tones, enhances gold-leaf and gilded details, and creates the intimate atmosphere for which these rooms were designed. 3000K is appropriate for more contemporary period renovations or transitional spaces. Never use above 3500K in period rooms, it renders plasterwork clinical and destroys the warmth of traditional decoration.
How to create a shadow gap effect with contemporary LED coving?
Install a trimless aluminium profile (PR-DW series from LightingLine) to the wall top plate before ceiling boarding. Leave a 10–20mm gap between the ceiling board edge and the profile’s upper edge. Direct the LED strip upward into the gap at 45–60°. Skim the profile flanges flush with wall and ceiling plaster. The result is a precise dark line at the wall-ceiling junction from which light emerges to wash the ceiling, the defining feature of contemporary minimalist LED coving design.
Does matte or clear diffuser work better for indirect uplighting on white cornice?
Matte (frosted) diffusers are strongly preferred for white or light-coloured cornices. Matte diffusers scatter light evenly in all directions, preventing hotspot reflections on bright surfaces. Clear diffusers transmit more lumens but reveal chip texture on smooth white ceilings at close range. The 15–20% lumen loss of a frosted diffuser is easily compensated by a slightly higher-output strip specification and is always worthwhile for the professional quality of the result.
How to design LED cornice uplighting in a low-ceiling Victorian flat?
Key principles for low ceilings (2.2m–2.6m): Use COB strips exclusively, use a frosted/opal diffuser without exception, keep lumen output conservative (350–500 lm/m maximum), always specify dimming, select the slimmest available profile (maximum 15mm height), position the profile as high as possible on the cornice face. The result is a subtle, warm ceiling wash that visually lifts the room rather than compressing it.
What are the best LED coving solutions for a minimalist modern interior?
For minimalist interiors: trimless shadow gap profiles (PR-DW series) that are skimmed flush with the ceiling, COB LED strips for an unbroken, perfectly seamless light line, opal diffuser for a uniform luminous aperture, 3000K or tunable white for flexibility. The shadow gap detail creates a ceiling that appears to float above the walls — the defining spatial quality of high-end contemporary interior architecture.
Can LED profiles be retrofitted into existing original cornices?
Yes. Surface-mount profiles can be fixed to the upper face of most original cornices using neutral-cure silicone adhesive, entirely non-invasive and reversible. For cornices with very shallow projections, wall-mounted uplight profiles (PR-WL series) fitted below the cornice provide an equally effective alternative. In either case, the original plasterwork is completely undisturbed.
How many lumens per metre for indirect uplighting on a 3m ceiling?
For a standard 3m ceiling with white surfaces and LED coving as primary ambient source: 600–900 lm/m. For supplementary mood uplighting alongside other sources: 300–500 lm/m. Always specify dimming to allow the output to be reduced for evening scenes. Use the lumen calculation method in Section 14.1 above for a precise specification tailored to your room dimensions and surface reflectance values.
Is LED strip replacement possible without removing the entire coving profile?
Yes, on clip-in or snap-in diffuser profile systems: remove the diffuser cover, peel out the old strip, clean the channel, install the new strip and refit the cover. For plaster-in trimless profiles, replacement is more complex and may require a specialist. This is why first-installation LED strip quality is critically important for plaster-in systems, specify L70 ≥ 50,000h strips.
How to prevent dust accumulation inside LED cornice profiles?
Use enclosed profiles with clip-in diffuser covers. Annual maintenance: remove diffuser cover and blow out with compressed air. In kitchens or cooking areas, specify IP44+ sealed profiles to prevent grease particle accumulation. Open-top profiles in dusty or high-traffic environments will require more frequent cleaning — quarterly is advisable in such conditions.
LED coving uplighting vs recessed ceiling spots: which is better for period rooms?
LED coving uplighting is strongly preferred in period rooms: it avoids any ceiling penetration; creates glare-free, comfortable ambient illumination; emphasises original plasterwork; and is architecturally sympathetic to the period character. Recessed spots can be added for task lighting in specific zones but should never be the primary ambient source in a period reception room. See the detailed comparison table in Section 14.4 of this article.
What is the average cost difference between plaster-in and clip-on LED cornice profiles?
Clip-on surface-mount profiles: approximately £8–18/m materials, 30–45 minutes installation per metre. Plaster-in trimless profiles: £20–40/m materials, with additional plastering labour making total installation cost 2–3× higher. The premium for plaster-in profiles is justified in high-end residential and hospitality projects where absolute invisibility of hardware is a design requirement. For period property retrofits, clip-on systems deliver excellent results at lower cost and with full reversibility.
How to connect multiple LED strip segments inside a long cornice run without voltage drop?
Use 24V (not 12V) systems. Feed from both ends of the perimeter run from a central driver. For runs exceeding 10m per direction, use amplifier/booster modules every 5–7 metres. Use 1.5mm² or 2.5mm² supply cables for long supply runs to the driver. Measure voltage at the far end of each segment with a multimeter and confirm it is within 0.5V of the driver output voltage before commissioning.
What size driver do I need for 15 metres of LED strip in coving?
Calculate: strip wattage per metre × 15m = total wattage. Add 20% safety margin. For a typical 10W/m COB strip: 10 × 15 = 150W × 1.2 = 180W minimum driver rating. A Mean Well 200W 24V PWM-dimmable driver is the appropriate specification. For runs above 10m, consider two 100W drivers feeding from opposite ends for voltage drop management.
Can I use addressable RGBW LED strips with cornice profiles for dynamic uplighting?
Yes. RGBW addressable strips (such as SK6812 or WS2815-based strips) can be installed in any standard LED profile wide enough to accommodate the 12mm or wider RGBW substrate. Use an opal diffuser for thorough colour mixing. Control via WLED/Home Assistant for the most flexible DIY approach, or via Skydance WT-SPI for professional residential applications. In period rooms, keep colour programmes warm-palette constrained for architectural sympathy.
LED coving and cornice: the most significant advance in domestic lighting design
LED coving and cornice uplighting represents, without reservation, the most significant advance in domestic lighting design of the past two decades. The combination of architectural invisibility, extraordinary visual comfort, profound energy efficiency, and unlimited design flexibility makes it the appropriate primary ambient light source for virtually every residential room type from the grandest Georgian drawing room to the most minimal contemporary loft apartment. No other lighting technology offers the ability to simultaneously honour original period architecture and deliver state-of-the-art light quality and controllability.
The decision to invest in LED coving uplighting is not merely an aesthetic one. The data are clear: indirect uplighting from cornice and coving profiles reduces visual fatigue, enhances perceived spatial quality, increases property value, and (through the use of circadian-supportive tunable white systems) actively supports human health and wellbeing. For renovation professionals and property developers, the return on investment is demonstrably positive. For homeowners who care about the quality of their lived environment, the intangible rewards (a room that feels genuinely beautiful at every hour of the day and night) are perhaps even more compelling than the financial return.
The principles, specifications and installation techniques described in this guide are the product of accumulated professional experience across thousands of LED coving projects in period and contemporary interiors throughout the United Kingdom and Europe. They are designed to give every reader (whether architect, designer, electrician, DIY enthusiast or property owner) the knowledge and confidence to specify, install and live with LED coving lighting of the highest quality.