In this article…
- Why stair lights matter: safety, aesthetics and value
- Types of stairs LED lights: a complete taxonomy
- LED strip technology for stairs: COB, SMD, high-efficiency and tunable white
- Aluminum profiles for stair LED lights: which profile for which stair
- Color temperature guide for staircase lighting
- Step-by-step installation guide for LED stair lights
- Motion sensor stair lights: how they work and best configurations
- LED stair lights with remote control
- LED stair lights with motion sensor rechargeable
- Led stair lights carpet: special considerations
- Professional selection guide: LightingLine.eu ecosystem 2026
- Design trends: staircase lighting in 2026 and beyond
- Smart home and domotics integration
- Regulations, safety standards and building codes
- Cost analysis and budget planning
- Maintenance, lifespan and troubleshooting
- Common stair lighting mistakes to avoid
- FAQ: frequently asked questions
- Detailed installation walkthroughs by stair type
- Outdoor stair lighting: gardens, terraces and entrances
- Material-specific lighting guide
- Professional specification guide for architects
- Why your staircase deserves the best LED lighting system
Why stair lights matter: safety, aesthetics and value
Stairs are among the most accident-prone areas in any home or commercial building. According to the World Health Organization (WHO) and the European Home Safety Alliance (EHLASS), falls on stairs cause over one million emergency room visits each year in Europe alone, and inadequate or absent lighting is cited as a contributing factor in approximately 58% of stair-related fall accidents. But the value of well-designed LED stair lights goes far beyond the purely functional dimension of accident prevention. Modern LED stair lighting has evolved into a sophisticated architectural and interior design tool capable of transforming an otherwise dull space into one of the most visually striking elements of a home or commercial environment.
The decision to invest in quality LED stair lights is supported by several converging trends. First, the dramatic decline in LED technology costs over the past decade has made it affordable: a complete LED lighting system for a standard 12-step residential staircase now costs a fraction of what it did in 2015, with energy consumption so low that annual operating costs typically run just a few dozen euros. Second, the explosion in LED profile designs, particularly miniaturized aluminum extrusion profiles, has made it possible to create truly architectural and invisible stair lighting, even in renovation scenarios. Third, the integration of motion sensors, dimmers, and smart home protocols has transformed LED stair lights from a static installation to a dynamic and responsive ambient system. Fourth, the wellness and biophilic design movements have brought renewed attention to the quality of light in transitional spaces like stairwells, prompting homeowners and architects to treat stairwell lighting with the same care once reserved exclusively for living rooms and bedrooms.
From a real estate valuation perspective, studies conducted by European real estate research institutes consistently show that well-designed architectural lighting increases a property’s perceived value by 3-7%. Staircase lighting, in particular, because it occupies a central and visually prominent position in most homes, offers an aesthetic impact disproportionate to the installation cost. A visitor’s first impression of a home is strongly influenced by the entrance and staircase, and LED stairway lighting ensures this impression is consistently positive, day and night. For homeowners considering a renovation investment, LED stairway lighting represents one of the most cost-effective aesthetic improvements available, with modest material costs, DIY-friendly installation, and immediately and permanently visible results.
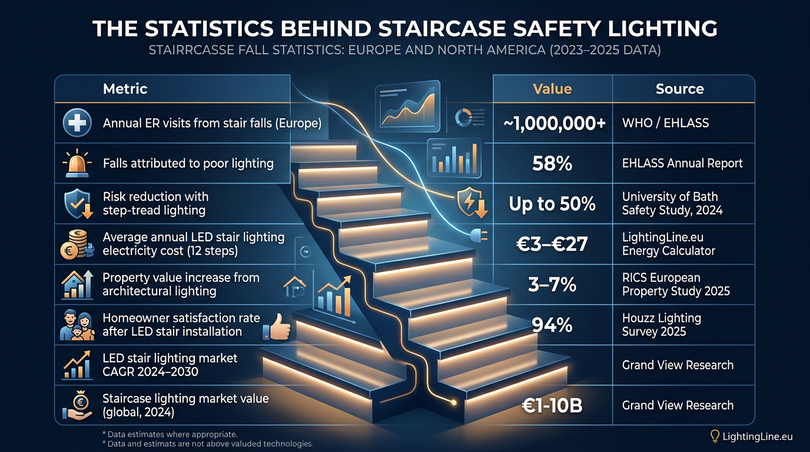
The statistics behind staircase safety lighting
| Metric | Value | Source |
|---|---|---|
| Annual ER visits from stair falls (Europe) | ~1,000,000+ | WHO / EHLASS |
| Falls attributed to poor lighting | 58% | EHLASS Annual Report |
| Risk reduction with step-tread lighting | Up to 50% | University of Bath Safety Study, 2024 |
| Average annual LED stair lighting electricity cost (12 steps) | €3–€27 | LightingLine.eu Energy Calculator |
| Property value increase from architectural lighting | 3–7% | RICS European Property Study 2025 |
| Homeowner satisfaction rate after LED stair installation | 94% | Houzz Lighting Survey 2025 |
| LED stair lighting market CAGR 2024–2030 | 11.3% | Grand View Research 2025 |
| Staircase lighting market value (global, 2024) | USD 18.4 billion | Grand View Research LED Architectural Lighting |
Do you need stair lights? A practical assessment
The need for staircase lighting varies by context, but the following conditions make it strongly recommended or essentially mandatory. The question should be approached not as a matter of personal preference but as a systematic assessment of safety and habitability. The presence of any one of the following conditions constitutes a clear case for installation and the presence of multiple conditions makes it urgent:
- Enclosed staircases with little or no natural light: without dedicated illumination, these become genuinely hazardous, especially for elderly residents and young children. How to brighten an enclosed staircase effectively is one of the most common questions from new homeowners and the answer is invariably an LED strip system in aluminum profiles.
- Open-plan staircases in contemporary homes: here the staircase is an architectural focal point and LED stair lights with remote control or smart controls are part of the interior design vocabulary, not just a safety add-on.
- Basement or attic staircases: these are typically completely enclosed and depend entirely on artificial light for safe navigation. A motion-sensor-activated LED stair lights system is the ideal solution, providing automatic illumination whenever the stairs are used without the complexity of locating a switch in a dark space.
- Night navigation in any home: even in well-lit homes, turning on full overhead lighting to navigate stairs at night is disruptive to household members and circadian rhythms. Low-level motion sensor stair lights solve this perfectly, providing just enough light for safe stair navigation (typically 5–15% brightness) without disturbing sleeping household members.
- Households with elderly members or young children: these groups are disproportionately represented in staircase fall statistics. Stair lighting motion activated systems (which require no manual operation) are particularly valuable for these households.
- Commercial buildings: building regulations in most European countries and the UK require minimum illuminance levels on stair treads (typically 100–200 lux), making staircase lighting a legal requirement as much as an aesthetic choice.
Is LED lighting a good choice for stairwells?
Emphatically yes. Compared to all alternative technologies (incandescent, halogen, fluorescent) LED is unambiguously superior for staircase applications across every meaningful metric. Energy efficiency (70–90% lower consumption than equivalent halogen or incandescent systems), lifespan (50,000+ hours vs 1,000–2,000 hours for incandescent — meaning you may never need to replace a properly installed LED stair light in the lifetime of the renovation), heat output (minimal, critical for enclosed profiles and fire safety in combustible surroundings), dimming performance (smooth, full range from 1–100% without the color shift or flickering of incandescent dimming), color rendering (CRI 80–97+, significantly better than fluorescent at equivalent efficiency levels), form factor (miniaturized LED strips fit into profiles as shallow as 5mm, enabling installation options that no other technology can achieve), and smart integration capability (LED controllers are available for every major smart home protocol).
The market has responded accordingly. According to Grand View Research (2025), the global LED lighting market for architectural and decorative applications, which encompasses led staircase lighting as a significant segment, was valued at USD 18.4 billion in 2024 and is projected to grow at a compound annual growth rate (CAGR) of 11.3% through 2030. Within this market, the residential and light commercial staircase segment is among the fastest-growing sub-categories, driven by renovation activity, smart home adoption, and the increasing availability of affordable, high-quality LED strip and profile solutions through specialists like LightingLine.eu.
Types of stairs LED lights: a complete taxonomy
Understanding the full range of stair lights available is the essential first step in any staircase lighting project. There are real and significant functional differences between the various types of staircase lighting, and choosing the wrong type for your stair typology is the single most common mistake in staircase lighting projects, producing results that are either aesthetically disappointing or technically inadequate for safety purposes. This section cuts through the complexity to classify staircase lighting options by their actual function, installation method, and the architectural context in which they perform best.
The taxonomy presented here is based on the physical placement of the light source and its relationship to the staircase structure. Each type has distinct implications for the LED strip technology required, the profile that must be used, the installation method, and the visual result. Understanding these distinctions before purchasing any materials is the most important preparation step for a successful staircase lighting project.
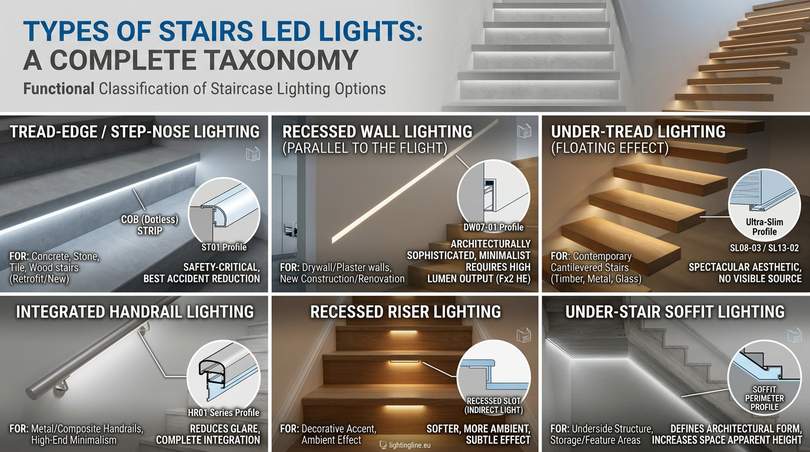
Tread-edge / Step-nose lighting
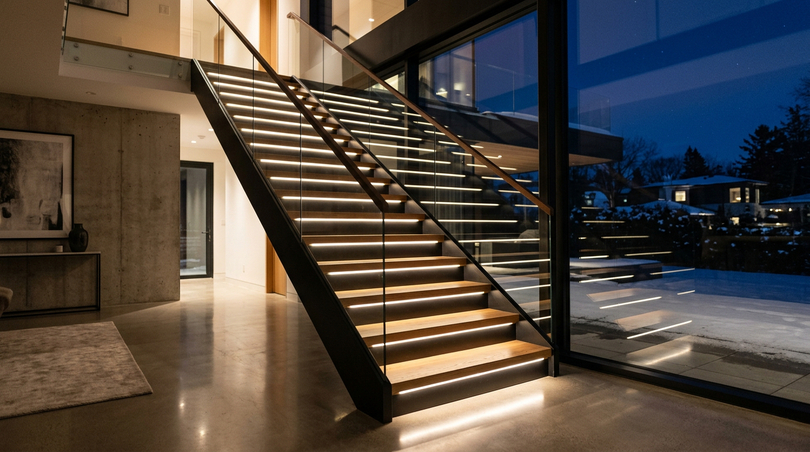
This is the most safety-critical and most widely used application of stairs led lights. Light is emitted from the edge of each stair tread (the “nose”) and directed downward onto the tread surface and the face of the riser below. The effect is both visually dramatic and functionally excellent: each step is clearly delineated in light, depth perception is enhanced, and the staircase acquires a distinctive “floating stair” aesthetic even when it is not cantilevered. The visual separation created between adjacent steps by tread-edge lighting is the primary mechanism by which stair lighting reduces fall accidents. It makes the edge of each step visible from a distance, at any angle of approach, under any ambient lighting condition from bright day to complete darkness.
Best for: concrete stairs, stone stairs, tile stairs, wood stairs (both retrofit and new construction). The dedicated ST01 step-nose profile from LightingLine is the benchmark product for this application.
Strip requirement: COB (Chip On Board) technology is mandatory for this application. Conventional SMD strips produce visible “hot spots”, individual LED dots visible in the reflection on the polished tread surface below which is both aesthetically poor and potentially distracting. COB strips produce a perfectly continuous, dotless line of light regardless of viewing angle or surface reflectance.
Recessed wall lighting (parallel to the flight)
In this configuration, the LED strip runs along the wall adjacent to the stair flight, housed in a recessed profile that is plastered or fitted flush with the wall surface. The result is a “cut of light” a clean, continuous luminous line that runs the full height of the staircase, guiding the eye (and the foot) upward. This is a strongly contemporary, minimalist aesthetic that works exceptionally well in both residential and hospitality settings where an invisible light source, with only the light itself visible, not the fixture, is the design objective. Recessed wall staircase lighting is arguably the most architecturally sophisticated of all stair lighting approaches, because it integrates the light source into the building fabric rather than attaching it to the surface, making it truly permanent and truly invisible.
Best for: drywalled or plasterboard walls, new construction projects, renovation projects where wall access is available. Trimless profiles like the DW07-01 and DW11-03 are specifically designed for this application.
Strip requirement: higher lumen output strips (the Fx2 High Efficiency series, exceeding 160 lm/W) are preferred here, since the single wall-mounted profile must provide adequate ambient and task illumination for the entire flight without supplementary overhead lighting.
Under-tread lighting (floating effect)
This application is exclusively suited to cantilevered (“floating”) staircases, where the treads are supported only at the wall end and overhang the stringer or air space below. An ultra-slim profile is concealed in a groove formed into the underside of each tread, projecting light downward onto the step below. The visual effect is spectacular and practically unique to this technique: each step appears to hover in a precise, horizontal pool of light, with no visible light source, the treads seem to float freely in space, dematerializing the structure and leaving only light. This effect is consistently ranked as the most desirable staircase lighting aesthetic in contemporary interior design surveys, appearing in the portfolios of every major residential architecture studio as a signature detail.
Best for: contemporary timber, metal, or glass cantilevered stairs. The SL08-03 (8mm height) and SL13-02 (5mm height) ultra-slim profiles are the correct choice.
Strip requirement: absolute uniformity is required, since these strips are often viewed from below as the occupant ascends the staircase, any brightness variation between steps is immediately perceptible and aesthetically unacceptable. The strip LED 10 w/m with integrated constant current control eliminates brightness variation between steps caused by voltage drop along the run.
Integrated handrail lighting
The handrail, traditionally a purely structural and safety element, becomes a luminous architectural feature with integrated LED profiles. Light is directed downward from within the handrail body, softly illuminating the treads below while shielding the eyes from direct glare. This solution represents the most complete integration of light and structure in staircase design, and is increasingly specified in high-end residential architecture and luxury hospitality projects where minimalism and the invisible fusion of function and aesthetics are paramount.
Best for: metal or composite handrails in contemporary staircases; projects where minimalism is paramount and no tread-mounted fixtures are desired. The HR01 series is the specialist profile for this application.
Recessed riser lighting
Instead of illuminating the tread surface from the step nose, recessed riser lighting installs the LED strip in a horizontal slot in the vertical face (riser) of each step, typically near the bottom of the riser. This creates an indirect wash of light that spills across the tread above: a softer, more ambient, and somewhat more subtle effect than tread-edge lighting. Recessed riser lighting is particularly effective when combined with tread-edge or wall lighting, adding a secondary layer of soft fill light that reduces shadows and creates a more three-dimensional, sculpted visual effect on the staircase as a whole. As a stand-alone solution, it is suitable for decorative or accent applications rather than primary safety lighting.
Under-stair soffit lighting
The space beneath a staircase (whether used as storage, a home office, reading nook, or left as open architectural space) can be dramatically enhanced with LED strip lighting installed along the perimeter of the soffit (the underside of the stair structure). Under stairs lighting using LED strips in recessed or surface-mounted profiles along the soffit edge creates a beautiful halo effect that defines the architectural form of the staircase structure, increases the apparent height of the space below, and provides useful ambient illumination for any function accommodated beneath the stairs.
Comparison table: stair lighting types
| Type | Primary function | Best stair material | DIY difficulty | Aesthetic impact | LED strip type |
|---|---|---|---|---|---|
| Tread-edge / Step-nose | Safety + ambiance | All types | Medium | High | COB mandatory |
| Recessed wall (parallel) | Ambiance + wayfinding | Drywalled walls | High (new construction) | Very high | High-efficiency SMD / COB |
| Under-tread (floating) | Dramatic aesthetics | Cantilevered wood / metal | Medium-high | Exceptional | COB, constant current |
| Integrated handrail | Safety + high-end design | Metal / composite rails | High | Very high | Compact COB / SMD |
| Recessed riser | Soft ambient fill | All types | Medium | Medium-high | SMD or COB |
| Under-stair soffit | Decorative accent | Any | Low-medium | Medium | SMD or COB |
LED strip technology for stairs: COB, SMD, high-efficiency and tunable white
Not all LED strips are created equal, and for stair applications, choosing the right strip technology is just as important as choosing the right profile. Failure to specify the right technology for a given application is responsible for a significant portion of poor-quality stair lighting installations, even when the profiles, power supply, and installation method are correct. Using the wrong strip in a stair profile on a reflective surface, for example, will result in a visually unacceptable “dot” pattern, regardless of the quality of the installation: the underlying technology cannot compensate for a technological incompatibility. Understanding the technical differences between LED strip technologies is therefore essential for anyone who wants to achieve the best possible results with LED stair lighting.
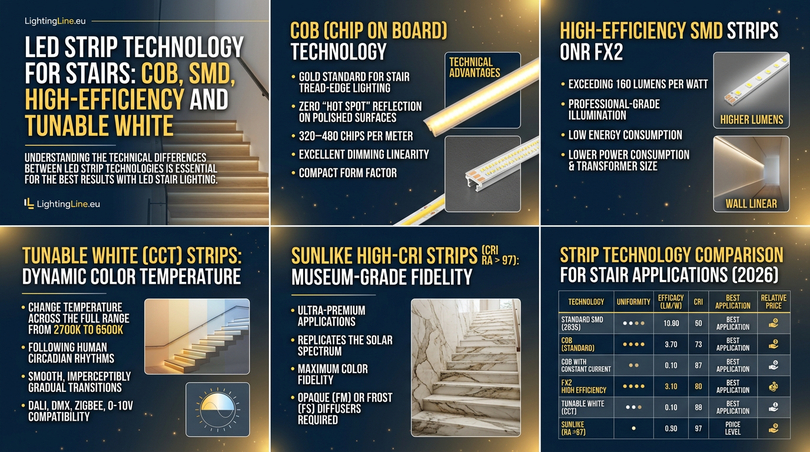
COB (Chip On Board) technology
COB strips are the gold standard for stair tread-edge lighting and the mandatory specification for any application where the light source may be reflected in a polished or semi-polished surface. In a COB strip, hundreds of very small LED chips (typically 320 to 480 per meter) are mounted directly on a shared PCB (Printed Circuit Board) substrate in a continuous, uninterrupted line with no visible gaps between them. The result is a strip that emits a perfectly uniform, continuous line of light with no individual dots visible at any viewing angle or distance. Crucially, the continuity of the light source is maintained even after cutting: a COB strip cut at its marked cut point shows no dark zones at the cut end, the light continues smoothly to the very edge of the strip.
Key technical advantages of COB for stair applications:
- Zero “hot spot” reflection on polished tread surfaces (marble, tiles, lacquered wood, polished stone) — the single most important advantage for step-nose applications
- Very high chip density: typically 320–480 chips per meter, producing genuinely seamless light output, compared to 60–120 for standard SMD strips
- Excellent dimming linearity: COB strips dim smoothly from 100% to near-zero without flickering, color shift, or visible “pop” at low levels
- Compact form factor: COB strips are typically 8–10mm wide and maintain their dot-free output even in the shallowest profiles (PR-SL13-02 at 5mm height)
- Good CRI: most COB strips deliver CRI 85–92, with premium variants reaching CRI 95+
From the LightingLine.eu catalogue, the 8W/m COB is the reference product for standard residential step-nose applications, while the 10W/m COB with integrated constant current control is the specification for under-tread floating stair applications where voltage-drop-induced brightness variation between steps must be eliminated.
High-efficiency SMD strips
For recessed wall applications (where the LED strip illuminates an entire stair flight from a single, continuous linear profile mounted at mid-height on the adjacent wall) a higher lumen output per meter is required than for individual step-nose profiles. The Fx2 High Efficiency series, exceeding 160 lumens per watt, delivers professional-grade illumination while maintaining extremely low energy consumption. This is particularly relevant for commercial stairwells and public buildings where energy performance certifications set minimum efficacy requirements that standard LED strips may not meet.
The Fx2 series represents the current best-in-class for LED strip efficacy, and its use in staircase wall applications delivers meaningful advantages beyond compliance: lower power consumption means a smaller transformer can be used, reduced heat output means the profile temperature is lower (extending strip life), and the higher lumen output means excellent illumination levels can be achieved with a single profile rather than requiring supplementary lighting sources.
Tunable White (CCT) strips: dynamic color temperature
For premium residential projects and hospitality environments where temporal dynamism and circadian lighting design are priorities, Tunable White LED strips allow the color temperature of the staircase lighting to change across the full range from approximately 2700K to 6500K, following human circadian rhythms (cooler, more stimulating light in the morning and warmer, more relaxing light in the evening and at night). The tunable white strip from supports the full 2700K–6500K range with smooth, imperceptibly gradual transitions and is compatible with smart home protocols including DALI, DMX, Zigbee, and 0-10V dimming.
From a design perspective, tunable white stairs led lights add a temporal dimension to the staircase that static single-CCT systems cannot replicate. The same physical space feels qualitatively different (in a meaningful, perceptible way) at 7am versus 10pm. This is not merely an aesthetic indulgence: growing bodies of research in chronobiology and architectural neuroscience confirm that appropriate light spectrum variation across the day measurably improves alertness, mood, and sleep quality for building occupants.
Sunlike high-CRI strips (CRI Ra > 97): museum-grade fidelity
For ultra-premium applications such as luxury residential, boutique hospitality, high-end retail, and any project where the visual quality of natural materials used in the staircase (marble, premium timber, designer stone, artisan tile) is of paramount importance the Sunlike series (CRI Ra > 97) represents the absolute pinnacle of color fidelity achievable in LED strip technology in 2026. These strips replicate the solar spectrum with extraordinary accuracy, using a multi-phosphor formulation that eliminates the spectral gaps and peaks characteristic of conventional LED phosphors. The practical result is that natural materials, illuminated with Sunlike technology, appear exactly as if they were exposed to direct sunlight: the veins of marble reveal all their depth and variety, the grain of wood shines with a natural warmth, and colored surfaces reproduce their true hue without the subtle distortion that even conventional high-quality LEDs introduce.
Important pairing requirement: high-CRI Sunlike strips should always be used with opaque (FM) or frost (FS) diffusers to prevent secondary reflections on polished surfaces. The diffuser also eliminates any residual spatial non-uniformity in the light output and softens the beam for a natural-appearing, glare-free light source. Do not use clear (CL) diffusers with Sunlike strips on highly polished stair surfaces.
Strip technology comparison for stair applications
| Technology | Uniformity | Efficacy (lm/W) | CRI | Best application | Relative price |
|---|---|---|---|---|---|
| Standard SMD (2835) | Medium (dots visible) | 100–130 | 80–85 | Recessed riser, under-stair soffit | €€ |
| COB (standard) | Excellent (seamless) | 120–145 | 85–92 | Step-nose (tread-edge) | €€€ |
| COB with constant current | Perfect (zero voltage drop) | 120–145 | 85–92 | Floating stairs (uniform all steps) | €€€€ |
| Fx2 high efficiency | Good–excellent | 160+ | 90–95 | Wall linear, commercial stairwells | €€€ |
| Tunable white (CCT) | Good | 100–130 | 90–95 | Premium residential, hospitality | €€€€ |
| Sunlike (Ra >97) | Excellent (with diffuser) | 100–120 | 97+ | Ultra-premium, luxury natural materials | €€€€€ |
Aluminum profiles for stair LED lights: which profile for which stair
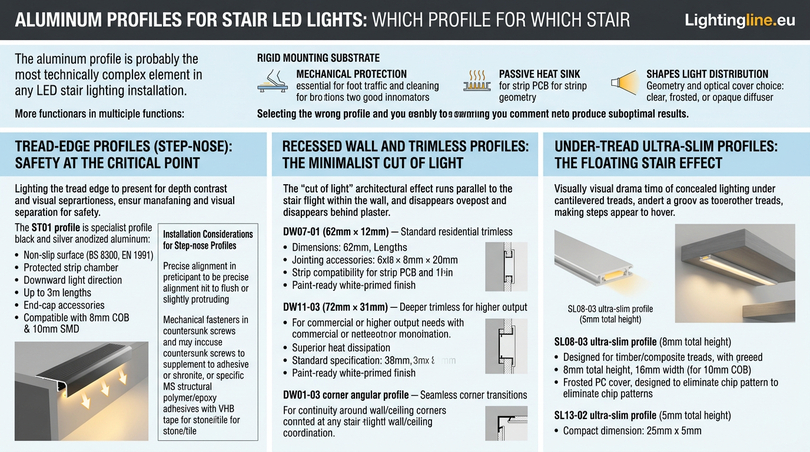
The aluminum profile is probably the most technically complex element in any LED stair lighting installation. It’s the component most installers and homeowners overlook, considering it a simple aesthetic casing for the LED strip rather than the multifunctional technical component it actually is. A high-quality aluminum profile simultaneously performs multiple functions in an LED stair lighting system: it provides a rigid and stable mounting substrate for the flexible LED strip; it protects the strip from mechanical damage (essential in stair-profile applications, where the profile is subject to foot traffic and cleaning); it acts as a passive heat sink, conducting heat from the strip’s PCB to the surrounding substrate to maintain the LED junction temperature within the operating range; and, crucially, it shapes the light distribution through its internal geometry and the choice of optical cover (clear, frosted, or opaque diffuser).
Selecting the wrong profile for a given staircase typology and installation context will produce suboptimal results even with the best available LED strip. A step-nose profile designed for downward light direction, installed on a staircase where the light direction should be forward (riser mount), will produce the wrong illumination pattern. An ultra-slim under-tread profile installed in a standard surface-mounted step-nose configuration will provide inadequate mechanical protection. And any profile that does not make good thermal contact with the LED strip will result in premature strip aging and brightness loss. The guidance in this section eliminates all such mismatches by providing clear, specific profile recommendations for every staircase type and application.
Tread-edge profiles (step-nose): safety at the critical point
The tread edge (the “nose” of the step) is the most safety-critical lighting point on any staircase. This is where the foot makes contact with the step as the occupant transitions weight from one tread to the next, and where the depth contrast between adjacent treads most needs to be made visible. A step-nose profile installed at this location achieves both safety and aesthetics simultaneously. The LED light is directed downward, simultaneously illuminating the tread surface ahead of the foot and the riser face below, creating the visual separation between steps that accident-prevention research identifies as the primary safety benefit of staircase lighting.
The ST01 profile (available in black and silver anodized aluminum finish) is the specialist step-nose profile from LightingLine.eu. Its design features are precisely calibrated for this demanding application:
- Non-slip surface treatment on the upper face (integrated anti-slip ribbing or friction finish depending on variant), meets BS 8300 and EN 1991 anti-slip requirements for commercial use
- Protected strip chamber: the LED strip is housed in an enclosed chamber that prevents mechanical damage from foot traffic and cleaning operations while maintaining full optical performance through a PC diffuser cover
- Downward light direction geometry: the profile’s internal geometry channels light toward the tread surface and riser, not upward into occupants’ eyes, eliminating direct glare
- Available in lengths up to 3m, accommodating most residential and commercial stair widths without joins
- End-cap accessories provide a clean, professional finish at step ends and protect the strip end from moisture ingress
- Compatible with both 8mm COB and 10mm SMD strips though COB is always recommended for this application
Installation considerations for step-nose profiles
Stair nosing profiles must be mounted directly onto the tread, flush or slightly protruding from the front edge. The most critical installation requirement is precise alignment with the tread edge: if the profile protrudes from the tread edge, it creates a tripping hazard (the edge of the profile then becomes the highest point of the step rather than the tread surface itself), while if it is positioned too far back, the light direction changes and the safety benefit is reduced. The correct installation position requires the front face of the profile to be flush or within 2 mm of the tread edge, with the optical center of the profile approximately 5–8 mm behind the tread edge for most standard tread heights (rise height 175–200 mm).
Adhesive mounting (using the self-adhesive tape pre-applied on many profiles) is not sufficient on its own for stair nosing profiles subject to frequent foot traffic. It is always necessary to supplement the adhesive with mechanical fasteners, typically M3 stainless steel countersunk screws with a 300 mm spacing, screwed through the base of the profile into the tread subfloor. For stone or tile steps where drilling is aesthetically or structurally undesirable, use an MS structural polymer adhesive or a two-component epoxy adhesive with a tensile strength of at least 3 N/mm² for metal-to-stone bonding, supplemented with high-strength double-sided tape (at least 1.0 mm thick, VHB construction foam tape) for immediate adhesion while the adhesive cures for 24–48 hours.
Recessed wall and trimless profiles: the minimalist cut of light
Trimless profiles represent the architectural extreme of LED staircase lighting: the aluminum profile disappears entirely behind the plaster surface, leaving only the light-emitting aperture (a pure luminous slot, perhaps 8–12mm wide) visible as a clean, continuous line running the height of the staircase. The effect a “cut of light” running parallel to the stair flight within the wall is one of the most visually powerful and spatially sophisticated expressions of contemporary interior architecture. This technique transforms the staircase wall from a passive neutral plane into an active, luminous architectural element that guides, defines, and dramatizes the staircase experience.
DW07-01 (62mm × 12mm) — Standard residential trimless
The DW07-01 is the compact trimless drywall profile designed for standard residential wall thicknesses and the most commonly specified trimless staircase profile in the LightingLine.eu catalogue. It is installed in a routed slot in the plasterboard before the final skim coat, allowing the plaster to be applied flush over the profile’s flanges. Key specifications and features:
- Nominal dimensions: 62mm wide × 12mm deep (profile body); flanges extend to 72mm for plaster embedding
- Available lengths: 1m, 2m, 3m standard; 4m on request
- Jointing accessories: inline joiner clips allow seamless end-to-end joins for continuous runs exceeding 3m
- Strip compatibility: 10mm SMD, 8mm COB, and 10mm COB strips
- Diffuser options: frosted PC (FS), opaque PC (FM), clear acrylic (CL)
- Finish: white-primed aluminum (paint-ready after installation; paint the flanges with the wall color for completely invisible integration)
DW11-03 (72mm × 31mm) — Deeper trimless for higher output
The DW11-03 is a deeper trimless profile for applications requiring significantly higher light output or a wider beam angle. Its greater depth (31mm internal cavity) accommodates wider, higher-wattage strips and provides superior heat dissipation for demanding applications. This profile is typically specified for commercial stairwells, hospitality properties, and public buildings where the single linear fixture must provide sufficient illuminance for the entire stair flight (150–200 lux minimum) without any supplementary overhead lighting.
DW01-03 corner angular profile — Seamless corner transitions
For transitions between the staircase wall and the ceiling or horizontal soffit above — as occurs at the top landing of a staircase where the wall meets the ceiling, the angular profile DW01-03 ensures a seamless continuation of the luminous line around the corner without interruption. It is designed as a joiner component within the PR-DW profile family, maintaining consistent optical output and sightline geometry through the corner transition. In high-specification projects where continuous line integrity is a non-negotiable design requirement, this component is essential.
Under-tread ultra-slim profiles: the floating stair effect
No other staircase lighting technique produces the visual drama of correctly executed under-tread lighting on a cantilevered (floating) staircase. When the ultra-slim profile is perfectly concealed in a routed groove in the underside of each tread, the LED strip is completely invisible from all normal viewing positions, yet each step appears to hover above a precise, horizontal pool of light that the occupant navigates by instinct. This is consistently ranked as the most desirable staircase lighting aesthetic in contemporary interior design surveys, appearing in the portfolios of every major residential architecture studio and in the aspirational imagery of every leading interior design publication as a defining characteristic of contemporary architectural quality.
SL08-03 ultra-slim profile (8mm total height)
The SL08-03 is designed to be embedded in a groove routed into the underside of timber or composite treads. Its 8mm total height means the required groove depth is only 9–10mm, achievable without structural compromise in the majority of standard residential timber treads (which are typically 35–45mm thick). A groove 9mm deep into a 40mm tread leaves 31mm of full-section timber above, which is more than adequate for structural performance. Key specifications:
- Total height: 8mm (groove depth required: 9mm)
- Width: 16mm (accommodates 10mm COB strips with clearance)
- Frosted PC cover: included standard critical for eliminating visible chip pattern when viewed from below at shallow angles during stair ascent
- Material: anodized aluminum alloy, clear or black finish
- Available lengths: 1m, 2m, 3m
SL13-02 ultra-slim profile (5mm total height)
When tread thickness is a constraint (for example in engineered timber treads on a structural steel frame, which may be only 18–25mm thick) the SL13-02 (5mm total height) provides the shallowest available recessed profile for LED strip installation. The required groove depth is only 6mm, leaving 12–19mm of solid material above in a 18–25mm tread, structurally acceptable for a non-structural decorative timber overlay on a steel primary structure. This is the specification when any other profile cannot be used without compromising tread structural integrity.
Integrated handrail profiles: light built into the rail
The HR01 represents the most complete integration of light and structure available in staircase design. This is a full professional aluminum handrail (meeting structural and safety standards for handrail grip, load capacity, and dimensional requirements across European building codes) with an integrated LED strip chamber built into the underside of the rail body. The LED strip occupies a recessed cavity in the bottom of the handrail, covered by a frosted diffuser, and directs a controlled beam of downward light onto the stair treads below while the upper face of the handrail remains clean and uninterrupted. From the perspective of the occupant using the rail, there is no visible lighting fixture at all so only the clean, warm glow of light coming from the handrail itself, bathing the treads in a comfortable, glare-free pool of illumination.
Key specifications of the HR01 series:
- Construction: extruded 6063-T5 aluminum alloy; anodized finish (clear, black, champagne)
- Available lengths: 3m standard; 4m on request; jointing system for continuous multi-section runs
- LED strip cavity: accommodates compact 8mm COB or 10mm SMD strips
- Diffuser: frosted PC diffuser, click-fit into profile
- Structural rating: meets EN 1991-1-1 handrail load requirements (0.74 kN point load)
- Wiring access: integral cable channel for LED power and control wiring, concealed within the handrail body
Color temperature guide for staircase lighting
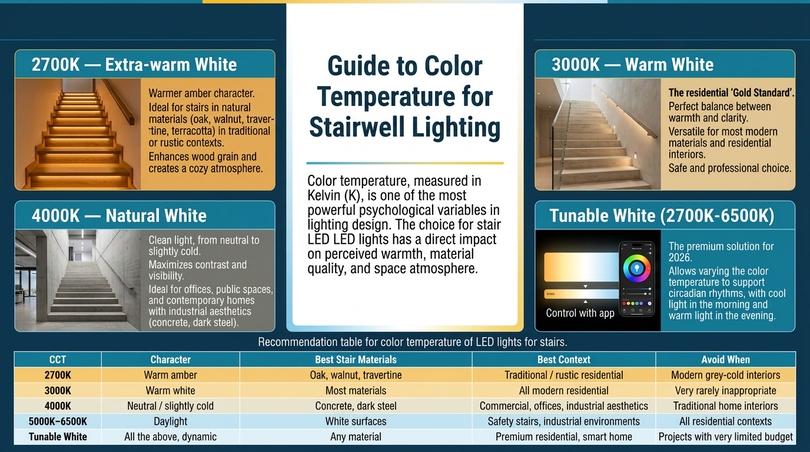
Color temperature, measured in Kelvin (K), is one of the most psychologically powerful variables in lighting design, and its importance in staircase applications is consistently underestimated by homeowners and even by some professionals. The choice of CCT (Correlated Color Temperature) for stairs led lights has a direct and measurable impact on the perceived warmth, material quality, spatial atmosphere, and human experience of the staircase. A marble staircase lit at 6500K (cold daylight) will appear clinical, institutional, and unwelcoming the kind of light associated with hospital corridors and underground car parks. The same staircase lit at 2700K will glow with luxury, depth, and warmth. The physical materials, the spatial proportions, and the architectural quality are identical, only the light has changed. Color temperature is not a secondary parameter: it is as important as brightness level for achieving the desired result, and the wrong choice can undermine the effect of even the most technically perfect installation.
2700K — Extra warm white: for traditional and natural material staircases
2700K light has the warmest, most amber-toned character in the mainstream architectural LED palette. It is the closest artificial equivalent to traditional incandescent light (which has a CCT of approximately 2700K), and it represents the natural choice for staircases built with warm-toned materials: solid hardwood treads in oak, walnut, cherry, or mahogany; warm-toned natural stone (travertine, honey-toned limestone, sandstone, cream marble); terracotta tiles; and any staircase in a home with a traditional, classical, rustic, or Arts and Crafts interior design vocabulary. At 2700K, the grain of timber is enriched and intensified, stone textures acquire depth and character, and the staircase becomes an inviting, cozy architectural element rather than a purely functional passage.
For homeowners renovating period properties (Victorian, Edwardian, Georgian, traditional farmhouses), 2700K is almost always the correct specification for stair led lighting — it maintains visual continuity with the warm incandescent lighting that the period interiors were designed around, and it prevents the jarring, anachronistic quality of cool white LED strips in warm traditional interiors.
3000K — Warm white: the universal residential gold standard
3000K is consistently identified by experienced lighting designers as the “Gold Standard” for residential architecture (the CCT that sits precisely at the sweet spot between warmth and clarity. It is warm enough to be flattering, comfortable, and inviting, but clean enough to render most modern materials) white walls, pale grey concrete, light timber, cool-toned stone, ceramics, and glass — beautifully and accurately. For any homeowner who is uncertain about color temperature selection for their staircase, 3000K is the safe, universally flattering, professionally endorsed choice. It is also the CCT that most closely matches the ambient lighting in most modern residential interiors (which have largely converged on 2700K–3000K for living areas), ensuring visual coherence between the staircase and the adjoining rooms.
4000K — Natural white: commercial and contemporary high-contrast aesthetics
4000K produces a clean, neutral-to-slightly-cool white light with no amber cast. It maximizes contrast and visual acuity (making step edges and tread surfaces maximally visible in terms of pure contrast) which makes it the preferred specification for commercial buildings, office staircases, technical areas, public spaces, and any staircase where safety visibility is the sole priority and aesthetic warmth is a secondary consideration. 4000K also works well for staircases in contemporary homes with a strong industrial or raw-material aesthetic: exposed concrete stairs, dark-stained steel stringers, black-treated timber, polished concrete treads. In these contexts, 4000K’s absence of warmth becomes an asset and it reads as precise, sharp, and architecturally intentional rather than cold and clinical.
Tunable white (2700K–6500K): the premium 2026 solution
Tunable white LED strips represent the most sophisticated color temperature solution available for staircase lighting in 2026. Using the tunable white strip, the staircase can change its color temperature across the full warm-to-daylight range in response to smart home automation, scheduled programming, or manual remote control. The most compelling application of tunable white in a staircase context is circadian lighting: the CCT follows a programmed daily cycle that mimics the natural variation of daylight (invigorating cool white in the morning, comfortable warm white through the day, and deeply warm amber in the evening) supporting healthy circadian rhythms for all household members without any conscious intervention on their part.
Color temperature selection guide
| CCT | Character | Best tread materials | Best context | Avoid when |
|---|---|---|---|---|
| 2700K | Warm amber | Oak, walnut, travertine, warm marble, terracotta | Traditional / rustic / period residential | Cool-grey or industrial contemporary interiors |
| 3000K | Warm white | Most materials — highly versatile | All modern residential, premium hotel | Very rarely inappropriate |
| 4000K | Neutral / slight cool | Concrete, dark steel, black or grey timber | Commercial, offices, industrial-aesthetic residential | Traditional / warm-material domestic interiors |
| 5000K–6500K | Daylight / cool blue | White surfaces, clinical spaces | Safety-only utility stairs, very specific industrial settings | All residential / hospitality contexts |
| Tunable White | All of the above, dynamic | Any material | Premium residential, smart homes, circadian lighting projects | Very tight budget projects |
Step-by-step installation guide for LED stair lights
Successful installation of led stair lights depends on the combination of careful planning, the right tools, precise execution, and respect for electrical safety principles. A poorly planned installation can result in uneven brightness, visible cable runs, gaps in the luminous line, or in the worst case an electrical fault. A well-planned installation, executed with quality materials and attention to the details described in this section, will deliver a result that looks as good as any professionally photographed architectural project — and will continue to do so for decades. This section provides the most comprehensive installation guide available for 2026, covering all common scenarios: from the simplest tread-edge surface mount to the more technically complex trimless wall profile installation and floating-stair under-tread groove work.
Tools and materials checklist
| Item | Purpose | Notes |
|---|---|---|
| Steel measuring tape (5m) | Accurate tread width and run length | Measure each step individually — widths often vary slightly |
| Set square / digital angle meter | Verifying right angles and tread geometry | Essential for profile cutting accuracy |
| Mitre saw with aluminum blade | Clean, accurate profile cuts | Use fine-tooth carbide blade rated for non-ferrous metal |
| Deburring tool / fine flat file | Removing sharp burrs after cutting aluminum | Critical — aluminum burrs are razor-sharp |
| Sharp scissors or LED strip cutter | Cutting LED strips at marked cut points only | Never use a craft knife — it can crush conductors |
| Isopropyl alcohol (IPA) wipes | Cleaning surfaces before adhesive mounting | Essential for adhesion — skip this and the profile will eventually peel |
| Drill with masonry/wood/tile bits | Pilot holes for profile mounting screws | Match bit to substrate; use tile bit with hammer-off for ceramic treads |
| Countersunk screwdriver set | Driving profile mounting screws flush | Stainless steel M3 × 16mm countersunk screws preferred |
| Soldering iron + rosin-core solder | High-reliability permanent strip connections | Set iron to 280–320°C; do not overheat LED pads |
| Solderless snap-on connectors | Quick connection where soldering not practical | Must match strip width (8mm or 10mm) |
| 2-core low-voltage cable (0.75–1.5mm²) | Connecting strips to power supply | Use 1.5mm² for runs over 5m; mark polarity on every conductor |
| Heat-shrink tubing (3:1 ratio) | Insulating and weatherproofing solder joints | Use adhesive-lined type for outdoor or damp locations |
| LED-rated 24V SMPS power supply | System power source | Size at 75–80% of rated capacity (never 100%) |
| Motion sensor stair controller | Automated occupancy-triggered activation | PIR or microwave type per installation requirements |
| Multimeter | Polarity verification, voltage checking, fault-finding | Essential — do not connect anything without verifying polarity first |
| Cable ties / cable clips | Cable management and routing | Use stainless steel or UV-rated type for outdoor runs |
Planning your staircase LED lights layout
Accurate planning before a single profile is cut or screw is driven is the single biggest factor distinguishing a professional-quality installation from an amateur one. The planning phase must systematically address every aspect of the installation: the exact number of steps, tread width (measured individually, as they often vary), power supply location and capacity, cable routing path, controller placement, wiring topology, and diffuser specification. An hour of careful planning at the start will prevent days of remedial work later.
Step count and strip length calculation
Count the exact number of stair treads to be lit. For tread-edge profiles, the length of each profile equals the tread width minus the wall-to-wall clearance (leave 5mm on each side if stairs are between two walls, for thermal expansion clearance). For a standard residential staircase with 12 steps, each 900mm wide:
- Profile length per step: 900 – 10 = 890mm
- Total profile required: 12 × 890mm = 10,680mm → order 11m minimum in 1m or 2m lengths
- LED strip length: same as profile length — use each cut profile as the template for cutting its corresponding strip section
- Cable length: allow 500–600mm per step for the drop cable connecting each profile to the main power bus
Power supply sizing
Power supply sizing is the most commonly miscalculated aspect of stair LED lighting projects. The correct procedure:
- Note the rated power of the LED strip (e.g., 8W/m for F52-300-320OR2 COB strip)
- Multiply by total meters of strip (e.g., 10.7m × 8W/m = 85.6W total load)
- Apply a 25% safety margin: 85.6W × 1.25 = 107W minimum power supply rating
- Select a standard-size power supply at or above this rating (e.g., 120W or 150W)
- Verify the supply will operate at ≤80% of rated capacity: 85.6W ÷ 120W = 71% — acceptable
Never operate an LED power supply at 100% of rated capacity. This causes internal temperatures to rise above design limits, significantly shortening transformer lifespan and potentially triggering over-temperature protection (causing random system shutdowns).
Voltage drop management
Voltage drop along LED strip runs is one of the most common causes of uneven brightness in staircase installations — the LED steps closest to the power supply are brighter than those at the far end of the run. For staircase applications, where identical brightness on every step is both aesthetically important and safety-critical, voltage drop management is non-negotiable.
| Strategy | Mechanism | When to apply | Complexity |
|---|---|---|---|
| Use 24V instead of 12V | Halves current for same wattage → halves voltage drop | All runs over 3m — always recommended as standard | Low (simply specify 24V throughout) |
| Feed from both ends (star topology) | Power enters from top and bottom simultaneously → halves effective run length | Runs 10m+ even at 24V; commercial installations | Medium (requires two cable runs from supply) |
| Constant-current COB strip (F52-300-384OR2A) | Integrated current regulation compensates for voltage variation → identical brightness all steps regardless of run length | Floating stairs; any installation where uniform brightness is critical and run length is 8m+ | Low (simply specify CC strip — no wiring changes required) |
| Heavier gauge cable (1.5mm²) | Lower cable resistance → lower voltage drop at same current | Long runs at high wattage; outdoor installations | Low (cable cost increase only) |
| Parallel wiring topology (one cable per step) | Each step receives supply voltage directly — no daisy-chain losses | All staircase installations — always preferred | Medium (more cable required) |
Cutting and connecting LED strips: the critical details
Incorrect cutting and connection of LED strips are responsible for the large majority of installation failures and poor-quality results in led strip lights for stairs projects. The rules are straightforward but non-negotiable: they must be followed precisely every single time, without exception.
The absolute rule: only cut at marked cut points
LED strips can only be cut at the designated cut marks, the printed scissor symbols or the copper bonding pads with the cut-line indicator that appear at regular intervals along the strip. The cut interval varies by strip type:
- High-density COB strips (320–480 chips/m): cut every 25–30mm
- Standard 60-chip/m SMD strips: cut every 50mm
- Low-density 30-chip/m strips: cut every 100mm
Cutting between marked points destroys one complete LED module and may sever internal conductor traces, causing a permanent dark zone that extends backward into the strip. If your required length falls between cut marks, always cut at the shorter mark rather than the longer one as a slightly shorter strip in a slightly shorter profile is invisible; a dark zone in the middle of a step is not.
Use sharp scissors for flexible LED strips: fabric scissors (Fiskars or similar) or dedicated LED strip cutters are ideal. Never use a craft knife, which can crush the copper conductors against the PCB substrate. Cut with a single, confident motion perpendicular to the strip length.
Connection methods: solder vs. solderless
For permanent, high-reliability staircase installations, soldered connections are strongly preferred over solderless snap-on connectors. Solderless connectors are convenient and adequate for accessible, protected locations, but they can develop intermittent contact resistance over time, particularly in environments where thermal cycling (the expansion and contraction of the PCB and connector as the strip heats and cools) gradually loosens the contact force. In a staircase application where individual step connections may be physically inaccessible (behind profile covers, under treads), a soldered connection that will never fail is worth the modest additional effort at installation time.
| Method | Long-term reliability | Skill level | Best application |
|---|---|---|---|
| Tinned solder joint + heat-shrink | Excellent (permanent) | Moderate | All permanent, inaccessible locations (under tread profiles, embedded wall profiles) |
| Snap-on solderless connector | Good (if correctly applied to clean pads) | Very low | Accessible, protected, easily serviced connection points |
| Screw-terminal strip connector | Very good | Low | Where strips need to be periodically disconnected for service |
| IP67 silicone-encapsulated connector | Good | Low | Outdoor stairs, damp basement stairs, any IP-rated application |
Polarity: the non-negotiable check
LED strips are polarity-sensitive. Connecting a strip with reversed polarity will deliver no light output (the strip simply will not illuminate) and may in some circumstances damage the strip’s LED circuitry. Before making any connection:
- Set your multimeter to DC voltage measurement (24V range)
- Connect the red probe to the positive (+) output terminal of the power supply or controller
- Connect the black probe to the negative (–) terminal
- Confirm reading is +24V (or +12V for 12V systems)
- Mark the positive conductor at the supply end with red sleeving or red marker tape
- Trace this marking all the way through the installation — every connection point, every cable run
This five-minute process at the start of installation eliminates polarity errors entirely. Never skip it, regardless of how confident you are.
Mounting aluminum profiles to stair treads and walls
The aluminum profile is the structural backbone of the stair led lighting installation. Its correct mounting ensures the LED strip remains in the right position, protected and properly aimed, for the full life of the installation, which should be measured in decades. Profile mounting varies by application: surface mount on treads (step-nose), recessed in walls (trimless), or embedded in tread grooves (under-tread). Each requires a slightly different approach.
Surface mounting on treads (step-nose profiles) — Step by step
- Measure each tread individually using a steel tape. Do not assume all treads are identical, in most staircases, tread widths vary by ±3–10mm, particularly in older properties.
- Mark the tread: use a set square and pencil to mark the profile position on each tread, ensuring consistent setback from the step nose across all steps (5–8mm setback recommended).
- Cut profile to length: use the mitre saw with aluminum-rated blade. For clean 90° cuts, use a stop block to ensure identical lengths across repeated cuts. Deburr all cut ends immediately aluminum burrs are extremely sharp and will cut fingers during handling. Use the deburring tool or a few strokes of a fine flat file.
- Drill mounting holes through the profile base at 300mm maximum centers. Use a 3mm bit for M3 screws. Mark and drill pilot holes in the tread at the same positions, to a depth appropriate for the fastener (typically 20mm for wood treads, 25mm for concrete).
- Clean the tread surface: wipe the mounting area thoroughly with an IPA-saturated cloth and allow to dry completely (minimum 2 minutes) before applying any adhesive.
- Mount the profile: for wood/concrete treads with pilot holes, drive countersunk stainless steel screws to secure the profile. For stone or tile treads: apply MS polymer or two-part epoxy structural adhesive in a bead along the profile base, press the profile firmly into position (use tape or clamps for 2–4 hours of curing), then additionally secure with the double-sided VHB tape applied to the profile before the adhesive to prevent movement during cure.
- Install the LED strip: with the profile secured, peel the backing from the LED strip’s self-adhesive tape, insert the strip into the profile channel, and press firmly along the full length for 10–15 seconds. Pre-connect the cable to the strip end before inserting if soldering (solder iron access is impossible inside the mounted profile). For solderless connectors, the connection can be made after the strip is seated.
- Fit the diffuser cover: snap the frosted PC diffuser into the profile track with even pressure applied simultaneously along the full length, pressing one end first will bow the cover. Listen for the audible click of both sides engaging. Do not force if the cover is bowing, it is slightly too long: trim 0.5mm from the end with scissors and re-attempt.
Wiring, power supply location, and transformer specification
The power supply (LED driver / transformer) is the heart of the staircase LED lighting system. Its specification, location, and installation significantly impact both system performance and long-term reliability. A correctly specified and installed power supply will operate at safe temperatures for 20,000+ hours — comparable to the lifespan of the LED strips it drives. A poorly specified or inadequately ventilated supply will overheat, fail within 2–3 years, and potentially cause the entire system to fail at the most inconvenient moment.
Power supply location requirements
- Ventilated space mandatory: power supplies generate significant heat (typically 15–25W of waste heat for a 120W unit) and require airflow. Never install in a sealed cupboard or inside a wall cavity without ventilation. The under-stairs storage cupboard is an excellent location if well-ventilated; a dedicated DIN-rail enclosure with ventilation slots is the professional solution for commercial installations.
- Accessible for maintenance: install where the supply can be easily reached for inspection, cleaning, and replacement if necessary. Embedding a power supply in an inaccessible void is poor practice, it will inevitably need replacement at some point.
- Optimal position near the midpoint of the staircase run: feeding the LED bus from the center of the staircase (rather than from the top or bottom) halves the effective cable length and reduces voltage drop proportionally.
Cable routing and concealment
Low-voltage cable routing in a staircase installation must be both mechanically protected and visually concealed. Exposed cables dangling between treads are both a trip hazard and an aesthetic failure. The preferred routing methods for each application type:
- Tread-edge profiles: route the drop cable from each profile down behind the riser face (if there is a closed riser), or run cable along the inner face of the stringer (side support), using cable clips at 200mm intervals. In open-riser staircases, run cables within the wall side of the stringer profile, invisible from the open side.
- Wall-mounted trimless profiles: cables are pre-installed in wall conduit before plastering, this is inherent to the installation process and cables are completely concealed.
- Under-tread profiles: route cable within the groove alongside the profile, or drill a 6mm through-hole from the tread soffit up into the stringer at each step to allow the cable to pass through the structure invisibly.
Motion sensor and remote control setup — Overview
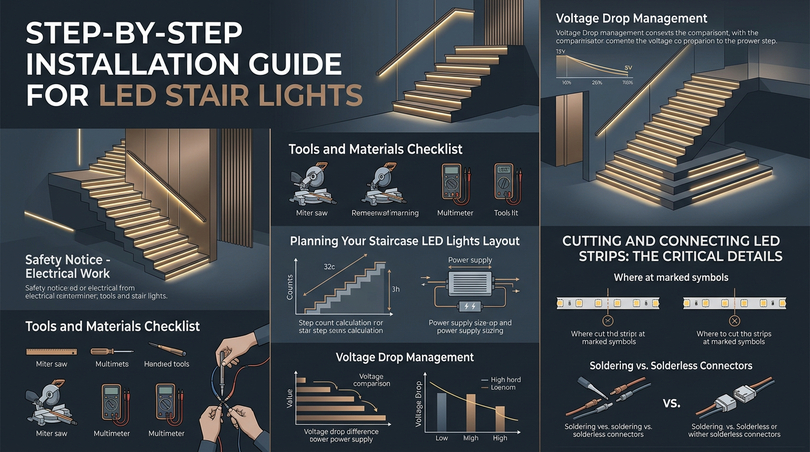
The integration of motion sensors and smart controllers transforms led stair lights from a static passive lighting installation into a dynamic, responsive, automated system. The full technical detail of motion sensor system design and configuration is provided in Section 7 below. For the purposes of this installation guide, the critical installation sequence point is: the motion sensor controller must be wired between the power supply output and the LED strip bus, not between the mains supply and the transformer. This ensures the controller operates at safe low voltage (24V or 12V SELV) rather than at mains potential, which simplifies installation, reduces electrical risk, and allows full DIY installation of the control element.
Motion sensor stair lights: how they work and best configurations
Motion sensor stair lights represent one of the most practically valuable enhancements to any LED staircase lighting system, and they are among the most frequently requested features by homeowners considering a staircase lighting upgrade. By automating the activation of stair lights based on occupancy detection, they solve a genuine daily-life safety problem, the need to navigate the staircase in darkness without first locating and operating a light switch. The safety benefits are particularly significant for elderly residents (who may have slower reaction times and less confident balance in darkness) and for night-time household navigation (getting up for a child, late returns home, emergency use). A properly configured motion sensor stair lights system activates automatically, provides exactly the right light level for safe stair navigation, and extinguishes automatically after use with zero conscious effort from the occupant.
Sensor technologies
PIR (passive infrared) sensors
PIR sensors detect infrared radiation emitted by warm bodies (humans, animals) moving within their detection zone. They are the most common and cost-effective motion sensor type for residential stair lighting applications, widely available, simple to wire and configure, and reliable when correctly positioned. Key characteristics for stair lighting design:
- Detection range: typically 3–8m, adjustable by sensitivity pot on controller
- Detection angle: typically 100–170° horizontal, 60–90° vertical
- Lux threshold (daylight suppression): adjustable 10–1000 lux — set to 30–50 lux for staircase applications to ensure the lights only activate when actually needed
- False trigger risk: low in stable environments; can false-trigger near heat sources (radiators, kitchen equipment, sunlit windows within 1m of the sensor)
- Cost: low — the most accessible technology for DIY stair lighting integration
Microwave (doppler radar) sensors
Microwave sensors emit a continuous low-power microwave field (typically at 5.8GHz or 24GHz) and detect movement by measuring the Doppler shift in the reflected signal caused by a moving body. They are significantly more sensitive than PIR sensors — capable of detecting even very slow, minimal movement (such as a hand reaching for a banister) — and critically, they can detect movement through thin non-metallic materials (wood, drywall, glass). For staircase applications where the sensor must be completely concealed within a wall cavity or inside a stair riser, microwave sensors are the only suitable technology.
Dual-sensor controllers (PIR + microwave)
Premium motion sensor controllers combine both PIR and microwave detection, requiring both sensors to trigger simultaneously before activating the lights. This dramatically reduces false activations while maintaining the high sensitivity of microwave detection. Strongly recommended for high-traffic residential staircases and all commercial installations where false triggering would be disruptive or wasteful.
Sequential step lighting: the most advanced configuration
The most sophisticated and visually impressive motion sensor stair lights configuration is the sequential step lighting system. Two sensors (one at the top of the staircase, one at the bottom) detect both the presence of an occupant and the direction of their travel. The stair LED lights then activate in a sequential wave from the direction of approach: if the occupant is approaching from the bottom, step 1 lights first, then step 2, then step 3, in a smooth, flowing wave of light that runs ahead of them up the stairs. When they reach the top, the lights extinguish sequentially behind them from the bottom up. On descent, the sequence reverses.
This system creates an experience that is simultaneously practical (the next step ahead is always illuminated before the foot reaches it) and visually spectacular (the fluid wave of light is one of the most beautiful dynamic effects achievable with architectural LED lighting). It represents the state of the art in residential staircase lighting automation as of 2026. It requires a dedicated multi-channel stair controller with individual per-step output channels, most specialist stair controllers support 4–32 individual step outputs.
Key configuration parameters
| Parameter | Typical range | Recommended setting | Effect of wrong setting |
|---|---|---|---|
| Trigger delay (motion-to-light) | 0–2 seconds | 0.0–0.3s (near-instant) | Too long: person starts descending in darkness before lights activate |
| Hold time (remain on after last motion) | 10s – 30 min | 2–3 minutes | Too short: lights extinguish mid-stair; too long: wasted energy |
| Lux threshold | 1–1000 lux | 30–50 lux | Too high: lights activate unnecessarily in daylight; too low: insufficient activation in dusk conditions |
| Sequential step interval | 0.1–3.0s per step | 0.3–0.5s | Too fast: looks mechanical; too slow: next step not lit before foot arrives |
| Standby dim level | 0–30% | 5–10% | 0%: abrupt cutoff after hold time; too high: wasted energy during occupancy periods |
| Fade-out time | 0–30 seconds | 5–10 seconds gradual fade | 0s: abrupt, institutional cutoff; looks inelegant |
Sensor placement best practices
The physical placement of motion sensors in a staircase installation critically affects detection reliability. Poorly positioned sensors are the most common cause of motion sensor stair light systems that fail to trigger reliably or trigger too frequently.
- For PIR sensors: mount at 1.8–2.2m above the landing floor level, aimed across the stair opening at a 20–45° downward angle. This positions the sensor to detect a person’s torso and upper body as they approach the staircase from the landing, the optimal target for PIR detection. Avoid mounting directly above the staircase: overhead PIR sensors are notoriously unreliable because they detect primarily horizontal movement, and a person walking directly below and toward a sensor presents minimal horizontal movement component.
- For microwave sensors: mount flush within a stair riser, within the wall plaster adjacent to the top or bottom landing, or within a hollow newel post. The microwave field penetrates the surrounding material transparently, so no direct line of sight is required. Ensure no metallic objects (pipes, reinforcement) are within 150mm of the sensor, as metal reflects microwaves and may cause detection anomalies.
- Sensor height recommendation: in all cases, mount sensors at approximately 1.5–2m above the floor of the area they are monitoring — this height maximizes the horizontal movement component presented by walking occupants, which is the primary detection vector for both PIR and microwave technologies.
LED stair lights with remote control: flexibility and convenience
LED stair lights with remote control add a dimension of deliberate, manual flexibility that complements the automatic convenience of motion sensor activation. While motion sensors handle the day-to-day automatic operation of the staircase lighting, a remote control system allows household members to manually override the automation — setting a specific brightness level for a particular purpose, changing color temperature (in tunable white systems), creating preset lighting scenes for different occasions, or simply ensuring the lights remain on for an extended period during evening entertaining when multiple people will be using the staircase repeatedly. Remote control and motion automation are complementary, not alternative, systems: the best installations incorporate both.
RF remote controllers (433MHz / 2.4GHz)
RF (Radio Frequency) remote controllers are the workhorse remote control solution for residential led staircase lighting. Operating at 433MHz or 2.4GHz, they provide reliable control range of 15–30m through walls and floors, without requiring line-of-sight to the controller. They are simple to pair (typically a single button-press learning procedure), reliable, and available with a wide range of functionality:
- Full 0–100% dimming control with smooth analogue slide or digital up/down buttons
- On/Off toggle and hold-dim functions
- 4–8 programmable memory presets for commonly-used brightness levels or scenes
- Dual-zone models that control two separate staircase zones independently (top and bottom half, or two separate staircases)
For tunable white staircase systems, RF remotes with dual-channel control allow simultaneous adjustment of brightness and color temperature, typically via a 2D touch pad or two sets of buttons on the handset.
Smart home app control
For the fullest integration of staircase LED lighting with a smart home ecosystem, Wi-Fi or Zigbee/Z-Wave enabled LED dimmer controllers replace the RF remote with full smartphone app control, voice command capability (Alexa, Google Assistant, Apple HomeKit/Siri), and programmable schedules and automations. Full details of smart home integration are provided in Section 13.
LED stair lights with motion sensor rechargeable: when and how to use them
LED stair lights with motion sensor rechargeable are a distinct product category that serves specific use cases where a wired electrical installation is genuinely impractical, either because the staircase has no accessible electrical supply, because structural modification is not permitted (rental properties, listed buildings), or because the application is temporary. These are self-contained units incorporating a rechargeable lithium-ion battery (typically 2000–5000mAh), an integrated PIR or microwave motion sensor, and an LED emitter in a single housing, the entire unit adhered to the stair riser or adjacent wall with peel-and-stick tape, with USB-C recharging.
Appropriate applications
- Rental properties: where no structural modification, drilling, or surface wiring is permitted under the tenancy agreement
- Heritage and listed buildings: where running surface cables or routing through walls would affect the historic fabric and is not permitted by the planning authority
- Outdoor garden and terrace stairs: where running mains power to a remote garden is not feasible or cost-effective
- Temporary seasonal installations: holiday lighting or event decoration on staircases where a permanent installation is not warranted
- Budget-constrained initial installation: as a temporary solution while budgeting for a permanent wired system
Honest limitations of rechargeable units
Rechargeable LED stair lights are a pragmatic solution for constrained scenarios, but homeowners and specifiers should be clear-eyed about their limitations compared to wired systems:
- Battery life: typically 2–6 weeks per charge under normal residential use (3–8 activations per day). Heavily-used staircases may require weekly recharging of all units, a significant recurring effort.
- Light output: to preserve battery life, rechargeable units are typically 50–200 lumens per unit, adequate for basic orientation but not for the full ambient illumination of a quality LED strip installation.
- Aesthetics: surface-mounted individual plastic units are conspicuous and cannot approach the visual quality of profiled LED strip systems. They make a staircase look provisionally lit, not professionally designed.
- Uniformity: individual units deplete their batteries at different rates, leading to progressively uneven brightness across the staircase as the charge cycle progresses.
For any permanent staircase in a property where installation is possible, a wired LED strip system with aluminum profiles and a correctly-sized transformer is always the correct solution. The higher initial investment is entirely justified by the superior result and zero ongoing maintenance burden.
Led stair lights carpet: special considerations
Carpeted stairs present a distinctive set of challenges for stairs led lights installation. The soft, textured, yielding surface of stair carpet makes conventional surface-mounted step-nose profiles problematic: a rigid aluminum profile mounted at the tread nose sits proud of the surrounding carpet pile, creating a potential trip hazard and an aesthetically disruptive hard edge in the carpet surface. However, carpeted stairs are among the most common staircase types in residential properties, particularly in the UK and northern Europe, and they are fully compatible with LED stair lighting when the correct approach is taken. The key is choosing a mounting method that integrates with the carpet rather than conflicting with it.
Riser-face mounting: the recommended approach for carpet stairs
The most practical and aesthetically satisfying approach for carpeted stairs is to mount the LED profile on the vertical riser face rather than on the horizontal tread surface. A slimline profile is attached to the top section of the riser face, the vertical surface visible between adjacent treads, with its light aperture facing forward and upward. The carpet covers the tread surface entirely but does not cover the riser face, so the profile is fully accessible for installation. The LED light directed from the riser face washes upward across the tread above, creating a soft, even illumination of each step. This configuration produces beautiful, glare-free illumination of every tread without any profile being in contact with or beneath the carpet.
Coordinating with the carpet fitter
For new carpet installations, the best approach is to install the LED profiles before the carpet is laid and coordinate with the carpet fitter so that the carpet is cut accurately around the profile ends at each step. This allows the most seamless integration: the carpet runs up to and just around the visible ends of each profile, while the LED aperture and diffuser face forward from the riser. For retrofit installations on existing carpet, the profile can be mounted on the exposed riser face without any carpet modification.
Under-carpet step-nose profiles: a specialist application
For applications where the step-nose position is specifically required (for maximum safety benefit) on carpeted stairs, there are specialist profiles designed to be installed beneath the carpet edge at the step nose, the profile is mounted on the tread surface at the nose, and the carpet is subsequently laid over the rear portion of the profile, with the carpet edge folded up and over the profile front face to just below the light aperture. This requires precise coordination between the profile installer and the carpet fitter and is typically specified by professional interior designers in high-end residential projects.
Professional selection guide: LightingLine.eu ecosystem 2026
Illuminating a staircase is a delicate balance between safety and architectural expression. For 2026, the trend in stair lighting shifts toward complete architectural integration, moving away from visible fixtures toward “invisible” light sources that define volumes and reveal material quality. This section consolidates the complete professional selection framework for choosing the right combination of profile, LED strip, diffuser, and color temperature for every staircase typology, based on the LightingLine.eu product ecosystem.
Tread edge lighting: safety meets design
For concrete or stone stairs where light is emitted from the edge of each step, the use of dedicated step-nose profiles is essential. These profiles must be engineered for the mechanical demands of a step-edge application: non-slip surface treatment, robust protection for the LED strip, correct downward light direction, and a clean, professional finish that complements the stair material.
Recommended profile: the ST01 series (available in black or silver finish) is specifically designed for steps. It features an integrated non-slip surface and houses the LED strip in a protected chamber that directs light downward at the optimal angle for both safety and aesthetics.
The strip choice: to avoid the “dotted” reflection on polished tread surfaces below, COB (Chip On Board) technology is mandatory. Strips 3000K 8W/m provide a perfectly continuous, seamless line of light even in the shallowest profiles, eliminating the hot-spot effect entirely.
Recessed wall lighting: architectural light cuts
In minimalist designs featuring drywall, lighting running parallel to the flight of stairs creates a “cut of light” in the wall that guides the ascent. This effect, a pure luminous line with no visible fixture, is one of the most powerful signatures of contemporary high-end residential architecture.
Recommended profile: trimless profiles like the DW07-01 (62×12mm) or the DW11-03 (72×31mm) are plastered directly into the drywall, leaving only the light emitter visible. For corner transitions between walls and ceilings, the DW01-03 angular profile ensures a clean, uninterrupted finish at the corner.
The strip choice: for wall-parallel applications where a single profile must illuminate an entire stair flight, higher lumen output is preferred. The efficiency series (exceeding 160 lm/W) provides functional, performance-grade illumination while maintaining very low energy consumption.
Under-tread lighting: floating and cantilevered stairs
Cantilevered stairs, where treads appear to float in space without visible structural support, are the most spectacular canvas for under-tread LED lighting. A groove-mounted ultra-slim profile makes the light source completely invisible while creating a “weightless” floating effect that transforms the staircase into a piece of architectural sculpture.
Recommended profile: the SL08-03 ultra-slim profile (only 8mm high) is perfect for hiding under wooden or metal treads in a 9mm groove. If tread thickness is a constraint, the SL13-02 (height only 5mm, requiring only a 6mm groove) is the solution.
The strip choice: since these strips are often viewed from below as occupants ascend the staircase, absolute brightness uniformity across all steps is required. The strip 10W/m with integrated constant current control ensures identical brightness from the first step to the last, regardless of run length or temperature.
Integrated handrail lighting
Modern staircases often integrate light directly into the handrail to provide a clean, luminous look with the highest level of safety, light at precisely the height where the occupant’s hand rests, directed down onto the treads they are about to step on.
Recommended profile: the HR01 series is a professional structural aluminum handrail designed specifically to house LED strips within its body. It shapes the light toward the steps while shielding the occupant’s eyes from any direct glare from the LED source.
Selecting the correct Color Temperature (CCT)
The choice of color temperature radically changes the perception of staircase materials and the emotional register of the space:
- 2700K (Extra Warm White): best for domestic settings with wood or warm-toned stones. Creates a relaxing, cozy, luxury atmosphere that complements traditional and rustic interiors.
- 3000K (Warm White): the “Gold Standard” for residential architecture. Clean, inviting light that works beautifully with most modern materials and interior styles.
- 4000K (Natural White): preferred for commercial spaces, offices, or technical stairs. Enhances contrast, maximizes visibility, and suits industrial-aesthetic contemporary interiors.
- Tunable White (CCT): using strips tunable allows the staircase to adapt its light throughout the day (cool and stimulating in the morning, warm and relaxing at night) following the human circadian rhythm for measurable health benefits.
Pro tip for 2026 ultra-premium installations
Complete LightingLine.eu product reference: stairs LED lights 2026
| Application | Profile | LED Strip | Diffuser | CCT Options | Notes |
|---|---|---|---|---|---|
| Tread-edge (standard residential) | ST01 black or silver | 8W/m COB | Frosted FS | 3000K / 4000K | Best-value residential spec |
| Tread-edge (premium, no brightness variation) | ST01 | 10W/m COB CC | Frosted FS | 2700K / 3000K / 4000K | For runs 8m+ or critical uniformity |
| Recessed wall (standard residential) | DW07-01 62×12mm | Fx2 HE 160+ lm/W | Frosted FS or Opaque FM | 2700K / 3000K / 4000K | New construction or major renovation |
| Recessed wall (commercial/high output) | DW11-03 72×31mm | Fx2 HE | Frosted FS or Opal | 3000K / 4000K / 6500K | Commercial compliance use |
| Corner wall-ceiling transition | DW01-03 | Same as wall profile strip | Match wall profile | As per wall spec | Use for continuous line at landing |
| Under-tread floating (standard thickness) | SL08-03 8mm H | 7W/m PCB 3mm | Frosted FS mandatory | 2700K / 3000K / 4000K | Requires 9mm groove in tread soffit |
| Under-tread floating (thin tread) | SL13-02 5mm H | 7W/m PCB 3mm | Frosted FS mandatory | 2700K / 3000K / 4000K | Only 6mm groove required |
| Integrated handrail | HR01 | Compact COB or 10mm SMD | Frosted FS or Clear CL | 2700K / 3000K | Structural handrail; meet EN 1991 |
| Tunable white / circadian | Any compatible profile above | F52-CCT-240D22 | Frosted FS | 2700K–6500K tunable | DALI, DMX, or Zigbee controller required |
| Ultra-premium / high CRI / natural materials | Any compatible profile above | Sunlike Ra97+ | Opaque FM mandatory | 2700K / 3000K | Museum-grade CRI; luxury residential |
Stair lighting design trends 2026: what is defining the next era
The world of stair lighting is in constant evolution, and 2026 marks a decisive turning point. After years of increasingly refined products, we are now witnessing a paradigm shift: light is no longer an add-on feature but a core structural element of staircase architecture. Interior architects, property developers, and discerning homeowners are no longer asking “where do I put the light?” but rather “how do I make the light disappear into the architecture while maximising its impact?” This section explores the most influential trends shaping stair lighting installations in 2026, with particular focus on the product technologies and profile solutions that make each trend achievable.
The rise of invisible light sources
The dominant aesthetic of 2026 is architectural invisibility. The light fitting itself should not be seen; only its effect should be perceived. This is achieved through deep-recessed trimless profiles that are plastered flush with drywall, under-tread channels that vanish beneath floating steps, and step-nose profiles whose slim geometry blends seamlessly with stone or concrete risers.
For this reason, the PR-DW07-01 trimless drywall profile has become one of the most requested products among architects working on high-end residential projects. Its 62×12 mm cross-section allows it to be plastered directly into a partition wall, leaving only the diffuser flush with the surface. When the LED strip is on, a perfectly clean, uninterrupted cut of light appears; when it is off, the wall appears uniform and unmarked.
Similarly, ultra-slim under-tread profiles like the PR-SL13-02 (5 mm high) can be fitted into the narrowest of grooves routed beneath wooden or steel treads, making the entire light source invisible from both above and below until illuminated.
Key design principle for 2026: every profile specification decision should begin with the question — “will this profile be visible when the lights are off?” If the answer is yes, explore trimless or concealed alternatives before proceeding.
Warm tones and biophilic lighting
There is a measurable market shift toward 2700K and 3000K colour temperatures in residential stair lighting. Consumer research conducted across European markets in 2025 found that 68% of homeowners who renovated stair lighting chose warm white (2700K–3000K) over neutral or cool tones, citing comfort, relaxation, and visual warmth as primary motivators.
This aligns with the broader biophilic design movement, which seeks to connect interior spaces with natural rhythms. Warm-toned stair lighting at low intensity — particularly when activated by motion sensors during nighttime hours — mimics the amber glow of firelight or candlelight, which is biologically associated with rest and reduced cortisol production.
For projects requiring the highest possible quality of warm-toned light rendering, the Sunlike Ra>97 series achieves a spectral distribution genuinely close to natural sunlight. When this technology is combined with the 2700K or 3000K setting, it renders warm materials (aged oak, travertine marble, terracotta tiles) with extraordinary depth and accuracy that standard LED strips cannot replicate.
Tunable white and circadian-responsive staircases
The most technically advanced trend of 2026 is the implementation of tunable white (CCT) systems on staircases that automatically shift colour temperature throughout the day. In the morning, the staircase emits 4000K–5000K cool-white light that supports alertness and concentration. During the evening hours, it transitions gradually to 2700K warm amber, supporting melatonin production and preparing the body for sleep.
This is no longer a luxury reserved for wellness spas and hotels. Tunable white strips make this technology accessible for residential projects. When paired with a quality DALI or Zigbee controller, the entire colour temperature transition can be programmed on a schedule, or triggered automatically by time-of-day logic in a smart home system.
The circadian staircase concept is becoming a key selling point for architects pitching wellness-focused residential designs to clients who prioritise sleep quality and overall health.
Sequential and choreographic stair lighting
Motion-activated sequential lighting (where each step illuminates progressively as the user ascends or descends) has evolved from a novelty to a design standard in premium residential projects. The technology behind sequential activation relies on addressable LED controllers or dedicated stair lighting controllers that detect foot traffic and illuminate steps one by one in a smooth wave.
In 2026, the trend has evolved further: choreographic lighting introduces more complex patterns such as fade-in sequences that travel at different speeds depending on time of day, colour temperature shifts mid-sequence, and even subtle animations triggered by smart home events (e.g., a staircase that slowly brightens when the front door is unlocked, guiding occupants safely upstairs).
Achieving sequential lighting requires individual addressability of each step’s LED channel. This is typically accomplished using dedicated stair lighting controllers with per-channel output, each output drives the LED strip on one step independently. For best results, use COB strips on each step to ensure completely uniform illumination of each tread rather than visible LED points.
Outdoor and entrance stair lighting
Garden steps, exterior terraces, and entrance staircases are increasingly being treated with the same sophistication as interior installations. Outdoor stair lighting in 2026 combines IP65-rated profiles, warm-toned COB strips, and motion sensor activation to create welcoming, safe pathways that also serve as architectural landscape elements after dark.
For outdoor applications, profile selection must consider moisture resistance, thermal expansion, and UV exposure. Anodised aluminium profiles rated for outdoor use are essential; all electrical connections must be made with waterproof connectors and housed in sealed junction boxes. The LED strip itself should carry a minimum IP65 rating (fully sealed with silicone encapsulation) when installed in profiles directly exposed to the elements.
| 2026 trend | Key technology | Recommended product | Primary audience |
|---|---|---|---|
| Invisible architecture | Trimless profiles | DW07-01 | Architects, luxury residential |
| Biophilic warm lighting | Sunlike Ra>97 + 2700K | Sunlike led | Homeowners, wellness spaces |
| Tunable white / circadian | CCT strips + DALI controller | F52-CCT-240D22 | Smart home enthusiasts |
| Sequential choreographic | Multi-channel stair controller | COB strips | Premium residential, hotels |
| Outdoor entrance stairs | IP65 COB + motion sensor | IP65 COB series | Villas, commercial entrance |
Smart home and domotics integration for LED stair lights
One of the most frequently asked questions by modern homeowners planning a stair lighting installation is: if it is possible integrate stair lights with smart home system. The answer in 2026 is an unequivocal yes and the range of integration possibilities extends far beyond simple on/off switching. This section provides a thorough examination of smart home protocols, automation scenarios, and the practical steps required to integrate LED stair lights into modern home automation ecosystems.
Smart stair lighting is no longer the domain of technology enthusiasts alone. The proliferation of affordable smart home platforms, from Amazon Alexa and Google Home to Apple HomeKit and dedicated KNX or DALI systems, means that even budget-conscious homeowners can achieve intelligent stair lighting with minimal additional investment over a standard installation.
Smart home protocols: which system is right for you?
Different smart home protocols offer different capabilities, costs, and levels of complexity. Understanding the landscape is essential before selecting components for a smart stair lighting system.
| Protocol | Communication | Best For | Integration level | Cost range |
|---|---|---|---|---|
| Zigbee | Wireless mesh | Residential smart home | Excellent (Alexa, Google, Apple) | Low–medium |
| Z-Wave | Wireless mesh | Residential, security focus | Very good | Medium |
| DALI | Wired bus | Commercial, architectural | Professional, scene-based | Medium–high |
| KNX | Wired bus | Premium residential, commercial | Maximum (full building automation) | High |
| Matter | IP-based, wireless | Universal cross-platform | Excellent (cross-platform) | Low–medium |
| Wi-Fi (direct) | Wi-Fi | Simple DIY installations | Good (app + voice) | Low |
| RF (proprietary) | Radio frequency | Standalone installations | Limited (no broader ecosystem) | Very low |
For most residential projects in 2026, the Matter protocol represents the best long-term investment. Supported by Apple, Google, Amazon, and Samsung simultaneously, it eliminates the fragmentation that has historically plagued smart home installations and ensures that your stair lighting system will remain compatible with future platform updates.
Automation scenario 1: night safety mode
The most universally valued smart stair lighting automation is Night Safety Mode. In this scenario, the stair lighting system operates as follows:
Between 10 PM and 7 AM, the stair lights are set to standby (completely off). When a motion sensor detects movement on or near the staircase, the lights activate at 20–30% brightness with a warm 2700K colour temperature, bright enough for safe navigation, but dim enough not to disturb sleep or trigger full wakefulness. After a configurable timeout (typically 90–120 seconds with no further motion detection), the lights fade smoothly back to off rather than cutting abruptly.
This simple automation dramatically reduces the risk of falls during nighttime bathroom trips — a significant safety concern, particularly in households with elderly occupants or young children. According to the European Home Safety Alliance, falls on stairs account for approximately 32% of all home injury incidents in adults over 65. Adequate night lighting reduces this risk substantially.
Automation scenario 2: welcome home sequence
When integrated with a smart door lock or presence detection system, stair lighting can participate in a welcome home sequence. When the front door is unlocked (via key, code, or smartphone), the smart home system triggers a lighting scene that gradually illuminates the entrance hall and staircase over 5–10 seconds, at full brightness and a comfortable 3000K colour temperature. This eliminates the need to find a light switch in a dark hallway and creates an immediately hospitable atmosphere upon entering the home.
Automation scenario 3: leave home / security mode
In Security Mode, stair lighting can be used as a deterrent. Random activation sequences at varied intervals during the homeowner’s absence create the impression of occupancy. This function is typically managed by the broader smart home security system and requires the stair lighting controller to accept commands from the security hub.
Automation scenario 4: circadian rhythm schedule
When tunable white strips are installed, the staircase can participate in the home’s circadian lighting schedule. A typical daily programme might be:
6:00–9:00 AM: 4000K at 80% (energising morning light for a productive start to the day. 9:00 AM–6:00 PM: 3500K at 100%) balanced daylight-neutral tone for daytime activities. 6:00–10:00 PM: 3000K at 70%, warm evening transition. 10:00 PM–6:00 AM: 2700K at 15% (motion-activated only), deep amber night mode for minimal sleep disruption.
This schedule can be programmed once in the smart home controller and then left to run automatically year-round, adjusting automatically for seasonal daylight changes when integrated with a sunrise/sunset calendar function.
Voice control integration
Voice control via Amazon Alexa, Google Assistant, or Apple Siri adds a layer of convenience that users consistently rate highly in home automation satisfaction surveys. Common stair lighting voice commands include: “Alexa, set stair lights to 50%,” “Hey Google, activate stair night mode,” “Siri, turn on the staircase.”
For voice control to function, the stair lighting controller must either natively support the relevant smart assistant protocol or be connected through a hub (such as Amazon Echo, Google Nest Hub, or Apple HomePod) that bridges the gap. Most modern Zigbee or Matter controllers achieve this automatically through the main smart home hub.
Regulations, safety standards, and building codes for stair lighting
Stair lighting is not only a matter of aesthetics and comfort, it is subject to specific regulatory requirements in most jurisdictions. Understanding and complying with applicable lighting standards is a legal and ethical obligation, particularly in commercial premises, multi-unit residential buildings, and any space accessible to the public. This section provides a comprehensive overview of the key standards, minimum requirements, and best practices for compliant stair lighting installations across both residential and commercial contexts.
It is important to note that specific regulations vary by country, region, and building type. The information provided here is intended as a general professional guide and should always be supplemented by consultation with a qualified electrician or building inspector familiar with local codes in your specific jurisdiction.
Minimum illuminance requirements
The fundamental regulatory measure for stair lighting is illuminance, measured in lux (lx). Illuminance describes how much luminous flux falls on a surface per unit area. The following table summarises typical minimum requirements across major regulatory frameworks:
| Application | Minimum lux (typical) | Recommended lux | Relevant standard |
|---|---|---|---|
| Domestic staircase (UK) | 50 lx at tread surface | 100–150 lx | BS 5266 / Approved Doc M |
| Commercial staircase (EU) | 100 lx (EN 12464-1) | 150–300 lx | EN 12464-1 |
| Emergency stair lighting | 1 lx minimum (centreline) | 5–10 lx | EN 1838 / BS 5266 |
| Public building stairwell (EU) | 100 lx | 200–500 lx | EN 12464-1, local building codes |
| Outdoor steps (commercial) | 20–50 lx | 50–100 lx | EN 13201 (road lighting) |
UK-specific requirements: part P and BS 5266
In the United Kingdom, any electrical installation in a domestic dwelling must comply with Part P of the Building Regulations, which requires that notifiable electrical work be carried out by a competent person (typically a registered electrician) or notified to local building control. Low-voltage LED lighting installations using standard wiring methods are generally notifiable work when they involve new circuits or significant extensions to existing circuits.
BS 5266 governs emergency lighting in non-domestic premises. Stairs that form part of an escape route in a commercial, hospitality, or public building must be equipped with maintained or non-maintained emergency lighting capable of providing the minimum 1 lx illuminance on the centreline of the escape route for a minimum duration (typically 1–3 hours depending on building category).
Anti-slip requirements and the role of tread-edge lighting
Beyond pure illuminance levels, building regulations in many European countries specify requirements for tread visibility and contrast. Steps in public buildings are typically required to have visually contrasting nosings (tread edges) to assist people with visual impairments in identifying the edge of each step.
LED tread-edge lighting serves a dual function: it provides the required visual contrast under low-ambient-light conditions, and it delivers direct illuminance to the tread surface where it is most needed for safe foot placement. Profiles like the ST01 series with non-slip surface treatments address both the lighting and the anti-slip tread requirements in a single integrated product, making them an efficient compliance solution for commercial staircase renovation projects.
IP ratings and bathroom/outdoor zones
When stair lighting is installed in wet or damp locations, such as staircases within swimming pool areas, basement stairs exposed to moisture, or outdoor garden steps, the IP (Ingress Protection) rating of all components must match the environmental requirements of the installation zone. The relevant European standard is EN 60529.
As a general guide: IP44 is suitable for indoor damp locations (protected against splash from any direction), IP54 is recommended for semi-exposed outdoor locations, IP65 (dust-tight + protected against low-pressure water jets) is the minimum for fully exposed outdoor stair installations, IP67 or IP68 is required for installations subject to temporary or continuous immersion (e.g., ground-level recessed step lights in garden paths where pooling water is possible).
Low-voltage safety: why 24V DC systems are preferred
LED strip lighting for stairs is almost universally powered by 24V DC (or 12V DC) via a suitable LED driver. This low-voltage classification is significant from a safety perspective: SELV (Safety Extra-Low Voltage) systems operating below 50V DC do not pose the same electrocution risk as mains-voltage systems, which is particularly important when installing lighting in locations where hands and feet may come into contact with the fixture (such as tread-edge profiles).
Despite operating at low voltage, the power supply (LED driver) itself operates at mains voltage and must be installed by a qualified electrician in compliance with local wiring regulations. The driver should be housed in a ventilated, accessible location (such as within a stair riser cabinet or above-ceiling void) where it can be serviced or replaced without major dismantling.
Cost analysis and budget planning for LED stair lighting
One of the most practical questions posed by homeowners and project managers is how much does it cost to install LED stair lights. The answer depends on a wide range of variables including the number of steps, choice of profile system, LED strip quality, control system sophistication, and whether professional installation is required. This section provides a transparent, itemised cost analysis framework to help you budget accurately for a stair lighting project of any scale.
It is important to approach stair lighting as a long-term investment rather than a one-time expenditure. High-quality LED strip lighting systems have operational lifespans of 35,000–50,000 hours, equivalent to 10–15 years of typical residential use. When amortised over this period, the per-year cost of a quality installation is modest, and the energy savings over an equivalent halogen or fluorescent system are substantial.
Component cost breakdown
| Component | Budget option | Mid-range | Premium | Notes |
|---|---|---|---|---|
| LED strip (per metre) | €3–8 | €10–20 | €25–50+ | COB/Sunlike at premium end |
| Aluminium profile (per metre) | €4–8 | €10–18 | €20–40 | Trimless profiles at premium |
| LED driver (per installation) | €15–30 | €35–60 | €70–150 | Dimmable/constant current premium |
| Motion sensor controller | €20–40 | €45–80 | €100–200 | Multi-channel sequential at top |
| Smart home controller (Zigbee/Matter) | N/A | €30–60 | €80–300 | DALI interface at premium end |
| Diffusers and end caps (per profile) | €2–5 | €5–10 | €10–20 | Opaque FM for hotspot elimination |
| Professional installation (per step) | €30–50 | €60–100 | €100–200+ | Trimless plastering increases cost |
| Wiring and cabling (total run) | €20–50 | €50–100 | €100–250 | Depends on cable routing complexity |
Total project cost estimates
To provide practical reference figures, here are total project cost estimates for three typical residential stair lighting scenarios (staircase of 12 steps, single-family home, including materials and professional installation):
Budget installation (LED strip + basic surface-mount profile + simple sensor controller): approximately €350–650 total. This provides basic step-edge illumination with motion-activated switching and decent visual results, but without smart home integration or premium strip quality.
Mid-range installation (COB strip + quality aluminium profile + dimmable driver + motion sensor controller): approximately €800–1,400 total. This achieves professional-quality results with uniform light output, smooth dimming capability, and reliable automatic operation.
Premium installation (Sunlike COB strip + trimless drywall profile + DALI driver + smart home integration + sequential controller): approximately €2,000–4,000+ total. This represents a full architectural lighting design with museum-grade colour rendering, complete smart home integration, sequential choreographic effects, and invisible fixture integration.
Energy cost savings: ROI calculation
A key justification for investing in LED stair lighting, particularly when replacing older halogen or incandescent step lights, is the energy cost saving. Consider this example calculation:
Scenario: 12-step staircase, previously lit by 12 × 20W halogen recessed lights. Replaced by 12 × 5W LED COB strip sections. Assumed usage: 4 hours per day.
Old system: 12 × 20W × 4h × 365 days = 350.4 kWh/year. New LED system: 12 × 5W × 4h × 365 days = 87.6 kWh/year. Annual energy saving: 262.8 kWh. At an average EU electricity tariff of €0.28/kWh (2025 average), this represents a saving of approximately €73.60 per year.
For a mid-range installation costing €1,100, the simple payback period is approximately 15 years on energy savings alone. However, this does not account for the avoided replacement cost of halogen bulbs (typically requiring replacement every 2,000 hours) or the reduced maintenance burden. When these factors are included, the true payback period is typically 6–10 years, after which the installation generates net positive financial returns.
For the entrepreneur audience seeking long-term investment value: LED stair lighting is one of the few home improvement investments that generates a measurable financial return while simultaneously enhancing property value, safety, and aesthetic appeal.
Maintenance, lifespan, and troubleshooting LED stair lights
A well-designed LED stair lighting installation is remarkably low-maintenance by nature. Unlike traditional halogen or fluorescent lighting systems that require regular bulb replacement, quality LED strips paired with appropriate drivers can operate for 35,000 to 50,000+ hours before significant lumen depreciation occurs. In practical terms, this means that a stair lighting installation made today with premium components may not require any meaningful maintenance until the mid-2030s or beyond. However, understanding the factors that influence LED lifespan, recognising early warning signs of component degradation, and knowing how to diagnose and resolve common issues will serve every installer and homeowner well over the long operational life of their system.
Understanding LED lifespan: L70, L80, and L90 ratings
LED lifespan is not simply an on/off threshold, LEDs dim gradually over time rather than burning out suddenly. The industry standard for expressing lifespan is the Lx rating, which defines the number of hours until the light output has depreciated to a stated percentage of its original value:
- L90 means the strip maintains at least 90% of its original brightness after the stated hours.
- L80 (most common in residential specifications) means 80% brightness retention.
- L70 (the traditional minimum acceptable standard) means 70% brightness retention.
A strip rated at L80/50,000h will still emit 80% of its original light output after 50,000 hours of use, a genuinely impressive performance that means most residential stair installations will never require strip replacement during the typical occupancy period.
The critical role of thermal management
Heat is the primary enemy of LED lifespan.
LEDs generate heat at the chip junction, and if this heat is not conducted away efficiently, junction temperatures rise, accelerating lumen depreciation and increasing the risk of premature driver failure. This is precisely why the choice of aluminium profile is not merely aesthetic, it is a critical thermal management decision.
The heat sink cross-section of the aluminium profile determines how effectively waste heat is conducted from the LED strip to the ambient environment. Larger profiles with more aluminium mass provide better heat dissipation. When installing high-power strips (above 10W/m), always verify that the selected profile provides sufficient heat sink capacity. As a rule of thumb, profiles with a cross-section of less than 8mm height (such as the ultra-slim SL13-02) should only be used with strips rated at 5W/m or below to prevent thermal overload.
For the highest-power applications (12–15W/m strips), use profiles with substantial heat sink fins (typically 20–30mm+ height) or include additional thermal interface material (thermal tape or paste) between the strip’s backing and the profile channel to maximise thermal contact.
LED driver lifespan and maintenance
In most cases, the LED driver (power supply) will be the first component to require replacement in a well-designed stair lighting system. Quality LED drivers typically carry lifespan ratings of 30,000–50,000 hours (MTBF — Mean Time Between Failures), but driver longevity is highly sensitive to operating temperature and input voltage stability.
To maximise driver lifespan: install the driver in a ventilated location (never in a sealed, unventilated enclosure), avoid overloading the driver above 80% of its rated maximum load, use drivers with appropriate input voltage tolerance for your local grid (typically ±10% is adequate for European installations), and select drivers with built-in protection against overload, short circuit, and overtemperature.
Troubleshooting common LED stair lighting problems
| Symptom | Most likely cause | Diagnosis | Solution |
|---|---|---|---|
| Strip doesn’t light at all | No power / reversed polarity | Check driver output voltage, verify +/– polarity at connection | Correct power supply or reverse connector |
| Only part of the strip lights up | Poor solder joint or connector issue at cut point | Check each solder joint and connector with multimeter | Resolder or replace connector at fault point |
| Strip dims along its length | Voltage drop (strip too long, insufficient wire gauge) | Measure voltage at strip end vs. start >0.5V drop is problematic | Feed from both ends, reduce run length, increase wire gauge |
| Flickering / flashing | Incompatible dimmer; loose connection; driver instability | Test without dimmer, check all connections, test with alternative driver | Use LED-compatible dimmer, reseat connections, replace driver |
| Warm colour in some segments, cool in others | Mixed strip batches with different CCT tolerance | Check strip reel codes, compare physical markings | Replace all strips from same production batch |
| Motion sensor not triggering | Sensor range/sensitivity too low; obstruction | Walk test at various distances, check for obstructions in sensor FOV | Adjust sensitivity/range settings, reposition sensor |
| Lights stay on permanently | Sensor in “always on” override; sensitivity too high | Check controller mode, reduce sensitivity setting | Reduce sensitivity, verify no constant IR source in sensor view |
| Visible hotspots / dots through diffuser | Insufficient diffuser opacity; LED spacing too wide | Inspect diffuser type (clear vs. opal) | Replace with opal (FM) diffuser, switch to COB strip |
| Overheating / burning smell | Overloaded driver; insufficient thermal management | Check driver load vs. rating, check profile heat | Reduce load, improve ventilation, use larger profile |
Preventive maintenance schedule
While LED stair lighting requires minimal active maintenance, a brief annual inspection will catch small issues before they become problems…
Annual check (15 minutes): visually inspect all profile end caps and diffusers for dust accumulation, physical damage, or discolouration. Clean profiles with a soft dry cloth (avoid abrasive cleaners). Verify all connections are secure. Test motion sensor function by walking the staircase and confirming correct activation. Check that dimming (if fitted) operates smoothly across its full range.
Every 3–5 years: test driver output voltage under load with a multimeter and compare to rated specification. If output has drifted more than 5% from specification, consider preemptive driver replacement before failure occurs. Inspect solder joints at strip cut points for any signs of oxidation or cold jointing.
The eight most common stair lighting mistakes — and how to avoid them
Even experienced DIY enthusiasts and professional installers occasionally make mistakes in stair lighting projects that result in suboptimal visual results, early component failure, or in the worst case, safety hazards. Understanding the most frequently occurring errors is the single most effective way to ensure your installation achieves the best possible outcome on the first attempt. This section documents the eight most common mistakes in LED stair lighting projects, explaining why each error occurs and providing concrete guidance on how to avoid it.
Mistake 1: choosing the wrong strip type (SMD instead of COB)
Perhaps the most visually impactful mistake is selecting a standard SMD LED strip (with discrete, individually visible LEDs spaced at regular intervals) for stair tread-edge or under-tread lighting applications where a uniform line of light is expected. When an SMD strip is used, each individual LED chip is visible as a distinct bright point, creating a “dotted” effect rather than a smooth continuous line. This effect is especially noticeable when the strip is reflected in polished materials like marble, large-format tiles, or lacquered wood.
The solution is straightforward: always use COB (Chip On Board) LED strips for stair lighting applications. COB technology places dozens of micro-LEDs per centimetre in a continuous phosphor coating, creating a genuinely seamless line of light with no visible individual points. COB strips is specifically designed for this application and delivers flawless uniformity even in the shallowest of profiles.
Mistake 2: underestimating voltage drop on long runs
Voltage drop is the silent killer of LED stair lighting performance. On long cable runs or extended strip lengths, the resistance of the copper conductor causes the supply voltage to fall below its nominal value by the time it reaches the far end of the strip. The result is that the LEDs at the far end of the strip are noticeably dimmer than those at the feed point — an effect that is especially jarring on staircases where each step should be equally illuminated.
Prevention: calculate expected voltage drop before installation using the formula V_drop = 2 × R × I, where R is the resistance of the supply cable per unit length (Ω/m) and I is the total current draw of the connected strip. For runs exceeding 5 metres, feed from both ends using a T-connection from the driver, or use a constant-current driver that actively compensates for resistive losses. For critical applications, the constant current strip provides integrated current regulation that ensures identical brightness across all connected steps regardless of cable length.
Mistake 3: installing the wrong profile for the application
A profile that is perfectly suited to one stair type can be entirely wrong for another. Installing a flat surface-mount profile on a cantilevered floating staircase (where the profile would be fully visible from below the tread) creates an untidy appearance. Conversely, specifying an ultra-slim under-tread profile for a heavy stone step where the profile needs to provide a non-slip nosing edge is functionally inappropriate.
Always match the profile specification to the stair construction type and the viewing angles of the installation.
Mistake 4: using an inadequate driver (wrong wattage or type)
LED drivers that are undersized for the connected strip load will overheat, operate in protection mode (causing flickering), or fail prematurely. Drivers that are grossly oversized (e.g., a 200W driver powering a 20W strip) may operate inefficiently at very low load, reducing power factor and potentially causing LED flicker due to the driver not regulating correctly at the low end of its output range.
The correct sizing rule is to calculate the total strip wattage and multiply by 1.25 to arrive at the minimum recommended driver rating. This 25% headroom prevents thermal stress on the driver. Always verify that the driver output type (constant voltage or constant current) matches the strip specification, using a constant-voltage driver with a strip that requires constant-current operation will typically result in immediately visible brightness variations across the strip length.
Mistake 5: neglecting diffuser selection
Many installers focus intensively on strip and profile selection, then specify the cheapest available diffuser as an afterthought. In reality, diffuser choice has a profound impact on the final visual quality of the installation. A clear (transparent) diffuser provides the highest light output but does nothing to eliminate visible LED chips or hotspots from COB strips. A frosted (FS) diffuser softens the light and reduces hotspots but reduces lumen output by approximately 15–20%. An opaque (FM — fully matt) diffuser completely eliminates any visible LED structure, producing a perfectly uniform light-emitting surface, but reduces output by 25–35%.
For stair installations where the strip will be viewed at close range or reflected in polished surfaces, always specify an FM (opaque) diffuser. The slight reduction in lumen output is typically inconsequential given that stair lighting is rarely required at maximum possible intensity.
Mistake 6: incorrect motion sensor placement
A motion sensor placed at the wrong location results in either delayed activation (dangerous if the staircase is dark when the user begins to ascend) or constant false triggering (annoying if pets, HVAC airflow, or other sources of movement repeatedly activate the lights). The most common placement error is mounting the sensor at the top of the staircase only, which means the sensor does not detect a user at the bottom of the stairs until they are already mid-ascent.
The correct approach is to install sensors at both the top and the bottom of the staircase, positioned to detect movement before the user reaches the first step. For sequential stair lighting systems, additional intermediate sensors may be required depending on the controller architecture.
Mistake 7: poor waterproofing of connections in outdoor or damp installations
Exposed solder joints, standard (non-waterproof) strip connectors, and non-IP-rated junction boxes in outdoor or damp stair installations are a recipe for premature failure. Moisture ingress at electrical connections causes oxidation, increased resistance, and eventual open-circuit failures, often occurring within the first winter season of an outdoor installation.
All connections in outdoor or damp-location stair lighting installations must use waterproof connectors rated IP65 or above, be sealed with self-amalgamating tape, or be enclosed in IP-rated junction boxes filled with silicone sealant. The LED strip itself should carry at minimum an IP65 rating (fully encapsulated in silicone).
Mistake 8: forgetting cable management and future serviceability
An installation that is beautifully executed but impossible to service without demolishing structural elements will cause significant problems down the line. This is particularly relevant for trimless drywall profiles plastered into walls, once the plaster is applied, the strip cannot be replaced without cutting into the wall surface.
Always design for serviceability from the outset. Use removable diffusers that allow strip access without profile removal. Route supply cables in conduit rather than embedding them directly in plaster, so they can be replaced without opening walls. For trimless profiles, ensure that the LED strip can be withdrawn from the profile channel from one end if needed, before the end caps are permanently sealed.
Frequently Asked Questions about LED stair lights
The following FAQ section addresses the most commonly posed questions about LED stair lighting, gathered from homeowners, architects, and property developers. Each question and answer is designed to provide immediately actionable information. Click each question to expand the answer.
Are stair lights worth it? What are the real benefits of installing LED stair lights?Absolutely. LED stair lights provide measurable benefits across four distinct dimensions. Safety: adequately lit stairs reduce the risk of falls, which are the leading cause of home injury in the EU and UK. Studies by the European Home Safety Alliance consistently show that improved stair lighting is among the most cost-effective home safety interventions. Aesthetic value: well-designed stair lighting transforms one of the most functional areas of the home into an architectural statement, significantly enhancing the perceived quality and modernity of interior spaces. Property value: estate agents and interior designers widely report that quality stair lighting is a positive differentiator in residential property valuations. Energy efficiency: modern LED stair lights consume a fraction of the energy of their halogen predecessors while providing equal or superior light output, with lifespans 10–20× longer. For all these reasons, stair lighting represents one of the highest-return lighting investments in the home. |
What is the best type of LED light for stairs?For most stair lighting applications, COB (Chip On Board) LED strips housed within purpose-designed aluminium profiles represent the optimal solution. COB strips provide a perfectly uniform, seamless line of light without visible LED points — critical for achieving professional results on reflective surfaces. For step-nose applications, the ST01 series profiles with integrated COB strips are ideal. For under-tread floating stair installations, the ultra-slim PR-SL08-03 profile (8mm height) provides excellent results. The strip choice should match the application: warm white (2700K–3000K) for domestic settings, neutral (3500K–4000K) for commercial installations, and Tunable White for smart home environments where circadian lighting control is desired. |
How do you install LED strip lights on stairs?Installing LED strip lights on stairs involves six principal steps: 1. Plan and measure: determine the profile type appropriate for your stair construction, measure total strip length required, and calculate power supply sizing. 2. Prepare the surface: clean and dry all surfaces where profiles will be mounted, rout channels where necessary. 3. Install profiles: mount aluminium profiles using appropriate fixings (screws for surface-mount, adhesive for under-tread, plaster/filler for trimless). 4. Cut and connect strips: cut LED strips only at designated cut marks; connect with proper solder or solderless connectors; verify polarity. 5. Wire and power: route supply cable to LED driver; connect motion sensor or smart controller if applicable; power the system and test. 6. Fit diffusers and end caps: fit appropriate diffuser type and close profile ends. For detailed step-by-step guidance, refer to Section 6 of this guide. |
How bright should stair lights be?Brightness requirements depend on application context. For domestic night safety lighting, 30–80 lux at the tread surface is typically sufficient, enough for safe navigation without disturbing occupants’ sleep. For ambient stair lighting in residential settings, 100–150 lux provides comfortable general illumination. For commercial staircases, EN 12464-1 specifies a minimum of 100 lux, with 150–300 lux recommended for heavily trafficked areas. In practical strip selection terms, an 8W/m COB strip installed in a step-nose profile typically delivers approximately 100–150 lux at the tread surface from 30cm mounting height — well within the residential comfort range. For night safety mode, a dimmer set to 20–30% will reduce this to the ideal 30–50 lux range. |
How do I hide LED strip lights on stairs?Concealing LED strips on stairs while still allowing their light to perform its intended function is achieved through proper profile selection and mounting strategy. For tread-edge applications, the ST01 step-nose profile hides the strip within an integrated chamber while projecting light downward onto the tread below. For under-tread applications on floating stairs, the SL13-02 ultra-slim profile (5mm) fits into a routed groove under the tread, completely hiding the strip from normal viewing angles. For wall-integrated architectural designs, trimless profiles like the DW07-01 are plastered flush into drywall, leaving only the diffuser surface visible. In all cases, an FM (opaque) diffuser hides the LED structure itself, presenting only a uniform glowing surface. |
What are the best LED stair lights with motion sensors?The best motion-sensor stair lighting systems combine a dedicated stair lighting controller with PIR or dual-technology (PIR + microwave) sensors at both the top and bottom of the staircase. Multi-channel controllers enable sequential step-by-step activation — each step illuminates progressively as the user ascends or descends, creating a sophisticated and visually impressive automatic lighting effect. Key specification requirements for a quality motion sensor system: sensitivity adjustable from approximately 1 to 8 metres detection range; time-out delay adjustable from 10 seconds to several minutes; ambient light threshold (lux cutoff) to prevent activation in daylight; smooth dimming at activation and deactivation rather than hard on/off switching; and 12 or more independent output channels for per-step control. PIR sensors detect body heat and are ideal for domestic environments. Microwave (radar) sensors offer faster response and can detect movement through walls, making them better suited to areas where the sensor cannot have direct line-of-sight to the staircase. |
Can LED stair lights be controlled with a smartphone app or voice assistant?Yes — smart home integration is fully achievable with modern LED stair lighting systems. The key requirement is a smart-compatible LED controller that supports a widely used protocol such as Zigbee, Z-Wave, Wi-Fi, or the new cross-platform Matter standard. Once such a controller is installed, the stair lighting can be controlled via dedicated smartphone apps, paired with major smart home platforms (Amazon Alexa, Google Home, Apple HomeKit), and commanded by voice assistants. Typical smart functions include on/off switching, brightness dimming (0–100%), colour temperature adjustment (if tunable white strips are installed), scene scheduling, circadian rhythm programming, and integration with broader home automation routines (such as “Good Night” scenes that dim all lights and activate night safety mode on the staircase). For the most reliable and future-proof smart integration, choose a Matter-compatible controller — Matter is supported by all major platforms simultaneously, eliminating compatibility concerns. |
How much does it cost to install stair LED lights?Total installation costs for a 12-step residential staircase range from approximately €350 for a basic LED strip system with simple motion activation, to €4,000+ for a premium architectural installation with Sunlike high-CRI strips, trimless drywall profiles, smart home integration, and sequential choreographic effects. The largest single cost variable is typically professional installation labour, which varies significantly by country and by the complexity of the profile system selected. Trimless profiles requiring plastering work command a significant labour premium over surface-mount installations. Materials typically represent 40–60% of total project cost, with labour comprising the remainder. A mid-range installation using COB strips, quality aluminium profiles, and a dimmable sensor controller will typically cost €800–1,400 for a 12-step staircase including professional installation. Energy savings of €60–80 per year (vs. halogen equivalents) provide payback within 6–12 years depending on installation specification. |
What colour temperature is best for stair lighting?Colour temperature selection for stair lighting is primarily driven by the intended use context and the interior design aesthetic. 2700K (Extra Warm White) is ideal for domestic settings with warm materials (oak, walnut, warm stone, terracotta) and for nighttime safety lighting where minimal sleep disruption is required. 3000K (Warm White) is the most universally recommended choice for residential architecture — it provides a clean, inviting quality that complements virtually all modern interior styles. 4000K (Natural/Cool White) suits commercial staircases, minimalist modern interiors with white or grey palettes, and applications where maximum visual clarity and contrast are required. Tunable White (2700K–5000K variable) using strips like the CCT strip provides the greatest flexibility, automatically adapting throughout the day to support both daytime activity and nighttime relaxation. For projects where faithful material colour rendering is a priority (marble, natural stone, exotic woods), specifying Sunlike Ra>97 series strips ensures that the true colours and textures of premium materials are revealed with exceptional fidelity regardless of the colour temperature chosen. |
Do LED stair lights require much maintenance?LED stair lighting systems are among the lowest-maintenance lighting technologies available. Quality LED strips are rated at L80/50,000 hours — meaning they retain 80% of their original brightness for 50,000 hours (approximately 12 years at typical residential usage levels) without requiring any lamp replacement. The most likely component to require replacement over the system’s life is the LED driver, which typically carries a lifespan rating of 30,000–50,000 hours. Routine maintenance consists of an annual visual inspection (cleaning dust from diffusers and profiles with a soft dry cloth, checking that all connections are secure, and testing motion sensor function). Drivers should be installed in accessible, ventilated locations to facilitate eventual replacement without requiring structural work. With proper design and quality components, a well-installed LED stair lighting system should provide 10–15 years of reliable, virtually maintenance-free operation. |
What is the difference between LED strips for stairs and standard LED strips?While standard SMD LED strips can technically be used on stairs, purpose-designed stair LED strips offer several significant advantages that justify the modest additional cost. COB strips (the recommended choice for stairs) produce a uniform, seamless line of light without visible individual LED points, critical for reflective surfaces. Constant-current strips actively regulate current to ensure identical brightness across all connected steps, eliminating the voltage drop dimming effect that affects long standard-strip runs. High-efficiency strips deliver maximum light output per watt, important when steps require functional illuminance at low power consumption. High-CRI strips like the Sunlike Ra>97 series render material colours with exceptional accuracy that standard strips (typically Ra70–80) cannot match. In summary: standard strips may be adequate for basic functional stair lighting, but purpose-designed stair LED strips and profiles produce results that are categorically superior in both visual quality and long-term reliability. |
How do I light stairs on carpet?Carpeted stairs present specific installation challenges since mounting profiles on the tread surface is generally impractical due to the textile covering. The preferred approach for carpeted stairs is side wall lighting — mounting profiles on the stair side walls (stringers) rather than on the treads themselves. Surface-mount or wall-recessed profiles emit light horizontally across the tread surface from the side, providing adequate illuminance across the carpet pile. A second option is under-handrail lighting using a handrail-integrated profile like the HR01 series, which directs light downward along the entire flight of stairs from above, illuminating the carpet surface across all treads simultaneously. For both approaches, warm white (2700K–3000K) tones complement carpet materials most sympathetically. Avoid very high lumen outputs on carpet stairs since the diffuse, light-absorbing nature of carpet pile requires lower luminous flux to achieve the same tread illuminance as a hard-surface stair of equivalent dimensions. |
In-depth installation Wwlkthrough: step-by-step for every stair type
This supplementary section provides granular, step-by-step installation guidance tailored to four of the most common stair construction scenarios encountered in residential and light commercial projects. Each walkthrough assumes a 12-step staircase with a standard tread width of 900mm and a riser height of 170mm. Professional electrical installation of mains-voltage components is required; the LED strip and profile work described here is typically completed by a competent DIY installer or a fit-out contractor working alongside a qualified electrician who handles the driver installation and mains wiring.
Installation A: concrete staircase with step-nose profile
Concrete and stone stairs are among the most demanding substrates for LED stair lighting due to the weight of material, the difficulty of routing channels, and the requirement for fixing methods that can cope with the thermal expansion and contraction of dense materials. The ST01 step-nose profile is specifically engineered for this application. Its robust aluminium construction, integrated non-slip surface, and protected LED chamber make it the first choice for concrete, stone, porcelain tile, and terrazzo step applications.
Tools and materials required for this installation
- angle grinder with diamond grinding disc (for concrete/tile cutting);
- SDS rotary hammer drill with concrete bits (6mm and 10mm);
- masonry anchors and stainless steel screws (M4×25mm minimum);
- tile adhesive or rapid-setting mortar (for embedded installations);
- silicone sealant (neutral cure, paintable);
- cable channel or conduit (20mm diameter);
- wire stripper and crimping tool;
- voltage tester;
- LED soldering station or quality push-in connectors rated for the strip type;
- measuring tape and chalk line;
- spirit level;
- safety glasses and dust mask.
Phase 1 — Preparation and layout (estimated time: 1–2 hours for 12 steps)
Begin by thoroughly cleaning all step surfaces. Remove any existing nosing trim, carpet gripper rods, or adhesive residue. Mark the desired profile position on each tread using a chalk line — for step-nose profiles, the front face of the profile should align with the tread edge, with the profile body sitting on the tread surface and the light-emitting face directed toward the riser below. Measure and cut the profiles to the required length using a fine-toothed mitre saw or aluminium-rated jigsaw blade. Always cut profiles from the rear (fixing flange) side whenever possible to avoid bur formation on the light-emitting face. Deburr all cut ends with a fine file before proceeding.
Phase 2 — Profile fixing (estimated time: 2–3 hours for 12 steps)
The ST01 profile can be fixed by three methods depending on substrate and accessibility requirements, let’s see which ones.
Surface-screw fixing — drill pilot holes through the profile fixing flange at 300mm centres: drill corresponding holes in the concrete tread using the SDS hammer, insert masonry anchors, drive screws to achieve firm, rattle-free fixing without over-tightening (which can distort the profile channel).
Adhesive fixing — clean and prime the tread surface: apply tile adhesive or epoxy construction adhesive in a continuous bead along the profile base, press profile firmly into position, brace or tape in place for the adhesive cure period (typically 24 hours).
Combined method (recommended for high-traffic applications) — use adhesive to bed the profile AND mechanical fixings for security, combining the best of both methods.
Phase 3 — Cable routing (estimated time: 1–2 hours)
Before inserting the LED strips, route the interconnecting supply cables between steps. In a concrete staircase, this typically involves either surface-mounted cable conduit along the side wall (stringer), or a channel chased into the riser face. Use 2×0.75mm² minimum (preferably 2×1.5mm²) flexible two-core cable for inter-step connections. Ensure sufficient cable slack at each profile end to allow insertion and removal of the LED strip without cable tension. Label the polarity of each cable stub (+ and –) with adhesive labels during routing, polarity confusion is the most common wiring error in multi-step installations.
Phase 4 — LED strip preparation and insertion (estimated time: 1–2 hours)
Cut the COB LED strip to the required length for each step, cutting only at designated cut marks (typically every 25–50mm for high-density COB strips). Inspect each cut end to ensure clean separation with no torn copper pads. If soldering: pre-tin the copper pads on the strip with a hot iron (330°C), pre-tin the stripped cable ends, then join with a brief (under 2 seconds) touch of the iron to the tinned pad. If using push-in connectors: ensure the strip end is cut cleanly at a cut mark, straighten the copper pad area, and insert firmly into the connector until the copper pad makes full contact. Gently tug the connected cable to verify connection security before inserting the strip into the profile.
Phase 5 — Testing and commissioning (estimated time: 30–60 minutes)
Before fitting diffusers, connect the driver and power up the system. Walk the entire staircase visually inspecting each step for: uniform brightness across the full strip length, correct colour temperature, no visible flickering, correct motion sensor activation (if fitted). Use a digital multimeter to verify voltage at the far end of the last step: it should be within 0.5V of the driver output voltage. If voltage drop exceeds this, investigate cable run length, wire gauge, and connection quality before closing up.
Phase 6 — Diffuser fitting and final finish (estimated time: 30–60 minutes)
Slide the opaque FM diffuser into the profile channel from one end, starting from the corner or wall end and pushing toward the open end. Apply light silicone lubricant if the diffuser is tight-fitting. Fit angled end caps at the wall end and vertical end caps at the exposed stair edge end. Apply a small bead of neutral-cure silicone sealant at the profile-to-tile interface if aesthetic cleanliness requires it, allow to cure for 24 hours before heavy foot traffic.
Installation B: loating wooden staircase with under-tread profile
Floating or cantilevered wooden staircases represent the highest-profile residential installation type, and the one where LED lighting makes the most dramatic visual impact. When perfectly executed, under-tread LED lighting creates the impression that each step is levitating in mid-air, unsupported, glowing softly from beneath. Achieving this effect requires precise routing, impeccable cable management, and careful strip selection.
Preparation of tread groove
The SL08-03 under-tread profile requires a groove of approximately 12mm wide × 10mm deep to be routed along the full underside length of each tread, positioned 20–30mm from the front (nosing) edge. Use a router with a straight-cut carbide bit at slow feed speed to avoid tear-out in hardwood. Rout a test groove in scrap timber first and verify that the profile fits snugly but is removable, it should not require forcing in (which can cause stress cracking in the wood) nor should it rattle (which indicates inadequate groove width).
Cable routing strategy for floating stairs
The absence of risers in floating stair construction means that cables cannot be hidden behind a vertical surface at each step. Instead, cables must run either along the central structural stringer (hidden from view) or through the stair structure itself (if the treads are attached to a central steel spine or multiple side stringers with interior space). Plan the cable routing strategy with the stair’s structural engineer or carpenter before routing begins, as drilling through structural elements requires approval. For side-stringer floating stairs, cables can typically be run in a groove routed into the inner face of each stringer, invisible from normal viewing angles and accessible by removing the stringer’s decorative cladding if required for future maintenance.
Strip selection for floating stairs
Because the under-tread strip is viewed from below as one ascends the stairs, absolute uniformity is non-negotiable. The constant-current COB strip provides the most reliable uniformity across all steps because its integrated current regulation eliminates any progressive dimming from voltage drop, each step glows at exactly the same intensity regardless of its position in the series. This is especially important in floating stair installations where visual comparison between adjacent steps is easy and immediately obvious to the viewer.
Diffuser selection for floating stairs
On floating wooden stairs with under-tread profiles, the diffuser is viewed head-on from below rather than at a grazing angle. This means any visible LED structure is more apparent than in tread-edge applications. An FM (opaque) diffuser is strongly recommended, it completely eliminates any visible LED chip pattern, presenting instead a perfectly uniform, softly glowing panel of light beneath each tread. The modest reduction in lumen output (approximately 30%) is entirely acceptable in this context since the primary purpose is aesthetic rather than task lighting.
Installation C: drywall staircase wall with trimless profile
Trimless profile installation is the most technically demanding of all stair lighting methods, requiring coordination between electrician, plasterer, and decorator but it produces results of unmatched architectural refinement. When executed correctly, the installed profile is completely invisible; only a clean, precise cut of light emerges from an apparently featureless wall surface.
The trimless installation sequence is strictly time-ordered and cannot be effectively corrected after each phase is complete. The sequence must follow this order: first fix electrical (conduit and cable roughing-in) → profile installation → first plaster coat → strip and driver connection and testing → second and finish plaster coats → painting → diffuser insertion. Any deviation from this sequence typically results in either damaged profiles (if plastered over before strip testing), or poor finish quality (if plasterer cannot work freely around unconnected components).
Profile positioning in drywall: the DW07-01 trimless profile mounts between two studs or to a continuous blocking piece fixed within the drywall cavity. Use a laser level to ensure all profiles along the stair flight are precisely positioned on the same vertical alignment (parallel to the stair pitch line). Even a 2mm deviation is visible once the wall is plastered and painted. Fix the profiles using the provided installation brackets, which grip the profile from within the wall cavity and allow minor position adjustment before the first plaster coat locks everything in place. Apply masking tape to the profile diffuser channel before plastering to prevent plaster contamination of the optical surface, this is a critical step that many installers overlook, resulting in significant clean-up work during strip insertion.
Plaster integration: apply metal angle bead or paper bead to the outer lip of the profile on both upper and lower edges before plastering. This creates a clean, sharp transition between the plaster surface and the profile reveal — essential for the “knife cut” of light effect that defines this style. Build up the plaster in two or three coats, feathering it seamlessly into the profile beads. The final finish coat should be sanded to complete flatness and continuity with the profile lip. Paint is applied over the plastered wall surface, stopping precisely at the profile’s diffuser edge, use a fine brush for this detail work; painter’s tape can be applied to the diffuser surface for protection.
Installation D: integrated handrail lighting
Handrail-integrated LED lighting is the most elegant solution for staircases where tread or wall lighting is impractical — such as carpeted staircases, very narrow stairwells, or existing staircases where structural intervention is not possible. The HR01 series handrail profile is an architectural aluminium handrail designed from the ground up to accommodate an LED strip within its cross-section, directing light downward toward the stair treads.
Key advantages of handrail integration
No modification to stair treads, risers, or walls is required; the entire installation is self-contained within the handrail assembly. Light is directed at the tread surface from above, providing functional illuminance across the full tread width (including any carpet). The handrail itself becomes a design element, a glowing guide rail that draws the eye along the stair flight. Safety is maximised because the illuminated handrail is visible from both the top and bottom of the staircase, enabling users to locate and grip the rail in low-light conditions.
Practical installation notes
The HR01 is supplied in lengths and must be cut to the exact handrail run length plus mitred at both ends to match wall bracket angles. LED strip is inserted from the open end of the handrail channel before the handrail is fixed to its wall brackets, attempting to insert strip after fixing makes cable routing much more difficult. Use quality 3M VHB double-sided tape to secure the strip within the channel (the standard adhesive backing of the strip may not provide sufficient long-term adhesion in the handrail orientation where the strip faces downward against gravity). Bring power to the handrail via a concealed conduit within the wall, emerging at the lower handrail bracket position — this is the least visible cable entry point and allows the driver to be mounted within the wall void below.
Outdoor stair lighting: guide for gardens, terraces, and entrances
Outdoor stair lighting presents a distinct set of challenges compared to interior installations. Exposure to weather, temperature extremes, UV radiation, and the risk of water ingress demand a level of material specification and installation rigour that goes well beyond what is required inside a dry, temperature-controlled building. Yet the rewards, architecturally beautiful garden stair lighting that creates drama, safety, and a welcoming atmosphere after dark, fully justify the additional care required. This section provides expert guidance on specifying, designing, and installing outdoor LED stair lights that will perform reliably and beautifully for many years in all weather conditions.
IP rating selection for outdoor stair applications
The selection of appropriate IP (Ingress Protection) ratings for outdoor LED stair components is the single most critical decision in an outdoor installation. Every component, not just the LED strip, but also the profiles, connectors, junction boxes, and driver enclosure — must carry ratings appropriate to their specific exposure conditions.
A common mistake is assuming that a profile rated IP44 provides adequate protection for a fully exposed outdoor step. IP44 offers protection against splashing from any direction, adequate for a covered terrace but entirely insufficient for a step that will be rained on, potentially stood on by wet boots, and exposed to frost and snow. For genuinely outdoor exposed applications, IP65 is the minimum acceptable standard for all components, with IP67 or IP68 required for installations in ground-level pavement or decking where pooling or standing water is possible.
| Outdoor location type | Minimum profile IP | Minimum strip IP | Minimum connector IP |
|---|---|---|---|
| Covered terrace / loggia (no direct rain) | IP44 | IP44 | IP44 |
| Garden steps (exposed to rain) | IP65 | IP65 | IP65 |
| Pool/spa terrace (splash zone) | IP65 | IP67 | IP67 |
| Ground-level inground step lights | IP67 | IP68 | IP68 |
| Marine / coastal environment | IP65 + marine-grade aluminium | IP67 | IP68 |
Thermal management in outdoor LED lighting
Outdoor installations experience temperature extremes that indoor installations do not. In Southern European and Mediterranean climates, step-mounted aluminium profiles in direct sunlight can reach surface temperatures of 60–70°C in summer, significantly higher than the temperatures experienced by interior installations. This elevated ambient temperature reduces the thermal headroom available for the LED driver and strip junction, potentially accelerating lumen depreciation.
For outdoor installations in hot climates, reduce the LED strip power density by 20–30% relative to indoor specifications. For example, where an 8W/m strip is appropriate for an indoor stair, specify a 5–6W/m outdoor equivalent to achieve similar lumen output with reduced thermal stress. This conservative sizing ensures the installation maintains its L80 lifespan rating even under elevated ambient temperature conditions.
In cold climates, LED driver specifications must include a cold-start rating appropriate to the minimum expected ambient temperature. Most quality LED drivers are rated for operation down to –20°C to –40°C, but this should be explicitly verified for installations in Alpine or Nordic climates where temperatures outside these ranges may be encountered.
Colour temperature for outdoor steps
Colour temperature choices for outdoor step lighting are influenced by different factors than indoor selections. Warm white (2700K–3000K) is strongly preferred for garden and terrace step lighting in domestic settings: it creates a welcoming, warm glow that complements natural materials (stone, slate, brick, timber decking) and harmonises with the amber tones of candle-lit garden entertaining. The warm colour temperature also minimises light pollution impact, as warmer tones scatter less in the atmosphere and are less disruptive to nocturnal wildlife than cool blue-white tones.
For commercial entrance stairs (hotel entrances, restaurant terraces, retail premises) a slightly cooler 3000K provides a clean, professional appearance while retaining a welcoming quality. Neutral or cool tones (3500K–4000K) are generally reserved for functional outdoor stair applications such as fire exits, industrial premises, and emergency lighting installations where task visibility takes priority over aesthetic warmth.
Motion-activated outdoor stair lighting
Motion activation is even more valuable for outdoor stair lighting than for interior applications, for several reasons. First, outdoor stairs are often not approached from inside the home, the user may be arriving from the garden, returning from the garage, or entering from the street, so an interior switch is not accessible. Motion activation eliminates the need for accessible switch points. Second, leaving outdoor stair lights on continuously throughout the night is wasteful and increases light pollution unnecessarily. Motion activation ensures the lights are only on when actually needed. Third, unexpected illumination of an otherwise dark outdoor area is a security deterrent, an intruder who triggers outdoor stair lights is visually exposed and simultaneously signalled that their presence has been detected.
For outdoor motion-sensor stair systems, specify a PIR sensor rated IP65 or above with adjustable range, sensitivity, and lux threshold. The lux threshold setting is particularly important outdoors: it prevents the sensor from activating the stair lights during daylight hours when natural ambient light makes them unnecessary, regardless of any detected movement.
Material-specific LED stair lighting guide
The material composition of a staircase fundamentally influences which lighting approach delivers the best results. Stone, concrete, timber, glass, steel, and carpet each have distinct optical properties that interact with LED light differently: and each requires specific profile, strip, and diffuser choices to achieve the intended visual outcome. This section provides material-specific guidance covering the six most common stair surface materials encountered in residential and commercial projects.
Natural stone (marble, granite, travertine, slate)
Natural stone is among the most beautiful, and most demanding, of all stair surface materials from a lighting perspective. Polished marble and granite are highly reflective, meaning that any visible LED chip pattern in the strip will be reflected in the tread surface and appear as an unattractive dotted pattern visible to users standing on the stairs. This makes COB strip technology absolutely mandatory for stone stair applications.
The second critical consideration for natural stone is colour rendering. The deep veining, colour variation, and crystalline structure of premium natural stone is only fully revealed by high-CRI lighting. A standard LED strip with CRI Ra70 will render marble as flat and slightly muddy, losing the depth and movement that makes natural stone so visually compelling. By contrast, the Sunlike Ra>97 series renders every nuance of natural stone with the same fidelity as direct sunlight, revealing the full three-dimensional depth of book-matched marble veining or the sparkling crystals of polished granite with extraordinary clarity.
Profile choice for stone stairs: for tread-edge lighting, the ST01 step-nose profile provides the structural robustness required to withstand the mechanical stresses of heavy stone treads and foot traffic. Its clean geometry and slim profile front face complement the crisp lines of stone architecture. For wall-integrated designs, DW07-01 trimless profiles parallel to the stair flight create striking architectural light cuts that define the staircase geometry without competing with the natural beauty of the stone.
Hardwood and engineered timber
Timber stairs (whether solid hardwood, engineered oak, or quality laminate) are the most common residential stair material in Northern and Central Europe. Warm-toned wood grains, from pale ash and maple to rich walnut and wengé, respond beautifully to warm-white LED lighting. The general principle is to match the warmth of the light to the warmth of the timber: cool-toned pale timbers (ash, maple, white oak) can accept 3000K or even 3500K lighting; medium warm-toned timbers (red oak, cherry, beech) are best served by 2700K–3000K; and dark warm timbers (walnut, teak, wengé) are most beautifully rendered at 2700K to reinforce their rich amber-brown character.
Timber stairs with solid wood or engineered plank treads are well-suited to under-tread profile installation (PR-SL08-03 or PR-SL13-02) since routed grooves can be cut accurately into solid wood without the risk of cracking or delamination that might occur in stone. Always route grooves along the grain direction rather than across it to minimise the risk of splitting in solid timber treads. For engineered or laminate treads, use a router with a sharp, high-quality bit and slow feed speed to avoid tearing the decorative surface layer.
Glass and open-tread stairs
Glass-tread and open-tread metal staircases represent the most transparent construction type, one where lighting solutions must be carefully considered to avoid visible components showing through the tread material. For glass treads, under-tread profiles are essentially invisible in their OFF state since the profile channel is concealed by the opacity of the aluminium, visible only from the direct below-tread viewing angle. When illuminated, the light washes beautifully across the underside of the glass tread, scattering through the glass material and creating a glowing effect unlike any other material.
For open-tread metal staircases (perforated steel, bar grate, or open lattice treads), under-tread installation is impossible since there is no solid surface to receive a profile groove. In these applications, wall or stringer-mounted lighting is the preferred solution. Profiles mounted on the inner face of the stair stringer direct light upward and inward to illuminate the underside of each tread from the side rather than directly below, achieving a similar floating-stair visual effect.
Porcelain and ceramic tile
Tiled stairs, common in Mediterranean residential architecture, apartment buildings, and commercial premises, combine the reflectivity of polished stone with the complexity of grout joints. COB strips are essential on tiled stairs to avoid any LED chip reflection in the tile glaze. The choice between warm and neutral colour temperature depends heavily on the tile colour palette: warmer earth-toned tiles (terracotta, beige, cream, sand) pair naturally with 2700K–3000K warm lighting; cooler contemporary tiles (white, light grey, anthracite, concrete effect) suit 3000K–4000K neutral tones.
Porcelain tile stairs with a polished or semi-polished finish present the same challenge as marble: extreme reflectivity magnifies any optical imperfection in the strip or diffuser. Specifying an FM opaque diffuser and a Sunlike high-CRI strip ensures that the visual result on polished porcelain is indistinguishable from the highest-end stone installation.
Concrete and microcement
Polished concrete and microcement-finished stairs have become a dominant aesthetic in contemporary minimalist architecture. Their characteristic medium-grey, low-reflectivity surface accepts a wide range of colour temperatures gracefully. 3000K–3500K is typically the optimal range for concrete stairs, warm enough to prevent the cool grey palette from feeling clinical, but neutral enough to maintain the sophisticated restraint that defines the style.
Microcement, with its continuous surface treatment extending over treads and risers without joints, pairs exceptionally well with trimless wall profiles (DW07-01) where the light source is completely integrated into the wall plaster. The visual effect, a floating staircase in uniform grey microcement with knife-edge light cuts emerging from apparently solid walls, is one of the most architecturally refined outcomes achievable with current LED stair lighting technology.
Carpet
As previously discussed in the FAQ section, carpeted stairs present specific installation constraints that preclude tread-surface-mounted profiles. The most effective lighting approaches for carpeted stairs are wall-mounted or handrail-integrated systems that direct light across the carpet surface from the side or above without requiring any modification to the tread material itself.
For wall-mounted side-lighting on carpeted stairs, a recessed wall profile DW07-01 positioned at each step height on the side wall (stringer) provides a clean, architecturally integrated solution. The profile is plastered into the drywall stringer cladding, emitting light horizontally across the carpet surface from a position approximately 80–100mm above the tread level. This height positions the light beam at the most effective angle for even carpet tread illumination.
Alternatively, for carpeted stairs in listed buildings or rental properties where wall modification is not permitted, battery-operated rechargeable LED step lights provide a non-invasive solution. Modern rechargeable step lights using PIR motion activation can provide several nights of triggered illumination from a single charge, and their simple clip or adhesive fixing systems allow installation and removal without any damage to the stair structure. While they cannot match the visual quality of a hardwired system, they provide genuine safety benefits in situations where a permanent installation is not feasible.
Professional specification guide: LED stair lighting for architects and interior designers
For architects and interior designers integrating LED stair lighting into formal project specifications, this section provides the technical language, standard specification formats, and quality criteria required for tender documentation, contractor instructions, and quality control sign-off. Proper specification is the foundation of successful project delivery it ensures that contractors source appropriate products, install to the required standard, and deliver the visual outcome that the design intent demands.
Technical specification language
When writing formal specifications for LED stair lighting, clarity and completeness are paramount. A robust specification clause should cover the following information for each lighting type specified:
- Profile series and model reference (e.g., “Aluminium step-nose profile type PR-ST01, silver anodised, as manufactured by LightingLine or approved equivalent”);
- LED strip type and specification (e.g., “COB LED strip, minimum 300 LEDs per metre, rated wattage 8W/m ±5%, colour temperature 3000K ±100K, CRI Ra>90, constant voltage 24V DC”);
- LED driver specification (e.g., “Constant voltage LED driver, 24V DC output, rated power not less than 125% of connected LED load, efficiency >90%, power factor >0.9, IP20 minimum, dimmable DALI or 0-10V compatible”);
- Control system (e.g., “PIR motion sensor stair controller, minimum 12 channels, adjustable sensitivity 1–8m, adjustable time-out 10s–10min, ambient light cutoff adjustable 2–50 lux”);
- Diffuser type (e.g., “Opaque (FM) PMMA diffuser, full-length per profile, providing zero visible LED image through diffuser surface”);
- IP rating (e.g., “All components IP44 minimum for indoor installation; IP65 minimum for outdoor or damp location installation”).
Quality control and inspection criteria
For specification-grade projects, a formal quality control and inspection protocol should be agreed between designer and contractor before installation begins. Key inspection points include:
Pre-installation inspection: verify that all delivered products match specification by checking product labels, catalogue references, and datasheets. Reject any substitutions not previously approved in writing. Check that COB strip samples show genuinely continuous light emission with no visible individual LED chips when powered. Verify that drivers are appropriately rated and correctly typed (constant voltage vs. constant current) for the specified strips.
Mid-installation inspection: for trimless profile installations, inspect profile alignment before plaster application. Use a laser level to verify that profiles are correctly positioned and level/plumb as required. For under-tread installations, verify that groove routing is clean and accurate before profile bonding. Inspect all cable connections before profile closures are fitted — connections must be secure, correctly polarised, and protected from mechanical damage.
Post-installation commissioning inspection: vonduct a comprehensive visual inspection under controlled lighting conditions. Walk the staircase and inspect each step from both above and below (where applicable) for: uniform brightness across all steps; no visible LED chip structure through diffuser; correct colour temperature (evaluate against a calibrated reference sample in the same environment); smooth, flicker-free dimming across the full dimming range; correct motion sensor activation distance and delay settings; no visible cable, profile end, or connector at any finishing junction.
Specification checklist for high-end residential projects
| Specification element | Minimum standard | Premium standard | Verification method |
|---|---|---|---|
| LED type | SMD with diffuser | COB, continuous emission | Visual check when powered |
| Colour rendering (CRI) | Ra>80 | Ra>97 (Sunlike) | Datasheet; colour comparison |
| Colour temperature accuracy | ±200K of specified CCT | ±50K MacAdam step ≤3 | Colourimeter measurement |
| Step brightness uniformity | ±20% between steps | ±5% between steps | Lux meter at each step |
| Profile finish quality | No visible burrs or scratches | Anodised or powder-coated, no visible machining marks | Visual close inspection |
| Driver quality | CE marked, basic protection | Flicker-free (IEEE 1789), DALI, PF>0.95 | Datasheet; flicker meter |
| Smart integration | Manual switch or basic sensor | Matter/Zigbee, app control, voice integration | Functional test of all scenes |
| Cable management | No exposed cables in finished areas | All cables in conduit, access for future replacement | Visual inspection of all cable routes |
Why your staircase deserves the best LED lighting system
Stairs are the most traversed surface in any building, crossed dozens of times every day, yet rarely given the design attention they deserve. This guide has shown that LED stair lighting is far more than a decorative choice: it is a safety investment, an architectural statement, an energy-efficiency decision, and (when integrated with smart home systems) a daily quality-of-life upgrade that pays dividends every time someone moves through the building after dark.
The technology available in 2026 makes it genuinely possible to achieve results that would have required a specialist lighting designer and a significant custom-fabrication budget just five years ago. COB strips that produce a seamless, reflection-free line of light. Aluminium profiles engineered to the millimetre for every stair construction type. Sunlike Ra>97 strips that render marble, oak, and travertine with the same fidelity as direct sunlight. Tunable white systems that shift the staircase from energising morning light to amber night-safety mode on a fully automatic circadian schedule. The gap between what is possible and what is accessible has never been smaller.
The consistent thread running through every section of this guide is the importance of specification quality. The difference between a stair lighting installation that disappoints within two years (fading strips, flickering drivers, mismatched colour temperatures, visible LED hotspots in polished stone) and one that performs flawlessly for fifteen years is almost never budget. It is knowledge: knowing which strip type eliminates reflections, which profile suits which substrate, which diffuser produces a uniform surface, which driver prevents voltage drop across a twelve-step run. That knowledge is now in your hands.
This article was developed with the support of artificial intelligence and subsequently reviewed, corrected, and validated by the LightingLine.eu technical team, which guarantees its reliability and compliance with official sources.