Light painting is a long-exposure photography technique in which a moving light source is used to draw, write or selectively illuminate a scene while the camera shutter stays open. The result is an image that records every trace of light as a continuous line, a glowing surface or a soft wash across an object. For centuries painters tried to capture light with pigments now with light painting, the light itself becomes the paint and the camera sensor becomes the canvas.
This guide looks at light painting from a perspective that most tutorials ignore: the perspective of the LED strip and the aluminium LED profile, the two components that turn an ordinary torch into a precise, uniform and repeatable light painting tool, and that allow architects to transform the same visual language into permanent installations. You will learn what light painting is, how to do light painting photography step by step, which camera settings for light painting really work, how to paint with light using an iPhone or an Android phone, and how to build professional light painting tools with components from the Lighting Line online catalogue.
Every idea you find here is linked to a real product family, a mounting method and, where relevant, a lux calculation you can put into a project. Light painting photography is where many designers first test linear light in space and aluminium profiles with LED strips are where those experiments become architecture.
In this article…
- What is light painting? Definition, meaning and history
- Light painting, LED strips and LED profiles: how they connect
- Light painting tools: strips, profiles, diffusers and controllers
- Light painting DIY: building LED light brushes with aluminium profiles
- How to do light painting photography step by step
- Camera settings for light painting
- Can you do light painting in daylight?
- Light painting ideas: portraits, cars, walls, frames and more
- Light painting for architects: from photo study to built installation
- Lux calculation for LED profile installations
- How to light a painting on the wall with LED profiles
- Light painting and LED effects for DJs and event planners
- Light art and linear lighting trends 2026
- Common mistakes and troubleshooting
- Choosing the right Lighting Line product
- Project scenarios: from light painting sketch to built installation
- Light painting and LED lighting glossary
- Frequently asked questions
- Conclusion
1. What is light painting? Definition, meaning and history
Before choosing a strip or a profile, it is worth understanding exactly what light painting is and why it has fascinated photographers, painters and architects for more than a century. This section defines the technique, clarifies the vocabulary (light painting, light drawing, light writing, light art photography) and traces the history that leads to today’s LED-based tools. Knowing the roots of light painting helps you use it intentionally rather than as a random effect.
A precise definition of light painting
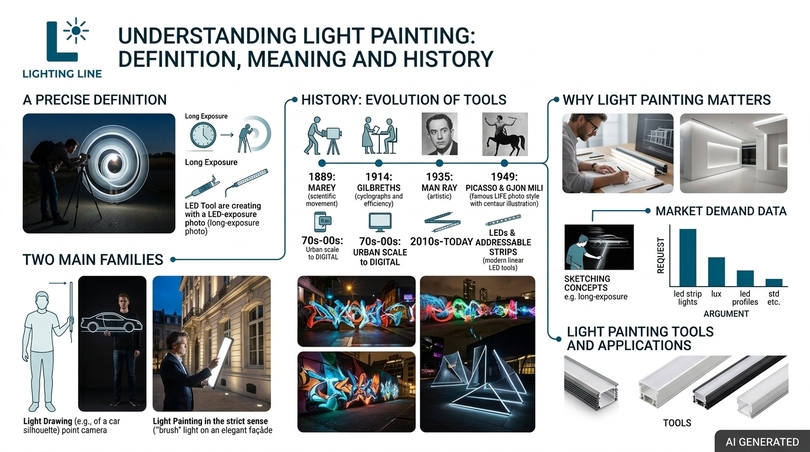
Light painting, also called painting with light, light drawing or light writing, is a photographic technique based on a long exposure. The camera is fixed, usually on a tripod, and the shutter stays open for several seconds or minutes. During that time a person moves one or more light sources in front of the lens, or uses them to illuminate parts of the scene. Because the sensor accumulates light for the whole exposure, every movement of the source is recorded as a continuous trace. The person holding the light, if dressed in dark clothes and kept moving, practically disappears from the final image.
There are two main families of light painting photography:
- Light drawing (or light writing): the light source points towards the camera, so the lens records the source itself as a line. This is how people write names, draw spirals, create orbs or trace the outline of a car.
- Light painting in the strict sense: the light source points at the subject, not at the camera. The photographer “brushes” light over a building, a product or a landscape, controlling which surfaces receive more or less light. This is the classic painting with light photography used in architecture, real estate, still life and automotive photography.
Most modern light painting photos combine both: a softly light-painted background with sharp, graphic light drawing strokes in the foreground.
Does photography mean “drawing with light”?
Yes. The word photography comes from the Greek phōs, phōtós (light) and graphē (drawing, writing). The term was popularised in 1839 by the astronomer Sir John Herschel. So when people ask “does photography mean light drawing”, “does photography mean writing with light” or “does photography mean painting with light”, the answer is that all photography is literally drawing or writing with light; light painting simply makes that idea visible by turning the light source into the drawing tool.
Light painting, light art photography and light graffiti: what is the difference?
The terms overlap, but they are used with slightly different nuances:
| Term | Typical meaning | Typical tools |
|---|---|---|
| Light painting | General term for long-exposure images created with moving light | LED strips in profiles, torches, light brushes |
| Painting with light photography | Selective illumination of a subject (car, building, product) | Diffused LED bars, soft panels, profiles with opal diffuser |
| Light drawing / light writing photography | Drawing lines, words and shapes pointing the light at the lens | Thin LED strips, round profiles, fibre-optic brushes |
| Light graffiti | Street-art style light writing, often in urban settings | Coloured LEDs, RGB strips, addressable bars |
| Light art photography | Artistic photography of light installations or light sculptures | Permanent or temporary LED profile installations |
A short history of light painting photography
The history of light painting is also a history of light sources. Each generation of tools, from gas lamps to LEDs, changed what photographers could draw.
1889: Marey and the study of movement
The French physiologist Étienne-Jules Marey is often credited with one of the first light painting images. In 1889 he attached small lights to the joints of a person and recorded their movement as lines on a single plate. Light painting was born as a scientific tool to make motion visible, not as an art form.
1914: the Gilbreths and the efficiency of gestures
Frank and Lillian Gilbreth, pioneers of industrial engineering, attached small lights to workers’ hands to create “cyclegraphs”: long-exposure images tracing each gesture. They used them to redesign workstations. For architects this is a fascinating precedent: light traces were used to design space around human movement, exactly what lighting designers do today when they follow circulation paths with linear LED profiles.
1935: Man Ray and artistic light writing
The surrealist artist Man Ray created his “Space Writing” self-portrait in 1935, drawing with a penlight in front of the camera. It is one of the first explicitly artistic uses of light writing photography.
1949: Picasso light painting with Gjon Mili
The best-known episode in the history of light painting is the 1949 session in which the photographer Gjon Mili, working for LIFE magazine, photographed Pablo Picasso drawing in the air with a small light. The Picasso light painting series, often called “light drawings”, shows centaurs, bulls and profiles sketched in a few seconds. Picasso painting with light proved that the technique could carry authorship and style, not just scientific data.
1970s–2000s: from torches to digital sensors
Photographers such as Eric Staller in the 1970s and 1980s expanded light painting to urban scale. The arrival of digital cameras in the 2000s changed everything: immediate feedback on the camera screen meant that photographers could experiment, correct and repeat within minutes. Light painting photographers multiplied, and so did the tools.
2010s–today: LEDs, addressable strips and light painting apps
LEDs made light sources small, cool, efficient and controllable. Programmable LED bars, which are essentially LED strips mounted in a rigid profile and driven by a microcontroller, allowed photographers to print images and gradients in mid-air. Smartphones added light painting apps and dedicated long exposure modes. Today, the same LED strips and aluminium profiles used in kitchens, shops and museums are also among the most effective light painting tools available.
Why light painting matters beyond photography
Light painting is not only a creative hobby, it is a way of thinking about light as a line, a gesture and a volume. Architects who practise light painting learn to see linear light as a design element: where a line of light should start and stop, how bright it should be relative to its surroundings, how it reveals texture on a wall. These are precisely the decisions involved in placing an aluminium LED profile in a ceiling, a stair or a façade.
Light painting, LED strips and LED profiles: how they connect
Light painting and LED strip lighting are not the same thing, but they belong to the same ecosystem of tools and ideas. This section explains the relationship in practical terms so you can decide when an LED strip is a light painting tool, when it is architectural lighting, and when it is both. Understanding the difference prevents wrong purchases and opens up new creative possibilities.
Three definitions side by side
| Element | What it is | Role in light painting | Role in architecture |
|---|---|---|---|
| Light painting | Long-exposure technique with moving light | The technique itself | Design study, visualisation, marketing photography |
| LED strip | Flexible circuit board with LEDs, often white, tunable white, RGB, RGBW or addressable | The light source, the ink of the light brush | Linear light source for coves, shelves, stairs, façades |
| Aluminium LED profile | Extruded aluminium housing with diffuser that holds the strip | Gives the brush shape, rigidity, uniformity and protection | Mounts, protects and cools the strip; defines the look of the line |
In short: LED strips can be the light source for light painting, and aluminium profiles turn that source into a rigid, uniform, professional light brush. A strip switched on in a living room is ordinary lighting. It becomes light painting when it moves in front of a camera during a long exposure, or when it is part of an installation that is photographed with that technique.
Why a bare LED strip is not enough
Many beginners try light painting with a bare LED strip taped to a stick. It works, but the results show the limits quickly:
- Visible dots: without a diffuser, each LED chip appears as a separate point, creating dotted strokes instead of smooth lines.
- Flexing and twisting: a bare strip bends while you move, so the stroke width changes unpredictably.
- Glare and hot spots: direct LEDs are very bright at close range, easily burning out highlights.
- Fragility: solder pads and components are exposed to knocks, sweat and moisture.
- Heat: at high power, strips without an aluminium heat sink lose efficiency and lifetime.
An aluminium profile with an opal diffuser solves all five issues at once. That is why the same component recommended for a kitchen under-cabinet light, a cove or a stair is also ideal for a professional light painting brush.
Where the two worlds meet
Photographing permanent LED installations
Architects and interior designers need spectacular images of their projects. Long exposure and painting with light photography are often used to balance interior LED profiles with daylight or dusk skies. Well-designed linear lighting photographs better: uniform lines without dots look clean even at 100% zoom.
Using light painting to preview a lighting concept
Before drilling a ceiling, a designer can “sketch” the future LED profiles in the actual room with a light brush during a long exposure. The resulting light painting photos show clients where the lines will go, how they relate to furniture and how they read at night. It is fast, cheap and very persuasive.
Kinetic and interactive light art
Addressable strips in profiles can be programmed to move light along a line. Photographed with a long exposure, these installations produce light painting effects without anyone moving: the light moves itself. This is where light art photography, stage design and architecture overlap.
Market demand confirms the connection
Content-gap data from the European LED market shows how strongly people require for the components behind light painting. The following monthly request volumes illustrate the size of the audience interested in LED strips, profiles and lux:
| Argument | Monthly request | Request | |
|---|---|---|---|
| led strip lights | 60,500 | Light source for light brushes and installations | |
| led strip lighting | 27,100 | Architectural applications to be photographed | |
| lux | 12,100 | Illuminance calculation for permanent installations | |
| led strips | 6,600 | Components for DIY light painting tools | |
| led profile | 2,900 | Housing that turns a strip into a light brush | |
| led strip lights kits | 2,400 | Ready-to-build light painting kits | |
| led strip diffuser | 1,600 | Key for smooth, dot-free light painting strokes | |
| rgb led strip | 1,300 | Colour light painting and events | |
| colour change led strip | 590 | Gradient strokes and party effects | |
| rgbw led strips | 480 | Colour plus clean white in one brush | |
| lux level | 480 | Recommended illuminance per room type |
The audience for LED strips is dozens of times larger than the audience for light painting alone, which is why this guide treats light painting as a gateway: an inspiring technique that leads naturally to better understanding and better specification of LED lighting.
3. Light painting tools: strips, profiles, diffusers and controllers
The quality of light painting depends on the tool as much as on the photographer. A good light painting tool delivers a uniform line, predictable brightness, a clean colour and enough robustness to survive night sessions outdoors. This section breaks down every component of a professional LED light painting tool and links each one to the corresponding product family in the Lighting Line catalogue. If you understand these components, you can build almost any light painting tool you have seen online, and specify the same parts for permanent projects.
The LED strip: choosing the “ink”
The strip determines colour, brightness, uniformity and control. Lighting Line offers two main technologies in its LED strip range: SMD LED strips and COB LED strips. The production unit can also manufacture customised strips, which matters for designers who need a specific length, colour temperature or density.
SMD vs COB for light painting
| Feature | SMD LED strip | COB LED strip |
|---|---|---|
| Structure | Individual LED packages spaced along the PCB | Continuous line of chips covered by phosphor |
| Look without diffuser | Visible dots | Almost continuous line |
| Look with opal diffuser | Uniform if profile is deep enough | Uniform even in shallow profiles |
| Colour options | White, tunable white, RGB, RGBW, addressable | Mainly white and tunable white; some colour versions |
| Best light painting use | Colour strokes, gradients, animations, addressable effects | Clean white neon lines, product light painting, architecture |
| Best architectural use | Coves, indirect lighting, colour scenes | Visible lines, shallow profiles, furniture, mirrors |
For white, dot-free light painting strokes, COB strips are the simplest choice while for colour and animation, SMD RGB, RGBW or addressable strips are unbeatable.
Voltage: 5 V, 12 V or 24 V?
Handheld light painting tools are battery powered, so voltage matters:
- 5 V strips (typical of addressable WS2812B/SK6812 types) run from USB power banks. They are ideal for short brushes up to about one metre.
- 12 V strips work with small 3S lithium packs or 12 V battery holders. They are a good compromise for brushes of one to two metres.
- 24 V strips suffer less voltage drop over long runs and are the standard for architectural installations; for handheld use they require a step-up converter or 24 V battery.
Colour temperature and colour rendering
When light painting a subject rather than drawing lines, colour quality becomes crucial. A high colour rendering index (CRI 90 or more) reproduces skin tones, wood, fabrics and paint finishes faithfully. Choose 2700–3000 K for warm, intimate light painting portraits and 4000 K for neutral product and architectural light painting. Tunable white strips let you switch between the two within the same session.
The aluminium profile: shaping the brush
The aluminium profile is what separates a hobby gadget from a professional light painting tool. It provides a straight or round body, a mounting surface for the strip, heat dissipation and a slot for the diffuser. The Lighting Line range includes more than a hundred profiles across families: surface, recessed, corner, wall, concrete, suspension, drywall, round, tiling, floor, baseboard, furniture, handrail, mirror and architectural.
Round profiles: the natural light painting wand
For handheld light painting, round profiles are the obvious starting point, because a cylinder emits light around its axis and looks the same from every angle as you rotate it. The Lighting Line round profile family includes:
| Product | Code | Light painting use | Architectural use |
|---|---|---|---|
| Round aluminium profile, diameter 30mm | NE01-14 | Classic handheld light sword and light brush, easy to grip | Slim pendants, tube lights, rails |
| Round waterproof aluminium profile, 30mm diameter, 2 meters | NE02-15-S2 | Outdoor sessions, rain, beaches, water reflections | Exterior linear lights, pergolas, damp areas |
| Round aluminium profile, diameter 50mm, 2 meters | NE04-19-S2 | Wide, bold strokes; large-scale “tube” light painting | Statement pendants, suspended lines over tables |
| Round aluminium profile, diameter 75mm, 2 meters | NE03-17-S2 | Very thick glowing columns, static props within a light painting | Large pendants, industrial and retail installations |
Flat and slim profiles: blades, frames and letters
Surface and furniture profiles produce a flat emitting face: in light painting they create “blade” strokes that change width as you rotate the tool, an effect used for ribbons, wings and waves. Slim surface profiles can also be assembled into rectangles, triangles and letters, producing geometric light painting frames and static light sculptures to photograph.
Profiles for silicone strips
Waterproof silicone strips are thicker than bare strips. The Lighting Line 15x10mm aluminium profile for silicone LED strips is designed specifically for them, useful for outdoor light painting tools and exterior installations.
Diffusers: the secret of smooth strokes
The diffuser determines whether your light painting looks like a string of pearls or a continuous neon line. Lighting Line offers a dedicated range of diffusers for its profiles.
| Diffuser type | Look | Light transmission | Best for |
|---|---|---|---|
| Clear | Dots fully visible, maximum sparkle | Highest | Sparkle effects, maximum output for painting large subjects |
| Frosted / satin | Dots softened | High | Good compromise for SMD strips in deep profiles |
| Opal | Uniform line, no dots | Lower | Neon-like light drawing, portraits, architecture |
Rule of thumb: the greater the distance between strip and diffuser, the more uniform the line. Deep profiles and round profiles give the LEDs room to blend. Shallow profiles need a denser strip, ideally COB, to avoid dots.
End caps, brackets and connectors
Small accessories make a big difference to safety and durability. End caps close the profile, protect the strip ends and provide cable exits. Mounting brackets fix profiles to handles, tripods, walls or ceilings. PCB LED strip connectors join strips without soldering, useful for quickly swapping colours in a light painting kit.
Controllers: dimmers, RGB and addressable drivers
Brightness control is the most underrated feature of light painting tools: a strip that is perfect for architectural lighting is often far too bright for light painting at close range. A PWM dimmer lets you reduce output to 5–30% so that strokes are exposed correctly at low ISO.
- Single-colour dimmer: essential for white light brushes.
- RGB / RGBW controller: static colours, fades and colour jumps.
- Addressable controller (for example ESP32 boards running open-source firmware such as WLED): per-pixel control for gradients, chasing effects, text and audio-reactive animations.
- DMX decoder: for events, where light painting tools and installed LED profiles must follow a lighting desk.
Other classic light painting tools and how LEDs compare
| Tool | Effect | Pros | Cons | LED profile alternative |
|---|---|---|---|---|
| Flashlight / torch | Points, lines, painting subjects | Cheap, available | Small source, hot spot | Short round profile with COB strip |
| Glow sticks | Soft coloured lines | Safe, fun | Weak, single use | RGB strip in round profile with opal diffuser |
| Fibre optic brush | Hair-like strands | Unique texture | Fragile | Combine with LED wand for base strokes |
| EL wire | Thin uniform lines | Flexible | Low brightness, inverter noise | COB strip in slim profile |
| Steel wool | Sparks | Spectacular | Fire risk, often prohibited | Addressable strip “spark” effects (safe) |
| Commercial pixel bars | Images, gradients | Ready to use | Expensive | Addressable strip in 1-2 m profile with ESP32 controller |
Safety note: steel wool and fire effects are dangerous and banned in many locations. LED-based tools deliver comparable visual energy without sparks, smoke or burns.
4. Light painting DIY: building LED light brushes with aluminium profiles
Building your own light painting tools is the fastest way to understand how LED strips and profiles behave, and it costs a fraction of commercial alternatives. This section provides complete build recipes, from a simple white light sword to an addressable RGB pixel bar, with the exact profile families to use. Each build is also a miniature version of a real architectural detail, so the skills transfer directly to your projects.
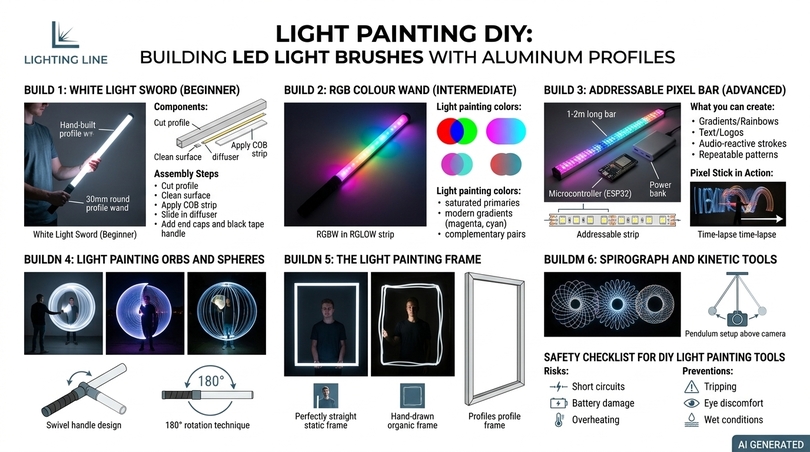
Build 1: the white light sword (beginner)
The white light sword is the most versatile light painting tool: it draws clean lines and, pointed at a subject, paints soft light.
Components
| Component | Suggested product | Notes |
|---|---|---|
| Profile | Round aluminium profile, diameter 30mm | Cut to 60–120 cm |
| Strip | COB LED strip, 3000 K or 4000 K, CRI 90+ | Cut only at marked points |
| Diffuser | Opal, from the diffuser range | Uniform stroke |
| End caps | Round end caps | One with cable hole |
| Power | Battery pack matching strip voltage + inline PWM dimmer | Fuse recommended |
Steps
- Cut the profile to length with a fine-tooth saw and deburr the edges.
- Clean the inner surface with isopropyl alcohol so the strip adhesive bonds well.
- Solder or connect the cable to the strip, then stick the strip along the full length.
- Slide in the opal diffuser and fit the end caps, passing the cable through the drilled cap.
- Wrap the lower 20 cm with black tape or heat-shrink to create an unlit handle, so your hand does not appear in the light painting.
- Connect the dimmer and battery, and test at 10%, 30% and 100% brightness.
Tip: mark the handle with a small piece of tape aligned to the strip, so you always know which side emits light even in complete darkness.
Build 2: the RGB colour wand (intermediate)
Replace the COB strip with an RGB or SMD RGBW strip and add a small RGB controller. Use a round profile with opal diffuser so colours mix inside the tube instead of appearing as separate red, green and blue dots. RGBW is recommended because the dedicated white channel gives a cleaner white than mixing RGB.
Light painting colors: what works best
- Saturated primaries (red, blue, green) read strongly against dark backgrounds.
- Magenta, cyan and amber create modern, fashionable palettes for portraits and events.
- Complementary pairs (blue/orange, cyan/red) give depth when you paint the background one colour and the subject another.
Build 3: the addressable pixel bar (advanced)
An addressable strip lets each LED change colour independently. Inside a 1-2 m profile it becomes a pixel stick: while you walk across the frame, the controller displays one column of an image at a time, and the long exposure reassembles it in mid-air.
Components
- Addressable 5 V strip (WS2812B-type RGB or SK6812-type RGBW), 60 LEDs/m or higher.
- Round 30 mm or 50 mm profile, 1-2 m, with opal diffuser.
- ESP32 or similar microcontroller with open-source firmware (for example WLED) or custom Arduino code.
- USB power bank with enough current (roughly 60 mA per RGB pixel at full white; in practice you will run at 20–40% brightness).
- Level shifter and a 330-470 Ω resistor on the data line, plus a large capacitor across the power input.
What you can create
- Gradients and rainbows in a single sweep.
- Text and logos “printed” in the air, ideal for brand events.
- Audio-reactive strokes that follow the music, perfect for DJs.
- Repeatable patterns: the same programme every time, useful for commercial shoots.
Build 4: light painting orbs and spheres
Light painting orbs are created by spinning a light source on a string or rotating a short wand around its axis while turning your body. A 20-40 cm round profile with a strip on a swivel handle is ideal. Rotating a straight wand 180° while stepping sideways creates the classic light painting sphere. A hoop-shaped tool can be built by bending a flexible strip into a ring and fixing it to a lightweight frame.
Build 5: the light painting frame
A light painting frame is a rectangular or circular outline of light placed in the scene, often around a person or object, to create a portal. You can draw it with a wand, or build a static frame from four lengths of slim surface profile joined with corner brackets and powered by a single strip. A static frame built with profiles appears perfectly straight in every shot, while hand-drawn frames look more organic. Many light painting photographers combine both.
Build 6: spirograph and kinetic tools
Hang a short LED wand from a string attached above the camera and let it swing like a pendulum while the camera points up. The long exposure records spirograph-like curves. Addressable effects add colour changes over time.
Safety checklist for DIY light painting tools
| Risk | Prevention |
|---|---|
| Short circuits | Insulate all joints, use end caps, fit an inline fuse |
| Battery damage | Use packs with protection circuits, never exceed rated current |
| Overheating | Mount strips in aluminium, limit brightness for long sessions |
| Tripping in the dark | Scout the location in daylight, use a dim red headlamp |
| Eye discomfort | Never point bright strips at people’s eyes at close range |
| Wet conditions | Use the waterproof round profile and IP-rated strips outdoors |
5. How to do light painting photography step by step
Now that you have the tools, it is time to answer the most searched question: how to do light painting. The method is simple, but the details separate an average light painting from a stunning one. This section explains how to light paint from planning to post-production, how to photograph light paintings, how to light paint an object and how to create a light effect that looks deliberate. Follow the sequence below and you will get a usable light painting on your first evening.
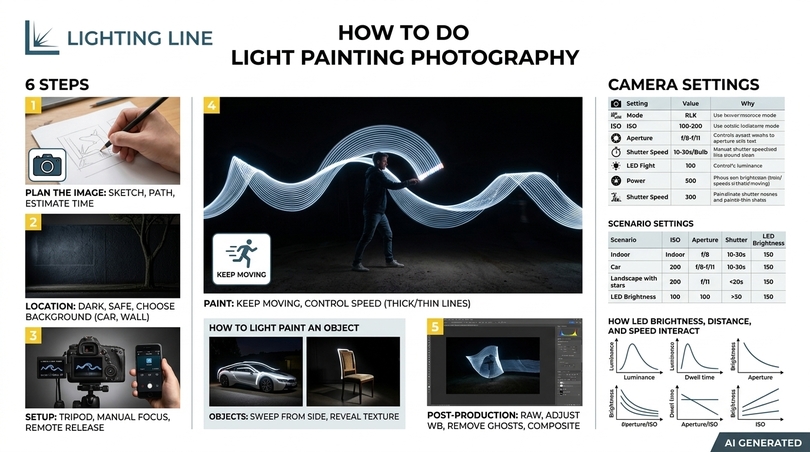
Step 1: plan the image
Good light painting starts on paper. Sketch what you want to draw, where the camera will be and where you will walk. Decide whether you are doing light drawing (light facing the camera), painting with light (light facing the subject) or both. Estimate how long the drawing will take; this becomes your shutter speed.
Step 2: choose the location
- Darkness: the darker the environment, the longer you can expose and the cleaner your strokes. Indoors, switch off all lights; outdoors, avoid street lighting.
- Background: a textured wall, a building, trees or a car give context. A pure black void is great for abstract light drawing.
- Safety and permissions: check that you are allowed to be there at night and that the ground is safe to walk on in the dark.
Step 3: set up the camera
- Mount the camera on a sturdy tripod.
- Switch off image stabilisation (it can cause blur on a tripod).
- Frame the scene with a small margin around the area you will paint.
- Focus manually: place your light wand at the drawing position, focus on it, then switch to manual focus so the camera does not hunt in the dark.
- Set manual exposure (see the settings section below).
- Use a remote release, a phone app or a 2–10 second self-timer.
Step 4: paint with light
Open the shutter, walk into the frame and start painting. Keep these rules in mind:
- Keep moving: if you stand still, you may appear as a ghost in the image.
- Keep your body between the light and the camera to a minimum: hold the wand to the side or wear dark clothes.
- Turn the light on and off between strokes to create separate shapes, or cover the wand with your hand.
- Control speed: slow movement produces thick, bright lines; fast movement produces thin, faint lines.
- Count the time so you close the exposure when the drawing is complete.
How to light paint an object
To light-paint a car, a chair, a building or a product, point the wand at the subject from the side, never directly at the camera. Sweep it slowly and evenly over the surfaces you want to reveal. Side light reveals texture; frontal light flattens it. Sweep the same area several times with short passes rather than once with a slow pass, to avoid hot spots. For glossy objects such as cars and lacquered furniture, a long diffused wand creates beautiful continuous reflections, which is why automotive photographers use long LED bars in profiles.
How do you photograph light paintings made by others or installations?
When photographing a static light art installation, such as an LED profile sculpture, treat it like architectural night photography: tripod, low ISO, bracketed exposures, and a shutter speed long enough to capture ambient detail while keeping the LED lines from clipping. Expose for the brightest line first, then add ambient exposure in a second frame if necessary, blending the two in post-production.
How to make a light painting at home
You do not need a studio. A dark living room is enough:
- Cover windows and switch off standby lights.
- Use a black sheet or a dark wall as background.
- Place the camera or phone on a tripod or a stack of books.
- Draw with a short LED wand or even a bare strip offcut in a small profile.
- Try writing a word, drawing a heart or outlining a friend sitting still for a light painting portrait.
Post-production basics
- Shoot RAW to keep colour flexibility.
- Adjust white balance to neutralise or intensify the LED colour.
- Lift shadows carefully, strong lifts reveal noise.
- Remove stray light leaks and ghosts with local tools.
- Stack several exposures (for example, one for the subject, one for the drawing) using layer masks.
6. Camera settings for light painting
Camera settings for light painting are the technical heart of the technique. Unlike ordinary photography, where the camera measures the scene and chooses an exposure, light painting requires full manual control because the light that matters will only exist during the exposure. This section provides tested starting points, explains the reasoning behind each value and shows how LED brightness interacts with exposure. Once you understand the relationship between stroke speed, strip brightness and aperture, you can predict your exposure before pressing the shutter.
Starting settings for light painting photography
| Setting | Recommended value | Why |
|---|---|---|
| Mode | Manual (M) or Bulb (B) | Complete control of exposure |
| ISO | 100-200 | Minimum noise over long exposures |
| Aperture | f/8–f/11 | Sharp lines, deep depth of field, controls LED brightness |
| Shutter speed | 10-30 s, or Bulb for longer drawings | Time to complete the drawing |
| Focus | Manual, pre-focused on drawing plane | Autofocus fails in the dark |
| White balance | Fixed (e.g. 3200 K for warm LEDs, 5000 K for neutral) | Consistent colour across shots |
| Image stabilisation | Off on tripod | Prevents micro-blur |
| Long exposure noise reduction | On for single images, off for sequences | Cleaner files vs faster workflow |
| File format | RAW | Maximum editing flexibility |
| Drive | Remote release or self-timer | No camera shake |
Adjusting settings for different light painting scenarios
| Scenario | ISO | Aperture | Shutter | LED brightness |
|---|---|---|---|---|
| Indoor light drawing, dark room | 100 | f/8 | 15-30 s | 10-20% |
| Light painting portraits | 100-200 | f/5.6-f/8 | 8-15 s | 15-30% |
| Light painting car (painting the body) | 100 | f/8-f/11 | 30 s-3 min (Bulb) | 50-100% |
| Landscape light painting with stars | 800-3200 | f/2.8-f/4 | 15-30 s | 5-10% |
| Architecture at dusk | 100 | f/8-f/11 | 2-30 s bracketed | Installed LEDs at design level |
| Product light painting (still life) | 100 | f/11-f/16 | 10-60 s | 20-50% |
How LED brightness, distance and speed interact
In light drawing, the camera records the light source directly. The exposure of the stroke depends on three variables:
- Source luminance: how bright the strip looks through the diffuser. Controlled by the dimmer.
- Dwell time: how long the source stays on each pixel of the sensor. Controlled by speed of movement.
- Aperture and ISO: how much of that light the camera accepts.
The shutter speed, surprisingly, does not change the brightness of a stroke; it only changes how much ambient light is recorded and how much time you have to draw. If your strokes are burnt out, dim the LED or move faster; if the background is too dark, lengthen the shutter.
When painting a subject, illuminance follows the inverse square law for small sources: doubling the distance between wand and subject reduces the light on the subject to about a quarter. For long linear sources held close to a surface, the fall-off is closer to inverse-distance, which is one reason why long LED bars in profiles give such even results on cars and walls.
Light painting settings for Canon, Nikon, Sony and other brands
The principles are identical across brands; only menus change. On Canon cameras, Bulb is usually found on the mode dial or beyond 30 s in M mode, and long exposure noise reduction sits in the shooting menu. Nikon and Sony follow the same logic: set M, scroll the shutter past 30 s to reach Bulb, and use a remote or the manufacturer’s smartphone app to hold the shutter open. Always check that the camera’s bulb timer or remote allows exposures of several minutes before a long light painting session.
Exposure bracketing and compositing
Professional light painting photographers often shoot a base exposure of the scene, then several separate exposures each with one element painted. They combine them later. This approach reduces risk: if one stroke goes wrong, you only repeat that part. It also mirrors how lighting designers think: each layer of light (ambient, accent, decorative) is designed and controlled separately.
7. Can you do light painting in daylight?
This is one of the most frequent questions from beginners and event organisers who work during the day. The honest answer is that light painting in full daylight is extremely difficult, but not impossible under the right conditions. This section explains the physics behind the limitation and the practical workarounds. Understanding the ratio between ambient light and your LED output tells you instantly whether a daylight light painting is feasible.
Why daylight makes light painting hard
Direct sunlight can exceed 100,000 lux; overcast daylight is typically in the range of thousands to tens of thousands of lux. A handheld LED wand, even a powerful one, produces a tiny fraction of that on the scene. A long exposure in daylight would overexpose the image in a fraction of a second, long before you could draw anything.
Workarounds
- Strong neutral density (ND) filters: a 10-stop ND filter (ND1000) reduces incoming light by a factor of about 1000, allowing exposures of several seconds in daylight. The LED source is also reduced by the same factor, so only very bright sources close to the lens remain visible.
- Deep shade or indoor spaces: interiors, tunnels, underpasses and forests reduce ambient light dramatically.
- Blue hour: the 20–40 minutes after sunset balance sky detail with visible light strokes. This is the favourite moment for architectural light painting.
- Frame stacking: shoot many short daylight frames and stack only the brightest pixels in software; this is how phone “light trail” apps behave.
Recommended ambient light levels for light painting
| Ambient condition | Approximate illuminance | Light painting feasibility |
|---|---|---|
| Direct sunlight | Over 100,000 lx | Practically impossible |
| Overcast day | About 1,000-10,000 lx | Only with ND filters and very bright sources |
| Typical office interior | About 300-500 lx | Poor; switch off lights |
| Twilight / blue hour | About 1-10 lx | Excellent balance |
| Street lighting | About 5-30 lx | Workable with short exposures |
| Full moon | Below 1 lx | Very good |
| Dark room | Close to 0 lx | Ideal |
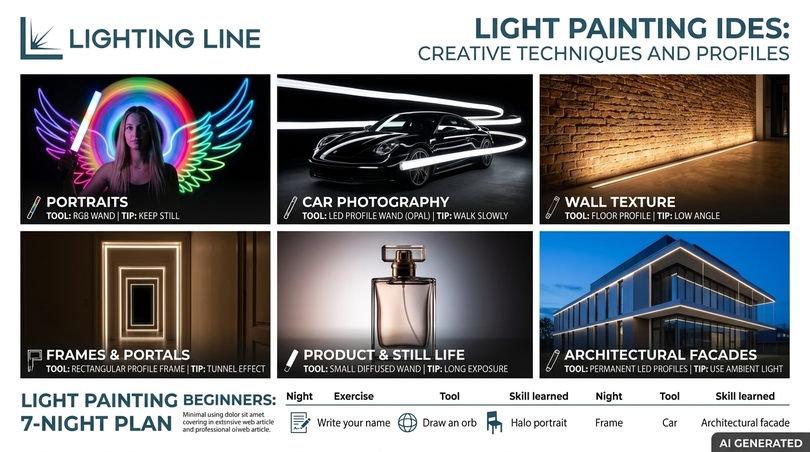
8. Light painting ideas: portraits, cars, walls, frames and more
Ideas are what keep light painting exciting. This section collects light painting ideas for beginners and professionals, organised by subject, with the tool and LED configuration that works best for each. Every idea includes a practical tip so you can go from inspiration to result on the same night. Many of these ideas also inspire permanent installations, which we explore in the architecture section.
Light painting portraits
Light painting portraits are among the most popular light painting photos on social media. The subject stays as still as possible while you draw around them or paint their face with soft light.
- Halo portrait: draw a circle behind the head with a short RGB wand.
- Wings: sweep a flat profile in arcs behind the shoulders, rotating it to vary width.
- Rim light portrait: paint only the edges of the face and shoulders from the sides with a warm 2700 K COB wand.
- Double exposure: flash or paint the subject briefly, then have them step aside while you draw.
For skin tones, use high CRI white LEDs and keep the wand moving to avoid harsh hot spots.
Light painting car photography
Light painting a car is a classic of automotive photography. The long, glossy surfaces of a car reflect a moving light bar as continuous highlights.
- Use a 1-2 m profile with opal diffuser, round 50 mm or wide flat profiles work very well.
- Walk slowly along the car at a constant distance, holding the bar vertically or horizontally.
- Shoot multiple exposures: one per panel, then composite.
- Use a neutral 4000-5000 K white to preserve paint colour.
This is also a lesson for showroom design: long linear light produces long, elegant reflections on glossy surfaces, which is why suspended and recessed profiles are standard in car dealerships.
Light painting wall ideas
A light painting wall can mean two things: a wall used as a background for light drawing, or a wall designed as a permanent “painting of light” using LED profiles. Both are powerful.
- Grazing light: paint the wall from a very low angle to reveal brick, stone or plaster texture. The permanent equivalent is a floor profile or baseboard profile at the foot of the wall.
- Graphic lines: draw diagonals and grids on a dark wall. The permanent version uses drywall profiles plastered flush into plasterboard.
- Colour gradients: paint the wall with two colours from opposite sides. Permanently, RGBW strips in wall profiles reproduce the effect.
Light painting frame ideas
- Draw a glowing rectangle around a doorway to create a portal.
- Build a static profile frame and place a subject inside it.
- Draw nested frames of different colours for a tunnel effect.
- Photograph a real picture frame lit by a profile for a “frame within a frame”.
Light painting landscape photography
In landscape light painting, the photographer paints trees, rocks or ruins with soft light under a starry sky. Keep brightness very low, because high ISO settings amplify every photon. A dimmed warm LED wand gives a natural, moonlight-like look; cold colours feel more dramatic.
Light painting product photography and still life
Light painting product photography produces gradients and reflections that are hard to achieve with fixed lights. Place the product on a black surface, set a long exposure and sweep a small diffused wand across its edges. Glass, metal and ceramics respond especially well. Furniture designers can use the same technique to photograph cabinets fitted with furniture profiles.
Light painting real estate photography
Real estate photographers use painting with light to balance interiors and exteriors: they paint dark corners, lift ceilings and bring out textures. In properties with integrated LED profiles, the photographer’s job becomes much easier because the architecture already contains well-placed, uniform light lines.
Light writing photography and typography
- Write words backwards so they read correctly from the camera, or flip the image later.
- Use a thin wand for script, a wide one for bold letters.
- Use addressable bars to “print” crisp fonts in one pass.
Creative and abstract light painting ideas
- Spirals and vortex shapes with a rotating wand.
- Light painting orbs and spheres.
- Light painting flowers and trees drawn in colour.
- Stop motion light painting animations.
- Light painting graffiti on urban walls (with permission).
- Reflections on water with the waterproof round profile.
Light painting ideas for beginners: a 7-night plan
| Night | Exercise | Tool | Skill learned |
|---|---|---|---|
| 1 | Write your name | Short white wand | Basic exposure and movement |
| 2 | Draw an orb | Short wand on swivel | Rotation and symmetry |
| 3 | Paint a chair | Diffused white wand | Painting with light on objects |
| 4 | Portrait with halo | RGB wand | Colour and subject interaction |
| 5 | Light painting frame | Wand or static profile frame | Geometry and composition |
| 6 | Car or bicycle | 1-2 m bar | Reflections and compositing |
| 7 | Architectural facade at blue hour | Long bar + installed LEDs | Balancing ambient and painted light |
9. Light painting for architects: from photo study to built installation
For architects and interior designers, light painting is much more than a photographic trick. It is a design language based on lines, gestures and contrasts, and it can be translated almost literally into built space with aluminium profiles and LED strips. This section shows how to use light painting as a design tool, then presents concrete residential, commercial, hospitality, office and outdoor schemes at low, medium and high budget levels.
Light painting as a design method
The “light sketch” survey
Visit the empty or existing space at night with a tripod and a 1 m LED wand. Take a base exposure of the room, then trace each proposed LED line with the wand: the ceiling perimeter, a niche, a stair, a line above the kitchen worktop. Each trace takes a few seconds. In twenty minutes you have a set of light painting photos that show the client exactly where the linear light will go, in the real space and at real scale, before any render is produced.
Testing intensity hierarchies
By varying wand brightness between traces you can test hierarchies: a strong accent line on the feature wall, a softer perimeter cove, a faint guide light at floor level. This anticipates the dimming scenes you will programme later.
Testing colour temperature
Tunable white wands allow you to trace the same line at 2700 K and 4000 K and compare them in the same frame. Clients understand colour temperature instantly when they see it on their own walls.
The language of painted light: five design principles
- Line over point: continuous lines give calm and direction; spotlights give focus. Light painting trains the eye to think in lines.
- Light reveals material: grazing light on stone, wood or plaster creates the depth that light painting photographers look for.
- Darkness is part of the design: light painting only works against darkness, in architecture, contrast is what makes linear light elegant.
- Invisible source, visible effect: in the best light painting the light carrier disappears, in architecture recessed and drywall profiles make the fitting disappear.
- Gesture and flow: light painting is movement; linear profiles along circulation paths guide movement through a building.
Residential projects
Living room: “painted” ceiling lines
A light painting of the ceiling perimeter becomes a shadow-gap cove built with drywall profiles plastered into the plasterboard. The line appears to float without visible fixtures. Add a warm 2700–3000 K strip for evenings and a dimmer for scenes.
| Budget | Configuration | Products | Effect |
|---|---|---|---|
| Low | Surface profile on top of a wardrobe or bookcase, indirect towards ceiling | Surface profile + SMD strip 3000 K + frosted diffuser | Soft uplight, no building works |
| Medium | Recessed lines in false ceiling, two dimmable circuits | Recessed profile + COB strip + opal diffuser | Graphic ceiling lines |
| High | Plaster-in drywall lines crossing walls and ceiling, tunable white, smart control | Drywall profile + tunable white COB + controller | Seamless “light painting” in the architecture |
Kitchen: task light that also paints the backsplash
Under-cabinet lighting is one of the most searched LED strip applications. A furniture profile under wall units provides task light on the worktop and grazes the backsplash, revealing the texture of tiles or stone, exactly as grazing light does in light painting photography. Use 4000 K for cooking precision or 3000 K for a warmer atmosphere, and a CRI of at least 90 for food colour.
Bathroom: mirror and niche light
A mirror profile creates the frontal, shadow-free light needed for grooming. Tiling profiles, such as the waterproof floor aluminium profile for 12mm tile, white painted aluminium profile for 8mm tile and aluminium profile for 11mm tile, integrate lines of light into tiled walls and niches, turning the shower into a light-painted surface. Always check IP ratings of strips and drivers in wet zones.
Stairs and corridors: light that guides movement
Like the Gilbreths’ light traces, stair lighting follows human movement. A handrail profile lights each step from above, a 75x13mm baseboard profile washes the floor of a corridor, corner profiles can outline stair nosings. Low-level linear light improves safety at night without glare.
Bedroom: floating bed and wardrobe interiors
A surface profile under the bed frame creates the popular “floating bed” effect. Inside wardrobes, furniture profiles with motion sensors light clothes evenly. Keep the bedroom warm (2700 K) and dimmable.
Retail and showrooms
Retail design uses light to guide customers and sell products. The visual vocabulary of light painting (streaks, reflections, gradients) is especially effective in fashion, automotive and technology stores.
| Budget | Configuration | Products | Design intent |
|---|---|---|---|
| Low | Surface profiles on shelves and display edges | Surface or furniture profiles + SMD strip 4000 K | Product visibility |
| Medium | Suspended linear pendants in rhythm with aisles | Suspension profiles + high-output strip | Direction and brand rhythm |
| High | Diagonal “light painting” lines across ceiling and walls, tunable white, walkable floor lines leading to hero products | Drywall profiles + 20x11mm walkable floor profile + COB strips | Immersive, instagrammable space |
Car showroom tip: a ceiling grid of suspended linear profiles produces continuous reflections on car bodies, just like a light painting car photo. Round profiles such as the 75 mm diameter round profile create softer, wider highlights.
Hospitality: hotels, restaurants and bars
Hotel lobbies
A lobby is the first image guests photograph. Continuous lines of light around reception desks, lifts and ceilings create a signature look that reads well on smartphones. Walkable floor profiles leading from the entrance to the reception desk paint a path of welcome.
Restaurants
Restaurants need intimacy: warm colour temperatures, low levels and light focused on tables. Suspended 50 mm round profiles above long tables create a warm glowing line, while under-counter furniture profiles make bar fronts glow.
Cocktail bars and clubs
Bars are the natural home of light painting aesthetics. RGBW or addressable strips in profiles behind bottles, under counters and along ceilings let the space change mood through the evening, and even synchronise with music. We cover this in detail in the events section.
| Budget | Hospitality configuration | Products |
|---|---|---|
| Low | Back-bar shelf lighting and counter underglow | Furniture / surface profiles + SMD 2700 K or RGBW |
| Medium | Suspended round profiles over tables + wall grazing | Round profiles + wall profiles + dimmers |
| High | Addressable ceiling lines synchronised to music and time of day | Drywall / recessed profiles + addressable strips + DMX or network control |
Offices and workplaces
Offices require functional light (task illuminance, low glare) more than drama. Linear profiles excel here because they spread light evenly. Suspended linear profiles over desks can deliver both direct task light and indirect ceiling light when strips are mounted on both faces. Light painting ideas still apply in reception areas, meeting rooms and corridors, where a strong graphic line of light supports brand identity.
Outdoor, landscape and façade
Outside, light painting photographers paint trees and walls at night; architects do the same permanently. Use waterproof profiles and IP-rated strips:
- Façade lines: waterproof round or wall profiles along cornices and window reveals.
- Pergolas and canopies: the waterproof 30 mm round profile under beams.
- Paths and terraces: walkable floor profiles such as the 25x11mm and 20x26mm walkable floor-recessed profiles.
- Concrete integration: the PVC profile for cement and the concrete profile family embed lines of light directly into cast surfaces.
Always respect dark-sky principles outdoors: aim light down or at surfaces, avoid upward spill and use warm colour temperatures near natural habitats.
Museums, galleries and exhibitions
Exhibitions combine the two worlds of this guide: the lighting of artworks (see the section on how to light a painting) and immersive light art installations. Linear profiles in coves or on tracks provide even wall washing; addressable installations create kinetic light art that visitors photograph with their phones, effectively turning every visitor into a light painting photographer.
Project summary matrix for architects
| Space | Light painting inspiration | Primary profile family | Strip | Colour temperature |
|---|---|---|---|---|
| Living room | Floating lines | Drywall / recessed | COB, dimmable | 2700-3000 K |
| Kitchen | Grazing backsplash | Furniture / surface | COB or SMD, CRI 90+ | 3000-4000 K |
| Bathroom | Light-painted tiles | Tiling / mirror | IP-rated | 3000-4000 K |
| Stairs | Traces of movement | Handrail / corner / baseboard | SMD or COB | 2700-3000 K |
| Retail | Streaks and reflections | Suspension / floor | High output | 3000-4000 K |
| Bar / club | Colour light drawing | Surface / recessed | RGBW / addressable | Variable |
| Garden / façade | Painted trees and walls | Round waterproof / floor / concrete | IP-rated | 2700–3000 K |
11. Lux calculation for LED profile installations
Light painting is judged by eye; architecture must also be judged by numbers. When a light painting idea becomes a permanent installation, you need to verify that the space receives the right amount of light for its function. This section explains lux, lumens and the practical formulas to size LED profile installations, with worked examples. A correct lux calculation is the difference between a beautiful line of light and a room that is beautiful but too dark to use.
Lumen vs lux: the essentials
- Lumen (lm): the total quantity of visible light emitted by a source. LED strips are specified in lumens per metre (lm/m).
- Lux (lx): illuminance, the amount of light falling on a surface. 1 lux = 1 lumen per square metre.
- Candela (cd): luminous intensity in a direction; useful for accent lighting.
- Luminance (cd/m²): how bright a surface looks, such as the diffuser of a profile or a lit wall. In light painting, stroke brightness on the sensor depends on luminance.
Recommended lux levels
The European standard EN 12464-1 sets maintained illuminance values for workplaces; residential values are commonly used guidance. The table below summarises typical targets.
| Space / task | Typical maintained illuminance | Notes |
|---|---|---|
| Corridors and circulation areas | 100 lx | Workplace reference value |
| Stairs | 100–150 lx | Higher on treads helps safety |
| Living room (ambient) | 100–200 lx | Residential guidance, layered with task lights |
| Kitchen worktop | 300–500 lx | Residential guidance for food preparation |
| Bathroom mirror | 300–500 lx on the face | Frontal, shadow-free light |
| Office writing, reading, computer work | 500 lx | EN 12464-1 reference for task area |
| Retail sales area | 300 lx and above | Accent levels often 3–5 times higher |
| Restaurant / bar ambience | 50–200 lx | Design-driven, dimmable |
| Highly light-sensitive artworks | About 50 lx | Museum conservation guidance |
| Oil and acrylic paintings | About 150–200 lx | Museum conservation guidance |
The average illuminance formula (lumen method)
For general lighting, the simplified lumen method gives a quick estimate:
E = (Φ × UF × MF) / A
- E = average maintained illuminance (lx)
- Φ = total luminous flux of all strips (lm) = lm/m × metres
- UF = utilisation factor (share of light reaching the working plane: typically 0.4–0.7 depending on room shape, surface reflectances and whether light is direct or indirect)
- MF = maintenance factor (typically 0.8 for LED in clean environments)
- A = area of the working plane (m²)
Rearranged to find the length of strip you need:
Length (m) = (E × A) / (lm/m × diffuser transmission × UF × MF)
Diffuser transmission and profile losses
Diffusers absorb part of the light. Clear covers lose little, frosted covers more, and opal covers the most, in exchange for perfect uniformity. Always use the effective output of the strip inside the chosen profile and diffuser, not the bare strip output. Where manufacturer data is not available for a specific combination, use a conservative estimate and verify with a lux meter after installation. The Lighting Line technical team can help you with data for specific profile and strip pairings; see the profiles catalogue and strip LED catalogue.
Worked example 1: kitchen worktop
| Parameter | Value |
|---|---|
| Worktop area | 3.6 m × 0.6 m = 2.16 m² |
| Target illuminance | 400 lx |
| Strip in furniture profile, effective output after opal diffuser | 800 lm/m (example value) |
| Utilisation factor (direct, close to surface) | 0.7 |
| Maintenance factor | 0.8 |
| Required flux on worktop | 400 × 2.16 = 864 lm |
| Length needed | 864 / (800 × 0.7 × 0.8) ≈ 1.93 m |
Since the cabinets run 3.6 m, a continuous 3.6 m line will deliver well above target, which is ideal because you can dim it down. Designing with headroom and then dimming is better than installing too little light.
Worked example 2: living room indirect cove
| Parameter | Value |
|---|---|
| Room area | 5 m × 4 m = 20 m² |
| Target ambient illuminance | 150 lx |
| Cove length (perimeter) | 18 m |
| Utilisation factor (indirect, light ceiling) | 0.4 |
| Maintenance factor | 0.8 |
| Required installed flux | 150 × 20 / (0.4 × 0.8) = 9,375 lm |
| Required effective output per metre | 9,375 / 18 ≈ 520 lm/m |
A mid-power strip in a surface or drywall profile will do the job. If the ceiling is dark or textured, the utilisation factor drops and you need more output.
Worked example 3: office desk line
A 1.6 m desk area of 1.6 m × 0.8 m = 1.28 m² needs 500 lx. With a suspended profile at 0.8 m above the desk, UF 0.6, MF 0.8 and 1,200 lm/m effective downlight output over 1.6 m, the average illuminance is (1,200 × 1.6 × 0.6 × 0.8) / 1.28 = 720 lx. The installation meets the target with margin for dimming, but for a real project you should also verify uniformity and glare with lighting software.
Linear sources and distance
Close to a long linear source, illuminance decreases roughly in proportion to distance rather than its square. Further away, when the distance becomes large compared to the length of the line, the source behaves like a point and the inverse square law applies. This explains why linear profiles are so effective at producing even light on worktops, shelves and walls, and why light painting with a long bar gives more uniform results than with a small torch.
Lux to lumens and lumens to lux: quick reference
| Conversion | Formula | Example |
|---|---|---|
| Lumens to lux (uniform) | lx = lm / m² | 1,000 lm on 2 m² = 500 lx |
| Lux to lumens | lm = lx × m² | 300 lx on 10 m² = 3,000 lm on the surface |
| Installed flux needed | lm = lx × m² / (UF × MF) | 300 × 10 / (0.5 × 0.8) = 7,500 lm |
| Strip length needed | m = installed lm / effective lm/m | 7,500 / 750 = 10 m |
Measuring lux on site
After installation, measure with a lux meter at several points on the working plane, then calculate the average and the uniformity ratio (minimum divided by average). Smartphone lux apps give rough indications only. Measured values should be recorded and compared with the design, especially in workplaces.
12. How to light a painting on the wall with LED profiles
The phrase “light painting” is also searched by people who want to know how to light a painting, that is, how to illuminate an artwork on a wall. It is a different meaning from light painting photography, but it is closely connected to the same products and to the same sensitivity for light. This section explains how to set up lighting for a painting at home, in a gallery or in a hotel, and how to photograph your artwork afterwards. Correct artwork lighting protects the work, reveals its colours and turns a wall into a focal point.
The three rules of artwork lighting
- Colour quality: use LEDs with CRI 90 or higher, ideally with good rendering of saturated reds (R9), so that pigments look as the artist intended.
- Angle: aim light at about 30° from the vertical onto the centre of the artwork. This minimises reflections on glass or varnish and avoids the frame’s shadow.
- Level and exposure: keep illuminance appropriate for the material. Sensitive works (watercolours, drawings, textiles, photographs) need low levels; oil and acrylic paintings tolerate more.
Light above a painting with a linear profile
A traditional picture light is a small fitting above the frame. A modern, minimal alternative is a slim linear profile. Options include:
- Surface profile on the frame top or wall: a short surface profile projects light down onto the canvas. Use an asymmetric position (slightly away from the wall) to achieve the 30° angle.
- Recessed ceiling line: a recessed profile or drywall profile parallel to the wall, about 60–90 cm away for a typical ceiling height, washes the entire gallery wall evenly.
- Corner profile at the ceiling-wall junction: a corner profile provides a discreet wall-grazing effect, suited to textured works but less to glossy canvases.
- Shelf lighting: for art displayed on shelves, a furniture profile under the shelf above lights the piece from the front.
How far from the wall?
| Height of light source above artwork centre | Distance from wall for approx. 30° |
|---|---|
| 0.5 m | About 0.29 m |
| 0.8 m | About 0.46 m |
| 1.0 m | About 0.58 m |
| 1.3 m | About 0.75 m |
| 1.5 m | About 0.87 m |
The distance is calculated as height × tan(30°) ≈ height × 0.577.
How to set up lighting for painting in a studio
Artists also ask how to set up lighting for painting, meaning the light they need while working. The goal is even, high-CRI light that does not change during the day.
- Choose 4000–5000 K for a neutral reference; some artists prefer a mix that simulates north light.
- Use long diffused profiles above and slightly in front of the easel to avoid shadows from the hand.
- Aim for 500–1000 lx on the canvas for detailed work.
- Avoid mixing colour temperatures in the studio: the eye adapts, but colour judgements suffer.
Linear LED profiles are ideal for studios because they behave like large, soft sources, reducing the harsh shadows typical of spotlights.
How do you photograph your artwork?
Photographing art is, in a sense, the most controlled form of painting with light:
- Place the camera exactly parallel to the artwork, centred, on a tripod.
- Light from both sides at about 45°, with two identical diffused sources (two LED profiles with opal diffusers work well), at equal distances.
- Switch off other lights to avoid colour casts.
- Use a grey card for white balance and shoot RAW.
- For glossy or varnished works, use polarising filters on the lens and, if possible, on the lights.
Alternatively, you can literally light paint the artwork: in a dark room, set a long exposure and sweep a diffused wand evenly across the surface from the side. This produces very even light on large works without needing big softboxes.
How do artists use light in paintings?
Painters have always used light as a subject: chiaroscuro, glowing skies, candlelit interiors. Understanding how artists use light helps lighting designers too. A painting that depicts strong light from the upper left will look most natural when lit from the same side, reinforcing the artist’s intention. Some curators adjust lighting direction for exactly this reason.
13. Light painting and LED effects for DJs and event planners
DJs, music producers and event planners work with light in a different way from architects: time is part of the design, and the goal is to create “light it up” moments that the audience remembers and photographs. Light painting aesthetics, with their streaks, colours and motion, are exactly what audiences love to share. This section answers the typical questions from DJs and event planners, with portable and permanent LED profile solutions. A well-designed linear LED setup gives a small club or a festival stage a visual identity at a fraction of the cost of moving heads.
How can I incorporate “light it up” effects into DJ performances?
“Light it up” moments are the peaks of a set: the drop, the chorus, the final track. LED profiles support them in three ways:
- DJ booth lines: surface or furniture profiles with RGBW or addressable strips along the front and top edges of the booth. At the drop, switch from a slow colour fade to full white or a fast chase.
- Vertical light bars: 1-2 m round profiles mounted on stands behind the DJ, acting as “light pillars” that pulse with the beat.
- Audience light painting: hand out short LED wands during a specific track and invite a photographer to shoot a long exposure of the crowd. The resulting light painting photos become social content for the event.
How do I synchronise lighting with music beats?
| Method | How it works | Complexity | Best for |
|---|---|---|---|
| Sound-activated RGB controllers | Built-in microphone triggers colour changes | Low | Small parties, bars |
| Addressable controllers with audio-reactive firmware | Microphone or line input analysed by frequency; effects follow bass, mids, highs | Medium | DJ booths, clubs, home studios |
| DMX512 with lighting console | LED strips driven by DMX decoders; operator programs cues or uses beat sync | Medium–high | Clubs, touring, events |
| Timecode / MIDI / network protocols | Lighting linked to DJ software or show control | High | Festivals, productions |
For DJs, an addressable strip in an opal-diffused profile controlled by audio-reactive firmware is the most cost-effective way to get beat-synchronised linear light. Keep latency low by using a line input rather than an ambient microphone when possible.
What are the best lighting options for a small club event?
- Bar front and back-bar: furniture and surface profiles with RGBW strips.
- Ceiling lines: surface-mounted profiles in geometric patterns echoing the brand or the music style.
- Dance floor edges: walkable floor profiles outlining the dance area, for permanent venues.
- DJ booth: addressable lines for beat sync.
- Toilets and corridors: low-level baseboard lines for safety and continuity of atmosphere.
Are there portable lighting solutions suitable for gigs?
Yes. Portable LED bars made from profiles are light, robust and quick to set up:
- Use 1 m or 2 m 30 mm round profiles with end caps, fixed to microphone stands or truss clamps via mounting brackets.
- Power them from compact power supplies or battery packs for wireless setups.
- Use connectors so that bars can be daisy-chained or swapped quickly.
- Store them in padded tubes to protect diffusers.
The same bars double as light painting tools after the show, which makes them attractive for DJs who also create content.
What is the impact of lighting on audience engagement?
Lighting shapes how people feel, move and remember an event. Coordinated light and music increase perceived energy; darkness punctuated by bright moments builds anticipation; colour communicates mood. Visual moments also drive social sharing, which extends the reach of an event far beyond the room. Lighting designed for the camera, with clean lines and bold colours, performs particularly well on phones, and linear LED profiles photograph cleanly without the dots and flicker that cheaper fixtures can show.
Flicker and cameras
At events, many phones record video. Poor PWM dimming frequencies can cause visible banding. Choose controllers with high PWM frequencies for anything that will be filmed.
How can event planners use light painting themes?
- Light painting photo booth: a dark corner, a camera on a tripod, a photographer and a set of LED wands. Guests draw their names or hearts and receive the photo instantly.
- Themed entrances: tunnels of light made with repeated profile frames, echoing the light painting frame effect.
- Brand light writing: addressable bars “printing” the brand logo in the air during a long exposure.
- Dinner tables: suspended round profiles giving each table a warm, glowing line.
What lighting equipment is recommended for outdoor festivals?
| Requirement | Recommendation |
|---|---|
| Water and dust protection | IP-rated strips, waterproof round profiles, sealed end caps, outdoor-rated drivers |
| Walkable areas | Walkable floor profiles for stage edges and paths |
| Robustness | Aluminium profiles protect strips from knocks during load-in and load-out |
| Visibility | High-output strips and bold colours, opal diffusers for uniform lines at distance |
| Control | DMX or network control to integrate with stage lighting |
| Safety | Low-voltage systems, residual current protection on mains, proper cable management |
Budget-friendly lighting for large events
Linear LED profiles offer a very favourable cost per metre of visible light. For large events:
- Standardise lengths (for example 2 m bars) so every element is interchangeable.
- Reuse: aluminium profiles last many events; only strips may need replacing after heavy use.
- Mix: use a few intelligent fixtures for beams and many linear bars for architecture of the space.
- Efficiency: LEDs use far less energy than traditional sources; the US Department of Energy notes that residential LEDs use at least 75% less energy and last up to 25 times longer than incandescent lighting, reducing generator loads outdoors.
How can lighting improve the overall attendee experience?
Beyond spectacle, lighting affects comfort and safety: well-lit paths, clear signage, glare-free seating areas and calm zones. Good event lighting combines “wow” moments with invisible functional light, just as good architecture combines feature lines with correct lux levels.
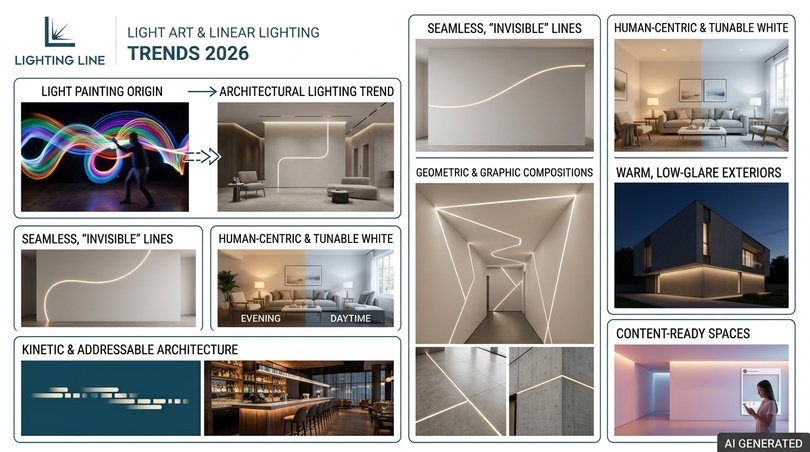
14. Light art and linear lighting trends 2026
Light painting keeps evolving, and so does architectural linear lighting. The two influence each other: what light painting photographers create today often becomes an interior trend a few years later. This section summarises the main trends for architects and designers. Knowing the trends helps you propose solutions that feel contemporary and future-proof.
Seamless, “invisible” lines
Plaster-in drywall profiles and dot-free COB strips produce lines that look drawn directly onto surfaces, just like a light painting stroke. The fitting disappears; only the gesture remains.
Human-centric and tunable white lighting
Tunable white strips allow warmer light in the evening and cooler light during the day, supporting comfort and well-being in homes, offices and hospitality.
Kinetic and addressable architecture
Addressable strips in profiles allow light to move along lines, creating slow, calm animations in lobbies and dramatic effects in bars. Designers borrow the motion vocabulary of light painting directly.
Geometric and graphic compositions
Diagonals, broken lines and continuous lines from wall to ceiling are replacing the classic perimeter cove. Corner and drywall profiles make it possible to “fold” a line of light around the architecture.
Integration into materials
Profiles for tiles, concrete and floors integrate light into the building fabric. Light becomes part of the surface rather than an object applied to it.
Warm, low-glare exteriors
Outdoor lighting is moving towards warmer colour temperatures, lower levels and careful shielding, respecting night skies and wildlife while still creating memorable façades.
Content-ready spaces
Owners want spaces that look good on social media. Lines of light, gradients and reflections inspired by light painting photos are designed with the camera in mind.
| Trend | Light painting origin | Lighting Line solution |
|---|---|---|
| Invisible lines | Light drawing strokes | Drywall profiles + COB strips |
| Tunable white | Colour temperature experiments | Tunable white strips in any profile |
| Kinetic light | Moving light sources | Addressable strips + round or recessed profiles |
| Graphic geometry | Light painting frames | Corner, surface and recessed profiles |
| Material integration | Grazing light on textures | Tiling, floor, concrete, baseboard profiles |
| Warm exteriors | Landscape light painting | Waterproof round profiles + warm IP strips |
15. Common mistakes and troubleshooting
Even experienced photographers and designers make recurring mistakes with light painting and LED profiles. This section lists the most common problems, their causes and their solutions, in both the photographic and the architectural context. Reading it before your first session or your first specification will save you hours of trial and error.
Light painting photography problems
| Problem | Likely cause | Solution |
|---|---|---|
| Strokes burnt out, white instead of coloured | LED too bright, moving too slowly | Dim to 10–30%, move faster, close aperture |
| Strokes dotted | Bare SMD strip or clear diffuser | Use opal diffuser, deeper profile or COB strip |
| Ghost of the photographer visible | Standing still, lit by own wand | Keep moving, wear dark clothes, shield the wand |
| Blurred background | Tripod unstable, stabilisation on | Heavier tripod, stabilisation off, remote release |
| Out-of-focus strokes | Autofocus in the dark | Pre-focus manually on drawing plane |
| Uneven painting on a subject | Stopping on areas, small source | Multiple quick passes, longer diffused bar |
| Colour cast | Auto white balance | Fixed white balance, RAW |
| Noise | High ISO, heat | Lower ISO, long exposure noise reduction |
| Hand visible in strokes | No unlit handle | Tape or heat-shrink the handle section |
LED profile installation problems
| Problem | Likely cause | Solution |
|---|---|---|
| Visible dots through diffuser | Strip too close to diffuser, low LED density | Deeper profile, opal diffuser, COB strip |
| Brightness drops along long runs | Voltage drop | Use 24 V strips, feed from both ends or mid-point |
| Colour differences between lines | Different strip batches or colour bins | Order all strips for a project together |
| Strip peeling off | Dirty surface, heat | Clean with isopropyl alcohol, use aluminium profile |
| Reduced lifetime | Overheating | Match strip power to profile heat dissipation |
| Glare | Visible bright line in field of view | Recessed or deeper profiles, lower output, indirect mounting |
| Flicker on camera | Low-frequency PWM dimming | High-frequency drivers or dimmers |
| Room too dark or too bright | No lux calculation | Calculate lux, install headroom and dimming |
16. Choosing the right Lighting Line product
With more than a hundred profiles and a wide range of strips, choosing can seem complex. This section condenses the whole guide into a decision table: start from what you want to achieve, and find the profile family, strip type and diffuser to use. Use it as a checklist when preparing a light painting kit or a project specification.
| I want to… | Profile | Strip | Diffuser |
|---|---|---|---|
| Build a handheld light painting wand | Round 30 mm | COB white or SMD RGBW | Opal |
| Light paint outdoors or near water | Round waterproof 30 mm | IP-rated strip | Integrated |
| Paint cars and large objects | Round 50 mm or wide surface profile | High output COB, 4000-5000 K | Opal |
| Create statement pendants | Round 75 mm or suspension | COB 3000 K | Opal |
| Draw seamless lines in walls and ceilings | Drywall | COB, dimmable or tunable | Opal |
| Create ceiling lines in false ceilings | Recessed | COB or high-density SMD | Opal or frosted |
| Add indirect light quickly | Surface | SMD | Frosted |
| Outline corners and edges | Corner | SMD or COB | Opal |
| Light kitchen cabinets and shelves | Furniture | COB CRI 90+ | Opal |
| Integrate light into tiles | Tiling | IP-rated | Opal |
| Light floors, paths and stages | Floor (walkable) | IP-rated | Integrated |
| Wash corridors at low level | Baseboard | SMD or COB warm | Opal |
| Light stairs from the handrail | Handrail | SMD or COB | Opal |
| Light a mirror | Mirror | High CRI, 3000-4000 K | Opal |
| Embed light in concrete | Concrete / PVC profile for cement | IP-rated as required | Opal |
| Beat-synchronised DJ lighting | Round or surface | Addressable SMD | Opal |
Not sure which combination fits your project? The Lighting Line technical team can help you choose profile, strip, diffuser and accessories, and support you with lux calculations. Explore the full profile catalogue, the LED strip catalogue, or create a professional account to order.
17. Project scenarios: from light painting sketch to built installation
Theory becomes convincing when it is applied to real situations. This section walks through three illustrative project scenarios, typical of the requests architects and designers bring to the Lighting Line technical team, showing how a light painting study evolves into a specification, a lux check and a product list. The scenarios are representative examples, not specific client projects, and the numbers are indicative values you should verify for your own space.
Scenario A: a city apartment living area (low to medium budget)
The brief
A 32 m² open-plan living and kitchen area in a renovated apartment. The client wants a calm, contemporary atmosphere in the evening, good task light in the kitchen and no visible downlights in the ceiling. The budget does not allow extensive plasterboard work.
The light painting study
At night, the designer photographs the empty room from the entrance with a 20-second exposure. In successive frames, she traces with a warm 1 m wand: a line along the top of the kitchen wall units towards the ceiling, a line under the wall units, a line along the top of a tall bookcase, and a short vertical line beside the television niche. The client immediately rejects the vertical line (too busy) and asks for the bookcase line to extend across the whole wall, a decision that would have taken several rounds of renders.
The specification
| Element | Product family | Strip | Length |
|---|---|---|---|
| Uplight on top of wall units | Surface profile, frosted diffuser | SMD 3000 K | 3.6 m |
| Under-cabinet task light | Furniture profile, opal diffuser | COB 3000 K, CRI 90+ | 3.6 m |
| Bookcase uplight | Surface profile, frosted diffuser | SMD 2700 K | 4.2 m |
| Control | Two dimmable circuits | – | – |
The lux check
The kitchen worktop calculation follows the method in section 11: with the continuous under-cabinet line, the worktop exceeds 400 lx with headroom for dimming. The indirect uplights contribute an estimated 80–120 lx of ambient light depending on ceiling reflectance. The result is a layered scheme: task light where needed, soft ambient light everywhere, and no visible fixtures.
Why it works
Surface and furniture profiles require no structural work, installation takes a day, and the light painting study guaranteed client approval before a single profile was cut.
Scenario B: a concept store with a car display (medium to high budget)
The brief
A 180 m² concept store combining lifestyle products and a single electric car on display. The brand wants a space that looks spectacular on social media, with strong reflections on the car body and a clear path from entrance to checkout.
The light painting study
The designer photographs the empty shell at night and uses a 2 m bar to light paint the car’s position from above, testing parallel lines at different spacings. Long exposures show that lines spaced about 60 cm apart produce continuous, elegant highlights along the bonnet and roof, while wider spacing breaks the reflections into separate stripes. A second series traces a floor line from the entrance.
The specification
| Element | Product family | Strip | Notes |
|---|---|---|---|
| Car display “reflection ceiling” | Suspension profiles in parallel rows | High-output COB 4000 K | Rows about 60 cm apart |
| Feature pendants over tables | Round 75 mm profile | COB 3000 K | Soft, wide glow |
| Guiding floor line | 20x11mm walkable floor profile | IP-rated SMD 3000 K | Entrance to checkout |
| Diagonal wall graphics | Drywall profiles | Tunable white COB | Brand-shaped lines |
| Shelving | Furniture profiles | COB 3000 K CRI 90+ | Product visibility |
The lux check
General sales areas are designed for around 300 lx on the working plane, with accent zones three to five times higher around the car and hero products. Because the reflection ceiling is designed for appearance first, a separate calculation confirms that general illuminance is not excessive, and dimming scenes reduce levels in the evening.
Why it works
The store literally reproduces the language of light painting car photography in built form, so every visitor’s phone photograph of the car looks like a professional shoot.
Scenario C: a rooftop bar with DJ booth (high budget)
The brief
An outdoor rooftop bar of about 250 m² with a covered bar area, a pergola, a small dance floor and a DJ booth. The operator wants calm warm light during aperitif hours and synchronised colour effects after 22:00. Everything must withstand rain and cleaning.
The light painting study
A blue-hour session with RGB and warm wands tests pergola lines, bar-front glow and floor outlines against the city skyline. The photographs reveal that warm white pergola lines must remain constant even during the party scenes, otherwise the space loses its architectural reading and looks like a temporary stage.
The specification
| Element | Product family | Strip | Control |
|---|---|---|---|
| Pergola beams | Round waterproof 30 mm profile | IP-rated warm white 2700 K | Dimmable, constant in all scenes |
| Bar front and back-bar | Surface and furniture profiles | RGBW, IP-rated where exposed | DMX scenes |
| Dance floor outline | 25x11mm walkable floor profile | IP-rated RGBW | DMX, beat-synchronised after 22:00 |
| DJ booth | Surface profiles + vertical round bars | Addressable RGBW | Audio-reactive controller linked to DMX |
| Steps and level changes | Corner profiles on nosings | IP-rated warm white | Always on at night |
The lux check and safety
Circulation and steps are checked for safe illuminance at all times, independently of the show scenes. Drivers and controllers are placed in protected enclosures. Safety lighting is never allowed to follow the music.
Why it works
The rooftop combines the two souls of this guide: stable architectural lines that define the space, and dynamic, light-painting-inspired effects that give the night its energy.
18. Light painting and LED lighting glossary
A shared vocabulary makes collaboration between photographers, architects, installers and clients much easier. This glossary defines the key terms used in this guide. Keep it at hand when reading technical data sheets or briefing a photographer.
| Term | Definition |
|---|---|
| Addressable strip | LED strip in which each LED or group can be controlled individually for colour and brightness |
| Bulb mode | Camera mode that keeps the shutter open as long as the button or remote is held |
| CCT | Correlated colour temperature, in kelvin (K); lower is warmer, higher is cooler |
| COB | Chip on board: LED technology with a continuous line of chips under phosphor, producing dot-free light |
| CRI | Colour rendering index; how faithfully a light source renders colours compared with a reference (maximum 100) |
| Diffuser | Clear, frosted or opal cover that clips into a profile and spreads the light |
| DMX512 | Standard protocol for controlling stage and entertainment lighting |
| End cap | Closure for the ends of a profile, with or without cable exit |
| IP rating | Ingress protection code indicating resistance to dust and water |
| Light drawing | Light painting in which the source faces the camera and is recorded as a line |
| Long exposure | Photograph with a shutter speed long enough to record movement over time |
| Lumen (lm) | Unit of luminous flux: total visible light emitted |
| Lux (lx) | Unit of illuminance: lumens per square metre falling on a surface |
| Maintenance factor | Factor accounting for light loss over time due to ageing and dirt |
| ND filter | Neutral density filter that reduces light entering the lens without altering colour |
| Opal diffuser | Milky cover that maximises uniformity at the cost of some light output |
| PWM dimming | Pulse width modulation: dimming by switching LEDs on and off at high frequency |
| SMD | Surface-mounted device: LED packages mounted at intervals along a strip |
| Utilisation factor | Share of the emitted light that reaches the working plane |
| Voltage drop | Loss of voltage along a long strip, causing brightness reduction at the far end |
19. Frequently asked questions about light painting and LED profiles
This section collects the most searched questions about light painting, painting with light photography and LED profile lighting, with concise, verified answers. Click each question to open the answer.
What is light painting?Light painting is a long-exposure photography technique where a moving light source draws lines or illuminates parts of a scene while the shutter is open. The camera records every movement as a continuous trace, creating images impossible to achieve with a single instant exposure. |
How do you do light painting photography?Put the camera on a tripod in a dark place, set manual mode (ISO 100, f/8, 15–30 s or Bulb), focus manually on the drawing area, open the shutter and move an LED light source through the frame. Review the image and adjust brightness, speed or aperture. |
What are the best camera settings for light painting?Start with ISO 100–200, aperture f/8–f/11, shutter 10–30 seconds (or Bulb), manual focus, fixed white balance, stabilisation off and RAW format. Adjust LED brightness rather than ISO to control the strokes. |
What are the best light painting tools?An LED strip mounted in an aluminium profile with an opal diffuser is one of the most versatile light painting tools: it gives smooth, dot-free strokes, is rigid, light and dimmable. Round profiles such as the Lighting Line 30 mm round profile are ideal for handheld wands. |
Can you light paint with an iPhone?Yes. You can use the Live Photo “Long Exposure” effect, Night mode on a tripod for longer captures, or a light trail app that accumulates bright pixels over time. A tripod and a dimmed LED wand are essential. |
Can you use an Android phone for light painting?Yes. Use Pro mode with shutter speeds up to 30 seconds where available, a dedicated light painting mode if your phone has one, or a light painting app for Android. |
Can you do light painting in daylight?Only with difficulty. Daylight is thousands of times brighter than a handheld LED. With strong ND filters and very bright sources it is possible for simple strokes, but blue hour and night give far better results. |
Does photography mean drawing with light?Yes. The word comes from the Greek words for light (phōs) and drawing or writing (graphē). Photography literally means drawing or writing with light, and light painting makes that meaning visible. |
Can you paint with light?Yes. Painting with light means using a moving light source during a long exposure to illuminate a subject selectively, like a brush applying paint. It is widely used in architectural, automotive, still life and real estate photography. |
How do you light paint an object?In darkness, set a long exposure and sweep a diffused light source over the object from the side, never pointing it at the camera. Make several even passes to avoid hot spots and use side light to reveal texture. |
How do I light paint a video?Use time-lapse (sequences of long exposures), stop motion (one light painting per frame), or camera and editing modes that accumulate frames to simulate light trails. |
How do I make a light painting at home?Darken a room, place the camera or phone on a tripod, set a long exposure and draw with a small dimmed LED wand. Write words, draw shapes or outline a person sitting still. |
Which LED strip is best for light painting?COB strips give the smoothest white lines; RGB, RGBW or addressable SMD strips give colour and animation. For handheld tools, 5 V or 12 V strips are easiest to power from batteries. |
Why use an aluminium profile for an LED strip?An aluminium profile keeps the strip straight, dissipates heat, protects the LEDs and holds a diffuser that turns individual dots into a uniform line. This improves both architectural installations and light painting tools. |
What diffuser gives the most uniform line?An opal diffuser gives the most uniform line, especially in deeper or round profiles. Frosted diffusers soften dots with higher output; clear diffusers maximise output but show every LED. |
How do I light a painting on the wall?Use high-CRI LEDs (CRI 90+) aimed at about 30° from the vertical onto the centre of the artwork. A slim surface profile above the frame or a recessed ceiling line parallel to the wall works well. Keep levels appropriate: about 50 lx for sensitive works, around 150–200 lx for oil and acrylic paintings. |
How do I calculate lux for an LED strip installation?Use E = (lumens × utilisation factor × maintenance factor) / area. Lumens equal the effective lm/m of the strip in its profile multiplied by the installed length. Compare the result with the recommended lux level for the space. |
What is the difference between lux and lumens?Lumens measure the total light emitted by a source; lux measures the light falling on a surface. One lux equals one lumen per square metre. |
How do I synchronise LED strips with music?Use a sound-activated controller for simple setups, an addressable controller with audio-reactive firmware for DJ booths, or DMX decoders controlled by a lighting console for clubs and events. |
Which LED lighting is suitable for outdoor festivals?Choose IP-rated strips in waterproof profiles, sealed end caps, outdoor-rated drivers and walkable floor profiles for stage edges and paths, all controlled via DMX or network for integration with stage lighting. |
How can architects use light painting?Architects can trace proposed LED lines in the real space with a light wand during a long exposure, creating quick visual previews for clients, then build the same lines permanently with drywall, recessed, surface or floor profiles. |
Who are famous light painting photographers?Historical milestones include Étienne-Jules Marey, Frank and Lillian Gilbreth, Man Ray and Gjon Mili with Pablo Picasso in 1949. Contemporary light painting photographers continue to push the technique with LED tools and addressable light bars. |
Is steel wool light painting safe?Steel wool produces burning sparks that can cause fires and injuries and is prohibited in many places. LED-based tools, including addressable strips in profiles, create dramatic effects safely. |
What colour temperature is best for light painting portraits?Warm white at 2700–3000 K flatters skin and creates intimacy; neutral 4000 K is more natural for documentary looks. High CRI (90+) is important in both cases. |
20. Conclusion: from light painting to lighting design
Light painting began as a way to make movement visible, became an art form with Man Ray and Picasso, and is today one of the most accessible creative techniques in photography. With an LED strip, an aluminium profile and a diffuser, anyone can build a professional light painting tool, and with the same components architects can turn those fleeting strokes into permanent lines of light in homes, shops, hotels, clubs and cities.
The journey described in this guide moves from the camera to the construction site: understand what light painting is, master the settings, build your own tools, experiment with ideas, then translate the most powerful gestures into architecture, verified with correct lux calculations. Along the way, the same principles keep returning: uniform lines, controlled brightness, high colour quality and respect for darkness.
Whether you are an architect preparing a client presentation, a photographer looking for smoother strokes, a DJ building a beat-synchronised booth or an event planner designing a light painting photo corner, the Lighting Line catalogue provides the profiles, strips, diffusers and accessories to make it happen. Start with a single round profile and a COB strip tonight, and you will see your spaces, and your photographs, in a completely new light.
Explore Lighting Line aluminium profiles | Discover SMD and COB LED strips | Download the profiles catalogue
This article was developed with the support of artificial intelligence and subsequently reviewed, corrected, and validated by the LightingLine.eu technical team, which guarantees its reliability and compliance with official sources.