LED strip lights have fundamentally transformed the way both domestic and commercial spaces are illuminated. From the quiet glow beneath a kitchen cabinet to the spectacular architectural lighting of a flagship retail store, the humble flexible circuit board populated with light emitting diodes has become the single most versatile tool in the modern lighting designer’s arsenal. In less than two decades, led strip lights have displaced fluorescent tubes, halogen bars, fibre-optic systems, and cold-cathode fluorescent lamps across virtually every sector of the built environment, and the pace of innovation shows no sign of slowing.
This guide is written for everyone who works with, specifies, or simply wants to understand led strip lights at a professional level. Whether you are a retail shop owner looking to slash your energy bill and showcase products more attractively, an architect integrating trimless recessed linear light into a minimalist drywall ceiling, an events professional creating immersive colour-changing environments with rgb led strips, or a DIY enthusiast fitting led lights in your kitchen for the first time, you will find detailed, actionable information here.
In this article…
- What is LED? Definition, etymology and the science
- Types of LED strip lights: a comprehensive classification
- SMD vs COB vs CSP technology
- 12V vs 24V vs 48V vs 240V LED strips
- IP ratings: waterproof and outdoor LED strips
- RGB, RGBW, RGBWW & colour changing LED strips
- CRI and colour temperature: choosing the right white
- Advantages of LED strip lights
- Energy efficiency and running costs
- Lifespan and reliability
- Environmental impact and sustainability
- Applications: where to use LED strip lights
- Kitchen LED strip lighting
- Living room, bedroom & home ambient lighting
- TV LED strip lights and bias lighting
- Commercial, retail and office LED strip lighting
- Automotive and car LED strip lights
- Outdoor, architectural and event lighting
- How to install LED strip lights: step-by-step guide
- Tools and materials required
- How to cut LED strip lights correctly
- How to connect LED strip lights
- How to stick and mount LED strip lights
- Wiring, polarity and common mistakes
- Aluminum LED profiles: the professional difference
- Types of aluminum extrusion profile
- How to cut aluminum LED profiles
- Installing profiles: step-by-step
- The professional ecosystem
- Buying guide: how to choose LED strip lights
- Smart LED strip lights: WiFi, Tuya, Alexa & DALI
- Market data, statistics and industry trends
- LED lighting design: ideas for every space
- FAQ: frequently asked questions
- Led strip lights: the most significant transformation
What is LED? Definition, etymology and the science of light emitting diodes
LED stands for light emitting diode. The acronym “LED” is today so universally embedded in consumer vocabulary that its full form is often forgotten, yet understanding what each word represents is essential for grasping why LED technology performs so differently from all its predecessors. A diode is a semiconductor device that allows electrical current to flow in only one direction. When that diode is fabricated from specific semiconductor materials (typically gallium nitride (GaN) compounds for blue and white emitters, or aluminium gallium indium phosphide (AlGaInP) for red and amber) passing a forward current through the p-n junction causes electrons and electron-holes to recombine, releasing energy in the form of photons: this is the phenomenon of electroluminescence.
The first practical visible-light LED was demonstrated by Nick Holonyak Jr. at General Electric in 1962, producing a red light with very low luminous efficacy and decades of materials science research followed. The 1990s saw the breakthrough development of the high-brightness blue LED by Shuji Nakamura at Nichia, an achievement that earned the 2014 Nobel Prize in Physics, which made white LED light possible by combining a blue chip with a yellow phosphor converter. This single innovation unlocked the entire modern LED lighting industry. By 2025, premium LED strips routinely exceed 160 lm/W in commercial products and over 200 lm/W in laboratory conditions.
How does an LED work?
An LED chip is essentially a tiny crystalline sandwich. The two layers of semiconductor material, one doped to have an excess of electrons (n-type) and one doped to have a deficit (p-type), are joined at a junction. When a forward voltage is applied, electrons are pushed across from the n-type side and combine with holes in the p-type side and each recombination event releases a quantum of energy: the wavelength (colour) of the emitted photon is determined by the energy gap of the specific semiconductor compound. This direct conversion of electrical energy to light is extraordinarily efficient compared to incandescent sources, where 90–95% of input energy is wasted as heat from a resistively heated filament.
In an LED strip, each individual LED chip, whether an SMD (Surface Mounted Device) package or a COB (Chip on Board) array, is soldered onto a flexible printed circuit board (FPCB). The FPCB consists of a flexible polyimide or polyester base, a copper circuit layer, and a protective solder mask. The quality of this copper layer, its thickness (typically 1oz or 2oz per square foot), and the accuracy of the solder paste application are primary determinants of long-term strip reliability.
LED vs traditional light sources
| Parameter | Incandescent | Halogen strip | Fluorescent tube | LED strip (Standard) | LED strip (High-Eff.) |
|---|---|---|---|---|---|
| Luminous Efficacy (lm/W) | 10–15 | 15–22 | 60–100 | 100–130 | 140–200+ |
| Rated Lifespan (hours) | 1,000 | 2,000–4,000 | 8,000–15,000 | 25,000–30,000 | 40,000–60,000 |
| CRI (Colour Rendering) | 100 | 100 | 70–85 | 80–95 | 95–99 (Ra) |
| Dimming | Excellent | Good | Limited | Excellent (PWM) | Excellent (PWM/CCT) |
| UV Emission | Moderate | High | Moderate | None (standard) | None (standard) |
| Mercury Content | No | No | Yes | No | No |
| 10-year running cost (5m, 24h/day, €0.25/kWh) | N/A | ~€657 | ~€219 | ~€65 | ~€44 |
The economics are decisive: even accounting for the higher upfront cost of quality led strip lights, the total cost of ownership over a 10-year period is dramatically lower than any alternative. A 5-metre run of high-efficiency LED strip consuming 15W costs approximately €44 in electricity over 10 years of continuous operation at average European electricity rates (~€0.25/kWh), versus ~€219 for a comparable fluorescent installation. When scaled to a commercial installation of 100 metres, the energy saving alone approaches €3,500 — not counting avoided lamp replacement costs and maintenance labour.
Types of LED strip lights: a comprehensive classification
Understanding the different categories of led strip lights is essential for selecting the right product for any given application. The market has evolved from a simple choice between “white” or “RGB” strips to a sophisticated matrix of variables including chip technology, LED density, PCB width, voltage, waterproofing, colour rendering, and spectral characteristics. Making the wrong choice at the specification stage is the single most common cause of disappointing LED installations, whether domestic or commercial.
SMD vs COB vs CSP technology
SMD LED strip lights
SMD (Surface Mounted Device) is the dominant technology in the global led strip lights market, accounting for approximately 78% of all flexible LED strip shipments as of 2024 (IHS Markit / Omdia). SMD strips use individually packaged LED chips soldered at regular intervals onto the PCB. The most common packages are:
| SMD package | Dimensions (mm) | Typical power | Primary application | Notes |
|---|---|---|---|---|
| SMD 2835 | 2.8 × 3.5 | 0.2–0.5W | General indoor lighting | Best value/performance ratio, current market standard |
| SMD 5050 | 5.0 × 5.0 | 0.2W (×3 dies) | RGB, RGBW colour strips | Contains 3 independent dies (R, G, B), wide-angle emission |
| SMD 3528 | 3.5 × 2.8 | 0.06–0.1W | Decorative, low-density strips | Older standard, being phased out in favour of 2835 |
| SMD 5630/5730 | 5.6 × 3.0 | 0.5W | High-brightness strips | Higher flux per LED, requires robust thermal management |
| SMD 4040 | 4.0 × 4.0 | 0.2–0.5W | High-efficacy modern strips | Increasingly replacing 2835 in premium products |
COB LED strip lights
COB (Chip on Board) technology represents the most significant advance in led strip design in the past decade. Rather than mounting individually packaged chips at intervals, COB strips deposit hundreds of tiny bare LED chips directly onto the PCB substrate and encapsulate them in a continuous phosphor layer. The result is a seamless, uniform line of light with no visible hot-spots or dotting even at very close viewing distances, even through shallow-diffuser profiles.
COB led strips are rapidly displacing SMD strips in premium applications, particularly under-cabinet kitchen lighting, bathroom mirror lighting, and architectural recessed linear fittings. The elimination of individual package lenses means light is emitted across a 180° angle uniformly. The very high LED density (typically 480–720 LEDs per metre) combined with the continuous phosphor layer produces a CRI consistently above Ra 90, with premium COB strips such as the Ledpoint Sunlike series achieving Ra>97.
The primary practical limitation of COB strips is that they cannot be cut as frequently as SMD strips: cut points are typically every 50mm or 100mm. They also require more careful thermal management due to concentrated heat generation, making installation in a proper aluminum profile with a diffuser not merely desirable but essential for achieving rated lifespan.
CSP and flip-chip LED strip lights
CSP (Chip Scale Package) and flip-chip architectures represent the current frontier of LED strip technology. CSP LEDs are essentially bare LED chips with minimal packaging overhead, offering the highest possible light output per unit area of PCB. These technologies are beginning to appear in premium commercial-grade strips where luminous efficacy above 180 lm/W is required, though at a price premium that currently confines their use to the highest-value applications.
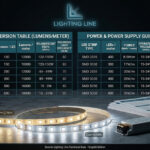
12V vs 24V vs 48V vs 240V LED strip lights
The operating voltage of an led strip has direct consequences for maximum run length, dimming quality, power supply selection, and safety classification.
| Voltage | Max recommended run | Typical application | Power supply | Safety class |
|---|---|---|---|---|
| 12V DC | 3–5m per feed | DIY home, automotive, furniture | Constant Voltage SMPS | SELV |
| 24V DC | 5–10m per feed | Domestic, commercial, retail, office | Constant Voltage SMPS | SELV |
| 48V DC | 10–20m per feed | Commercial linear, architectural | 48V Constant Voltage SMPS | SELV |
| 240V AC (Mains) | Up to 50–100m | Outdoor architectural, large commercial | Direct mains connection | Qualified electrician required |
For most domestic and commercial trade applications, 24V DC is now the preferred standard, superseding 12V in all but the smallest or most cost-sensitive projects. For a given strip wattage, the current through the copper conductors is halved compared to 12V, halving the voltage drop and allowing longer runs without brightness variation. 240V mains LED strip lights must be installed by a qualified electrician in the UK and across most of Europe.
IP ratings: waterproof and outdoor LED strip lights
The Ingress Protection (IP) rating system (IEC 60529) is the primary framework for selecting the correct led strip lights for any environment where moisture or dust is present.
| IP rating | Dust protection | Water protection | Typical application | Product form |
|---|---|---|---|---|
| IP20 | Fingers (12.5mm+) | None | Dry indoor — living rooms, offices, enclosed profiles | Bare PCB |
| IP44 | Objects >1mm | Splash from any direction | Bathrooms outside shower zone 1, covered outdoor | Conformal coating or sleeve |
| IP65 | Dust-tight | Low-pressure water jets | Kitchen splash zones, bathrooms zone 1, outdoor covered | PU coating or Parylene coating |
| IP67 | Dust-tight | Temporary immersion (1m, 30 min) | Outdoor exposed, garden, ground-level | Silicone sleeve or solid silicone extrusion |
| IP68 | Dust-tight | Continuous immersion | Underwater — pools, fountains, aquariums | Solid silicone with end-sealed connectors |
A critical nuance frequently misunderstood by installers: the IP rating of the LED strip itself is distinct from the IP rating of the overall luminaire assembly. Installing an IP65-rated strip in an open-ended aluminum profile does not create an IP65-rated product. The LightingLine IP65 waterproof LED strip range includes strips with Parylene C conformal coating, offering significantly superior moisture resistance and anti-yellowing properties versus standard PU coating, particularly in environments with temperature cycling or chemical exposure.
RGB, RGBW, RGBWW and colour changing LED strip lights
The ability to produce any colour of light or to change between millions of colours on command, is one of the most commercially compelling features of modern led strip lights. The ecosystem of colour-capable strips has expanded considerably beyond the original RGB format.
RGB LED strips use tri-colour SMD5050 packages containing independent red, green, and blue dies. By mixing these three primaries at varying intensities via PWM dimming of each channel, the human eye perceives a wide gamut of colours. Standard RGB strips are appropriate for accent lighting, entertainment environments, retail visual merchandising, events, and any application where saturated colour is the primary requirement.
RGBW LED strips add a dedicated white LED die to the RGB package. This is critically important because the “white” produced by mixing R+G+B in an RGB strip is never truly neutral white, it typically has a slightly greenish or cyan cast and poor colour rendering. The dedicated white chip delivers clean, high-CRI white for general illumination. RGBW is the professional standard for hospitality, retail, and residential applications where both atmosphere and quality illumination are required.
RGBWW strips combine RGB with two white channels (cool white + warm white), enabling full colour gamut plus tunable white (approximately 2700K to 6500K) independently of the colour channels. These are specified for high-end architectural installations and applications requiring dynamic circadian lighting alongside colour capability.
CCT Tunable White strips (also called “dual white” or “bi-white”) combine warm and cool white LEDs in a single strip, enabling colour temperature adjustment across the warm-to-cool spectrum. This is particularly valued in kitchen environments, where a warmer tone creates a hospitable dining atmosphere while a cooler tone improves task visibility for food preparation.
CRI and Colour Temperature: choosing the right white
Two parameters dominate white LED selection: Colour Rendering Index (CRI, also denoted Ra) and Correlated Colour Temperature (CCT, measured in Kelvin). Confusing or neglecting these parameters is responsible for the majority of “the LED lights look wrong” complaints in completed installations.
| CCT Range | Appearance | Recommended application |
|---|---|---|
| 2700K – 3000K | Warm white (candle/incandescent tone) | Living rooms, bedrooms, hospitality, restaurants |
| 3500K – 4000K | Neutral white | Kitchens, retail, offices, bathrooms, educational |
| 5000K – 6500K | Cool/daylight white | Industrial, workshops, task lighting, display cabinets |
What colour temperature is best for a kitchen?
Professional kitchen lighting designers typically specify 3000K–4000K as the primary task lighting CCT, with an optional 2700K layer for dining and mood. The neutral-to-cool range maximises visual acuity for food preparation without creating the clinical harshness of 5000K+ sources. The CRI scale rates a light source’s ability to render colours faithfully compared to natural sunlight (Ra 100). For most domestic and general commercial applications, Ra≥80 is the minimum acceptable standard. Retail environments, art galleries, and food retail should specify Ra≥90. For maximum colour fidelity (luxury jewellery retail, museum lighting, professional photography) Ra≥95 is the target, with Sunlike-spectrum strips achieving Ra>97.
Advantages of LED strip lights: why they dominate every market
The dominance of led strip lights across domestic, commercial, and industrial lighting applications reflects genuine and quantifiable superiority across the most important lighting performance parameters. Understanding these advantages in depth is particularly valuable for professionals making specification decisions on behalf of clients, where the technical and financial justification for LED adoption must often be formally documented.
Energy efficiency and running costs
Energy efficiency is the headline advantage of LED technology, and it is even more pronounced when comparing modern high-efficiency strips against the halogen strip lights they most commonly replace in kitchen and retail settings. A typical halogen under-cabinet strip light consumes 35–50W per linear metre and an equivalent LED strip consumes 8–15W per linear metre while delivering equal or greater lux levels on the working surface.
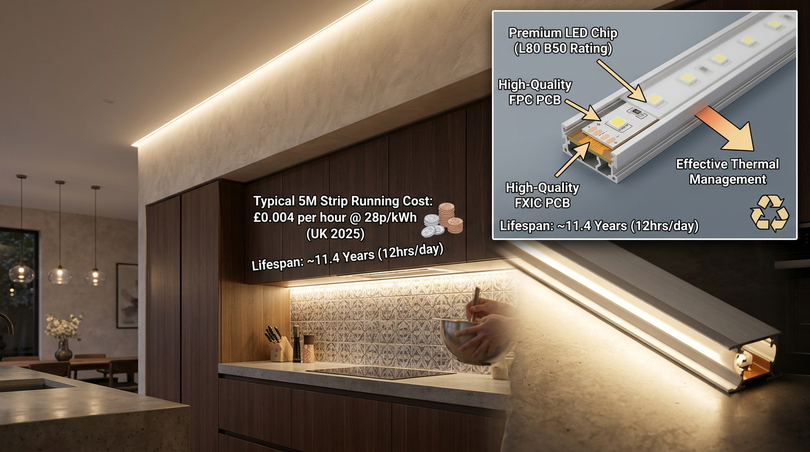
If you are asking if do LED strip lights use a lot of electricity? No. A typical 5-metre RGB LED strip kit drawing 14.4W costs approximately £0.004 per hour at the UK average electricity tariff (approximately 28p/kWh, early 2025) — roughly £14 per year at 8 hours of daily operation. Leaving led lights on all night is entirely practical from an energy cost perspective, particularly for accent and night-light applications. Another question maybe if are LED lights cheap to use? Yes, definitively. Compared to halogen, a well-specified LED strip system uses 70–85% less energy for the same light output. Compared to fluorescent strip lighting, the saving is typically 30–50%, with the additional benefit of superior dimming capability, longer life, and the elimination of mercury-containing components.
According to the European Commission’s Joint Research Centre (JRC), if all remaining halogen and fluorescent sources in EU commercial buildings were replaced with LED equivalents, the resulting energy saving would be approximately 40 TWh per year, equivalent to removing 10 million cars from European roads.
Lifespan and reliability
How long do LED lights last? The rated lifespan of a quality LED strip is typically stated as L70 or L80 at a specified number of operating hours. Premium strips such as the Ledpoint Fx2 High Efficiency series are rated L80 B50 at 50,000 hours, meaning the median population of strips retains 80% of initial brightness after 50,000 hours of operation. At 12 hours of daily operation, 50,000 hours equates to approximately 11.4 years before any significant reduction in light output.
In practice, the most common causes of premature LED strip failure are not the chips themselves but: the power supply, the adhesive system, and most critically inadequate thermal management. An LED strip operating at chronically elevated junction temperatures degrades orders of magnitude faster than one properly managed thermally. Installing led strip lights in aluminum profiles with adequate thermal mass is the single most effective step any installer can take to maximise system lifespan.
Environmental impact and Sustainability
The environmental case for LED strip lights is compelling at every stage of the product lifecycle. In the use phase, energy efficiency directly translates to reduced carbon emissions: at the UK grid’s average carbon intensity of approximately 190 gCO&sub2;e/kWh (2024), replacing 100W of halogen with 15W of LED strip saves approximately 123 kg of CO&sub2; per year of daily operation. Unlike fluorescent tubes, LED strips contain no mercury, eliminating a significant hazardous waste concern. Formal LED recycling schemes (available in the UK and EU through WEEE collection points) recover rare earth materials for reuse in new LED products, closing the material loop.
The EU Ecodesign Regulation (EU) 2019/2015 has already phased out halogen capsule lamps and is progressively tightening minimum efficiency requirements that only LED technology can satisfy. Fluorescent tubes, including T8 and T5 strip light replacements, face similar regulatory phase-out timelines across the EU and UK. LED strip lighting is not merely an alternative but increasingly the only compliant solution for many applications.
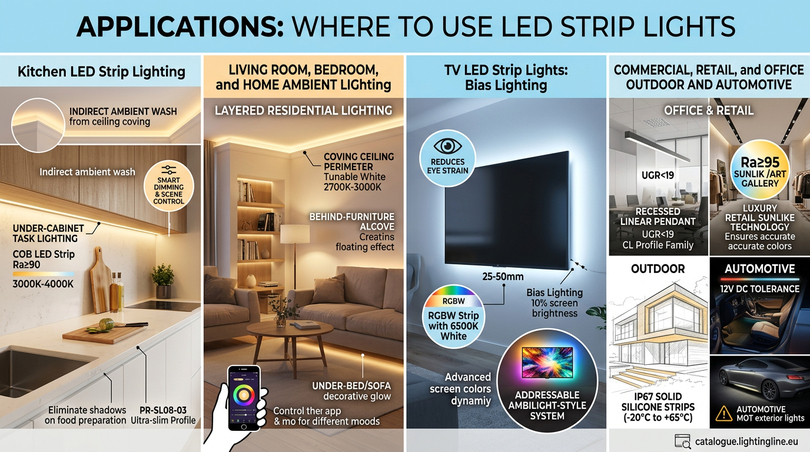
Applications: where to use LED strip lights
The extraordinary versatility of led strip lighting (flexible, cuttable, available in countless CCTs, colours, IP ratings, and power densities, controllable via any modern protocol from simple on/off to DALI-2) means that virtually every interior and exterior lighting application has an LED strip solution. The following sections address each major application domain in the depth required for professional specification or informed DIY planning, with reference to specific product families available at catalogue.lightingline.eu.
Kitchen LED strip lighting: under-cabinet and ceiling
The kitchen is the primary domestic battlefield for led strip lights, and the application domain where the difference between a professionally specified installation and a budget DIY attempt is most immediately visible. Kitchen lighting serves two distinct functions: task lighting (high-intensity, high-CRI illumination of food preparation surfaces) and ambient/mood lighting (warmer, dimmable background illumination that makes the kitchen a welcoming social space). A well-designed kitchen LED strip system addresses both.
Strip lighting for kitchens under cabinets is the most common application, replacing halogen strip light bars. The key specification requirements are: CRI Ra≥90 (critical for accurate food colour rendering), colour temperature 3000–4000K, and uniformity of illumination across the worktop surface. COB LED strips are overwhelmingly preferred for this application because their continuous emission line eliminates the “scalloped” shadow pattern produced by SMD strips with individual chips at 50mm or wider spacing.
The ideal kitchen under-cabinet installation uses: a COB 24V strip, Ra≥90, 3000K or 4000K, typically 8–12W/m and an ultra-slim aluminum profile such as the LightingLine PR-SL08-03. To complete a 24V Mean Well constant-voltage driver with dimming input sized at 120% of total strip load and a compatible Skydance PWM dimmer or smart controller for scene control.
Strip lighting for kitchen ceiling applications encompasses perimeter coving channels (for indirect ambient wash) and central linear pendants. For ceiling coving, the profile selection shifts to those designed for surface-mount at wall-ceiling junctions, such as the LightingLine (corner) series. For suspended linear pendants, deeper profiles such as the CL series offer controlled optical output with reduced glare. The COB strip range covers every application from the most compact under-shelf fitting to the longest commercial kitchen counter run.
Living room, bedroom and home ambient lighting
Home LED lighting strips for living rooms and bedrooms are one of the fastest-growing consumer LED product categories. The key design principle for residential ambient lighting is layering: using multiple independently controllable circuits at different positions and light angles to create depth and visual interest rather than relying on a single overhead source.
Coving and ceiling perimeter: strips installed in coving channels or at the wall-ceiling junction, facing upward, create a soft indirect wash that raises the apparent brightness of the space without creating glare. A 2700–3000K CCT tunable white strip on this circuit allows the room to shift from a bright social setting to a warm intimate atmosphere with a single voice command or app instruction.
Behind-furniture and alcove lighting: LED strips installed behind large furniture pieces (bookshelves, sideboards, TV units) create a “floating” visual effect by illuminating the wall behind. This technique works best with strips in a surface-mounted profile with a side-emitting diffuser, or angled profiles directing light away from the observer’s direct line of sight.
Under-bed and furniture base lighting: low-power RGB or warm white strips installed in a slim floor-level profile on the underside of bed bases or sofas create a soft decorative glow that doubles as a subtle night-light function. Led lights for the home in this configuration are extremely popular among interior design enthusiasts and content creators who use the effect in photography and video for social media platforms.
LED lights for room desk applications: the rise of home working and gaming has created a significant market for desk and monitor-surround led lighting strips. The most common configuration is an RGB or RGBW strip in a slim surface-mount profile behind the monitor (bias lighting that reduces eye strain) and along the rear and sides of the desk for ambient colour effect. Smart led strip systems with music sync capability are particularly popular in gaming and streaming setups.
TV LED strip lights: bias lighting and Backlighting
LED strip lights behind TV screens (commonly marketed as “TV led strips,” “TV light strips,” or “bias lighting“) represent one of the most widely adopted consumer LED strip applications globally, with an estimated 45 million units sold annually worldwide (Grand View Research, 2024). Bias lighting reduces eye strain during extended viewing sessions by narrowing the perceived contrast ratio between the bright screen and the dark surrounding wall.
It’s possible put LED lights behind TV: the recommended specification is a strip calibrated to approximately 10% of the screen’s peak brightness at approximately 6500K (matching the D65 white point of the television). Mount the strip 25–50mm behind the screen perimeter so that light washes the wall rather than pointing directly at the viewer. A simple RGBW strip kit with a clean 6500K white channel is ideal. More advanced Ambilight-style systems use addressable LED strips driven by media player software that analyses screen content in real time and mirrors the dominant colours on each edge of the screen to the corresponding strip segment.
Commercial, retail and office LED strip lighting
The commercial LED strip lighting market is the fastest-growing segment of the global LED industry, forecast to reach USD 8.4 billion by 2028 at a CAGR of 13.2% (MarketsandMarkets, 2024). Driving factors include mandatory energy efficiency regulations, rising electricity costs in Europe and North America, and growing awareness of the link between lighting quality and employee productivity.
Retail applications place the most demanding requirements on LED strip quality. For luxury retail, art galleries, and food retail environments, Ra≥95 strips are the minimum acceptable specification. The investment in Sunlike-technology strips in food retail pays for itself in customer perception of product freshness and quality.
Office LED strip lighting is governed by EN 12464-1 (the European standard for workplace lighting), which specifies a maximum UGR of 19 for office environments. Achieving UGR<19 with linear LED strip lighting requires either deep-recessed profiles that shield the observer from direct chip visibility, or louvered/microprismatic diffusers, the CL profile family is specifically designed for this application.
Automotive and car LED strip lights
Car LED strip lights represent a major consumer aftermarket category, encompassing interior accent lighting (footwell, door sill, dashboard) and exterior underbody lighting. Car led strip lights must be rated for 12V DC with tolerance for the actual voltage range of a running automotive electrical system, which varies from approximately 11.5V (battery discharge) to 14.4V (alternator charging).
Are LED lights an MOT failure? Will LED lights pass MOT? Interior LED strips (footwells, under-seat lighting, dashboard accent) do not affect MOT outcome. However, LED strips fitted to alter the photometric characteristics of exterior road-legal lighting assemblies (headlights, tail lights, brake lights) may constitute an MOT failure if they change the beam pattern or light intensity. Always consult current DVSA guidelines before fitting any exterior LED modifications to a road-going vehicle.
Outdoor, architectural and event lighting
Outdoor LED strip lighting requires a carefully considered combination of IP rating, UV resistance, temperature rating, and voltage selection. The primary failure modes in outdoor applications are: moisture ingress through compromised sealing, UV degradation of encapsulant materials, and thermal cycling fatigue.
For professional outdoor architectural applications (facade grazing, soffit lighting, step lighting, garden feature lighting) the recommended specification is IP67 solid silicone-encapsulated strips rated for an operating temperature range of at least -20°C to +65°C. The LightingLine IP67 solid silicone range uses an aviation-grade silicone extrusion with high UV stability.
Event LED lighting requires rapid deployment and disassembly, robustness against accidental impact, and the widest possible colour gamut and scene programmability. RGB led strips with DMX512 control and the Skydance TD series professional controller are the industry standard for temporary event LED installations. The auto-synchronisation feature of Skydance controllers allows multiple units to operate in perfect unison within a 30-metre range without signal cables, particularly valuable in temporary setups where running DMX data cables between fixtures is impractical.
How to install LED strip lights: step-by-step professional guide
The gap between a visually disappointing LED strip installation and a genuinely impressive one is almost never due to the quality of the LED chips themselves. It is almost always due to errors in preparation, cutting, connecting, and mounting. The following section provides the most detailed professional installation guide available, covering every step from initial planning to final commissioning, with particular emphasis on the common mistakes that even experienced installers make with led strip lights.
Tools and materials you will need
| Tool / Material | Purpose | Professional grade recommendation |
|---|---|---|
| Sharp scissors or craft knife | Cutting LED strip to length | Wiss W10N scissors, Stanley #99 knife |
| Steel rule / measuring tape | Accurate measurement | Stainless steel rule, 500mm minimum |
| Wire strippers (0.5–2.5mm²) | Stripping supply cable insulation | Knipex 12 22 160 or equivalent |
| Soldering iron + solder | Making permanent electrical connections | Temperature-controlled station 350°C, Hakko FX-888D |
| Flux pen | Improving solder joint quality | Kester 951 no-clean flux pen |
| Isopropyl alcohol + lint-free wipes | Surface preparation before adhesive mounting | IPA 99.9%, essential for any adhesive application |
| Multimeter | Verifying polarity, voltage, continuity | Fluke 115 or equivalent, essential for commissioning |
| Mitre saw or fine-tooth hacksaw | Cutting aluminum profiles to length | |
| Drill + bits | Fixing profiles to surfaces | Appropriate for surface material (wood, plasterboard, masonry) |
How to cut LED strip lights correctly
This is the most frequently asked installation question, and getting it wrong permanently damages the strip. The fundamental rule is: led strip lights may only be cut at the designated cut marks. These marks are printed on the strip’s solder mask at regular intervals typically every 25mm for high-density strips, every 50mm for standard-density strips, and every 100mm for mains-voltage strips. The cut mark position coincides with a set of exposed copper solder pads, which allow the cut end to be soldered to a new supply wire or connected via a push-fit strip connector.
Cutting at any other point will: destroy one or more LED chips and their current-limiting resistors, leave exposed copper conductors that may short against the profile body, void the product warranty and potentially create a fire or shock hazard.
Step 1 — Measure and mark: count cut marks from the start rather than relying solely on a measured distance. For a run requiring 847mm with cut marks every 50mm, the correct cut is at the 16th mark (800mm), not between marks at 847mm.
Step 2 — Power off: always cut strips with power completely removed. Even at 12V DC, a short-circuit at the cut location can damage the LED chips nearest the cut point.
Step 3 — Use sharp scissors or a craft knife: make a single, decisive, straight cut through the centre of the copper pads at the cut mark. A hesitant or angled cut leaves partial pads that are difficult to solder and may not engage push-fit connectors correctly. For COB strips, where the phosphor layer extends continuously over the cut zone, use a craft knife against a steel rule.
Step 4 — Inspect the cut end: verify that both copper pads are fully intact, symmetrical, and clean. If the cut has been made even slightly off-centre, the smaller pad may be insufficient for a reliable connection. If the pad quality is poor, move to the next cut mark.
Step 5 — Protect the cut end: if the cut end will not immediately be connected, apply a small piece of insulation tape to prevent accidental short-circuit.
Special considerations for RGB and multi-channel strips: RGB strips have three or four conductors at each cut mark (R, G, B, and optionally a common positive). Polarity must be observed carefully. Connecting channels in the wrong order to an RGB controller results in incorrect colour output, the strip will produce green when red is commanded. Always verify channel assignment before finalising connections.
How to connect LED strip lights: connectors vs soldering
Solderless push-fit connectors
Push-fit strip connectors consist of a small plastic housing with spring-loaded or lever-activated contacts that clamp onto the copper pads of the strip ends. They are sold in a wide variety of configurations to accommodate different strip widths and channel counts.
Advantages: no tools or heat required, reversible and reusable, fast to install, ideal for inaccessible locations.
Disadvantages: they are the single most common cause of intermittent fault and failure in amateur LED strip installations. A push-fit connector not properly seated on clean, undamaged copper pads will have elevated contact resistance that increases over time, causing heat buildup, voltage drop, and eventually complete contact failure.
Best practice for push-fit connectors: use only quality connectors rated for the strip’s current, ensure the strip is cut cleanly and squarely, clean copper pads with IPA before insertion and insert the strip fully until it contacts the internal stop. After powering on, check each connector with an infrared thermometer: any connector running significantly hotter than adjacent ones has elevated contact resistance and should be replaced.
Soldering — the professional method
For all permanent, high-reliability, and professional-grade installations, soldering is the correct connection method. A properly made solder joint on a clean copper pad creates a metallurgical bond with essentially zero contact resistance, immune to vibration, thermal cycling, and physical tension.
The critical technique parameters:
- Temperature: 350–370°C tip temperature for lead-free solder, higher temperatures risk delaminating the pad.
- Dwell time: no more than 2–3 seconds contact.
- Flux: apply no-clean flux to the pad before tinning.
- Wire preparation: pre-tin the stripped wire before soldering to the strip pad to minimise heat exposure time.
- Strain relief: always mechanically strain-relieve the wire after soldering using hot-melt adhesive or a clip at the profile entry point.
How to stick and mount LED strip lights
All standard LED strips are supplied with a pressure-sensitive acrylic adhesive tape backing (typically 3M 467MP or equivalent) protected by a release liner. Premature adhesive failure is an extremely common complaint and in almost all cases it is caused by incorrect surface preparation rather than a defect in the adhesive itself.
- Step 1 — Clean the surface: the bonding surface must be clean, dry, and free from grease, dust, silicone contamination, and any existing adhesive residue. Wipe with a lint-free cloth dampened with 99.9% isopropyl alcohol. Allow full IPA evaporation (2–3 minutes) before proceeding.
- Step 2 — Assess the surface material: the pressure-sensitive acrylic adhesive bonds well to clean, smooth, non-porous surfaces: painted metal, powder-coated aluminum, smooth painted drywall, glass, clean PVC. It bonds poorly to rough or textured surfaces, silicone-contaminated surfaces (common in kitchens and bathrooms near silicone bead joints), and untreated wood.
- Step 3 — Apply the strip firmly: after removing the release liner, press the strip firmly onto the prepared surface along its entire length, applying even finger pressure for at least 30 seconds. For overhead applications (underside of cabinets), additional mechanical support via purpose-designed clips is strongly recommended for the first 24 hours, and ideally for the lifetime of the installation.
Wiring, polarity and common mistakes to avoid
Polarity errors are the single most common cause of immediate strip LED failure upon first power-on. Before connecting power for the first time, always verify polarity with a multimeter: a 24V SMPS should read 23.5–24.5V DC between its positive and negative output terminals. Mark the positive terminal clearly before making any connections.
| Mistake | Consequence | Prevention |
|---|---|---|
| Cutting between designated cut marks | Damaged LEDs, non-functional segment | Always cut only at printed cut marks |
| Overloading a single run beyond max length | Voltage drop, brightness variation along strip | Feed from both ends, use mid-point injection, keep runs within spec |
| Undersizing the power supply | PSU overheating, shutdown, premature failure | Size PSU to 120–130% of total strip load |
| Installing strip without profile in high-temp locations | Adhesive failure, reduced LED lifespan, colour shift | Always use aluminum profile where ambient temp exceeds 30°C or strip >8W/m |
| Folding or kinking the strip to change direction | Fractured copper traces, open circuit | Use purpose-designed corner profiles or L-connectors, minimum bend radius 25mm |
| Using wrong IP rating for location | Moisture ingress, failure, fire risk | Use IP65 minimum in any splash zone |
| Not allowing 24h adhesive cure time for overhead applications | Strip falls from surface, potential short circuit | Clip-mount during first 24h, use mechanical clips for permanent security |
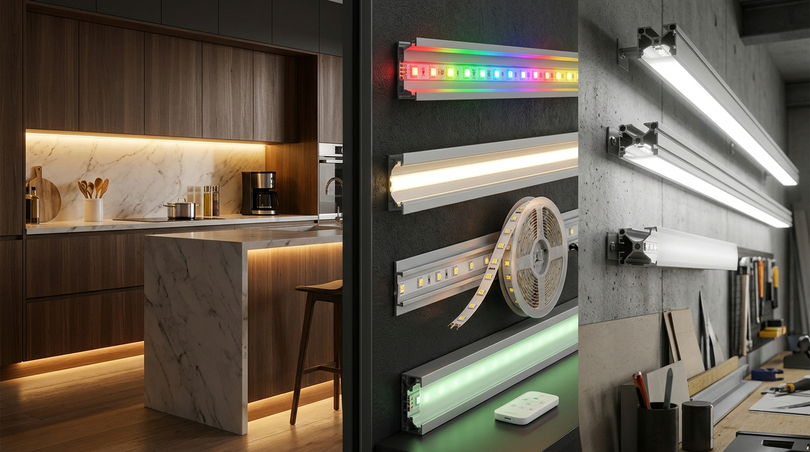
Aluminum LED profiles: the professional difference
The aluminum LED channel extrusion profile (also called an aluminum extrusion, LED housing, LED channel, or LED profile) is what separates a genuinely professional LED strip installation from a DIY strip stuck on with tape. The profile simultaneously serves four critical functions:
- it provides a precise, clean optical surface for the diffuser;
- it acts as a heatsink that conducts heat away from the LED chips;
- it gives the installation a finished, architectural appearance;
- it provides structural support that allows the LED strip assembly to be mounted in ways that the flexible strip alone could not achieve.
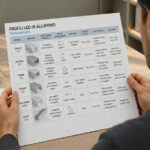
Types of aluminum extrusion profile for LED strips
| Profile series | Type | Typical dimensions | Primary application |
|---|---|---|---|
| SL series (e.g. SL08-03) | Ultra-slim surface mount | Width: 10–16mm, Height: 6–8mm | Under-cabinet kitchen, furniture edge, slim display lighting |
| A series (e.g. A16) | Corner / 45° angle | 14–20mm per face, 45° profile | Wall-ceiling junctions, step lighting, stair nosing |
| DW series | Recessed / trimless (plaster-in) | Depth 10–25mm, mounting flange 0–5mm | Drywall recessed slot, plaster ceiling, high-end architectural |
| CL series (e.g. CL02-07) | Surface mount, medium depth | Width: 17–25mm, Height: 12–20mm | Office ceilings, retail linear, UGR-controlled environments |
| FL series | Floor / step recessed | Width: 20–35mm, IP65+ | Step lighting, floor-level path marking, stair nosing |
| NE series | Round / circular extrusion | Diameter 10–18mm | Decorative ceiling strings, rope-light substitute, display |
| W series | Wide-body surface mount | Width: 35–50mm, Height: 10–15mm | High-power commercial strips, double strip width |
For kitchen and DIY solutions, the PR-SL series offers an ultra-slim design that fits perfectly under kitchen cabinets, sitting flush against the cabinet base with minimal visual footprint. Its frosted PC diffuser eliminates LED chip visibility entirely while maintaining high light transmission (typically 88–92% of bare strip flux). For corner installations, the A16 directs light at a 45° angle, shielding the eyes from direct glare while maximising light delivery to the target surface.
For commercial and trade applications requiring “invisible” linear lighting, the PR-DW series of trimless profiles are plastered directly into the drywall to create seamless architectural light cuts. These profiles feature a mounting flange for integration into the drywall structure and an exposed face flush with the finished plaster surface. The result is a ceiling from which light appears to emerge from a narrow linear slot in the plaster, a design statement impossible to achieve with any surface-mounted fitting.
In office settings, deeper profiles like the CL02-07 are used to reduce the Unified Glare Rating (UGR), enhancing visual comfort for employees. Combined with a microprismatic or high-transmission diffuser, the PR-CL profile achieves UGR<19 compliance, the European standard for office environments.
How to cut aluminum LED profiles correctly
Cutting aluminum LED profiles is a distinct skill from cutting LED strips, and the quality of the profile cut is often the most visible indicator of installation quality to a discerning client or end user. A clean, square, burr-free profile end produces a professional finish with tight-fitting end caps, a rough or angled cut produces visible gaps and may prevent end caps from fitting correctly.
Mitre saw with aluminum-cutting blade is the fastest and most accurate method. Use a fine-tooth TCT blade specifically rated for non-ferrous metal cutting, typically 80–100 teeth for a 250mm blade. Do not use a wood-cutting blade (too coarse) or a steel-cutting blade (wrong tooth geometry). Set the mitre saw fence to the required length and use a sacrificial backing piece beneath the profile to prevent tear-out on the exit cut.
Fine-tooth hacksaw with mitre box is the appropriate method for occasional cuts and site work. Use a hacksaw blade with at least 24 TPI for profiles up to 20mm wall thickness, 32 TPI for thin-wall profiles. Clamp the profile firmly in the mitre box before cutting — movement during the cut produces a rough, angled end face.
After cutting — always deburr: any aluminium cutting process produces small burrs on the cut edges. These burrs are sharp and can cut the LED strip’s PCB or encapsulant if not removed before strip insertion. Use a flat file or fine wet-and-dry abrasive paper (240 grit) to remove all burrs, and wipe out the interior of the profile with a damp cloth to remove all aluminium swarf before inserting the strip.
Mitred corner joints: for corner installations where two profiles must meet at a 45° joint (typical of coving profiles at room corners), both profiles must be cut at 45° with a mitre saw. The common error is to measure both profiles from the same face: the internal dimension and external dimension of a mitred corner joint are different, and the profile must be measured accordingly.
Installing profiles: step-by-step
For surface-mount profiles (SL, CL, A series):
- Step 1 — Mark fixing positions: surface-mount profiles are fixed via drilling and screwing through the profile base at intervals of 300–500mm. Mark fixing positions through the pre-drilled fixing holes in the profile base.
- Step 2 — Pilot drill: drill pilot holes appropriate to the fixing surface material: 3mm pilot for wood/MDF, or a masonry anchor hole for plasterboard or brick/block. For plasterboard, use appropriate hollow-wall fixings unless a timber nogging can be located behind the board.
- Step 3 — Screw-fix the profile body: fix the profile body to the surface. Do not overtighten — aluminium is soft and the screw will strip the thread if excessive torque is applied. Hand-tight plus a quarter-turn with a screwdriver is sufficient.
- Step 4 — Insert the LED strip: feed the LED strip into the profile channel, adhesive side down. The strip should slide smoothly with light friction from the channel walls. Route the supply cable out through the profile end or a pre-drilled cable entry hole.
- Step 5 — Press fit the diffuser: snap the PC diffuser cover into the profile retention clips. The diffuser should seat evenly along the full length with no visible gaps. If the diffuser bows before clipping in, trim 0.5–1mm from one end with a craft knife.
- Step 6 — Fit end caps: fit the appropriate end caps (closed for run ends, cable-entry for supply connection ends). Apply a small bead of clear silicone around the cable entry end cap if IP protection is required.
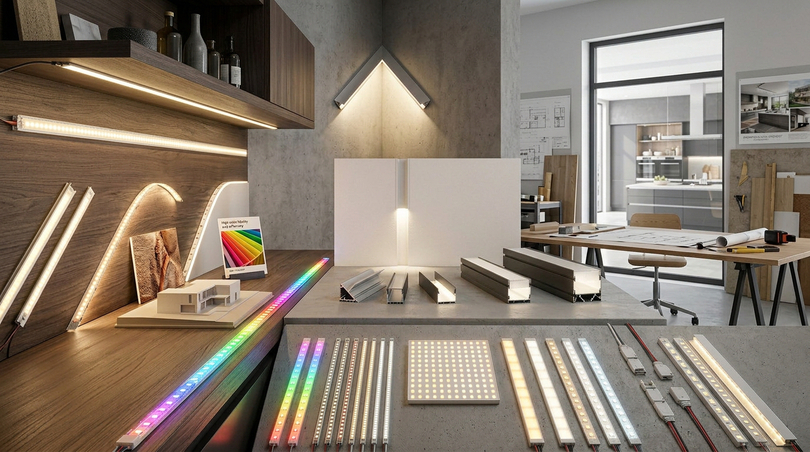
The professional ecosystem
The transition from domestic kitchen lighting to large-scale commercial installations requires a versatile ecosystem of high-performance components. Whether you are a DIY enthusiast or a trade professional, the combination of Orizzonte strips, LightingLine profiles, Skydance controls, and Mean Well power supplies ensures a certified, flicker-free, and aesthetically superior result.
High-performance LED strips
Selecting the right light source is the first step in any project. For modern kitchens, COB (Chip On Board) technology is the preferred choice for under-cabinet lighting because it provides a seamless, “dot-free” line of light even when installed in shallow profiles. The elimination of visible individual chip positions, combined with the high LED density of COB construction, makes COB strips the undisputed choice wherever the strip is visible through a clear or lightly frosted diffuser at close viewing distances.
For commercial spaces where colour accuracy is critical such as retail displays, galleries, food retail, or professional photography studios, the Sunlike series (CRI Ra>97) mimics the spectrum of natural sunlight, ensuring that textures and colours are rendered with maximum fidelity. The Sunlike phosphor technology achieves a spectral power distribution significantly closer to the CIE D65 daylight standard than conventional LED phosphor systems, with particular improvement in the red spectral region (R9>85 on premium variants). This is the specification required for jewellery display, fresh food retail, fine art illumination, and any application where accurate colour representation is commercially critical.
Large-scale projects benefit from the Fx2 High Efficiency series, which exceeds 140–160 lm/W, significantly reducing energy consumption without sacrificing brightness. In a 500-metre commercial installation running 10 hours per day at 240 operating days per year, the difference between a standard 100 lm/W strip and an Fx2-series 160 lm/W strip represents a saving of approximately 600W of installed power, roughly equivalent to €360 in annual energy costs at European tariffs, with full payback of the high-efficiency premium within 12–18 months.
In environments exposed to moisture (bathrooms, outdoor commercial signage, catering facilities, or car wash installations) Parylene-treated IP65 strips or solid silicone IP67 versions provide robust protection against dust and water while resisting yellowing over time. Parylene C conformal coating is applied by vapour deposition, creating a pinhole-free, uniform coating of approximately 10–25 microns thickness that conforms exactly to the topography of the circuit board and components, including the undersides of components, which conventional spray-applied coatings cannot reach.
Architectural integration: LightingLine aluminum profiles
The profile acts as both a heat sink to extend the LED’s lifespan and an optical tool to shape the light. The thermal function is often underappreciated: an LED strip operating at 60°C junction temperature has a projected lifespan of approximately 35,000 hours, the same strip at 85°C junction temperature degrades to approximately 15,000 hours, less than half. A correctly sized aluminum profile with adequate surface area conducts the strip’s heat into the surrounding air via natural convection, keeping junction temperatures well within the strip’s rated thermal limits.
Kitchen and DIY Solutions: the SL series offers an ultra-slim design that fits perfectly under kitchen cabinets. Its minimal height allows installation between the cabinet base and the worktop surface with no visible intrusion from normal eye level.
For corner installations, the A16 directs light at a 45° angle, shielding the eyes from direct glare. This profile is designed to be mounted in the internal corner between two surfaces (e.g., wall-ceiling junction) with the strip directed at 45° into the room, creating an extremely wide-angle wash that illuminates both adjacent surfaces simultaneously. It is ideal for cove lighting in residential and hospitality environments.
Trade and commercial spaces: for “invisible” lighting, trade professionals use the DW series of trimless profiles, which are plastered directly into the drywall to create seamless architectural light cuts. The result is a ceiling from which light appears to emerge from a narrow linear slot in the plaster, a design statement impossible to achieve with any surface-mounted fitting. The key installation requirement is that the profile must be fixed rigidly in position before plastering, with the correct setting-out depth to ensure the diffuser surface is flush with the finished plaster face.
In office settings, deeper profiles like the CL02-07 are used to reduce the Unified Glare Rating (UGR), enhancing visual comfort for employees. Combined with a microprismatic or high-transmission diffuser, the PR-CL profile achieves UGR<19 compliance, the European standard for office environments, while maintaining the excellent light output required for productive visual tasks.
Smart control ecosystem: Skydance intelligent systems
Control is where functionality meets atmosphere. Skydance offers scalable solutions for every user level, from simple single-zone dimming in a domestic kitchen to sophisticated multi-zone DALI-2 control of hundreds of fixtures in a large commercial installation.
DIY flexibility: systems like the V1-L or WT1 utilise 2.4GHz RF and WiFi technology, allowing users to manage their lights via the Tuya Smart app, voice commands (Alexa/Google Assistant), or wireless remote controls. These controllers connect directly to the home WiFi network. Native integration is available with Amazon Alexa, Google Assistant, and Apple HomeKit via Matter bridge. The Auto-synchronisation feature ensures that multiple controllers within 30 metres operate in perfect unison without needing signal cables, making it straightforward to create large-area single-scene lighting using multiple controllers managing separate strip runs.
Trade reliability: for complex commercial installations, DMX512 and DALI-2 (via the TD series master panels) allow for granular control of hundreds of fixtures from a single control point. DALI-2 (IEC 62386) supports up to 64 individually addressed devices on a single bus, with up to 16 groups and 16 scenes storable in each device. Integration with Building Management Systems via DALI-2 enables automatic daylight-responsive control, occupancy-based dimming, fault detection and reporting, and energy sub-metering — all requirements of BREEAM and LEED building sustainability certifications.
Professional controllers like the V3-X support high-capacity loads of 10A per channel, allowing for longer runs of RGB strip without needing power repeaters. For a 24V RGB installation, 10A per channel corresponds to 240W per colour channel, sufficient for approximately 80 metres of standard 3W/m RGB strip on a single channel. All professional Skydance controllers utilise a logarithmic dimming curve, which matches the human eye’s perception for a smooth, linear brightness transition.
Reliable power: Mean Well drivers
The longevity of an LED system depends entirely on the stability of the power supply. The LED driver is simultaneously the most critical and most frequently under-specified component of an LED strip installation. A poor-quality power supply with inadequate ripple filtering produces a flickering LED output that may not be visible to the naked eye but causes eye strain and headaches in occupants exposed to it for extended periods.
Robust durability: the HLG and XLG series are the gold standard for trade installations, offering metal enclosures, IP67 waterproof ratings, and up to a 7-year warranty. Mean Well’s HLG series uses a constant-voltage, constant-current topology with active power factor correction (PFC>0.9), ensuring compliance with EN 61000-3-2 harmonic current regulations. These drivers are designed to withstand significant lightning surges (up to 10kV for XLG models) — a critical specification for outdoor installations where cabling may act as a lightning antenna.
Commercial design: the XLC and XLN series are specifically designed for linear indoor commercial fixtures, featuring flicker-free performance compliant with IEEE 1789 standards to prevent eye strain and headaches in professional environments. A driver compliant with these standards produces an output with percentage flicker below 0.5%, imperceptible even to high-speed cameras and completely non-harmful for all occupant groups including those with photosensitive conditions.
Dimming compatibility: Mean Well’s 3-in-1 dimming (0–10V, PWM, or resistance) and AC Push-Dim functions provide versatile integration options for both simplified DIY setups and sophisticated commercial building automation systems. The 3-in-1 input means a single driver model is compatible with any dimming protocol the building management system uses, eliminating the need to specify different driver models for different control architectures.
By integrating specialised COB LEDs for uniformity, recessed profiles for aesthetics, and DALI/WiFi controls for intelligence, users can transform any space into a high-end lighting environment. Always ensure that the power supply is sized with a 20% safety margin relative to the total load to guarantee long-term system stability. For example, a 5-metre run of 24V strip consuming 15W/m (75W total) requires a power supply rated for at least 90W.
Buying guide: how to choose LED strip lights
The led strip lights market contains products ranging from sub-€5 budget rolls with no meaningful specification data to premium professional strips at €40+/metre with full laboratory test reports. Navigating this market effectively requires a clear framework for evaluating product quality and matching specification to application requirements.
How much do LED strip lights cost?
| Product category | Price range (per metre, EUR) | Typical application |
|---|---|---|
| Budget SMD2835 white, 12V, IP20 | €0.80–€2.50 | Temporary decoration, low-visibility installs, prototyping |
| Mid-range SMD2835 white, 24V, IP20, Ra≥80 | €2.50–€5.00 | General residential, DIY kitchen under-cabinet |
| Premium COB white, 24V, IP20, Ra≥90 | €5.00–€10.00 | Professional kitchen, retail, hospitality |
| Premium RGB/RGBW SMD5050, 24V, IP20 | €3.50–€7.00 | Architectural colour, retail, events, residential mood |
| Sunlike/High-CRI COB, 24V, Ra≥95 | €8.00–€18.00 | Museum, luxury retail, art, medical, photography |
| High-efficiency Fx2 series, 24V, IP20 | €6.00–€12.00 | Large commercial, energy-sensitive, retrofit |
| IP67 solid silicone outdoor | €8.00–€20.00 | Outdoor architectural, facade, garden, pool perimeter |
| Complete LED strip kit (strip + PSU + controller, 5m) | €25–€80 | DIY bedroom, living room, under-cabinet, TV backlight |
In the vast majority of applications, the answer is yes. The incremental cost of a premium Ra>90 COB strip over a budget Ra>80 SMD strip is typically €3–€5 per metre. For a 10-metre kitchen installation, this is €30–€50 of additional cost. The quality improvement (in light uniformity, colour rendering, visual comfort, and long-term brightness maintenance) is immediately obvious and permanently present for the life of the installation. For commercial installations, the difference in maintenance costs alone typically justifies the premium on high-reliability components within 2–3 years.
Where to buy LED strip lights
For the combination of professional product quality, complete system availability (strips, profiles, power supplies, controllers, accessories), expert technical support, and European-standard certification, catalogue.lightingline.eu is a specialist. The LightingLine range is designed and tested for compatibility, every specification is independently verified, and every product carries CE marking and relevant certification required for professional installation. Trade accounts are available for architects, designers, and professional installers with volume pricing and dedicated technical support.
Smart LED strip lights: WiFi, Tuya, Alexa & DALI Control
Smart LED strip lighting has moved from a luxury option to a mainstream expectation in both residential and commercial markets. The combination of smartphone app control, voice assistant integration, timer scheduling, circadian scene automation, and music synchronisation has transformed LED strip lights from simple decorative lighting into a multifunctional smart home and smart building component.
WiFi smart LED strip lights
The most accessible tier of smart led strip control uses direct 2.4GHz WiFi connectivity and integrates with the major voice assistant and smart home platforms. The Skydance WT1 (single-colour/CCT tunable white) and WT2 (RGB/RGBW) WiFi controllers, connect directly to the home WiFi network and appear as controllable devices in the Tuya Smart app (iOS/Android). Native integration is available with Amazon Alexa, Google Assistant, and Apple HomeKit via Matter bridge, enabling voice control without any additional hub hardware. Smart LED strip systems with music sync functionality use either a built-in microphone to detect audio volume and frequency, or a dedicated sound-to-DMX interface for precise synchronisation with a specific audio source (DJ setup, live event sound system).
DALI-2 & DMX512: professional lighting control
For all serious commercial installations (offices, retail, hotels, public buildings, large residential developments) the specification of a proper lighting control protocol is non-negotiable. DALI-2 (IEC 62386) is an addressable 2-wire bus system where each connected device has a unique address and can be individually commanded, grouped, and interrogated for status (lamp failure, power consumption) from the building management system. DALI-2 supports up to 64 individually addressed devices on a single bus, with up to 16 groups and 16 scenes storable in each device. Integration with BMS enables automatic daylight-responsive control, occupancy-based dimming, fault detection, and energy sub-metering requirements for BREEAM and LEED certification.
DMX512 (ANSI E1.11) is a unidirectional 512-channel broadcast protocol, the industry standard for entertainment and events lighting. The Skydance TD series DMX master panels can control up to 8 universes (4096 channels) simultaneously. DMX is valued in events and hospitality for zero latency, compatibility with professional lighting desks (Avolites, Chamsys, MA Lighting), and robustness against interference.
Market data, statistics and industry trends
Understanding the market context for LED strip lights provides important perspective for both commercial buyers making investment decisions and trade professionals advising clients.
| Market parameter | 2022 value | 2024 value | 2028 forecast | CAGR | Source |
|---|---|---|---|---|---|
| Global LED lighting market size | USD 75.8B | USD 89.4B | USD 135.1B | ~11.0% | Grand View Research, 2024 |
| LED strip lights market (global) | USD 3.4B | USD 4.7B | USD 8.4B | ~13.2% | MarketsandMarkets, 2024 |
| Smart LED lighting market | USD 9.5B | USD 13.1B | USD 24.8B | ~15.9% | Allied Market Research, 2024 |
| EU LED penetration (all light sources) | 58% | 72% | ~88% | — | European Commission JRC, 2024 |
| Average LED luminous efficacy (commercial strip) | 118 lm/W | 140 lm/W | ~175 lm/W | — | DOE SSL Program, 2024 |
| Annual TV bias lighting unit sales (global) | 32M units | 45M units | ~72M units | ~12% | Grand View Research, 2024 |
Key trend 1 — COB displacement of SMD: COB technology’s share of the premium domestic and commercial LED strip market increased from approximately 12% in 2021 to 34% in 2024 (IHS Markit), forecast to reach 55% by 2027 as manufacturing yields improve and unit prices converge with premium SMD products.
Key trend 2 — Matter protocol adoption: the ratification of the Matter smart home interoperability standard (CSA Alliance, 2022) is accelerating the consolidation of the fragmented smart LED control market. LED controllers with native Matter support can be controlled by Amazon Alexa, Google Assistant, Apple HomeKit, and Samsung SmartThings simultaneously. Skydance’s next-generation range incorporates Matter over WiFi, positioning it as a future-proof choice for smart home installations.
Key trend 3 — Human Centric Lighting (HCL) and circadian applications: growing scientific understanding of light’s non-visual effects on human circadian rhythm, sleep quality, alertness, and mood has created a significant new application category. LED strip systems that automatically adjust colour temperature throughout the day are now specified in offices, schools, hospitals, and care homes as an evidence-based wellness intervention. The Skydance CCT tunable white range fully supports this application with programmable day-curve scenes.
Key trend 4 — 48V DC as the emerging commercial standard: 48V DC is gaining traction as the preferred supply voltage for commercial LED linear lighting in new-build commercial interiors, offering longer runs, lower current, reduced voltage drop, and finer dimming resolution compared to 24V.
Content gap analysis note: based on competitive intelligence data analysed across the LightingLine content gap dataset (10,339 keywords), the highest-opportunity content gaps in the UK and European LED strip market include: led strip lighting for kitchens (KD 56, Opportunity 43, Volume 60,500), leds lights (KD 41, Opportunity 79, Volume 49,500), and downlighting (KD 18, Opportunity 82, Volume 8,100). LightingLine is uniquely positioned to capture these opportunities through the depth and quality of technical content combined with a complete product ecosystem that competitors cannot match.
LED lighting design: ideas for every space
The technical specification of an LED strip lighting system is only half the design challenge: the other half is knowing where to place the light to achieve the desired perceptual effect. The most common error in LED strip lighting design is treating LED strips as a direct replacement for conventional fixtures rather than exploiting the unique design possibilities their linear, low-profile, flexible form factor enables. This section provides design principles and specific application ideas for each major space type.
Kitchen LED lighting design ideas
Strip lighting ideas for kitchens centre on the concept of layered illumination: separating the task, ambient, and accent lighting functions into independent circuits that can be individually controlled.
Under-cabinet task lighting: COB strip in a PR-SL profile, mounted flush to the cabinet base at the rear of the worktop zone (so the profile is not visible when standing at the worktop), provides shadow-free task illumination for food preparation. Position the profile as far toward the front of the cabinet base as possible for maximum worktop coverage.
Coving ambient lighting: a strip in a PR-A corner profile installed at the wall-ceiling junction, directed upward onto the ceiling, creates a soft indirect ambient wash. Use a CCT-tunable warm-cool white strip on this circuit for flexibility between daytime cooking and evening dining atmospheres.
Plinth LED lighting: a low-power strip (5–8W/m) in a floor-level slim profile installed along the base of kitchen units creates a visually striking “floating” effect and practical night-light function. IP44 minimum is recommended for floor-level kitchen applications.
Display cabinet interior lighting: COB or SMD strip in a mini surface-mount profile on the interior back and/or top of display cabinets illuminates displayed objects from multiple directions, eliminating shadows and showcasing items with high colour fidelity.
Living room and bedroom LED design ideas
LED strip lights for room atmosphere excel in the living room and bedroom because the dramatic effect-to-cost ratio is very high, and smart control allows the same installation to serve multiple different functions from a single voice command or scene button.
Floating furniture effect: install a strip in a slim profile on the underside or rear of sofas, TV units, and side tables, directed downward or against the wall. The resulting halo of indirect light makes heavy furniture appear to float.
Ceiling coving indirect wash: in rooms with cornicing or coving, a strip installed in a PR-A profile directed upward creates a soft, glare-free ambient ceiling wash. This is the single most transformative LED strip application for residential living rooms, eliminating a harsh ceiling pendant in favour of indirect coving light changes the entire mood character of the space.
Headboard or bed canopy lighting: LED strips in slim profiles installed behind or above a bed headboard create a dramatic architectural backlight. CCT tunable white capability allows the scene to shift from bright reading light to deep warm sleep-preparation ambiance.
Retail and commercial LED design ideas
Fashion retail: neutral to warm white (3000–4000K), Ra>90, with carefully controlled directional spotlights supplemented by perimeter linear strips for ambient fill. Avoid cool white sources above 4000K in fashion retail, they render skin tones poorly and create an unwelcoming atmosphere.
Food retail and delicatessen: high-CRI (Ra>95) warm white (2700–3000K) for meat, charcuterie, and bakery displays; neutral white (4000K, Ra>90) for vegetable and fresh produce areas.
Technology and electronics retail: cool white (4000–5000K), Ra≥80, high illuminance levels (500+ lux on display surfaces). RGB accent lighting for product feature highlighting and window display.
Office and workspace: neutral white (3500–4000K), Ra≥80, UGR<19, 300–500 lux on work surfaces. DALI-2 daylight sensing and occupancy control for energy management and BREEAM compliance.
FAQ: frequently asked questions about LED strip lights
The following questions represent the most common queries about led strip lights, led lighting, and related topics. Each answer reflects the current state of LED technology and professional installation practice as of 2025.
What does LED stand for? What is the meaning of LED?LED stands for Light Emitting Diode. It is a semiconductor device that emits light when a forward electric current is passed through a p-n junction fabricated from specific semiconductor compounds. The meaning of LED in common usage refers broadly to any lighting product using this technology. |
Do LED strip lights use a lot of electricity? Are LED lights cheap to run?No — LED strip lights are among the most energy-efficient lighting solutions available. A typical 5-metre 24V LED strip consumes between 12W and 24W depending on LED density and chip type. At the UK average electricity tariff (approximately 28p/kWh in 2025), a 5m run consuming 15W costs approximately £0.004 per hour, or roughly £14 per year at 8 hours per day. This is 70–85% less than the halogen strips they commonly replace, and 30–50% less than equivalent fluorescent strip lighting. Are LED lights cheap to use? Definitively yes. |
How long do LED lights last? What is the lifespan of an LED light?Premium LED strip lights are rated L80 B50 at 50,000 hours, meaning the median strip retains 80% of initial brightness after 50,000 hours. At 8 hours of daily operation, this equals approximately 17 years. In practice, the most common cause of premature failure is thermal — strips not installed in aluminum profiles run hotter and degrade faster. Mean Well power supplies with 7-year warranties further extend system reliability. LED strip lights correctly installed in aluminum profiles routinely outlast the renovation cycle of the spaces they illuminate. |
How do you cut LED strip lights? Where can you cut them?LED strip lights may only be cut at the designated cut marks printed on the PCB — typically indicated by a scissors icon or a printed line at 25mm, 50mm, or 100mm intervals depending on the strip type. These marks coincide with exposed copper solder pads. Use sharp scissors or a craft knife to make a clean, straight cut through the centre of the pads. Cutting between marks will destroy the LEDs in the cut segment and potentially create a short-circuit hazard. Always power off the strip completely before cutting. |
What colour temperature is best for a kitchen?For kitchen task lighting (under-cabinet, over-sink, preparation area), 3000–4000K neutral to neutral-warm white with CRI Ra≥90 is the professional standard. 3000K provides excellent food colour rendering with a comfortable warm tone; 4000K offers slightly better task visibility. Avoid 5000K+ (too clinical/harsh) and anything below 2700K for task lighting (insufficient colour discrimination). A CCT-tunable system that can shift between these settings provides the ideal flexible solution for kitchens used for both cooking and dining. |
Can I leave LED lights on all night? Is it OK to leave LED lights on all night?Yes, from both a safety and economic perspective. LED strips generate far less heat than incandescent or halogen sources and do not pose a fire risk when correctly installed. The running cost of leaving a 5m LED strip on all night (8 hours) is approximately £0.03 at current UK electricity rates. Quality LED strips and Mean Well power supplies are rated for continuous duty cycle operation. However, for longevity, it is generally better to use smart controls (timer scheduling or occupancy sensing) rather than leaving LED strips on permanently when the space is unoccupied. |
Are LED lights bad for you? Do LED lights affect circadian rhythm?Standard LED lighting, including LED strip lights, is safe for general use. The “blue light” concern relates specifically to prolonged exposure to high-intensity, short-wavelength (blue-rich) LED sources at close range in the evening hours, which can suppress melatonin production and disrupt sleep. To minimise any circadian disruption: use warm white (2700–3000K) LEDs in bedrooms and living spaces after evening; dim LED strips in the evening; and avoid installing very bright cool-white strips (5000K+) in sleeping areas. The EU’s Blue Light Hazard standard (EN 62471) classifies most domestic LED strips in Risk Group 0 (exempt) — no hazard under normal use conditions. |
What is the difference between 12V and 24V LED strip lights?24V strips allow for longer runs (up to 10m versus 5m for 12V) without visible brightness variation from voltage drop; they generate less heat per metre; and they offer finer PWM dimming resolution. 12V strips are more common for DIY, automotive, and battery-powered applications. For most domestic and commercial fixed installations, 24V is the preferred modern standard for all but the most cost-sensitive applications. |
Can LED strip lights replace fluorescent tubes?Yes, in the vast majority of applications. LED strips in appropriate aluminum profiles with diffusers can replace T8, T5, and T12 fluorescent tube installations in offices, retail, kitchens, and industrial premises. The LED alternative offers higher CRI, better dimming capability (fluorescent dimmers are expensive and limited), longer lifespan, no mercury content, and typically 30–50% lower energy consumption. The initial cost is higher but payback in energy savings is typically achieved within 2–4 years for commercial installations operating 8+ hours per day. |
Should I put LED lights behind my TV?Yes. TV bias lighting, an LED strip installed around the back perimeter of a television screen, reduces eye strain by narrowing the perceived contrast ratio between the bright screen and the dark wall. The recommended specification is RGBW with a clean 6500K white channel at approximately 10% of screen peak brightness. For the best experience, mount the strip 25–50mm behind the screen edge to wash the wall rather than pointing directly at the viewer. Smart strips synced to screen content (Ambilight-style) provide the most immersive result. |
Are LED strip lights legal in the UK? Are they an MOT failure?LED strip lights for interior domestic use (home, office, retail) are entirely legal in the UK, subject to compliance with the relevant wiring regulations (BS 7671 for mains-connected systems) and the relevant product safety directives (Low Voltage Directive, RoHS). For automotive applications: interior LED strips do not affect MOT. Exterior LED modifications that alter the photometric characteristics of road-legal headlights, tail lights, or indicator assemblies may constitute an MOT failure. Always verify current DVSA guidelines before fitting any exterior LED modifications to road vehicles. |
What are the disadvantages of LED strip lights?The main disadvantages of LED strip lights are: (1) Higher upfront cost than halogen or fluorescent alternatives, though offset by lower running and replacement costs; (2) Complexity a complete system requires matching strip, power supply, controller, and profile, which is more involved than screwing in a replacement bulb; (3) Quality variation the market contains a very wide range of product quality, and low-quality strips produce poor light output, limited lifespan, and colour inaccuracy; (4) Thermal sensitivity LED strips must be installed with adequate thermal management (aluminum profiles) to achieve rated lifespan. None of these disadvantages outweigh the substantial advantages for any application operated for more than a few months. |
Do LEDs attract bugs? Do LED lights attract spiders?LEDs are significantly less attractive to flying insects than fluorescent or incandescent sources because most insects navigate by ultraviolet (UV) and short-wavelength visible light. Standard LED strips emit essentially no UV radiation, making them far less attractive to moths, mosquitoes, and other phototactic insects than fluorescent tubes. Warm-white LEDs (2700–3000K) are even less attractive to insects than cool-white LEDs. LED lighting does not specifically attract spiders, though spiders may follow insects attracted to any light source. |
What is CRI and why does it matter for LED strip lights?CRI (Colour Rendering Index, also denoted Ra) measures how faithfully a light source renders the colours of objects compared to natural sunlight (Ra 100). A CRI of 80 means colours look reasonably natural; CRI 90+ means colours look very natural; CRI 95+ is near-sunlight quality. For domestic kitchens, Ra≥90 is strongly recommended. For retail, galleries, and professional food displays, Ra≥95 is the minimum. For luxury jewellery, fine art, and medical, Ra≥97 (Sunlike technology). Low-CRI strips make colours look washed out or inaccurate — food looks less fresh, skin tones look unflattering, and coloured objects appear different from how they look in natural light. |
Where can I buy LED strip lights in the UK and Europe?For professional-grade LED strip lights with full certification, complete system compatibility, and expert technical support, catalogue.lightingline.eu is the definitive European specialist. LightingLine ships across the UK and EU and provides trade accounts for professional installers, architects, and quantity buyers. Major DIY retailers (B&Q, Screwfix in the UK) stock basic consumer-grade strip kits. For professional trade and commercial applications, specialist LED suppliers provide the product depth, technical documentation, and application support that generalist retailers cannot match. |
Led strip lights: the most significant transformation
LED strip lights represent the most significant transformation in practical lighting technology since the introduction of fluorescent sources in the 1950s. From the modest under-cabinet kitchen strip to the multi-zone, DALI-controlled commercial interior, the ecosystem of LED strip technology has matured to the point where it is the correct choice for virtually every linear lighting application — economically, aesthetically, and environmentally.
The key message of this guide is that the performance of an LED strip lighting installation is determined not by any single component but by the quality and compatibility of the complete system: the right strip, installed in the right profile, powered by the right driver, controlled by the right system, for the specific requirements of the application. The light ecosystem (combining high-performance LED strips, precision-engineered aluminum profiles, intelligent controllers, and certified power supplies) provides exactly this complete, compatible, certified solution for every scale of installation, from a single kitchen cabinet to a large commercial development.
Whether you are a retail professional updating your store with the latest LED commercial lighting, an architect integrating trimless recessed linear light into a contemporary ceiling, an events specialist creating immersive colour environments, or a homeowner fitting your first LED strip kit under kitchen cabinets, the starting point is the same: begin with the right components from a specialist who can provide the technical support to make the installation exceptional.