Bathroom led lights must be chosen carefully when it comes to spaces like this: the bathroom is probably the most technically demanding space in any building when it comes to lighting. It’s where humidity, steam, condensation, temperature fluctuations, and proximity to water combine to create conditions hostile to unsuitable lighting fixtures and downright dangerous if electrical safety is neglected. Yet it’s also one of the spaces where the quality of lighting has the greatest impact on the daily experience: from the clarity of details in the bathroom mirror in the morning to the soft, warm ambient light that transforms an evening bath into a true moment of relaxation and regeneration.
Over the past decade, led technology has become the dominant choice for bathroom lighting among architects, interior designers, electricians, hoteliers, spa operators, and homeowners. The reasons are compelling and well-documented: leds consume 75% to 90% less energy than incandescent lamps, last 25,000 to 50,000 hours compared to 1,000 hours for a standard GLS lamp, produce negligible heat (critical in high-humidity environments), and are available in an extraordinary variety of formats, from recessed spotlights and surface-mounted ceiling panels to flexible led strips housed in waterproof aluminum profiles, mirrored light bars, and decorative pendant lamps.
At LightingLine.eu, we have spent years developing a range of waterproof led profiles and selecting and supplying IP-rated led strips specifically designed for humid and challenging environments. This guide draws on consolidated technical expertise to offer everyone a comprehensive, authoritative, and highly practical resource on every aspect of led bathroom lighting: from the regulatory and legal framework for bathroom lighting zones, SELV compliance, and condensation management, to the aesthetic dimension of color, intensity, and fixture design, and the finer details of wiring diagrams and led strip circuit management.
- Bathroom led lights: IP44, IP65 and the law
- SELV compliance: what it is and why it saves lives
- Types of bathroom led lights: a complete taxonomy
- Technical specifications: lumens, colour temperature, CRI and more
- led aluminium profiles for bathrooms: selection and installation
- Condensation prevention: the silent enemy of bathroom lighting
- Step-by-step bathroom led lights installation guide
- Wiring diagrams and electrical schematics for led strip circuits
- Colour temperature and CRI: choosing the perfect light for every area
- Design and aesthetics: integrating led lighting into bathroom interiors
- Smart controls: dimmers, sensors and home automation
- Energy efficiency, running costs and environmental impact
- Buying guide: what to look for and what to avoid
- Maintenance, lifespan and troubleshooting
- Frequently asked questions
- Conclusion
Bathroom led lights: IP44, IP65 and the law
Before purchasing a single led light or led strip for the bathroom, every designer and installer must fully understand the bathroom’s zoning system.
In the UK, bathroom lighting is regulated by BS 7671: Requirements for Electrical Installations (IET Wiring Regulations, 18th edition), specifically “Part 7”, “Special Installations – Section 701”, which implements IEC 60364-7-701.
In the European Union and most other markets, IEC 60364-7-701 or its national equivalent (e.g., NF C 15-100 in France, DIN VDE 0100-701 in Germany, CEI 64-8/7 in Italy) applies directly. The basic principles are identical across all these standards.
The three bathroom zones explained
The zone system divides the bathroom into areas based on their proximity to water sources, bath, shower tray or shower area and assigns minimum Ingress Protection (IP) ratings accordingly. Understanding these zones precisely is essential because using an under-rated fitting in a high-risk zone is both illegal and dangerous, while over-specifying can add unnecessary cost.
| Zone | Location | Definition | Min. IP rating | SELV required? | Notes |
|---|---|---|---|---|---|
| Zone 0 | Interior of bath or shower tray | The volume inside the bath, shower tray or shower basin. Includes the space directly above the bath surface to the maximum showerhead height (or 2.25 m if no showerhead). | IPX7 / IP67 minimum | Yes — 12V SELV only | Very few fittings are suitable. Submersible or bath-edge led lights only. No standard mains fittings permitted. |
| Zone 1 | Above bath / shower to 2.25 m height | The area directly above zone 0, from the bath or shower tray surface up to a height of 2.25 m from the finished floor level. Includes the shower enclosure volume. | IP44 minimum (IP65 strongly recommended) | Yes — SELV or mains with RCD protection | IP65 or IP66 is the professional standard for shower zones. led drivers must be outside zone 1 if mains-connected. |
| Zone 2 | 0.6 m beyond zone 1, to 2.25 m height | A band 0.6 m wide horizontally outside the perimeter of Zone 1 and the outer edge of the bath. Also includes the area above Zone 1 where the ceiling is below 2.25 m. | IP44 minimum | Recommended but not mandatory if on a 30 mA RCD | Shaver sockets to BS EN 61558-2-5 are permitted in zone 2 only. |
| Outside Zones | Rest of the bathroom beyond 0.6 m from Zone 1 | Area beyond 0.6 m horizontally from zone 1 and beyond 2.25 m height. Sometimes called zone 3 in older literature, though this designation has been removed from current standards. | IP20 minimum (IP44 recommended) | Not mandatory (but always protected by 30 mA RCD) | Standard domestic or commercial fittings may be used here, though IP44 is best practice in bathrooms due to general humidity. |
IP ratings explained: what the numbers actually mean
The IP (Ingress Protection) rating, defined by IEC/EN 60529, is a two-digit code that tells you how well an enclosure is protected against solid particle ingress (first digit) and liquid ingress (second digit). Understanding IP ratings is fundamental to selecting the correct bathroom led lights for each location.
| IP rating | Solid protection (1st digit) | Liquid protection (2nd digit) | Typical application in bathroom |
|---|---|---|---|
| IP20 | Objects >12.5 mm (finger) | None | Outside bathroom zones only |
| IP44 | Objects >1 mm (tools, wires) | Water splashing from any direction | Zones 1 and 2, general bathroom ceiling |
| IP54 | Dust-limited ingress | Water splashing from any direction | Zone 1, enhanced protection above showers |
| IP65 | Dust-tight | Water jets from any direction (no ingress) | Zone 1 showers, recommended for led profiles in wet areas |
| IP66 | Dust-tight | Powerful water jets (no ingress) | Zone 1 walk-in showers, commercial wet rooms |
| IP67 | Dust-tight | Temporary immersion up to 1 m for 30 min | Zone 0, over bath tray; spa pools |
| IP68 | Dust-tight | Continuous immersion beyond 1 m | Zone 0, underwater pool lighting; decorative bathtub lighting |
A critical practical point: the IP rating of a led luminaire is only as good as its installation. An IP65 led downlight with inadequately sealed cable entry glands, or with condensation pathways created by improper thermal design, will quickly lose its protection. This is particularly relevant to led aluminium profiles, where end-cap sealing, cable entry waterproofing and diffuser seating quality determine the real-world protection level.
Measuring and mapping your bathroom zones
To correctly apply the zone system to your bathroom, you need to take precise measurements and create a zone plan. The process is straightforward but must be executed methodically.
Step 1 – Identify all water sources: mark the exact location of the bath, shower tray, walk-in shower area, and any shower heads or sprays. Include any thermostatic shower columns or overhead rain-head showers, noting their maximum reach of the water spray.
Step 2 – Define zone 0: this is the interior volume of the bath or shower tray. If the bath has a showerhead over it, zone 0 extends vertically to 2.25 m above the floor within the bath plan area. For a separate shower enclosure with no bath, zone 0 is the interior of the shower tray and the volume directly above it.
Step 3 – Define zone 1: draw a vertical boundary around the exterior of zone 0 (i.e. the outer edge of the bath rim or shower enclosure wall) and extend it vertically to 2.25 m. For a walk-in shower without an enclosure, zone 1 extends 1.2 m horizontally from the shower head position in all directions, up to 2.25 m height. This is where IP65 led bathroom ceiling lights, waterproof led downlights and IP-rated led profiles must be used.
Step 4 – Define zone 2: extend 0.6 m horizontally outward from the zone 1 boundary at all heights up to 2.25 m. IP44 is the minimum for all led bathroom lights in zone 2, and this typically includes most of the main ceiling area in a standard bathroom.
Step 5 – Document and plan: create a dimensioned drawing of the floor plan and section view, marking all zones. Use this as the basis for specifying lighting, wiring routes and driver locations. If the installation is in a commercial building (hotel, spa, gym), this documentation is essential for Building Regulations sign-off and for future maintenance records.
Common mistakes in bathroom zone assessment
In our experience at LightingLine.eu, and from feedback from professional electrical contractors, certain mistakes recur repeatedly in bathroom zone assessments. Understanding these errors will help you avoid costly remedial work and potential safety hazards.
Mistake 1 – Ignoring the ceiling plane: the zones extend up to 2.25 m, not just at head height. If the ceiling is at 2.4 m and directly above a shower, that ceiling area is technically outside zone 1 (above 2.25 m from floor) but is still subject to heavy condensation. Professional practice is to use IP44 minimum throughout the entire bathroom ceiling.
Mistake 2 – Treating walk-in showers as zone 2 at their edges: a walk-in shower without an enclosure has zone 1 extending 1.2 m horizontally from the shower head in all directions, not just within the notional “shower area.” led lights positioned on the ceiling above the periphery of a walk-in shower may well be within zone 1.
Mistake 3 – Placing the led driver within zone 1: the SELV led driver (transformer) must be located outside zone 0 and zone 1. Placing it in the ceiling void directly above the shower is incorrect if that void is within Zone 1. The driver must be accessible for maintenance and must not be in a position where it is subject to water ingress or condensation damage.
Mistake 4 – Using IP44 led downlights in fire-rated ceiling voids without checking compressible fire protection: IP44 downlights with a sealed back (as required for fire-rated ceilings) may not have adequate ventilation for led thermal management. Always check the fire rating compatibility of any recessed bathroom led light fixture.
SELV compliance: what it is and why it saves lives
Of all the safety requirements that govern bathroom led lighting, SELV (Safety Extra-Low Voltage) compliance is the most important and the least understood by non-specialists. Getting SELV wrong can be fatal. Understanding it correctly allows you to design and install bathroom led lights that are genuinely and provably safe, even in zone 0 where the risk of simultaneous contact with live parts and water is highest.
What is SELV?
SELV is defined in IEC 61140 and BS 7671 as an electrical system in which the voltage cannot exceed 50V AC or 120V DC under any conditions, including fault conditions, and in which the circuit is electrically separated from earth and from other systems by a safety isolating transformer. In practice, for led lighting, this means:
- the led driver (transformer) converts mains voltage (230V AC in Europe, 120V AC in North America) down to 12V DC or 24V DC;
- the output circuit of the driver is electrically isolated from the mains input by a safety-isolating transformer core compliant with IEC 61558-2-6;
- the 12V or 24V DC output circuit is not connected to earth;
- the maximum touch voltage at the led strip terminals is 12V or 24V DC, which is physiologically harmless in normal circumstances;
The key characteristic that distinguishes SELV from simple low-voltage systems is the electrical isolation: even if you simultaneously touch the positive and negative terminals of a SELV circuit while standing in a bath, the current that can flow through your body is limited to a level that cannot cause ventricular fibrillation (heart stoppage). This is why zone 0 led lighting must always be SELV, and why SELV is strongly recommended throughout the entire bathroom.
SELV vs PELV vs class II: understanding the differences
Electricians and lighting designers sometimes confuse SELV with related concepts. The distinctions matter both legally and practically.
| System | Voltage | Earth connection | Isolation from mains | Bathroom zone 0/1 permitted? |
|---|---|---|---|---|
| SELV | ≤50V AC / ≤120V DC | Not connected to earth | Safety isolating transformer (IEC 61558-2-6) | Yes — mandatory in zone 0 |
| PELV | ≤50V AC / ≤120V DC | Connected to earth or earthed parts | Safety isolating transformer | No — not permitted in zone 0 (earth connection creates return path for fault current) |
| Class II (double insulated) | Mains voltage | Not connected to earth (no earth terminal) | Double or reinforced insulation | Zone 1 and 2 permitted if IP-rated, not zone 0 |
| Mains + 30mA RCD | Mains voltage | Earth connected | No isolation | Zone 1 permitted (with IP44+), not zone 0 |
The practical implication for led strip lighting: when you install a SELV led driver, you must verify that it is genuinely SELV-rated, that is, that it carries the appropriate safety certification (CE, UKCA, UL, cUL as applicable) and that the specification sheet explicitly states “SELV output” or “safety isolating transformer to IEC 61558-2-6.” A cheap unbranded led driver that merely states “12V output” may not be isolated from mains. LightingLine.eu only supplies led drivers that are fully certified SELV compliant with documented test reports.
SELV circuit design rules for bathroom led lighting
Designing a correct SELV circuit for bathroom led lighting requires attention to several interconnected rules:
Rule 1 – Driver location: the SELV driver must be sited outside zone 0 and zone 1. Preferred locations include an adjacent bedroom ceiling void, a built-in storage cupboard, the airing cupboard, or a dedicated electrical enclosure in the bathroom outside the wet zones. The driver must be accessible without removing fixed building fabric;
Rule 2 – Cable routing: the low-voltage SELV cable running from the driver to the led strips within zones 1 and 2 does not need to be mechanically protected to the same degree as mains wiring, but it must be suitable for the environment (moisture-resistant sheathing) and must not share a conduit with mains cables unless it is in a separate conduit or has separate insulation rated for the full mains voltage. This is to prevent induction of mains voltage into the SELV circuit if insulation breaks down;
Rule 3 – No connection to earth: in a SELV system, the output circuit must not be connected to the protective earth conductor. This means led strip lights and profiles on a SELV circuit must not have any metal parts connected to earth.
Rule 4 – Maximum voltage: the SELV output voltage must not exceed 50V AC or 120V DC at any point. In practice, 12V DC and 24V DC led drivers are used. Note that nominal 24V DC systems may have open-circuit voltage of 25–28V, still well within the SELV limit;
Rule 5 – Overcurrent protection: the SELV circuit must be protected against overcurrent (typically by a fuse or circuit breaker in the driver or in an adjacent distribution board). For led strip circuits, the current draw is predictable and the driver’s built-in current limiting usually provides adequate protection.
SELV and led dimming in bathrooms
Dimming bathroom led lights adds enormous value to the user experience, allowing the lighting to transition from full task brightness for morning grooming to soft, warm ambient light for an evening bath. However, dimming on a SELV circuit requires specific products and wiring arrangements.
There are four main approaches to SELV led dimming in bathrooms:
Approach 1 – 0-10V analogue dimming: the SELV driver has an analogue control input (0V = off, 10V = 100% output). A low-voltage dimmer switch (which may be located outside the bathroom zones) sends a 0–10V signal to the driver. The led strip itself does not carry any switching current—all switching happens in the driver. This is a very clean, flicker-free dimming method widely used in commercial bathrooms.
Approach 2 – PWM (Pulse Width Modulation) dimming: the SELV driver outputs a constant voltage (12V or 24V) but at a variable duty cycle controlled by a PWM signal. Alternatively, a PWM dimmer module is inserted in the low-voltage output circuit between driver and strip. PWM dimming at frequencies above 2,000 Hz is generally flicker-free and safe; lower-frequency PWM can cause stroboscopic effects visible in video and uncomfortable to some users.
Approach 3 – DALI-2 or DSI digital dimming: the driver is DALI-2 compliant and receives digital dimming commands from a DALI controller. DALI is the professional standard for commercial bathroom lighting in hotels, spas and healthcare facilities. It allows per-channel dimming, scene setting and integration with building management systems (BMS).
Approach 4 – Triac/leading-edge/trailing-edge dimming via a dimmable mains driver: some SELV drivers have a mains-side dimming input compatible with standard mains dimmer switches. This is the simplest consumer-oriented approach but requires a mains dimmer (outside the bathroom zones) and a fully dimmable driver. Not all led strips are compatible with all dimming protocols—always check compatibility.
Types of bathroom led lights: a complete taxonomy
The diversity of bathroom led light formats available in 2026 is greater than at any previous point in the technology’s history. Each format has distinct advantages, installation requirements, aesthetic characteristics and appropriate use cases. Understanding the complete taxonomy of bathroom led lighting types is essential for creating a layered, functional and visually sophisticated bathroom lighting scheme.
Led downlights (recessed ceiling lights)
Led bathroom ceiling lights in the recessed downlight format are the most common type of general (ambient) lighting in modern bathrooms. They are available in a wide range of sizes (typically 70 mm, 90 mm, 100 mm or 145 mm cut-out diameter), colour temperatures (2700K–6500K), beam angles (24°–120°) and IP ratings (IP44, IP54, IP65).
Key selection criteria for led bathroom ceiling lights:
- IP rating: IP44 for general ceiling area, IP65 for directly above shower or bath;
- fire rating: in most residential and commercial ceilings, fire-rated (FR) downlights are required to maintain the fire integrity of the floor above;
- lumen output: typically 400–1,000 lm per downlight for a medium bathroom; space at 0.8–1.2 m centres for general ambient lighting;
- colour temperature: 2700K or 3000K for a warm, welcoming feel, 4000K for a crisper, more clinical appearance;
- CRI (Colour Rendering Index): minimum CRI 80, CRI 90+ strongly recommended for vanity areas and colour-sensitive grooming tasks;
- dimmability: essential for flexibility, ensure dimmer compatibility is confirmed;
- driver type: integral driver (most common for consumer market) or remote driver (for commercial applications).
For hotel bathrooms, spa facilities and high-end residential projects, recessed led downlights with integrated adjustable glare-control optics and CRI 95+ are increasingly specified. These provide the best possible colour rendering for guest experience and match the high expectations of the luxury market.
Led strip lights in bathroom applications
Led strip lights, also known as led tape or led flex, are perhaps the most versatile format of bathroom led lighting available. They consist of a flexible printed circuit board (PCB) substrate on which SMD (Surface-Mount Device) leds are mounted at regular intervals, covered with a silicone potting compound or sleeve for waterproofing. In bathroom applications, led strips can be used for mirror backlighting, under-shelf lighting, niche illumination, shower recess lighting, bath plinth lighting and architectural cove lighting, virtually any linear or curvilinear surface.
The waterproofing of led strips is classified as follows
| Type | IP rating | Construction | Bathroom zone suitability | Notes |
|---|---|---|---|---|
| Bare strip (non-IP) | IP20 | No waterproofing | Outside zones only (in sealed profile) | Best for indirect lighting, not suitable for direct moisture exposure |
| Silicone-sleeved | IP54/IP65 | Thin silicone sleeve over leds | Zones 1 and 2 | Reduces maximum current per metre, check thermal derating |
| Full potting (silicone-filled) | IP67 | PCB fully encapsulated in silicone | Zone 1 (above shower), zone 0 edges | Excellent moisture protection, heat dissipation slightly reduced |
| Double-wall tube | IP68 | PCB in sealed silicone tube with air gap | Zone 0 (submersible) | True submersion-rated, used in bath edges and pool features |
LightingLine.eu offers waterproof led strips in IP65, IP67 and IP68 variants, in both 12V and 24V versions, with led densities from 60 leds/m to 240 leds/m and lumen outputs from 400 lm/m to 2,800 lm/m. All strips are available in single-colour (white, warm white, neutral white, cool white) and RGB, RGBW and tunable white variants for maximum design flexibility.
Led aluminium profiles for bathrooms
Led aluminium profiles (also known as led channels, led extrusions or led housings) are the professional standard method for installing led strip lights in bathrooms and all other environments. The profile serves multiple critical functions simultaneously:
- heat dissipation: the aluminium conducts heat away from the led PCB, dramatically extending led lifespan. An led strip running without a profile operates 15–25°C hotter at the junction than the same strip in a well-fitted aluminium profile;
- mechanical protection: the profile protects the delicate led strip PCB from physical damage during and after installation;
- optical control: the diffuser cover (opal, frosted or clear) controls glare and creates a uniform light output without visible hotspots between individual leds;
- waterproofing: waterproof profiles with sealed end caps, silicone-sealed diffuser slots and IP-rated cable entry glands create a genuinely water-resistant assembly even when used with a non-IP led strip inside;
- aesthetic: aluminium profiles present a clean, architectural finish that elevates the visual quality of any led strip installation.
LightingLine.eu waterproof led profile range for bathrooms
- Surface-mount waterproof profiles (IP65): rectangular and curved profiles for surface mounting on walls, under shelves and on mirror surrounds. Available in anodised aluminium (silver, black, gold) and with white or opal diffusers;
- Recessed waterproof profiles (IP44/IP65): designed for plasterboard, tile and solid wall recessing. Create a flush, architectural light line with no visible profile body;
- Plinth profiles (IP65): low-profile, wide-base designs for bathroom furniture plinth and toe-kick lighting;
- Round: for pendant and surface-mount circular luminaires using led strip as the light source.
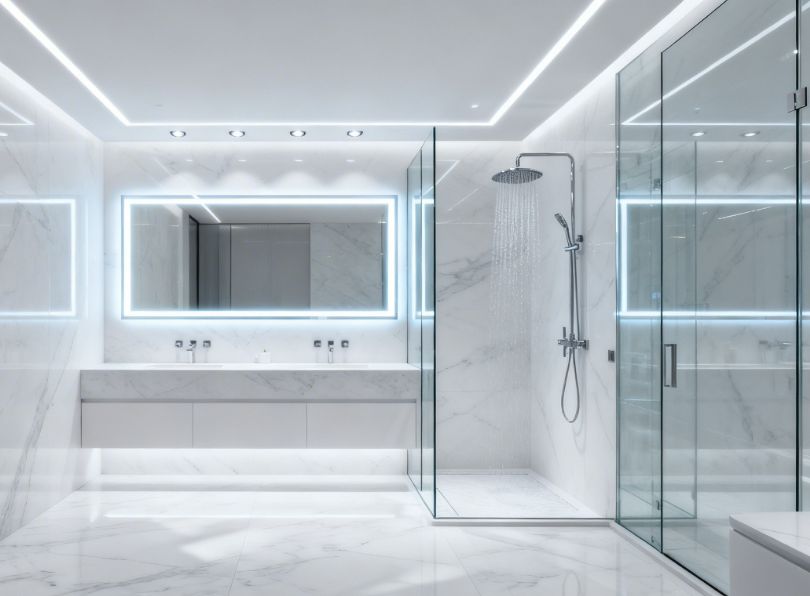
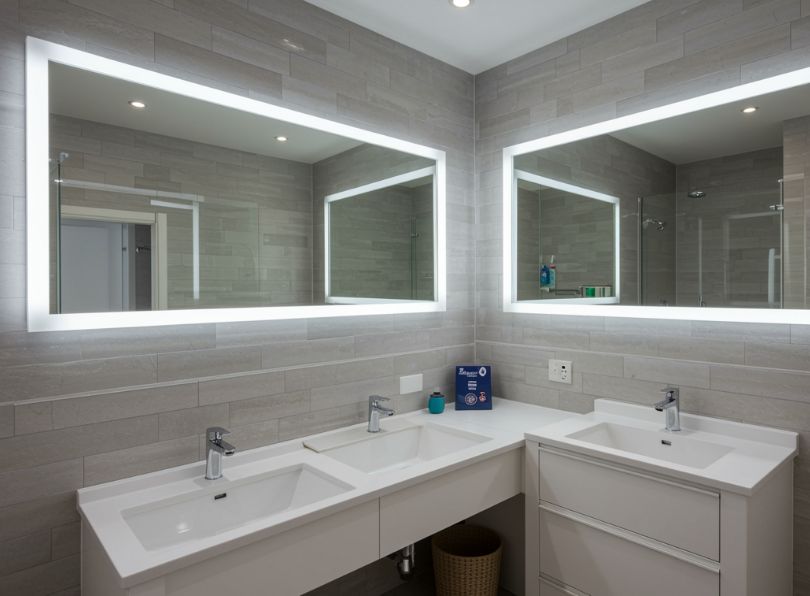
Led mirror lights and bath bar lights
led bathroom mirror lights and led bath bar lights are purpose-designed luminaires for mounting above or alongside bathroom vanity mirrors. They serve the critical function of providing task lighting for grooming, make-up application, shaving and personal care. The quality of this light is more important than almost any other aspect of bathroom lighting design because it directly affects how accurately users can see themselves and their appearance.
The professional lighting design standard for vanity mirrors is to provide light from three sides, top and both sides, rather than solely from overhead. This eliminates the harsh under-chin shadows created by ceiling-only lighting and provides the even, diffuse illumination familiar from theatrical dressing rooms and professional photography. led bath bar lights mounted vertically on both sides of the mirror, supplemented by a horizontal bar or profile above, achieve this ideal.
Critical specifications for led vanity mirror lights:
- CRI ≥ 90 (ideally CRI 95+): lower CRI will cause inaccurate colour rendering, making it impossible to match make-up to real-world appearance or to see true skin tone.
- Colour temperature 3000–4000K: this range provides the best balance between warmth (flattering to most skin tones) and accuracy. 2700K is too warm for accurate grooming, 6500K is too cool and clinical.
- High lumen output at face level: aim for 800–1,400 lm at face distance (approximately 600–800 mm from the fitting). Insufficient light at the vanity is the single most common bathroom lighting complaint.
- Dimmability: allows intensity adjustment for different tasks and times of day.
- IP44 minimum: even if the mirror is in zone 2 or outside zones, bathroom humidity makes IP44 best practice for all led bathroom light fixtures near the mirror.
- Glare control: diffused light sources (frosted glass, opal diffuser) are preferred over bare led arrays, which can cause discomfort glare when looked at directly in the mirror.
Led panel lights for bathroom ceilings
Led panel lights are large-format, flat luminaires that provide very even, diffuse general illumination. In bathrooms they are used primarily in commercial settings (hotel bathrooms, spa changing rooms, gym facilities) where high ceilings and large floor areas require generous ambient output. Standard panel sizes are 600×600 mm, 600×300 mm and 1200×300 mm.
For residential bathrooms, smaller panel formats (300×300 mm, 450×450 mm) are increasingly popular as ceiling-centre fixtures, particularly in contemporary flat-ceiling bathroom designs where recessed downlights are not appropriate. Led panel lights suitable for bathrooms must be IP44 rated and must not exceed the maximum weight for the ceiling fixing.
Are led panel lights suitable for bathrooms? Yes, provided they are IP44 rated and installed by a qualified electrician in compliance with the zone regulations. They are particularly well suited to large bathrooms and commercial wet rooms where wide, even illumination is required.
Led decorative and accent lighting for bathrooms
Beyond functional lighting, the contemporary bathroom increasingly incorporates decorative led accent lighting for atmosphere, visual interest and what the hospitality industry calls “experiential differentiation.” This category includes more type of products.
- Bathtub led lights (bath surround lighting): IP68-rated led strips recessed into the bath apron or plinth, creating a floating effect. Increasingly popular in freestanding bath installations in luxury hotels and residential master bathrooms. All must be SELV 12V or 24V.
- Niche and alcove led lighting: recessed shower niches, shelving alcoves and architectural recesses highlighted with IP65 led strip in aluminium profile. Creates dramatic depth and visual luxury.
- Under-bath led lighting: freestanding baths illuminated from below create a highly Instagrammable floating bath effect. Requires IP44 minimum, IP65 recommended.
- led-lit mirror surrounds: backlit mirrors with an integrated led surround, or mirrors with a custom led halo behind them using led strip in a flat aluminium profile. CRI 95+ strips are strongly recommended.
- Toe-kick and plinth lighting: continuous led strip under bathroom furniture at floor level, creating ambient ground-level illumination for night-time bathroom visits without the harshness of a ceiling light.
- Colour-changing (RGB/RGBW) accent lighting: for spa and wellness bathrooms where chromotherapy (colour therapy) is part of the user offer. Controlled via wireless remote, smartphone app or integrated BMS.
Technical specifications: lumens, colour temperature, CRI and more
Specifying bathroom led lights correctly requires more than simply choosing a product with an appropriate IP rating. The photometric, electrical and thermal specifications of the led system determine how well it performs in practice, how bright it is, how accurately it renders colours, how long it lasts and how efficiently it converts electricity to light. This section provides a comprehensive technical reference for every specification parameter that matters in bathroom led lighting.
Luminous flux (lumens) and illuminance (lux) requirements
Lumens measure the total light output of a source. Lux (lm/m²) measure the illuminance at a surface, how much light actually arrives at the point of interest. The relationship between lumens and lux depends on the geometry of the space and the beam angle or uniformity of the source.
Recommended illuminance levels for bathroom areas (based on CIBSE LG3 guidance and SLL Lighting Handbook)
| Area / Task | Recommended illuminance (lux) | Minimum illuminance (lux) | Notes |
|---|---|---|---|
| General ambient (background) lighting | 150–300 lux | 100 lux | Average maintained illuminance at floor level |
| Shower area (task) | 200–400 lux | 150 lux | At shower-head height |
| Vanity mirror (grooming task) | 500–1,000 lux | 300 lux | At face level, approximately 600 mm from fitting |
| Make-up application (professional standard) | 800–1,400 lux | 500 lux | CRI 95+ strongly recommended |
| Relaxation / bath ambiance | 50–150 lux | 30 lux | Dimmable system allows range |
| Commercial bathroom (hotel, spa) | 300–500 lux average | 200 lux | CIBSE LG3 hotel standard |
Practical lumen calculations for bathroom led lighting
For a typical residential bathroom of 4 m x 2.5 m (10 m²) with a 2.4 m ceiling, achieving 200 lux average maintained illuminance requires approximately:
- total installed lumens = illuminance (lux) × area (m²) ÷ utilisation factor (UF) ÷ maintenance factor (MF);
- for a typical bathroom: UF ≈ 0.55–0.65 (depends on room surface reflectances and fitting distribution), MF ≈ 0.80–0.85;
- required lumens ≈ 200 × 10 ÷ 0.60 ÷ 0.83 ≈ 4,016 lm installed;
- with 4 led downlights of 600 lm each (typical IP44 bathroom downlight) + led strip at mirror of 1,200 lm: total ≈ 3,600 lm — slightly below target but acceptable for most residential contexts with reflective tiles;
- for higher ambient targets (hotels), increase downlight count or lumen output accordingly.
Colour temperature: 2700K, 3000K, 4000K or 5000K?
Colour temperature is expressed in Kelvin (K) and describes the warmth or coolness of white light. It is one of the most debated topics in bathroom lighting design, with strong opinions and some significant misconceptions in the popular discourse.
| Colour temperature | Appearance | Best for | Not ideal for | Common application |
|---|---|---|---|---|
| 2700K | Warm white (incandescent-like) | Relaxing ambiance, evening baths, spa atmosphere | Make-up application, clinical grooming tasks | Ambient ceiling lights, under-bath accent, bath plinth |
| 3000K | Warm-neutral white | General bathroom ambient; flattering skin tones; versatile | Very high-accuracy colour matching tasks | led bathroom ceiling lights, mirror bar lights, hotel bathrooms |
| 4000K | Neutral/cool white | Accurate grooming, make-up, shaving; daytime energy | Relaxing evening atmosphere | Vanity mirror task lighting, commercial bathrooms, gyms |
| 5000–6500K | Cool/daylight white | Maximum brightness perception; clinical environments | Residential bathrooms; uncomfortable for most users in evening | Hospital bathrooms, medical examination areas |
Is 2700K or 4000K better for bathrooms? The answer depends on use. For residential bathrooms, 3000K is the professional consensus best all-rounder, warm enough to be comfortable and flattering, neutral enough for accurate grooming tasks. For commercial spa and wellness contexts, 2700K ambient with 4000K task lighting at the mirror is the premium specification. For gym facilities, 4000K throughout.
Is warm white or daylight better for bathrooms? Warm white (2700–3000K) is preferable for most bathroom environments. Daylight (5000–6500K) is uncomfortable for extended periods in an intimate space and tends to render skin tones harshly. The exception is situations where colour matching (e.g. professional make-up artistry) is the primary requirement.
Is 3000K or 4000K better for bathrooms? 3000K is generally preferred for residential and hospitality bathrooms. 4000K works well where clinical accuracy is prioritised, but should be limited to the task area (mirror) rather than the entire room.
Colour Rendering Index (CRI): why Ra ≥ 90 matters
The CRI (Colour Rendering Index), also known as Ra, measures how accurately a light source renders the true colours of objects compared with a reference illuminant. It is expressed on a scale of 0–100, where 100 represents perfect colour rendering (equivalent to natural daylight or a black-body radiator at the same colour temperature).
In bathroom applications, CRI is arguably more important than anywhere else in the home, because the bathroom is where personal appearance is assessed and where grooming tasks require accurate colour discrimination. Consider:
- under CRI 80 lighting, skin tones can appear sallow, grey or washed out;
- under CRI 80 lighting, make-up colours will appear different in the bathroom than in natural daylight outside—leading to make-up application errors;
- under CRI 80 lighting, the true colour of hair, facial hair and complexion cannot be accurately assessed;
- under CRI 95+ lighting, the bathroom appearance matches natural daylight appearance closely, enabling accurate grooming and confident personal presentation.
| CRI range | Classification | Bathroom suitability | Recommendation |
|---|---|---|---|
| CRI < 70 | Poor | Unacceptable | Do not use in bathrooms |
| CRI 70–80 | Fair | Minimum acceptable for general ambient only | Avoid at mirror; acceptable for indirect accent lighting only |
| CRI 80–90 | Good | Acceptable for general bathroom lighting | Minimum standard; CRI 80 is the typical residential baseline |
| CRI 90–95 | Very Good | Recommended for all bathroom areas | Professional standard for residential bathrooms |
| CRI 95–100 | Excellent | Ideal for vanity mirror and grooming tasks | Premium standard; specified in high-end hotels and spas |
LightingLine.eu led strips and profiles are available in CRI 80, CRI 90+ and CRI 95+ variants, clearly indicated in the product specifications. For bathroom led mirror lighting and vanity task lighting, we strongly recommend CRI 90+ as the minimum and CRI 95+ as the preferred specification.
led efficiency: efficacy (lm/W) and energy consumption
Luminous efficacy, expressed in lumens per watt (lm/W), is the primary measure of energy efficiency for led systems. The higher the lm/W value, the more light output you get for each watt of electrical power consumed.
| Light source | Typical efficacy (lm/W) | Lifespan (hours) | Notes |
|---|---|---|---|
| Incandescent (GLS) | 10–15 lm/W | 1,000 | Phased out under ErP regulations; worst efficiency |
| Halogen | 15–25 lm/W | 2,000–4,000 | Very poor efficiency; prohibited for most applications in EU since 2018 |
| Compact Fluorescent (CFL) | 45–70 lm/W | 6,000–15,000 | Being phased out; contains mercury |
| led (entry-level) | 80–100 lm/W | 15,000–25,000 | Standard consumer led |
| led (mid-range) | 100–140 lm/W | 25,000–35,000 | Good quality commercial led |
| led (high efficiency) | 140–200 lm/W | 35,000–50,000 | Premium led; latest generation chips (2024–2026) |
| led strip (LightingLine.eu, typical) | 100–160 lm/W | 25,000–50,000 | In aluminium profile; thermal management critical for lifespan |
Practical energy saving calculation: a traditional bathroom with four 50W GU10 halogen downlights (200W total) replaced with four 5W led GU10 equivalents (20W total) saves 180W per lighting session. At 4 hours per day use and an EU electricity price of €0.25/kWh, the annual saving is 180W × 4h × 365 days × €0.25/1000 = €65.70 per year, enough to pay for a complete bathroom led upgrade in under two years in many cases.
Led colour quality: colour consistency, MacAdam Ellipses and R9
Beyond CRI and colour temperature, professional bathroom led lighting specifiers pay attention to two additional colour quality parameters that rarely appear in consumer marketing but significantly affect real-world appearance quality:
MacAdam Ellipses (SDCM): leds from the same production batch may have slight colour variations due to manufacturing tolerances. SDCM (Standard Deviation Colour Matching) measures how tightly the actual colour of a batch of leds matches the specified colour temperature. A 1-step MacAdam ellipse (1 SDCM) is imperceptible to the human eye, 3 SDCM is the maximum for good quality lighting, 5 SDCM or more is visible as colour inconsistency between fittings and is unacceptable in high-quality bathroom installations.
R9 value (saturated red rendering): the standard CRI Ra value averages colour rendering across eight pastel colour samples (R1–R8). It does not include R9, the saturated red sample, which is critically important for the accurate rendering of skin tones and many cosmetics. A lamp may have Ra 90 but an R9 value of only 20 or 30, which means it renders skin tones poorly. For bathroom led mirror lighting, always specify R9 ≥ 50, and ideally R9 ≥ 80.
Led aluminium profiles for bathrooms: selection and installation
Led aluminium profiles are the backbone of a professional bathroom led lighting installation. They transform a humble led strip from a rough-and-ready decorating material into a precision-engineered luminaire with controlled light output, excellent thermal management, mechanical robustness and a finished, architectural appearance. Understanding how to select and install the right profile for each application in a bathroom is a skill that separates competent led lighting professionals from amateurs, and the quality of the end result reflects this directly.
Profile selection criteria for bathroom applications
The selection of an appropriate aluminium led profile for a bathroom application requires evaluation of several criteria simultaneously. At LightingLine.eu, our technical team developed the following selection framework based on years of project work:
Criterion 1 – Zone and IP requirement: as established, the zone in which the profile will be installed determines the minimum IP rating required. Profiles for zones 1 and 2 must be sealed, with IP65-rated end caps, IP-rated diffuser-to-extrusion gaskets and IP-rated cable entry glands. Our waterproof profile range achieves IP65 as an assembled unit.
Criterion 2 – Surface or recess mounting: surface-mount profiles are the easiest to install and allow the led strip to be accessed for future maintenance without structural work. Recessed profiles create a cleaner, more integrated appearance, the light line appears to emerge directly from the wall or ceiling surface without any visible housing. Recessed installation requires a chase routed into plasterboard, tile or solid substrate; this adds installation time and cost but delivers a superior aesthetic result.
Criterion 3 – Profile geometry: the cross-sectional shape of the profile determines the direction and distribution of light output. Common options include:
- rectangular surface-mount (U-channel): direct light forward, standard for most applications;
- wide rectangular: wider body for better thermal performance and wider led strip compatibility (up to 20 mm);
- corner (45°/90°): directs light forward and to one side, for corner mounting and indirect lighting;
- recessed narrow: for recessing into 12–15 mm plasterboard, minimalist appearance;
- wing/stepped: wide flanges that allow surface-flush mounting with recessed led channel, premium architectural look;
- plinth: very flat, wide profile for floor-level and furniture plinth applications.
Criterion 4 – diffuser type: the diffuser cover controls glare and optical quality. Options include:
- clear: maximum light transmission (typically 95%+), individual leds are visible (hotspots visible at close range unless high-density strips are used);
- frosted/satin: light transmission typically 85–90%, reduces hotspots; generally preferred for visible applications;
- opal/diffuse: light transmission typically 60–75%, completely eliminates led hotspots; creates even light bar effect; preferred for bathroom mirror lighting and any application where the profile is viewed directly;
- amber/tinted: modifies apparent colour temperature, rarely used in bathrooms.
Criterion 5 – Anodisation and finish: the profile body finish affects both aesthetics and corrosion resistance. Anodised finishes (silver, black, white) offer excellent corrosion resistance and are strongly recommended for bathroom environments where moisture and cleaning chemicals could attack unprotected aluminium. Powder-coated profiles in white or coloured finishes are also available for specific design requirements.
Criterion 6 – Compatible led strip width: most standard led profiles accept strips up to 10 mm or 12 mm wide. Premium profiles accept 15 mm or 20 mm strips. Always check that the profile channel width is compatible with the led strip width before ordering.
Installing led profiles in bathroom zones: step-by-step
The correct installation of a waterproof led aluminium profile in a bathroom wet zone is a precision task that requires methodical execution. The following procedure applies to surface-mount IP65 profiles in zone 1 and zone 2 (e.g., above a shower niche, under a floating vanity shelf, or surrounding a mirror).
Tools required: tape measure, spirit level, pencil/chalk line, drill with appropriate bits (masonry, wood or metal as required), Torx/Phillips screwdriver, wire strippers, voltage tester, silicone applicator gun, neutral-cure silicone sealant, cleaning solvent (isopropyl alcohol), paper towels.
Materials required: waterproof aluminium profile (cut to length), IP65 led strip (correct lumen output and colour temperature), SELV driver (external to Zone 1), IP65 cable entry glands, IP65 end caps (supplied with profile), low-voltage cable (1.5 mm² twin or appropriate for current), mounting clips or screws, double-sided tape (high-performance VHB type).
Step 1 – Planning and measurement: determine the exact length of profile required. Measure carefully and cut the profile to length using a mitre saw or aluminium hand saw. Deburr cut ends with a flat file. Do not cut the profile in situ if avoidable, cutting near tiled surfaces risks tile damage.
Step 2 – Surface preparation: the mounting surface must be clean, dry and flat. Remove any existing caulk or loose material. Wipe down with isopropyl alcohol and allow to dry completely. If the surface is painted, ensure the paint is sound and not flaking.
Step 3 – Mark fixing positions: hold the profile in position (or use the mounting clips as a template) and mark the fixing hole positions on the surface. Check that the profile position is level (horizontal) or plumb (vertical) using a spirit level.
Step 4 – Drill and fix: drill pilot holes at marked positions. In tile, use a carbide-tipped tile drill bit at low speed with light pressure. Fix the profile or mounting clips using appropriate fixings (stainless steel screws for wet areas). Do not overtighten into tile.
Step 5 – Seal fixing holes: before inserting the screws finally, apply neutral-cure silicone sealant into the fixing holes and onto the screw threads. This prevents water ingress through the fixing points—a critical detail that is often omitted. Note: only neutral-cure (acetoxy-free) silicone is compatible with anodised aluminium; acetic-acid-curing silicone can discolour the anodised finish.
Step 6 – Run cable from driver to profile: route the low-voltage SELV cable from the driver location (outside Zone 1) to the profile installation position. Use appropriate cable management (conduit, cable lips, or trunking). Where the cable passes through walls, use IP-rated grommets and seal with silicone. Ensure adequate cable length to allow the end cap with cable gland to be properly fitted.
Step 7 – Install led strip into profile: peel back approximately 50 mm of the led strip’s self-adhesive backing at one end and carefully start inserting the strip into the profile channel. Work along the profile length, pressing the strip firmly and evenly into the channel to ensure good thermal contact with the aluminium. Do not allow the strip to twist or buckle. For long runs, secure with small additional clips at 500 mm intervals.
Step 8 – Install end caps and cable glands: fit the supplied IP65 end caps to both ends of the profile. On the end where the cable enters, use the end cap with the pre-formed cable gland entry, and thread the cable through before fitting. Apply a small bead of silicone sealant around the interior perimeter of each end cap before pressing into place. On profiles with a clip-fit diffuser, ensure the diffuser is fully seated before fitting the end caps.
Step 9 – Connect to SELV driver: strip approximately 8 mm of insulation from the cable conductors and connect to the led strip solder pads or connector, observing correct polarity (red or marked conductor to + positive). Connect the other end of the cable to the driver output terminals, again observing polarity. Secure all connections.
Step 10 – Test before final sealing: switch on the driver and verify the led strip illuminates fully and evenly along its length. Check for any dark spots, flickering or inconsistent sections. If any issues are found, investigate and resolve before proceeding. Once the installation is confirmed good, apply a final bead of neutral-cure silicone sealant along both long edges of the profile where it meets the mounting surface. Tool the sealant smooth and allow to cure for at least 24 hours before exposing to water.
Maximum led strip run length: voltage drop and its consequences
One of the most frequently misunderstood technical issues in led strip installation, including bathroom applications, is voltage drop. Led strips are resistive loads connected in series along a PCB rail. The resistance of the copper conductors on the PCB causes the voltage at the far end of the strip to be lower than at the connection end, resulting in a gradual reduction in brightness along the run.
Maximum recommended run lengths before voltage drop becomes visible (>5% reduction)
| led strip type | Drive voltage | Power consumption | Max single-end feed run | Solution for longer runs |
|---|---|---|---|---|
| Standard density (60 led/m) | 12V DC | 4.8 W/m | ~5 m | Feed from both ends, use 24V version |
| High density (120 led/m) | 12V DC | 9.6 W/m | ~3 m | Feed from both ends, switch to 24V |
| Standard density (60 led/m) | 24V DC | 4.8 W/m | ~10 m | Mid-run injection for runs >10 m |
| High density (120 led/m) | 24V DC | 9.6 W/m | ~7 m | Mid-run injection for runs >7 m |
| Ultra-high density (240 led/m) | 24V DC | 19.2 W/m | ~3.5 m | Feed from both ends, use constant-current driver |
In bathroom applications, voltage drop is particularly important when led strips are used around large mirrors or in long shower niches. For a continuous led profile run around a 1200 mm x 800 mm mirror (total perimeter approximately 4 m), a 24V system fed from one end will typically maintain adequate uniformity. For a 3 m continuous shower niche illumination on a 12V system, voltage drop will be visible at the far end, switch to 24V or feed from both ends via a mid-run T-connector.
Condensation prevention: the silent enemy of bathroom lighting
Even when all IP ratings are correctly specified and SELV compliance is achieved, condensation remains the single most common cause of premature failure in bathroom led lighting. Understanding the mechanisms of condensation formation, and the engineering strategies that prevent it from occurring, is essential for anyone specifying or installing led lighting in humid environments.
How condensation damages led lighting
Condensation occurs when warm, moisture-laden air contacts a surface that is below the air’s dew point temperature. In a bathroom, this typically happens when:
- a hot shower rapidly raises the air temperature and moisture content (relative humidity can reach 90–100% during showering);
- the bathroom is then ventilated or cools down, dropping the air temperature below the dew point;
- water vapour condenses on cooler surfaces, including the exterior and, critically, the interior of lighting fixtures.
Led luminaires are particularly vulnerable to condensation for two reasons. First, during operation the led generates heat, which creates a warm microclimate inside the fitting. When the led is switched off and the fitting cools, air inside contracts, drawing in moist external air through any gaps in the sealing, a phenomenon called thermal breathing. Over hundreds of on/off cycles, this progressively accumulates moisture inside nominally sealed fittings.
Second, the IP rating test conditions (specified in IEC 60529) do not replicate the repeated condensation cycling that occurs in real bathroom use. A fitting that passes the IP65 water-jet test may still be penetrated by condensation over months of use if the seals and materials are not chosen with condensation resistance in mind.
The effects of moisture ingress on led lighting include:
- corrosion of led and driver contacts: even trace moisture accelerates electrochemical corrosion at low-voltage connection points, increasing contact resistance and causing flickering or failure;
- PCB contamination: moisture on the led strip PCB facilitates the migration of ionic contaminants between conductors, causing short circuits and led failures;
- diffuser clouding: moisture inside profiles condenses on the diffuser inner surface, causing a milky fogging that permanently reduces light output;
- driver failure: electrolytic capacitors in led drivers are particularly sensitive to moisture; condensation accelerates their degradation and reduces driver lifespan;
- mould growth: in extreme cases, persistent moisture inside led profiles can support microbial growth, which further damages components and may create health hazards.
Engineering strategies for condensation prevention
Waterproof led profiles incorporate multiple engineering features specifically designed to prevent condensation damage:
Strategy 1 – Sealed end caps with gel-filled cable glands: our IP65 end caps use a compression-fit cable gland with silicone gel filler that creates a capillary-resistant seal even during repeated thermal cycling. This is significantly more reliable than simple rubber grommets, which can harden and crack over years of temperature cycling;
Strategy 2 – Silicone gaskets between diffuser and profile body: a continuous silicone gasket runs along both sides of the diffuser-to-profile joint, preventing moisture migration through this high-risk interface. The silicone remains flexible down to −40°C and up to +180°C, maintaining sealing performance over decades of thermal cycling.
Strategy 3 – Anti-condensation venting (for non-IP profiles): in profiles installed outside wet zones but in areas of high humidity (e.g. above the door in a steam-rich bathroom), our profiles can be specified with micro-vent end caps. These allow slow air pressure equilibration without allowing water droplets to enter, eliminating the pressure differential that drives thermal breathing without compromising moisture exclusion.
Strategy 4 – Silicone conformal coating on led strip PCB: even with IP65 strips, the PCB conformal coating on LightingLine.eu strips extends beyond the minimum specification to provide additional protection against the ionic contamination that causes insidious corrosion in humid environments.
Strategy 5 – Profile surface-mount installation with sealant bed: applying a continuous bead of neutral-cure silicone under both long edges of the profile before final fixing creates a sealed joint between profile and substrate that prevents moisture from migrating behind the profile, where it could corrode fixings, stain grout and eventually work its way into the cable entry.
Strategy 6 – Maintaining thermal equilibrium: where possible, led profiles in zone 1 should be operated at consistent intervals rather than left unused for long periods, as intermittent use creates more severe thermal cycling. In commercial bathrooms, an always-on night-light mode at very low dimming level (5–10%) maintains a slightly elevated temperature inside the profile that inhibits condensation formation.
Ventilation and humidity management in bathrooms
The best protection against condensation damage to bathroom led lighting is to maintain acceptable humidity levels in the bathroom generally. Good bathroom ventilation dramatically reduces condensation on all surfaces, fittings, mirrors, tiles and windows, and extends the service life of all bathroom equipment, not just lighting.
UK Building Regulations (Part F) and EU Directive 2010/31/EU require mechanical ventilation in bathrooms that do not have adequate natural ventilation. The minimum extract flow rates are:
- residential bathrooms: 15 l/s (54 m³/h) continuous or 30 l/s (108 m³/h) during use;
- commercial bathrooms: calculated on number of cubicles and occupancy, typically 6 air changes per hour minimum
For bathrooms with shower enclosures or wet rooms, an extract fan with a run-on timer of 15–20 minutes after the shower is used is the minimum recommended standard. Humidity-sensing fans (also called humidistats) that activate automatically when humidity exceeds a set threshold and run until humidity normalises are the professional specification for hotel and spa bathrooms.
Positioning of extract fans relative to led lighting: extract fans should ideally be positioned near the shower enclosure (the major source of moisture) but not directly above the shower (zone 1), where the fan motor electrical safety requires careful attention. Most extract fans are rated IP44 or IP45 and are suitable for zone 1 use when correctly wired. The extract point should be positioned so that fresh air is drawn across the entire bathroom, sweeping moisture away from all lighting positions before it can condense.
Step-by-step bathroom led lights installation guide
This section provides a comprehensive, practical guide to the complete installation of a bathroom led lighting system, from planning and material specification through to testing and commissioning. The guide covers both the led downlight installation for ceiling ambient lighting and the led strip/profile installation for task and accent lighting. Where mains voltage wiring is required, work must be carried out by a qualified and competent electrician (in the UK, this means a Part P registered electrician or a person competent within the meaning of Regulation 4 of the Electricity at Work Regulations 1989).
Pre-installation planning
Creating the lighting design brief: before any products are ordered, establish a clear brief for the bathroom lighting scheme. For a typical residential bathroom renovation project, this should address:
- room dimensions and ceiling height;
- location of bath, shower, WC, basin and vanity;
- bathroom zone plan (as per Section 2.3);
- required illuminance levels for each area;
- preferred colour temperature and CRI;
- dimming requirements;
- switch and control positions (outside bathroom for mains; SELV controls can be anywhere);
- driver location;
- aesthetic requirements (fitting finish, profile type);
- budget range.
Drawing the electrical layout: produce a scaled floor plan and ceiling plan showing all proposed lighting positions. Mark the zone boundaries clearly. Identify cable routes from the consumer unit (or local junction box) to each fitting and from the SELV driver to each led strip run. Identify any areas where cables must cross zones (e.g. a mains feed cable passing through zone 2 to reach the SELV driver location).
Selecting products: with the zone plan and brief complete, select the following product components:
- ceiling led downlights (IP44 for general area; IP65 for shower/bath zone);
- led aluminium profiles for strip lighting (type, length, finish);
- led strips (voltage, colour temperature, CRI, IP rating, led density);
- SELV driver(s);
- dimmer switches (if required; must be zone-compliant and driver-compatible);
- led vanity mirror light or bath bar light (if required);
- Cables, connectors, junction boxes, grommets, sealant.
Driver sizing: how to calculate the correct led driver wattage
Correct driver sizing is critical for both safety and led strip longevity. Undersized drivers overheat, reduce lifespan and may fail, oversized drivers are wasteful and can cause compatibility issues.
Step 1 – Calculate total led strip load: add up the total length of led strip to be connected to each driver. Multiply by the power consumption per metre (W/m) of the strip
Example: 5 m of 24V led strip at 14.4 W/m = 5 × 14.4 = 72W total load
Step 2 – Add 20% safety margin: led drivers perform best and last longest when loaded to 70–80% of rated capacity. Therefore: required driver rating = total load ÷ 0.8 = 72 ÷ 0.8 = 90W minimum driver rating
Step 3 – Select driver output voltage: must match led strip drive voltage exactly: 12V strip requires 12V driver; 24V strip requires 24V driver. Never mix voltages;
Step 4 – Verify SELV certification: confirm the driver specification states “SELV output” or “safety isolating transformer to IEC 61558-2-6.” This is mandatory for bathroom zone 0 and strongly recommended for all bathroom zones;
Step 5 – Check dimming compatibility: if dimming is required, ensure the driver is dimmable and compatible with the intended dimming protocol (0-10V, PWM, DALI-2, or mains-side Triac). Check the led strip manufacturer’s compatibility confirmation.
Maximum connected loads for common driver sizes
| Driver output | Rated wattage | 80% Loading limit | Equivalent led strip length at 4.8 W/m | Equivalent led strip length at 14.4 W/m |
|---|---|---|---|---|
| 12V DC | 30W | 24W | 5 m | 1.7 m |
| 12V DC | 60W | 48W | 10 m | 3.3 m |
| 24V DC | 60W | 48W | 10 m | 3.3 m |
| 24V DC | 100W | 80W | 16.7 m | 5.6 m |
| 24V DC | 150W | 120W | 25 m | 8.3 m |
| 24V DC | 200W | 160W | 33 m | 11.1 m |
Mains wiring for bathroom led lighting
The mains-side electrical installation for bathroom led lighting must comply fully with BS 7671 (UK) or the applicable national standard in other countries. The following notes are for reference and guidance, actual installation must be carried out by a competent person:
Circuit protection: all bathroom lighting circuits must be protected by a 30 mA RCD (Residual Current Device). In the UK, this is typically provided by an RCBO (RCD+MCB combination) in the consumer unit. The RCD must be tested after installation to verify correct operation (trip current and trip time within BS EN 61008 limits).
Cable selection: for general wiring to fixed led bathroom fittings, 1.0 mm² or 1.5 mm² twin and earth (T&E) thermoplastic PVC insulated cable to BS 6004 is standard in the UK. For damp locations and where the cable may be exposed to condensation (e.g. in the ceiling void above a shower), BASEC-approved heat-resistant or LSF (Low Smoke and Fume) cable is preferred.
Junction boxes: any junction or connection within the bathroom must be in an IP-rated (IP20 minimum outside zones, IP44 in zones 1 and 2) enclosure, securely fixed and accessible. Connections must not be made within the profile itself unless the profile has been specifically rated for this (most are not).
Earthing and bonding: all metallic parts within the bathroom that are simultaneously accessible must be equipotentially bonded. This includes metal baths, shower trays, taps, pipes and any exposed metalwork. led aluminium profiles on SELV circuits are not required to be earthed (and must not be earthed, as this would compromise SELV separation), but any mains-connected metal fittings must be earthed.
Switch positioning: switches and dimmers for mains-voltage bathroom lighting must be located outside zone 0 and zone 1, typically outside the bathroom entirely (a pull-cord switch or an external wall switch). SELV switches (controlling 12V or 24V circuits only) may be located within zones 1 and 2 provided the switch and cable are rated for the zone (IP44 minimum).
Led downlight installation in bathroom ceilings
The installation of recessed led downlights in a bathroom ceiling is a relatively straightforward task, but several points of detail determine the quality of the outcome:
Fire-rated downlights: where the ceiling separates habitable spaces (e.g. a bedroom above a bathroom), the downlights must be fire-rated. This means the fitting includes either an intumescent collar or a fire-rated box that maintains the fire integrity of the ceiling for the required period (typically 30 or 60 minutes, as specified in the building regulations for the construction type). Do not install a non-fire-rated downlight in a fire-rated ceiling, this is a building regulations breach and a life safety issue.
Insulation clearance: led downlights generate heat, which must be dissipated. If roof insulation is present above the ceiling (as in top-floor bathrooms), a minimum air gap must be maintained around the downlight body, or a fitting approved for use under/through insulation must be selected. Many led bathroom ceiling lights are now rated IC (insulation contact) approved.
Cut-out sizing: use the exact cut-out dimension specified for the fitting. Too large a hole will prevent the spring clips from gripping the ceiling, too small will prevent the fitting from sitting flush. Use a joist detector before cutting to avoid severing structural elements or existing wiring.
Ceiling void depth: recessed downlights require a minimum ceiling void depth. Standard depth is typically 100–130 mm for most led bathroom downlights. Ultra-shallow fittings (as shallow as 40 mm) are available for low-profile ceiling voids but may have reduced thermal performance.
Wiring diagrams and electrical schematics for led strip circuits
This section provides detailed descriptions of the most important wiring arrangements for bathroom led strip lighting circuits. While circuit diagrams are ideally represented graphically, the following descriptions and tables provide sufficient detail for a competent electrician to construct and verify each circuit type. All mains wiring elements must be installed by a qualified electrician, SELV low-voltage elements may be connected by a competent person.
Basic single-zone SELV led strip circuit
The most fundamental bathroom led strip circuit consists of a single SELV driver supplying one or more led strips in a single bathroom zone. This is the standard configuration for a residential bathroom mirror lighting or shower niche lighting installation.
Circuit components:
- 230V AC mains supply, protected by 30 mA RCD and 6A MCB in consumer unit;
- 230V mains cable (1.0 mm² T&E) from consumer unit to driver location (outside Zone 1);
- SELV led driver (e.g. 24V DC, 60W, IEC 61558-2-6 certified),
- 24V DC low-voltage twin cable (1.0 mm² or 1.5 mm²) from driver to led strip,
- IP65 waterproof aluminium profile with IP65 led strip.
Wiring sequence:
- Mains Live (brown) → Driver L terminal;
- Mains Neutral (blue) → Driver N terminal;
- Mains Earth (green/yellow) → Driver Earth terminal (PE);
- Driver +V output → led strip positive (+) wire (typically red);
- Driver 0V output → led strip negative (−) wire (typically black);
- No earth connection at led strip or profile on SELV circuit.
Control (if dimming required):
- for 0-10V dimming: additional 2-core signal cable (0.5 mm²) from dimmer controller to driver dim+ and dim− terminals, dimmer located outside zone 1;
- for DALI-2 dimming: DALI bus cable (2-core, 1.5 mm²) from DALI controller to driver DALI bus terminals.
Multi-zone led strip circuit with multiple drivers
A full bathroom led lighting scheme typically requires multiple separate led strip circuits: one for the mirror lighting, one for the shower niche, one for the bath plinth accent, and possibly one for under-shelf task lighting. Each circuit benefits from a separate driver, which allows independent control (on/off and dimming) of each zone and limits the total current on any single cable run.
| Circuit | Zone | led strip | Driver | Switch/Control | Notes |
|---|---|---|---|---|---|
| Circuit 1: mirror lighting | Zone 2 (outside zones) | 24V IP20, CRI 95+, 3000K, 14.4 W/m, 2.5 m total | 24V 60W SELV dimmable | 0-10V push dimmer, outside bathroom | Profile: surface-mount wing profile, opal diffuser, anodised silver |
| Circuit 2: shower niche | Zone 1 | 24V IP65, 3000K, CRI 80+, 9.6 W/m, 1.5 m total | 24V 30W SELV dimmable | Shared with ceiling light switch (relay) | Profile: waterproof recessed profile, opal diffuser, sealed end caps |
| Circuit 3: bath plinth | Zone 2 | 24V IP44, 2700K, CRI 80+, 4.8 W/m, 3 m total | 24V 30W SELV | Separate dimmer, outside bathroom | Profile: IP65 plinth profile, opal diffuser, warm white accent |
| Circuit 4: ceiling ambient | Zones 1&2 | IP65 led downlights, 5W each, 3000K, CRI 90+ | Integral driver in each downlight | External mains switch (pull-cord or external wall switch) + 30mA RCD | 4 off downlights; IP65 above shower, IP44 elsewhere |
RGB/RGBW led strip circuits for bathroom colour-changing applications
RGB (Red-Green-Blue) and RGBW (Red-Green-Blue-White) led strip circuits for chromotherapy or decorative colour-changing applications in bathrooms require a more complex wiring arrangement than single-colour (CCT) strips, because the controller must independently vary the current through four channels (R, G, B, W) simultaneously.
Essential components for a bathroom RGB/RGBW circuit:
- 24V DC SELV driver (sized for total RGBW strip wattage + 20% margin);
- IP65 or IP44 RGB/RGBW led controller (PWM, 4-channel output), rated for the zone;
- RGBW led strip (IP65 or IP68 as required), with 4 conductors (+, R, G, B or +, R, G, B, W);
- IP-rated end caps, profiles and connectors;
- control interface: wireless RF/Bluetooth remote control; or smartphone app via WiFi bridge; or integration with DALI-RGB or DMX-512 for commercial applications.
Important notes for bathroom RGBW circuits:
- the RF or Bluetooth remote control handset may be used within the bathroom (no mains voltage involved);
- the WiFi bridge or main controller unit must be located outside zone 1;
- for hotel and spa applications, integrate RGB control into the room management system (RMS) via KNX, BACnet or proprietary protocol for centralised scene management;
- RGBW strips provide the best colour gamut plus clean white light for task modes—RGB-only strips produce a poor quality white (pinkish or blue-tinted).
Tunable White (CCT) led strip circuits for bathroom applications
Tunable white led strips, also known as dual-white or bi-colour strips, contain two types of led on the same PCB: a warm white (typically 2700K or 3000K) and a cool white (typically 5000K or 6500K). By varying the relative output of each, the apparent colour temperature of the combined light output can be continuously adjusted across the full warm-to-cool range. This is increasingly specified in premium bathroom installations where a single installation must serve both relaxing (warm) and task (cool) lighting modes.
Tunable white strips require a dedicated 2-channel controller (one channel for warm led, one for cool led), typically driven at 24V DC with a combined power consumption of up to 24 W/m for high-output variants. The user experience is typically controlled via a dual-slider panel (one slider for brightness, one for colour temperature) located outside the bathroom, or via a smartphone app for smart home integration.
Colour temperature and CRI: choosing the perfect light
We have already introduced the technical parameters of colour temperature and CRI in Section 5. This section explores the practical, human experience dimension of these choices, how different colour temperatures and rendering qualities feel in different bathroom contexts, what the leading hotel groups and spa brands specify, and how to create a layered lighting scheme that serves all bathroom uses beautifully.
The science of flattering bathroom light
The question “what lights make you look good in bathroom” is one of the most searched queries related to bathroom lighting, and the answer draws on both photometry and human perception psychology.
Human skin contains a wide range of colour information, from the deep reds and oranges of subcutaneous blood vessels and muscle tissue, through the yellows of fat, to the desaturated pinks of surface epidermis. Light sources with poor red rendering (low R9) suppress the warmth and richness of skin tones, making complexions appear flat, grey or unhealthy. Light sources with excellent red rendering (R9 ≥ 80) reveal the natural warmth and vitality of human skin.
The optimal colour temperature for flattering skin rendering in bathroom lighting is 3000–3500K with CRI ≥ 90 and R9 ≥ 50. This combination provides:
- sufficient warmth to enhance skin tone and suppress unflattering blue-green components;
- enough neutrality to allow accurate colour discrimination for grooming tasks;
- high enough red rendering to show the true, healthy appearance of skin.
The widespread consumer preference for soft white bathroom lighting at 2700K for relaxation modes and bright neutral at 4000K for morning grooming tasks has driven the adoption of tunable white led systems in premium residential and hotel bathrooms, where a single switch or app can transition the entire lighting scheme from spa-warm to task-bright with a single gesture.
Lighting for photography and social media
A new driver of bathroom lighting specification, particularly noted in the influencer community and increasingly adopted in hotel design, is the requirement for photogenic bathroom lighting. The explosion of social media content featuring bathroom settings (Instagram, TikTok, YouTube) has created a sophisticated understanding among certain user groups of the difference between lighting that makes you look good in person and lighting that makes you look good on camera.
Camera sensors respond somewhat differently to light than the human eye. For smartphone cameras in selfie mode:
- softness matters most: large-area diffuse light sources (led strip around mirror, wide panel above vanity) are far more flattering than small-area point sources (bare GU10 downlights) that create hard shadows under chin, nose and eye sockets;
- 3000K wins on camera: slightly warmer light (3000K) tends to render more attractively in smartphone cameras than cooler light (4000K+), which the camera’s auto-white-balance often interprets as harsh;
- front lighting is essential: light must come from in front of the face (from the mirror area) rather than purely from overhead. Top-only lighting creates the famous “unflattering bathroom selfie” effect of deeply shadowed eyes;
- High lux levels allow lower ISO: brighter light means less camera noise and sharper detail in selfie mode, 1,000+ lux at face level is the goal for the best photographic bathroom lighting.
Lighting design for different bathroom user types
A well-designed bathroom lighting scheme accommodates the full range of users and uses, from the early morning rush to the leisurely weekend bath. The following design approach, used by LightingLine.eu in our commercial project consulting work, addresses the needs of all user types:
| User type / Context | Illuminance | Colour temp | CRI | Key light sources | Control mode |
|---|---|---|---|---|---|
| Morning grooming (weekday) | 600–800 lux at mirror | 3500–4000K | ≥90, R9 ≥50 | Mirror-surround led profile + ceiling downlights | Pre-set morning scene |
| Make-up application | 800–1200 lux at face | 3000–4000K | ≥95, R9 ≥80 | Side-lit vanity bars (left+right+top of mirror) | Manual dimmer at max, tunable white at neutral |
| Evening bath / relaxation | 50–100 lux ambient | 2700–2900K | ≥80 | Bath plinth led, indirect cove, dimmed downlights | Pre-set relax scene, low dim level |
| Night-time visit | 10–30 lux floor level | 2700K or amber | Not critical | Plinth/toe-kick led strip at low level | Motion sensor, auto-dim, auto-off |
| Children’s bath time | 200–400 lux general | 3000K | ≥80 | Ceiling downlights at medium level | Manual switch, simple on/off |
| Hotel guest (luxury) | Fully variable 30–800 lux | Tunable 2700–4000K | ≥90 throughout | Full layered scheme: ambient + task + accent | Bedside scene panel + smartphone app |
Design and aesthetics: integrating led lighting into bathroom interiors
The technical specification of bathroom led lighting is only half of the story. The other half is design, how the lighting integrates with the architectural character of the bathroom, how it reinforces (or transforms) the spatial experience, and how it contributes to the particular atmosphere the client or designer is seeking to create. This section explores the aesthetic dimension of bathroom led lighting, from the current major design trends to the specific decisions that separate a lighting scheme that merely functions from one that genuinely delights.
Current trends in bathroom led lighting design
Several major design trends are shaping bathroom led lighting in 2025–2026:
Trend 1 – Invisible lighting: the dominant aesthetic trend across all premium bathroom tiers is the elimination of visible light sources in favour of light that seems to emerge from the architecture itself. This is led strip in recessed ceiling channels. The fitting disappears, only the light remains.
Trend 2 – Biophilic lighting: inspired by the wellness movement and the Biophilic Design concept, an increasing number of high-end residential and spa bathroom projects specify led lighting that mimics natural daylight variation, warmer and lower-level in the morning and evening, cooler and brighter at midday. Tunable white led systems controlled by circadian rhythm algorithms are the technical enabler for this trend. Research shows that circadian-appropriate lighting in bathrooms (which are often accessed both early morning and late evening) can improve sleep quality, mood and cognitive performance.
Trend 3 – Statement mirror lighting: backlit mirrors, led surround mirrors and illuminated medicine cabinets have evolved from functional items into centrepiece design statements in contemporary bathrooms. The mirror becomes a glowing architectural element rather than simply a reflective surface. Rectangular and round profiles in anodised black or brushed gold finish, combined with CRI 95+ warm white led strips, are the preferred specification for bespoke mirror lighting applications of this type.
Trend 4 – Warm metallic finishes: anodised black, brushed brass, brushed gold and antique bronze led profile finishes are strongly trending as complements to the warm-toned tile, stone and wood material palettes that dominate contemporary bathroom design. The era of cold polished chrome and clinical white is in retreat; richly patinated warm metals are the new premium aesthetic. LightingLine.eu offers profiles in anodised black, champagne gold and natural silver as standard, with bespoke anodising available for project-specific requirements.
Trend 5 – Integrated architecture/furniture lighting: led lighting is increasingly incorporated into bathroom furniture, vanity units, storage columns, freestanding bathtub pedestals, wall-hung shelf systems, at the design stage, rather than added as an afterthought. This requires close collaboration between the lighting supplier, furniture manufacturer and interior designer. LightingLine.eu’s slim plinth profiles, narrow linear profiles and corner profiles are specifically designed for integration into bathroom furniture systems.
Trend 6 – Wellness and chromotherapy: RGB and RGBW led systems for colour-changing bathroom lighting have moved from novelty to mainstream in the premium spa and wellness sector. Research suggests that specific wavelengths of coloured light influence mood and physiological state: blue-toned light (480 nm) suppresses melatonin and increases alertness, warm red/amber light (620–700 nm) promotes relaxation, green light (520 nm) has been associated with pain reduction. Chromotherapy bathroom lighting is now a standard feature in five-star hotel spa suites worldwide.
Designing layered bathroom lighting
The professional lighting design standard for any high-quality space is layered lighting: the combination of multiple light sources, each performing a specific function, that can be adjusted independently to create different atmospheres and levels of illumination for different activities and times of day. In bathrooms, layered lighting involves three primary layers:
Layer 1 – Ambient lighting: the background illumination that fills the space with general light sufficient for safe movement and orientation. In most bathrooms, this is provided by ceiling-mounted led downlights (recessed or surface-mount), led panel lights or indirect led cove lighting. The ambient layer should be dimmable, allowing it to be reduced to a low level for relaxation modes.
Layer 2 – Task lighting: targeted, high-intensity lighting for specific activities that require good visibility and colour accuracy. In bathrooms, the primary task area is the vanity mirror, where lighting for make-up, shaving and general grooming must meet the demanding specifications (CRI 95+, 800–1,200 lux, 3000–4000K, front-lit) . Secondary task areas include the shower (clear visibility for product identification and shaving) and the WC. The task layer should be independently dimmable from the ambient layer.
Layer 3 – Accent / decorative lighting: low-level accent lighting that adds visual interest, depth and atmosphere without contributing significantly to the ambient illumination level. In bathrooms, this includes bath plinth lighting, toe-kick leds, mirror halo effects, shower niche spotlighting and any RGB/chromotherapy elements. The accent layer is typically the most intensely personal and design-expressive element of the bathroom lighting scheme, and it is where decorative profile range offers the greatest creative latitude.
Small bathroom lighting – Making the most of limited space
The majority of residential bathrooms are small, typically 3–6 m² in UK housing stock. In small bathrooms, the quality of the lighting has a disproportionate effect on the perceived size and comfort of the space. Poor lighting makes small bathrooms feel even smaller and more confined, excellent lighting can make a 4 m² bathroom feel generous and luxurious.
Key strategies for maximising the apparent size and quality of small bathroom lighting with led:
- Avoid central ceiling-only lighting: a single pendant or panel in the centre creates dense shadows at the perimeter that visually compress the space. Distribute light to the walls and corners instead.
- Use wall-washing led profiles: an led profile concealed in the ceiling cornice, directed to wash light down the wall, dramatically increases the apparent wall height and creates a sense of space.
- Mirror lighting is disproportionately effective: a well-lit mirror appears to double the space. Frame the mirror with led strip for maximum reflective effect.
- Keep the ceiling bright: bright ceilings advance optically (appear closer and larger), while dark ceilings recede. In a small bathroom, a bright, uniformly lit ceiling with recessed downlights or an opal led panel is preferable to a dark ceiling with decorative pendant lighting.
- Use warm white (2700–3000K): warm light makes tight spaces feel more comfortable and intimate rather than clinical and constraining.
- What is the best ceiling light for a small bathroom? A 300×300 mm IP44 led panel light (approximately 2,000 lm) combined with a mirror-surround led profile provides the ideal combination of ambient spread and task quality in a small bathroom.
Smart controls: dimmers, sensors and home automation
The integration of smart lighting controls with bathroom led systems represents one of the most significant developments in residential and commercial bathroom design over the past five years. Smart controls transform a static lighting installation into a dynamic, responsive system that adapts to the user’s needs, schedule and preferences without conscious effort, while also delivering significant energy savings through automation.
Dimmer switches for bathroom led lighting
The most fundamental smart control for bathroom led lighting is the dimmer switch. Dimming transforms the bathroom from a functional utility into a multi-purpose space, enabling the full range from high-intensity grooming to intimate ambient relaxation.
Key requirements for bathroom led dimmers
- Compatibility: the dimmer must be specifically designed for led loads. Old-style triac dimmers designed for incandescent/halogen lamps frequently cause flickering, buzzing or poor minimum light levels with led drivers. Always use an led-rated dimmer confirmed compatible with the specific driver model.
- Location: mains-voltage dimmer switches must be located outside zone 0 and zone 1, typically outside the bathroom entirely. Pull-cord dimmers are available for installation on the bathroom ceiling outside the zones. SELV dimmers (controlling 12V or 24V circuits) can be located within the bathroom outside zone 1.
- Minimum load: most led dimmers have a minimum load requirement (typically 10–25W) below which they cannot regulate smoothly. With efficient led strips, it is easy to have a total load below this threshold, check specifications carefully.
- Dimming range: the best led dimmer/driver combinations achieve a smooth range from 100% to 1% or lower (for night-light mode) without flicker or pop-off at the low end.
Motion and occupancy sensors for bathroom led lighting
PIR (Passive Infrared) motion sensors are increasingly used in bathroom led lighting systems for both convenience and energy saving. The most valuable application is for night-time visits: rather than switch on full ambient lighting (which causes sleep disruption through blue light stimulation and sudden high luminance), a motion sensor triggers a low-level (10–30 lux), warm-coloured (2700K) led circuit at plinth or toe-kick level, sufficient for safe navigation without causing significant circadian disruption.
For commercial bathrooms (hotels, spas, gyms), motion sensors combined with DALI-2 dimming allow lighting to reduce to a low maintenance level (10–20%) when the space is unoccupied and return to the user-set level when occupancy is detected, saving 30–50% of lighting energy in rooms with intermittent occupancy patterns.
Sensor placement in bathrooms: PIR sensors must be in a position that provides a clear view of the main entry area and all activity zones without being subject to steam condensation or direct water spray. Outside zone 1 is strongly recommended. Ceiling-mount sensors with a 360° detection cone are preferred for bathrooms, wall-mount sensors can have detection shadows in small spaces.
Smart home integration: KNX, zigbee, z-wave and matter
Premium bathroom led lighting is increasingly integrated into whole-home or whole-building smart systems. The major integration protocols relevant to bathroom led lighting are:
KNX: the international standard for building automation, KNX is the protocol of choice for large commercial installations (hotels, offices, healthcare) and high-end residential projects. KNX DALI-2 gateways allow all DALI-2 bathroom led circuits to be controlled from a KNX system, with scene control, occupancy management, circadian rhythm programming and remote monitoring. KNX is extremely robust and reliable but requires specialist programming knowledge.
Zigbee / Z-Wave: mesh-network wireless protocols used extensively in consumer smart home ecosystems (Amazon Alexa, Samsung SmartThings). Zigbee-enabled led drivers and controllers allow bathroom lighting to be controlled via smartphone app, voice command or automated scheduling without the need for a dedicated wired control bus. The wireless nature of Zigbee/Z-Wave means no additional control wiring is required in the bathroom, particularly advantageous for retrofit installations where adding new control cables is difficult.
Matter / Thread: the newest smart home interoperability standard (Matter, backed by Apple, Google, Amazon and the Zigbee Alliance) promises to eliminate compatibility fragmentation between smart home platforms. Matter-compatible led drivers and lighting controllers for bathrooms are available from 2024 onwards and represent the future direction of consumer smart bathroom lighting. Integration with Apple HomeKit, Google Home and Amazon Alexa is seamless with Matter-certified products.
Bluetooth Mesh: for smaller residential applications where internet connectivity is not required, Bluetooth Mesh led controllers allow smartphone-based dimming and scene control without any hub or gateway. Range is limited (typically 10–30 m through walls) but adequate for most residential bathroom applications.
Scene control for bathroom led lighting
The ultimate expression of bathroom smart lighting control is a scene system that allows the entire multi-layer lighting scheme to transition to pre-set configurations with a single action (button press, app tap, voice command or automatic trigger). For a premium residential or hotel bathroom, a scene system might include:
- “Wake” scene: gradual ramp-up over 5–10 minutes from 0% to 80% ambient at 4000K, task lighting at mirror at 100%, no accent. Simulates sunrise, promotes cortisol release and alertness. Triggered by alarm time.
- “Grooming” scene: full ambient at 100%, mirror task at 100% with 3500K, shower downlight at 100%. Maximum functionality for grooming tasks.
- “Relax” scene: ambient dimmed to 20–30% at 2700K, accent (bath plinth) at 50% warm white or amber, mirror task off or at 10%. Perfect for evening bath.
- “Night” scene: all mains circuits off, plinth/toe-kick SELV at 5% at 2700K. Sufficient for safe navigation at night, minimal circadian impact.
- “Spa” scene: RGB chromotherapy at preferred colour (e.g. deep blue-green for relaxation), ambient at 20%, accent at 30%. For chromotherapy bath experience.
Energy efficiency, running costs and environmental impact
The energy efficiency and environmental credentials of led lighting are among its most compelling advantages, and in the context of bathroom lighting, where lights are used multiple times daily by all household members, the financial and environmental benefits of switching from halogen or fluorescent to led are among the most significant achievable through any domestic product change.
Led vs traditional sources: energy and cost comparison
| Metric | Incandescent (60W) | Halogen GU10 (50W) | CFL (11W) | Led equivalent (5–7W) |
|---|---|---|---|---|
| Wattage | 60W | 50W | 11W | 5–7W |
| Lumen output | ~600 lm | ~500 lm | ~600 lm | 600 lm |
| Efficacy | 10 lm/W | 10 lm/W | 55 lm/W | 100–120 lm/W |
| Rated lifespan | 1,000 h | 2,000–4,000 h | 8,000–15,000 h | 25,000–50,000 h |
| Annual energy cost (4h/day, €0.25/kWh) | €21.90 | €18.25 | €4.02 | €1.83–2.56 |
| Annual CO2, (EU grid, 0.255 kg CO2/kWh) | 22.3 kg | 18.6 kg | 4.1 kg | 1.9–2.6 kg |
| Replacement cycles in 25,000 h | 25 lamps | 6–12 lamps | 2–3 lamps | 0–1 replacement |
Whole-life cost analysis for a medium bathroom (4 downlights, 4h/day use)
| Parameter | Halogen (4 × 50W) | led (4 × 6W) | Saving (led vs halogen) |
|---|---|---|---|
| Annual energy cost | €73.00 | €8.76 | €64.24/year |
| Lamp replacement cost over 25,000 h | €40–80 (8 replacements) | €0–20 (0–1 replacement) | €30–70 |
| Total 10-year cost | €730 + replacements | €87.60 + 1 replacement | €640+ saving over 10 years |
| Annual CO2 emissions | 74.4 kg CO2 | 8.9 kg CO2 | 65.5 kg CO2/year |
These figures demonstrate that for a typical residential bathroom, the switch from halogen to led pays back the cost of the led fittings within 6–18 months (depending on the lamp cost and electricity tariff), with ongoing savings for the remaining 20–30 year lifespan of the led installation. The environmental benefit a 90% reduction in CO2 per lamp, is achieved from day one of installation.
ErP regulation and the phasing out of non-led sources
The EU Ecodesign Regulation for light sources (EU 2019/2020), which came into force on 1 September 2021, has progressively eliminated the sale of most halogen lamps and non-efficient light sources in the European Union. The regulation sets minimum energy efficiency standards that only led and certain other advanced technologies can meet, making led the de facto only viable option for new bathroom lighting installations throughout Europe from 2021 onwards.
In the United Kingdom, post-Brexit equivalent regulations (the Ecodesign for Energy-Related Products and Energy Information Regulations 2021) have implemented equivalent standards. The practical result is the same: if you are purchasing new bathroom lighting for a UK or EU market property in 2025–2026, led is your only realistic option, and there is no reason to seek any other technology.
Buying guide: what to look for and what to avoid
The market for bathroom led lights and led accessories is vast and, in parts, poorly regulated. A significant proportion of low-cost products sold online do not meet the safety, performance or IP rating specifications claimed on their packaging, a potentially dangerous situation in a bathroom environment. This section provides a practical framework for evaluating and selecting led products for bathroom applications with confidence.
Safety certifications to look for
All bathroom led lighting products sold in the European Union must carry the CE marking, indicating compliance with relevant EU directives (Low Voltage Directive 2014/35/EU, Electromagnetic Compatibility Directive 2014/30/EU, RoHS Directive 2011/65/EU). In the United Kingdom, the equivalent is UKCA marking (from 1 January 2023).
The CE or UKCA mark is a self-declaration by the manufacturer of compliance. For safety-critical products in wet environments, additional third-party certification provides stronger assurance:
- ENEC (European Norms Electrical Certification): european third-party safety certification for luminaires, more rigorous than self-declared CE
- TUV / VDE / BSI / Intertek: recognised test house certificates for component safety (drivers, led strips)
- IEC 62262 (IP rating): third-party tested IP rating (rather than manufacturer self-declared) should be specified for commercial and safety-critical applications
- DALI-2 certification: products certified by the DALI Alliance guarantee interoperability in DALI systems
Led profiles, strips and drivers carry full CE marking with documented technical files, and key products carry third-party safety certifications from recognised European test laboratories.
Red flags: products to avoid
Based on our experience and industry knowledge, the following product characteristics are reliable indicators of low quality or non-compliant bathroom led products:
- IP ratings not supported by documentation: any supplier that claims an IP rating without being able to provide the corresponding IEC 60529 test report should be avoided, particularly for zone 1 and zone 0 applications;
- no SELV output specification on led driver: if the driver specification does not explicitly state “SELV” or reference IEC 61558-2-6, do not use it in zone 0 or zone 1;
- lumen output claims not supported by LM-80 data: led lumen output should be verified by LM-80 test data (for led chip performance) and tested luminaire data, not just marketing claims
- CRI claims without R9 documentation: CRI 90+ claims without documented R1–R14 test data (including R9) should be treated with scepticism; R9 is commonly omitted because it is frequently low in otherwise decent-CRI products;
- very low prices for technically complex products: an IP65 waterproof led aluminium profile with diffuser, end caps and cable glands that costs a few euros is almost certainly not genuinely IP65 in use, quality sealed profiles require precision extrusion, quality silicone seals and third-party testing that cannot be achieved at very low cost;
- no warranty or technical support: a supplier unwilling to provide a minimum 3-year warranty on led products, or unable to provide technical specifications on request, should not be trusted for professional bathroom applications.
Budget guidelines for bathroom led lighting
| Budget category | Typical spend (per bathroom) | What to expect | Best for |
|---|---|---|---|
| Entry level | €50–€150 | Standard IP44 led downlights + basic mirror strip light, no dimming, CRI 80 | Rental properties, quick upgrades, tight budgets |
| Mid-range | €150–€500 | IP44/IP65 downlights, led profile for mirror, dimmable driver, CRI 90+, SELV compliant | Owner-occupied residential, boutique hotel rooms, studio flats |
| Premium residential | €500–€1,500 | Full layered scheme, CRI 95+, tunable white, smart dimming scenes, architectural led profiles, quality finishes | High-end residential renovation, design-conscious homeowners |
| Luxury / commercial | €1,500–€8,000+ | Full DALI-2 or KNX control, CRI 95+ throughout, bespoke profiles, RGB chromotherapy, full smart integration, hotel/spa specification | Five-star hotels, luxury spas, premium residential developments |
Value optimisation tip: in a layered bathroom lighting scheme, allocate the largest proportion of the budget to the task lighting at the mirror (where CRI and light quality matter most), and be more budget-conscious on the ambient ceiling lighting (where CRI 80 is acceptable). This approach delivers the best overall user experience per euro of spend.
Maintenance, lifespan and troubleshooting
One of the most significant benefits of led bathroom lighting is its exceptionally low maintenance requirement compared with all previous lamp technologies. However, low maintenance does not mean zero maintenance, and understanding the common failure modes of bathroom led lighting systems, and how to prevent or address them, is important for maximising system performance and longevity.
Expected lifespans for bathroom led components
| Component | Typical rated lifespan | Real-world bathroom lifespan | Key lifespan factors |
|---|---|---|---|
| led chip (L70 lumen maintenance) | 30,000–50,000 h | 25,000–40,000 h (with good thermal management) | Junction temperature, operating current, condensation |
| led strip (in aluminium profile) | 25,000–50,000 h | 20,000–35,000 h | Profile quality, thermal contact, condensation protection |
| SELV led driver | 30,000–50,000 h | 15,000–30,000 h | Electrolytic capacitor quality, operating temperature, condensation |
| IP-rated led downlight (complete) | 25,000–40,000 h rated | 15,000–30,000 h actual | IP seal integrity, thermal management, on/off cycles |
| led aluminium profile (extrusion body) | Indefinite (aluminium) | Indefinite | Anodising quality, installation environment, cleaning chemicals |
| Silicone diffuser | 10–15 years (yellowing) | 8–12 years in bathroom | UV exposure, cleaning chemicals, temperature cycling |
| Silicone end-cap seals | 10–15 years | 8–12 years in bathroom | Temperature cycling, compression set, chemical exposure |
Preventive maintenance schedule for bathroom led lighting
The following preventive maintenance schedule is recommended for commercial bathroom led lighting installations (hotels, spas, gyms) and is good practice for premium residential installations:
Monthly (commercial) / Quarterly (residential):
- visual inspection of all led profiles and downlights for signs of moisture ingress (condensation droplets visible through diffuser, milky fogging of diffuser);
- check for flickering, non-illuminating sections or colour shift in led strips;
- clean diffusers with soft damp cloth; never use abrasive cleaners or solvent on anodised profiles;
- check dimmer performance and scene activation where applicable.
Annually (commercial) / Every 2–3 years (residential):
- Check and re-apply silicone sealant where signs of lifting or cracking are observed at profile edges;
- inspect driver ventilation (if applicable); remove dust accumulation;
- verify RCCB/RCD still trips correctly (test button);
- check all electrical connections within junction boxes for corrosion or looseness;
- assess lumen output (subjective comparison with original commissioning record, or measured with light meter if records kept).
Every 5 years (commercial) / Every 7–10 years (residential):
- consider replacing led drivers (electrolytic capacitors degrade over 5–10 years even in good-quality drivers);
- inspect and replace silicone diffusers if yellowing or cloudiness is apparent;
- review the IP integrity of all wet-zone profiles; re-seal or replace end caps as necessary;
- full electrical inspection by qualified electrician.
Common troubleshooting scenarios
Problem: led strip flickering when dimmed
Possible causes: dimmer incompatibility with led driver, driver below minimum load, voltage drop on long strip run, poor connection at strip solder point.
Solution: verify dimmer is led-rated and confirmed compatible with the specific driver model. Check total load against dimmer minimum. Measure voltage at far end of strip, switch to 24V or feed from both ends if voltage drop identified. Inspect all connections.
Problem: milky fogging inside led profile diffuser
Possible causes: condensation inside profile, moisture ingress through unsealed end cap or cable gland, insufficient bathroom ventilation causing persistent high humidity inside profile;
Solution: improve bathroom extract ventilation. Remove profile end cap, allow to dry thoroughly (use compressed air or low-temperature dryer). Reseal end cap with fresh silicone. If recurring, switch to anti-condensation micro-vent end caps (outside wet zones only).
Problem: one section of led strip not illuminating
Possible causes: strip PCB fault at cut point, poor solder connection, broken led, voltage drop on long run;
Solution: test voltage at the dark section with a multimeter. If voltage is present, the strip PCB or led at that point has failed, replace that section of strip. If voltage is absent, trace backward to find the break in continuity.
Problem: led driver making audible buzzing
Possible causes: harmonic distortion from dimming, driver overloaded, electrolytic capacitors degrading;
Solution: if buzzing occurs only when dimmed, switch to a higher-quality DALI-2 or 0-10V dimming protocol (less prone to harmonic issues than Triac). If buzzing occurs at full load, verify total strip wattage is within driver rating. If driver is old (>5 years), consider replacement.
Problem: led strip leds changing colour along their length (not uniform).
Possible causes: voltage drop causing apparent colour shift (more pronounced in RGB strips); mixed SDCM bins (different colour temperatures within same strip).
Solution: switch to 24V, feed from both ends, ensure all strip sections are from the same batch (same bin code). For large installations, order from suppliers who can guarantee bin consistency across large quantities.
Problem: led downlight (recessed) overheating and failing prematurely
Possible causes: insulation laid directly over downlight in ceiling void, insufficient ceiling void depth for thermal convection; downlight not IC-rated in an insulated ceiling;
Solution: remove insulation from directly above downlight (maintain 100 mm clearance on all sides) or switch to an IC-rated (insulation contact approved) led downlight. Verify total wattage is within thermal rating for the installation configuration.
Yuor questions
This section compiles and answers the most commonly asked questions about bathroom led lights that we have receiveid in the years.
Are led lights good for bathrooms?
Yes, led lights are unequivocally the best choice for bathrooms in 2026. They consume 75–90% less energy than halogen equivalents, last 25,000–50,000 hours (compared with 2,000 hours for halogen), are available in IP-rated versions for all bathroom zones, generate minimal heat at the fitting (important in steam-rich environments), and offer the widest range of colour temperatures, CRI values and design formats of any lighting technology available. There is no credible argument for any alternative in a new or renovated bathroom.
Are led lights suitable for bathrooms?
Absolutely. led lights are not merely suitable for bathrooms, they are the professionally specified standard for bathroom lighting across the entire market, from budget residential to ultra-luxury hospitality. The key is correct specification: appropriate IP rating for each zone, SELV compliance for zone 0 and zone 1, correct colour temperature and CRI for the intended use, and quality products from certified suppliers.
Can I put led strip lights in a bathroom?
Yes, led strip lights can be installed in bathrooms. The requirements are: IP65 minimum for zone 1 and zone 2, IP67 or IP68 for zone 0. All led strips in bathrooms must be powered from a SELV driver (12V or 24V DC). Install led strips in LightingLine.eu waterproof aluminium profiles for correct thermal management, diffused light output, mechanical protection and improved IP integrity of the assembly. Never connect led strips in bathrooms to mains voltage directly.
Are led lights safe in shower? Can you put an led light over a shower?
Yes, with the correct specification. led lights in a shower (zone 1) must be rated IP65 minimum and be supplied at SELV (12V or 24V DC) or from a mains circuit protected by a 30 mA RCD. IP65 led downlights specifically designed for shower use are the most common fitting over a shower tray or walk-in shower. Led strip lights in IP65 profiles are an elegant alternative for shower niche or perimeter lighting. All must comply with IEC 60364-7-701 (European) or BS 7671 Section 701 (UK).
Can I put waterproof led lights in my shower?
Yes. For the area directly above the shower (zone 1), IP65-rated waterproof led lights are the correct specification. For lights within the shower tray itself (zone 0, an unusual specification for domestic showers), IP67 or IP68 is required, and the fitting must be on a SELV circuit. IP65 and IP68 led strip lights and waterproof profiles are specifically designed for this application.
Do I need an electrician to install led lights in a bathroom?
For any work involving mains voltage wiring in a bathroom (installing new circuits, adding new switches, connecting led drivers to the mains), a qualified electrician is legally required in the UK (Part P of the Building Regulations) and strongly recommended throughout Europe. The SELV low-voltage wiring between the driver and led strips can be connected by a competent DIYer, but the mains-side installation must be carried out by a registered electrical contractor. In a bathroom, electrical safety is a life safety matter and should never be compromised.
Do all bathroom lights need to be IP44?
All lights installed within zone 1 (above bath/shower up to 2.25 m height) and zone 2 (0.6 m beyond zone 1) must be IP44 minimum. In practice, professional installers use IP44 for the entire bathroom ceiling regardless of zone, because the entire bathroom is a humid environment and IP44 provides appropriate moisture resistance throughout. IP65 is strongly recommended (and effectively mandatory for Zone 1 shower positions) as it provides a significantly higher level of protection.
How many watts should a bathroom led light be?
For a recessed led downlight in a bathroom ceiling, 4W–8W is typical, delivering 400–800 lm. For a vanity mirror bar light, 10W–20W total (for a full-width bar). For led strip lighting (per metre): 4.8 W/m (standard density) to 14.4 W/m (high density) is the typical range. Total bathroom led power demand varies enormously depending on room size, number of layers and use case, but a well-designed 5–7 m² residential bathroom can be effectively lit with 30–60W total installed led power.
How long do led lights last in a bathroom?
High-quality led lights last 25,000–50,000 hours. At 4 hours per day bathroom use, that equates to 17–34 years of service life. In practice, the led driver often fails before the led chip (particularly in humid environments), so expecting to replace drivers every 10–15 years in a bathroom installation is realistic. The led strip and profile body may outlast one or two driver replacements. Proper installation (correct IP rating, adequate ventilation, condensation prevention) is the single most important determinant of real-world lifespan.
How many lumens do I need for a bathroom led?
For a typical residential bathroom (5–8 m²): 400–800 lm total ambient for a small bathroom; 1,000–3,000 lm total for a medium to large bathroom. For the vanity mirror task area, aim for 800–1,400 lm at face level from a mirror-surround or bar-mount led source. Note that lumen output must be considered alongside distribution: a single 2,000 lm point source creates harsh contrast; 2,000 lm distributed across a mirror surround creates soft, flattering light. led strip at 800–1,400 lm/m in a LightingLine.eu mirror profile is the professional standard.
What type of lighting should be in a bathroom?
A complete bathroom should have:
- Ambient general lighting, recessed led downlights or surface panel at the ceiling providing 150–300 lux average
- Task lighting at the vanity mirror, led strip or bar providing 800–1,200 lux at face height with CRI 90+ and 3000–4000K
- Accent/mood lighting, led strips in plinth, coves or niches at low level for ambience. All three layers should be independently dimmable. All must meet appropriate IP ratings for their zone position.
What is the best led color for a bathroom?
3000K (warm white) is the professional consensus best all-purpose colour temperature for bathroom led lighting, warm enough to be comfortable and flattering to skin tones, neutral enough for grooming tasks. For task lighting at the mirror, 3500–4000K provides slightly better colour discrimination for make-up. For relaxation/spa modes, 2700K creates a soothing, intimate atmosphere. Avoid 5000K+ (cool daylight) for most bathroom environments as it is clinically harsh for an intimate space.
What are the latest trends in bathroom lighting?
The major 2025–2026 trends in bathroom led lighting are: invisible light sources (recessed profiles, concealed strips), biophilic/circadian tunable white systems, statement backlit mirrors, warm metallic finishes (anodised black, brushed gold), integrated furniture lighting; chromotherapy RGB in spa bathrooms, and matter/thread smart home integration. The overriding aesthetic direction is away from visible fittings and toward light that appears to emerge from the architecture itself.
Where should led lights be placed in a bathroom?
Key positions for bathroom led lights:
- ceiling centre or grid: recessed led downlights for ambient coverage;
- above and/or beside the mirror: led bar or profile for task lighting;
- shower ceiling (Zone 1): IP65 led downlight directly above shower head;
- bath plinth/under-bath: IP44–IP65 led strip profile for accent;
- shower niche: IP65 led profile for luxury accent;
- toe-kick/plinth of vanity unit: led strip for night-light and depth effect;
- cove (if ceiling detail exists): indirect led cove for soft ambient wash.
What is the downside of led lights?
The genuine downsides of led lights are few but real:
- higher upfront cost than halogen (though lower whole-life cost);
- heat sensitive led performance degrades at high junction temperatures, correct thermal management is essential;
- driver dependency the driver can fail before the led, requiring replacement;
- dimmer compatibility issues not all led drivers work well with all dimmers, confirmation of compatibility is required;
- blue light concern cool-white leds (4000K+) emit more blue wavelength light that can affect sleep if used in the evening, use warm-white or tunable white with warm evening setting to mitigate.
- quality variation a wide range of quality exists; always buy from certified suppliers.
Are there special lights for showers?
Yes. Shower lights must be specifically rated for zone 1 installation, IP65 minimum, and on a SELV circuit or mains circuit with 30 mA RCD. Standard domestic led downlights (IP20 or IP44) are not suitable for use directly above a shower enclosure. In the shower zone, you need IP65-rated led downlights (often recognisable by their sealed, gasketed trim and IP65 labelling on the product) or IP65/IP68 waterproof led strip lights in sealed aluminium profiles.
Is led lighting good for bathroom vanity?
led vanity lighting is not just worth it, it is the only rational choice. The benefits are overwhelming: extraordinary longevity (25,000+ hours versus 2,000 hours for halogen equivalents), 80–90% lower energy consumption, the availability of high-CRI (95+) versions that provide genuinely superior colour rendering for grooming tasks, and the design flexibility of led strips in architectural profiles that allows bespoke mirror surround lighting of any size and shape. The vanity mirror lighting is the single most used and most experience-affecting element of bathroom lighting, and it deserves the best led specification the budget allows.
Do led lights need special wiring?
led lights do not require special wiring in the sense of exotic cable types, but they do have specific requirements:
- SELV circuits (from a 12V or 24V driver) require low-voltage twin cable rather than mains T&E;
- mains-connected led fittings in bathrooms must be on a 30 mA RCD-protected circuit (this is a safety requirement, not specific to leds);
- dimmable led systems require a dimmer specifically compatible with the led driver. For zone 0 and zone 1, you need specifically IP-rated bathroom led fittings, not generic domestic led bulbs, which are IP20 and not suitable for wet areas.
Bathroom led lights an ideal bathroom with led lighting system
Throughout this comprehensive guide, we have explored every dimension of bathroom led lights, from the legal framework of zone regulations and IP ratings, through the life-critical importance of SELV compliance, to the practical engineering of led aluminium profile installation, the physics of condensation and how to defeat it, the human experience science of colour temperature and CRI, the creativity of layered lighting design, and the precision of wiring schematics and circuit sizing. The depth of knowledge required to specify and install a truly excellent bathroom led lighting system is considerable—but the rewards are proportionate.
A well-designed bathroom led lighting system is not merely a utility. It is the framework within which one of the most intimate and personally significant rooms in any building functions, a space of morning preparation and evening recovery, of personal care and private reflection. When the lighting is excellent, appropriately bright for task performance, beautifully warm for relaxation, accurately colour-rendering for grooming confidence, quietly smart in its control, perfectly safe in its installation and effortlessly efficient in its operation, it transforms the experience of the bathroom in ways that are felt daily for decades.
This outcome is what our product range, our technical support and our ongoing R&D effort are all designed to deliver. Our waterproof led profiles, IP65 and IP68 led strips, SELV-certified drivers, high-CRI led light engines and comprehensive accessory range provide everything you need to create a bathroom led lighting installation that exceeds expectations at every level, technically, aesthetically, commercially and environmentally.
Explore the LightingLine.eu bathroom led lighting range at www.lightingline.eu, whether you are a professional electrical contractor, an interior architect, a hotel or spa operator, or a homeowner planning your bathroom renovation, we are here to help you achieve lighting excellence.