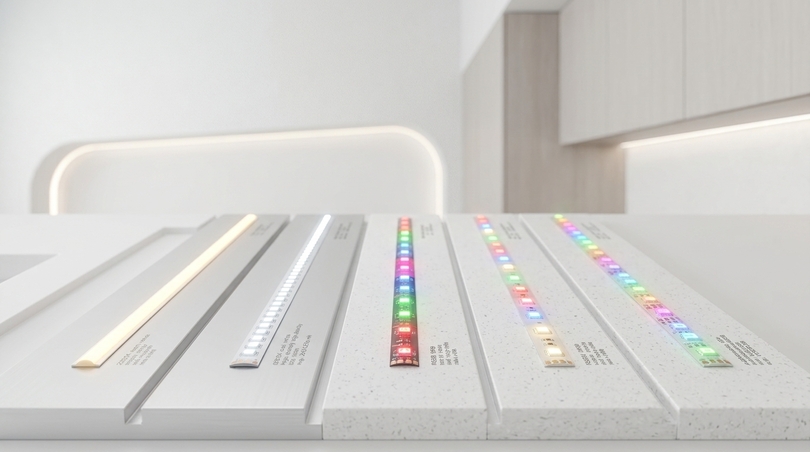
LED light strips have become the single most versatile lighting product of the last decade, and they are also the most misunderstood. A flexible printed circuit board no wider than a shoelace can now deliver more usable light per metre than a fluorescent batten, render colour accurately enough for a jewellery display, survive permanent immersion in a garden pond, and dim smoothly from full output down to one per cent without a visible step. The same product category also contains adhesive-backed novelty rolls that fail within a season. Understanding the difference between those two extremes is the entire purpose of this guide.
This article is written for anyone who needs to specify, purchase, install, or simply properly understand LED light strips: architects and lighting designers integrating linear lighting into a building fabric, electricians and installers who need the numbers right the first time, content creators and gamers building a set, retailers lighting a shelf, and homeowners who want a kitchen, bedroom, or bathroom to look thoughtful rather than improvised. Everything below is linked to the actual technical parameters that appear on a professional datasheet (LEDs per meter, watts per meter, lumens per watt, CRI, binning tolerance, IP rating, cutoff pitch, PCB width, voltage, and thermal behavior) because these parameters, not promotional materials, determine how the light will look on the wall.
In this article…
- What LED light strips are, and how they actually work
- LED strip lights, LED tape light, strip lighting: the terminology decoded
- Market data: how LED strip lighting became the default linear light source
- The two families of LED light strips: SMD and COB
- SMD LED strips in detail: 2835, 3014, 5050, 5630 and LED density
- COB LED strips in detail: the dot-free continuous line
- Colour options: single colour, CCT tunable, RGB, RGBW, RGB+CCT and Pixel LED
- Colour rendering, binning and why CRI Ra>90 changes a room
- Voltage explained: 5V, 12V, 24V, 48V and 230V mains LED strip lights
- Brightness, lumens and watts per metre: how much light do you actually need?
- IP ratings, waterproof LED light strips and outdoor installation
- Cutting LED strips: where, how, and what happens afterwards
- Connecting LED strips: solder joints, PCB connectors and run topology
- Power supplies: sizing, derating, location and safety
- Dimming and control: PWM, TRIAC, 0-10V, DALI, smart, music sync and remotes
- Aluminium profiles and diffusers: the part that decides how good it looks
- Thermal management, lifespan, L70/L80 and why LED strip lights fail
- Room-by-room applications: ceiling, kitchen, bathroom, bedroom, TV, panelling, stairs
- Outdoor, garden, wet areas, pools and marine applications
- Commercial, retail, office, hospitality and industrial applications
- Four real briefs: content creator, architect, student, business owner
- Running costs: are LED strip lights expensive to run?
- Safety, fire risk, legality and the standards that matter
- Health: flicker, blue light, circadian rhythm, eyes and pets
- Cheap versus quality LED light strips: 14 tells that separate them
- The 12 most common mistakes and how to avoid them
- Troubleshooting guide: symptoms, causes and fixes
- The complete specification checklist before you buy
- Why specify Lighting Line LED strips
- Glossary of LED strip lighting terms
- Frequently asked questions
- Conclusion
1. What LED light strips are, and how they actually work
Before comparing products, it’s worth being clear about what the item is. Too many purchasing decisions go awry because shoppers compare a length of flexible circuit board to a light fixture, when in reality, a strip is a component that only becomes a light fixture when combined with a driver, housing, and optics. Having that correct mental model makes every subsequent decision easier.
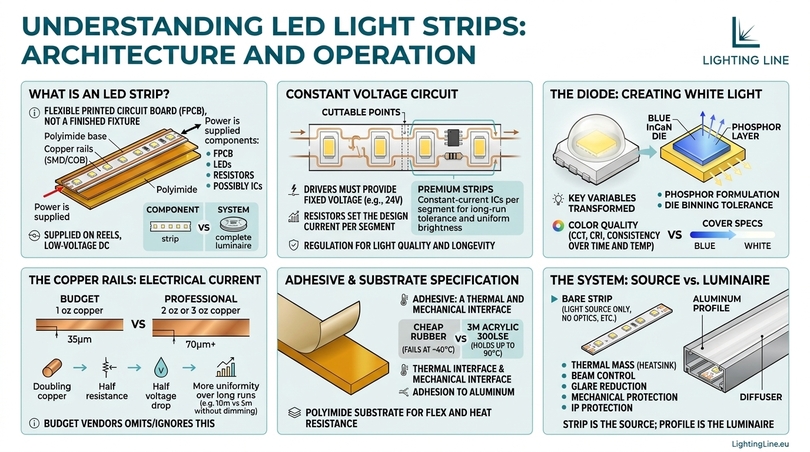
An LED light strip is a flexible printed circuit board (FPCB) that carries a series-parallel array of light-emitting diodes, current-limiting resistors, and, in some designs, a constant-current integrated circuit. The board is typically made of copper laminated on polyimide, 3 mm to 30 mm wide, and is supplied on reels in 5 m, 10 m, 25 m, or 50 m lengths. The bottom side carries double-sided acrylic adhesive tape (3M 300LSE or equivalent for professional grade products), and the top side houses either discrete surface-mount (SMD) diode packages or a continuous array of phosphor-coated die (COB). Power is supplied from one end as low-voltage DC power, or, in the case of a mains-powered strip, via an integrated rectifier.
The circuit: why LED light strips are constant voltage devices
Almost all low-voltage LED strips on the market are constant voltage devices, and this single specification determines which power supply you can use, whether you can cut the strip, and how it performs over long runs.
Inside a 24V strip, the LEDs are grouped into segments. A typical segment contains six to eight diodes in series with a resistor sized so that, at 24V across the entire segment, the current through the string is at the design point—commonly 20 mA to 120 mA depending on the package. Each segment is connected in parallel across the same two copper rails that run the entire length of the board. This parallel architecture is what makes the strip cuttable: remove one segment, and the remaining segments still see the same 24V and behave the same way.
The consequence is that the driver must provide a fixed, well-regulated voltage and the current required for the connected length. A 24 V, 14.4 W/m plug operating at 5 m consumes 72 W, so a 24 V DC power supply capable of at least 72 W plus headroom is required. If the driver output drops to 22 V under load, each segment fades; if it exceeds 26 V, each resistor dissipates more heat, and the diodes age more rapidly. Voltage regulation on the power supply is therefore a lighting quality specification, not just an electrical one.
A minority of premium strips (including several COB LED strips with current control in the Lightning Line catalog) replace the simple resistor with a small constant-current driver IC on each segment. The advantage is that the output brightness remains constant even when the supply voltage varies by one or two volts, and the strip becomes much more tolerant to long runs. You pay a small premium in efficiency for a large gain in uniformity.
The diode: what is actually emitting the light
A white LED is not a white emitter. It’s a blue indium gallium nitride die, typically emitting around 450 nm, coated with a phosphor mixture that reduces some of that blue to longer wavelengths. The mixture of transmitted blue and re-emitted yellow-green-red is what the eye perceives as white. Everything that varies between a mediocre strip and an excellent one (color temperature, color rendering, color consistency along the spool, how the color changes as the strip heats up, how the color changes after 10,000 hours) comes back to the quality and quantity of that phosphor layer and the precision of the die binning.
This is the most useful thing to understand about LED strip lighting: two strips can share the same wattage, the same number of LEDs, and the same stated color temperature, and still look completely different on the wall. The phosphor formulation, die binning tolerance, and thermal design account for this difference, and none of these appear in a cover spec.
The copper: the specification nobody prints
Copper rails carry the entire current of the strip. Standard budget strip uses 1 oz of copper (about 35 μm thick) on a single layer. Professional strip uses 2 oz (70 μm) or 3 oz, sometimes on a double-layer board with vias plated through the plating. Doubling the copper roughly halves the resistance per meter, which directly halves the voltage drop and directly reduces the temperature rise of the board itself.
Copper weight is one of the most obvious factors between a $4/m strip and a $14/m strip, and it’s the very parameter that budget vendors omit. If you can run 10 m of 24V strip from one end without visible dimming at the other end, you’re looking at a heavy copper board. If 5 m already fades visibly, you’re not.
The adhesive and the substrate
The tape on the back of an LED strip isn’t decorative; it’s a thermal and mechanical interface. Cheap rubber-based adhesive loses adhesion above about 40°C, which is exactly the temperature the back of a working strip reaches. That’s why many people ask how to prevent LED strips from falling off: failure is almost always due to the adhesive specification, not user error. Acrylic adhesives like 3M 300LSE hold up to 90°C and stick properly to aluminum, which is the surface a strip should be mounted to in the first place.
The substrate matters, too. Polyimide (the amber-colored film) tolerates higher temperatures and repeated flexing than cheaper PET alternatives, and that’s what you’ll find under any strip rated for 50,000 hours.
What an LED strip is not
A strip is not a finished luminaire. Sold bare, it has no optic, no thermal mass, no mechanical protection and no glare control. Mounted in an aluminium profile with a diffuser, the same strip becomes a linear luminaire with a defined beam, a controlled surface luminance, a heatsink and an IP-rated body. The strip is the light source; the profile is the luminaire. Treating the two as a single system is the difference between an installation that looks designed and one that looks like tape stuck to a wall.
2. LED strip lights, LED tape light, strip lighting: the terminology decoded
Search behaviour around this product is chaotic, and the chaos is informative. People look for led strip lights, led strip lighting, led light strips, led lighting strips, led tape light, strip lighting, light strips and led stripping and in the trade these words are not always synonyms. Clarifying them prevents you buying the wrong thing.
LED strip lights versus LED tape light
In everyday use the terms are interchangeable, and most manufacturers use them that way. Where a distinction exists, it is one of width and market: LED tape light tends to describe the narrower, thinner, adhesive-backed flexible product used architecturally (typically 5–10 mm wide), while LED strip light is used more broadly and includes wider consumer RGB rolls and rigid bars. If you search for led tape lights and receive results for led strip lights, nothing has gone wrong.
Strip lights and strip lighting: the fluorescent legacy
Here’s the real trap. In the UK and Ireland, “strip light” historically means a fluorescent batten, the long tube fitting in a garage, workshop, or kitchen ceiling. Searches for strip lighting bulbs, strip light bulbs, strip lighting replacement bulbs, small strip light bulbs, and fluorescent strip lights come from that world. When someone asks whether strip lights are being phased out in the UK, they’re asking about fluorescent tubes, not LEDs.
The answer is yes, for fluorescent. According to EU and UK RoHS amendments, mercury exemptions in general-purpose T5 and T8 fluorescent lamps expired until 2023, while compact fluorescent lamps ended earlier. Production and imports ceased; remaining stock is being sold. LED strip lighting and LED battens are direct replacements, and a well-specified LED strip with an aluminum profile will outperform the T8 batten it replaces in terms of efficacy, color rendering, dimmability, instant start-up, and lifespan. This is the biggest question in this category right now, which is why “can LED strips replace fluorescent tubes” is such a common question. Replacement is possible, and retrofitting usually requires less energy for a perceived brighter light, because the strip can be aimed where the light is needed instead of radiating in all directions.
Other names you will encounter
| Term | What it usually means | Watch out for |
|---|---|---|
| LED strip lights / LED light strips | Flexible constant-voltage FPCB with SMD or COB emitters | Covers everything from professional tape to novelty rolls |
| LED tape / LED tape lighting | Narrow architectural flexible strip, usually 5–10 mm | Same technology, professional framing |
| Strip light / strip lighting (UK) | Often a fluorescent or LED batten luminaire | Not the same product as flexible tape |
| LED rope light | Round PVC-encapsulated string, older technology | Much lower efficacy and colour quality |
| Neon flex | Silicone-encapsulated strip with diffusing body | A finished profile around a strip, not a bare strip |
| LED bar / rigid strip | Strip mounted on rigid aluminium PCB | Cannot be bent; fixed lengths |
| Light bar (automotive) | Vehicle auxiliary lamp | Entirely different product and legal regime |
| Addressable / Pixel LED strip | Strip with per-pixel data control (WS2812, SK6812, SPI) | Requires a data controller, not just a dimmer |
| LED light roll / LED lights on a roll | Colloquial for reeled strip | Reel length varies: 5, 10, 25, 50 m |
Una regola pratica: se il prodotto viene venduto a metro su un mulino, presenta segni di taglio e necessita di un driver, si tratta di una striscia LED indipendentemente da come la chiami l’annuncio. Il catalogo delle strisce LED di Lighting Line segue la convenzione professionale: le strisce sono classificate per tecnologia degli emettitori (SMD o COB), tensione, LED per metro, watt per metro, potenza IP, altezza di taglio, larghezza del PCB, colore e CRI: i parametri che permettono di confrontare simili con simili.
3. Dati di mercato: come l’illuminazione a strisce LED è diventata la fonte luminosa lineare predefinita
I numeri aiutano a contestualizzare perché questo prodotto esiste in così tante varianti. L’illuminazione LED lineare è passata da una soluzione di illuminazione a nicchia a uno strumento architettonico mainstream in circa quindici anni, guidata da tre curve simultanee: l’efficacia in aumento, il collasso del costo per lumen e la regolamentazione che elimina le tecnologie già esistenti.
The efficacy curve
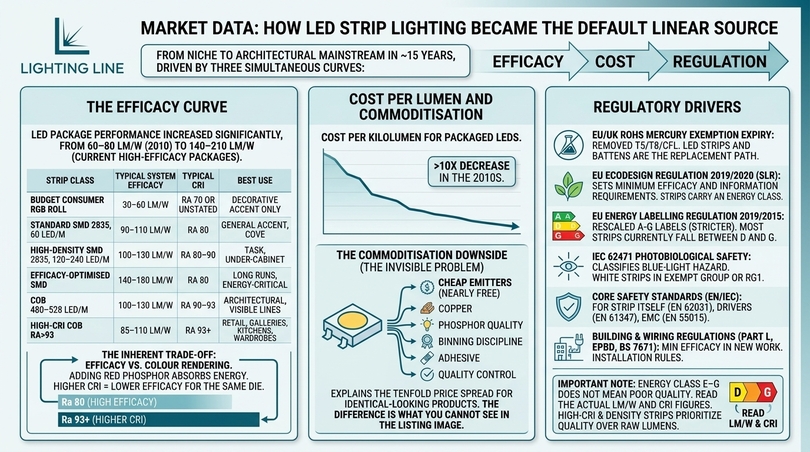
Mid-power white LED packages of the type used in strip lighting have moved from roughly 60–80 lm/W in commercial product around 2010 to 140–210 lm/W in current high-efficacy packages, with laboratory devices considerably higher. In finished strip form, after resistor losses and thermal derating, the realistic figures today are:
| Strip class | Typical system efficacy | Typical CRI | Best use |
|---|---|---|---|
| Budget consumer RGB roll | 30–60 lm/W | Ra 70 or unstated | Decorative accent only |
| Standard SMD 2835, 60 LED/m | 90–110 lm/W | Ra 80 | General accent, cove |
| High-density SMD 2835, 120–240 LED/m | 100–130 lm/W | Ra 80–90 | Task, under-cabinet |
| Efficacy-optimised SMD | 140–180 lm/W | Ra 80 | Long runs, energy-critical |
| COB 480–528 LED/m | 100–130 lm/W | Ra 90–93 | Architectural, visible lines |
| High-CRI COB Ra>93 | 85–110 lm/W | Ra 93+ | Retail, galleries, kitchens, wardrobes |
Note the trade-off embedded in that table: efficacy and colour rendering pull against each other. Adding red phosphor to lift CRI absorbs energy, so a Ra>93 strip will always be less efficient than an Ra 80 strip using the same die. Anyone quoting both maximum efficacy and maximum CRI from the same reference is quoting from two different products.
Cost per lumen and the commoditisation problem
Cost per kilolumen for packaged LEDs fell by more than an order of magnitude over the 2010s. The upside is obvious. The downside is less discussed: when the emitter becomes nearly free, the remaining cost in a strip is copper, phosphor quality, binning discipline, adhesive and quality control: those are exactly the invisible components a price-driven manufacturer removes first. This is the structural reason why the market contains products with a tenfold price spread that look identical in a photograph, and why “are there different quality LED strip lights” is one of the most frequently asked questions in the category. There are, and the difference is almost entirely in what you cannot see in the listing image.
Regulatory drivers
| Regulation | Effect on the category |
|---|---|
| EU/UK RoHS mercury exemption expiry (T5/T8 fluorescent, CFL) | Removed the incumbent linear source; LED strip and battens are the replacement path |
| EU Ecodesign Regulation 2019/2020 (SLR) | Sets minimum efficacy and information requirements; strips carry an energy class |
| EU Energy Labelling Regulation 2019/2015 | Rescaled A–G labels; most strips currently fall between D and G |
| IEC 62471 photobiological safety | Classifies blue-light hazard; well-made white strips fall in Exempt Group or RG1 |
| EN 62031 / IEC 62031 LED modules for general lighting | Core safety standard for the strip itself |
| EN 61347 / EN 61558 (drivers) | Safety of the LED driver / SELV transformer |
| EN 55015 / EN 61000 | EMC — flicker and interference behaviour |
| UK Building Regulations Part L / EU EPBD | Efficacy minimums for fixed lighting in new work |
| BS 7671 (UK wiring regulations) | Governs how a mains-fed driver and its final circuit are installed |
You will notice the energy class letter on Lighting Line product pages — for example energy class E, F or G on various COB references. A “G” on an LED strip is not a sign of poor quality. The rescaled EU label is deliberately demanding, and high-CRI, high-density strips that prioritise light quality over raw lumens per watt sit lower on the scale by design. Read the actual lm/W and CRI figures rather than the letter.
4. The two families of LED light strips: SMD and COB
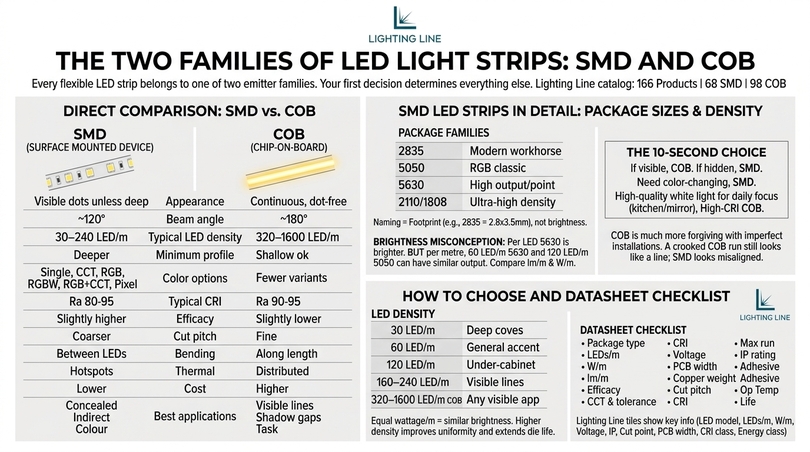
Every flexible LED strip on the market belongs to one of two emitter families, and choosing between them is the first and most important decision you’ll make. Everything else (voltage, color, IP, density) is a refinement within that choice. The Lighting Line catalog directly reflects this phenomenon, dividing its 166 products into 68 SMD LED strips and 98 COB LED strips.
SMD: discrete diode packages on a board
SMD stands for Surface Mounted Device. The individual pre-packaged diodes are reflow-soldered onto the board with a fixed pitch. Each package is a small plastic or ceramic housing containing one or more dies and a phosphor layer, and emits in a beam defined by the lens, typically at 120°. The result is a series of discrete points of light along the strip.
The distinguishing feature of the SMD strip is that you can see the individual LEDs. Whether this matters depends entirely on whether the strip is visible or hidden. Hidden inside a bay that casts light onto the ceiling, the dots are irrelevant. Mounted in a shallow profile with a clear cover at eye level, the dots are the first thing you notice.
The advantages of SMD are real and often decisive: it is generally cheaper per lumen, dissipates heat to discrete points that are easier to cool, achieves very high efficacy values, and supports multi-die packages, making RGB, RGBW, and RGB+CCT possible in a single emitter. Almost all color-changing strips are SMD, because it is not easy to build a tricolor CON.
COB: chip-on-board and the continuous line
COB stands for Chip-on-Board. Instead of packaged diodes, bare dies are bonded directly to the substrate in a dense line, wire-bonded, then covered with a continuous phosphor-silicone layer that spans the whole run. The eye sees an unbroken band of light with no visible points and no shadow gaps.
COB LED light strips produce a genuinely dot-free line and a wider 180° beam, which is exactly what the Lighting Line product icons indicate on every COB reference. Two consequences follow. First, COB is the correct choice whenever the light source itself is visible: recessed shadow gaps, handrails, under-shelf lines seen from below, wall grazing at close range, mirror surrounds, exposed profiles. Second, because light is emitted over a wider angle and from a continuous surface, COB tolerates shallow profiles and thin diffusers where SMD would show dotting.
The die density is remarkable: Lighting Line COB references run at 384, 400, 420, 480, 528, 576, 600, 608, 624, 720, 756, 768, 784, 810, 840, 1080 and up to 1600 LEDs per metre. At 480–600 LEDs/m the emitting surface is effectively continuous.
Direct comparison
| Criterion | SMD LED strip | COB LED strip |
|---|---|---|
| Appearance of the lit line | Visible dots unless deeply diffused | Continuous, dot-free |
| Beam angle | ~120° | ~180° |
| Typical LED density | 30–240 LED/m | 320–1600 LED/m |
| Minimum profile depth for uniformity | Deeper (10–20 mm typical) | Shallow profiles acceptable |
| Colour options | Single, CCT, RGB, RGBW, RGB+CCT, Pixel | Single, CCT, RGB, RGB+CCT (fewer variants) |
| Typical CRI available | Ra 80–95 | Ra 90–95 commonly standard |
| Efficacy at equal CRI | Slightly higher | Slightly lower |
| Cut pitch | Coarser (typically 2.5–12.5 cm) | Fine (often 1–5 cm) |
| Bending behaviour | Bends between LEDs | Bends along the length, more evenly |
| Thermal profile | Concentrated hotspots at each package | Distributed along the run — needs a heatsink |
| Cost per metre | Lower | Higher |
| Best applications | Concealed cove, indirect, colour-changing, long runs | Visible lines, shadow gaps, task, retail, mirrors, handrails |
How to choose in ten seconds
Chiediti innanzitutto se qualcuno vedrà mai la sorgente stessa, o solo la luce che produce? Se la sorgente è visibile o il diffusore è poco profondo, scegli COB. Se la fonte è completamente nascosta e stai comprando lumen, scegli SMD. Se hai bisogno di cambiare colore, quasi sicuramente sceglierai SMD. Se hai bisogno della massima qualità possibile di luce bianca su una superficie che la gente guarda ogni giorno (un piano da lavoro cucina, un armadio, uno specchio da bagno) scegli un COB ad alto CRI.
Una seconda considerazione, più silenziosa: il COB è molto più indulgente con installazioni imperfette. Un tratto COB leggermente storto si legge come una linea; una corsa SMD leggermente storta si legge come una linea di punti disallineati. Per gli installatori fai-da-te e per chi lavora con substrati imperfetti, questa perdita vale la differenza di prezzo di per sé.
5. SMD LED strips in detail: package sizes, density and what the numbers mean
SMD packages are named by their physical footprint in tenths of a millimetre. A 2835 package is 2.8 mm × 3.5 mm; a 5050 is 5.0 mm × 5.0 mm. That naming convention tells you the size of the package, not the brightness, and confusing the two is the most common misunderstanding in the category.
The main SMD package families
| Package | Size (mm) | Dies | Typical output per LED | Character |
|---|---|---|---|---|
| 3014 | 3.0 × 1.4 | 1 | 8–11 lm | Very slim boards, narrow profiles, low output per point |
| 2835 | 2.8 × 3.5 | 1 | 18–26 lm | The modern workhorse: high efficacy, good thermal pad, excellent value |
| 3528 | 3.5 × 2.8 | 1 | 5–8 lm | Legacy low-output package, largely superseded by 2835 |
| 5050 | 5.0 × 5.0 | 3 | 14–18 lm (white) | The classic RGB package: three dies in one housing |
| 5630 / 5730 | 5.6 × 3.0 | 1 | 45–60 lm | High output per point, higher heat, coarser dot spacing |
| 2110 / 1808 | very small | 1 | 6–12 lm | Ultra-high density strips for near-COB uniformity |
| 5050 RGBW / RGBWW | 5.0 × 5.0 | 4 | varies | Colour plus a dedicated white die |
Answering a very common question directly: are 5630 LEDs brighter than 5050? Per individual LED, yes — a 5630 white package typically produces roughly three times the output of a single white 5050 package. But strips are not sold per LED, they are sold per metre. A 60 LED/m 5630 strip and a 120 LED/m 5050 strip can land at similar lumens per metre with very different appearances. Always compare lumens per metre and watts per metre, never package size.
LED density: 30, 60, 120, 240 LEDs per metre
Density controls two things: total output per metre and the visual spacing of the dots. It does not, on its own, control efficiency.
| Density | LED pitch | Typical W/m | Typical lm/m | Dot visibility | Use |
|---|---|---|---|---|---|
| 30 LED/m | 33 mm | 2.4–4.8 W | 250–500 | Very visible | Deep coves only, decorative |
| 60 LED/m | 16.7 mm | 4.8–9.6 W | 500–1000 | Visible | General accent, concealed cove |
| 120 LED/m | 8.3 mm | 9.6–19.2 W | 1000–2000 | Reduced | Under-cabinet, task, shallow profiles |
| 160–240 LED/m | 4–6 mm | 14–24 W | 1500–2900 | Nearly continuous | Visible lines, high-output task |
| 320–1600 LED/m (COB) | <3 mm | 6–26 W | 600–3000 | None | Any visible application |
The practical answer to “which is brighter, 60 LED or 120 LED?” is: usually the 120, but not always. A 120 LED/m strip using low-drive-current dies at 9.6 W/m and a 60 LED/m strip using high-current dies at 9.6 W/m produce almost identical light. The 120 version simply spreads the same power over twice as many points, which improves uniformity and, importantly, lowers the junction temperature of each die and therefore extends life. Higher density at equal wattage is a quality choice, not a brightness choice.
Reading an SMD strip datasheet correctly
A complete SMD specification should give you: package type, LEDs per metre, watts per metre, lumens per metre, efficacy in lm/W, colour temperature with tolerance in SDCM, CRI (Ra and ideally R9), operating voltage, PCB width, copper weight, cut pitch, maximum single run length, IP rating, adhesive type, operating temperature range and rated life with L-value. If more than three of those are missing from a listing, treat the product as unspecified.
Lighting Line SMD references are published with LED model (2835), LEDs per metre, W/m, voltage, IP rating, cut point in centimetres, PCB width, CRI class and energy class visible directly on the product tile: which is the level of disclosure you should demand from any supplier before buying.
6. COB LED strips in detail: the dot-free continuous line
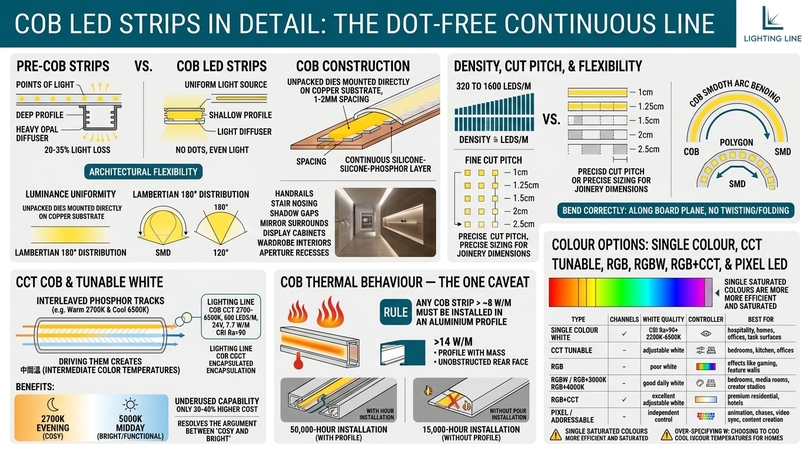
COB deserves its own section because it changed what is architecturally possible with linear light. Before COB, any visible strip needed a deep profile and a heavy opal diffuser to hide the dots, and that diffuser threw away 20–35% of the light. COB removed the compromise: the source is already uniform, so a shallow profile and a light diffuser are enough.
Construction and why it looks different
In a COB strip, unpackaged dies are mounted in rows directly on the copper substrate at a spacing of one to two millimetres, then encapsulated under a continuous silicone-phosphor layer. Because the phosphor is a single unbroken film, there is no gap between emitting regions and no lens edge to create a bright point. The luminance across the surface is nearly constant, and the emission approaches a Lambertian 180° distribution rather than the 120° of a lensed SMD package.
The practical outcome is that a COB strip can be looked at directly without the eye resolving individual sources, which is why it dominates in handrails, stair nosing, shadow gaps, mirror surrounds, display cabinets, wardrobe interiors and any recess where the aperture is visible.
Density, cut pitch and flexibility
The Lighting Line COB range spans densities from 320 to 1600 LEDs per metre, with cut points as fine as 1 cm, 1.25 cm, 1.5 cm, 2 cm and 2.5 cm. Fine cut pitch is a genuine practical advantage: on a 1 cm cut pitch you can size a run to within a centimetre of a joinery dimension, whereas a 12.5 cm cut pitch on a low-density 230V strip forces you to design around the increment.
COB also bends more gracefully. Because there is no rigid package periodically stiffening the board, a COB strip follows a curve as a smooth arc rather than a polygon. It still must be bent on the correct axis (along the plane of the board, never twisted or folded sharply against the emitting face) but for curved coves, radiused reveals and circular ceiling details, COB gives a cleaner result.
CCT COB and tunable white
A tunable-white COB strip carries two interleaved phosphor tracks (typically a warm channel around 2700K and a cool channel around 6500K) under one continuous encapsulation. Driving the two channels at complementary duty cycles produces any intermediate colour temperature. The Lighting Line COB CCT 2700–6500K reference at 600 LEDs/m, 24V, 7.7 W/m with CRI Ra>90 is a good example of the class: one product covers the entire white range, so a single installation can run at 2700K in the evening and 5000K at midday.
Tunable white is the most underused capability in residential and office lighting. It costs perhaps 30–40% more than fixed-CCT strip and a two-channel controller, and it resolves the argument between “warm and cosy” and “bright and functional” permanently, because you no longer have to choose.
COB thermal behaviour — the one caveat
Because COB distributes heat continuously rather than at discrete pads, it must be mounted on a heatsink. Running a 15 W/m COB strip loose on a plasterboard surface will raise the encapsulation temperature substantially, accelerate phosphor ageing and shift the colour warm over time.
Rule: any COB strip above approximately 8 W/m should be installed in an aluminium profile. Above 14 W/m, the profile should have meaningful mass and, ideally, an unobstructed rear face. This is not a sales recommendation; it is the difference between a 50,000-hour installation and a 15,000-hour one. Lighting Line’s aluminium profile range(surface, recessed, corner, wall, concrete, suspension, drywall and round) exists precisely to provide that heatsink in a form that also solves the optical and mechanical problems at the same time.
7. Colour options: single colour, CCT tunable, RGB, RGBW, RGB+CCT and Pixel LED
Colour is where buyers most often over-specify and under-think. The instinct is to buy the strip that can do everything, but a 16-million-colour RGB strip usually produces a poorer white than a dedicated white strip costing less, and white is what the light will be set to 95% of the time in most rooms. This section maps each option to the situation it genuinely suits.
Single-colour white: the workhorse
A fixed-CCT white strip has one phosphor formulation, one channel, one driver requirement and the best efficacy and colour quality per euro in the category. The Lighting Line range covers 2200K, 2500K, 2700K, 3000K, 3500K, 4000K, 5000K and 6500K.
| CCT | Appearance | Where it belongs | Where it fails |
|---|---|---|---|
| 2200K | Deep amber, candle-like | Hospitality, bars, evening-only accent, feature niches | Any task surface |
| 2500K | Very warm, filament-lamp feel | Bedrooms, lounges, restaurants, headboard lighting | Kitchens, offices |
| 2700K | Warm white, incandescent equivalent | Living rooms, bedrooms, hotel rooms, residential coves | Detailed task work |
| 3000K | Warm neutral — the residential default | Kitchens, bathrooms, hallways, under-cabinet, wardrobes | Clinical or inspection tasks |
| 3500K | Neutral | Offices, mixed-use rooms, retail with warm goods | Very traditional interiors |
| 4000K | Neutral cool — the commercial default | Offices, workshops, garages, utility, retail, studios | Bedrooms, lounges |
| 5000K | Cool white, daylight-adjacent | Task benches, inspection, medical, colour-critical work | Any relaxation space |
| 6500K | Daylight, blue-leaning | Industrial, technical, display of cool-toned products | Homes, evening use |
The single most common specification error is choosing a colour temperature that is too cool. Cooler light reads as “brighter” in a showroom at high output, then reads as harsh and institutional at low output in a real room at night. For homes, 2700K or 3000K is right in the overwhelming majority of cases. Reserve 4000K for work surfaces, utility spaces and commercial interiors.
CCT tunable white
Two white channels, one strip, any colour temperature between the endpoints. Requires a dual-channel controller and a driver sized for both channels. Genuinely valuable in bedrooms (warm at night, cool in the morning), kitchens (task versus dining), offices (circadian support), hospitality (scene changes across the day) and photography or video studios (matching ambient light).
Watch for one detail: cheap CCT strips shift in brightness as they shift in colour, because the two channels are not power-matched. Quality CCT strips maintain constant total output across the tuning range, and quality controllers implement constant-lumen mixing.
RGB
Three dies (red, green, blue) in one package, most commonly a 5050. Mixing produces saturated colour and a wide gamut. The critical limitation: RGB white, produced by driving all three channels together, is a poor white. It has an extremely low effective CRI, a spiky spectrum with gaps in the yellow and deep red, and it makes skin, wood and food look wrong. It is fine as an effect and unacceptable as room lighting.
Choose plain RGB only where the light will be coloured essentially all the time: gaming setups, feature walls, event and stage work, signage, party spaces, under-vehicle and PC lighting.
RGBW and RGB+CCT
RGBW adds a fourth, dedicated white die, the Lighting Line catalogue lists RGB + 3000K and RGB + 4000K variants. RGB+CCT adds two white channels for full tunable white plus colour. These are the correct specification for almost every real-world colour-changing installation, because they let you have a proper phosphor-converted white for daily use and saturated colour for effect, from the same strip.
| Type | Channels | White quality | Controller | Best for |
|---|---|---|---|---|
| Single colour | 1 | Excellent | Simple PWM dimmer | Most architectural and task lighting |
| CCT tunable | 2 | Excellent, adjustable | Dual-channel | Bedrooms, offices, kitchens, hospitality |
| RGB | 3 | Poor | RGB controller | Effect-only installations |
| RGBW / RGB+3000K / RGB+4000K | 4 | Good | 4-channel | Bedrooms, media rooms, retail, creator studios |
| RGB+CCT | 5 | Excellent, adjustable | 5-channel | Premium residential, hotels, showrooms |
| Pixel / addressable | Data | Varies | SPI / DMX controller | Animation, chases, video sync, signage |
Pixel LED and addressable strips
An addressable strip carries a driver IC per LED or per group, and receives a serial data stream instead of a simple analogue level. Each pixel can be set independently, which enables chases, gradients, colour waves, ambient screen-sync and full video mapping. Lighting Line lists Pixel LED as a distinct light-colour category within its strip range.
Addressable strips need a data controller, correct data-line termination, a resistor on the data line, a capacitor across the supply, and careful attention to the first-pixel injection point. They are also more sensitive to voltage drop, because the ICs mis-clock before the LEDs visibly dim. For a content creator or gamer building a reactive set, they are transformative. For a client who wants a warm line under a kitchen cabinet, they are the wrong tool entirely.
Single saturated colours
Red, green, blue, ice blue, yellow, orange, pink and purple are available as dedicated single-colour strips. A dedicated colour die is dramatically more efficient and more saturated than the same colour produced by mixing RGB, and it needs only a single-channel dimmer. For permanent architectural colour (a red emergency indication line, an amber sea-turtle-safe coastal walkway, a branded corporate blue) dedicated colour is the professional answer.
8. Colour rendering, binning and why CRI Ra>90 changes a room
If you take one specification away from this guide, make it this one. Colour rendering is the difference between light that makes a space look expensive and light that makes it look cheap, and unlike brightness it cannot be fixed after installation.
What CRI actually measures
The Colour Rendering Index compares how eight pastel test colours appear under the light source versus under a reference of the same colour temperature. The average is Ra. A perfect match scores 100.
| CRI | Perceived quality | Appropriate applications |
|---|---|---|
| Ra < 70 | Poor — colours visibly distorted | Nothing in an occupied interior |
| Ra 80–84 | Acceptable | Concealed cove, storage, garage, utility, corridors |
| Ra 85–89 | Good | General residential and commercial accent lighting |
| Ra 90–92 | Very good | Kitchens, bathrooms, wardrobes, living spaces, offices |
| Ra 93+ | Excellent | Retail display, galleries, studios, food, cosmetics, textiles |
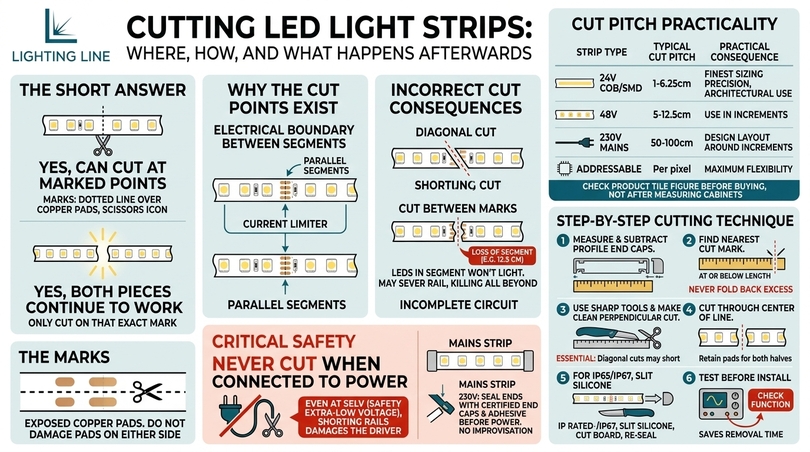
Lighting Line publishes CRI class on every strip — Ra>80, Ra>85, Ra>90 and Ra>93 which is unusual disclosure at catalogue level and makes genuine comparison possible.
R9 — the number behind the number
Ra averages only the eight pastel samples and deliberately excludes R9, saturated red. Most cheap LEDs are terrible at red, and because Ra ignores it, a strip can score Ra 82 while rendering red at R9 = 5. Under such a light, skin looks grey, wood looks flat, red packaging looks brown and food looks unappetising.
Ask for R9 whenever the light will fall on people, food, timber, brick, textiles or anything red. R9 > 50 is a reasonable floor for residential; R9 > 90 is what you want in retail or photography. High-CRI COB strips at Ra>93 typically deliver strong R9 as a by-product of the red-enriched phosphor they use.
Binning and SDCM: consistency along the run
Manufacturing tolerance means dies from the same wafer vary in colour. Manufacturers sort them into “bins”, and the tightness of that sort is expressed in SDCM (Standard Deviation of Colour Matching), also called MacAdam ellipses.
| Binning | Visible difference | Where acceptable |
|---|---|---|
| 1–2 SDCM | Imperceptible | Premium retail, galleries, any long continuous line |
| 3 SDCM | Barely perceptible side by side | Professional standard for architectural work |
| 4–5 SDCM | Noticeable when compared directly | Concealed lighting only |
| 6+ SDCM / unstated | Obvious patchiness | Avoid for any continuous run |
Binning is the reason a cheap strip looks patchy along a ten-metre kitchen run while a professional strip looks like one light source. It is also why you should buy all the strip for one project from a single batch: two reels from different production runs of the same specification can differ visibly even from the same manufacturer.
TM-30, Rf and Rg
Modern colour science has moved beyond CRI. IES TM-30-20 uses 99 samples and reports Rf (fidelity) and Rg (gamut). Rf 90+ with Rg near 100 describes light that is both accurate and vivid. You will not see TM-30 on most strip datasheets yet, but specifiers in retail and hospitality increasingly ask for it, and its appearance on a datasheet is a strong signal of a serious manufacturer.
9. Voltage explained: 5V, 12V, 24V, 48V and 230V mains LED strip lights
Voltage determines how far you can run the strip, how thick the cable must be, what driver you need and how the installation is regulated. The Lighting Line catalogue offers 5V, 12V, 24V, 48V and 230V — five distinct answers to five distinct problems.
The comparison
| Voltage | Max single-feed run (typical) | Cut pitch | Driver | Strengths | Limitations |
|---|---|---|---|---|---|
| 5V | 1–2 m | Very fine (per pixel) | USB or 5V PSU | Addressable strips, USB LED light strips, PC and TV backlight | Severe voltage drop; very short runs only |
| 12V | 3–5 m | Fine (2.5–5 cm) | 12V DC | Automotive, boats, campers, furniture, tight cut increments | Twice the current of 24V; more drop; heavier cable |
| 24V | 5–10 m | Medium (1–10 cm) | 24V DC | The architectural standard: best balance of run length, efficiency and cut resolution | Needs a driver; not for very long unbroken runs |
| 48V | 15–25 m | Coarser | 48V DC | Long corridors, warehouses, perimeter runs from one feed | Fewer accessories; still SELV but nearer the limit |
| 230V mains | 50–100 m | Coarse (typically 12.5–100 cm) | Rectifier/plug unit | Very long runs, no low-voltage cabling, simple installation | Not SELV; coarse cuts; harder to dim smoothly; strict safety requirements |
Why 24V is the professional default
Power equals voltage times current. At the same wattage, a 24V strip draws half the current of a 12V strip. Because voltage drop is current times resistance and heating loss is current squared times resistance, halving the current halves the drop and quarters the copper loss. That single relationship is why virtually all architectural LED strip lighting specified today is 24V. You get roughly double the run length, cooler operation, thinner cable and better far-end uniformity for no extra product cost.
Choose 12V only when the supply is inherently 12V (vehicles, caravans, boats, some furniture systems) or when you need extremely short segments and the finest cut pitch. Choose 5V only for addressable, USB-powered or very short accent runs.
Voltage drop: the numbers
How far the light travels before it fades
Voltage drop is the reason far-end sections look dimmer and warmer. As voltage falls, current falls, the drive point on the diode’s curve moves, output falls and the colour shifts slightly. On white strips a 5% drop is generally invisible; 10% is visible on a long straight run; 15% is obvious.
| Strip load | System | Feed from one end | Feed from both ends | Feed at centre |
|---|---|---|---|---|
| 4.8 W/m | 24V | up to ~12 m | up to ~24 m | up to ~24 m |
| 9.6 W/m | 24V | up to ~8 m | up to ~16 m | up to ~16 m |
| 14.4 W/m | 24V | up to ~5–6 m | up to ~11 m | up to ~11 m |
| 19.2 W/m | 24V | up to ~4–5 m | up to ~9 m | up to ~9 m |
| 9.6 W/m | 12V | up to ~4 m | up to ~8 m | up to ~8 m |
| 14.4 W/m | 12V | up to ~2.5–3 m | up to ~5–6 m | up to ~5–6 m |
Figures assume 2 oz copper and a 5% drop criterion; heavier copper and constant-current strips extend these limits, thin copper reduces them.
The three fixes for voltage drop
- Power injection: run a separate pair of conductors from the driver and reconnect to the strip at the midpoint or the far end. This is the standard professional solution and costs almost nothing.
- Split the run: use two shorter runs on two drivers, or two outputs of one driver. Cleanest for long corridors.
- Move up in voltage: specify 48V for perimeter runs or 230V mains strip for very long single lines.
Never solve voltage drop by simply raising the driver output voltage. You will over-drive the near end to compensate for the far end, which shortens the life of the whole run.
Mains 230V / 240V LED strip lights
Searches for 240v led strip lights, 230v led strip lights, mains led strip lights and 240v led strip lighting reflect a real and legitimate use case: someone needs 40 metres of light around a warehouse, a long garden perimeter or a commercial ceiling, and does not want low-voltage cabling and a dozen drivers.
Mains strip contains an on-board rectifier so it runs directly from a plug-in supply unit. Advantages: extremely long single runs, minimal cabling, easy extension. Trade-offs to understand clearly:
- Cut increments are coarse: typically 50 cm to 1 m, because each cuttable section is a complete high-voltage circuit.
- It is not SELV: all connections must be made with the correct sealed, certified connectors and the installation must comply with local wiring regulations. In the UK that means BS 7671.
- Dimming is harder: many mains strips are not dimmable at all; those that are usually need a specific TRIAC-compatible supply unit.
- Ripple is a risk: simple rectification without sufficient smoothing gives 100 Hz flicker. Insist on a smoothed or high-frequency design if the strip will be in a workspace or on camera.
For most interior architectural work, 24V remains the better answer. For perimeter, industrial and long-run outdoor lines, mains strip earns its place.
10. Brightness, lumens and watts per metre: how much light do you actually need?
Almost every disappointing LED strip installation fails for one of two reasons: the wrong colour rendering, or the wrong quantity of light. The second is entirely preventable with five minutes of arithmetic, and the arithmetic is genuinely simple.
Stop buying watts, start buying lumens
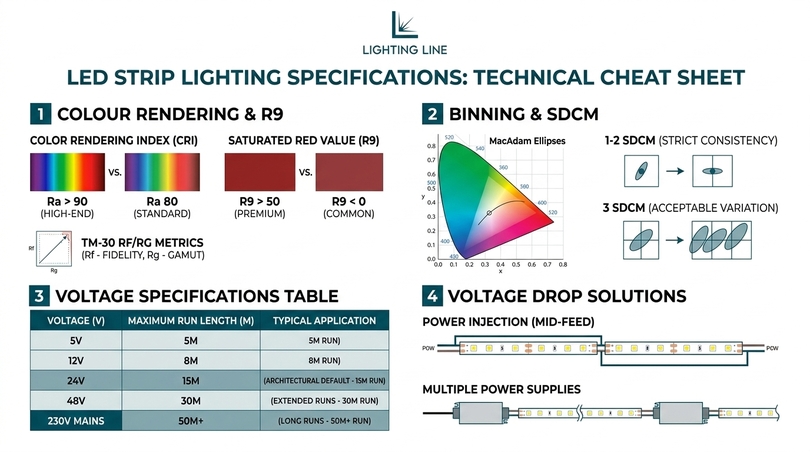
Watts per metre tells you what the strip consumes, not what it produces. Two 14.4 W/m strips can differ by 60% in output depending on die quality and efficacy. The number that matters is lumens per metre, and the number that tells you whether you are buying a good product is lumens per watt.
| Output class | Lumens per metre | Typical W/m | What it does |
|---|---|---|---|
| Very low | 150–350 | 2–4 | Night-time orientation, skirting, stair edge, plinth glow |
| Low | 350–700 | 4–7 | Decorative cove, headboard, shelf accent, TV backlight |
| Medium | 700–1200 | 7–12 | Under-cabinet task, wardrobe, mirror, general cove |
| High | 1200–2000 | 12–20 | Primary indirect ceiling light, retail display, workshops |
| Very high | 2000–3500 | 20–40 | Sole room light source, high ceilings, industrial, wall wash from distance |
Application targets that actually work
| Application | Target lm/m | Suggested CCT | Minimum CRI | Emitter |
|---|---|---|---|---|
| Kitchen under-cabinet worktop task | 800–1200 | 3000K | Ra 90 | COB preferred |
| Kitchen plinth / toe-kick | 300–500 | 2700–3000K | Ra 85 | Either |
| Ceiling cove as primary light (2.4–2.7 m ceiling) | 1200–1800 | 3000K | Ra 90 | SMD high-efficacy |
| Ceiling cove as accent only | 500–800 | 2700K | Ra 85 | Either |
| Bathroom mirror side-lighting | 800–1200 | 3000–4000K | Ra 90+ with strong R9 | COB |
| Bedroom headboard / mood | 200–500 | 2200–2700K | Ra 90 | COB |
| TV bias backlight | 150–350 | 6500K (D65) | Ra 90+ | Either |
| Wall panelling / shadow gap reveal | 400–900 | 2700–3000K | Ra 90 | COB essential |
| Stair nosing / handrail | 250–500 | 3000K | Ra 85 | COB |
| Wardrobe / display cabinet | 600–1000 | 3000–4000K | Ra 93 | COB |
| Retail shelf / display case | 1000–1800 | 3000–4000K | Ra 93 + high R9 | COB |
| Office indirect / suspended profile | 1200–2000 | 3500–4000K | Ra 90 | SMD or COB |
| Garage / workshop replacement for fluorescent | 1500–2500 | 4000–5000K | Ra 80 | SMD high-efficacy |
| Outdoor façade grazing | 800–1500 | 2700–3000K | Ra 85 | IP67 either |
| Garden path / decking edge | 200–400 | 2200–2700K | Ra 80 | IP67 |
| Content creator key/fill accent | 500–1200 | Tunable or RGB+CCT | Ra 95 for on-camera | COB CCT or RGB+CCT |
| Gaming desk / PC RGB | 200–600 | RGB / addressable | n/a | SMD 5050 or Pixel |
The diffuser tax
The lumens on the datasheet are bare-strip lumens. Put the strip in a profile behind a diffuser and you lose light and you must design for that loss:
| Cover type | Light transmission | Dot hiding | Use |
|---|---|---|---|
| No cover | 100% | None | Fully concealed coves only |
| Clear / transparent | 92–96% | None | Protection only; COB in shallow reveals |
| Frosted / satin | 80–88% | Partial | General purpose, good compromise |
| Opal / milky | 65–78% | Excellent | Visible SMD lines, direct-view profiles |
| Deep opal / black-out | 50–65% | Total | Very shallow profiles, low-glare requirements |
| Micro-prismatic / UGR<19 | 70–82% | Excellent | Office and screen environments |
Design rule: specify the strip at roughly 25–30% above the target lumens if it sits behind an opal diffuser, and dim it down in commissioning. Running a strip at 70% of its rated current also drops its junction temperature substantially, which is the cheapest lifespan extension available to you.
Will LED strip lights light a whole room?
It’s possible light a whole room but with the right specification. A 3.5 m × 4 m living room needs roughly 1,700–2,500 lumens of general light. A perimeter cove of 15 m running a 1,400 lm/m strip produces 21,000 bare lumens; after a 25% diffuser loss and the significant loss of bouncing off a ceiling (a white ceiling returns perhaps 70–80%), you land comfortably above the target. The reason people believe LED light strips cannot light a room is that they tried it with a 4.8 W/m decorative roll, which was never intended to.
Two caveats for using strip as the sole source. Indirect cove light is soft and flat: beautiful, but it lacks the modelling that makes a room feel three-dimensional. Pair it with a few directional sources. And check the ceiling: a cove throws light onto the ceiling surface, so any imperfection in the plaster will be revealed mercilessly by grazing light.
11. IP ratings, waterproof LED light strips and outdoor installation
Ingress Protection ratings are widely printed and widely misread. The consequences of misreading them are expensive, because water damage in a strip is almost always terminal and almost never covered.
How to read an IP code
The two digits of an IP code
The first digit is solids, the second is liquids.
| Rating | Protection | Construction | Correct location |
|---|---|---|---|
| IP20 | No water protection | Bare PCB | Dry interiors: coves, cabinets, ceilings, wardrobes |
| IP54 | Splash resistant | Light silicone coating | Kitchens away from the sink, covered porches |
| IP65 | Low-pressure jets | Silicone-coated top face | Bathrooms outside zones, kitchens, sheltered exterior |
| IP66 | Powerful jets | Full silicone sleeve | Exposed façades, wash-down commercial kitchens |
| IP67 | Temporary immersion to 1 m | Extruded silicone tube, sealed ends | Gardens, decking, terraces, ground-level exterior |
| IP68 | Continuous immersion | Fully encapsulated, potted terminations | Pools, ponds, fountains, submerged installations |
| IP69K | High-pressure hot wash-down | Industrial encapsulation | Food processing, industrial cleaning environments |
Lighting Line classifies its range as IP20, IP65 silicone and IP67 silicone, with several references using a spherical extruded silicone tube construction, a sleeve extruded around the strip rather than a coating brushed on it. This distinction matters more than the number: a co-extruded tube is a genuine mechanical barrier, whereas a thin sprayed conformal coat degrades under UV and can yellow.
The four rules of waterproof LED strip lighting
- The rating applies to the strip, not to the joint: the moment you cut an IP67 strip you have created two unrated open ends. They must be re-sealed with the correct end cap and silicone adhesive, or the whole run is IP20 at that point.
- The driver almost always lives indoors: unless you buy a specifically IP67-rated driver, keep it inside a dry, ventilated enclosure and run only the low-voltage output outdoors.
- Silicone yellows under UV unless it is UV-stabilised: ask for UV-stabilised silicone for any south-facing exterior run. Non-stabilised material shifts noticeably warm within two summers.
- Encapsulation traps heat: a silicone-sleeved strip runs hotter than the same strip bare, so derate output or step up the profile mass for exterior runs.
Bathrooms and the zone system
Bathroom lighting is governed by zones. In the UK under BS 7671, Zone 0 is inside the bath or shower basin (IPX7 and SELV only), Zone 1 is above the bath or shower to 2.25 m (minimum IPX4, commonly IP65), Zone 2 extends 0.6 m beyond Zone 1 (minimum IPX4), and outside zones has no specific IP requirement, though IP54 or better is sensible in a room that gets steamy.
Practical specification for bathroom strip lighting: use IP65 or IP67 strip for mirror surrounds, niches and shower recesses, keep everything at 24V SELV, locate the driver outside the zones (a ceiling void, an airing cupboard or an adjacent room) and choose a high-CRI 3000K or 4000K COB for the mirror, because that is the light people apply make-up and shave under, and Ra 80 light makes accurate skin-tone judgement impossible.
12. Cutting LED light strips: where, how, and what happens afterwards
No question about LED strip lighting is asked more often than whether the strip can be cut. It arrives in dozens of phrasings: can you cut LED light strips anywhere, can I cut LED strip lights and they still work, do LED light strips still work when cut, can you cut LED strip lights to size, can you just cut LED light strips and they all have the same three-part answer.
The short answer
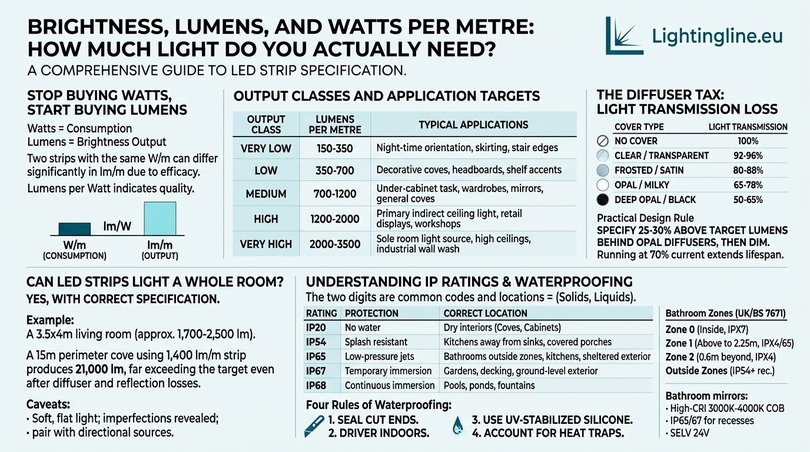
Yes, LED light strips are designed to be cut but only at the marked cut points, and yes, both pieces continue to work. The marks are printed on the board, usually as a dotted line crossing a pair of exposed copper pads, sometimes with a scissors icon. Cut exactly on that line with sharp scissors or a craft knife, straight across, leaving the copper pads intact on both sides.
Why the cut points exist and what happens if you ignore them
As explained in section 1, the strip is built from parallel segments, each containing a series string of LEDs and its current limiter. The cut mark sits exactly at the electrical boundary between two segments. Cut there and each remaining segment is complete and functional.
Cut between the marks and you break a series string mid-circuit. The result is that the LEDs in that partial segment never light, and depending on where the break falls you may also sever one of the copper rails, killing everything beyond the cut. Nothing dramatic happens (no fire, no damage to the rest) but you lose that segment permanently, and on a coarse-pitch strip that can be 12.5 cm of dark line.
Cut pitch across the range
| Strip type | Typical cut pitch | Practical consequence |
|---|---|---|
| 24V high-density COB | 1 cm – 2.5 cm | Size a run to a joinery dimension almost exactly |
| 24V COB standard | 2.5 cm – 5 cm | Excellent for architectural work |
| 24V SMD 2835 | 2.5 cm – 6.25 cm | Fine for most cabinetry |
| 12V SMD | 2.5 cm – 5 cm | Good resolution; short runs |
| 48V | 5 cm – 12.5 cm | Design in increments |
| 230V mains | 50 cm – 100 cm | Design the layout around the increment |
| Addressable / Pixel | Per pixel | Finest resolution; renumber the data map after cutting |
Lighting Line publishes the cut point in centimetres on every product tile — 1, 1.25, 1.5, 1.92, 2, 2.083, 2.4, 2.5, 2.65, 2.94, 3.125, 3.33, 3.55, 4, 4.17, 4.55, 5, 6.25 and 12.5 cm across the range. Check this figure before you buy, not after you have measured the cabinet. If you need a 47 cm run, a 12.5 cm cut pitch will give you 37.5 cm or 50 cm and nothing in between.
Cutting technique, step by step
- Measure the finished run and subtract the length taken by the profile end caps.
- Identify the nearest cut mark at or below your required length. Never cut long and fold back the excess.
- Use sharp scissors or a fresh blade against a straight edge. A clean perpendicular cut is essential: a diagonal cut can short the two rails or leave insufficient pad for soldering.
- Cut through the centre of the marked line so that both halves retain usable copper pads.
- On IP65/IP67 strip, slit the silicone first with a knife, expose the pads, then cut the board, then re-seal with an end cap and silicone adhesive.
- Test the cut section before installing it. Two minutes with a bench supply saves an hour of removing adhesive from a plastered reveal.
One warning: never cut a strip while it is connected to power. Even at SELV voltages, shorting the two rails with scissors will trip or damage the driver.
What about mains strip?
230V strip can be cut, but the discipline is stricter. The exposed ends carry mains potential once energised, so they must be sealed with the manufacturer’s certified end cap and adhesive before power is applied. Only ever use the connector system supplied for that specific product. This is one area where improvisation is genuinely dangerous.
13. Connecting LED light strips: solder joints, PCB connectors and run topology
The connection is where most installations fail, not the strip. A flickering, intermittent or partially dead run is far more likely to be a bad joint than a faulty product, and the fix is a small amount of technique.
Soldering versus solderless connectors
| Soldered joint | Solderless PCB connector | |
|---|---|---|
| Electrical reliability | Highest — gas-tight metallurgical bond | Good if the correct type, quality and width |
| Mechanical strength | High when strain-relieved | Moderate; can loosen with vibration or thermal cycling |
| Profile compatibility | Flat — fits any channel | Bulky — may not fit shallow profiles |
| Speed | Slower, needs skill and equipment | Seconds, no tools |
| Reworkability | Requires desoldering | Instant |
| Best for | Permanent architectural runs, high current, exteriors | Prototyping, retail displays, short accent runs, DIY |
Professional recommendation: solder every joint that will be inaccessible after installation, and use connectors only where you can reach them again. A connector inside a sealed plasterboard cove is a future callout waiting to happen. Lighting Line supplies dedicated PCB LED strip connectors for the applications where solderless is the right choice.
Soldering technique that survives ten years
- Set the iron to 300–320 °C and use a chisel tip. Higher temperatures lift pads; lower temperatures create cold joints.
- Clean the pads with isopropyl alcohol. On silicone-coated strip, strip back 8–10 mm of silicone first.
- Tin the pad and the wire separately. Then bring them together for no more than two to three seconds.
- Use flexible stranded wire, typically 20 AWG (0.5 mm²) for runs up to about 3 A and 18 AWG (0.75 mm²) beyond that.
- Observe polarity: the board is marked + and −, and on RGB/RGBW strips each channel is marked. Reverse polarity will not damage a resistive strip but nothing will light; on addressable strips it can destroy the first IC.
- Insulate with heat-shrink and provide strain relief. The joint should never carry mechanical load.
- On IP-rated strip, re-seal the joint with neutral-cure silicone and a heat-shrink sleeve.
Choosing the right connector
Connectors are specified by PCB width (8, 10 or 12 mm are common; Lighting Line strips run from 3 mm to 30 mm), by number of contacts (2 for single colour and CCT-per-channel, 3 for addressable, 4 for RGB, 5 for RGBW, 6 for RGB+CCT) and by geometry: strip-to-strip, strip-to-wire, L-corner, T-junction, cross.
Buy the connector width that exactly matches your strip. A 10 mm connector on an 8 mm strip makes intermittent contact that manifests as flicker weeks later. The 4-pin connector search volume in this category is high precisely because people order the wrong one first.
Topology: how to lay out a run
| Topology | Description | Verdict |
|---|---|---|
| Single feed, end of run | Driver at one end, strip runs away | Fine within the length limits in §9.3 |
| Centre feed | Driver at the middle, two half-runs | Doubles the effective length; the simplest upgrade |
| Dual-end feed | Parallel conductors to both ends | Doubles length, keeps a single visible line |
| Home run / star | Each segment individually fed from the driver | Best uniformity; most cable |
| Daisy chain (strip-to-strip) | Segments joined end to end | Cumulative voltage drop — avoid beyond two segments |
Never join two strips end to end and expect the far one to match the near one. Every joint adds resistance on top of the strip’s own. Where a corner requires a break, feed both sides from the driver rather than passing current through the corner joint.
Corners, curves and vertical drops
For a 90° corner, do not fold the strip. Folding cracks the copper. Either cut and use an L-connector or a short soldered jumper, or use a purpose-made corner profile. Lighting Line produces corner profilesspecifically for 45° coving details, which give a mechanically sound and visually clean transition.
For curves, bend along the flat plane only, respect a minimum bend radius of roughly 30–50 mm on standard flexible strip, and never twist the board. COB tolerates curves better than SMD.
14. Power supplies: sizing, derating, location and safety
The driver is the component most likely to fail in the system and the component buyers spend the least time thinking about. A €12 unbranded supply behind a €400 run of high-CRI COB is a false economy that will announce itself within eighteen months.
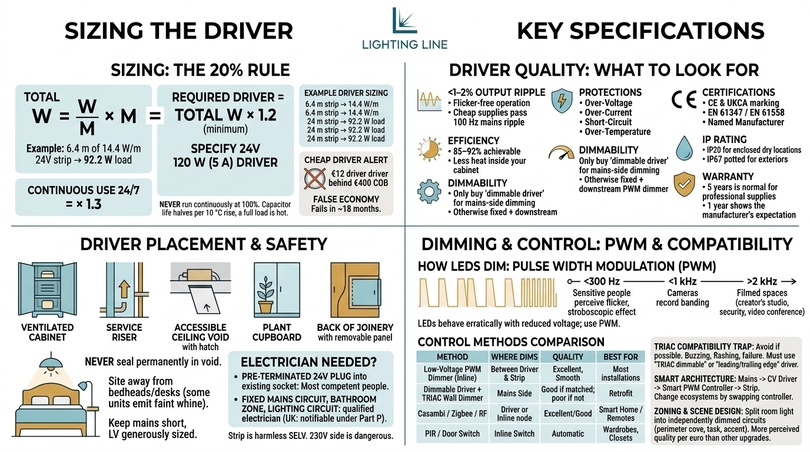
Sizing: the 20% rule
The sizing formula
Calculate the total load, then add headroom:
Total watts = watts per metre × metres. Required driver = total watts × 1.2 (minimum), or × 1.3 for continuous 24/7 operation.
Worked example: 6.4 m of a 14.4 W/m 24V strip = 92.2 W. Multiply by 1.2 = 110.6 W. Specify a 24V 120 W (5 A) driver. Never run a switch-mode supply continuously at 100% of its nameplate rating; electrolytic capacitor life roughly halves for every 10 °C rise, and a supply at full load runs hot.
| Strip load | Length | Load (W) | Recommended 24V driver | Current |
|---|---|---|---|---|
| 4.8 W/m | 5 m | 24 W | 30 W | 1.25 A |
| 7.5 W/m | 5 m | 37.5 W | 45–60 W | 2.5 A |
| 9.6 W/m | 5 m | 48 W | 60 W | 2.5 A |
| 10.5 W/m | 10 m | 105 W | 150 W | 6.25 A |
| 14.4 W/m | 10 m | 144 W | 200 W | 8.3 A |
| 15.5 W/m | 10 m | 155 W | 200 W | 8.3 A |
| 19.2 W/m | 10 m | 192 W | 250 W | 10.4 A |
| 24 W/m | 10 m | 240 W | 320 W | 13.3 A |
Constant voltage, and why it must be the right kind
LED strips need a constant-voltage supply. A constant-current LED driver (the type used for downlights and rated in mA) will not work and may destroy the strip. Check the label: it must state an output voltage (12V, 24V, 48V DC) and a maximum current or wattage.
What separates a good driver from a bad one
- Regulation and ripple: output ripple below 1–2% keeps the strip flicker-free. Cheap supplies pass 100 Hz mains ripple straight through.
- Protection: over-voltage, over-current, short-circuit and over-temperature protection should all be listed.
- Certification: CE and UKCA marking, EN 61347 / EN 61558 compliance, a named manufacturer and a real address.
- Efficiency: 85–92% is achievable; the losses become heat inside your cabinet.
- Dimmability: Only buy a “dimmable driver” if you need mains-side dimming; otherwise use a fixed driver and a PWM dimmer downstream.
- Ingress rating: IP20 for enclosed dry locations, IP67 potted for exteriors.
- Warranty: Five years is normal for professional supplies. One year tells you what the manufacturer expects.
Placement
Drivers need ventilation and access. Never seal a driver permanently inside a plastered void. Good locations: a ventilated cabinet, a service riser, an accessible ceiling void with a hatch, a plant cupboard, the back of a joinery unit with a removable panel. Keep the mains side short and the low-voltage side generously sized, and site the driver away from bedheads and desks, because some units emit a faint high-frequency whine.
Do you need an electrician?
Plugging a pre-terminated 24V supply into an existing socket and connecting a strip is a job most competent people can do safely. Anything that involves connecting a driver to a fixed mains circuit, installing into a bathroom zone, or working on a lighting circuit should be done by a qualified electrician: in the UK that is notifiable work under Part P of the Building Regulations in certain locations, and in the EU equivalent national rules apply. The strip itself is SELV and harmless, the 230V side is not.
15. Dimming and control: PWM, TRIAC, 0-10V, DALI, smart, music sync and remotes
Control is what turns a length of LED strip lighting into a designed environment. It is also where compatibility problems concentrate, because the dimmer, the driver and the strip must all agree on the same method.
How LED light strips dim
Why PWM and not voltage reduction
Unlike an incandescent lamp, an LED cannot be dimmed simply by lowering the voltage: reduce a 24V strip to 18V and it will not dim gracefully, it will behave erratically and shift colour. Instead, strips are dimmed by Pulse Width Modulation (PWM): the supply is switched fully on and fully off thousands of times per second, and the ratio of on-time to off-time sets the perceived brightness. Because the LED is always driven at its correct current when on, colour stays consistent from 100% down to 1%.
PWM frequency is the specification to check. Below about 300 Hz, sensitive people perceive flicker and the stroboscopic effect on moving objects is visible. Below 1 kHz, cameras will record banding. For any space that will be filmed (a content creator’s studio, a retail floor with security cameras, a video conferencing room9 insist on a PWM frequency above 2 kHz, ideally 3–25 kHz. This single number is the difference between a strip that looks perfect on camera and one that ruins every take.
The control methods compared
| Method | Where the dimming happens | Quality | Best for |
|---|---|---|---|
| Low-voltage PWM dimmer (inline) | Between driver and strip | Excellent, smooth to 1% | Most installations — simplest and most reliable |
| Dimmable driver + TRIAC wall dimmer | Mains side | Good if matched; poor if not | Retrofit into existing wall dimmer switches |
| 0-10V / 1-10V | Driver, analogue control signal | Very good | Commercial, BMS-integrated projects |
| DALI / DALI-2 | Driver, digital addressable bus | Excellent, addressable, feedback | Offices, hotels, large commercial schemes |
| Casambi / Bluetooth mesh | Driver or inline node | Excellent, wireless | Retrofit commercial and premium residential |
| Zigbee / Matter / Wi-Fi smart controller | Inline after the driver | Good | Smart homes, voice control, app scenes |
| RF remote controller | Inline | Good | Simple retrofit, bedrooms, no app needed |
| IR remote controller | Inline | Basic — needs line of sight | Budget consumer kits |
| SPI / DMX512 | Data controller | Full pixel control | Addressable, entertainment, signage |
| PIR / microwave sensor | Inline switch | Automatic | Wardrobes, stairs, corridors, garages |
| Door / drawer switch | Inline | Simple | Cabinetry and wardrobe lighting |
The TRIAC compatibility trap
Wiring a standard mains wall dimmer to a non-dimmable LED driver produces buzzing, flashing, a limited dimming range that dies at 30%, or an immediate driver failure. If you want to dim from an existing wall dimmer, you need a driver explicitly labelled “TRIAC dimmable” or “leading/trailing edge dimmable”, and you should check the manufacturer’s compatibility list for your specific dimmer model. Trailing-edge dimmers generally behave far better with LED loads than leading-edge.
Where you have the choice, avoid the whole problem: run the driver at full output permanently and dim on the low-voltage side with a PWM dimmer. It is cheaper, smoother, quieter and more reliable.
Smart control, app control and voice
For smart LED light strips the practical architecture is: mains → constant-voltage driver → smart PWM controller → strip. The controller is the smart element, which means you can change ecosystems later without replacing anything else. Look for Matter support if you want long-term interoperability across Apple Home, Google Home and Amazon Alexa, and prefer controllers that retain local control if the cloud service disappears.
A Wi-Fi, Bluetooth or Zigbee inline controller gives you full app control of brightness, colour temperature, colour, scenes and schedules, and works with existing smart-home hubs. While RF remotes are the most reliable for everyday use because they do not need line of sight, and many support multiple zones from one handset.
Music sync, screen sync and video reactivity
Three distinct technologies get grouped under “sync”:
- Microphone-based music sync: a controller with a built-in mic modulates brightness or colour to the beat. Cheap, effective, no configuration. Suits parties and gaming.
- Screen sync / ambient bias: a capture device or software reads the edge colours of a display and drives an addressable strip behind it, so the wall extends the picture. This is the technology behind the “TV light strip” category.
- Timecode / DMX: professional show control where lighting cues are locked to a timeline. Used in studios, events and installations.
For live-streaming and reactive sets, use addressable Pixel LED strip with an SPI controller and software integration while for simple beat reactivity, a music-sync controller on RGB or RGBW strip is enough. F
Zoning and scene design
The most sophisticated thing you can do with LED strip lighting is not colour, it is zoning. Split a room’s linear light into two or three independently dimmed circuits (perimeter cove, task line, accent line), and you can produce a genuinely different room at breakfast, at work and at midnight from the same hardware. Zoning delivers more perceived quality per euro than any other upgrade in the category.
16. Aluminium profiles and diffusers: the part that decides how good it looks
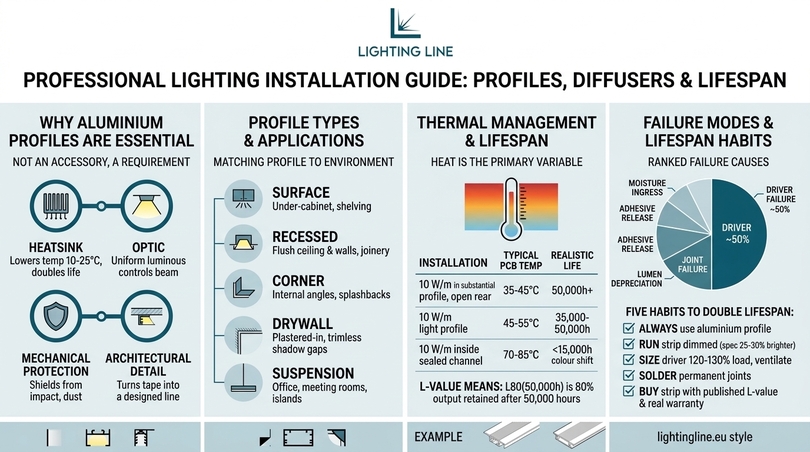
This is the section that separates professional results from disappointing ones, and it is routinely skipped. A profile is not an accessory. It performs four jobs simultaneously, and removing it removes all four.
The four jobs a profile does
- Heatsink: aluminium conducts heat away from the PCB, lowering junction temperature by 10–25 °C. That single change can double useful life and prevent colour shift.
- Optic: the diffuser converts a line of point sources into a uniform luminous surface, controls the beam and eliminates glare.
- Mechanical protection: the channel shields the strip from impact, dust, cleaning and curious fingers, and holds it perfectly straight.
- Architectural detail: the profile is what the eye actually sees. It turns tape into a designed line integrated with plaster, timber, tile or concrete.
An installation without a profile is not a cheaper version of the same thing; it is a different and much worse product.
Profile families and where each belongs
| Profile type | Mounting | Typical application |
|---|---|---|
| Surface | Screwed or bonded to a face | Under-cabinet, shelving, garages, workshops, retrofit: the universal choice |
| Recessed | Set into a routed or formed channel | Flush ceiling and wall lines, joinery, stair treads, flooring |
| Corner | 45° into an internal angle | Worktop-to-splashback, ceiling perimeter, cabinet interiors |
| Wall | Wall mounted, often asymmetric | Wall washing, up/down lines, corridor and stair lighting |
| Drywall | Plastered in, trimless | Shadow gaps, seamless architectural reveals, high-end residential |
| Suspension | Cable-suspended | Offices, meeting rooms, kitchen islands, retail: up/down distribution |
| Concrete | Cast into concrete | New-build structural integration, exposed concrete architecture |
| Round | Tubular | Pendant lines, decorative features, handrails |
Matching the profile to the strip
Three dimensions must agree:
- Channel width versus PCB width: Lighting Line strips range from 3 mm to 30 mm. The channel should be 1–2 mm wider than the strip: no more, or the strip will wander when the adhesive warms.
- Channel depth versus diffuser distance: for SMD, the rule of thumb is that the distance from the LED to the diffuser should be at least equal to the LED pitch to avoid visible dots. At 60 LED/m (16.7 mm pitch) that means a deep profile. At 120 LED/m (8.3 mm) a medium profile suffices. COB needs almost none.
- Thermal mass versus watts per metre: below 8 W/m almost any profile works. From 8 to 15 W/m use a profile with real wall thickness. Above 15 W/m use a substantial section with an open rear face, and never bury it in insulation.
The diffuser choice
Refer back to the transmission table in §10.3. In practice: clear for COB in protected reveals, frosted as the general-purpose default, opal whenever an SMD strip will be directly visible, and micro-prismatic where screens and glare control matter. Always buy the diffuser and the strip together and, ideally, test one metre before committing to forty.
End caps and brackets
End caps close the profile, hide the cut edge of the diffuser and, in IP-rated assemblies, complete the seal. Mounting brackets allow a profile to be removed for service without destroying the substrate: worth specifying wherever access matters. These are three-euro components that determine whether an installation looks finished.
17. Thermal management, lifespan, L70/L80 and why LED strip lights fail
LEDs do not burn out the way filaments do. They fade. Understanding how and why they fade is the key to buying strip that is still acceptable in year ten rather than replaced in year two.
What 50,000 hours actually means
Reading an L-value correctly
Lifetime for LEDs is expressed as an L-value with a time: L70(50,000h) means that after 50,000 hours the strip still produces at least 70% of its original output. L80 and L90 are stricter and increasingly used for professional product.
| Rating | Meaning | Perceptibility | Suits |
|---|---|---|---|
| L70 | 70% output retained | Noticeable if compared to new | General and industrial use |
| L80 | 80% retained | Barely noticeable | Commercial and quality residential |
| L90 | 90% retained | Imperceptible | Retail, galleries, colour-critical work |
| Bxx suffix (e.g. L80B10) | Percentage of units below the threshold | — | Specification-grade projects |
Contextualise the hours
50,000 hours is 5.7 years of continuous 24/7 operation, about 11 years at 12 hours a day, or roughly 23 years at 6 hours a day. Domestic kitchen under-cabinet lighting running four hours a day reaches 50,000 hours after 34 years. In practice the strip will be replaced for aesthetic reasons long before it fades.
Heat is the only variable that matters
Every published lifetime figure is quoted at a specific case temperature, usually 25 °C ambient with proper heatsinking. Run the same strip 20 °C hotter and the lifetime figure is not conservative: it is fiction.
| Installation | Typical PCB temperature | Realistic life |
|---|---|---|
| 10 W/m in a substantial aluminium profile, open rear | 35–45 °C | 50,000 h+ |
| 10 W/m in a light aluminium profile | 45–55 °C | 35,000–50,000 h |
| 10 W/m stuck directly to plasterboard | 60–75 °C | 15,000–25,000 h |
| 10 W/m inside a sealed plastic channel | 70–85 °C | <15,000 h, visible colour shift |
| 20 W/m without a heatsink | 85 °C+ | Rapid degradation and adhesive failure |
This table is the answer to “why do LED strip lights fail” and “do LED strip lights burn out”. They rarely fail because of the diode. They fail because of heat, and heat is almost always an installation decision rather than a product defect.
The actual failure modes, ranked
- Driver failure (roughly half of all faults): electrolytic capacitors dry out, especially in hot enclosures. Symptom: the whole run dies at once, or flickers under load.
- Joint failure: cold solder joints, wrong-width connectors, oxidised contacts. Symptom: one section flickers or dies.
- Thermal lumen depreciation and colour shift: gradual, and the strip goes warmer and dimmer together. Symptom: it “used to be brighter”.
- Adhesive release: the strip peels, often taking the joint with it. Symptom: drooping and intermittent contact.
- Moisture ingress: corrosion at the pads, green deposits, progressive dropout. Symptom: sections dying one by one in a bathroom or exterior.
- Mechanical damage: kinked corners, over-tight bend radius, cracked copper.
- Genuine diode failure: rare, and usually shows as a single dark segment.
The five habits that double lifespan
- Always use an aluminium profile: non-negotiable above 8 W/m.
- Specify the strip 25–30% brighter than needed and run it dimmed. Lower current means lower junction temperature.
- Size the driver at 120–130% of load and keep it ventilated.
- Solder permanent joints; keep connectors accessible.
- Buy strip with a published L-value and a real warranty from a manufacturer that will still exist in five years.
18. Room-by-room applications: ceiling, kitchen, bathroom, bedroom, TV, panelling, stairs
Specification is easier when you start from the room rather than the product. Each of the following is a complete brief: what the light is for, what to specify, and what to avoid.
Ceiling strip lighting and coves
Ceiling strip lighting is the single most transformative application. Light bounced off a ceiling plane makes a room feel larger, taller and calmer, and it removes the harsh downward shadows of recessed spots.
Recommended specification for ceiling coves
Specification: 24V SMD 2835 at 120 LED/m or COB, 1200–1800 lm/m if this is the primary light source, 3000K, Ra>90. Recessed or drywall profile at the ceiling perimeter, or a plasterboard cove with a minimum 100 mm gap between the strip and the ceiling and at least 60 mm of upstand to hide the source. Dim on a low-voltage PWM dimmer.
What to avoid in cove design
Avoid: a cove less than 80 mm from the ceiling (it produces a hard bright band instead of a wash), a textured or imperfect ceiling (grazing light exposes every flaw), and mounting the strip so it can be seen from any seated position in the room. Check sightlines from the sofa, not from the doorway.
Kitchens: under-cabinet, plinth, and inside the units
Kitchen strip lighting is the highest-value application in the home, because it converts a shadowed worktop into a properly lit work surface. It is also the application where colour rendering shows most clearly, because you are looking at food.
Under-cabinet task lighting
Under-cabinet task line: COB, 800–1200 lm/m, 3000K, Ra>90 with good R9, in a corner or surface profile with a frosted diffuser, mounted at the front edge of the cabinet underside so the light falls on the worktop and not on the splashback. Mounting it at the back is the single most common kitchen lighting error: it lights the tiles and leaves your hands in shadow.
Plinth and toe-kick lighting
Plinth / toe-kick: IP65, 300–500 lm/m, 2700K, on a separate circuit so it can be left on as night lighting.
Inside glass cabinets and open shelving: COB Ra>93 at 600–1000 lm/m, in a slim corner profile, with a door switch or PIR.
Above wall units (uplight): 500–800 lm/m SMD, purely decorative, on the same circuit as the cove if you have one.
Avoid: IP20 strip within 300 mm of a hob or sink, cool white above 4000K (it makes food look grey), and any strip without a profile, because kitchen cabinet undersides get greasy and a bare strip cannot be cleaned.
Bathrooms
Bathroom strip lighting has to satisfy three constraints at once: IP rating for the zone, colour quality good enough to judge skin tone, and glare control, because bathrooms have hard reflective surfaces.
Bathroom mirror lighting
Mirror surround: IP65 COB, 800–1200 lm/m, 3000K or 4000K, Ra>90 with R9>50, in a recessed or corner profile with an opal diffuser, run vertically down both sides of the mirror rather than above it. Vertical side-lighting illuminates a face evenly; overhead lighting produces shadows under the eyes and nose.
Niche and shelf lighting: IP67 COB, 400–800 lm/m, 3000K.
Under-vanity night light: IP65, 200–350 lm/m, 2200–2700K, PIR-triggered.
Non-negotiables: 24V SELV throughout, driver outside the zones, correct IP for the zone, and all cut ends properly re-sealed.
Bedrooms
Bedrooms are about low-level, warm, glare-free light. LED strip lights for bedroom and led strip lighting in bedroom are enormous search categories, largely driven by decorative use, but the professional approach produces a far better result.
Headboard and bedside lighting
Headboard / behind-bed wall wash: COB, 200–500 lm/m, 2200–2700K, Ra>90, recessed into joinery or a slim surface profile, dimmed to 10–20% for evening use. Keep the source completely hidden from the sightline of someone lying down.
Perimeter cove: as §18.1 but at lower output, 2700K, tunable CCT if budget allows so the room can be 4000K in the morning.
Under-bed night light: 150–300 lm/m, 2200K, PIR-triggered — genuinely useful and much kinder than switching on a main light at 3 a.m.
Wardrobe and closet lighting
Wardrobe interiors: COB Ra>93, 600–1000 lm/m, 3000–4000K, door switch. Colour rendering matters here for exactly one reason: choosing clothes that match.
TV backlighting and media walls
A TV light strip is the cheapest meaningful upgrade to a viewing room. Placing a low-output strip behind the screen raises the ambient luminance of the wall, which reduces the contrast ratio between the bright screen and the dark surround. The eye stops working so hard, perceived contrast improves and eye strain drops.
Specification: 150–350 lm/m, 6500K (the D65 reference white used in video mastering (a warm strip will visibly tint your picture), Ra>90, USB-powered 5V for a simple retrofit or 24V for a permanent installation. Mount it around the rear perimeter, set back from the edges so it washes the wall rather than spilling around the bezel. Target a wall luminance of roughly 10% of the screen’s peak white.
For screen-sync ambient lighting, use addressable Pixel LED with a capture device. For a media wall, add a separate warm cove for the room and keep the two on independent circuits.
Wall panelling, shadow gaps and joinery
LED light strips for panelling is a fast-growing application, and it is the one where COB is genuinely mandatory. A shadow gap behind a panel is typically 10–20 mm deep and directly visible at an angle, an SMD strip in that gap produces a visible row of dots and an unresolvable scalloped pattern on the return face.
Specification: COB, 400–900 lm/m, 2700–3000K, Ra>90, in a slim recessed or drywall profile with a frosted cover, set back at least 15 mm from the visible edge. Plan the profile into the joinery drawing, not after the panels are made — retrofitting a channel into finished panelling never looks as good.
Stairs, corridors and handrails
Stair lighting is functional safety lighting that happens to look beautiful. Options: a continuous line recessed into the wall at nosing height, individual treads lit from a recessed profile in the riser, or a handrail with a COB strip in an integrated channel.
Specification: COB, 250–500 lm/m, 3000K, Ra>85, recessed profile, PIR-activated with a soft fade so it does not startle. Aim the light across the tread, never up into the eyes of someone descending. Glare on a staircase is a safety hazard, not just an annoyance.
Living rooms, home offices and studies
In living spaces, use strip lighting to define planes rather than to illuminate objects: a cove around the ceiling, a line above a bookshelf, a graze down a textured wall, a line under a floating media unit. Keep everything 2700–3000K, Ra>90, and dimmed. In home offices, add a suspended profile above the desk with up/down distribution and a micro-prismatic diffuser: indirect light on the ceiling plus controlled downlight on the desk eliminates screen reflections better than any downlight arrangement.
Garages, workshops and utility spaces
This is the direct fluorescent replacement case. A 24V high-efficacy SMD strip at 1500–2500 lm/m in a surface profile with a frosted diffuser, at 4000–5000K and Ra 80, mounted along the ceiling in continuous runs, produces more usable light than the T8 batten it replaces, starts instantly in the cold, does not hum, and dims. For long spans, consider 48V or mains strip to reduce the number of drivers.
19. Outdoor, garden, wet areas, pools and marine applications
Outdoor LED strip lighting is the application with the widest gap between what people buy and what survives. An indoor strip in a silicone sleeve will last one winter. A properly specified exterior system lasts a decade. The difference is a handful of decisions.
The exterior specification
| Location | Minimum IP | Profile | CCT | Notes |
|---|---|---|---|---|
| Covered porch / soffit | IP65 | Surface aluminium | 2700–3000K | Sheltered, standard silicone acceptable |
| Exposed façade / wall graze | IP67 | Wall or surface, marine-grade finish | 2700–3000K | UV-stabilised silicone essential |
| Decking edge / step nosing | IP67 | Recessed, drainable | 2200–2700K | Must not pond water, drill drainage |
| Garden path / border | IP67 | Ground-rated recessed | 2200–2700K | Below ground level: IP68 |
| Pergola / outdoor kitchen | IP65–IP67 | Surface or corner | 2700–3000K | Ra>90 if food is prepared there |
| Pool coping / water feature | IP68 | Fully encapsulated | Colour or 3000K | SELV mandatory, specialist installation |
| Submerged / pond | IP68 | Potted terminations | Any | 12V or 24V SELV only |
| Boats and marine | IP67–IP68 | Marine-grade anodised | 2700K / red for night | Salt-spray corrosion is the limiting factor |
The seven rules for exterior installations that last
- Use an aluminium profile outdoors as well as indoors: it protects the silicone from UV and mechanical damage and prevents the strip sagging as the adhesive ages in temperature cycling.
- Never let water sit on the strip: IP67 resists immersion, it does not resist permanent standing water plus freeze-thaw cycling. Design for drainage.
- Keep the driver dry or use an IP67 potted driver: most exterior failures are driver failures.
- Seal every cut end properly with the correct cap and neutral-cure silicone. Acetic-cure silicone corrodes copper.
- Allow for thermal expansion: a 20 m aluminium run moves several millimetres between winter and summer; do not clamp both ends rigidly.
- Use UV-stabilised materials for silicone sleeves, diffusers and cable.
- Respect wildlife and neighbours: use warm 2200–2700K, aim downward, and put exterior lighting on a timer or PIR. Cool white uplighting is the main contributor to residential light pollution and is genuinely disruptive to insects, bats and birds.
Aquariums and specialist wet applications
Aquarium LED strip lights are a real search category, and the honest answer is that general-purpose architectural strip is not the right product for a planted or reef tank, which requires specific spectral output. For a fish-only tank, an IP68 strip above the waterline in a sealed hood is workable. For plants or corals, buy a purpose-designed aquarium fixture. Never place a non-IP68 strip where condensation will reach it.
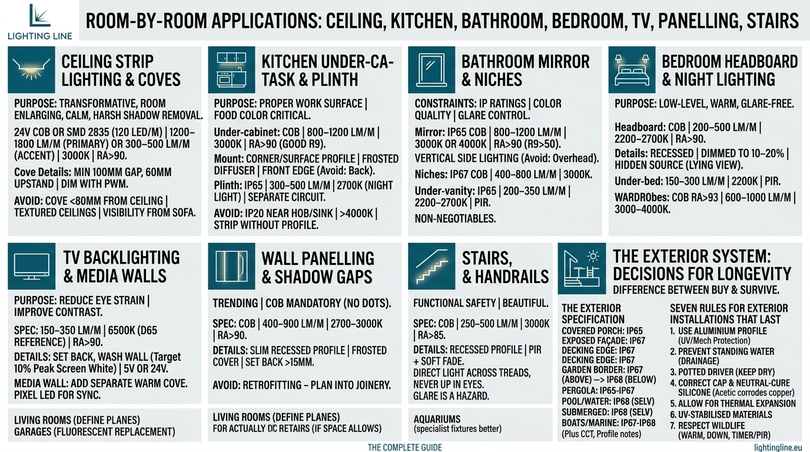
20. Commercial, retail, office, hospitality and industrial applications
Commercial specification differs from residential in three ways: the light is on for far more hours, the consequences of failure are higher, and the lighting has a measurable commercial job to do.
Retail and display
In retail, lighting is merchandising. Colour rendering directly affects whether a product looks worth its price. Textiles, cosmetics, food, timber and anything red demand Ra>93 with high R9.
Specification: COB Ra>93 at 1000–1800 lm/m; 3000K for warm goods, food, wood, cosmetics and fashion; 4000K for technology, cool-toned products and supermarkets. Shelf-edge lighting in a corner profile aimed at the goods, display case lighting in a slim recessed profile, and 1–2 SDCM binning throughout so a 20 m shelf run reads as one colour. Add a DALI or Casambi layer for scene control across trading hours.
Offices and workplaces
Office lighting is regulated by comfort standards: EN 12464-1 requires 500 lux on task areas in most office work and controls glare through UGR limits. Linear LED strip in a suspended profile is now the dominant solution because it delivers both indirect and direct components from one line.
Specification: suspended profile with up/down distribution, 1200–2000 lm/m, 3500–4000K (or tunable CCT for circadian support), Ra>90, micro-prismatic UGR<19 diffuser on the downward face, DALI-2 dimming with daylight and occupancy sensing. Insist on PWM above 3 kHz — offices are full of cameras and screens.
Hospitality
Hotels, bars and restaurants are the natural home of 2200K and 2500K strip, tunable white and RGB+CCT scene control. Warm, low-level, glare-free linear light in coves, behind bars, under counters, along corridors and in niches produces the atmosphere the venue is selling. Specify Ra>90 minimum (hospitality is a business of food and faces) and put everything on a scene controller with day, service, evening and night presets.
Industrial and warehousing
Here the criteria invert: efficacy and maintenance cost dominate, colour quality is secondary. High-efficacy SMD at 2000–3500 lm/m, 4000–5000K, Ra 80, IP65 in a sealed profile, 48V or 230V mains strip to minimise driver count on long runs, and L80 rated product because replacing luminaires at 12 m height is expensive.
Studios, content creation and broadcast
This is a demanding and growing application. On camera, three specifications matter more than anything else:
- Flicker-free operation: PWM above 3 kHz, ideally 20 kHz+, or DC-dimmed. This is non-negotiable — low-frequency PWM produces rolling bands on high-frame-rate and slow-motion footage.
- High CRI and TM-30: Ra>95 with R9>90 for anything involving skin tone. Cameras are far less forgiving than eyes.
- Tunable colour: RGB+CCT lets you match the strip to your key light, gel the background and change the set look without changing hardware.
Add addressable Pixel LED for reactive backgrounds and screen sync, and zone the set so background, key fill and accent are independently controllable.
21. Four real briefs: content creator, architect, student, business owner
The same product range answers very different questions depending on who is asking. These four briefs cover the majority of real enquiries.
The content creator and gamer
Goal: distinctive, engaging on-camera environments that increase audience engagement.
How do I install LED strip lights in studio
Map the camera frame first, then place strips where they will appear as light rather than as visible sources: behind the desk, along shelf undersides, up the wall corners behind you, behind an acoustic panel. Use surface or corner aluminium profiles so the lines are straight and crisp, a wavy strip reads as amateur on camera. Feed everything from a single 24V driver in a ventilated position under the desk, zone it into three circuits (background, accent, key fill), and control it from one app or one RF remote.
What are the best colour options for a gaming setup
RGB+CCT rather than plain RGB. You get saturated colour for the set and a genuine phosphor white for facecam lighting. Cyan-magenta and teal-orange pairings read far better on camera than the full-saturation red-green-blue defaults. Keep the background one or two stops below your key light.
Can LED strip lights sync with videos
Aaddressable Pixel LED with an SPI controller for screen sync and scripted scenes, or a music-sync controller for beat reactivity. For anything appearing in frame, check PWM frequency first.
Changing colours easily
An RF remote with zone memory is faster mid-stream than an app, and it does not need line of sight.
How energy-efficient are these LED strips
A full creator set of 15 m at 10 W/m draws 150 W at full output and typically far less in use, comparable to two old incandescent bulbs, for an entire lit environment.
The architect and lighting designer
Goal: integrate linear light into design proposals to create modern, tailored environments.
The best LED strip lights for architectural projects
24V COB, Ra>90 or Ra>93, 2–3 SDCM binning, published L80 data, in a profile system with recessed, drywall, corner, suspension and concrete variants so a single visual language runs through the whole building. The Lighting Line strip and profile systemis built around exactly this: one strip family, eight profile families, matched end caps and brackets.
Customise the lighting to match different interior styles
To customise we have three levers. Colour temperature (2200–2500K for hospitality warmth, 2700–3000K for residential, 3500–4000K for commercial), profile geometry (trimless drywall for minimalist interiors, exposed anodised surface profiles for industrial, concrete-cast for brutalist and structural work), distribution (grazing for texture, washing for evenness, direct for task).
Waterproof options for outdoor installations
IP65 and IP67 silicone-extruded strip, including tubular spherical-extrusion constructions, with matching profiles and sealed end caps.
How install LED strip lights in a professional setting
Design the profile into the construction drawings, coordinate driver locations with the electrical package early, specify DALI or 0-10V for anything in a controlled building, and require the contractor to submit a sample mock-up of at least one metre before the full order.
The student decorating a room
Goal: a creative, photogenic bedroom, easily and affordably.
The easiest LED strip lights to install in a bedroom
A 24V plug-in kit with a pre-terminated driver, a 5 m RGB+CCT or CCT strip, an RF remote and a set of surface profiles. Profiles are the difference between “student room” and “designed room”, and they cost very little.
Best colours for a cosy atmosphere
2200–2700K warm white at 10–25% brightness. Warm amber light at low level reads as cosy; coloured light at high level reads as a nightclub. If you want colour, use it as a background accent behind the warm white, not instead of it.
Control the lights with smartphone
It’s possible with a Wi-Fi or Bluetooth inline controller gives app control, scheduling, scenes and voice assistant integration. It’is also possible have a music-sync controller with a built-in microphone, or addressable strip with an app that does frequency-band mapping.
Hide the wires for a clean look
To have a clean look run the strip inside a profile, route cable along the back edge of furniture, use self-adhesive cable channel painted to match the wall, drop the driver behind the desk or bed, and keep all joints at the concealed end of the run. Plan the cable route before you stick anything down, this is the mistake almost everyone makes once.
The business owner
Goal: a stimulating, modern office or shop.
Best LED strip lights for commercial spaces
24V COB Ra>90 for anything customers look at, high-efficacy SMD for general illumination, in surface or suspended profiles, with a dimming protocol that a facilities contractor can maintain, DALI-2 or Casambi rather than a consumer app are the best solution.
Plug-in drivers and surface-mounted profiles on existing walls and joinery are within reach of a competent person. Anything wired into a fixed circuit, and any work in a commercial premises subject to inspection, requires a qualified electrician and a certificate. In commercial settings this also affects your insurance.
From a simple inline PWM dimmer up to full DALI-2 scene control with daylight and occupancy sensing, and tunable white for circadian support across the working day.
It is also possible integrate LED light strips with smart home systems with Matter, Zigbee and Bluetooth mesh controllers integrate with the major ecosystems; DALI and 0-10V integrate with building management systems.
What safety considerations should I keep in mind?
CE/UKCA-marked drivers, correct IP rating for the location, an aluminium profile for heat, no strip in contact with insulation, an electrical installation certificate, and (in premises open to the public) coordination with your fire risk assessment.
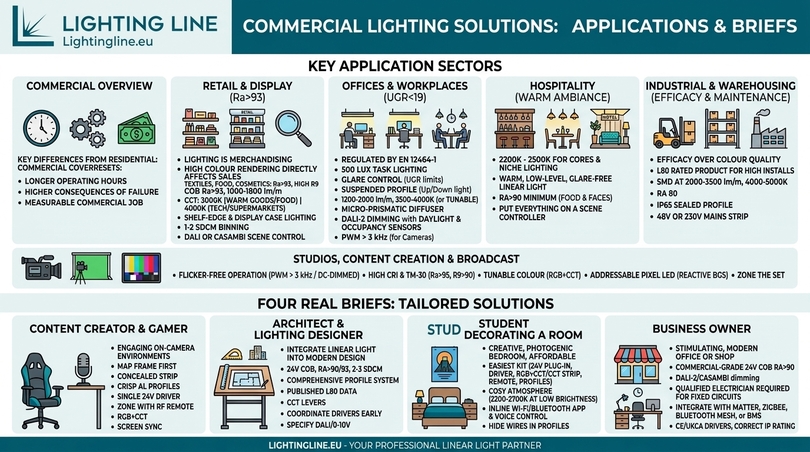
22. Running costs: are LED strip lights expensive to run?
This is the most-asked question in the entire category, phrased dozens of ways: are strip lights expensive to run, do LED strip lights use a lot of electricity, do LED light strips raise the electric bill, how much does it cost to run an LED light strip for 24 hours, are LED light strips cheap to run. The answer, backed by arithmetic rather than reassurance, is that LED strip lighting is one of the cheapest things in a home to operate.
The calculation
Cost = watts per metre × metres ÷ 1000 × hours × price per kWh.
Worked example at €0.28/kWh (a representative European domestic rate; substitute your own): 5 m of a 9.6 W/m strip is 48 W. Running four hours a day is 0.192 kWh/day, about €0.054 a day, €1.61 a month, €19.60 a year.
| Installation | Total power | 4 h/day | 8 h/day | 24 h/day |
|---|---|---|---|---|
| 2 m TV backlight, 4.8 W/m | 9.6 W | €3.92/yr | €7.85/yr | €23.55/yr |
| 5 m bedroom accent, 7.5 W/m | 37.5 W | €15.33/yr | €30.66/yr | €91.98/yr |
| 5 m kitchen under-cabinet, 9.6 W/m | 48 W | €19.62/yr | €39.25/yr | €117.74/yr |
| 12 m ceiling cove, 14.4 W/m | 172.8 W | €70.63/yr | €141.27/yr | €423.80/yr |
| 20 m retail shelf, 15.5 W/m | 310 W | €126.73/yr | €253.47/yr | €760.40/yr |
| 40 m warehouse, 20 W/m | 800 W | €327.04/yr | €654.08/yr | €1,962.24/yr |
The 24-hour question answered directly: a 5 m strip at 9.6 W/m left on continuously for a full day consumes 1.15 kWh and costs about €0.32. That is less than a cup of coffee, and it is why leaving a low-output accent strip on overnight is economically trivial.
Comparison with what it replaces
| Source | Power for ~1000 lm | Annual cost at 4 h/day | Life |
|---|---|---|---|
| Incandescent bulb | ~75 W | €30.66 | 1,000 h |
| Halogen | ~53 W | €21.67 | 2,000 h |
| CFL | ~18 W | €7.36 | 8,000 h |
| T8 fluorescent batten | ~14 W | €5.72 | 15,000–20,000 h |
| Standard LED strip (100 lm/W) | ~10 W | €4.09 | 50,000 h |
| High-efficacy LED strip (160 lm/W) | ~6.3 W | €2.58 | 50,000 h |
The energy saving against halogen and incandescent is dramatic; against modern fluorescent it is real but modest. The bigger commercial saving is maintenance: 50,000 hours versus 15,000 means two fewer replacement cycles, and in a warehouse or retail unit the labour to replace a fitting costs more than the fitting.
The hidden costs nobody mentions
- Driver standby: a switch-mode supply left energised with the strip off draws 0.3–1.5 W. Across ten drivers running 24/7 that is 26–130 kWh a year. Switch the mains side, not just the low-voltage side.
- Driver inefficiency: at 85% efficiency, a 100 W strip draws about 118 W from the wall. Always calculate cost from the input side.
- Over-specification: the most common waste is installing a 19.2 W/m strip where 9.6 W/m would have been ample and then running it at 100%.
Are LED light strips worth it?
Financially, on a pure energy basis, LED strip lighting pays back against halogen in months and against fluorescent in a few years. But the honest framing is different: most people do not buy LED strip lighting to save money, they buy it to do something no other light source can do, which is to produce a continuous line of light integrated into a surface. The running cost is simply low enough that it never becomes a reason not to.
23. Safety, fire risk, legality and the standards that matter
The safety questions in this category are asked constantly and answered badly. Here is the accurate picture.
Are LED strip lights safe?
A correctly specified, correctly installed low-voltage LED strip is one of the safest light sources available: it operates at 12V or 24V SELV (below the threshold considered hazardous to humans) it produces no UV, it contains no mercury, and its surface temperature typically stays between 35 °C and 60 °C, well below the ignition temperature of any building material.
Fire incidents involving LED strip lighting are real but rare, and they trace to a consistent set of causes:
- Uncertified drivers: the overwhelming majority of incidents involve the power supply, not the strip. An uncertified supply with no over-current protection and undersized creepage distances is the actual hazard.
- Overloaded drivers: running a 60 W supply at 60 W continuously in a sealed cabinet.
- Strip buried in insulation: thermal insulation around a strip or driver traps heat.
- Bad joints: a high-resistance connection creates a localised hot spot.
- Water ingress on non-IP-rated product: corrosion leads to short circuits.
- Coiled strip on the reel: never power a strip while it is still wound, heat cannot escape and the reel can reach damaging temperatures within minutes.
Are tape lights a fire hazard? Not inherently. The rules that eliminate the risk are: buy CE/UKCA-marked product from an identifiable manufacturer, size the driver at 120–130% of load, mount the strip on aluminium, keep drivers ventilated and accessible, never bury anything in insulation, and never energise a coiled reel.
Can LED strip lights be left on 24/7?
It’s possible, provided the installation is properly heatsinked and the driver is correctly sized and ventilated. Continuous operation is routine in retail, hospitality and signage. Two caveats: continuous use consumes the rated life at four to six times the rate of domestic use, and a driver at full load 24/7 should be specified at 130% headroom rather than 120%. Is it safe to leave LED strip lights on all night? For a properly installed system, yes, without qualification.
Legality
Interior and exterior architectural LED strip lighting is legal throughout the UK and EU when it uses compliant components and complies with wiring regulations. There is no restriction on colour, brightness or usage inside a building.
Where legality genuinely bites is on vehicles, and this is a frequent source of confusion because the searches sit adjacent to each other. In the UK, decorative LED strip lighting on the exterior of a road-going vehicle, and light bars fitted above the permitted lamp positions, are generally not road legal; auxiliary light bars must be covered or removed for road use and the Road Vehicles Lighting Regulations 1989 restrict colour, position and use. Blue and red lights are reserved for emergency vehicles. Interior lighting that could distract the driver or be visible externally is also restricted. Architectural strip is legal, vehicle exterior strip generally is not. If your project is automotive, consult the vehicle lighting regulations for your jurisdiction before buying.
Standards checklist for procurement
| Standard | Applies to | Why it matters |
|---|---|---|
| EN/IEC 62031 | LED modules | Core safety of the strip itself |
| EN 61347-2-13 | LED drivers | Electrical safety of the power supply |
| EN 61558-2-16 | SELV transformers | Isolation from mains |
| EN 55015 / EN 61547 | EMC | No interference with radio, Wi-Fi, hearing aids |
| IEC 62471 | Photobiological safety | Blue light hazard classification |
| IEC TR 61547-1 / IEEE 1789 | Flicker | Health and camera performance |
| EU 2019/2020 Ecodesign | Efficacy and data | Minimum performance and disclosure |
| RoHS / REACH | Materials | Restricted substances |
| BS 7671 (UK) | Installation | Wiring regulations, bathroom zones, certification |
| EN 12464-1 | Workplace lighting | Lux levels and glare in commercial projects |
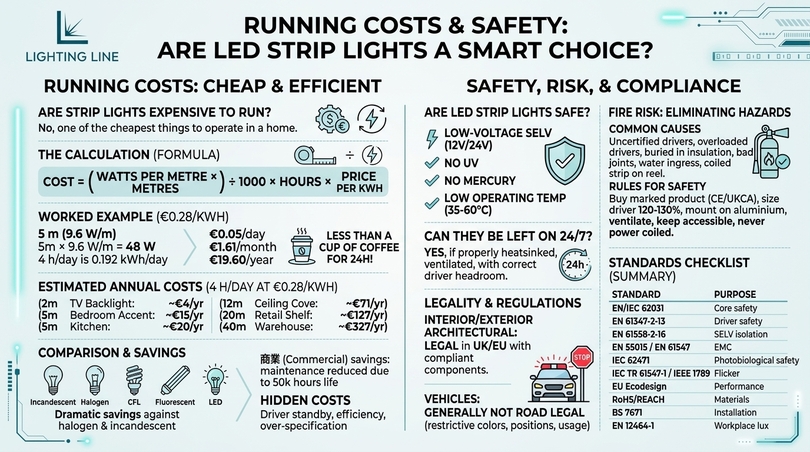
24. Health: flicker, blue light, circadian rhythm, eyes and pets
Questions about whether LED light strips are bad for your eyes, whether they affect sleep, and whether they are safe around pets deserve accurate answers rather than either dismissal or alarm.
Flicker: the real issue
Of all the health concerns raised about LED lighting, flicker is the one with the strongest evidence behind it. Poorly driven LEDs modulate at 100 or 120 Hz, following the mains rectification. Most people cannot consciously see this, but it is associated with headaches, eye strain, reduced reading performance and, in a small number of people, migraine and photosensitive responses. It also produces the stroboscopic effect, which is a genuine safety hazard around rotating machinery.
The solution is entirely a purchasing decision: use a well-smoothed constant-voltage DC driver and a PWM dimmer operating above 2–3 kHz. Do this and the flicker question disappears. A simple test: point a phone camera at the lit strip and dim it; visible banding on the screen means low-frequency modulation.
Blue light and eye safety
Are LED light strips bad for your eyes? White LED strip lighting at normal domestic and commercial output levels falls within IEC 62471 Exempt Group or Risk Group 1 (the same classification as ordinary interior lighting) and does not damage the retina under normal iewing.
Two sensible precautions remain. First, do not stare directly at a bare high-output strip at close range; the luminance of the source is high even though the total output is modest, which is another argument for a diffuser. Second, cooler colour temperatures contain more short-wavelength energy, so use 2700K in the evening rather than 6500K. Discomfort from LED strip lighting is almost always glare from an undiffused source, not photochemical damage and glare is solved with a profile and an opal cover.
Circadian rhythm and sleep
Light in the 460–490 nm range suppresses melatonin and shifts the circadian clock. Evening exposure to bright cool light delays sleep onset; morning exposure to bright cool light advances it and improves alertness. This is well established.
The practical design response is dimmable, tunable lighting: 4000–5000K at higher output in the morning, 2700K or below and dimmed to 10–20% after sunset. CCT-tunable strip with a scheduled controller does this automatically. In bedrooms, specify 2200–2700K and dim deeply. This is one of the few areas where the technology genuinely delivers a health benefit rather than merely avoiding harm.
Pets and animals
Are LED lights OK for cats, rabbits and other pets? Standard white LED strip lighting is safe for household animals. Two considerations are worth noting. Many animals have higher flicker fusion thresholds than humans (cats, dogs and birds can perceive modulation that people cannot) which is another reason to specify high-frequency, low-flicker drivers in a home with pets. And animals need a natural light-dark cycle, so put strip lighting in a pet area on a timer rather than leaving it on continuously.
Rabbits, being crepuscular, are particularly sensitive to constant illumination; give them genuine darkness at night. For reptiles and birds with specific UV requirements, general-purpose LED strip is not a substitute for a species-appropriate UVB source. And the persistent question about whether LED lights attract spiders: LEDs attract fewer insects than older sources because they emit little UV, and warmer colour temperatures attract fewer still: so if you want fewer insects, and therefore fewer spiders, on an exterior installation, specify 2200–2700K rather than 6500K.
Can LED lights cause dizziness or headaches?
In some people, and there are three identifiable causes: flicker, glare from an undiffused source, and extreme colour temperature at high output. All three are specification and installation problems with straightforward fixes: high-frequency driver, proper diffuser, appropriate CCT, and dimming. If a specific installation causes symptoms, test by dimming it and by comparing it with a known-good flicker-free source before assuming LEDs in general are the problem.
25. Cheap versus quality LED light strips: 14 tells that separate them
Two reels can look identical on screen and differ by a factor of five in price and a factor of three in useful life. Since you cannot inspect the phosphor or weigh the copper from a listing photograph, you have to read the specification — and read what is missing from it.
The 14 tells
| # | Specification | Quality product | Cheap product |
|---|---|---|---|
| 1 | Lumens per metre | Published, measured, with test conditions | Absent, or “super bright” |
| 2 | Efficacy (lm/W) | Published, 90–180 | Absent |
| 3 | CRI | Ra>80 to Ra>93 stated, R9 available | Absent, or “high CRI” unquantified |
| 4 | Binning / SDCM | 2–3 SDCM stated | Never mentioned |
| 5 | Copper weight | 2 oz or 3 oz stated | Not stated (means 1 oz) |
| 6 | PCB substrate | Polyimide, double-layer options | Thin PET |
| 7 | Adhesive | 3M 300LSE or equivalent, named | “Strong adhesive tape” |
| 8 | LED brand / package | Named package (2835, COB) with die source | Unnamed |
| 9 | Lifetime | L70 or L80 with hours and conditions | “50,000 hours” with no L-value |
| 10 | Cut pitch | Stated in cm | Vague or absent |
| 11 | PCB width | Stated in mm | Absent: makes profile matching impossible |
| 12 | IP construction | Method described (coating vs extruded tube) | Just “waterproof” |
| 13 | Certification | CE/UKCA, EN 62031, declaration available | Logo image with no documentation |
| 14 | Warranty and traceability | 3–5 years, batch codes, named manufacturer | Marketplace seller, no batch tracking |
The strongest single signal is disclosure. A manufacturer that publishes cut pitch in centimetres, PCB width in millimetres, CRI class, energy class, LEDs per metre, watts per metre and IP construction method on every product tile: as Lighting Line does across its 166-reference strip catalogue is a manufacturer that has measured those things and expects to be held to them.
Are cheap LED light strips worth it?
Sometimes, honestly. For a temporary installation, an event, a prototype, a garage shelf or a child’s bedroom that will be redecorated in two years, an inexpensive strip is a rational purchase. The point at which cheap becomes expensive is when the strip is difficult to replace. Anything plastered in, built into joinery, installed at height, positioned outdoors or specified for a client is a place where you should buy the best strip you can, because the labour to replace it will dwarf the material saving. That is why professional installers use professional strip: their time, not the tape, is the expensive part.
What you are actually paying for
The premium in a professional strip buys: tighter binning so the line is one colour; heavier copper so the far end matches the near end; better phosphor so red renders correctly and the colour holds over ten years; better adhesive so it stays up; polyimide substrate so it survives heat; a real warranty; and a catalogue of matched profiles, end caps, brackets and connectors so the system goes together properly. None of those appear in a listing photograph, and all of them appear on the wall.
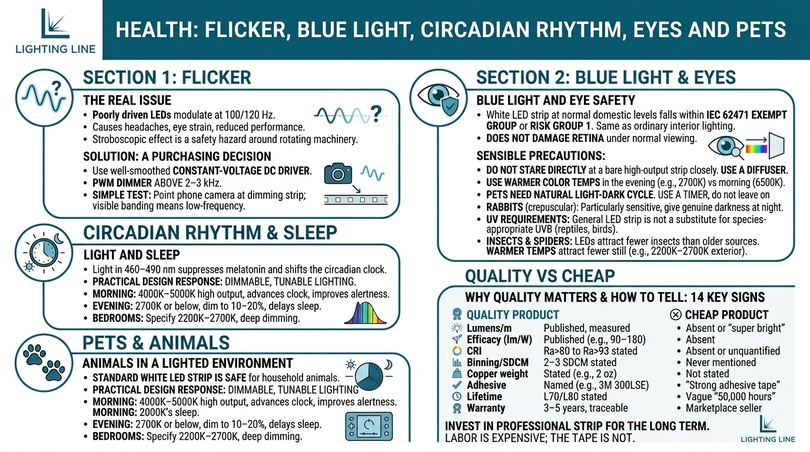
26. The 12 most common mistakes and how to avoid them
- No aluminium profile. The default error. It costs lifespan, uniformity, glare control and appearance simultaneously. Budget for the profile from the start.
- Under-sizing the driver. Running a supply at 100% of nameplate. Always specify 120–130%.
- Ignoring voltage drop. Feeding 10 m of 14.4 W/m from one end and then wondering why the far end is dim and warm. Use centre feed or power injection.
- Choosing a colour temperature that is too cool. 4000K+ in a living room or bedroom reads as clinical. Use 2700–3000K at home.
- Buying RGB when you need white. RGB white is a poor white. Buy RGB+CCT or a dedicated white strip.
- Wrong IP rating for the zone. IP20 in a bathroom or under a pergola. Match the rating to the location and re-seal every cut.
- Mounting under-cabinet strip at the back. Mount at the front edge so light reaches the worktop, not the tiles.
- Visible source. Check sightlines from where people actually sit and stand, not from the doorway.
- Cutting in the wrong place. Only on the marks, only straight across, only unpowered.
- Powering a coiled reel. Unroll fully before testing. This one causes real damage.
- Burying the driver. If you cannot reach it, you cannot replace it — and it is the component most likely to fail.
- Mixing batches on one run. Order all strip for a continuous line at the same time, from the same batch, and keep 10% spare from that batch.
27. Troubleshooting guide: symptoms, causes and fixes
| Symptom | Most likely causes | What to do |
|---|---|---|
| Nothing lights at all | Reversed polarity; driver failure; no mains; blown fuse | Check DC output with a meter; reverse the connection; confirm the driver is constant voltage |
| Far end dimmer and warmer than near end | Voltage drop over an excessive run | Add power injection or centre feed; shorten the run; move to 24V or 48V |
| Whole run flickers | Undersized or failing driver; incompatible mains dimmer; loose supply connection | Measure the load; replace with 120–130% driver; use a low-voltage PWM dimmer instead of a TRIAC |
| One section flickers or is dead | Bad joint; wrong-width connector; cracked copper at a bend | Re-solder the joint; replace the connector with the correct PCB width; inspect the corner |
| Visible banding on camera | Low PWM frequency or mains ripple | Replace the dimmer with a >3 kHz unit; use a smoothed DC driver |
| Colour varies along the run | Poor binning; mixed batches; voltage drop | Little can be fixed after installation — this is a purchasing decision |
| Strip has gone warmer and dimmer over time | Thermal lumen depreciation and phosphor ageing from inadequate heatsinking | Refit into an aluminium profile; reduce drive current by dimming |
| Strip peels off the surface | Rubber adhesive; dusty or porous substrate; heat | Clean with isopropyl alcohol; mount on aluminium; add mounting clips |
| Buzzing or whining | Driver cooling fan or transformer; incompatible dimmer | Relocate the driver; change the dimming method |
| Interference with Wi-Fi or radio | Non-EMC-compliant driver or controller | Replace with an EN 55015 compliant unit |
| Sections dying one by one outdoors | Moisture ingress at cut ends or joints | Re-seal with end caps and neutral-cure silicone; check IP rating suits the location |
| Dimming stops at 30% and then cuts out | TRIAC dimmer below its minimum load | Fit a dimmer rated for low LED loads, or dim on the low-voltage side |
| Addressable strip shows random colours | Data line noise, missing resistor, voltage drop, wrong direction | Add a 330–470 Ω series resistor and a 1000 µF capacitor; inject power; check the arrow direction |
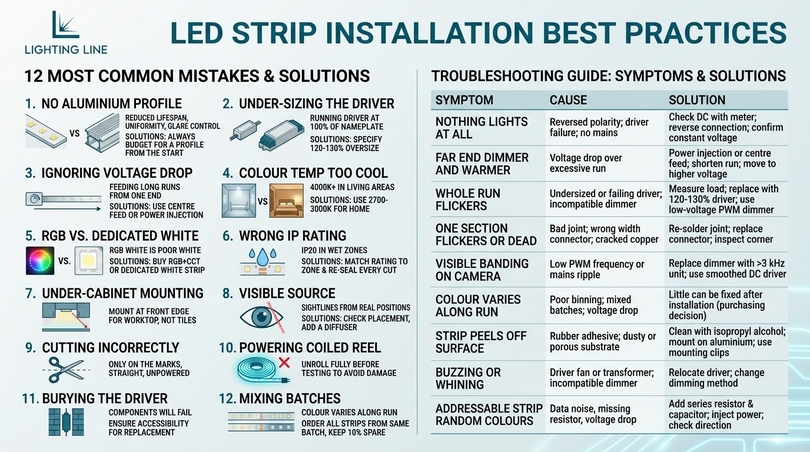
28. The complete specification checklist before you buy
Work through this list and you will not make an expensive mistake. Every line corresponds to a decision covered in this guide.
| Step | Decision | How to decide |
|---|---|---|
| 1 | Is the source visible? | Visible → COB. Concealed → SMD or COB. |
| 2 | What is the light for? | Task, general, accent or effect — sets the lumen target (§10.2) |
| 3 | Lumens per metre | From the application table, +25–30% if behind an opal diffuser |
| 4 | Colour temperature | 2700–3000K residential, 3500–4000K commercial, 6500K TV bias |
| 5 | CRI | Ra>90 for occupied spaces, Ra>93 for retail and colour-critical, Ra>80 for utility |
| 6 | Single colour, CCT, RGBW or Pixel | White for 95% of applications; RGB+CCT if colour is genuinely needed |
| 7 | Voltage | 24V by default; 12V for vehicles/furniture; 48V or 230V for long runs; 5V for USB/addressable |
| 8 | IP rating | IP20 dry, IP65 damp, IP67 exterior, IP68 submerged |
| 9 | Cut pitch | Check it divides into your required lengths |
| 10 | PCB width | Must match the profile channel within 1–2 mm |
| 11 | Profile family | Surface, recessed, corner, wall, drywall, suspension, concrete, round |
| 12 | Diffuser | Clear, frosted, opal or micro-prismatic — factor the transmission loss |
| 13 | Run length and topology | Check against §9.3; plan power injection now |
| 14 | Driver | Constant voltage, correct DC voltage, load × 1.2–1.3, certified, accessible |
| 15 | Dimming and control | Low-voltage PWM >3 kHz by default; DALI or Casambi commercially |
| 16 | End caps, brackets, connectors | Order with the profile, matched to PCB width |
| 17 | Spares | 10% extra from the same batch |
| 18 | Documentation | Datasheet, declaration of conformity, warranty terms |
29. Why specify Lighting Line LED strips
Everything above is technology-neutral: it applies whoever you buy from. This section explains where Lighting Line fits, so you can judge it against the criteria you have just read.
Lighting Line manufactures and supplies aluminium profiles and LED light strips as one engineered system. The LED strips catalogue currently holds 166 references — 68 SMD and 98 COB — alongside 126 profiles, 168 end caps, 58 mounting brackets and dedicated PCB connectors. That ratio is the point: the strip is specified together with the heatsink, the optic, the termination and the fixing, which is how a professional linear lighting installation is actually built.
Range depth against the checklist
| Parameter | Available range |
|---|---|
| Technology | SMD 2835 and COB |
| Voltage | 5V, 12V, 24V, 48V, 230V |
| LEDs per metre | 60 to 1600 |
| Power | 4.8 W/m to 40 W/m |
| Colour temperature | 2200K, 2500K, 2700K, 3000K, 3500K, 4000K, 5000K, 6500K, CCT tunable |
| Colour | RGB, RGB+3000K, RGB+4000K, RGB+CCT, Pixel LED, red, green, blue, ice blue, yellow, orange, pink, purple |
| CRI | Ra>80, Ra>85, Ra>90, Ra>93 |
| IP rating | IP20, IP65 silicone, IP67 silicone (including spherical extruded tube) |
| PCB width | 3, 5, 6, 6.6, 8, 10, 12, 30 mm |
| Cut point | 1 cm to 12.5 cm across nineteen increments |
| Reel length | 5 m, 10 m, 25 m, 50 m |
| Profiles | Surface, recessed, corner, wall, concrete, suspension, drywall, round |
What this means in practice
- You can match the strip to the detail instead of the detail to the strip. Nineteen cut increments and eight PCB widths mean a run can be sized to a joinery dimension and fitted into a channel that actually suits it.
- High-CRI COB is standard, not a premium option. Ra>90 and Ra>93 references across the COB range, including CCT-tunable 2700–6500K at 600 LED/m.
- Full disclosure at catalogue level. LED model, LEDs per metre, W/m, voltage, IP rating, cut point, CRI class and energy class are published on every product tile — the transparency test from §25.1.
- Italian profile design at competitive prices, which is what makes the finished line look like architecture and not like hardware.
Browse the full range at catalogue.lightingline.eu/en/led-strips, or go straight to SMD, COB, aluminium profiles and PCB connectors. The complete Strip LED catalogue is available for download.
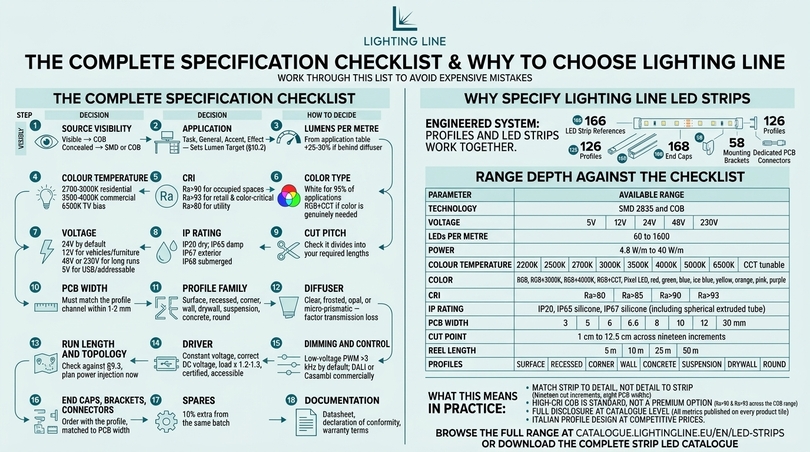
30. Glossary of LED strip lighting terms
| Term | Definition |
|---|---|
| Addressable / Pixel LED | Strip with a driver IC per LED or group, controlled by a serial data signal, allowing each pixel to be set independently |
| Beam angle | The angle over which the source emits: ~120° for SMD, ~180° for COB |
| Binning | Sorting of LED dies by colour and output; tightness expressed in SDCM |
| CCT | Correlated Colour Temperature in kelvin: lower is warmer, higher is cooler |
| COB | Chip-on-Board: bare dies bonded to the substrate under continuous phosphor, giving a dot-free line |
| Constant current | Driver type that regulates current; used for downlights, not for standard LED strip |
| Constant voltage | Driver type that regulates voltage; the correct type for LED light strips |
| CRI / Ra | Colour Rendering Index; how accurately colours appear compared to a reference source |
| Cut pitch / cut point | The interval at which the strip can be cut without breaking a segment |
| DALI | Digital Addressable Lighting Interface, the commercial digital control standard |
| Diffuser | Translucent cover that spreads light, hides dots and controls glare |
| Driver / power supply | Converts mains AC into the low-voltage DC the strip requires |
| Efficacy | Lumens produced per watt consumed — the true efficiency measure |
| FPCB | Flexible Printed Circuit Board, the substrate of the strip |
| IP rating | Ingress Protection: resistance to solids and liquids |
| Junction temperature | The temperature at the LED die; the primary determinant of lifespan |
| L70 / L80 / L90 | Hours until output falls to 70%, 80% or 90% of initial |
| Lumen | Total quantity of visible light emitted |
| Lux | Lumens per square metre falling on a surface |
| Power injection | Feeding power to the middle or far end of a run to overcome voltage drop |
| PWM | Pulse Width Modulation: rapid on/off switching used to dim LEDs without colour shift |
| R9 | Rendering of saturated red; excluded from the Ra average but critical for skin and food |
| RGB / RGBW / RGB+CCT | Colour-changing strips with three, four or five channels |
| SDCM / MacAdam ellipse | Measure of colour consistency; lower is tighter |
| SELV | Separated Extra-Low Voltage; the safe low-voltage regime for 12V/24V strip |
| SMD | Surface-Mounted Device: individually packaged diodes soldered to the board |
| TM-30 (Rf / Rg) | Modern colour evaluation using 99 samples: fidelity and gamut |
| UGR | Unified Glare Rating; UGR<19 is the office requirement |
| Voltage drop | Loss of voltage along a run due to conductor resistance |
31. Frequently asked questions about LED light strips
The questions below are the ones buyers, installers and specifiers ask most often. Each answer is short, direct and consistent with the technical detail in the sections above.
Can you cut LED strip lights, and do they still work?Yes. LED light strips are designed to be cut at the marked cut points — a dotted line across a pair of copper pads — and both pieces continue to work normally. Cut straight across, on the mark, with the power disconnected. Cutting between the marks breaks a series segment, so that segment will not light and you may sever a copper rail. Cut pitch varies from 1 cm on high-density COB to 50–100 cm on 230V mains strip, so always check the figure before measuring your run. |
Can you cut LED light strips anywhere on the strip?No. Only at the printed cut marks. The strip is built from parallel segments, each containing a series string of LEDs with its own current limiter, and the marks sit at the electrical boundaries between segments. Cutting elsewhere disables that segment permanently. |
Are LED strip lights expensive to run?No. A 5 m strip at 9.6 W/m consumes 48 W. At four hours a day and €0.28/kWh that is roughly €19.60 a year. Left on continuously for 24 hours it uses 1.15 kWh, about €0.32. LED strip lighting is among the cheapest electrical loads in a building to operate. |
How much does it cost to run an LED light strip for 24 hours?Multiply watts per metre by metres, divide by 1000, multiply by 24, multiply by your tariff. A 2 m TV backlight at 4.8 W/m costs about €0.06 a day. A 12 m ceiling cove at 14.4 W/m costs about €1.16 a day. |
Are LED strip lights safe? Can they cause a fire?Correctly specified low-voltage LED strip is very safe: it operates at 12V or 24V SELV, produces no UV, contains no mercury and typically runs between 35 °C and 60 °C. The rare fire incidents in this category almost always involve an uncertified or overloaded driver, a strip buried in insulation, a bad joint, or a reel energised while still coiled. Buy CE/UKCA-marked components, size the driver at 120–130% of load, mount on aluminium, keep drivers ventilated and accessible, and never power a coiled reel. |
Is it safe to leave LED strip lights on all night, or 24/7?Yes, for a properly installed system with adequate heatsinking and a correctly sized, ventilated driver. Continuous operation is routine in retail and hospitality. For 24/7 use, size the driver at 130% of load rather than 120%, and remember that continuous running consumes the rated 50,000 hours in about 5.7 years. |
How long do LED strip lights last?Professional strip is rated L70 at 50,000 hours, meaning 70% of original output remains after that time — around 34 years at four hours a day. That figure assumes proper heatsinking. The same strip stuck directly to plasterboard may only reach 15,000–25,000 hours before visible dimming and colour shift. The aluminium profile is part of the lifespan specification. |
Why do LED strip lights fail?In order of frequency: driver failure (roughly half of all faults), bad solder joints or wrong-width connectors, thermal lumen depreciation from inadequate heatsinking, adhesive release, moisture ingress at unsealed cut ends, and mechanical damage at over-tight bends. Actual diode failure is rare. |
Do LED strip lights need to be plugged in? Are there options without a plug?Every LED strip needs a power source. The common options are a plug-in DC adapter, a hard-wired driver connected to a fixed circuit, USB power for 5V strips, or battery packs for very short decorative runs. There is no mains-independent strip of any useful length; battery-powered versions are limited to short low-output runs. |
Can I connect LED strip lights to the mains or to a lighting circuit?Low-voltage strip cannot connect directly to mains — it needs a constant-voltage driver in between. That driver can be hard-wired to a lighting circuit and switched by a normal wall switch. Wiring a driver into a fixed circuit is electrical work and should be done by a qualified electrician; in the UK, work in certain locations is notifiable under Part P. Mains 230V strip includes an integrated rectifier and connects via its own certified supply unit. |
Do I need an electrician to install LED strip lights?Not for a plug-in kit connected to an existing socket. Yes for anything hard-wired to a fixed circuit, anything inside bathroom zones, and any commercial installation requiring certification. |
Can you wire LED strip lights to a wall switch?Yes. Switch the mains input to the driver from a standard wall switch — this is the cleanest arrangement and also eliminates driver standby consumption. Do not switch the low-voltage output with a mains-rated switch unless it is rated for DC. For dimming, add a low-voltage PWM dimmer after the driver, or use a driver explicitly rated for TRIAC dimming. |
What power supply do I need for LED strip lights?A constant-voltage DC supply matching the strip’s voltage, rated at total load × 1.2 (or × 1.3 for 24/7 use). For 5 m of 14.4 W/m 24V strip: 72 W load, so a 24V 90–100 W driver. Never use a constant-current driver. |
Which is better, 12V or 24V LED strip?24V for almost all architectural work. At equal wattage a 24V strip draws half the current, which halves voltage drop and quarters copper loss, roughly doubling the run length from one feed and lowering operating temperature. Choose 12V only where the supply is inherently 12V — vehicles, caravans, boats — or where you need the finest cut increments on short runs. |
Which is brighter, 60 LED or 120 LED per metre?Usually the 120, but compare watts per metre and lumens per metre rather than LED count. A 120 LED/m strip at the same wattage as a 60 LED/m strip produces similar light but spreads it over twice as many dies, which improves uniformity and lowers junction temperature, extending life. |
Are 5630 LEDs brighter than 5050?Per individual package, yes — typically around three times the output of a single white 5050. But strips are bought per metre, so a high-density 5050 strip can match or exceed a low-density 5630 strip. Compare lumens per metre. |
What is the difference between SMD and COB LED strips?SMD uses discrete packaged diodes and shows visible dots with a ~120° beam; COB uses bare dies under a continuous phosphor layer and produces a dot-free line with a ~180° beam. Choose COB when the source is visible or the profile is shallow, and SMD when the strip is fully concealed, when you need colour changing, or when maximum efficacy per euro matters. |
What is the best type of LED strip?For most projects: 24V COB, Ra>90, in an aluminium profile, at 2700–3000K for residential and 3500–4000K for commercial, driven by a certified constant-voltage supply at 120% of load and dimmed on a high-frequency PWM dimmer. Adjust IP rating to the location and output to the application. |
What are the two types of LED light strips?By emitter technology: SMD and COB. By electrical class: low-voltage DC (5V, 12V, 24V, 48V) and 230V mains. By colour capability: fixed white, tunable white, and colour-changing (RGB, RGBW, RGB+CCT, addressable). |
Are LED strip lights brighter than fluorescent, and can they replace fluorescent tubes?Yes to both. A high-efficacy LED strip in a profile delivers more usable light on the working plane than the T8 batten it replaces, because it can be aimed rather than radiating in all directions. It also starts instantly in the cold, dims, does not hum, and lasts two to three times longer. With mercury exemptions for T5 and T8 fluorescent lamps now expired in the EU and UK, LED strip and battens are the replacement path. |
Are strip lights being phased out in the UK?Fluorescent strip lights are. Under RoHS amendments, exemptions for mercury in general-purpose T5 and T8 fluorescent lamps expired through 2023, so manufacture and import have ceased and remaining stock is selling through. LED strip lighting and LED battens are the direct replacement. |
Can LED light strips light a whole room?Yes, with the right specification. A living room needs roughly 1,700–2,500 lumens of general light; 15 m of a 1,400 lm/m strip in a perimeter cove produces 21,000 bare lumens, comfortably above target even after diffuser and ceiling-bounce losses. The reason people doubt it is that they tried with a 4.8 W/m decorative roll. Pair cove lighting with a few directional sources for modelling, and check that the ceiling plaster is good, because grazing light reveals every imperfection. |
What are the disadvantages of LED strip lights?They need a driver and a profile to perform properly, which adds cost and planning. Cheap product varies visibly in colour along the run. Voltage drop limits single-feed run length. Poor drivers flicker. Diffusers absorb 15–35% of the light. Colour-changing strips make a poor white unless they include dedicated white channels. Every one of these is a specification issue rather than a fault of the technology. |
Are there different quality LED strip lights?Enormously different. The variables are binning tolerance, copper weight, phosphor quality, substrate material, adhesive grade and driver quality — none of which appear in a listing photograph. The most reliable proxy for quality is disclosure: a manufacturer publishing lumens per metre, efficacy, CRI, SDCM, cut pitch, PCB width and an L-value has measured those things. |
Are cheap LED light strips worth it?For temporary, accessible or short-life installations, sometimes. For anything plastered in, built into joinery, installed at height, sited outdoors or supplied to a client, no — the labour to replace it will exceed the material saving many times over. |
Are LED strip lights bad for your eyes?White LED strip lighting at normal output falls in IEC 62471 Exempt Group or Risk Group 1, the same as ordinary interior lighting, and does not damage the retina in normal use. Discomfort is almost always glare from an undiffused source or flicker from a poor driver. Use a diffuser, use a high-frequency PWM dimmer, and avoid staring directly at a bare strip. |
Do LED strip lights affect sleep or circadian rhythm?Bright cool light in the evening suppresses melatonin and delays sleep onset. The fix is design rather than avoidance: 4000–5000K at higher output in the morning, 2700K or below dimmed to 10–20% in the evening. Tunable CCT strip on a schedule does this automatically. |
Are LED lights OK for cats and rabbits?Yes, standard white LED strip lighting is safe for household pets. Two notes: many animals perceive flicker that humans cannot, so specify high-frequency drivers; and animals need a genuine light-dark cycle, so put pet-area lighting on a timer. Rabbits in particular should have real darkness at night. |
Do LED lights attract spiders or insects?LEDs attract fewer insects than older sources because they emit little UV, and warmer colour temperatures attract fewer still. Spiders follow insects, so for exterior installations specify 2200–2700K rather than 6500K if insect attraction is a concern. |
Are LED strip lights legal in the UK?Yes for architectural use, indoors and outdoors, when compliant components are used and the installation follows BS 7671. Vehicle exterior decorative lighting and auxiliary light bars are a separate matter and are generally not road legal under the Road Vehicles Lighting Regulations 1989; blue and red are reserved for emergency vehicles. Check vehicle lighting regulations before any automotive project. |
How do I stop LED light strips falling off the wall?Mount them in an aluminium profile — that is the real answer. If you must surface-mount, clean the substrate with isopropyl alcohol, use strip with a named acrylic adhesive such as 3M 300LSE rather than a rubber-based tape, avoid porous or dusty surfaces, and add mechanical clips every 300–500 mm. Adhesive failure is usually caused by heat, which a profile also solves. |
How do I hide the wires?Plan the cable route before sticking anything down. Run the strip in a profile, take cable along the back edge of furniture or through a routed channel, use paintable self-adhesive cable trunking on walls, position the driver behind a desk, bed or cabinet, and keep all joints at the concealed end of the run. |
Why does the far end of my strip look dimmer?Voltage drop. The conductors have resistance, so voltage falls along the run and output falls with it. Fix it by feeding from the centre, feeding both ends in parallel, splitting the run across two drivers, or moving up to 24V or 48V. Do not compensate by raising the driver voltage — that over-drives the near end. |
How far can a single run go?Approximately: 24V at 4.8 W/m up to 12 m from one end; 24V at 9.6 W/m up to 8 m; 24V at 14.4 W/m up to 5–6 m; 12V at 14.4 W/m only 2.5–3 m. Feeding from both ends or the centre roughly doubles these. Heavier copper extends them. |
Are LED light strips or bulbs better?They do different jobs. Bulbs and downlights produce directional light from a point and give modelling and sparkle. Strips produce continuous linear light integrated into a surface, ideal for coves, task lines, reveals and grazing. A good scheme uses both: strip for the ambient and architectural layer, directional sources for focus. |
What is the difference between LED tape light and LED strip light?In everyday use, nothing — the terms are interchangeable. Where a distinction is drawn, “tape” tends to describe narrower, thinner architectural product and “strip” is used more broadly. Note that in the UK “strip light” can also mean a fluorescent or LED batten, which is an entirely different product. |
Which LED strip lights are the brightest?The highest-output architectural strips reach 2,000–3,500 lumens per metre at 20–40 W/m. Brightness at that level demands serious heatsinking — a substantial aluminium profile with an open rear face — otherwise lifespan collapses. For most applications, 800–1,800 lm/m is the useful range. |
What CRI do I need?Ra>80 for garages, storage and concealed coves. Ra>90 for kitchens, bathrooms, bedrooms, living spaces and offices. Ra>93 with high R9 for retail display, galleries, studios, food and cosmetics. Ask for R9 specifically wherever light falls on people, food or timber. |
Which colour temperature should I choose?2200–2500K for hospitality and evening-only accent; 2700K for bedrooms and living rooms; 3000K for kitchens, bathrooms and hallways; 3500–4000K for offices, workshops and retail; 5000–6500K for technical work and TV bias lighting. The commonest error is going too cool at home. |
Are LED strip lights waterproof? Which IP rating do I need?Only rated versions are. IP20 for dry interiors, IP65 for bathrooms and sheltered exterior, IP67 for gardens, decking and exposed façades, IP68 for submerged use. The rating applies to the strip, not to the cut ends — every cut must be re-sealed with the correct end cap and neutral-cure silicone, and the driver must be dry or IP67-rated. |
Can LED strip lights be used in bathrooms?Yes. Use IP65 or IP67 strip at 24V SELV, match the rating to the bathroom zone, locate the driver outside the zones, and re-seal all cut ends. For mirror lighting, use high-CRI COB at 3000–4000K run vertically down both sides of the mirror rather than above it. |
Can LED strip lights bend around corners?They bend along the flat plane with a minimum radius of roughly 30–50 mm, but they must never be folded, twisted or creased — that cracks the copper. For a 90° corner, cut and use an L-connector, a soldered jumper, or a purpose-made corner profile. |
Do I really need an aluminium profile?Above about 8 W/m, yes. The profile is the heatsink, the optic, the mechanical protection and the architectural detail all at once. Removing it costs lifespan, uniformity, glare control and appearance simultaneously. It is the single highest-value component in the system after the strip itself. |
Why do my LED light strips flicker on camera?PWM frequency is too low, or the driver is passing mains ripple. For any space that will be filmed — a studio, a retail floor with cameras, a conference room — specify a dimmer operating above 3 kHz and a well-smoothed DC driver. Test by pointing a phone camera at the dimmed strip and looking for banding. |
Can LED strip lights sync with music or video?Yes. Microphone-based controllers give beat reactivity on RGB or RGBW strip. Screen-sync systems use a capture device to drive addressable Pixel LED strip so the wall extends the picture. Professional installations use DMX or timecode. For anything on camera, check PWM frequency first. |
Can I dim LED strip lights from my existing wall dimmer?Only with a driver explicitly rated as TRIAC or leading/trailing-edge dimmable, and only with a dimmer on the manufacturer’s compatibility list. Trailing-edge units behave better with LED loads. The more reliable approach is to run the driver at full output and dim on the low-voltage side with a PWM dimmer. |
What is the best LED strip for a kitchen?COB at 800–1,200 lm/m, 3000K, Ra>90 with good R9, in a corner or surface profile with a frosted diffuser, mounted at the front edge of the cabinet underside so the light lands on the worktop rather than the splashback. Use IP65 near the sink and hob, and put plinth lighting on a separate circuit. |
What is the best LED strip for TV backlighting?150–350 lm/m at 6500K (D65) with Ra>90, mounted around the rear perimeter and set back from the edges so it washes the wall. Warm strip will visibly tint the picture. For screen-sync ambient effects, use addressable Pixel LED with a capture device. |
What is the best LED strip for wall panelling and shadow gaps?COB is effectively mandatory: an SMD strip in a 10–20 mm gap produces visible dots and scalloping on the return face. Specify COB at 400–900 lm/m, 2700–3000K, Ra>90, in a slim recessed or drywall profile set back at least 15 mm, and design the channel into the joinery drawings from the start. |
Can I use LED strip lights outdoors?Yes, with IP67 strip, UV-stabilised silicone, an aluminium profile, properly sealed cut ends, a dry or IP67 driver, and drainage so water cannot pond on the strip. Use warm 2200–2700K aimed downward to limit light pollution and insect attraction, and put exterior lighting on a timer or PIR. |
How many LED strips can one driver run?As many as fit within its wattage at 120–130% headroom, provided each run stays within its voltage-drop limit. A 200 W 24V driver can feed 13 m of 14.4 W/m strip in total, but that should be split into two or three separately fed runs rather than one 13 m line. |
What are common mistakes with LED strip lights?Skipping the aluminium profile; under-sizing the driver; ignoring voltage drop; choosing too cool a colour temperature; buying RGB when white is needed; using the wrong IP rating; mounting under-cabinet strip at the back instead of the front; leaving the source visible from seated sightlines; cutting off the marks; powering a coiled reel; burying the driver where it cannot be replaced; and mixing production batches on one continuous run. |
What should I look for when buying LED strip lights?Published lumens per metre and efficacy; CRI class and R9; SDCM binning; copper weight; PCB width and cut pitch; IP construction method; a stated L70 or L80 figure; CE/UKCA certification with documentation; a matched profile, diffuser, end cap and connector range; and a real warranty from an identifiable manufacturer. |
32. Conclusion
LED light strips are not a single product; they are a system with five decisions in it. Emitter technology decides whether the line reads as dots or as light. Colour temperature and CRI decide whether the room looks considered or cheap. Voltage decides how far you can run before the far end fades. IP rating decides whether the installation survives its environment. And the aluminium profile — the component most often left out of the budget — decides how good it looks and how long it lasts.
Get those five right and the rest follows easily. A 24V COB strip at Ra>90, sized 25% above the target output, mounted in an aluminium profile with a diffuser matched to the sightline, fed by a certified constant-voltage driver at 120% of load and dimmed on a high-frequency PWM dimmer, will do everything asked of it for decades — in a kitchen, a bathroom, a shop, a studio, a stairwell, an office ceiling or a garden path. Get them wrong and no amount of brightness or colour will rescue the result.
The practical next step is to specify the strip and the profile together, from the same range, at the same time. Lighting Line’s catalogue is organised to make that straightforward: 166 LED strip references across SMD and COB, from 5V to 230V, IP20 to IP67, 2200K to 6500K, CRI up to Ra>93, matched to 126 aluminium profiles, 168 end caps, 58 mounting brackets and dedicated PCB connectors.
Browse the complete LED light strips range at catalogue.lightingline.eu →
This article was developed with the support of artificial intelligence and subsequently reviewed, corrected, and validated by the LightingLine.eu technical team, which guarantees its reliability and compliance with official sources.