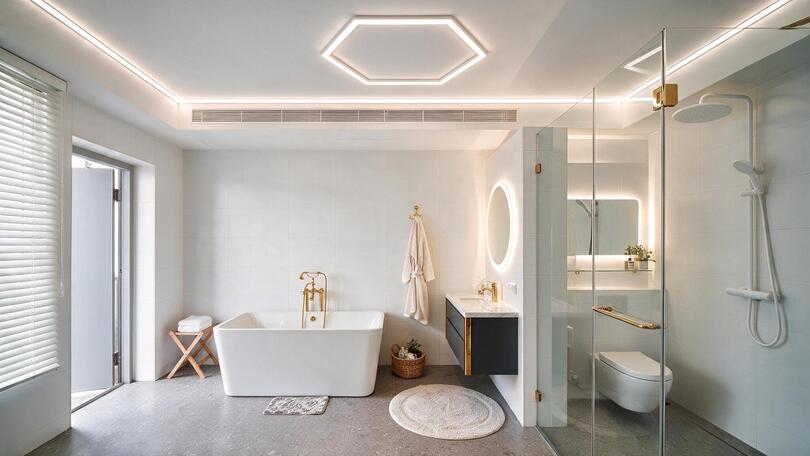
Bathroom lighting is the only lighting design problem in a home that has to satisfy four contradictory requirements at the same time: it must be bright enough for precision grooming, soft enough to be tolerable at three in the morning, sealed well enough to survive years of steam and cleaning chemicals, and beautiful enough to justify the tile budget that surrounds it. Most rooms let you trade one requirement against another. A bathroom does not. The result is that bathroom lighting fails more often than any other domestic lighting scheme: not because the fittings are bad, but because the layout, the ingress protection rating, the colour temperature and the wiring were each decided in isolation, by different people, at different stages of the build.This guide takes the opposite approach. It treats bathroom lighting as a single integrated system in which the light source, the aluminium profile that carries it, the position of the driver, the cable cross-section, the silicone grade of the encapsulation and the cleaning regime are all one decision. It is written for architects specifying a scheme, for contractors who have to install it in a real wall cavity, for interior consultants who have to make it flattering, for homeowners upgrading a tired ceiling fitting, and for content creators who need a bathroom that photographs cleanly. Every technical figure is stated so it can be checked, every recommendation is tied to a physical product specification, and every wiring instruction is written so that an electrician can work from it.
The central argument of this article is that linear LED lighting (strip inside an extruded aluminium profile) has become the correct default for bathroom lighting, and that traditional point-source bathroom light fittings should now be treated as accents rather than as the backbone of a scheme. That is a strong claim, so the article spends considerable space justifying it: with photometric reasoning, with ingress protection data, with thermal and lifetime numbers, with cost comparisons, and with the specific material-safety considerations that arise when a light source sits inside a room where people are naked, wet, and surrounded by aerosolised cleaning products.
In this article…
- Why bathroom lighting matters more than any other room
- The four-layer method: the structural logic of bathroom lighting
- Bathroom zones and IP ratings: the compliance backbone
- Are LED lights safe in a bathroom and in a shower?
- LED strip technology for bathrooms: SMD, COB, density and voltage
- Colour temperature, CRI and how bathroom lighting renders skin
- Aluminium profiles: the component that decides whether it looks professional
- Wiring layout: drivers, cable sizing, voltage drop and dimming
- Position-by-position recipes: mirror, niche, shower, ceiling, floor
- Food-safe and hygienic considerations: silicone grades, cleaning and material safety
- Small bathroom lighting: making a tight room feel generous
- Luxury and modern bathroom lighting: what actually reads as expensive
- The fifteen most common bathroom lighting mistakes
- Energy efficiency, running cost and payback
- Installation, commissioning and maintenance
- Costing and bill of materials for three real bathrooms
- Buying guide: choosing the right Lighting Line strip and profile
- Answers by profession: architect, contractor, consultant, homeowner, creator
- Bathroom lighting trends and where the category is going
- Standards, regulations and documentation
- Frequently asked questions
- Bathroom lighting a contradictory room
1. Why bathroom lighting matters more than any other room
Every room in a house has a lighting brief. The bathroom is the only one where the brief changes completely four or five times a day, in a space that is often the smallest room in the building, clad in the most reflective materials available, and filled with water. Understanding why bathroom lighting is genuinely harder than living-room lighting is the precondition for getting it right, because almost every failure traces back to treating it as a simpler problem than it is.
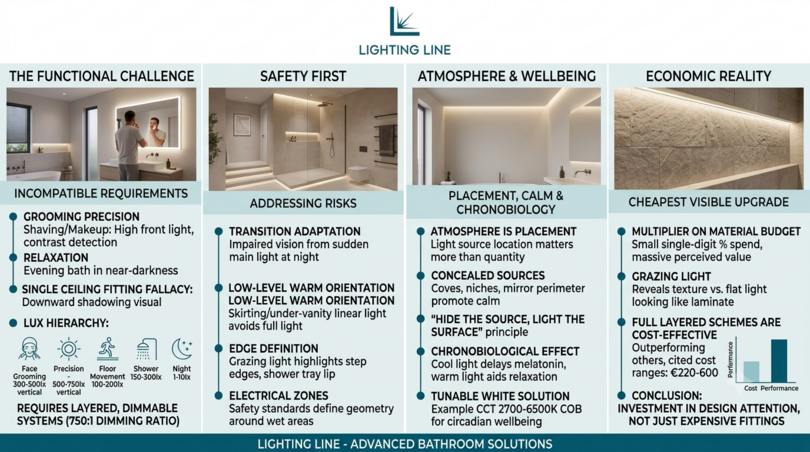
The functional case: three tasks with incompatible requirements
Consider what actually happens at a bathroom mirror. Shaving requires the ability to distinguish a two-millimetre stubble shadow from the skin beneath it, which is a contrast-detection task that needs high illuminance and, critically, light arriving from the front rather than from above. Applying make-up requires accurate colour rendering across the full spectrum, because a foundation matched under a green-deficient light source will look wrong the moment the person steps outdoors. Checking a mole or a rash requires both. And yet the same room, ninety minutes later, has to support a bath taken deliberately in near-darkness.
No single luminaire can serve all of these, and the attempt to make one do so is the origin of the single most widespread bathroom lighting error in existence: the lone central ceiling fitting. A downward-facing source directly above the head places the eye sockets, the underside of the nose, the jawline and the neck in shadow.
The functional requirements can be stated as a hierarchy. The vertical illuminance on the face at the mirror should reach roughly 300 to 500 lux for general grooming and 500 to 750 lux for precision work such as make-up application or contact lens insertion. The horizontal illuminance on the floor needs only 100 to 200 lux for safe movement. The illuminance inside a shower enclosure needs 150 to 300 lux to make the floor readable and the controls legible. And the night-orientation level should sit somewhere between 1 and 10 lux — low enough not to trigger the melanopic response that suppresses melatonin and wakes a person fully at four in the morning. The ratio between the brightest and the dimmest requirement in a bathroom is therefore roughly 750 to 1, or nearly three orders of magnitude. No fixed fitting spans that. Only a layered, separately dimmed system does.
The safety case: wet skin, hard surfaces and low light
Bathrooms are, statistically, among the most dangerous rooms in a dwelling. The combination of wet ceramic, bare feet, low-contrast white-on-white surfaces and a person who has just stood up quickly from a hot bath produces a well-documented slip and fall pattern, and it is disproportionately concentrated in older occupants and in night-time hours. Lighting cannot eliminate this, but it addresses two of the contributing factors directly.
The first is transition adaptation. Walking from a dark hallway into a bathroom lit to 300 lux at 4000 K forces the pupil through a rapid constriction that takes several seconds to complete, during which visual acuity is genuinely impaired. A low-level, warm, floor-adjacent orientation layer that comes on automatically removes the need to trigger the main lighting at all during night use, which is why skirting-level and under-vanity linear lighting is now standard in specification-grade bathrooms and in accessible design.
The second is edge definition. A bathroom finished entirely in one pale material offers almost no luminance contrast at the critical boundaries: the step into a wet room, the front edge of a bath, the lip of a shower tray. Grazing light along a floor, or a continuous line under a vanity, creates a luminance gradient exactly where the eye needs one. This is not decoration: it is the same principle that governs stair-nosing contrast requirements in accessibility standards.
The third safety dimension is electrical, and it is the reason ingress protection ratings and bathroom zones exist at all. A bathroom combines a conductive, earthed, wet human body with mains electricity in a confined space. The response of every wiring regulation in the developed world has been to define a geometry of risk around the bath and shower, to restrict what may be installed within it, and to require supplementary protective bonding and residual current protection. Section 4 of this guide covers that geometry in full detail, because the majority of non-compliant bathroom lighting installations are non-compliant not through ignorance of the rules but through misunderstanding where one zone ends and the next begins.
The atmospheric and wellbeing case
The bathroom has quietly become the most emotionally loaded room in the contemporary home. It is where the day begins and ends, and the domestic spa has moved from luxury-hotel language into ordinary renovation briefs. That shift has real lighting consequences, because atmosphere in a bathroom is produced almost entirely by where the light comes from rather than by how much of it there is.
Light that emerges from a concealed source (a cove, a niche, the underside of a floating vanity, the perimeter of a mirror) reads as calm because the eye cannot locate a glare source. Light that emerges from a visible bright object reads as functional, and at low levels it reads as a bright dot in a dark room, which is agitating rather than restful. This is the single most useful piece of atmospheric knowledge in bathroom lighting: to make a bathroom feel expensive and calm, hide the source and light the surface. It is also the reason linear LED in profile, rather than decorative fittings, dominates high-end bathroom lighting design.
There is a chronobiological layer to this as well. The intrinsically photosensitive retinal ganglion cells that regulate circadian timing are most sensitive to short-wavelength light around 480 nm. Bright, cool, blue-rich bathroom lighting at 22:30 is pharmacologically active: it delays melatonin onset and pushes sleep later. Bright cool light at 07:00 does the opposite and is genuinely useful. A bathroom lighting scheme that can shift from 2200–2700 K in the evening to 4000–5000 K in the morning is therefore not a gimmick but a legitimate wellbeing feature, and it is now trivially achievable with tunable-white LED strip such as the CCT 2700–6500 K COB strip with CRI Ra>90 and a suitable tunable driver.
The economic case: bathroom lighting is the cheapest visible upgrade in the room
In a renovation budget, tiles, sanitaryware and labour dominate. Lighting typically represents a small single-digit percentage of the total spend, yet it determines how every other pound of that spend is perceived. A grazing light across a stone-effect large-format tile reveals its texture; flat overhead light makes the same tile look like laminate. Lighting is the multiplier on the material budget, and linear LED is the lowest-cost way to apply that multiplier.
The comparison below sets out what the different strategies actually cost and deliver for a typical 6 m² bathroom. The figures are indicative European trade-level ranges for materials, excluding labour and VAT, and are intended for relative comparison rather than as a quotation.
| Strategy | Indicative material cost | Face lighting quality | Night usability | Perceived value | Failure mode |
|---|---|---|---|---|---|
| Single central ceiling fitting | €25–80 | Poor — downward shadowing | None | Low | Unflattering, flat, dated |
| Ceiling fitting plus over-mirror bar | €70–180 | Fair — still top-down | None | Low–medium | Shadow under brow and chin |
| Recessed downlights (4–6 no.) | €90–260 | Poor at mirror, good on floor | Poor unless dimmed | Medium | Scallop patterns, glare, hot ceiling |
| Downlights plus vertical mirror-side strips | €150–380 | Excellent | Medium | High | Poor CRI strip choice |
| Full four-layer linear scheme in profile | €220–600 | Excellent | Excellent | Very high | Under-specified IP or driver |
| Decorative pendant plus chandelier scheme | €300–2,000+ | Poor to fair | Poor | High but style-dependent | IP non-compliance in zones |
The important observation from Table 1 is that the full linear scheme is not the expensive option. It sits in the same material band as a set of decent downlights plus a mirror fitting, and well below a decorative scheme, while outperforming both on every functional axis. What it costs instead is design attention and that is what the rest of this guide supplies.
2. The four-layer method: the structural logic of bathroom lighting
Almost every good bathroom lighting scheme in the world, whatever its style, resolves into the same four functional layers. Almost every bad one is missing two or three of them. Learning to see a bathroom as four layers rather than as a set of fittings is the single most transferable skill in this discipline, because it converts a subjective aesthetic argument into a checklist that can be verified on a drawing. This section defines each layer, states its target performance, and identifies the linear LED solution that delivers it.
Layer one: ambient light
Ambient light establishes the base luminance of the room and determines whether it feels open or oppressive. The common mistake is to equate ambient light with a ceiling fitting. In fact the best ambient bathroom lighting is almost always indirect: light thrown onto the ceiling or upper wall from a concealed linear source, which then returns to the room as a large, soft, virtually shadow-free field.
The physics is straightforward. A 100 mm wide luminaire produces hard shadows because it is a small source relative to the object it illuminates. A 2.5 m ceiling lit by a perimeter cove becomes, effectively, a 2.5 m × 3 m luminaire: an enormous source, which wraps light around objects and eliminates the harsh shadowing that makes people look tired. Indirect ambient light is the reason a hotel bathroom feels different from a domestic one, and it costs a run of LED strip and a profile.
Specification for the ambient layer
- Output: 400–700 lm per metre of run for a plaster or painted ceiling, increase by 30–40 percent for a dark ceiling, which absorbs rather than returns light.
- Source: a COB strip is strongly preferred here, because any dotting on the PCB will be visible as a scalloped pattern on a nearby ceiling. A COB LED strip with 480 to 600 LEDs per metre produces a continuous, dot-free line of light with a 180° beam.
- Colour temperature: 2700 K or 3000 K for a residential feel; 3500 K where the room contains cool grey stone; tunable white if the scheme is to serve both morning and evening use.
- CRI: Ra>90 minimum. Ambient light is what fills the shadows in every other layer, so a poor-CRI ambient source contaminates the whole room.
- Position: in a cove or a slot, set back a minimum of 60–80 mm from the ceiling plane so the strip itself is never in the line of sight from the doorway.
- Ingress protection: if the cove sits above 2.25 m and outside the shower zones, IP20 is technically permissible but see Section 11 for why IP65 or IP67 is nonetheless the professional default in a room that gets steam-cleaned.
Layer two: task light
Task light in a bathroom means, in practice, mirror light. Everything else in the room is a low-precision activity; the mirror is where the eye does real work. This is also where the largest quality gap exists between a competent scheme and the typical one.
The governing rule is that a face must be lit from the sides, at approximately face height, from a large diffuse source. Two vertical light lines flanking the mirror, each running from roughly 900 mm to 1,900 mm above floor level, illuminate the front planes of the face symmetrically and fill the eye sockets, the underside of the nose and the jawline. This is theatrical dressing-room lighting, and it has been the correct answer since the 1920s. Top-only lighting fails because it puts every recess of the face into shadow. Bottom-only lighting fails in the opposite direction and looks theatrically sinister.
Where the mirror geometry makes side lighting impossible (a full-width mirror across a narrow room, for instance) the fallback hierarchy is: a horizontal line immediately above the mirror combined with a horizontal line below it at vanity level, then above-only with a highly reflective pale wall opposite to bounce fill light back, then a downlight positioned forward of the person rather than above them, at roughly 600–750 mm in front of the mirror face so that the beam strikes the face at an angle rather than the top of the head.
Specification for the task layer
| Parameter | Minimum acceptable | Recommended | Precision grooming / make-up |
|---|---|---|---|
| Vertical illuminance at face | 200 lux | 300–500 lux | 500–750 lux |
| Luminous flux per side | 350 lm | 500–700 lm | 700–1,000 lm |
| CRI (Ra) | >80 | >90 | >93 |
| R9 (deep red rendering) | >20 | >50 | >60 |
| Colour temperature | 2700–4000 K | 3000–3500 K | 3500–4000 K or tunable |
| MacAdam binning | 5 SDCM | 3 SDCM | ≤3 SDCM |
| Diffuser | Opal | Opal, source not visible | Opal, wide emission |
| Dimming | Not essential | Recommended | Recommended |
The R9 figure in Table 3 deserves special attention because it is the specification almost nobody checks and it matters more in a bathroom than anywhere else in a home. R9 measures how faithfully a light source renders saturated deep red: which is the dominant component of human skin tone, blood perfusion, lips and gums. Two strips can both claim Ra>90 while one has R9 of 15 and the other R9 of 60. Under the first, skin looks grey and slightly ill; under the second it looks alive. This is why a high-CRI strip such as the 2700 K COB strip with CRI Ra>90 at 480 LEDs/m belongs at a mirror and a generic budget strip does not.
Layer three: accent light
Accent light does no functional work. It exists to create depth, to reveal material, and to give the eye something to rest on. In a bathroom it is also the layer that produces almost all of the perceived value, because it is the layer that makes the tile, stone and joinery look like a deliberate design rather than a set of surfaces.
The four highest-impact accent positions in a bathroom, in order of return on effort, are: the underside of a wall-hung vanity, which makes the unit appear to float and simultaneously lights the floor, a tiled shower niche lit from the front upper lip so the light grazes down over the contents, the perimeter or back of a mirror producing a halo of reflected light on the wall behind and a vertical or horizontal reveal in a feature wall, where a slot of light grazes across a textured tile to reveal its relief.
Accent light works by contrast, not by brightness. An accent run at 300–500 lm/m in a room whose ambient level is 200 lux reads as luminous and jewel-like. The same run at 1,200 lm/m simply becomes another source of general light and loses all of its effect. Under-specifying output and over-specifying quality is the correct trade for this layer.
Layer four: night and orientation light
The fourth layer is the one that separates a designed bathroom from a decorated one, and it is the answer to one of the most common questions in the demand data: how to light a bathroom at night without waking up. The requirement is a light level low enough that the pupil does not need to constrict, warm enough that it does not suppress melatonin, and positioned low enough that it never enters the direct field of view.
The standard solution is a continuous run of warm strip at floor level: in a shadow-gap detail at the base of the wall, recessed into a plinth, or under the front lip of a vanity or bath panel. Output is deliberately tiny (40 to 120 lumens per metre, which is 5 to 10 percent of a normal accent run) and the colour temperature should be 2200 K or 2500 K, well below the usual residential 2700 K, because at very low light levels the eye perceives warm light as more comfortable and blue content as more disruptive.
Control is what makes this layer work. A PIR occupancy sensor combined with a light-level threshold, or a simple astronomical timer, means the orientation layer becomes the only layer that operates between, say, 23:00 and 06:00 unless the main switch is deliberately pressed. In practice this is the single most appreciated feature of a well-designed bathroom lighting scheme, and it is also the cheapest to add.
How the four layers combine
| Layer | Purpose | Typical position | Output per metre | Colour temp | CRI | Recommended source | Control |
|---|---|---|---|---|---|---|---|
| Ambient | Base luminance, soft fill | Ceiling cove, upper wall slot | 400–700 lm/m | 2700–3500 K | Ra>90 | COB 480–600 LED/m | Dimmed, main circuit |
| Task | Face, grooming, precision | Vertical at mirror sides | 500–1,000 lm/m | 3000–4000 K or tunable | Ra>93 | High-CRI COB, opal diffuser | Separately switched, dimmed |
| Accent | Depth, material reveal | Under vanity, niche, mirror halo | 300–500 lm/m | 2700–3000 K | Ra>90 | COB or fine-pitch SMD | Scene-controlled |
| Night / orientation | Safe movement, no sleep disruption | Skirting, plinth, bath panel | 40–120 lm/m | 2200–2500 K | Ra>80 | Low-density COB, deeply dimmed | PIR or timer, automatic |
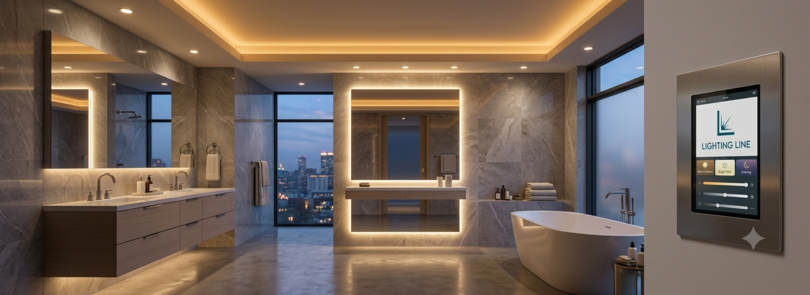
A scheme built to Table 4 gives a bathroom four distinct personalities from the same hardware: full brightness for cleaning, task-plus-ambient for the morning, accent-plus-low-ambient for the evening, and orientation only at night. Four layers, four circuits, one integrated bathroom lighting system.
3. Bathroom zones and IP ratings: the compliance backbone of bathroom lighting
This is the section that most bathroom lighting content gets wrong, and the search data confirms it is the section people most need. Terms such as IP44 rating, IP44 rated, bathroom zones, zone 1 bathroom lights and IP67 waterproof meaning carry thousands of monthly searches at some of the lowest competitive difficulty scores in the entire lighting category: which is to say, a great many people are trying to understand a safety-critical topic and finding thin answers. What follows is the complete picture: what the IP code actually encodes, how bathroom zones are geometrically defined, what may legally and sensibly go where, and why the professional answer is almost always a higher rating than the minimum.
What an IP rating actually means
IP stands for Ingress Protection and is defined by the international standard IEC 60529, which the European Union publishes as EN 60529. The code consists of the letters IP followed by two digits. The first digit describes protection against solid objects and dust, the second digit describes protection against water. A common and consequential error is to read the two digits as a single scale of “waterproofness”, so that IP65 is assumed to be strictly better than IP67 in every respect. It is not: IP65 and IP67 protect against different things.
| Digit | First digit — solids | Second digit — water | Test condition for the water digit |
|---|---|---|---|
| 0 | No protection | No protection | — |
| 1 | Objects >50 mm | Vertically dripping water | Drip box, 10 min |
| 2 | Objects >12.5 mm | Dripping water at up to 15° tilt | Drip box, tilted, 4 × 2.5 min |
| 3 | Objects >2.5 mm | Spraying water up to 60° from vertical | Oscillating tube or spray nozzle |
| 4 | Objects >1 mm | Splashing water from any direction | Spray nozzle, all angles, 5–10 min |
| 5 | Dust protected | Water jets from any direction (6.3 mm nozzle) | 12.5 l/min at 2.5–3 m distance |
| 6 | Dust tight | Powerful water jets (12.5 mm nozzle) | 100 l/min at 2.5–3 m |
| 7 | — | Temporary immersion to 1 m for 30 min | Full submersion test |
| 8 | — | Continuous immersion, depth agreed with manufacturer | Extended submersion |
| 9K | — | High-pressure, high-temperature jets | 80–100 bar at 80 °C |
Two practical consequences follow. First, IP67 is not automatically superior to IP65 for a pressure-washing scenario, because the immersion test at digit 7 does not include a jet test: a product rated IP67 has not necessarily been jetted. In lighting practice, however, the encapsulation methods used to reach IP67 on an LED strip (a full silicone extrusion or a filled channel) almost always also confer excellent splash and jet resistance, and manufacturers frequently state IP65/IP67 together for this reason. Second, and much more important for bathroom lighting: IP44 does not protect against jets at all. It protects against splashing. That distinction determines whether a fitting belongs in a shower.
Bathroom zones: the geometry of electrical risk
Wiring regulations across Europe and the United Kingdom define zones around baths and showers, following the framework of IEC 60364-7-701 (implemented in the UK as Section 701 of BS 7671, the IET Wiring Regulations). The zones are volumes, not areas, and they are measured from specific datum surfaces. Understanding them precisely is what allows a designer to place a light with confidence rather than guesswork.
Zone 0 — inside the bath or shower tray
Zone 0 is the interior of the bath tub itself, or the interior of the shower tray. Anything installed here is, by definition, going to be submerged or standing in water. The requirement is a minimum of IP67 and the equipment must be supplied at SELV, separated extra-low voltage, at no more than 12 V AC or 30 V DC, with the safety source located outside the zones. In practice, the only lighting that belongs in Zone 0 is purpose-designed submersible luminaires (the kind used in whirlpool baths and spa tubs) and 12 V IP67-encapsulated strip installed in a fully sealed, drained detail. This is specialist territory and should be treated as such.
Zone 1 — directly above the bath or shower, up to 2.25 m
Zone 1 is the volume directly above Zone 0, extending upward to 2.25 m above the floor (or above the base of the shower tray, whichever is higher), and bounded by the vertical plane at the outer edge of the bath or shower. The minimum requirement in Zone 1 is IP44, but this is a floor and not a specification. Every competent specifier now treats IP65 as the practical minimum inside Zone 1 and IP67 as the correct choice for anything within a shower enclosure, because the difference in cost is trivial and the difference in service life is measured in years. Where the shower head can be directed at the fitting (which, with a hand shower, is essentially always) a jet-tested rating is not optional in engineering terms even where it is not mandated in regulatory terms. Equipment in Zone 1 must be supplied through a 30 mA residual current device, and if the supply is SELV at 12 V, the transformer must sit outside the zones.
Zone 2 — the 0.6 m margin
Zone 2 extends 0.6 m horizontally outward from the boundary of Zone 1, and to the same height of 2.25 m. It also extends 0.6 m around a wash basin where a shower head on a flexible hose can reach. The minimum requirement in Zone 2 is IP44. Again, IP65 is the sane professional default: a mirror light 400 mm from a shower opening will be hit by spray, condensation and cleaning products for the whole of its life.
Outside the zones
Beyond 0.6 m from Zone 1, and above 2.25 m, no specific IP rating is mandated by the wiring regulations for a normal domestic bathroom. This is the origin of the single most consequential misunderstanding in bathroom lighting: the belief that outside the zones means an ordinary indoor fitting is fine. It is legally true and practically wrong. A bathroom ceiling is where steam collects; a bathroom is cleaned with aerosolised surfactants and, frequently, chlorine-based products; and condensation forms preferentially on the coolest surface in the room, which is often the metal body of a light fitting. An IP20 strip in an open ceiling cove in a family bathroom with a poorly ventilated shower will corrode at the solder joints within a few years. Sections 11 and 16 return to this in detail.
| Zone | Geometric definition | Regulatory minimum IP | Voltage restriction | Lighting Line recommended IP | Suitable linear solution |
|---|---|---|---|---|---|
| Zone 0 | Interior of bath tub or shower tray | IP67 | SELV 12 V AC / 30 V DC max, source outside zones | IP67 or IP68 | 12 V IP67 silicone-encapsulated strip in sealed, drained detail |
| Zone 1 | Above Zone 0 up to 2.25 m from floor, within the plan outline of bath/shower | IP44 | SELV preferred; 30 mA RCD mandatory | IP67 | IP67 silicone-extruded COB strip in sealed profile; niche and recess lighting |
| Zone 2 | 0.6 m horizontally beyond Zone 1, up to 2.25 m; plus 0.6 m around a basin reachable by a hand shower | IP44 | 30 mA RCD mandatory | IP65 minimum, IP67 preferred | IP65/IP67 strip in profile for mirror-side task lighting |
| Outside zones | >0.6 m from Zone 1 and/or above 2.25 m | None specified | Standard mains permitted | IP65 as good practice | Ceiling cove, upper wall slot, skirting orientation runs |
IP44 versus IP65 versus IP67 for bathroom lighting: the decision that actually matters
Because “do I need IP44 or IP65 for a bathroom?” is one of the most frequently asked questions in this category, it deserves a direct answer rather than a hedge. The honest answer is that IP44 is the legal minimum for Zones 1 and 2, IP65 is the correct minimum for anything you intend to keep, and IP67 is what you should specify for LED strip anywhere inside a shower enclosure, inside a niche, under a bath panel, or at floor level.
The reasoning is economic as much as technical. On a strip product, the difference between an IP20 open PCB and an IP67 silicone-extruded version of the same strip is a modest percentage of the material cost of a bathroom lighting scheme and the material cost of the strip is itself a small fraction of the installed cost, because labour, tiling and making good dominate. If a strip fails behind a tiled niche, the replacement cost is not the price of the strip: it is the price of removing and replacing the tiling. Under-specifying ingress protection to save a few euros on a component that is buried inside a wet, tiled, finished detail is the least rational saving available in a bathroom build.
| Position | Zone | Exposure reality | Minimum legal | Specify this | Why |
|---|---|---|---|---|---|
| Inside shower enclosure, wall recess | 1 | Direct jet, constant steam, soap and limescale | IP44 | IP67 | Hand shower will be aimed at it; sealed detail is not accessible |
| Shower niche, front lip | 1 | Splash, pooling water on shelf, aggressive cleaning | IP44 | IP67 | Water sits in the niche; strip may be below the pooling line |
| Ceiling above shower | 1 | Rising steam, condensation dripping | IP44 | IP65/IP67 | Condensate forms on the coolest surface |
| Mirror side verticals, basin within 0.6 m of shower | 2 | Overspray, toothpaste, hairspray, glass cleaner | IP44 | IP65 | Chemical exposure as much as water |
| Mirror side verticals, basin remote from shower | Outside | Splash from basin, humidity, cleaning | None | IP65 | Cheap insurance in a humid room |
| Under wall-hung vanity | 2 or outside | Mopping, floor cleaning, splash from below | IP44 / none | IP67 | Mop water is thrown upward at exactly this height |
| Skirting / plinth orientation run | Outside | Floor washing, standing water | None | IP67 | Lowest point in the room; water always ends up here |
| Ceiling perimeter cove, remote from shower | Outside | Steam, dust, long-term humidity | None | IP65 | Corrosion of solder joints over years |
| Bath panel or bath surround reveal | 1 or 2 | Splash-out, overflow, direct wetting | IP44 | IP67 | Water reaches this detail routinely |
| Inside the bath tub | 0 | Full immersion | IP67 + SELV 12 V | IP67/IP68 at 12 V | Non-negotiable; use only purpose-made products |
Lighting Line’s strip catalogue is filterable directly by water protection, with IP20, IP65 silicone and IP67 silicone as explicit options across the range, which means the same optical specification (the same colour temperature, the same CRI, the same LED density) can be carried through from a dry ceiling cove to a wet shower recess without changing the appearance of the light. That consistency is precisely what makes a multi-zone bathroom lighting scheme look like one design rather than several.
What the two encapsulation methods mean in practice
Not all IP-rated strip is built the same way, and the construction determines both the optical result and the installation method.
Silicone-coated or channel-filled (typically IP65)
A layer of silicone is applied over the top of the PCB, or a shallow U-channel of silicone is filled and cured over the emitting surface. The strip stays relatively thin and flexible, remains cuttable at the marked cut points, and can usually be soldered after cutting with reasonable ease. The rear adhesive is retained. This is the right choice for the majority of splash-exposed positions: mirror surrounds, ceiling coves in a humid room, under-vanity runs.
Fully extruded silicone tube (typically IP67)
The PCB is drawn through a continuous extruded silicone jacket, so the strip is sealed on all sides. A spherical or domed extrusion profile also acts as an optical element, softening the emission and widening the apparent light-emitting surface. The IP67 tubular silicone products in the Lighting Line range use exactly this construction (for example the 5 m warm white 2700 K COB strip, 480 LED/m, 24 V, 6 W/m on a 3 mm PCB in a spherical extruded silicone tube) and their very narrow 3 mm PCB is what allows them to be used in tight architectural details such as tile joints, niche lips and shadow gaps where nothing else will fit. Cutting and re-terminating an extruded product requires more care: the cut end must be re-sealed with a silicone end cap and neutral-cure sealant, and it is far better to plan runs to avoid cutting inside a wet zone at all.
Supplementary protective measures that must accompany the lighting
Ingress protection is only one of the protective layers required in a bathroom, and lighting design that ignores the others is incomplete. Three additional requirements apply in most European jurisdictions and all of them affect how a bathroom lighting scheme is wired.
- Residual current protection: all circuits serving a bathroom, lighting included, must be protected by a residual current device with a rated residual operating current not exceeding 30 mA. This is a hard requirement, not a recommendation.
- Supplementary equipotential bonding: depending on the characteristics of the installation and whether the general conditions for omission are satisfied, supplementary bonding of extraneous conductive parts may be required. This is an assessment for the installing electrician, not the lighting designer, but a specification that introduces new metallic elements into a bathroom (an aluminium profile run, for instance) should be flagged to them.
- Switch position: conventional wall switches are not permitted within the zones in most jurisdictions, which is why bathroom lighting is traditionally controlled by a pull cord, by a switch outside the door, or by a sealed switch rated for the zone. Low-voltage, SELV-supplied controls, sealed capacitive switches and sensor-based control offer more modern answers, and PIR occupancy control removes the question entirely for the orientation layer.
One further point of practical importance: a low-voltage LED driver is mains equipment and belongs outside the bathroom zones. The correct locations are a ventilated ceiling void with access, a service cupboard, a boxed-out bulkhead, or the interior of a vanity unit that is itself outside Zone 2: never sealed permanently inside a tiled wall with no route to replacement, and never inside a shower enclosure. Section 9 deals with driver placement and cable sizing in full.
4. Are LED lights safe in a bathroom and in a shower?
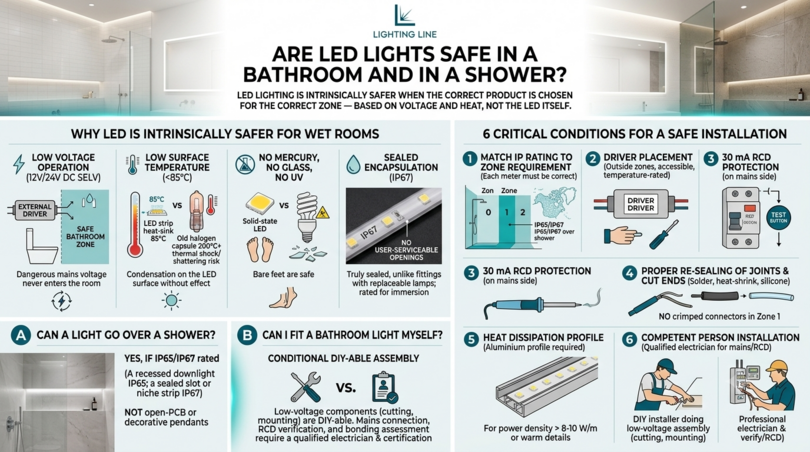
This question, in dozens of phrasings, is one of the highest-volume queries in the whole bathroom lighting category, and it deserves a clear, unhedged answer rather than a marketing one. The short version: LED lighting is not only safe for bathroom use, it is inherently safer than the incandescent, halogen and fluorescent technologies it replaced — but only when the correct product is chosen for the correct zone, and the reason is voltage and heat, not the LED itself. The longer version follows, because the details are what protect people.
Why LED is intrinsically better suited to a wet room
Four properties of LED technology make it the appropriate light source for a bathroom.
Low voltage operation: the overwhelming majority of LED strip systems run at 12 V or 24 V DC, supplied from a driver located outside the wet zones. A 24 V DC circuit within the bathroom is dramatically less hazardous than a 230 V AC one, and a 12 V SELV circuit satisfies the requirement for the most restricted zones. This is a categorical safety advantage that no mains-voltage fitting can match: the dangerous voltage never enters the room.
Low surface temperature: a halogen capsule reaches several hundred degrees Celsius at the envelope. Water striking that surface causes thermal shock and, historically, shattering. A well-heatsinked LED strip in an aluminium profile runs at a junction temperature typically well under 85 °C and a surface temperature that is warm to the touch at most. Condensation landing on it does nothing. This also removes the scald and fire risk associated with hot fittings in a small, textile-filled room.
No mercury, no glass envelope, no UV: compact fluorescent lamps contained mercury, which is an obvious problem in a room where a breakage means glass and vapour in a space occupied by bare feet. LEDs contain none, emit negligible ultraviolet, and are solid-state rather than glass.
Sealed encapsulation is available: a silicone-jacketed LED strip can be genuinely sealed against water in a way that a fitting with a replaceable lamp and a removable diffuser fundamentally cannot, because every access point is a potential ingress path. An IP67 extruded strip has no user-serviceable openings, which is exactly why it can be rated for temporary immersion.
The conditions that must be met
Safety in this context is conditional, and the conditions are specific. A bathroom LED installation is safe when all of the following are true.
- The IP rating matches or exceeds the requirement for the zone in which the strip physically sits not the zone where the driver sits, and not the zone where the switch sits. Every metre of the run must be rated for where that metre is.
- The driver is located outside the zones, is rated for the ambient temperature of its enclosure, and is accessible for replacement. Drivers are the shortest-lived component in an LED system, burying one is a design defect.
- The circuit is protected by a 30 mA RCD on the mains side.
- Every cut end and every joint inside a wet zone is properly re-sealed: solder joint, heat-shrink, silicone end cap, neutral-cure sealant. Crimped push-fit connectors are not adequate inside Zone 1.
- The strip is mounted in an aluminium profile wherever its power density requires heat dissipation, which in practice means anything above roughly 8–10 W/m and, in a warm, unventilated bathroom detail, rather less.
- The installation is carried out or verified by a competent person in accordance with the national wiring regulations, and certified where the jurisdiction requires it.
Can you put a light over a shower, and can I fit a bathroom light myself?
Yes, a light may be installed over a shower, provided it is rated for Zone 1 and in engineering terms that means IP65 as a floor and IP67 as the sensible choice. A recessed downlight rated IP65 is acceptable directly above a shower, a strip installed in a sealed slot or a niche within the enclosure must be IP67. What is not acceptable is a decorative pendant, an unrated batten fitting, or an open-PCB IP20 strip.
On self-installation, the honest answer varies by jurisdiction and by the scope of the work. In the United Kingdom, electrical work in a bathroom falls within the scope of Part P of the Building Regulations and notifiable work must be certified: replacing a like-for-like fitting on an existing circuit is treated differently from creating a new circuit or altering the wiring. In most European jurisdictions, work on a bathroom electrical installation requires a qualified electrician and produces a certificate. Our position is that the low-voltage assembly (cutting profile, mounting strip, dressing cables, positioning the driver) is entirely within the reach of a competent DIY installer, but the mains connection, the RCD verification and the bonding assessment should be done by a qualified electrician and documented. That division of labour is also how most professional installations are actually organised, and it is the reason LED strip systems are so attractive to contractors: the skilled electrical content is small and concentrated.
Are all bathroom light fittings the same, and are bathroom lights different?
They are not the same, and yes, they are different from ordinary interior fittings in three specific ways: the ingress protection of the enclosure, the corrosion resistance of the materials and finishes, and the electrical class and voltage of the supply. A fitting sold for a living room may have an unsealed body, ferrous internal fixings, a lacquered finish not tested against surfactants, and no IP declaration at all. The absence of an IP rating on a product is not a neutral fact, it is a statement that the manufacturer has not tested it against water ingress. In a bathroom, treat an unmarked fitting as IP20 and place it accordingly, which usually means not at all.
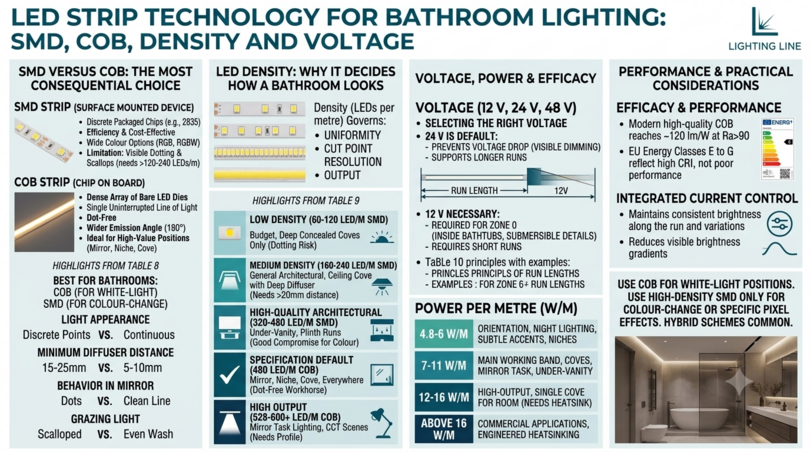
5. LED strip technology for bathroom lighting: SMD, COB, density and voltage
Having established where light should go and what protection it needs, the next question is what to put there. LED strip is not a commodity: the difference between a good and a bad strip in a bathroom is visible from across the room and measurable in years of service life. This section covers the four decisions that actually matter (emitter type, density, voltage and power) and explains the trade-offs in each so that a specification can be written rather than guessed.
SMD versus COB: the most consequential choice
Two construction technologies dominate the LED strip market, and for bathroom lighting they are not interchangeable.
SMD strip
SMD stands for Surface Mounted Device. Discrete packaged LED chips (commonly the 2835 package in modern architectural strip) are soldered onto the flexible printed circuit at regular intervals. Each package is a small, intense point source with a nominal beam angle of about 120°. SMD strip is efficient, cost-effective, available in an enormous range of colour options including RGB, RGBW and RGB+CCT, and entirely appropriate where the emitter is not directly visible and the light is not grazing a nearby surface.
The limitation is dotting. Because the light originates from discrete points, a low-density SMD strip placed close to a surface produces a visible series of bright spots and scallops. At 60 LEDs per metre this is obvious, at 120 it is noticeable on a nearby wall, at 240 and above with a good diffuser it becomes acceptable. Lighting Line’s SMD strip range covers 68 products spanning densities from 60 to 1,600 LEDs per metre, which means high-density SMD is available where colour flexibility is required.
COB strip
COB stands for Chip on Board. Rather than discrete packages, a dense array of bare LED dies is mounted directly onto the substrate and covered with a continuous phosphor layer, producing a single uninterrupted line of light with no visible dots and a wider emission angle of approximately 180°. For bathroom lighting this is decisive, because the three highest-value positions (the mirror surround, the shower niche and the ceiling cove) all place the source close to the surface it lights and often within the field of view through a reflection.
In a bathroom, a mirror is a device that shows you your light source whether you want it or not. A dotted strip reflected in a mirror looks like a fault. A COB strip reflected in a mirror looks like a line of light. That single observation is why COB has become the default for specification-grade bathroom lighting, and why Lighting Line’s COB range is the larger of the two at 98 products.
| Criterion | SMD (2835 and similar) | COB | Better for bathrooms |
|---|---|---|---|
| Light appearance | Discrete points, dotting at low density | Continuous, dot-free line | COB |
| Beam angle | ~120° | ~180° | COB |
| Minimum diffuser distance | 15–25 mm for smooth output | 5–10 mm | COB — allows shallower profiles |
| Behaviour in a mirror reflection | Visible dots | Clean line | COB |
| Grazing light on tile | Scalloped pattern | Even wash | COB |
| Cut point resolution | Typically 25–100 mm | As fine as 10 mm | COB — better for exact niche lengths |
| Colour options | Widest: RGB, RGBW, RGB+CCT, pixel | White and CCT, some RGB | SMD for colour-change |
| Efficacy at equal CRI | Slightly higher in some ranges | Comparable; up to ~120 lm/W available | Draw |
| Cost per metre | Lower at equal output | Modest premium | SMD on budget grounds only |
| Thermal management need | Concentrated hot spots at each package | Distributed heat, but higher density | Both require aluminium profile |
The practical rule: use COB for every white-light position in a bathroom, and use high-density SMD only where colour change or a specific pixel effect is required. A hybrid scheme (COB for the four functional layers, an RGB+CCT SMD run for a single feature such as a bath surround or a niche) is a common and sensible arrangement.
LED density and why it decides how a bathroom looks
Density is expressed in LEDs per metre and ranges, in the Lighting Line catalogue, from 60 to 1,600. It governs three things simultaneously: the uniformity of the line, the resolution of the cut points, and the output per metre available at a given drive current.
| Density | Typical use | Dotting risk | Suitable bathroom position | Notes |
|---|---|---|---|---|
| 60–120 LED/m SMD | Budget general strip | High | Deep concealed coves only | Avoid anywhere visible or reflected |
| 160–240 LED/m SMD | General architectural | Medium | Ceiling cove with deep diffuser | Needs 20 mm+ to diffuser |
| 320–480 LED/m SMD | High-quality architectural | Low | Under-vanity, plinth runs | Good compromise where colour needed |
| 480 LED/m COB | Specification default | None | Mirror, niche, cove, everywhere | The workhorse density |
| 528–600 LED/m COB | High output, tunable white | None | Mirror task lighting, CCT scenes | Higher W/m; profile essential |
| 720–1,080 LED/m | Very high output / fine pitch | None | Short high-intensity accents | Significant thermal load |
| 1,600 LED/m | Specialist ultra-fine | None | Micro-detail, very shallow reveals | Requires careful driver and heatsink design |
Voltage: 12 V, 24 V, 48 V and why it is not a trivial choice
Lighting Line strip is available at 5 V, 12 V, 24 V, 48 V and 230 V. For bathroom lighting, the meaningful choice is between 12 V and 24 V, with 48 V relevant only to very long runs.
24 V is the correct default for almost all bathroom lighting. The reason is voltage drop. Current, for a given power, is inversely proportional to voltage; halving the current quarters the resistive power loss in the cable and halves the voltage drop for the same conductor. A 24 V system therefore supports roughly twice the run length of a 12 V system before the far end of the strip becomes visibly dimmer than the near end — a defect that is impossible to hide on a straight line of light along a wall.
12 V remains necessary in one situation: zone 0, and any position where the national wiring regulations require SELV at not more than 12 V AC or 30 V DC. Inside a bath tub or a fully submersible detail, 12 V is the requirement and the shorter permissible run length simply has to be designed around, typically by keeping runs very short and feeding them individually.
| Strip power | 12 V single feed | 24 V single feed | 24 V fed from both ends | 48 V single feed |
|---|---|---|---|---|
| 4.8 W/m | ~5 m | ~10 m | ~20 m | ~20 m |
| 6 W/m | ~4 m | ~8–9 m | ~17 m | ~18 m |
| 9.6 W/m | ~2.5 m | ~5–6 m | ~11 m | ~12 m |
| 14.4 W/m | ~1.5–2 m | ~4 m | ~8 m | ~9 m |
| 19.2 W/m | ~1.5 m | ~3 m | ~6 m | ~7 m |
The figures in Table 10 are conservative planning values that depend on the copper cross-section of the PCB and should always be checked against the manufacturer’s data for the specific product. The design lesson, however, is universal: if a bathroom run exceeds the single-feed limit, feed it from both ends or inject power at the midpoint rather than accepting a visible gradient. Because the two feeds must come from the same driver output at the same potential, this is an easy fix at design stage and an expensive one after tiling.
Power per metre: matching output to purpose
Lighting Line strip spans 4.8 W/m to 40 W/m. It is tempting to read higher wattage as better; in a bathroom the opposite is usually true. Higher power means more heat in a small enclosed detail, a larger driver, thicker cable, and (most importantly) a light level that is wrong for the layer.
- 4.8–6 W/m: orientation runs, night lighting, subtle accents, niche lighting. The 3000 K 6 W/m IP67 COB strip on a 3 mm PCB is an excellent example: low heat, tiny cross-section, fully sealed.
- 7–11 W/m: the main working band for bathroom lighting. Ceiling coves, mirror task lighting, under-vanity runs. The 2700 K COB strip at 10.5 W/m delivering 120 lm/W sits precisely here.
- 12–16 W/m: high-output applications: a single cove asked to light an entire room indirectly, or a cool-white task installation such as the 6000 K COB strip at 15.5 W/m. Aluminium profile is mandatory; thermal calculation is advisable.
- Above 16 W/m: rarely appropriate in a domestic bathroom. Reserve for commercial and hospitality applications with engineered heatsinking and verified thermal performance.
Efficacy, energy class and current control
Luminous efficacy (lumens per watt) determines both running cost and heat. Modern high-quality COB strip reaches around 120 lm/W at Ra>90, which is a genuinely high figure given that high CRI is achieved by broadening the phosphor spectrum at some cost to efficiency. European energy labelling assigns strip products a class from A to G under the EU energy labelling framework, and in the current scale most high-CRI architectural strip sits in the E to G range, this reflects the deliberately demanding rescaled thresholds rather than poor product performance, and a class F strip at Ra>90 is an entirely appropriate specification for a bathroom.
One product feature deserves particular mention for bathroom use: integrated current control. A strip with on-board constant-current regulation, such as the 2700 K COB strip with current control at 7.5 W/m, maintains consistent brightness along the run and across small supply-voltage variations. In a bathroom, where runs are often awkwardly fed and drivers sometimes sit at the end of a long cable, this substantially reduces the risk of a visible brightness gradient — the defect that most often makes an otherwise good installation look amateur.
6. Colour temperature, CRI and how bathroom lighting renders skin
If ingress protection is the compliance half of bathroom lighting, colour is the perceptual half and it is where the difference between a scheme that people love and one they merely tolerate is decided. Two numbers govern almost everything: correlated colour temperature, which describes the warmth or coolness of the white light, and the colour rendering index, which describes how faithfully that light reveals the colours of the objects it strikes. Both are routinely misunderstood, and in a bathroom both are unusually consequential because the object being lit is a human face.
Should bathroom lighting be warm or cool?
This is among the most-asked questions in the category and the usual answer “warm for relaxation, cool for tasks”: is true but useless, because it does not tell anyone what to buy. Here is a specific answer.
| CCT | Character | Best bathroom use | Skin rendering | Works with these finishes | Avoid when |
|---|---|---|---|---|---|
| 2200 K | Candle / amber | Night orientation, spa bath scenes | Very flattering, low detail | Brass, warm stone, terracotta, wood | Any task lighting |
| 2500 K | Deep warm | Evening ambient, plinth runs | Flattering | Warm marble, brushed brass, oak | Cool grey schemes |
| 2700 K | Warm residential | Ambient and accent default in homes | Warm, healthy | Almost everything warm-toned | Where colour accuracy is critical |
| 3000 K | Warm neutral | Best all-round bathroom choice | Natural and flattering | White, warm grey, chrome, marble | Very cool blue-grey palettes |
| 3500 K | Neutral | Mirror task light; cool-toned rooms | Accurate, still kind | Grey porcelain, concrete, black taps | Where a cosy mood is essential |
| 4000 K | Cool neutral | Precision grooming, make-up, shaving | Very accurate, slightly clinical | Cool grey, white, stainless | Evening ambient use |
| 5000–6500 K | Daylight / cool white | Commercial, clinical, colour matching | Accurate but unflattering | Clinical, hospitality back-of-house | Almost all domestic bathrooms |
| CCT 2700–6500 K tunable | Adjustable | The premium answer, all of the above | Selectable per task and time | Any | Where budget or control is limited |
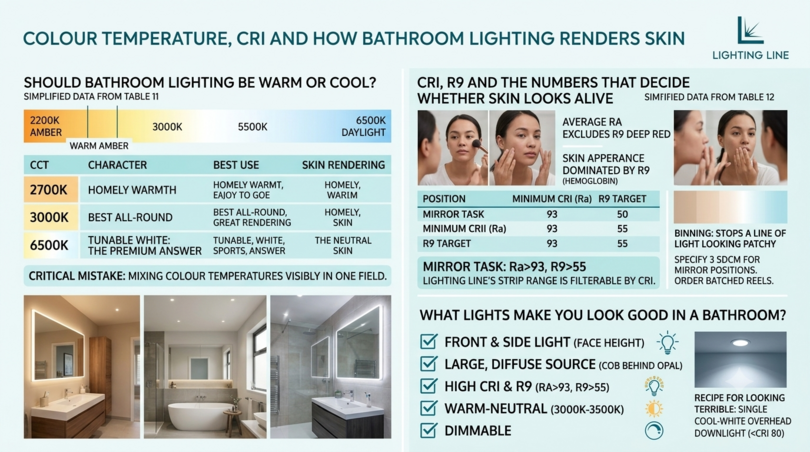
The single most common colour mistake in bathroom lighting is mixing colour temperatures within one visual field. A 3000 K cove above a 4000 K mirror light, both visible at once, reads unmistakably as a mistake: the warm light looks dirty and the cool light looks blue. If two different temperatures are genuinely wanted, they must be separated: different rooms, different scenes that never run simultaneously, or a difference of no more than 500 K. Otherwise, pick one temperature for the whole room and hold it.
This constraint is precisely what makes tunable white so valuable in a bathroom, and it is worth understanding why. A CCT strip such as the 2700–6500 K COB strip with CRI Ra>90, 600 LEDs/m, 24 V, 7.7 W/m lets every layer in the room shift together: 4000 K across the whole bathroom at 07:00 for shaving and make-up, 3000 K at 18:00, 2200 K at 22:30 for a bath. The colour temperatures never conflict because they never coexist. That is the technically correct way to have both, and it also answers the wellbeing and circadian brief discussed in Section 1.3.
CRI, R9 and the numbers that decide whether skin looks alive
The colour rendering index, expressed as Ra, is the average of how faithfully a light source renders eight standard pastel colour samples relative to a reference illuminant, scored out of 100. It is an old metric with well-known weaknesses, but it remains the industry currency and it is a useful filter: a strip that cannot state a CRI figure should not be installed in a bathroom.
The critical subtlety is that Ra is an average of eight desaturated samples and excludes the saturated samples R9 through R15. R9 is deep red. Because human skin owes its appearance to haemoglobin, R9 performance dominates how a face looks under a given light source far more than the Ra average does. A strip with Ra 90 and R9 of 12 will make a healthy person look grey and drawn while a strip with Ra 90 and R9 of 55 will make the same person look well. This is the entire explanation for why some bathroom mirrors are unbearable and others are not.
| Position | Minimum CRI | Recommended CRI | R9 target | Consequence of under-specifying |
|---|---|---|---|---|
| Mirror / vanity task light | Ra>90 | Ra>93 | >55 | Make-up mismatched outdoors; skin looks unwell |
| Ambient cove | Ra>85 | Ra>90 | >40 | Contaminates every other layer; tiles look flat |
| Shower and niche | Ra>80 | Ra>90 | >30 | Stone and tile colour reads wrong |
| Under-vanity accent | Ra>80 | Ra>90 | >30 | Timber and stone appear dull |
| Night orientation | Ra>80 | Ra>80 | n/a | Minimal — visual system is not colour-critical at 5 lux |
| Photography and video | Ra>93 | Ra>95 with TM-30 Rf/Rg data | >60 | Unfixable colour cast in post-production |
Lighting Line’s strip range is filterable by colour rendering across Ra>80, Ra>85, Ra>90 and Ra>93, which allows a designer to specify Ra>93 at the mirror and Ra>90 elsewhere without changing supplier or product family and therefore without introducing a colour mismatch between layers.
Binning: the specification that stops a line of light looking patchy
Two LEDs nominally rated 3000 K can differ visibly in colour. Manufacturers therefore sort production into bins, and the tightness of the binning is expressed in MacAdam ellipses or SDCM — standard deviation of colour matching. A 3-step MacAdam tolerance means the variation is at or below the threshold at which most observers notice a difference: a 5-step or 7-step tolerance is visible, particularly on a long continuous line.
Bathrooms punish loose binning more than other rooms for two reasons. First, the runs are often continuous and adjacent: two vertical mirror strips side by side make any difference between them immediately obvious. Second, mirrors multiply the number of places where two nominally identical runs appear next to each other. Always order the strip for a single bathroom as one batch, from one reel where possible, and specify 3 SDCM for mirror positions. Buying the second mirror strip six months later from a different production batch is a reliable way to produce a visible mismatch.
What lights make you look good in a bathroom?
Pulling the preceding three subsections together produces a concrete answer to a question people ask constantly. A face looks its best when the light satisfies five conditions simultaneously.
- It arrives from the front and the sides, at approximately face height: two vertical lines flanking the mirror, not a single line above it.
- It comes from a large, diffuse emitting surface: a COB strip behind an opal diffuser in a profile, so the apparent source is a soft band rather than a point.
- It renders red faithfully: Ra>93 with R9 above 55.
- It is warm-neutral rather than cool: 3000 K to 3500 K for general use, moving to 4000 K only where colour-matching precision outweighs flattery.
- It is dimmable, because the ideal level for applying make-up at 07:30 is not the ideal level for looking in the mirror at 23:00.
Conversely, the reliable recipe for making everyone look terrible is a single cool-white downlight directly overhead with a CRI in the low 80s. It is also, unfortunately, the most commonly installed bathroom lighting arrangement in existence.
7. Aluminium profiles: the component that decides whether bathroom lighting looks professional
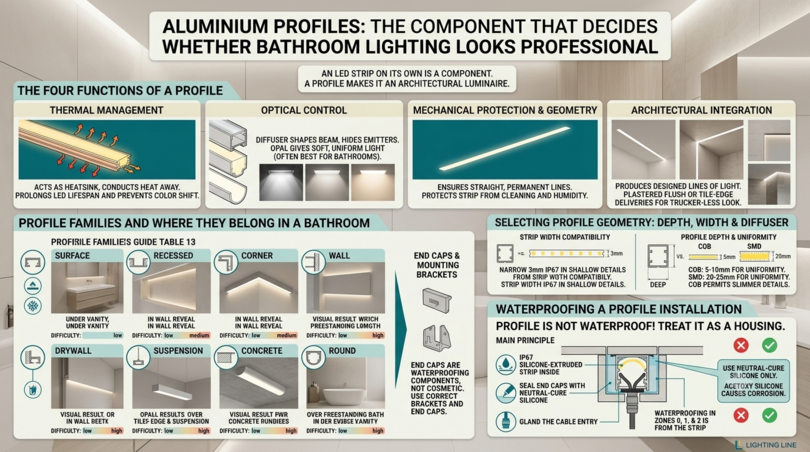
An LED strip on its own is a component, not a luminaire. What turns it into architectural bathroom lighting is the extruded aluminium profile it sits in and this is the part of the specification most often treated as an afterthought, with predictable results. The profile performs four distinct jobs at once, and each of them affects either the appearance or the lifespan of the installation.
The four functions of a profile
Thermal management: LEDs convert a substantial fraction of their input power into heat, and that heat has to leave the junction. Junction temperature is the primary determinant of both lumen depreciation and colour shift over time. An extruded aluminium channel acts as a heatsink, conducting heat away along its length and radiating it into the room. A strip above about 8–10 W/m installed without a profile (adhered directly to plasterboard, tile or timber) will run hot, lose output faster, and shift colour. In a bathroom, where details are often enclosed and ventilation is poor, this threshold is lower still. Aluminium profile is not optional for bathroom lighting: it is part of the product.
Optical control: the diffuser turns a bright line into a soft one, hides the emitters, and defines the beam. An opal diffuser gives the softest, most even output at some cost to efficiency; a frosted diffuser transmits more light with slightly more visible structure, a clear cover maximises output and protects the strip but does nothing optically. For bathroom lighting, opal is almost always correct, because every position is either visible directly or visible in a mirror.
Mechanical protection and geometry: a profile gives a crisp, straight, permanent line. Strip adhered directly to a wall follows every irregularity in the substrate, and adhesive on a silicone-jacketed strip in a humid room is a temporary arrangement at best. A profile also protects the strip from cleaning cloths, from mops, and from being knocked.
Architectural integration: a recessed profile plastered flush into a ceiling produces a line of light with no visible hardware. A tile-edge profile produces a lit shadow gap between two tiled planes. This is what distinguishes designed bathroom lighting from added bathroom lighting.
Profile families and where each belongs in a bathroom
Lighting Line manufactures 126 profile variants across eight families, all with original Italian design and all dimensioned to work with the strip range. The selection logic for a bathroom is as follows.
| Profile family | Mounting | Best bathroom application | Visual result | Installation difficulty |
|---|---|---|---|---|
| Surface | Screwed or bonded to a finished face | Retrofit mirror verticals, under-vanity runs, upgrades without demolition | Visible slim channel | Low — the retrofit answer |
| Recessed | Set into a routed or formed channel | Flush ceiling lines, vanity worktop reveals, joinery integration | Flush line of light, no hardware visible | Medium — needs a channel |
| Corner | 45° internal corner | Junction of wall and ceiling, inside a niche, behind a mirror for halo effect | Diagonal wash across both planes | Low |
| Wall | Wall-mounted, often asymmetric emission | Up-and-down wall washing, mirror flanking, bath surround | Directional grazing light | Low–medium |
| Drywall | Plastered in, edge-to-plaster | Trimless ceiling slots and wall reveals, the premium detail | Light appears from a gap in the plaster | High, needs coordination with plasterer |
| Suspension | Suspended on wires | Linear pendant over a double vanity or a freestanding bath | Floating line, up and down light | Medium |
| Concrete | Cast into concrete | Poured concrete vanity tops, benches, seats in wet rooms | Light integral to the structure | High, must be set before pour |
| Round | Circular section | Curved features, mirror perimeters, decorative rings | Tubular line of light | Medium |
Beyond the profiles themselves, the components that determine whether an installation survives are the end caps (168 variants, matched to each profile family, and available in tiling versions specifically for details that terminate into a tiled surface) and the mounting brackets, of which there are 58 including baseboard versions for skirting-level orientation runs. In a bathroom, the end cap is a waterproofing component, not a cosmetic one. An open profile end in a shower recess is a drain into the cavity behind the tile.
Selecting profile geometry: depth, width and diffuser distance
The internal channel of the profile must accommodate the PCB width and the encapsulation. Lighting Line strip is available in widths from 3 mm to 30 mm, and the narrow 3 mm IP67 products exist precisely so that sealed strip can be used in shallow architectural details where a standard 10 mm strip in an 8 mm silicone jacket will not fit.
Profile depth governs the distance from the emitting surface to the diffuser, and that distance governs uniformity. The rule of thumb for COB is that 5 to 10 mm between emitter and opal diffuser produces a fully homogeneous line: for SMD at 120 LEDs/m, 20 to 25 mm is needed, which is why COB permits much slimmer bathroom details. If a designer wants a 10 mm-deep reveal in a tiled wall with a perfectly even line of light, COB is the only technology that will deliver it.
Waterproofing a profile installation
A profile is not itself waterproof. An aluminium channel with an opal cover and two end caps is a splash-resistant enclosure at best, and in a wet zone it must be treated as a mechanical housing that happens to contain a separately sealed strip. This produces the governing principle for bathroom profile installation:
In Zones 0, 1 and 2, waterproofing is provided by the strip’s own encapsulation, not by the profile: use an IP67 silicone-extruded strip inside the profile, seal the profile’s end caps with neutral-cure silicone, gland the cable entry, and treat the profile purely as heatsink, optic and geometry. Where the profile is recessed into tile or plaster, the perimeter joint between profile and tile should be sealed with a sanitary-grade, mould-resistant, neutral-cure silicone: not an acetoxy-cure product, which releases acetic acid during cure and will corrode aluminium and attack solder joints. This is one of the most common and most avoidable causes of premature failure in bathroom LED installations, and it is entirely a matter of buying the correct tube of sealant.
8. Wiring layout: drivers, cable sizing, voltage drop and dimming
A bathroom lighting scheme is only as good as its wiring layout, and the wiring layout is the part that cannot be changed after the tiler leaves. Everything in this section has to be decided before first fix, because every element of it (where the driver lives, which route the low-voltage cables take, how many circuits exist, how the dimming works) is buried inside the construction. This is where good bathroom lighting is actually won or lost, and it is the section that architects and specifiers should read most carefully, because the decisions belong to them and the consequences belong to whoever owns the building for the next twenty years.
Where the driver goes, and why it matters so much
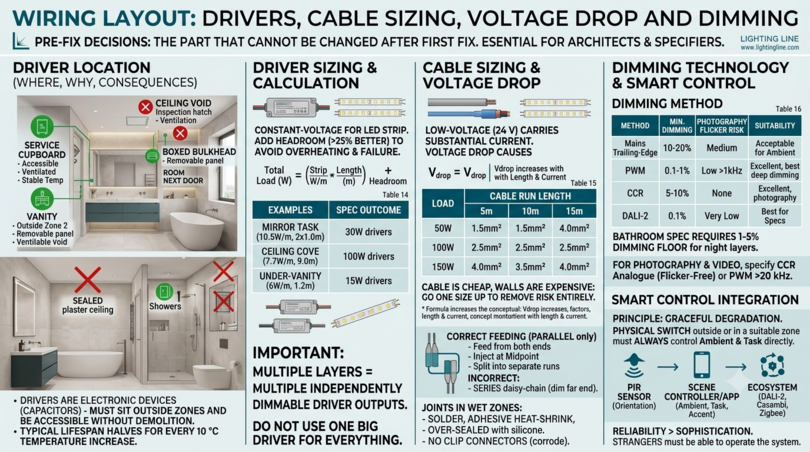
An LED driver is a mains-voltage electronic device containing electrolytic capacitors. Two facts follow from that. It must sit outside the bathroom zones, and it is the component most likely to fail first, typically well before the LEDs themselves, because capacitor life is strongly temperature-dependent and halves for roughly every 10 °C of additional operating temperature. A driver rated for 50,000 hours in a 25 °C ambient may deliver a fraction of that in a sealed, unventilated void above a bathroom ceiling in summer.
The design consequence is unambiguous: every driver in a bathroom lighting installation must be accessible without demolition. Acceptable locations, in descending order of preference:
- A service cupboard or airing cupboard adjacent to the bathroom: ventilated, accessible, outside all zones, at stable temperature. This is the professional answer and should be planned into the architecture.
- Inside a vanity unit that sits outside Zone 2: in a compartment with airflow and a removable panel. Convenient and accessible, but check the zone geometry carefully: a vanity within 0.6 m of a shower opening is in Zone 2.
- A ceiling void accessed through a proper inspection hatch or through a removable luminaire aperture: acceptable if there is genuine access and genuine ventilation.
- A boxed bulkhead with a removable panel: works well where a ceiling has been dropped anyway to accommodate a cove.
- The room next door, on the other side of the wall, in an accessible enclosure. Perfectly valid and often the easiest solution in a retrofit.
Unacceptable: sealed inside a plasterboard ceiling with no hatch, inside a tiled wall cavity, inside a shower enclosure at any rating, in an unventilated void immediately above a heat source, anywhere that requires breaking finishes to reach. A specification that does not state the driver location is an incomplete specification.
Driver sizing
Constant-voltage drivers are used for LED strip. Sizing is straightforward arithmetic but is frequently done wrong in two ways: forgetting to include the whole run, and running the driver at 100 percent of its rating.
The calculation: total load in watts equals strip power per metre multiplied by total metres on that driver output. Then add a minimum of 20 percent headroom: 25 to 30 percent is better in an enclosed bathroom void. A driver run continuously at its full nameplate rating gets hot, and hot drivers fail. A 100 W driver carrying 75 W will comfortably outlive a 100 W driver carrying 98 W.
| Layer | Strip | Length | Load | +25% headroom | Driver to specify |
|---|---|---|---|---|---|
| Mirror task, two verticals | 10.5 W/m COB 2700 K | 2 × 1.0 m = 2.0 m | 21 W | 26 W | 30 W, 24 V, dimmable |
| Ceiling perimeter cove | 7.7 W/m CCT COB | 9.0 m | 69 W | 87 W | 100 W, 24 V, tunable-white |
| Under-vanity accent | 6 W/m IP67 COB 3000 K | 1.2 m | 7.2 W | 9 W | 15 W, 24 V, dimmable |
| Shower niche | 6 W/m IP67 COB 3000 K | 0.9 m | 5.4 W | 7 W | Share the accent driver output |
| Skirting orientation | 4.8 W/m IP67 COB 2200 K | 4.5 m | 22 W | 27 W | 30 W, 24 V, deep-dimming |
| Whole bathroom total | — | 17.6 m | 125 W | 156 W | 4 driver outputs, 4 circuits |
Note the structural point in Table 14: four layers means four independently dimmable driver outputs, not one big driver. A single 200 W driver feeding everything makes the four-layer method impossible, because the layers can then only be dimmed together. This is the most common wiring error in otherwise well-designed bathroom lighting schemes, and it is invisible on a plan drawing unless someone thinks to check.
Cable sizing and voltage drop
The low-voltage cable between driver and strip carries substantial current at low voltage, which makes voltage drop a real design constraint rather than a theoretical one. At 24 V, a 3 percent drop is only 0.72 V and a strip at 23.3 V is measurably dimmer than one at 24 V.
Voltage drop in a two-core run is calculated as Vdrop = 2 × L × I × ρ / A, where L is the one-way cable length in metres, I is the current in amps, ρ is the resistivity of copper (approximately 0.0175 Ω·mm²/m) and A is the conductor cross-section in mm². The factor of two accounts for the return path.
| Load on the run | Current at 24 V | Cable run 2 m | Cable run 5 m | Cable run 10 m | Cable run 15 m |
|---|---|---|---|---|---|
| 10 W | 0.42 A | 0.5 mm² | 0.75 mm² | 1.0 mm² | 1.5 mm² |
| 25 W | 1.04 A | 0.75 mm² | 1.0 mm² | 1.5 mm² | 2.5 mm² |
| 50 W | 2.08 A | 1.0 mm² | 1.5 mm² | 2.5 mm² | 4.0 mm² |
| 75 W | 3.13 A | 1.5 mm² | 2.5 mm² | 4.0 mm² | 6.0 mm² |
| 100 W | 4.17 A | 1.5 mm² | 2.5 mm² | 4.0 mm² | 6.0 mm² |
| 150 W | 6.25 A | 2.5 mm² | 4.0 mm² | 6.0 mm² | 10 mm² |
Two practical observations. First, the cable is cheap and the wall is expensive: going one size up costs a few euros and removes the risk entirely. Second, the table explains why driver placement and cable routing are a single decision. Moving a driver from an airing cupboard 3 m away to a distant loft 14 m away can multiply the required cable cross-section by four. Plan the driver close to the load.
Feeding strategy
Voltage drop also occurs along the strip itself, through the copper of the PCB. Where a run exceeds the single-feed limit, there are three correct responses and one incorrect one.
- Feed from both ends: run cable to both terminations of the strip from the same driver output. This halves the effective length and is the simplest fix. Both feeds must come from the same output at the same potential.
- Inject at the midpoint: bring a feed to the centre of the run. Functionally similar to end-feeding.
- Split into separate runs on separate outputs: cleanest for very long perimeter coves; requires that the outputs are dimmed in lockstep or the join will be visible.
- Incorrect: connecting strip end-to-end in series to extend the run. This is the single most common cause of the “dim at the far end” complaint. Strips are connected in parallel to the supply, never daisy-chained beyond the manufacturer’s stated maximum length.
For joints, Lighting Line supplies PCB LED strip connectors, which are appropriate for dry positions outside the zones. Inside a wet zone, every joint should be soldered, insulated with adhesive-lined heat-shrink, and over-sealed with neutral-cure silicone. Mechanical clip connectors rely on spring pressure against a copper pad and will corrode in a humid, chloride-containing atmosphere.
Dimming: the technology choice that determines how the room feels
Dimming is not an optional refinement in bathroom lighting; it is what makes the four-layer method deliver four different rooms. But the dimming method matters, because the low-level performance that a bathroom needs is exactly where cheap dimming falls apart.
| Method | How it works | Practical dimming floor | Flicker risk | Bathroom suitability | Notes |
|---|---|---|---|---|---|
| Mains trailing-edge dimming of the driver | Phase-cut on the primary side | 10–20% | Medium | Acceptable for ambient only | Compatibility must be verified driver-by-driver |
| PWM on the secondary | Rapid on/off switching of the DC output | 0.1–1% | Low if frequency >1 kHz | Excellent | Best for deep dimming, use high PWM frequency for video |
| Constant-current reduction (CCR / analogue) | Reduces drive current | 5–10% | None | Excellent, flicker-free | Slight colour shift at low output, ideal for photography |
| 0–10 V / 1–10 V | Analogue control signal to driver | 1–5% | Low | Very good | Reliable, needs control wiring |
| DALI / DALI-2 | Digital addressable bus | 0.1% | Very low | Best for specification projects | Per-driver addressing, scenes, tunable white, diagnostics |
| Casambi / Bluetooth mesh | Wireless mesh, app control | 0.1–1% | Low | Best for retrofit | No control cabling, excellent for renovations |
| Zigbee / Matter / Thread | Smart-home ecosystem protocols | 1% | Low | Very good | Integrates with voice and home automation |
| Wi-Fi controllers | Direct IP control | 1% | Medium | Adequate | Latency and cloud dependency are the weak points |
The critical specification for a bathroom is the dimming floor, the lowest output the system can reach and hold stably. The night-orientation layer needs to run at roughly 1 to 5 percent of full output. A mains phase-cut dimmer that gives up at 15 percent cannot produce that layer at all: the light will either be too bright to be restful or will flicker and drop out. This is why PWM, CCR, 0–10 V, DALI or a good Bluetooth mesh controller are the correct choices for a bathroom, and why the orientation layer in particular should never be on a basic phase-cut circuit.
A second bathroom-specific point concerns flicker. Anyone photographing or filming in a bathroom and that now includes a large population of content creators as well as every estate agent and interior photographer — will encounter banding artefacts if the PWM frequency is low relative to the camera’s shutter or rolling-shutter readout. For photographic and video use, specify either CCR analogue dimming, which is genuinely flicker-free, or PWM at a frequency above 20 kHz. This is a small note in a specification that saves an enormous amount of frustration later.
Smart control and home automation integration
For contractors and homeowners asking how to integrate bathroom lighting into a smart home, the architecture that works reliably is layered and deliberately conservative.
The principle is graceful degradation: the bathroom lighting must work when the internet does not, when the app is being updated, and when a guest who has never seen the house needs the light on. That means a physical switch outside the door, or a sealed switch appropriate to the zone, must always control at least the ambient and task layers directly. Automation is added on top of that, never underneath it.
Above the physical layer, the practical arrangement is: a PIR or microwave occupancy sensor driving the orientation layer automatically with a time-of-day condition, a scene controller or app handling the accent and ambient layers, a tunable-white schedule shifting colour temperature across the day and a humidity-linked extract fan interlock that is separate from the lighting circuits. DALI-2 is the right backbone for a specification-grade new build, Casambi or a comparable Bluetooth mesh is the right choice for a retrofit where no control cabling exists, Zigbee or Matter is right where the client already has an established smart-home ecosystem.
One caution worth stating plainly: bathroom lighting is the wrong place to experiment with an unproven control system. It is used by every occupant and every guest, often at speed, often half-asleep, sometimes wet. Reliability outranks sophistication, and any control scheme that cannot be operated by a stranger without instruction has failed regardless of how impressive it is in the app.
9. Position-by-position recipes for bathroom lighting
This section converts everything above into ten specific, buildable details. Each recipe states the position, the effect it produces, the strip and profile to use, the IP rating required, the output, the mounting geometry and the mistakes to avoid. These are the details that appear in specification-grade bathroom lighting, and any five of them together produce an outstanding room.
Mirror side verticals: the single highest-value detail
Effect: even, flattering, shadow-free illumination of the face. The correct answer to the entire mirror lighting problem.
Specification: two vertical runs, one either side of the mirror, each 900–1,000 mm long, mounted with the centre of the run at approximately 1,500–1,600 mm above finished floor level so the illuminated band spans roughly 1,050 mm to 1,950 mm. Set the runs 80–150 mm clear of the mirror edge. Use a surface or recessed profile with an opal diffuser. Strip: high-CRI COB at 480–600 LEDs/m, Ra>93 preferred, 3000 K or 3500 K or tunable, 10–11 W/m to deliver 700–1,000 lm per side.
IP: IP65 minimum; IP67 if the basin is within 0.6 m of a shower opening.
Mistakes to avoid: mounting the strips behind the mirror glass so the light passes through the mirror, which loses most of the output and turns the mirror into a grey haze; using a clear rather than opal diffuser, which puts a visible bright line in the field of view; and using a dotted low-density SMD strip, which will be reflected as a row of dots in every mirror in the room.
Mirror halo backlight
Effect: a soft glow of light on the wall from behind the mirror, making it appear to float. Produces almost no useful task light but transforms the perceived quality of the room, and provides an excellent low-level evening layer.
Specification: a continuous run around the rear perimeter of the mirror, set in from the mirror edge by 20–40 mm and mounted in a corner profile angled at 45° so the light is thrown outward and backward onto the wall rather than sideways into the gap. The mirror must be held off the wall by 25–40 mm. Strip: COB, 6 W/m, 2700 K or 3000 K, IP67 given the sealed and inaccessible location.
Mistakes to avoid: insufficient standoff, which produces a hard bright edge instead of a glow; a strip too close to the mirror edge, which makes the source visible from an oblique angle; and using a non-IP-rated strip in a permanently sealed position.
Under-vanity float
Effect: a wall-hung vanity appears to float; the floor is gently lit; the room reads as larger because the floor plane continues visually beneath the unit.
Specification: a run along the front underside of the vanity carcass, set back 30–50 mm from the front face so the strip is invisible from standing height. Recessed or surface profile with opal diffuser, oriented to throw down and slightly forward. Strip: COB 6 W/m at 2700 K or 3000 K, 300–500 lm/m.
IP: IP67. This is non-negotiable: the detail sits at mop height and will be hit by floor-washing water from below throughout its life.
Shower niche and recess lighting
Effect: the tiled niche becomes a lit alcove; bottles and soap are visible; the shower gains a focal point that reads as hotel-grade.
Specification: the strip is mounted on the inside of the front upper lip of the niche, facing inward and downward, so it grazes down the back face and across the shelf. A 3 mm PCB IP67 extruded silicone strip is ideal because the available depth in the lip detail is usually minimal. Length matched to the niche width; output modest at 200–400 lm/m; 3000 K to keep the tile warm.
IP: IP67 absolutely. This is Zone 1, the hand shower will be aimed into the niche, water pools on the shelf, and the detail is permanently sealed behind tile.
Mistakes to avoid: mounting the strip on the shelf surface where water pools; running the cable through the tile without a sealed sleeve and gland; failing to plan the cable route before tiling — retrofitting a niche light after the tiling is complete is effectively impossible.
Ceiling perimeter cove
Effect: the primary ambient layer. Indirect light off the ceiling produces a soft, shadow-free field and visually raises the ceiling height.
Specification: a continuous slot around the room perimeter, or along two facing walls, with the strip set 60–100 mm below the ceiling and 60–80 mm back from the front lip so the source is never visible from the doorway. Drywall profile for a trimless plastered result; surface or recessed profile in a formed cove. Strip: COB at 7.7–10.5 W/m, 400–700 lm/m, 2700–3000 K or tunable CCT.
IP: IP65 as good practice, IP67 within 0.6 m of a shower or above a shower.
Mistakes to avoid: setting the strip too close to the ceiling, which produces a bright hot band immediately above the cove and a rapid falloff instead of an even wash, running the cove across only one wall, which produces a strongly directional and uneven ambient field and forgetting that a long perimeter run will need feeding from both ends.
Skirting and plinth orientation run
Effect: the night-safety layer. A low line of very warm light at floor level makes the room navigable without waking anyone.
Specification: a run in a shadow-gap detail at the base of the wall, or recessed into a vanity plinth, or under the front lip of a bath panel. Baseboard mounting brackets and a recessed or wall profile. Strip: 4.8–6 W/m COB at 2200 K or 2500 K, run at 5–15 percent output for 40–120 lm/m. Control: PIR with a time-of-day condition, on its own deep-dimming driver output.
IP: IP67. The floor is where all water eventually goes.
Bath surround reveal
Effect: light emerging from beneath the rim of a built-in bath, or from a reveal in the bath surround, producing the spa effect at the point in the room where it is most wanted.
Specification: recessed profile in the surround upstand or under the bath rim, throwing light down and outward. Strip: 4.8–6 W/m, 2200–2700 K, deeply dimmable. Consider an RGB+CCT SMD strip here if the client wants colour scenes, this is the one position in a bathroom where colour change is genuinely useful rather than gimmicky.
IP: IP67, and IP68 with SELV 12 V if any part of the detail is inside Zone 0.
Feature-wall grazing slot
Effect: a vertical or horizontal slot of light grazing across a textured or large-format tile, revealing relief and material character. The detail that makes an expensive tile look expensive.
Specification: the strip must be very close to the wall plane — 10–25 mm and aimed almost parallel to it. Corner or wall profile. COB mandatory, because any dotting will be magnified into a scalloped pattern across the tile. 6–10 W/m, colour temperature matched to the tile: 2700 K for warm stone and travertine, 3000–3500 K for white and grey porcelain, 3500 K for concrete effect.
Suspended linear over a double vanity or freestanding bath
Effect: a floating line of light that provides both downward task light and upward ambient light, and acts as the visual anchor of the room.
Specification: suspension profile with a bi-emission opal diffuser, hung 700–850 mm above a vanity top or 1,900–2,100 mm above finished floor over a bath. COB at 10–11 W/m, Ra>90, 3000 K. Confirm zone geometry: over a freestanding bath this is likely to be Zone 1, requiring IP65 as a minimum and careful attention to the suspension and cable entry sealing.
Threshold and step lighting in a wet room
Effect: defines the level change or the boundary of a wet area, which is a genuine safety function in a room finished in a single pale material throughout.
Specification: a recessed run in the vertical face of the step or in the shadow gap at the wet-area boundary, throwing light across the floor to create a luminance gradient at the edge. 4.8–6 W/m, 2500–3000 K, IP67, on the orientation circuit so it is always on at night.
| Detail | Layer | Strip | Output | CCT | IP | Profile | Impact |
|---|---|---|---|---|---|---|---|
| Mirror side verticals | Task | COB 480–600, Ra>93 | 700–1,000 lm/side | 3000–3500 K | IP65–67 | Surface / recessed | Very high |
| Mirror halo backlight | Accent | COB 6 W/m | 300–400 lm/m | 2700–3000 K | IP67 | Corner 45° | High |
| Under-vanity float | Accent | COB 6 W/m | 300–500 lm/m | 2700–3000 K | IP67 | Recessed / surface | Very high |
| Shower niche | Accent | COB 3 mm PCB 6 W/m | 200–400 lm/m | 3000 K | IP67 | Micro recessed | High |
| Ceiling cove | Ambient | COB 7.7–10.5 W/m | 400–700 lm/m | 2700–3000 K / CCT | IP65–67 | Drywall / recessed | Very high |
| Skirting orientation | Night | COB 4.8–6 W/m | 40–120 lm/m | 2200–2500 K | IP67 | Recessed / baseboard | High |
| Bath surround reveal | Accent | COB or RGB+CCT | 200–400 lm/m | 2200–2700 K | IP67–68 | Recessed | Medium–high |
| Feature-wall graze | Accent | COB 6–10 W/m | 400–600 lm/m | Match the tile | IP65 | Corner / wall | High |
| Suspended linear | Task + ambient | COB 10–11 W/m | 600–900 lm/m | 3000 K | IP65 | Suspension | High |
| Threshold / step | Night / safety | COB 4.8–6 W/m | 80–150 lm/m | 2500–3000 K | IP67 | Recessed | Medium |
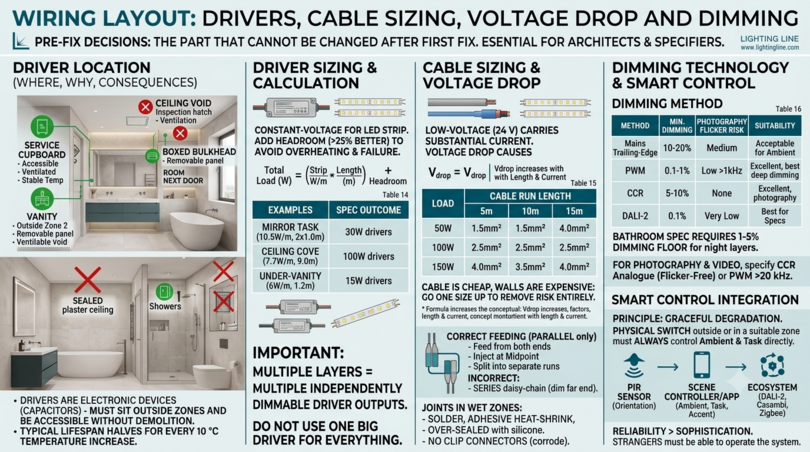
10. Considerazioni sicure e igieniche nell’illuminazione del bagno
Questa sezione affronta una serie di considerazioni che quasi nessuna guida all’illuminazione del bagno copre, e che i professionisti di specificatori interrogano sempre di più: la sicurezza dei materiali, la resistenza chimica e le prestazioni igieniche dei componenti che finiscono per essere installati permanentemente in una stanza umida, calda e frequentemente disinfettata, dove le persone sono spoglie e dove le superfici vengono toccate a mani nude.
Perché i gradi in silicone sono rilevanti per l’illuminazione dei bagni
Una striscia LED IP65 o IP67 è, materialmente parlando, un assemblaggio rame e fosforo incapsulato in silicone. Quel silicone è la superficie che vive nella stanza. In bagno viene esposto continuamente all’aria calda e umida, periodicamente all’acqua calda diretta e regolarmente a qualsiasi prodotto detergente preferito dall’occupante, che può essere un tensioattivo alcalino, un rimuovente acido per il calcare, una candeggina che rilascia cloro o un disinfettante a base di alcol. Potrebbe anche essere a portata di mano dei bambini.
Il silicone non è un materiale unico: va da composti industriali di bassa qualità contenenti riempitivi, estensori, residui catalizzatori e plastificanti, fino a gradi ad alta purezza polimerizzati al platino, idonei per uso a contatto alimentare e medico. La distinzione è importante in un bagno per quattro motivi.
Migrazione di plastificanti e additivi: gli elastomeri di bassa qualità possono liberare additivi a temperature e umidità elevate. Una striscia LED funziona calda, in modo permanente, in una stanza umida. Nel corso degli anni, gli additivi migrati producono una pellicola superficiale appiccicosa che attrae e trattiene residui di sapone e terra biologica, e una superficie appiccicosa in un bagno è un problema di igiene più che estetico. Un silicone adeguatamente polimerizzato, ad alta purezza senza plasticante libero, non fa questo. Il silicone di grado a contatto alimentare è specificato precisamente in base ai limiti di migrazione, motivo per cui rappresenta un indicatore significativo per la stabilità della superficie a lungo termine in un bagno.
Resistenza chimica: il silicone qualificato per il contatto con gli alimenti e il lavaggio ripetuto con acqua calda è stato valutato rispetto a detergenti, alcali e acqua calda a temperature ben superiori a quelle prodotte da un bagno. Gli incapsulanti di grado industriale possono fragilizzare, ingiallirsi, deformarsi o perdere l’adesione alla PCB se ripetutamente puliti con candeggina o rimuovente calcare. La perdita di adesione all’interfaccia silicone-PCB è il meccanismo preciso di guasto che trasforma una striscia IP67 in una striscia IP20 senza alcun cambiamento visibile, ed è per questo che la resistenza chimica è un problema di protezione dall’ingresso e non solo estetico.
Colonizzazione microbica: i bagni supportano muffa, muffa e biofilm. Una superficie liscia, non porosa e chimicamente inerte, senza micro-crassioni e senza film appiccicosi, è davvero difficile da colonizzare per questi organismi. Una superficie degradata, con sfioramento additivo e micro-crepata è un ottimo substrato per loro. Questo è il più forte argomento di sicurezza per specificare l’incapsulamento di qualità nell’illuminazione del bagno: la scelta del materiale determina se un apparecchio rimane pulibile per vent’anni o diventa una linea di stampo color stucco dopo cinque anni.
La lista di controllo per materiali e conformità per l’illuminazione del bagno
| Proprietà | Perché è importante in un bagno | Cosa chiedere al fornitore | Risposta accettabile |
|---|---|---|---|
| Grado in silicone e sistema di polimerizzazione | Determina migrazione, aderenza, resistenza chimica, longevità | L’incapsulamento è un silicone ad alta purezza e privo di additivi? Quale sistema di cura? | Grado polimerizzato al platino o equivalente ad alta purezza; Nessun plastificante gratuito |
| Idoneità al contatto alimentare dell’incapsulante | Il miglior proxy disponibile per la stabilità e l’inerzia della superficie | Il composto siliconico è qualificato secondo i criteri di migrazione a contatto con il cibo? | Conformità documentata al quadro applicabile per il contatto alimentare |
| Conformità RoHS | Sostanze pericolose proibite in una bagna umida occupata | Il prodotto è conforme a RoHS? | Sì, con dichiarazione |
| REACH / SVHC | Sostanze di grande interesse in un ambiente domestico | Il prodotto contiene SVHC sopra la soglia? | No, con dichiarazione |
| Costruzione senza alogeni | Corrosione nelle atmosfere umide; Tossicità da fumo nel fuoco | L’isolamento dei cavi e l’incapsulante sono privi di alogeni? | Preferito senza alogeni in tutto |
| Stabilità UV e ingiallimento | Il silicone vicino a una finestra o sotto un forte giallo chiaro cambia colore | Qual è la sopravvalutazione della durata della performance di ingiallimento? | Incapsulamento in silicone invece che in poliuretano o epossidica |
| Resistenza a detersivi e disinfettanti | La striscia verrà pulita con candeggina e rimuovente calcare | L’incapsulante è stato valutato contro detergenti alcalini e a base di cloro? | Resistenza documentata; silicone invece di PU |
| Finitura superficiale | Superfici lisce e non porose resistono al biofilm | L’estrusione è liscia e non appiccicosa alla temperatura di esercizio? | Superficie estrusa liscia, senza aderenza |
| Compatibilità con i sigillanti | Il silicone acetossico corrode l’alluminio e la saldatura | Quale sigillante è compatibile con il profilo e la striscia? | Polimerizzazione neutra, di qualità sanitaria, resistente alla muffa |
| Intervallo di temperatura di funzionamento | Vapore, riscaldamento a pavimento, vuoti chiusi | Qual è la gamma ambientale classificata? | Comodamente sopra la temperatura di dettaglio chiusa |
| Sicurezza elettrica del sistema a bassa tensione | Occupanti bagnati ed elettricità | Il conducente è classificato SELV e adeguatamente certificato? | Uscita SELV, certificato CE, driver certificato |
Pulizia e disinfezione: come mantenere l’illuminazione del bagno senza rovinarla
Il modo più comune in cui una buona illuminazione del bagno viene danneggiata è pulirla. Questo vale la pena menzionarlo nelle specifiche e nei documenti di consegna, perché i prodotti che rimuovono il calcare in modo più efficace sono anche quelli più propensi ad attaccare un incapsulante, un diffusore in policarbonato o una finitura in alluminio anodizzato.
Cosa è sicuro: un panno in microfibra morbido, acqua tiepida e un detergente a pH neutro o leggermente alcalino. Pulisci invece di strofinare. Asciuga dopo, perché è l’acqua stagnante e i residui a causare problemi, non l’acqua stessa.
Cosa evitare: detergenti abrasivi per crema e tamponi abrasivi, che micrograffiano un diffusore in policarbonato e trasformano una superficie trasparente o opale in una permanentemente offuscata; rimuoventi di calcare acidi concentrati lasciati a contatto con l’alluminio anodizzato, che incidono la finitura; detergenti a base di solventi, tra cui acetone e alcoli forti sul policarbonato, che causano fessurature e eventuali crepe; e pulitori a vapore diretti a un reparto di illuminazione, che spingono il vapore caldo oltre guarnizioni testate contro acqua liquida invece che vapore pressurizzato.
La regola pratica per chi occupa è semplice e dovrebbe essere inserita nel pacchetto di consegna: mai spruzzare un prodotto per la pulizia direttamente su una lampada o su una luce accesa. Spruzza il panno, poi pulisci. Questa singola abitudine elimina la maggior parte del rischio, ed è facile comunicare.
Ventilazione: il fattore igienico che determina la durata dell’illuminazione
Nessuna protezione dall’ingresso compensa un bagno che non si asciuga. Una stanza che rimane ad alta umidità relativa per ore dopo ogni doccia corroderà le terminazioni, favorirà la formazione di muffa in ogni giunzione e farà entrare condensa in qualsiasi vuoto dove si trova un driver o un connettore. La ventilazione a estrazione fa quindi parte della specifica di illuminazione, anche se non fa parte dell’illuminazione.
I punti rilevanti per un progettista di illuminazione: specificare una velocità di estrazione appropriata per la stanza e le normative edilizie nazionali, utilizzare un estrattore rilevante o a flusso in modo che continui dopo la fine della doccia, assicurarsi che qualsiasi vuoto sul soffitto contenente driver o connettori sia ventilato o completamente sigillato dalla stanza, mai parzialmente entrambi; ed evitare di posizionare un driver direttamente sopra la doccia, dove il vuoto sarà la parte più calda e umida del soffitto. Un bagno ben ventilato con illuminazione IP65 durerà più di uno mal ventilato con IP67.
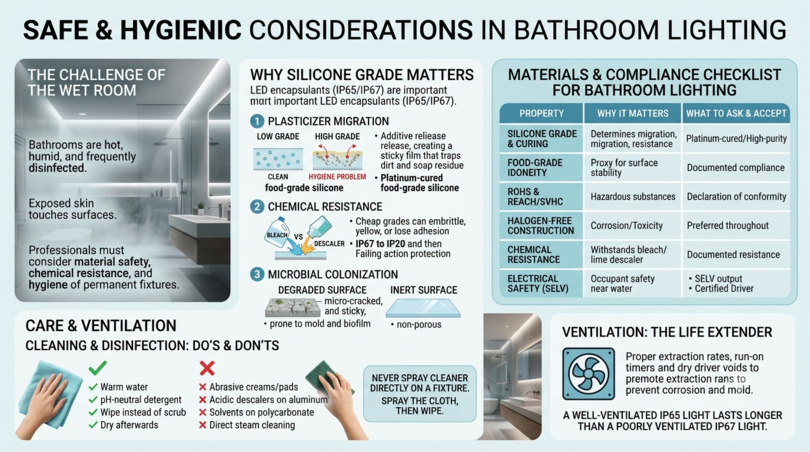
11. Small bathroom lighting: making a tight room feel generous
Small bathroom lighting is one of the highest-volume question clusters in the demand data, and it is genuinely a different design problem rather than a scaled-down version of the same one. In a 2.5 m² cloakroom or a 4 m² en-suite, every surface is close to every other surface, sightlines are short, and there is nowhere for a glare source to hide. The instinct (fewer, smaller fittings) is exactly wrong.
The governing principle for small bathrooms
In a small bathroom, light the surfaces and hide every source. Do not add fittings; add lit surfaces. A small room feels larger when its boundaries are legible and evenly lit, because the visual system reads an evenly lit surface as further away than a shadowed one. A small room feels smaller when a bright point source dominates the field of view, because the eye adapts to the bright object and everything else recedes into relative darkness.
This produces a specific and slightly counter-intuitive strategy. A 3 m² cloakroom is better served by a perimeter cove washing the ceiling, two slim mirror verticals and a skirting-level orientation run (three concealed linear elements) than by a single ceiling fitting, even though the first option contains more lighting. The concealed scheme produces even boundary luminance and no glare, the single fitting produces one bright dot and a shadowed room.
Specific tactics for small bathroom lighting
- Use vertical light to gain apparent height: a vertical slot of light in a wall reveal, or vertical mirror strips running the full available height, draws the eye upward and adds perceived volume. Horizontal-only lighting emphasises the low ceiling.
- Wash the largest wall: grazing or washing light across the biggest uninterrupted surface makes that surface read as a plane rather than a boundary. This is the single most effective small-bathroom tactic.
- Extend the mirror wall-to-wall and light it from the sides: a full-width mirror doubles the apparent room depth, and side lighting is the only way to light it without a visible source in the reflection.
- Float everything: a wall-hung vanity with a lit underside and a wall-hung WC with a lit plinth reveal continue the floor plane visually beneath them, which is worth a surprising amount of perceived floor area.
- Use one colour temperature throughout: in a small room every source is in the same visual field, so mixing colour temperatures is far more damaging than it is in a large room. Pick 3000 K and hold it.
- Keep the profile slim: a 3 mm PCB IP67 strip in a shallow recessed profile can produce a lit reveal only 10–12 mm wide, which is proportionally appropriate in a small room where a 40 mm surface channel would look bulky.
- Light the shower separately: a small bathroom with an unlit shower has a dark hole in it, which shrinks the room. An IP67 niche or recess light in the enclosure keeps the whole volume legible.
- Avoid downlights entirely if possible: in a small room, four downlights produce four scalloped pools on the walls, four bright dots in the field of view, and heavy shadowing on the face. One cove does more with less.
Lighting a bathroom with no windows
An internal bathroom with no daylight is a specific case that appears frequently in the demand data, and it has two requirements beyond a normal bathroom. The first is a higher ambient level, because there is no daylight contribution at any time of day and the room will be used at full darkness adaptation. The second is tunable white, because an internal room offers no external cue to time of day and a colour-temperature schedule genuinely helps.
The recommended approach for a windowless bathroom: a generous perimeter cove using tunable-white CCT strip at 7.7–10.5 W/m, scheduled to run at 4000–5000 K in the morning, 3000 K through the day and 2200–2500 K in the evening, high-CRI mirror verticals at Ra>93 and an orientation layer for night use. This delivers something an internal room otherwise cannot have, which is a sense of time. It is one of the clearest cases where tunable-white bathroom lighting is a functional feature rather than a luxury.
12. Luxury and modern bathroom lighting: what actually reads as expensive
The perception of luxury in a bathroom is produced almost entirely by three things, none of which is the price of the fitting.
The three signals of expensive bathroom lighting
Signal one – the source is invisible: in every bathroom that reads as high-end, light appears from gaps, edges, reveals and undersides rather than from objects. This is not a stylistic preference: it is the most reliable single predictor of perceived quality, and it is achievable with a strip and a profile in any budget bracket. Conversely, a very expensive decorative fitting mounted where its lamp is directly visible will read as cheaper than a well-detailed concealed slot.
Signal two – the lines are continuous and the light is even: a line of light with visible dots, a scalloped wash, a bright hot spot at one end, or a mismatch in colour between two adjacent runs immediately reads as a budget installation. Continuity is a function of COB technology, correct diffuser distance, adequate feeding and tight binning: all specification decisions, none of them expensive in absolute terms.
Signal three – the colour is warm-neutral and the rendering is high: cool, low-CRI light makes marble look like plastic and makes skin look grey. Warm-neutral high-CRI light makes ordinary porcelain look like stone. The cheapest available upgrade to the perceived value of a bathroom is to replace an Ra 80 light source with an Ra 93 one at the same colour temperature, and it is the change that clients notice most reliably without being able to name what changed.
What modern currently means in bathroom lighting
The contemporary language of bathroom lighting has converged on a recognisable set of moves, and they are all linear.
- Trimless and shadow-gap details: light emerging from a plaster slot with no visible frame, achieved with drywall profile plastered flush.
- Backlit mirrors and lit niches rather than applied fittings.
- Floating joinery with lit undersides.
- Vertical lines rather than horizontal ones at the mirror, reflecting both better face lighting and a preference for slender proportion.
- Warm colour temperatures: the shift from 4000 K to 3000 K and 2700 K in domestic bathrooms is one of the clearest trends of the last decade, and 2200 K is now common as an evening scene.
- Tunable white as standard: in specification-grade projects.
- Matte black, brushed brass and bronze profile finishes: where a channel is visible, coordinated with tapware rather than defaulting to silver.
- Deliberate darkness: the most current move of all is the willingness to leave parts of a bathroom unlit and to run the whole room at low output in the evening, which requires a control system capable of deep dimming.
Where decorative fittings still belong
None of this means decorative bathroom lighting is obsolete. A pair of wall sconces flanking a mirror in a traditional or period bathroom, a small chandelier in a large room with a freestanding bath, an Art Deco or industrial fitting in a scheme committed to that language: these are legitimate and often the right answer for the character of the room. The correct relationship is that decorative fittings provide identity and linear lighting provides performance. A scheme with sconces at the mirror for character and concealed mirror verticals for function will outperform either alone, and it resolves the recurring conflict between what a client wants to see and what actually lights a face.
Two cautions apply to decorative fittings in bathrooms. The first is compliance: a decorative fitting near a bath or shower must carry the appropriate IP rating for its zone, and many attractive fittings do not. The second is colour and rendering: a decorative fitting is only as good as the lamp in it, and a period sconce fitted with a low-CRI lamp will undo the quality of everything else in the room.
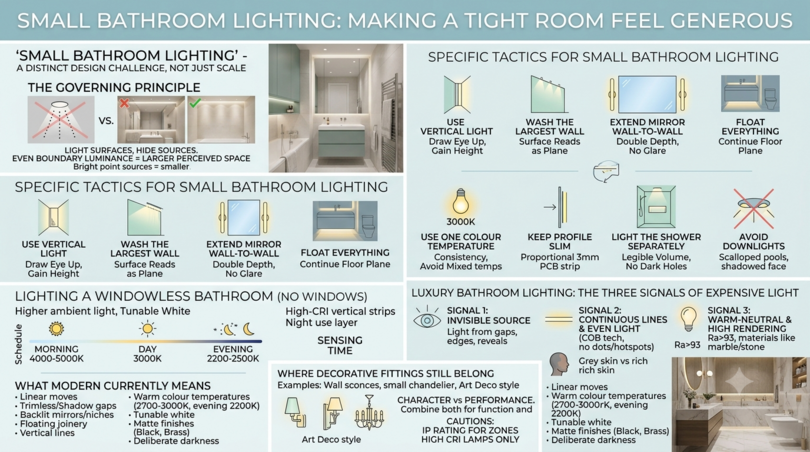
13. The fifteen most common bathroom lighting mistakes
Every recurring failure in bathroom lighting appears on this list, and every item on it is preventable at design stage at essentially no cost. It is worth reading as a checklist against a drawing before anything is ordered.
- One central ceiling fitting as the entire scheme: produces downward shadowing on every face, no night usability, and no atmosphere. The defining bathroom lighting error.
- Lighting the mirror from above only: shadows the eye sockets, the underside of the nose and the jaw. Side lighting is the answer; above-and-below is the fallback.
- Specifying IP44 because it is the legal minimum: legal and adequate are different standards. IP65 minimum, IP67 in wet and sealed positions.
- Assuming outside the zones means no rating is needed: steam, condensation and cleaning chemicals do not respect zone boundaries.
- Choosing low-CRI strip: Ra 80 at a mirror produces grey skin and mismatched make-up. Ra>93 at the mirror, Ra>90 elsewhere.
- Ignoring R9: two strips can both claim Ra>90 and render skin completely differently.
- Mixing colour temperatures in one visual field: the warm light looks dirty and the cool light looks blue. One temperature per room, or tunable white.
- Using dotted low-density SMD strip where it will be seen or reflected: a mirror will show every dot. COB for anything visible.
- Omitting the aluminium profile: heat shortens life and shifts colour, adhesive fails in humidity, the line follows every substrate irregularity.
- One driver for all layers: makes independent dimming impossible and destroys the whole point of a layered scheme.
- Burying the driver with no access: the driver is the component most likely to fail. Sealing it in is a designed-in future demolition.
- Under-sizing the low-voltage cable or over-running a single feed: produces a visible brightness gradient along the run that cannot be corrected after tiling.
- Using acetoxy-cure silicone sealant: releases acetic acid, corrodes aluminium and attacks solder joints. Neutral-cure, sanitary-grade only.
- Specifying dimming that cannot reach low output: a dimmer with a 15 percent floor makes the night-orientation layer impossible.
- Leaving out the night layer entirely: the cheapest and most appreciated element of a bathroom lighting scheme, omitted from the overwhelming majority of installations.
Three further errors deserve honourable mention because they are common and expensive: ordering strip for one room in two separate batches, which risks a visible colour mismatch, failing to plan cable routes before tiling, which makes niche and recess lighting impossible to add later; and specifying a scheme so complex that the occupant cannot operate it, which results in the whole system being left permanently on one setting.
14. Energy efficiency, running cost and payback
Energy efficiency is one of the primary motivations homeowners give for upgrading bathroom lighting, and it is also the area where the arithmetic is most often presented badly: either exaggerated by suppliers or dismissed as trivial. The honest picture is that a bathroom is a low-hours room, so the savings from a lighting upgrade are modest in absolute terms, but the payback on replacing halogen is nonetheless fast, and the secondary benefits in lamp replacement, heat load and lifespan are substantial.
What bathroom lighting actually consumes
A typical family bathroom sees perhaps 1.5 to 2.5 hours of lighting use per day across all occupants, and a well-designed layered scheme spends most of that time at partial output rather than full. The comparison below models a 6 m² bathroom at 2 hours per day, 730 hours per year, using an indicative electricity price of €0.28 per kWh.
| Scheme | Connected load | Effective average load with dimming | kWh/year | Cost/year | Lamp replacement over 10 years |
|---|---|---|---|---|---|
| 6 × 50 W halogen downlights | 300 W | 300 W (rarely dimmed) | 219 | €61.32 | ~20–30 lamps |
| 2 × 36 W fluorescent battens | 72 W + ballast losses ~82 W | 82 W | 60 | €16.80 | ~4–6 tubes plus starters |
| 6 × 7 W LED downlights | 42 W | 42 W | 31 | €8.68 | 0–6 integrated units |
| Four-layer linear LED scheme | 125 W connected | ~38 W average with dimming and layering | 28 | €7.84 | 0 lamps; possibly 1 driver |
The interesting result in Table 19 is that the four-layer linear scheme has the highest connected load of all the LED options and the lowest running cost. That is not a contradiction; it is the whole logic of layered lighting. A scheme with 125 W of connected load that spends most of its operating hours running the accent layer at 30 percent and the orientation layer at 5 percent consumes less than a 42 W scheme that is always either fully on or fully off. Connected load is a capacity figure; consumption is a control figure. This is the single most useful thing to understand about the energy performance of architectural lighting, and it is routinely missed.
Payback on replacing halogen
Replacing six 50 W halogen downlights with a layered linear scheme saves approximately 191 kWh and €53 per year in the model above, plus the cost of twenty to thirty replacement lamps over a decade: call it a further €60 to €120 at retail prices, and considerably more if a ladder and someone’s time are counted. On a materials cost of €220 to €600 for the linear scheme, the simple payback against halogen falls between four and eight years on energy alone, and between three and six years once lamp replacement is included. Against an existing LED installation, the payback on energy grounds alone is long and the case for change is therefore a quality-of-light case rather than an energy case — which is an honest thing to tell a client.
There is also a heat-load argument that is frequently overlooked. Six 50 W halogen downlights inject 300 W of heat into a small room, most of it upward into the ceiling void and the insulation above. In summer this is genuinely unpleasant in a small bathroom, and in an insulated ceiling it creates a fire-risk management problem that requires fire-rated fittings and insulation clearances. A 38 W average linear scheme removes both issues.
Efficacy, energy labels and what to look for
Under the European energy labelling framework, light sources including LED strip are classified from A to G on a rescaled efficacy scale that is deliberately demanding: the top classes are reserved for future performance levels that current products do not reach. In practice, a high-CRI architectural strip in class E, F or G is entirely normal and is not an indication of poor quality. High colour rendering is achieved by broadening the emission spectrum, which necessarily costs efficacy; a strip that achieves a better energy class while claiming Ra>90 should be examined carefully.
The figures worth checking on a datasheet are luminous efficacy in lumens per watt at the stated CRI, the rated lifetime expressed properly as L-value and B-value, and the declared operating conditions. An efficacy of around 120 lm/W at Ra>90, as achieved by the 2700 K COB product in the Lighting Line range, is at the strong end of what is currently available at that rendering level.
Lifetime, lumen depreciation and what a warranty actually covers
LED lifetime is not a single number. It is expressed as LxBy: L is the percentage of initial luminous flux remaining, and B is the percentage of units that have fallen below that level. L80B10 at 50,000 hours means that after 50,000 hours, 90 percent of units still deliver at least 80 percent of their initial output. A claim of 50,000 hours with no L or B value attached is not a specification.
Two bathroom-specific points. First, at 730 hours per year, 50,000 hours is roughly 68 years, which means the LEDs are not the limiting component. The driver is, and driver life is temperature-dependent, which returns the discussion to ventilation and accessibility. Second, lumen depreciation is accompanied by colour shift, and colour shift is what people actually notice. A strip that has drifted 200 K warmer than its neighbour after eight years is a visible fault even though both are still working. This is another argument for buying a whole bathroom from one batch and one manufacturer, and for keeping junction temperatures low with proper profiles.
15. Installation, commissioning and maintenance
This section is written for the person actually holding the tools. It assumes the design decisions from Sections 4 to 11 have been made and covers sequence, technique and verification. The order matters more than anything else here, because several steps become impossible once tiling starts.
Sequence: what has to happen before the tiler arrives
- Mark out every lighting position on the substrate: before any board or tile goes on, at full size, including the exact extents of each run and the position of every cable entry.
- Confirm the zone geometry on site: not from the drawing. Measure 0.6 m horizontally from the actual shower enclosure and 2.25 m vertically from the actual finished floor level. Tray thicknesses and screed depths move these lines.
- Install first-fix cabling to every position: with generous tails (at least 300 mm) left coiled and protected. Label every tail. A labelled tail costs nothing; an unlabelled one costs an hour with a multimeter later.
- Form the recesses, coves, niches and shadow gaps: and fit the profiles into them, so the tiler or plasterer works up to a fixed edge rather than guessing.
- Seal every cable penetration into a wet area: with an appropriate sleeve and gland, before waterproofing. This must happen before the tanking membrane is applied so the membrane can be dressed to the penetration.
- Apply tanking and waterproofing: dressed correctly around the lighting details.
- Tile or plaster.
- Only then fit the strips, diffusers and end caps: fitting strip before tiling exposes it to grout, adhesive, dust and mechanical damage.
The step most frequently skipped is the fourth, and it is the one that determines whether a lit reveal has crisp edges or a wobbling grout line following it. Fitting the profile before tiling is the difference between an architectural detail and an approximation of one.
Cutting, terminating and sealing
Profile: cut aluminium profile with a fine-tooth blade designed for non-ferrous metal, on a mitre saw, with the profile fully supported. Deburr the cut with a fine file so the diffuser slides freely and the end cap seats flush. Mitre internal and external corners rather than butt-jointing them wherever the joint will be visible.
Strip: cut only at the marked cut points, using a sharp blade and cutting square. On a silicone-coated IP65 strip, peel back the silicone from the pads before soldering. On a fully extruded IP67 strip, cut through the jacket, expose the pads, solder the leads, then re-seal with a moulded end cap and neutral-cure silicone, allowing full cure before the detail is closed.
Soldering: tin the pads and the wire separately, then join. Use a temperature-controlled iron at a moderate setting; excessive heat lifts pads and damages the phosphor. Sleeve each joint with adhesive-lined heat-shrink, then over-seal with silicone for anything in a wet zone.
Sealing: neutral-cure, sanitary-grade, mould-resistant silicone throughout. Never acetoxy-cure. Seal end caps, cable entries and the perimeter joint between profile and tile. Allow full cure (typically 24 hours for a bead of meaningful thickness) before wetting.
The commissioning checklist
Commissioning is what separates an installation that works from one that appears to work. Every item below should be completed and recorded.
| Check | Method | Acceptance criterion |
|---|---|---|
| Driver output voltage, no load | Multimeter at driver terminals | Within manufacturer’s stated tolerance of nominal |
| Voltage at the far end of each run, full load | Multimeter at the far termination | Not less than 97% of nominal |
| Driver loading | Calculate actual load against nameplate | ≤80% of rated output |
| Driver ambient temperature after 2 hours | Thermometer or IR in the enclosure | Within the driver’s rated ambient range with margin |
| Strip surface temperature after 2 hours | IR thermometer on the profile | Comfortably below the strip’s rated maximum |
| Dimming range | Sweep from 100% to minimum on each output | Smooth, no flicker, no drop-out, reaches the design floor |
| Colour uniformity between adjacent runs | Visual, side by side, at full and at 30% output | No perceptible difference |
| Source visibility | View from doorway, from mirror, from seated and standing positions | No emitter or bright edge visible from any normal position |
| Reflection check | Look at every mirror and glass surface in the room | No dotting, no bright line, no unintended reflection of a source |
| Seal integrity | Visual inspection of every end cap, joint and penetration | Continuous seal, full cure, no gaps |
| RCD operation | Test button and instrument test | Trips within the required time at rated current |
| Scene verification | Operate every scene and every switch | All layers behave as designed; a stranger can turn the light on |
| As-built record | Mark up drawing with driver locations, run lengths, product codes | Documented and handed over |
The final item in Table 20 is the one that matters most in ten years’ time: an as-built record naming the exact product codes, the driver locations and the run lengths turns a future repair from an investigation into a purchase. Given that Lighting Line product codes are stated on every catalogue page (the 2700 K IP67 spherical tube strip, for instance, is coded OR270W-U52-480OR2-W3) recording them takes minutes and saves days.
Maintenance and troubleshooting
| Symptom | Most likely cause | Diagnostic | Remedy |
|---|---|---|---|
| Far end of run visibly dimmer | Voltage drop along strip or cable | Measure voltage at both ends under load | Feed from both ends, or increase cable size |
| Flicker at low dim levels | Dimmer incompatible or below its stable floor | Sweep the dimmer, check driver compatibility list | Change to PWM, CCR, 0–10 V or DALI control |
| Banding in photographs or video | PWM frequency too low | Film at several shutter speeds | Specify CCR analogue dimming or PWM >20 kHz |
| Section of strip dark | Failed segment or broken joint | Measure voltage across the segment | Replace the segment, re-solder and re-seal the joint |
| Whole run dead | Driver failure, the usual culprit | Measure driver output, check mains input | Replace driver like-for-like or better rated |
| Colour has drifted over time | Thermal ageing from inadequate heatsinking | Compare with an unused offcut, measure profile temperature | Improve ventilation, replace run, use profile |
| Corrosion at terminations | Moisture ingress at a joint, or acetoxy sealant used | Inspect joints and cable entries | Re-terminate, re-seal with neutral-cure silicone, improve extract ventilation |
| Diffuser hazed or yellowed | Abrasive or solvent cleaning, UV exposure | Compare with a spare length | Replace diffuser, revise cleaning regime |
| Sticky or tacky strip surface | Additive migration from a low-grade encapsulant | Wipe test, check product grade | Replace with a high-purity food-contact-grade silicone product |
| Mould along a lit reveal | Inadequate extract ventilation, non-sanitary sealant | Check humidity and extract performance | Improve ventilation, re-seal with mould-resistant sanitary silicone |
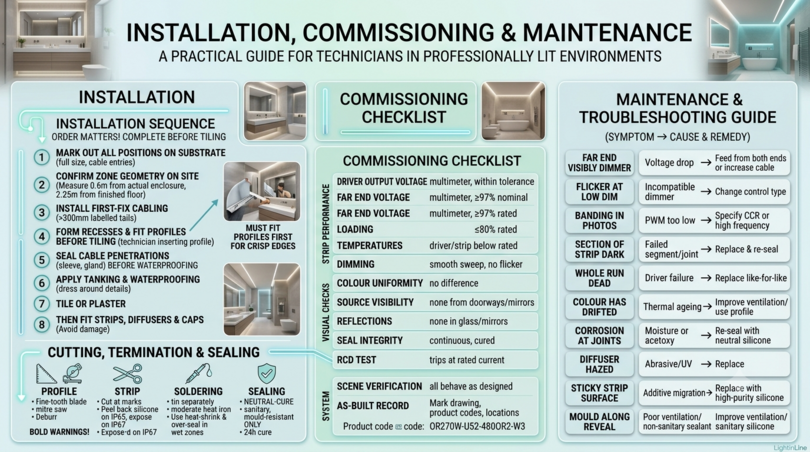
16. Costing and bill of materials for three real bathrooms
Abstract advice is easy to agree with and hard to act on. This section sets out three complete schemes at three scales, with the components identified and indicative material costs, so that a budget can be tested against reality. Figures are indicative European trade-level ranges for materials only, excluding labour, VAT and controls beyond the drivers stated, and are for relative comparison rather than quotation.
Scheme A — small cloakroom, 2.5 m², no shower
| Item | Specification | Qty | Indicative cost |
|---|---|---|---|
| Mirror verticals | COB 480 LED/m, Ra>90, 3000 K, 6 W/m, IP65 | 2 × 0.9 m | €20–35 |
| Profiles for verticals | Surface profile, opal diffuser, end caps | 2 × 1.0 m | €30–50 |
| Under-basin accent | COB 480 LED/m, 3000 K, 6 W/m, IP67 | 0.6 m | €8–14 |
| Profile for accent | Recessed profile, opal diffuser, end caps | 0.7 m | €12–20 |
| Driver | 24 V, 30 W, dimmable | 1 | €25–45 |
| Cable, glands, sealant, connectors | Sundries | — | €15–25 |
| Total materials | — | — | €110–190 |
Scheme B — family bathroom, 6 m², bath with shower over
| Layer | Specification | Qty | Indicative cost |
|---|---|---|---|
| Ambient cove | COB 480 LED/m, Ra>90, 3000 K, 10.5 W/m, IP65 | 7.5 m | €70–120 |
| Cove profile | Recessed or drywall profile, opal, end caps, brackets | 7.5 m | €110–190 |
| Mirror task verticals | COB 480 LED/m, Ra>93, 3000 K, 10.5 W/m, IP65 | 2 × 1.0 m | €25–40 |
| Mirror profiles | Surface profile, opal, end caps | 2 × 1.0 m | €30–50 |
| Under-vanity accent | COB 480 LED/m, 3000 K, 6 W/m, IP67 | 1.2 m | €15–25 |
| Accent profile | Recessed profile, opal, end caps | 1.3 m | €20–35 |
| Orientation run | COB, 2200 K, 4.8 W/m, IP67 | 3.5 m | €35–55 |
| Orientation profile | Recessed profile, baseboard brackets, end caps | 3.5 m | €45–80 |
| Drivers | 24 V × 4: 100 W, 30 W, 15 W, 30 W, all dimmable | 4 | €110–190 |
| Control | PIR sensor, 4-channel dimming controller | 1 set | €60–150 |
| Cable, glands, sealant, connectors | Sundries | — | €35–60 |
| Total materials | — | — | €555–995 |
Scheme C — principal en-suite, 12 m², walk-in shower and freestanding bath
| Layer / detail | Specification | Qty | Indicative cost |
|---|---|---|---|
| Ambient cove, tunable white | COB CCT 2700–6500 K, Ra>90, 600 LED/m, 7.7 W/m, IP65 | 13 m | €180–300 |
| Cove profile, trimless | Drywall profile, opal, end caps, brackets | 13 m | €230–390 |
| Mirror verticals × 2 mirrors | COB, Ra>93, CCT, 10.5 W/m, IP65 | 4 × 1.0 m | €60–95 |
| Mirror profiles | Recessed profile, opal, end caps | 4 × 1.0 m | €70–120 |
| Mirror halo backlight | COB 6 W/m, 3000 K, IP67 | 5 m | €50–80 |
| Halo profile | Corner 45° profile, end caps | 5 m | €65–110 |
| Shower niche | COB 3 mm PCB, 3000 K, 6 W/m, IP67 | 1.2 m | €18–30 |
| Niche profile | Micro recessed profile, tiling end caps | 1.3 m | €25–45 |
| Under-vanity float | COB 6 W/m, 3000 K, IP67 | 2.4 m | €30–50 |
| Bath surround reveal | COB 4.8 W/m, 2200 K, IP67 | 2.0 m | €25–40 |
| Feature wall graze | COB 10.5 W/m, 3000 K, IP65 | 2.6 m | €30–50 |
| Profiles for the above three | Recessed and corner profiles, end caps | 7.0 m | €100–175 |
| Orientation and threshold | COB 4.8 W/m, 2200 K, IP67, with recessed profile | 6.5 m | €130–220 |
| Drivers | 24 V, tunable-white and single-channel, DALI-2, 6 outputs | 6 | €350–700 |
| Control system | DALI-2 controller, scene panel, PIR, tunable-white scheduling | 1 set | €350–900 |
| Cable, glands, sealant, connectors | Sundries | — | €80–140 |
| Total materials | — | — | €1,793–3,445 |
Read against a typical en-suite renovation of this scale, Scheme C represents a small percentage of the total project cost and delivers the element that every visitor notices. The pattern across all three schemes is consistent: profiles and drivers cost more than strip. Anyone budgeting a linear bathroom lighting scheme who prices only the strip will be out by a factor of three, and anyone economising on the profile to afford more strip has the priority exactly backwards.
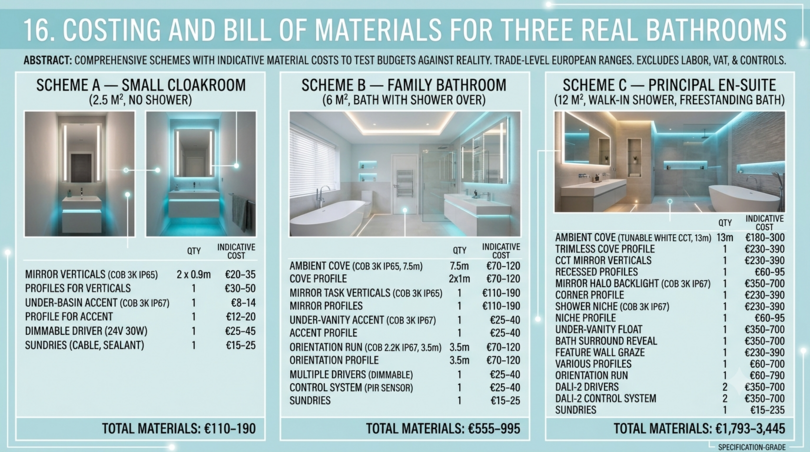
17. Buying guide: choosing the right Lighting Line strip and profile
The catalogue at catalogue.lightingline.eu/en/led-strips contains 166 LED strip products alongside 126 profiles, 168 end caps, 58 mounting brackets and a range of connectors. That breadth is what makes a coherent four-layer bathroom lighting scheme possible from a single source, but it also means a specifier needs a filtering strategy. This section provides one, working through the filters in the order that actually narrows the choice fastest.
The six-filter decision sequence
- Water protection first: this is a compliance decision, not a preference, and it eliminates the largest number of products fastest. Filter to IP67 silicone for Zones 0 and 1, floor-level runs, niches, under-vanity and sealed details. IP65 silicone for Zone 2 and splash-exposed positions. IP20 only for genuinely dry positions above 2.25 m and away from the shower.
- LED model second: filter to COB for every white-light architectural position. Choose 2835 SMD only where RGB, RGBW, RGB+CCT or pixel behaviour is required.
- Voltage third: 24 V for everything except Zone 0 or wherever national regulations demand SELV at 12 V. 48 V for exceptionally long runs.
- Light colour fourth: pick one colour temperature for the whole room, or pick CCT tunable white. The available range spans 2200 K to 6500 K plus RGB and CCT variants, for bathrooms the working set is 2200 K, 2500 K, 2700 K, 3000 K, 3500 K, 4000 K and CCT.
- Colour rendering fifth: Ra>93 at the mirror. Ra>90 for ambient and accent. Ra>80 acceptable for orientation runs only.
- Power and density last: match to the layer: 4.8–6 W/m for orientation and accent, 7–11 W/m for ambient and task, above that only with engineered heatsinking.
Two further filters are decisive in tight details and are easy to overlook. LED strip width ranges from 3 mm to 30 mm, and the 3 mm IP67 products are what make sealed lighting possible in a niche lip or a shadow gap. Cut point ranges from 1 cm to 12.5 cm, and in a bathroom where a niche is 847 mm wide, a 1 cm cut point produces a run that fits and a 5 cm cut point produces one that does not. Filter by cut point whenever the run length is dictated by joinery or tiling rather than chosen freely.
A specification matrix for the four layers
| Layer | IP filter | LED model | Voltage | Light colour | CRI | Power | Width | Profile family |
|---|---|---|---|---|---|---|---|---|
| Ambient cove | IP65 silicone | COB | 24 V | 3000 K or CCT | Ra>90 | 7.7–10.5 W/m | 8–10 mm | Drywall or recessed |
| Mirror task | IP65 silicone | COB | 24 V | 3000–3500 K or CCT | Ra>93 | 10.5–11 W/m | 8–10 mm | Surface or recessed |
| Under-vanity accent | IP67 silicone | COB | 24 V | 3000 K | Ra>90 | 6 W/m | 3–8 mm | Recessed or surface |
| Shower niche | IP67 silicone | COB | 24 V | 3000 K | Ra>90 | 6 W/m | 3 mm | Micro recessed + tiling end caps |
| Mirror halo | IP67 silicone | COB | 24 V | 2700–3000 K | Ra>90 | 6 W/m | 3–8 mm | Corner 45° |
| Feature wall graze | IP65 silicone | COB | 24 V | Match the tile | Ra>90 | 10.5 W/m | 8–10 mm | Corner or wall |
| Bath surround | IP67 silicone | COB or RGB+CCT SMD | 24 V | 2200–2700 K | Ra>90 | 4.8–6 W/m | 3–10 mm | Recessed |
| Orientation | IP67 silicone | COB | 24 V | 2200–2500 K | Ra>80 | 4.8 W/m | 3–8 mm | Recessed + baseboard brackets |
| Inside bath (Zone 0) | IP67 minimum | COB | 12 V SELV | 2700 K | Ra>80 | 4.8–6 W/m | 3 mm | Sealed, drained detail |
What to buy alongside the strip
A bathroom lighting order that contains only strip and profile will stop halfway through the installation. The complete list:
- End caps matched to each profile, including tiling variants where a profile terminates into tile. One pair per run, plus spares. These are waterproofing components in a bathroom.
- Mounting brackets appropriate to the substrate and the profile, including baseboard brackets for skirting-level runs.
- Diffusers in opal for every position. Confirm the diffuser is included with the profile or ordered separately.
- PCB connectors for dry positions, soldering materials for wet ones.
- Drivers, one output per layer, sized with 25 percent headroom, with the correct dimming interface.
- Neutral-cure sanitary silicone, adhesive-lined heat-shrink, cable glands and appropriately sized low-voltage cable.
- 10 percent spare strip from the same batch, retained and labelled. This is the cheapest insurance available against a future colour mismatch.
For projects at specification stage, the downloadable Strip LED catalogue and Profiles catalogue contain the full technical data, and the filterable online catalogue is the fastest route from a performance requirement to a product code.
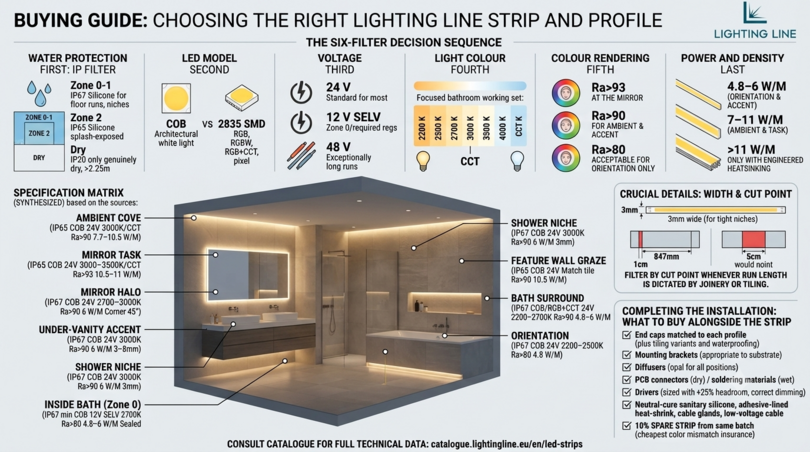
18. Answers by profession
Different professionals arrive at bathroom lighting with different questions, different constraints and different definitions of success. This section answers each group directly.
For the architect
What are the current trends in bathroom lighting? Concealed linear replacing point sources, trimless and shadow-gap details, tunable white as standard on specification projects, warmer colour temperatures with 2200 K evening scenes, vertical rather than horizontal mirror lighting and a growing willingness to leave parts of the room deliberately dark.
How do I integrate lighting into the overall bathroom design? By drawing it in section, not just in plan, and by drawing the details at 1:5. Every one of the ten recipes in Section 10 is a construction detail with a dimension, a substrate and a sealing strategy. Lighting that appears only as a symbol on a plan will be resolved on site by someone who is not you.
Which materials are most resistant to humidity? Anodised extruded aluminium for the housing, high-purity silicone encapsulation for the strip, polycarbonate rather than acrylic for the diffuser, because acrylic is more brittle and less chemically resistant, stainless or non-ferrous fixings, halogen-free cable and neutral-cure sanitary sealant.
How do I choose the most energy-efficient option? Check efficacy in lumens per watt at the stated CRI rather than reading the energy class in isolation, and design for control. As Table 19 shows, a layered scheme with higher connected load and proper dimming consumes less than a smaller scheme without it.
What are the safety regulations? The zone framework of IEC 60364-7-701 and its national implementations, IP ratings to IEC/EN 60529, 30 mA RCD protection, SELV where required, and supplementary bonding as assessed. Section 4 and Section 21 cover this in detail.
For the contractor and building professional
Which smart lighting solutions are most reliable in a bathroom? DALI-2 for new build, Casambi or comparable Bluetooth mesh for retrofit, Zigbee or Matter where an ecosystem already exists. Always retain direct physical switching of the ambient and task layers so the room works when the network does not.
How do I reduce installation cost without compromising quality? Standardise on one voltage, one colour temperature and one strip family across the whole project, so offcuts are interchangeable and there is one product to learn. Use surface profiles where a recessed detail would require carpentry. Place drivers in a single accessible location rather than distributed. Buy profile, end caps and brackets from the same manufacturer so they fit without modification. And get the first-fix cabling right, because every hour spent on first fix saves several after tiling.
Which products last longest in humid environments? IP67 silicone-extruded strip in anodised aluminium profile, with soldered and sealed terminations, driven at moderate power per metre, fed by an accessible driver in a ventilated location, in a room with adequate humidity-controlled extract.
How do I integrate with home automation? Bring a control cable to every driver location at first fix even if the initial installation is a simple dimmer. Retrofitting a control cable is expensive; installing an unused one costs almost nothing and makes a future upgrade trivial.
Which certifications should I look for? CE marking with a declaration of conformity, RoHS and REACH declarations, IP rating tested to IEC/EN 60529 with the class stated per product rather than per range, driver safety certification with a SELV-classified output and documented material grade for the encapsulant.
For the interior designer and furnishing consultant
Which lights create a relaxing bathroom atmosphere? Concealed, warm, low and dimmable. A 2200–2500 K bath surround reveal and an under-vanity float at 10 percent output, with the ambient cove at 15 percent and the mirror lights off entirely, produces a genuinely restful room. The visible-source fitting is the enemy of relaxation.
How do I choose lighting for make-up and skincare? Two vertical opal-diffused runs flanking the mirror at face height, Ra>93 with R9 above 55, 3500 K or tunable white, delivering 500–750 lux vertical illuminance at the face, dimmable. This is the complete answer and it is set out in Table 3.
What adjustable options exist? Dimming on every layer, tunable white from 2700 K to 6500 K, scene control combining the four layers into named settings, and RGB+CCT where colour is genuinely wanted. Table 16 compares the control technologies.
How do I combine function and aesthetics? By separating them into layers. The task layer does the work and is invisible when off, the accent and ambient layers carry the mood. This resolves the usual conflict between a beautiful fitting and a functional one, because you no longer have to choose.
Which light colours support daily wellbeing? Cool-neutral 4000–5000 K in the morning to support alertness, warm-neutral 3000 K through the day, 2200–2500 K in the evening to avoid suppressing melatonin. A tunable-white system delivers all three from one installation.
For the homeowner
What are the best low-energy bathroom lamps? High-CRI COB LED strip at around 120 lm/W in aluminium profile, on dimmable drivers. As Table 19 shows, a layered dimmable scheme costs under €10 a year to run in a typical family bathroom.
How do I install LED lights safely in a humid room? Specify the correct IP rating for the position, keep the driver outside the zones and accessible, use neutral-cure sanitary silicone and have the mains connection made and certified by a qualified electrician.
Which options are easiest to manage with a smart system? Bluetooth mesh controllers such as Casambi need no control wiring and are ideal for retrofit, Zigbee or Matter integrate with an existing smart home. In all cases keep a physical switch that works without the app.
How do I improve bathroom lighting without major building work? Three retrofit moves, in order of impact. First, add two surface-mounted vertical profiles flanking the existing mirror, on an IP65 high-CRI COB strip: this alone transforms the room and requires only a cable to a driver hidden in the vanity. Second, add an IP67 run under a wall-hung vanity or along the bath panel lip. Third, add a warm orientation run at floor level on a PIR. None of these requires tiling, and together they cost a fraction of a renovation while delivering most of the benefit.
What are the most economical effective solutions? A single pair of high-CRI mirror verticals in surface profile, on a dimmable driver. If the budget allows only one intervention, this is the one to make: it fixes the worst deficiency in almost every existing bathroom, which is how the room lights a face.
For the content creator and photographer
Which lights are best for taking good photographs in a bathroom? Large diffuse sources at face height with high colour rendering: which is to say, opal-diffused COB strip verticals at the mirror. A large soft source is what a photographer would bring to the room anyway, building it in permanently means the room is always ready.
How do I make a bathroom brighter and more attractive on video? Increase the ambient layer rather than the task layer, because indirect light off the ceiling fills shadows without creating hotspots. Then add a low warm accent for depth. A flat, evenly lit room reads as bright on camera, a room with one bright fitting reads as dark with a blown highlight.
Which lighting solutions are most current visually? Backlit mirrors, lit niches, floating vanities with lit undersides, and trimless slots. All are linear LED details.
How do I highlight design details? Grazing light almost parallel to the surface, from a COB strip 10–25 mm from the plane. This reveals texture that flat light hides, and it is the difference between a tile that photographs as a material and one that photographs as a colour.
Which light colours improve skin appearance on camera? 3000–3500 K with Ra>93 and R9 above 60. Cooler than 4000 K makes skin look grey on camera, warmer than 2700 K produces a colour cast that is hard to correct. And critically for video: specify flicker-free CCR dimming or PWM above 20 kHz, because banding is the one lighting fault that cannot be fixed in post-production.
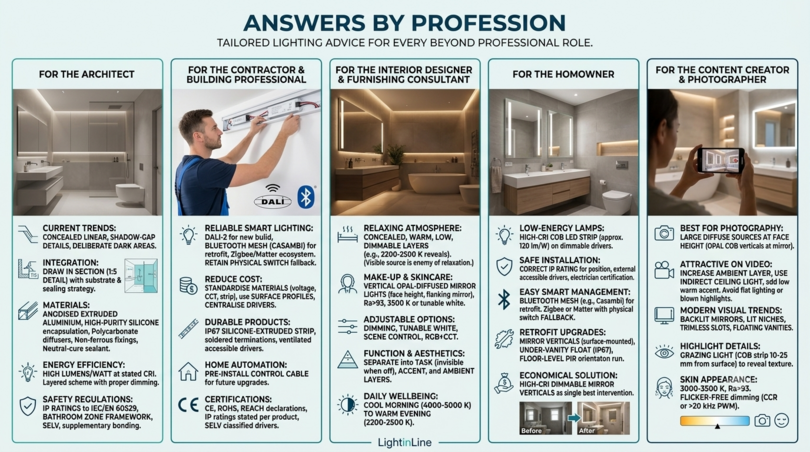
19. Bathroom lighting trends and where the category is going
Trend forecasting in lighting is usually a list of finishes. The more useful version identifies the structural shifts, because those determine what will still look right in ten years rather than what looks new this season.
The five structural shifts
From fittings to details: the most durable change in bathroom lighting is that the unit of design has stopped being the luminaire and become the architectural detail. This is a one-way shift, because once a designer has drawn a lit shadow gap they do not go back to selecting a ceiling rose.
From cool to warm: domestic bathroom lighting has moved from 4000 K towards 3000 K and 2700 K, with 2200 K established as an evening scene. The driver is partly aesthetic and partly the wider circadian-health conversation.
From static to tunable: tunable white has moved from specification projects into mainstream renovation, and windowless bathrooms are where its value is clearest.
From maximum light to controlled light: the current sophistication marker is the willingness to run a bathroom at 10 percent output in the evening, which requires deep-dimming control and a low-level orientation layer.
From point compliance to system thinking: specifiers increasingly ask about material grades, cleanability, driver accessibility and documented lifetime rather than only about IP class.
What to be sceptical about
Two current enthusiasms deserve caution. Colour-changing RGB lighting throughout a bathroom is almost always regretted: it dates quickly, RGB white is markedly inferior to dedicated white LED, and the effect that looked good in a showroom looks like a nightclub at seven in the morning. Confine colour to one feature such as a bath surround, and use dedicated white sources for everything functional.
Fully app-dependent control with no physical switch is the other. It fails in exactly the circumstances where a bathroom light matters most: a guest, a power cut, a firmware update, a dead phone. Automation should extend a working manual system, never replace it.
20. Standards, regulations and documentation
A short reference list of the frameworks that govern bathroom lighting in Europe and the United Kingdom. National implementations differ and the current published version of each document always governs; this is a map, not a substitute for it.
| Standard or framework | Subject | Relevance to bathroom lighting |
|---|---|---|
| IEC 60364-7-701 | Low-voltage installations — locations containing a bath or shower | Defines the zones and the requirements within them |
| BS 7671 Section 701 (UK) | National implementation of the above | UK zone definitions, RCD and bonding requirements |
| IEC / EN 60529 | Degrees of protection provided by enclosures (IP code) | Defines what IP44, IP65, IP67 actually mean |
| IEC / EN 60598 series | Luminaires — general and particular requirements | Safety requirements for the luminaire itself |
| IEC / EN 61347 series | Lamp controlgear | Driver safety, SELV classification |
| EN 12464-1 | Light and lighting of indoor work places | Illuminance and quality benchmarks, useful as a reference for domestic targets |
| IEC 62471 | Photobiological safety of lamps | Blue-light hazard classification |
| IEC 62717 / EN 62717 | LED modules for general lighting — performance | Lumen maintenance, L and B values |
| IES TM-30 | Colour rendition evaluation | Modern alternative to CRI; Rf and Rg metrics |
| EU Regulation 2019/2015 and 2019/2020 | Energy labelling and ecodesign for light sources | Energy class A–G, EPREL registration |
| Directive 2011/65/EU (RoHS) | Restriction of hazardous substances | Material compliance declaration |
| Regulation 1907/2006 (REACH) | Chemicals registration and SVHC | Material compliance declaration |
| Regulation 1935/2004 and 2023/2006 | Food-contact materials framework | Basis for food-contact silicone grade qualification (Section 11) |
| Part P, Building Regulations (England & Wales) | Electrical safety in dwellings | Notifiable work and certification in bathrooms |
For any project, the documentation pack that should be retained comprises: the declaration of conformity for each product; the IP class per product code; the driver datasheet with SELV classification and dimming compatibility, the photometric data including CRI, R9, CCT and binning, the material compliance declarations, the as-built layout with product codes and driver locations and the cleaning and maintenance instructions for the occupant. That pack is what turns a bathroom lighting installation into an asset with a service life rather than a mystery to be excavated later.
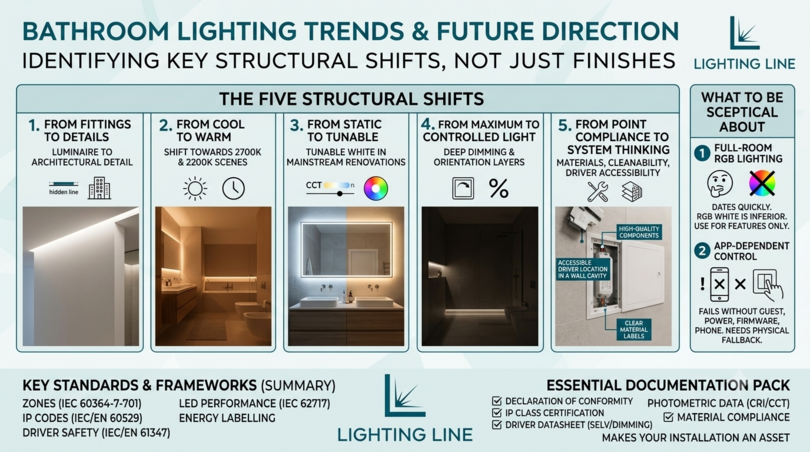
21. Frequently asked questions about bathroom lighting
The questions below are the ones actually asked most often, taken from the search demand data analysed in Section 2. Each answer is written to stand alone, so this table can be used as a quick reference without reading the whole guide. Click a question to expand the answer.
| Question |
|---|
What is the best type of lighting for a bathroom?A layered scheme combining four elements: indirect ambient light from a concealed ceiling cove, vertical task lighting either side of the mirror, concealed accent lighting under the vanity and in niches, and a very low warm orientation layer at floor level. Linear LED strip in aluminium profile delivers all four. A single ceiling fitting cannot deliver any of them properly. |
Are LED lights safe in a shower?Yes, provided the product is rated for the zone. Inside a shower enclosure that means IP65 as a minimum and IP67 in practice, supplied at low voltage from a driver located outside the zones, on a circuit protected by a 30 mA RCD. LED is inherently better suited to a shower than halogen or fluorescent because the dangerous mains voltage never enters the room and the surface temperature stays low. |
Do I need IP44 or IP65 for a bathroom?IP44 is the regulatory minimum for Zones 1 and 2. IP65 is the correct professional minimum for anything you intend to keep, and IP67 is what should be specified for LED strip inside a shower, in a niche, under a vanity, at floor level, or in any sealed detail behind tile. The cost difference is small; the difference in service life is measured in years. |
What does Zone 1 and Zone 2 mean in bathroom lighting?Zone 1 is the volume directly above the bath or shower tray up to 2.25 m above floor level, within the plan outline of the bath or shower. Zone 2 extends 0.6 m horizontally beyond Zone 1 to the same height, and also 0.6 m around a basin that a hand shower can reach. Zone 0 is the interior of the bath or tray itself. Beyond 0.6 m from Zone 1 and above 2.25 m, no specific IP rating is mandated — but steam and cleaning chemicals still reach there. |
Are IP65 downlights suitable for bathrooms?Yes. IP65 is suitable throughout a domestic bathroom including directly above a shower in Zone 1. Whether downlights are the right choice is a separate question: they light the floor well and faces badly, and in a small bathroom they create scalloped patterns and glare. Use them as a supplement to linear lighting rather than as the primary scheme. |
Should bathroom lights be warm or cool?Warm-neutral. 3000 K is the best single choice for a domestic bathroom; 2700 K for a warmer, more residential feel; 3500 K where the room is finished in cool grey stone or concrete. Reserve 4000 K for precision grooming and colour-critical tasks, and avoid 5000 K and above in domestic bathrooms entirely. The premium answer is a tunable-white system running 4000 K in the morning and 2200–2500 K in the evening. |
Should bathroom vanity lights face up or down?Neither, ideally — they should face sideways at the face. Two vertical runs flanking the mirror is the correct arrangement. Where a horizontal fitting is unavoidable, an upward-facing bar bouncing light off a pale ceiling is more flattering than a downward one, which shadows the eye sockets and jaw. Best of all is a bar above and a bar below at vanity level, which fills the shadows the top light creates. |
What lights make you look good in a bathroom?Light arriving from the front and sides at face height, from a large diffuse source, with Ra>93 and R9 above 55, at 3000–3500 K, dimmable. In practice: two opal-diffused COB strip verticals flanking the mirror. The reliable recipe for looking terrible is a single cool-white downlight overhead with a CRI in the low 80s. |
What is CRI and why does R9 matter for bathroom lighting?CRI (Ra) is the average fidelity with which a light source renders eight standard pastel colour samples, scored out of 100. R9 measures deep red specifically and is excluded from the Ra average. Because human skin owes its appearance to haemoglobin, R9 dominates how a face looks. Two strips can both claim Ra>90 while one has R9 of 12 and makes people look grey and the other has R9 of 55 and makes them look well. Always ask for R9 at a mirror. |
Can I fit a bathroom light myself?It depends on the jurisdiction and the scope. The low-voltage work — cutting profile, mounting strip, dressing cables, positioning the driver — is within reach of a competent DIY installer. The mains connection, the RCD verification and the bonding assessment should be carried out by a qualified electrician and certified where the national regulations require it. In England and Wales this falls under Part P of the Building Regulations. |
Can you put a light over a shower?Yes, provided it is rated for Zone 1: IP65 as a minimum and IP67 for strip in a sealed detail, on a 30 mA RCD-protected circuit. A recessed IP65 downlight is acceptable directly above a shower. A decorative pendant, an unrated batten or an open-PCB IP20 strip is not. |
Are all bathroom light fittings the same?No. Bathroom fittings differ from ordinary interior fittings in three specific ways: the ingress protection of the enclosure, the corrosion resistance of the materials and finishes, and the electrical class and voltage of the supply. If a product carries no IP declaration at all, treat it as IP20 — the absence of a rating means the manufacturer has not tested it against water. |
How do I light a bathroom at night without waking up?Add a dedicated orientation layer: a continuous run of very warm strip at 2200–2500 K at floor level — in a skirting shadow gap, a vanity plinth or under a bath panel lip — running at 40 to 120 lumens per metre, which is 5 to 10 percent of a normal accent output. Control it with a PIR sensor and a time-of-day condition so it is the only layer that operates at night. This is the cheapest and most appreciated element of a bathroom lighting scheme. |
How do you light a bathroom with no windows?Use a generous tunable-white perimeter cove scheduled to run cool in the morning, neutral through the day and very warm in the evening, so the room provides a sense of time that daylight would otherwise give. Add high-CRI mirror verticals at Ra>93 and a night orientation layer. A windowless bathroom needs a higher ambient level than a daylit one because there is no daylight contribution at any hour. |
How do you add lighting to a small bathroom?Light the surfaces and hide every source. A perimeter cove washing the ceiling, two slim mirror verticals, and a skirting orientation run will make a 3 m² room feel considerably larger than a single ceiling fitting does, even though the concealed scheme contains more lighting. Use one colour temperature throughout, extend the mirror wall to wall, and choose slim 3 mm PCB strip in shallow profiles so the details stay proportionate. |
What is the best light for a small bathroom?Concealed linear LED. Specifically: an indirect ceiling cove for ambient light plus two vertical mirror runs for task light. Avoid downlights in a small bathroom — four of them produce four scalloped wall patterns, four glare sources in a short sightline, and heavy shadowing on the face. |
What is the difference between SMD and COB LED strip?SMD strip uses discrete packaged LED chips soldered at intervals, producing visible dots at low density and a roughly 120° beam. COB strip mounts a dense array of bare dies under a continuous phosphor layer, producing an uninterrupted line of light with a 180° beam and no dotting. For bathrooms, COB is strongly preferred because mirrors reflect every dot and because grazing light on tile magnifies any scalloping. Use SMD only where RGB or colour-change behaviour is needed. |
Are LED strips suitable for bathroom use, and are they worth it?Yes on both counts, with the correct IP rating and an aluminium profile. LED strip is the only technology that can produce concealed linear light in a cove, a niche, a mirror surround and a floor reveal from one product family, at one colour temperature, with one control system. That coherence is what makes a bathroom read as designed. The material cost of a full four-layer linear scheme is comparable to a set of good downlights plus a mirror fitting. |
Do I need an aluminium profile for bathroom LED strip?Yes, in almost every case. The profile provides heat dissipation, which determines lumen maintenance and colour stability over time; optical diffusion, which hides the emitters; mechanical protection and a straight permanent line; and the architectural detail itself. Strip above roughly 8–10 W/m adhered directly to plasterboard or tile will run hot, lose output faster and shift colour — and adhesive fails in a humid room. |
Should I use 12 V or 24 V LED strip in a bathroom?24 V for almost everything. Halving the current for a given power quarters the resistive loss in the cable and roughly doubles the run length achievable before the far end becomes visibly dimmer. Use 12 V only in Zone 0 or wherever the national wiring regulations require SELV at not more than 12 V AC or 30 V DC, and design around the shorter permissible run length by keeping runs short and feeding them individually. |
Where should the LED driver go?Outside the bathroom zones and accessible without demolition. In order of preference: an adjacent service or airing cupboard; inside a vanity unit that sits outside Zone 2; a ceiling void with a proper inspection hatch; a boxed bulkhead with a removable panel; or the room next door. Never sealed inside a plasterboard ceiling with no hatch, never in a tiled wall cavity, never in a shower enclosure. The driver is the component most likely to fail first. |
How do I size an LED driver for bathroom lighting?Multiply the strip’s watts per metre by the total metres on that output, then add at least 20 percent headroom — 25 to 30 percent in an enclosed void. Use one driver output per lighting layer so each can be dimmed independently. A driver running continuously at its full nameplate rating gets hot, and hot drivers fail early. |
Why is one end of my LED strip dimmer than the other?Voltage drop, either along the strip’s own PCB or in the supply cable. Measure the voltage at both ends under full load; it should not fall below 97 percent of nominal at the far end. Fix it by feeding the run from both ends from the same driver output, injecting power at the midpoint, or increasing the cable cross-section. The underlying cause is often strips daisy-chained beyond the manufacturer’s maximum single-feed length. |
What dimming should I use for bathroom lighting?Something that can reach a genuinely low output. PWM on the secondary, constant-current reduction, 0–10 V, DALI-2 or a Bluetooth mesh system such as Casambi will all dim to 1 percent or below. Basic mains phase-cut dimming typically gives up around 10 to 20 percent, which makes the night orientation layer impossible. For photography and video, specify CCR analogue dimming or PWM above 20 kHz to avoid banding on camera. |
What is the difference between IP65 and IP67 LED strip?IP65 strip typically has silicone applied over the emitting face, leaving it thin, flexible and relatively easy to cut and re-solder, and protects against water jets from any direction. IP67 strip is drawn through a continuous extruded silicone jacket, sealing it on all sides, and is rated for temporary immersion to 1 m for 30 minutes. IP67 is the choice for sealed, inaccessible or immersion-risk details; IP65 is right for splash-exposed but accessible positions. |
What does food-safe silicone have to do with bathroom lighting?The encapsulation silicone is the surface that lives in the room, exposed to steam, hot water and cleaning chemicals for decades. High-purity grades qualified against food-contact migration criteria do not leach additives, do not develop a tacky surface film that harbours soap scum and biofilm, and resist repeated cleaning with alkaline and chlorine-based products. Loss of adhesion between a degraded silicone and the PCB turns an IP67 strip into an IP20 strip with no visible change, which makes material grade an ingress-protection issue rather than a cosmetic one. |
Which sealant should I use around bathroom lighting?A neutral-cure, sanitary-grade, mould-resistant silicone. Never an acetoxy-cure product: it releases acetic acid during cure, which corrodes aluminium profile and attacks solder joints. This is one of the most common and most easily avoided causes of premature failure in bathroom LED installations, and it is entirely a matter of buying the correct tube. |
How do I clean bathroom LED lighting without damaging it?A soft microfibre cloth, warm water and a pH-neutral or mildly alkaline detergent. Spray the cloth, not the fitting, then wipe and dry. Avoid abrasive creams and scouring pads, which permanently haze a polycarbonate diffuser; concentrated acidic limescale removers left in contact with anodised aluminium, which etch the finish; solvents such as acetone, which craze polycarbonate; and steam cleaners aimed at a lighting detail, which force hot vapour past seals tested against liquid water. |
Are light switches allowed in a bathroom?Conventional wall switches are not permitted within the bathroom zones in most jurisdictions, which is why bathroom lighting is traditionally controlled by a pull cord, by a switch outside the door, or by a sealed switch rated for the zone. Low-voltage SELV controls, sealed capacitive switches and PIR occupancy sensing are modern alternatives. Always check the current national wiring regulations, and always retain some form of physical control that works without an app. |
How bright should bathroom lighting be?It depends entirely on the layer. Vertical illuminance at the face for grooming: 300–500 lux, rising to 500–750 lux for make-up. Horizontal illuminance on the floor for safe movement: 100–200 lux. Inside a shower: 150–300 lux. Night orientation: 1–10 lux. That is a range of roughly 750 to 1, which is precisely why a single fitting cannot serve a bathroom and why every layer needs independent dimming. |
Is 40 W or 60 W better for a bathroom?Neither figure is meaningful with LED, because watts measure input power rather than light output. Specify lumens instead. A 60 W incandescent lamp produced roughly 800 lumens; an equivalent LED source draws 7 to 9 W. For bathroom lighting, work from the illuminance targets above and the lumens-per-metre figures in Table 4 rather than from wattage equivalence. |
What are the most common bathroom lighting mistakes?In order of frequency: a single central ceiling fitting as the whole scheme; lighting the mirror only from above; specifying IP44 because it is the legal minimum; assuming no rating is needed outside the zones; choosing low-CRI strip; mixing colour temperatures in one visual field; using dotted low-density strip where it will be reflected in a mirror; omitting the aluminium profile; using one driver for all layers; burying the driver with no access; under-sizing the low-voltage cable; using acetoxy-cure sealant; specifying dimming that cannot reach low output; and leaving out the night orientation layer entirely. |
What is the current trend in bathroom lighting?Five structural shifts: from fittings to architectural details; from cool colour temperatures to warm, with 2200 K evening scenes; from static white to tunable white; from maximum light to controlled, deeply dimmed light; and from point compliance to whole-system thinking about materials, cleanability and driver accessibility. Visually this means trimless slots, backlit mirrors, lit niches, floating vanities with lit undersides and vertical rather than horizontal mirror lighting. |
How much does bathroom lighting cost to run?Very little. A four-layer linear LED scheme in a 6 m² family bathroom used two hours a day, dimmed and layered, averages around 38 W and consumes roughly 28 kWh a year — under €10 at €0.28 per kWh. The same room lit by six 50 W halogen downlights consumes 219 kWh and costs over €60, plus twenty to thirty replacement lamps a decade. Note that the layered scheme has a higher connected load and a lower consumption, because connected load is a capacity figure and consumption is a control figure. |
How long does bathroom LED lighting last?The LEDs will outlast the installation: at 730 hours a year, a 50,000-hour L80B10 rating is roughly 68 years. The limiting component is the driver, whose electrolytic capacitors have a strongly temperature-dependent life that roughly halves for every additional 10 °C. This is why driver location, ventilation and accessibility matter more than the strip’s headline lifetime figure. Insist on lifetime stated as an L and B value; “50,000 hours” alone is not a specification. |
Can I improve bathroom lighting without a full renovation?Yes, and there are three retrofit moves in order of impact. First, add two surface-mounted vertical profiles flanking the existing mirror with IP65 high-CRI COB strip, driven from a driver hidden in the vanity — this alone fixes the worst deficiency in most bathrooms. Second, add an IP67 run under a wall-hung vanity or along the bath panel lip. Third, add a warm orientation run at floor level on a PIR. None of these requires tiling. |
Why does my LED strip look patchy or slightly different in colour?Loose colour binning, or two runs from different production batches. Binning tolerance is expressed in MacAdam ellipses or SDCM; 3 SDCM is at or below the threshold most observers notice, while 5 or 7 SDCM is visible on a long continuous line. Bathrooms punish this more than other rooms because runs are adjacent and mirrors multiply the comparisons. Always order all the strip for one bathroom as a single batch and specify 3 SDCM at mirror positions. |
Can LED strip go inside a bath or a whirlpool tub?That is Zone 0, and it requires IP67 as a minimum with a SELV supply at not more than 12 V AC or 30 V DC, with the safety source located outside all zones. In practice this means purpose-designed submersible products or 12 V IP67 encapsulated strip in a fully sealed and drained detail. This is specialist territory and should be designed and installed as such rather than improvised. |
Why does my bathroom lighting cause banding in photos and video?The PWM dimming frequency is too low relative to the camera’s shutter or rolling-shutter readout. Specify constant-current reduction dimming, which is genuinely flicker-free, or PWM above 20 kHz. This is worth stating in a specification because banding is the one lighting fault that cannot be corrected in post-production, and it affects everyone who photographs the room — content creators, interior photographers and estate agents alike. |
How do I integrate bathroom lighting with a smart home?Use DALI-2 for a new build with control cabling, Casambi or a comparable Bluetooth mesh for a retrofit with no control wiring, or Zigbee or Matter where an ecosystem already exists. Layer the automation on top of a working manual system: keep a physical switch for the ambient and task layers so the bathroom works during a power cut, a firmware update or a guest’s first visit. Bring a control cable to every driver location at first fix even if the initial installation is a simple dimmer. |
22. Bathroom lighting a contradictory room
Bathroom lighting is a small design problem that behaves like a large one. It has to satisfy contradictory functional requirements, survive a hostile physical environment, comply with the most restrictive electrical rules in a dwelling, and carry most of the aesthetic weight of the room: all within a few square metres and a modest budget. The reason it goes wrong so consistently is not that any part of it is difficult, but that the parts are usually decided separately: the fitting by one person, the IP rating by another, the driver position by whoever happens to be on site, and the colour temperature by whatever the wholesaler had in stock.
The method set out in this guide is simply the practice of deciding them together. Four layers, each with its own purpose, its own output, its own colour temperature and its own dimmed circuit. An ingress protection rating chosen from the physical reality of each position rather than from the regulatory minimum. A strip technology chosen so that no dot is ever visible in a mirror, and a colour rendering specification chosen so that skin looks alive. An aluminium profile treated as part of the light source rather than an accessory. A driver placed where it can be reached in fifteen years. A silicone grade chosen because it will still be smooth, clean and sealed after two decades of steam and bleach. And a wiring layout committed to paper before the tiler arrives, because that is the last moment at which any of it can still be changed.
Do that, and a bathroom stops being a room with lights in it and becomes a room made of light: brighter than it needs to be when you are shaving, almost dark when you are not, flattering at the mirror, safe at three in the morning, and capable of making an ordinary porcelain tile look like stone. That transformation costs a run of LED strip, a length of extruded aluminium, four driver outputs and a few hours of attention at design stage. It is the best value available anywhere in a bathroom budget.
This article was developed with the support of artificial intelligence and subsequently reviewed, corrected, and validated by the LightingLine.eu technical team, which guarantees its reliability and compliance with official sources.