Bedroom lighting in 2026 has crossed a threshold: it is no longer the afterthought screwed into the centre of the ceiling at the end of a build, but the single design decision that most powerfully shapes how a room feels, how well you sleep and how the materials around you read to the eye. This expert guide to bedroom lighting brings together everything an architect, an interior designer, a homeowner or a lifestyle creator needs to plan, specify and install a bedroom lighting scheme that is genuinely modern, deeply restful and built to last.
Across this guide we treat bedroom lighting as a layered system rather than a single fitting. We will move from the science of why light matters to your rest, through the three layers of light that every great bedroom uses, into colour temperature and brightness, smart control, energy efficiency, and a complete hands-on workshop on cutting and connecting LED strips and aluminium profiles without ruining them.Whether you are searching for bedroom lighting ideas, planning master bedroom lighting, comparing bedroom lights ceiling options, or specifically researching bedroom lighting LED and led strip lighting bedroom installations, this is designed to be the most complete, most practical and most trustworthy resource on the subject anywhere online. It is long by design, because doing bedroom lighting properly rewards depth.
In this article…
- Why bedroom lighting matters more than any other room
- The three layers of bedroom lighting
- Types of bedroom lighting and the fixtures that deliver them
- Bedroom ceiling lighting ideas and the no-ceiling-light problem
- Colour temperature and brightness: getting the mood right
- LED strip lighting for the bedroom: the modern core
- Choosing the right aluminium profile for each application
- Master bedroom lighting design, room by room
- Smart bedroom lighting and circadian control
- Energy efficiency, sustainability and running cost
- The workshop: cutting and connecting profiles and strips correctly
- 2026 architectural techniques: invisible light done right
- Common bedroom lighting mistakes to avoid
- Bedroom lighting for every kind of user
- Frequently asked questions
- Bedroom lighting: three layers for efficient results
Why bedroom lighting matters more than any other room
Of every room in a home, the bedroom is the one where light does the most invisible work. You spend roughly a third of your life there, much of it preparing your body to do its single most important maintenance task: sleep. The right bedroom lighting does not simply let you see, it actively tells your brain whether to wind down or wake up. This is why getting lighting for bedroom spaces right is fundamentally different from lighting a kitchen or a hallway, and why a thoughtful approach to bedroom lighting pays back every single night.
The biology of light and rest
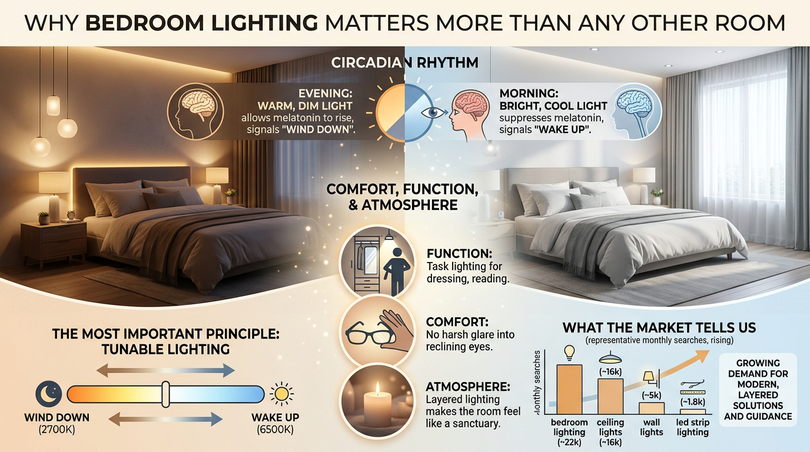
The human body runs on a circadian rhythm, an internal clock synchronised primarily by light hitting the retina. Cool, blue-rich light in the morning suppresses melatonin and signals alertness: warm, dim light in the evening allows melatonin to rise and prepares the body for sleep. Bedroom lighting that ignores this rhythm works against your biology every night. A bright, cool overhead fixture left on until the moment you switch it off floods your eyes with exactly the wavelengths that say “stay awake,” which is precisely why so many people lie in bed feeling wired.
The most important principle in modern bedroom lighting follows directly from this: light should be tunable across the day. Warm light between 2700K and 3000K is best for a bedroom in the evening, while a cooler 4000K to 6500K can help with morning waking and detailed tasks. We return to colour temperature in detail later, but the headline is simple: a bedroom lit with a single fixed colour temperature can only ever be right at one time of day.
Comfort, function and atmosphere
Beyond biology, bedroom lighting has to serve three competing jobs at once. It must be functional enough to dress, read and find things, comfortable enough never to glare into reclining eyes and atmospheric enough to make the room feel like a sanctuary. A single ceiling light cannot do all three, which is the core reason every professional scheme uses layers. The most common reason a bedroom feels harsh, clinical or simply “off” is that it relies on one light source doing every job badly.
What the market tells us
Search and market data confirm how central this question has become. The phrase family around bedroom lighting and bedroom lights attracts well over twenty thousand searches a month in English-speaking markets, with bedroom lighting ideas, master bedroom lighting and led strip lighting bedroom all showing strong and rising intent. The table below summarises representative monthly demand for the core terms this guide addresses.
| Keyword theme | Representative monthly searches | Dominant intent |
|---|---|---|
| bedroom lights / bedroom lighting | ~22,000 | Informational + transactional |
| bedroom ceiling lighting / ceiling lights | ~16,000 | Transactional |
| bedroom wall lights / wall lighting bedroom | ~5,000 | Transactional |
| bedroom lighting ideas / lighting bedroom ideas | ~4,000 | Mixed |
| led strip lighting bedroom / strip lights for bedroom | ~1,800 | Transactional |
| master bedroom lighting / lighting for master bedroom | ~1,200 | Informational |
| mood lighting for bedrooms / cool bedroom lighting | ~1,500 | Informational |
Indicative figures aggregated from keyword research across UK and international English markets, 2026. The pattern is clear: people increasingly want modern bedroom lighting built from LED and strip solutions rather than a single traditional fixture, and they want guidance they can act on. That is exactly what this guide provides.
The three layers of bedroom lighting
Every successful bedroom lighting scheme, from a compact rental to an architect-designed master suite, is built from the same three layers of light. Understanding these layers is the single most useful concept in this guide, because once you think in layers, every bedroom lighting idea you will ever encounter slots cleanly into place. The three layers are ambient, task and accent, and a well-designed room lets each one be controlled independently.
Ambient layer: the soft wash
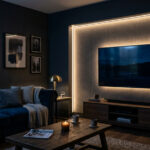
The ambient layer is the general, foundational lighting for bedroom use that fills the space evenly so you can move safely and see the room as a whole. In modern bedroom lighting, the best ambient layer is rarely a glaring central fixture. The most comfortable ambient light in a bedroom is indirect, light bounced off the ceiling or upper walls so the source itself is never visible. This is the layer where coving and perimeter LED strip runs excel, washing the ceiling in a soft glow that raises the apparent brightness of the room without a single point of glare.
For an indirect ambient wash, a continuous LED strip in a recessed or coving aluminium profile is the cleanest solution. Lighting Line’s drywall and recessed profiles let the strip disappear into the ceiling line so only the light is seen. Pair them with a tunable white strip from the LED strip range so the ambient layer can shift from a bright morning room to a low evening glow.
Task layer: light where you do things
The task layer delivers focused light exactly where an activity happens: reading in bed, applying makeup at a dressing table, finding clothes in a wardrobe. Good task lighting is local, controllable and aimed away from sleeping eyes. In the bedroom the classic task lights are bedside reading lamps, wall-mounted reading lights beside the headboard, and dressing-table or wardrobe lighting. The crucial design rule is that each side of the bed should have its own independently switchable task light, so one partner can read while the other sleeps.
LED strips contribute strongly to the task layer too. A strip in a slim surface profile run inside a wardrobe or along the underside of a headboard shelf gives clean, shadow-free task light exactly where you need it. The ultra-slim furniture profiles are designed precisely for these tight, close-viewing positions.
Accent layer: drama and depth
The accent layer is what separates a flat room from a designed one. It picks out architecture, art, texture and shape: a strip grazing a stone feature wall, a glow behind a headboard, a line of light under the bed that makes the frame appear to float. Accent lighting is where bedroom lighting becomes emotional, and it is almost always built from LED strip in a profile because only a continuous, hidden line of light produces the “where is that coming from?” effect that defines cool bedroom lighting and modern bedroom lighting alike.
The relationship between the layers matters as much as the layers themselves. A professional rule of thumb is that a bedroom should have at least three independently controlled lighting circuits: ambient, bedside task and accent. This lets a single room transform from a bright functional space in the morning to an intimate, warm retreat at night with no change of fixtures, only a change of which layers are on and at what level. This layered, circuit-based thinking is the foundation of all the specific bedroom lighting ideas that follow.
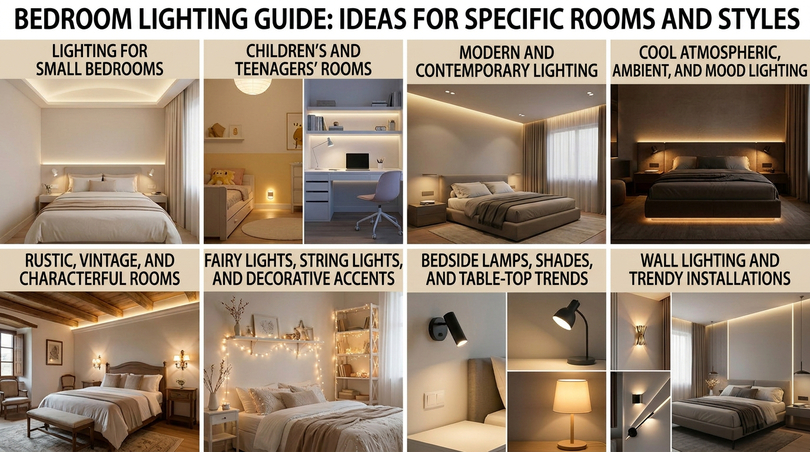
Bedroom lighting ideas for specific rooms and styles
The layered approach to bedroom lighting adapts to any room, but the emphasis shifts depending on size, occupant and style. This section translates the principles into concrete bedroom lighting ideas for the situations people most often need to solve, from a tiny box room to a child’s bedroom to a particular design aesthetic. In every case the same toolkit: strips in profiles, wall lights, lamps and dimming, simply gets arranged differently.
Small bedroom lighting ideas
Small rooms reward light that adds depth without taking floor or surface space. The single best small-bedroom move is concealed perimeter or coving light, which makes the ceiling feel higher and the room feel larger without occupying a single shelf. Pair it with wall-mounted reading lights to keep the bedside table clear, and a slim headboard strip for a soft glow. Avoid bulky pendants and large lamps that crowd a small room; let hidden LED strip lighting do the heavy lifting. In a small bedroom, hidden light reads as space, while visible fixtures read as clutter. A pale ceiling reflecting a coving wash will visually lift a low room more effectively than any single fitting.
Children’s and teenage bedroom lighting
Children’s and teenage rooms need light that is safe, flexible and fun, and that can grow with the occupant. For a child’s bedroom, prioritise a warm, dimmable ambient layer for bedtime, a focused task light for homework, and a gentle night-light at floor level for reassurance and safe night movement. A low-power baseboard strip on a timer is far kinder than a glaring plug-in night-light. For teenagers, flexibility and personality matter: tunable white and colour-capable LED strips let a teen shift the room’s whole feel, from cool focused light for study to warm relaxed light for downtime, while concealed strips around a desk or shelf give the contemporary look they tend to want. Keep all strips in proper profiles for safety and durability, children’s rooms are exactly where heat management and robust mounting matter most.
Modern and contemporary bedroom lighting
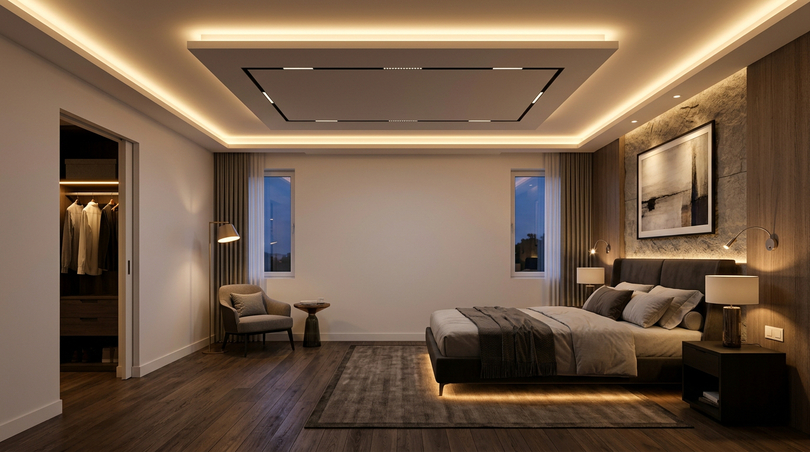
The contemporary look is defined by what you do not see. Modern bedroom lighting hides its sources: trimless recessed ceiling lines, concealed coving, floating headboard halos and slim under-furniture strips, all on warm, dimmable, tunable white. The aesthetic is calm planes of surface with crisp slots of light, no visible clutter, and a colour temperature that warms toward evening. This is the look that the trimless drywall profiles and slim surface profiles in the Lighting Line catalogue are built to deliver, and it is the single most-requested style in 2026.
Cool, mood and atmospheric bedroom lighting
“Cool” and “mood” bedroom lighting are really about layering low-level, hidden, warm light to build atmosphere. The recipe is several independent low-output sources (headboard glow, coving wash, floor light) rather than one source dimmed into a murky haze. Tunable white lets the mood shift from a crisp evening scene to a very warm, candle-like late-night setting. Colour-capable strips add an optional layer of expressive accent light for those who want it, but the foundation of genuinely sophisticated mood lighting is always warm, hidden white light at a low level.
Rustic, vintage and characterful rooms
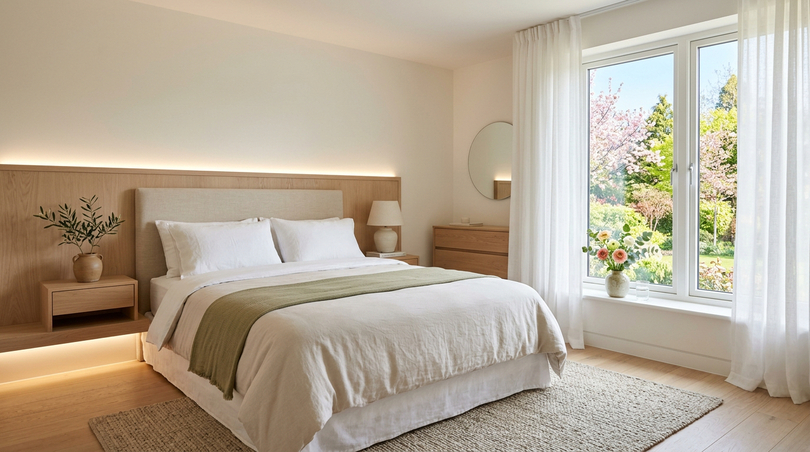
Even traditional or characterful bedrooms benefit from concealed LED light working behind the scenes. Let decorative fixtures provide the visible character while hidden strips do the comfort work: a warm coving wash and a concealed reading light let a vintage lamp or rustic fitting be purely decorative rather than overworked. High-CRI strips are especially valuable here, because they render natural wood, aged metal and textured fabric with the richness those materials deserve.
Fairy lights, string lights and decorative accents
Decorative string and fairy lights are popular, particularly in younger and creative spaces, and they have a legitimate place as a pure accent layer. Treat them as decoration, not as a primary light source, and keep them on their own switch so they can be enjoyed without lighting the whole room. For a more permanent and refined version of the same soft, sparkling effect, a low-output COB or fine SMD strip in a slim profile gives a continuous glow that reads as deliberate design rather than temporary decoration, the grown-up evolution of the fairy-light look.
Bedside lamps, shades and the bedside trend
The bedside continues to evolve. The current trend favours directional, dimmable bedside light (often wall-mounted reading lights or compact adjustable lamps) that put light on the page without spilling across the room. Lamp shades in warm, light-diffusing materials soften output and reduce glare, and a warm bulb or strip behind them keeps the bedside restful. The key principle never changes: bedside light should be warm, focused and independently controlled on each side of the bed.
Wall lighting depth and the question of fashion
Wall lights deserve a closer look because demand for bedroom wall lighting is so strong. Far from being dated, wall lights are firmly in fashion in 2026, because they solve real problems: they free surfaces, light at a flattering angle and can be aimed for reading. Beside the bed, a pair of wall reading lights is one of the most practical upgrades available. As an accent, a linear LED strip in a slim wall profile creates a vertical or horizontal line of light that reads as architecture. Whether decorative sconce or linear strip, wall lighting is a layer worth investing in, not a trend to fear missing.
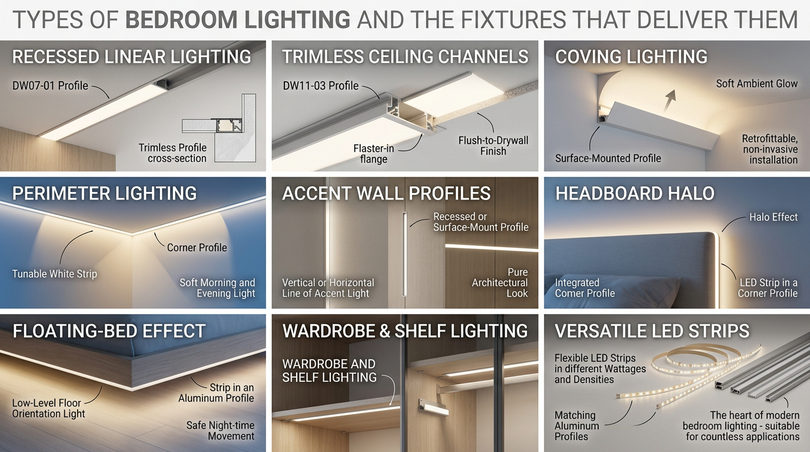
Types of bedroom lighting and the fixtures that deliver them
With the three layers established, we can map the actual fixtures and techniques you will choose between. The vocabulary of bedroom lighting is wide, people search for everything from bedroom light fixtures and bedroom pendant lighting to led lighting for bedroom and bedroom wall lighting, but every option belongs to one or more of the three layers. This section is a practical catalogue of the types, what each does best, and where it falls short, so you can build a balanced scheme rather than collecting fixtures at random.
Recessed and trimless linear lighting
Recessed linear lighting is the defining technique of modern bedroom lighting. Instead of a visible fitting, a continuous LED strip sits inside a profile that is plastered into the ceiling or wall, so the finished surface shows only a crisp slot of light. This is the single most powerful way to make a bedroom look architect-designed. It serves the ambient and accent layers simultaneously, and because nothing protrudes, the ceiling reads as calm and uncluttered: exactly the quality that defines premium contemporary interiors.
For this technique, trimless drywall profiles are the right tool. Profiles such as the DW07-01 and the larger DW11-03 from the drywall profile range are engineered with a plaster-in flange so the diffuser finishes flush with the ceiling. We cover their installation in detail in the workshop and 2026-techniques sections.
Coving and perimeter lighting
Coving lighting places a strip in a channel at the junction of wall and ceiling, facing upward. The light bounces off the ceiling and returns as a soft, even glow. Coving is the most forgiving way to add modern bedroom lighting to an existing room because it can be retrofitted with a surface-mounted coving profile without disturbing the structure. It is pure ambient layer, and on a tunable white strip it carries a bedroom from bright morning to dim evening beautifully.
Ceiling lights, pendants and chandeliers
Traditional bedroom lights ceiling options (flush fittings, pendants and the bedroom chandelier) still have a place, particularly as a decorative centrepiece in a master bedroom with height. A pendant or chandelier over the foot of the bed or a seating area can be a stunning accent. The key is to treat a decorative ceiling fixture as one layer among several, never as the room’s only light, and always to put it on a dimmer so it can drop to a soft evening level. Pendant and chandelier searches remain strong, but in 2026 the trend is decorative-as-jewellery rather than decorative-as-sole-source.
Wall lighting and sconces
Bedroom wall lighting is one of the fastest-growing categories, and for good reason: wall lights free up the bedside table, throw light at a flattering angle, and can be aimed for reading. Wall-mounted reading lights on each side of the headboard are one of the most practical upgrades in any bedroom. A linear LED strip in a slim wall profile can also create a vertical or horizontal line of accent light that reads as pure architecture. Searches such as bedroom wall lighting ideas, wall lighting for bedroom and bedroom sconces lighting all point to the same need: gentle, directional light at the right height.
Bedside and reading lamps
The bedside lamp remains the workhorse of the task layer. The essentials are a warm colour temperature, a dimmable output and, ideally, a directional element so light falls on the page and not the room. Reading light should be focused on the book, not spread across the whole bed, which is why an adjustable arm or a directional wall reading light often beats a broad table lamp for serious readers.
Strip lighting for accents and orientation
Finally, the LED strip itself (installed in a profile) is its own category and the heart of led strip lighting bedroom design. Beyond coving and recessed lines, strips create headboard halos, floating-bed effects, wardrobe and shelf lighting, and low-level floor orientation light for safe night-time movement. Because the same strip technology serves so many roles, it is the most versatile single product in modern bedroom lighting, which is why the rest of this guide returns to it repeatedly.
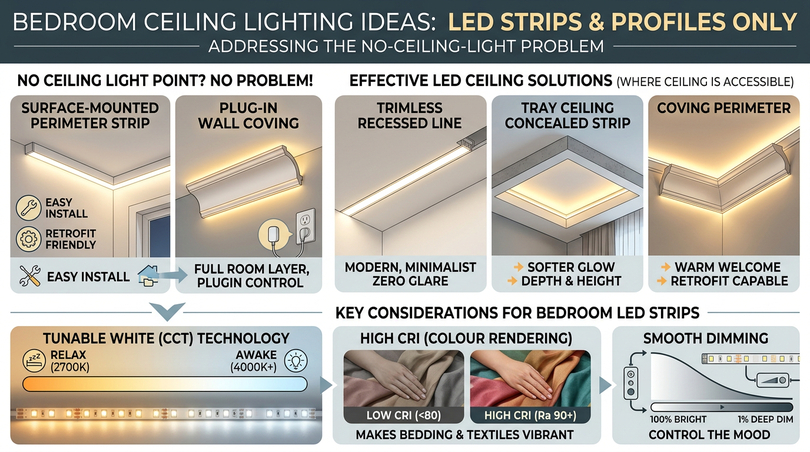
Bedroom ceiling lighting ideas and the no-ceiling-light problem
Few questions come up more often than whether a bedroom needs a ceiling light at all, and what to do when there is no ceiling fixture available. This section gathers the most-searched bedroom ceiling lighting ideas and answers the practical problem of lighting a bedroom without a central ceiling point, a situation common in older buildings, rentals and converted spaces.
Does a bedroom need a ceiling light?
A bedroom does not strictly need a central ceiling light. A layered scheme built from recessed strips, coving, wall lights and bedside lamps will out-perform a single overhead fitting on comfort, mood and flexibility every time. That said, a ceiling light is convenient for cleaning, dressing and quickly flooding the room with light, so the best answer for most people is to include some form of ceiling-level light: ideally recessed or coving rather than a glaring central fixture — and never to rely on it as the only source.
Ceiling lighting ideas that actually work
The most effective bedroom ceiling lighting ideas in 2026 share one trait: the source is hidden or diffuse. Recessed trimless lines, a coving perimeter, a shallow tray ceiling with concealed strip lighting, and widely spaced recessed downlights on a dimmer all produce a calm, even ceiling. Avoid a single bright downlight or bare fixture directly over the bed, which glares straight into reclining eyes — the most common ceiling-lighting mistake in bedrooms.
| Ceiling approach | Layer | Glare risk | Best for |
|---|---|---|---|
| Trimless recessed line | Ambient + accent | Very low | Modern, architect-led rooms |
| Coving perimeter strip | Ambient | Very low | Retrofit, soft glow |
| Tray ceiling concealed strip | Ambient + accent | Very low | Master bedrooms with height |
| Recessed downlights (dimmed, off-bed) | Ambient + task | Medium | Dressing zones, walkways |
| Central pendant / chandelier (dimmed) | Decorative accent | Medium-high if over bed | Statement, high ceilings |
How to light a bedroom with no ceiling light
When there is no ceiling point, the room becomes an opportunity for a fully layered, plug-in or surface-run scheme. The most reliable solution is a combination of a coving or surface-mounted LED strip run, wall lights and bedside lamps. A surface coving profile can be fixed around the room perimeter and fed from a single point, while plug-in wall lights and lamps fill the task and accent layers. The result is frequently better than the original ceiling light would have been, because every layer is now intentional. This is also the ideal moment to introduce led strip lighting bedroom techniques, since strips do not require a ceiling rose or junction box in the centre of the room.
Colour temperature and brightness: getting the mood right
If there is one technical concept that separates amateur from professional bedroom lighting, it is colour temperature and its close partner, brightness. Get these two right and even a simple scheme feels intentional and calm. Get them wrong and the most expensive fixtures in the world will still feel cold, harsh or sterile. This section explains colour temperature, brightness and colour rendering in plain language, then gives concrete targets for the bedroom.
What colour temperature actually means
Colour temperature, measured in Kelvin (K), describes whether light appears warm and yellow or cool and blue. Lower numbers are warmer, higher numbers are cooler. Candlelight sits around 1800K, a cosy warm-white lamp around 2700K, neutral white around 4000K, and crisp daylight-white around 6000K to 6500K. For the bedroom, the evening target is firmly at the warm end.
| Colour temperature | Appearance | Best bedroom use |
|---|---|---|
| 2200K–2400K | Very warm, candle-like | Deep evening mood, accent glow |
| 2700K | Warm white | Primary evening ambient, bedside reading |
| 3000K | Soft warm white | General relaxed bedroom light |
| 4000K | Neutral white | Dressing, makeup, wardrobe task |
| 5000K–6500K | Cool / daylight white | Morning waking, detailed tasks only |
Warm or cool: which is best for a bedroom?
The honest answer is both, at different times: which is exactly why tunable white (CCT) technology has become the default recommendation for serious bedroom lighting. For relaxation and sleep, warm white at 2700K to 3000K is best, because warm light supports the natural rise of melatonin in the evening. For morning energy and tasks like makeup or reading fine print, a cooler 4000K or higher is more useful. A tunable white LED strip lets a single installation deliver both, transitioning smoothly across the day.
Colour rendering: the quality you can’t fake
Colour Rendering Index (CRI, expressed as Ra) measures how faithfully a light source reveals colours compared with natural daylight, on a scale to 100. In a bedroom, high CRI is what makes skin, wood, fabric and bedding look natural rather than washed-out or grey. For general bedroom use, Ra 90 or above is the target, for a truly premium result, Sunlike-spectrum strips reach Ra above 97, rendering colours with near-daylight accuracy. This is one of the most under-appreciated factors in how a bedroom feels, and one of the easiest to get right by simply specifying a high-CRI strip from the start.
How bright should bedroom light be?
Brightness is measured in lumens, and the bedroom is a place for restraint. A bedroom rarely needs the high lumen levels of a kitchen; what it needs is the ability to range from bright to very dim. A useful target for total ambient output is around 1,500 to 3,000 lumens for a typical room, but the single most important feature is dimming. Every primary light in a bedroom should be dimmable, because the difference between a functional room and a restful one is often nothing more than turning the level down. Layering then lets you reduce the number of active sources at night rather than dimming one harsh source into a murky glow.
The 5-7 lighting rule and rules of thumb
People often search for a single rule, such as the so-called 5-7 lighting rule, that promises perfect results. The truth is that the real rule of thumb for bedroom lighting is layering and dimming, not a magic number. Aim for at least three independently controlled layers, keep the evening colour temperature warm, choose high CRI, and make everything dimmable. Follow those four principles and any room will be well lit, regardless of its size or shape.
LED strip lighting for the bedroom: the modern core
If recessed and concealed light is the look of modern bedroom lighting, the LED strip is the engine that produces it. Almost every contemporary bedroom lighting idea, the floating headboard glow, the perimeter ceiling wash, the under-bed orientation light, the wardrobe and shelf illumination, is an LED strip installed in an aluminium profile. This section explains the strip itself: the technologies, the choices, and why the profile is not optional.
Why a strip always needs a profile
A bare adhesive LED strip stuck to a surface is the single most common mistake in DIY led strip lighting bedroom projects. An LED strip needs an aluminium profile for three reasons: heat, light quality and longevity. Aluminium draws heat away from the LEDs, which directly protects their lifespan and prevents colour drift; the diffuser turns a line of bright dots into a smooth, glare-free ribbon of light; and the channel protects the strip mechanically and gives a clean, finished edge. A strip in a profile looks professional; a strip stuck straight to the wall looks like a kit.
SMD versus COB strips
There are two dominant strip technologies, and the choice matters in the bedroom. SMD strips use individual LED chips spaced along the strip; they are efficient and versatile and ideal where the strip is hidden and only its reflected light is seen, such as coving or recessed ceiling lines. COB strips (Chip On Board) use a dense, continuous line of tiny LEDs under a phosphor layer, producing a perfectly uniform line of light with no visible dots even at close range. For any bedroom application where the strip is viewed directly or through a clear diffuser — under a headboard, along a shelf, on a slim surface profile — COB is the right choice.
| Technology | Appearance | Best bedroom use | Cut frequency |
|---|---|---|---|
| SMD strip | Discrete dots, smooth when diffused/hidden | Coving, recessed ceiling, accent washes | Frequent cut points |
| COB strip | Continuous, dot-free line | Headboards, shelves, slim surface profiles, close viewing | Cut points every 50–100 mm |
Tunable white (CCT) and the circadian bedroom
The most important strip choice for the bedroom is tunable white, also called CCT. A tunable white strip carries two LED channels, a warm one and a cool one, whose mix a controller can blend to any colour temperature across the day. This is what turns a static installation into a circadian one: cool and energising in the morning, warm and calming at night, mirroring natural daylight to support better sleep. For most bedrooms this single feature delivers more wellbeing benefit than any other upgrade.
Sunlike strips and visual comfort
At the top of the quality ladder sit Sunlike-spectrum strips, which reconstruct the full solar spectrum and reach CRI above 97 with strong deep-red (R9) performance. In a bedroom this means skin tones, natural wood and textiles are rendered with near-museum fidelity, producing a sense of natural comfort that standard LEDs simply cannot match. For a master bedroom or any space where light quality is paramount, a Sunlike strip is the definitive specification.
Are LED lights bright enough, modern and safe for a bedroom?
Three reassurances are worth stating plainly, because they are among the most-searched bedroom lighting questions.
- Are LED lights bright enough for a bedroom? Comfortably, modern LED strips far exceed bedroom brightness needs, and the real skill is restraining and dimming them.
- Are LED lights modern and still trendy? They are the defining lighting technology of the era and the foundation of every contemporary scheme.
- And are LED strips safe in a bedroom? Yes, when installed correctly in an aluminium profile with a quality driver, the profile managing heat and the low-voltage strip running cool to the touch.
The safety caveat is always correct installation, which the workshop section covers in full.
Understanding the full LED system: strips, drivers, controllers and accessories
A successful led strip lighting bedroom installation is a small system, not a single product, and understanding each component prevents the disappointments that catch out first-time installers. This section explains the parts beyond the strip and profile (the driver, the controller, the connectors and the accessories) so you specify a complete, compatible kit from the start rather than discovering a missing piece halfway through.
The driver: the heart of the system
Every LED strip needs a driver to convert mains voltage to the low voltage the strip runs on. The driver must match the strip’s voltage and be sized for the total wattage of the run, with headroom of around twenty per cent so it never runs at its limit. An undersized driver overheats, buzzes and shortens its own life and the strip’s while an oversized driver is simply wasteful. For dimmable bedroom schemes, choose a dimmable driver compatible with your chosen control method: this is a decision to make before you buy, not after. The most common cause of a flickering or buzzing bedroom strip is a driver mismatched to the dimmer.
Controllers and dimming methods
The controller sits between the driver and your input, whether that is a wall dimmer, an app or a voice assistant. For tunable white you need a controller that handles both LED channels; for colour-capable strips you need an RGB or RGBW controller. Dimming itself comes in several forms (mains dimming, low-voltage PWM dimming and smart wireless dimming being the most common) and the strip, driver and controller must all speak the same method. Planning the control chain end to end is what separates a smooth, silent, flicker-free bedroom from a frustrating one.
Connectors, cable and feeds
Beyond the strip itself you will need connectors or solder, low-voltage cable of adequate gauge, and possibly corner connectors for L-shaped runs. Use cable of sufficient cross-section for the current and the run length, because thin cable on a long feed causes voltage drop and dimming at the far end. Plan where power enters the run and where cables exit the profile before you fix anything, and keep all joints accessible or properly insulated. Quality connectors and clean soldered joints are cheap insurance against the most common failure point in any strip installation.
IP rating and where it matters
Most bedroom strips can be standard, non-waterproof IP20 because the bedroom is a dry environment. Reserve higher IP-rated strips for the rare bedroom application near a basin or in a connected ensuite zone, where moisture is a factor. In the bedroom proper, a standard strip in a profile with the right diffuser is exactly what you want: over-specifying IP rating adds cost and can dull the light for no benefit.
Matching strip density to profile and diffuser
A subtle but important point: the strip’s LED density must suit the profile depth and diffuser. A shallow profile viewed at close range (under a headboard, on a shelf) needs a high-density COB strip and an opaque diffuser to avoid visible dots, while a deep, hidden coving profile can use a more economical SMD strip because only its reflected light is seen. Matching density, depth and diffuser is the quiet craft that makes a line of light look uniform and intentional rather than spotty and cheap.
Planning, measuring and calculating your bedroom scheme
Before any product is ordered, a short planning exercise saves money and prevents mistakes. This section gives a practical method for planning a bedroom lighting scheme on paper, calculating quantities, and avoiding the over- and under-buying that plague impulse installations.
Mapping the room and its zones
Start with a simple plan of the room, marking the bed, wardrobe, dressing area, seating and circulation paths. Assign each zone to the layers it needs (ambient everywhere, task at the bed and dressing area, accent at the headboard and any feature) and note where power can reasonably be brought in. This single sheet of paper becomes the brief for everything that follows and exposes problems, like a bed wall with no nearby power, while they are still cheap to solve.
Calculating strip length and run layout
Measure each run the strip will occupy and add a small allowance for cutting to the nearest cut point. Always round strip orders up to the next sensible length and plan the layout so any offcut falls in a hidden position, since strips only divide at fixed cut points. For coving and perimeter runs, measure the full perimeter and decide where the feed and any corner joints will sit. For a headboard, measure the visible width you want lit, not the whole headboard, unless a full wash is intended.
Estimating brightness and power
Translate your brightness goal into strip choice using lumens per metre and the run length, then sum the wattage to size the driver. For ambient coving, a moderate-output strip across the room perimeter usually exceeds the needed level, so plan to dim it: for accent and orientation, low-output strips are intentional, not a compromise. Remember that with efficient LED you almost always end up dimming, so err toward comfortable rather than maximal output and rely on dimming for restraint.
Budgeting realistically
A complete layered LED bedroom scheme costs more than a single ceiling fixture but transforms the room, and the spend is mostly in the strips, profiles and control. Spend where it shows and where it lasts: quality profiles for heat and finish, high-CRI strips for material rendering, and a good driver and controller for silent, flicker-free dimming. Save by choosing economical SMD strips for fully hidden runs and reserving premium COB and Sunlike strips for the visible, close-range accents where their quality is actually seen.
How LED strip lighting compares with traditional bedroom fixtures
It is worth setting modern led strip lighting bedroom solutions directly against the traditional fixtures people are choosing between, because the comparison clarifies why layered LED has become the default for serious schemes. The table and notes below summarise the trade-offs honestly.
| Approach | Strengths | Limitations | Best role |
|---|---|---|---|
| LED strip in profile | Hidden, even, tunable, efficient, long-lived | Needs planning and correct install | Ambient, accent, orientation: the core |
| Central ceiling fixture | Simple, floods the room, easy to clean by | Glares over bed, single layer, flat | Occasional bright-up only, dimmed |
| Pendant / chandelier | Decorative statement, character | Can glare; decorative not functional | Accent jewellery in tall rooms |
| Wall lights / sconces | Free surfaces, flattering angle, reading | Fixed position once wired | Bedside task, wall accent |
| Table / floor lamps | Flexible, no wiring, warm pools | Occupy surfaces, trailing cables | Task and cosy accent layer |
The conclusion is not that traditional fixtures are obsolete: a beautiful pendant or a well-placed lamp adds character and warmth. It is that the hidden LED strip in a profile is uniquely able to serve the ambient and accent layers invisibly, efficiently and tunably, which is why it has become the backbone around which the decorative pieces are arranged. The best bedrooms combine both: concealed LED doing the systematic work, and a few chosen fixtures providing personality.
Choosing the right aluminium profile for each application
The aluminium profile is the unsung hero of led strip lighting bedroom design. Choosing the right one is the difference between an installation that looks like architecture and one that looks like an experiment. This section maps the main profile families to bedroom applications, with the specific Lighting Line products that suit each. Profiles fall into broad families (recessed and drywall, surface, corner, wall, baseboard and furniture) and each has a home in the bedroom.
Drywall and recessed profiles for invisible ceiling lines
For the trimless, plastered-in look that defines premium bedroom ceiling lighting ideas, drywall profiles are the answer. The DW07-01 is a compact trimless profile ideal for crisp ceiling and wall cuts, while the larger DW11-03 suits deeper recesses and longer runs. Both are designed to be plastered directly into drywall so only the light is visible, and both live in the drywall profile range. These are the profiles to reach for when you want the ceiling to read as a clean plane with light emerging from a slot.
Surface and furniture profiles for headboards and shelves
Where the strip sits on a visible surface (the underside of a headboard, a floating shelf, the edge of a wardrobe) an ultra-slim surface or furniture profile keeps the hardware discreet. Profiles like the SL08-03 (around 8 mm high) and the very low SL13-0222 (around 5 mm high) are designed to hide in narrow gaps or sit almost flush on wood and fabric. Their minimal thickness is exactly what headboard and furniture accent lighting needs, and they pair naturally with COB strips for a perfectly uniform line. B
Baseboard profiles for floor-level orientation light
Soft floor-level light that guides you safely at night without fully waking you is one of the most appreciated touches in a bedroom. Baseboard profiles such as the BB02-02 integrate a low-power strip at skirting level, casting a gentle wash across the floor that orients without glare. Combined with a low-output, warm strip and ideally a motion or timer control, this creates a calm, safe night-time environment.
Diffusers: opaque, satin or clear
The diffuser is the final, decisive choice. In a bedroom, always favour an opaque or satin diffuser rather than a clear one. A frosted opaque or satin cover softens the beam, hides the individual LEDs and prevents harsh reflections on polished furniture, mirrors and screens, exactly the kind of glare that disturbs rest. A clear diffuser maximises output but reveals the source and reflects sharply, which is rarely what a bedroom wants. The small choice of diffuser finish has an outsized effect on eye comfort.
| Bedroom application | Profile family | Example product | Strip + diffuser |
|---|---|---|---|
| Invisible ceiling line | Drywall / trimless | DW07-01, DW11-03 | CCT SMD, satin diffuser |
| Headboard / shelf accent | Surface / furniture (slim) | SL08-03, SL13-0222 | COB, opaque diffuser |
| Floor-level orientation | Baseboard | BB02-02 | Low-power warm, opaque diffuser |
| Coving / perimeter wash | Surface coving | Coving surface profile | CCT SMD, satin diffuser |
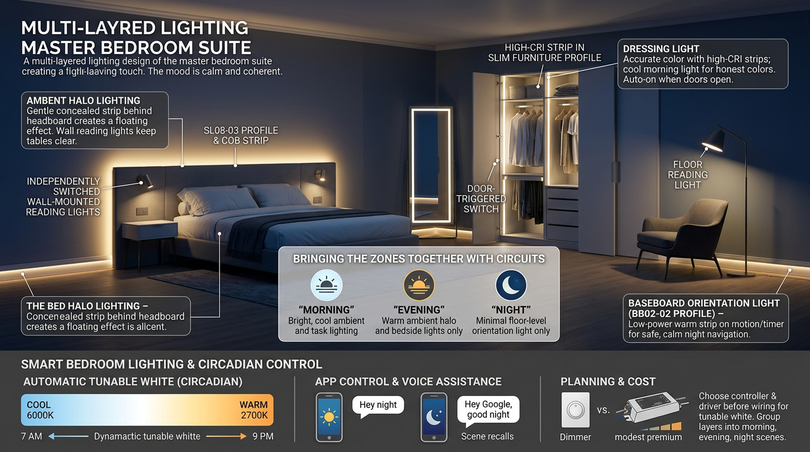
Master bedroom lighting design, room by room
A master suite is larger, often used at more times of day, and frequently includes a dressing zone, a reading area and sometimes an ensuite. This section walks the room zone by zone, showing how to layer light so each area works on its own and the whole reads as one calm, coherent space. The principles apply equally to a small bedroom — you simply use fewer of each element.
The bed and headboard zone
The bed is the emotional centre, and its lighting should be the gentlest in the room. The signature master bedroom move is a concealed strip behind the headboard, washing the wall above the bed in a soft halo of warm light. Using a slim surface profile such as the SL08-03 with a COB strip and an opaque diffuser, the light appears to float behind the bed with no visible source. Add an independently switched reading light on each side (wall-mounted to keep the bedside table clear) and the bed zone is complete: ambient halo for atmosphere, focused task light for reading.
The dressing and wardrobe zone
Dressing needs honest, accurate light, which is where higher CRI and a neutral-to-cool option matter most. Light the wardrobe interior and the area in front of a full-length mirror with a high-CRI strip that can run cooler in the morning, so colours and skin tone read truthfully. A strip in a slim furniture profile inside the wardrobe, ideally on a door-triggered switch, gives clean, shadow-free task light precisely when the doors open.
The reading and seating zone
If the master has an armchair or chaise, treat it as its own task pool: a floor or wall reading light aimed at the seat, independent of the rest of the room, so one person can read while the room stays dim. Localised task light in a seating zone keeps the rest of the master bedroom restful.
Floor-level and circulation lighting
In a large room, getting from bed to door or ensuite at night is safer and calmer with low orientation light. A baseboard strip on a motion or timer control provides exactly enough light to navigate without flooding the room, using a profile like the BB02-02 and a low-power warm strip. This is one of the touches that most distinguishes a professionally designed master bedroom.
Bringing the zones together with circuits
The final step is control. A well-designed master bedroom lighting scheme groups its layers into scenes: a bright “morning” scene with cooler ambient and task light, a balanced “evening” scene with warm ambient and bedside light, and a minimal “night” scene with only floor-level orientation light. Each zone’s circuits are assigned to these scenes, so a single tap transforms the whole room. We cover the smart control that makes this effortless next.
Smart bedroom lighting and circadian control
Smart control is what turns a good bedroom lighting installation into a living system that adapts to you. In 2026 smart lighting is no longer a novelty but a mainstream expectation, and for the bedroom it delivers the single most valuable feature of all: automatic colour-temperature and brightness changes that follow your daily rhythm. This section explains what smart bedroom lighting is, how to plan it, and what to watch for.
What smart bedroom lighting actually does
At its simplest, smart bedroom lighting LED control means dimming and switching from a phone, a voice assistant or an automated schedule. At its most powerful, it means a tunable white system that automatically shifts from cool energising light in the morning to warm relaxing light at night, plus scenes that recall whole combinations of layers with a single command. The headboard halo, the bedside reading lights and the floor orientation strip can each be controlled independently or grouped into a “good night” routine.
Planning a smart scheme
The key planning decision is to choose your control method before you wire, because tunable white strips need a compatible controller and driver. Decide early whether you want app control, voice control via a smart assistant, or automated schedules, ideally all three, and specify a controller that supports tunable white if you want circadian behaviour. Group your layers into the morning, evening and night scenes described earlier, and assign each circuit accordingly.
Voice, automation and security
Most smart systems integrate with the major voice assistants, so “good night” can dim the room, warm the colour temperature and leave only the floor light on. Automation can wake you with a gradual sunrise of cool light. On security and privacy, keep smart lighting on a well-protected home network, keep firmware updated, and prefer reputable controllers; the lighting itself carries little sensitive data, but it sits on your home network like any connected device.
Cost expectations
Smart control adds cost mainly at the controller and driver level rather than the strip. A tunable white strip plus a quality smart controller and driver is a modest premium over a basic dimmed installation, and for the wellbeing benefit of automatic circadian lighting it is among the best-value upgrades in the whole scheme. The strips and profiles themselves remain the same Lighting Line products; only the control layer changes.
Energy efficiency, sustainability and running cost
Energy efficiency is no longer a niche concern: it is central to how people choose bedroom lighting and a genuine point of difference for LED systems. This section explains why LED strip lighting is the most efficient and sustainable choice for the bedroom, and how to maximise that advantage.
Why LED is the efficient choice
LED strip lighting converts far more of its energy into light and far less into heat than older technologies, which is why a well-designed LED bedroom scheme can be both brighter and dramatically cheaper to run than a single incandescent or halogen fitting. Because LED bedroom lighting is also dimmable, you draw even less power at the low levels a bedroom uses most of the time.
Lifespan, heat and sustainability
Sustainability is not only about energy per hour but about how long a product lasts before it is thrown away. This is where the aluminium profile earns its place twice over: by drawing heat away from the LEDs, it directly extends their working life, reducing replacement and waste. A strip running cool in a quality profile holds its brightness, colour temperature and CRI far longer than a bare strip overheating against a surface. Choosing a matched profile-and-strip system is therefore an environmental decision as much as an aesthetic one.
Practical efficiency tips
Three habits maximise efficiency in a bedroom: specify low-power strips where high output is not needed (a 4.8 W/m strip is ample for floor orientation light); use dimming and scenes so layers run at low levels most of the time; and use automation so lights are never on unnecessarily. Together these make a layered LED scheme one of the lowest-running-cost lighting installations in the entire home, despite delivering far more capability than a single fixture.
The workshop: cutting and connecting profiles and strips correctly
This is the most practical section of the guide, and the one that protects your investment. A beautiful design fails if the profile is cut crooked or the strip is connected wrongly. The quality of a cut and a connection is the most visible indicator of installation quality to a discerning eye, so this workshop walks through tools, technique and the critical do-nots for each profile type and for the strips themselves. Read it before you cut anything.
Tools you will need
Doing this properly needs the right kit, and the right kit is modest. For aluminium profiles: a fine-tooth metal hacksaw or, far better, a mitre saw with a fine non-ferrous (aluminium) blade, plus a mitre box for straight and 45-degree cuts, a metal file, masking tape and a tape measure. For LED strips: sharp scissors or a fine craft knife, a multimeter, a soldering iron with thin solder or quality solderless connectors, and a clean flat surface. Never improvise with a coarse wood blade on aluminium: it tears the metal and leaves a ragged edge.
Measuring and marking
The golden rule of every cut is the oldest one: measure twice, cut once. Measure the run, mark the profile clearly, and wrap a band of masking tape around the profile at the cut line. The tape does two jobs: it gives you a crisp line to follow and it prevents the saw from scratching the visible surface and the diffuser channel. Mark the cut on the tape, never directly on the finished aluminium face.
Cutting aluminium profiles
Aluminium profiles cut cleanly only with the right blade and a steady, controlled stroke. Clamp the profile firmly in a mitre box or mitre saw, support its full length so it cannot flex, and let the fine-tooth blade do the work without forcing it. For inline runs, cut square at 90 degrees while for L-shaped corners where two profiles meet on a wall or ceiling, cut matching 45-degree mitres so the join is seamless. After cutting, always deburr the cut edge with a file: running a file lightly over the inside and outside edges removes the sharp burr that would otherwise stop end caps fitting and could damage the strip or your hands. A clean, deburred, square cut is the foundation of a professional finish.
Common profile-cutting mistakes
The mistakes that ruin profiles are predictable and avoidable. Using a coarse blade tears the edge, forcing the cut bends the channel, skipping the file leaves a burr that prevents the diffuser and end caps seating and cutting without tape scratches the visible face. The most painful mistake of all is cutting from the wrong reference point so a mitre faces the wrong way — always dry-fit the corner orientation before you cut the second mitre.
Cutting LED strips
LED strips can only be cut at their marked cut points, and this differs by technology. SMD strips have frequent cut marks, usually every 25–100 mm while COB strips cut less often, typically every 50–100 mm. Cut precisely on the marked line with sharp scissors, square and clean, so the copper contact pads on both sides of the cut remain intact for connection. Never cut between the marked points: doing so destroys the segment and may leave exposed conductors. If a run does not divide evenly into the cut spacing, plan the layout so any short offcut falls where it will be hidden.
Connecting strips: soldering versus connectors
There are two ways to join strips and feed power, and both are valid when done well. Soldering gives the most reliable, lowest-resistance and most durable connection and is preferred for permanent installations and for tunable white strips with multiple contacts; tin the pads, tin the wire, join them with a brief touch of the iron, and insulate the joint. Solderless connectors are faster and need no iron, and quality connectors are excellent for accessible joins: the key is to align the polarity and contacts exactly and to ensure the connector clamps onto clean, undamaged pads. Whichever you choose, always match polarity (and, on CCT strips, match every channel) or the strip will not light or will show wrong colours.
Powering, polarity and voltage drop
Three electrical points protect both performance and safety. First, respect polarity and channel order on every connection; reversed polarity prevents lighting and mismatched CCT channels invert your colour control. Second, size the driver to the total strip wattage with headroom, never running a driver at its absolute maximum. Third, watch voltage drop on long runs: feeding power to both ends of a long strip, or breaking a very long run into shorter parallel-fed sections, keeps the far end as bright as the near end. A strip that fades along its length is almost always a voltage-drop problem, not a faulty strip.
Seating the strip and fitting the diffuser
The finishing steps make or break the look. Clean the inside of the profile, peel and press the strip down its centre line in one steady pass to avoid bubbles, then slide the diffuser in from one end rather than snapping it down from above. Fit the end caps last, with cable exits planned in advance. Run the strip briefly before final fixing to confirm every segment lights and the colour is even : it is far easier to fix a connection now than after the profile is plastered or glued in place.
A quick installation sequence
To pull it together, the reliable order of work is: plan the layout and circuits; measure and mark, cut and deburr the profiles, cut the strip at its marked points, make and test all connections, mount the profile, seat the strip, fit the diffuser and end caps and finally connect to the driver and control. Test at every stage, never only at the end. Following this sequence is how a first-time installer achieves a result that looks like professional work.
Cutting and fitting each profile type, step by step
Different profile families behave differently under the saw and on the wall, so this section extends the workshop with type-specific guidance. Whether you are working with a recessed drywall profile, a slim surface profile or a baseboard profile, the right technique protects both the finish and the strip inside.
Recessed and drywall (trimless) profiles
Trimless drywall profiles are the most demanding to fit because they are plastered in, so the cut and the setting-out must be right before any plaster goes on. The critical requirement is that the profile is fixed rigidly in position before plastering, at the correct depth, so the diffuser face finishes flush with the finished plaster surface. Cut the profile square with a fine non-ferrous blade, deburr the edge, and dry-fit it in the channel before fixing. Get the depth wrong and the light slot will sit proud of or sunk below the ceiling: a mistake that is expensive to correct once plastered. Run and test the strip before the plasterer arrives, because access afterwards is effectively impossible.
Surface and slim furniture profiles
Slim surface and furniture profiles are the most forgiving to cut and the most rewarding to fit well, since they are visible. Cut them square, deburr carefully so the tiny end caps seat cleanly, and mount them on a clean, dry, degreased surface using their adhesive or clips. Because they sit in close view, take extra care that the cut is perfectly square and the diffuser sits flush at both ends. On a headboard or shelf, plan the cable exit so no wire is visible from normal viewing angles: the hidden feed is what makes the light appear sourceless.
Baseboard profiles
Baseboard profiles run at floor level and often turn corners, so mitred joints matter. Cut matching 45-degree mitres for internal and external corners, dry-fit the whole run before fixing, and ensure the profile sits level along its length so the light line is straight. Because these run low and are walked past daily, fix them securely and route the low-voltage feed neatly behind the skirting. A low-power warm strip and an opaque diffuser complete the calm, glare-free orientation light.
Corner and wall profiles
Corner profiles, mounted at the junction of two surfaces, are ideal for coving-style accent light and need the same mitred care at any change of direction. Cut corners as matched mitres, support the profile fully while cutting so it cannot flex, and check the angle dry before committing. Wall profiles for vertical or horizontal accent lines should be set out with a level so the line of light reads as deliberately architectural rather than slightly off-true: the eye is unforgiving of a line that is nearly, but not quite, straight.

Troubleshooting common LED strip problems
Even a careful installation can throw up issues, and almost all of them have simple causes. This troubleshooting guide covers the problems people most often meet with led strip lighting bedroom projects, with the likely cause and fix for each.
The strip does not light at all
Check polarity first: a strip connected with reversed polarity will not light. Then confirm the driver is powered and correctly rated, the connections are clean and tight, and the strip is being fed at the correct voltage. A multimeter quickly confirms whether voltage is reaching the strip. In most cases the fault is a reversed or loose connection, not a faulty strip.
One end is dimmer than the other
This is voltage drop, the classic symptom of a long run fed from one end only. The fix is to feed power to both ends of the run, or to split a very long run into shorter sections each fed in parallel, and to use adequately thick feed cable. A strip that fades along its length is rarely faulty, it is under-fed.
Visible dots or spotting
Visible dots mean the strip, profile depth and diffuser are mismatched for the viewing distance. Switch to a higher-density or COB strip, increase the gap between strip and diffuser, or use a more opaque diffuser. In close-view positions like headboards and shelves, COB with an opaque cover is the reliable cure.
Flickering or buzzing
Flicker and buzz almost always point to a driver or dimmer mismatch. Confirm the driver is dimmable and compatible with the dimmer or controller, and that it is not overloaded. Replacing a non-dimmable or incompatible driver with the correct dimmable type usually resolves it immediately.
Colour looks wrong on a tunable white strip
If warm and cool seem swapped or fixed, a CCT channel is miswired. Check that both channels of the tunable white strip are connected in the correct order to a controller that supports CCT. Mismatched channels invert or disable the colour-temperature control.
Maintenance and longevity of bedroom LED lighting
One of LED’s quiet advantages is how little maintenance it needs, but a few habits keep a bedroom lighting installation looking and performing its best for many years. This short section covers care and the realistic lifespan you can expect.
What maintenance LED actually needs
LED strip lighting is close to fit-and-forget, but not entirely. Occasionally dust the diffusers, since a film of dust dulls and slightly warms the light over time, and check that connections remain sound, especially after any building work. A profile keeps the strip protected from dust, knocks and moisture, which is one more reason the profile is not optional.
Realistic lifespan and what shortens it
Quality LED strips in a profile last many years of normal use, and the single biggest factor in reaching that lifespan is heat. A strip running cool in an aluminium profile holds its brightness and colour far longer than a bare strip overheating against a surface, which dims and drifts in colour prematurely. Choosing a matched profile-and-strip system, sizing the driver with headroom, and not over-driving the strip are the three habits that turn a rated lifespan into a real one.
The science of light and sleep, in depth
Because the wellbeing case for good bedroom lighting is so central, it is worth understanding the underlying science a little more deeply. This section explains, in accessible terms, how light influences sleep and why the tunable, layered approach this guide recommends aligns with what the body actually needs.
How light reaches the body clock
Special light-sensitive cells in the retina report the brightness and colour of light directly to the brain’s master clock, independently of vision. These cells are most sensitive to blue-rich, cool light, which is why cool light in the evening is so effective at signalling “stay awake” and suppressing the sleep hormone melatonin. Warm light in the evening, low in blue content, allows melatonin to rise naturally. This is the biological basis for the whole warm-evening principle.
Why brightness and timing matter as much as colour
It is not only colour but level and timing that count. Bright light late in the evening delays the body clock and pushes back sleep, while dim, warm light in the hour before bed supports a natural wind-down. This is exactly why dimming and layering matter so much: reducing both the colour temperature and the brightness in the evening sends a consistent, reinforcing signal that it is time to rest.
Morning light and waking
The same system works in reverse at the start of the day. Brighter, cooler light in the morning helps suppress residual melatonin and promotes alertness, which is why a tunable system that runs cool at dawn and warm at night mirrors the natural daylight cycle the body evolved with. A gradual “sunrise” wake routine on a smart system applies this principle gently, easing waking rather than jolting it.
Designing a bedroom that respects sleep
Putting the science together gives a clear design brief, which is precisely the one this guide has followed throughout. Use warm, dim, layered light in the evening; keep bright cool light for the morning; make everything tunable and dimmable; and hide the sources so no glare disturbs the eyes near sleep. A bedroom lit this way does not merely look good — it actively works with your biology to support better rest, which is the deepest reason to take bedroom lighting seriously.
2026 architectural techniques: invisible light done right
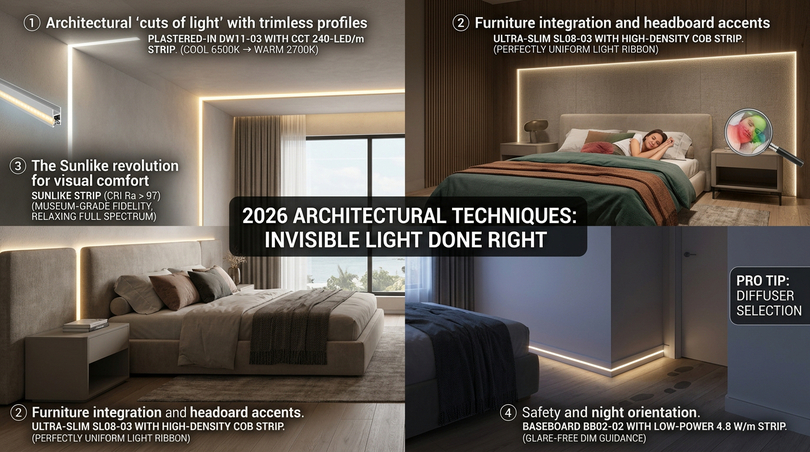
Having covered the principles, the products and the craft, we can now bring them together into the specific architectural techniques that define bedroom lighting in 2026. In this year, bedroom lighting is no longer just a functional necessity but a key element of well-being and architectural expression. By integrating advanced LED strips and aluminium profiles, designers can create invisible light sources that follow the human circadian rhythm and enhance the room’s materials. The four techniques below are the ones professionals reach for most often, each paired with the right Lighting Line profile and strip.
1. Architectural “cuts of light” with trimless profiles
For a truly modern aesthetic, trimless profiles like the DW07-01 or the larger DW11-03 are the preferred choice for ceilings and walls. Why use them? These profiles are designed to be plastered directly into drywall, leaving only the light emitter visible. They create sharp, clean lines that define the bedroom’s geometry without the clutter of traditional fixtures. The strip choice: pair these with tunable white (CCT) strips such as a CCT 240-LED/m variant. This allows you to transition from a stimulating cool white (6500K) in the morning to a relaxing warm white (2700K) in the evening, mirroring natural daylight to improve sleep quality.
2. Furniture integration and headboard accents
Low-profile lighting behind headboards or under bedside tables requires ultra-slim surface profiles like the SL13-0222 (only around 5 mm high) or the SL08-03 (around 8 mm high). Why use them? Their minimal thickness allows them to be hidden in narrow gaps or directly on the surface of wood and fabric without being obtrusive.The strip choice: for these applications, COB (Chip On Board) technology is essential. A high-density COB strip eliminates the “dotted” effect, providing a perfectly uniform “ribbon” of light even in shallow profiles.
3. The Sunlike revolution for visual comfort
To truly elevate a bedroom, the quality of light is paramount. The Sunlike strips represents the pinnacle of 2026 bedroom technology. Why use them? With a Color Rendering Index (CRI) Ra above 97, these strips mimic the full solar spectrum. They are used because they render the colours of bedroom textiles, wood, and skin tones with museum-grade fidelity, providing a sense of natural comfort that standard LEDs cannot match.
4. Safety and night orientation
Soft orientation lighting at floor level can be achieved using baseboard profiles such as the BB02-02. They guide the way at night without causing glare or fully waking the user. The strip choice: low-power strips, such as those consuming around 4.8 W/m, are ideal here. They provide just enough illumination for safety while maintaining a calm, dim environment.
Pro tip: diffuser selection
Always pair your profiles with opaque or satin diffusers. In a bedroom, these are vital because they soften the light beam and prevent harsh reflections on polished furniture or screen surfaces, ensuring maximum eye comfort. A clear diffuser maximises raw output but reveals the LEDs and reflects sharply, almost never the right choice where rest is the goal.
Common bedroom lighting mistakes to avoid
Knowing what to avoid is as valuable as knowing what to do. These are the recurring mistakes that undermine otherwise good bedroom lighting, collected from the most common questions and real installations. Avoiding them costs nothing and improves almost every scheme.
Relying on a single overhead light
The most common mistake of all is lighting a bedroom with one central fixture. A single overhead source cannot serve ambient, task and accent needs, and a bright fixture over the bed glares straight into reclining eyes. The fix is layering: spread the work across at least three independently controlled sources.
Choosing the wrong colour temperature
Lighting a bedroom with a fixed cool white is the second great mistake. Cool light in the evening fights melatonin and keeps you alert when you want to wind down. Specify warm 2700K–3000K for evening, ideally tunable so morning can run cooler.
Skipping dimming
Non-dimmable bedroom lights force a binary choice between glare and darkness. Every primary light in a bedroom should dim, because the move from functional to restful is usually just a matter of level.
Sticking strips straight to surfaces
Mounting a bare LED strip without a profile is the classic DIY error. Without an aluminium profile the strip overheats, shows visible dots, drifts in colour and ages fast, and the result looks unfinished. Always use a matched profile and diffuser.
Ignoring glare and reflections
Clear diffusers, exposed sources and light aimed at shiny surfaces all create glare that disturbs rest. Hide the source, use satin or opaque diffusers, and aim light away from sleeping eyes and reflective screens.
Forgetting independent bedside control
Wiring both bedside lights to one switch means one partner cannot read while the other sleeps. Give each side of the bed its own switchable light. It is a small wiring decision with a large daily payoff.
Bedroom lighting for every kind of user
The right bedroom lighting depends on who you are and what you need from the room. This section answers the priorities of four very different users, showing how the same layered LED approach flexes to serve each.
For the architect
Architects want innovation, durability and a restful, functional night-time environment. The priorities here are trimless recessed lines for clean geometry, tunable white for circadian performance, high-CRI Sunlike strips for material fidelity, and aluminium profiles for longevity. The latest trend is invisible architectural lighting integrated into drywall, and the most energy-efficient solution is a layered, dimmed, scene-controlled LED system: exactly what the trimless and Sunlike techniques above deliver. The most durable choice is always a matched aluminium-profile-and-strip system, which manages heat and protects the LEDs for years.
For the teacher seeking rest
Someone focused on a calm, restful room wants warm, gentle, sleep-friendly light and easy dimming. The answer is a warm 2700K–3000K ambient layer, a dimmable headboard halo, and low-level orientation light, all controllable so the room winds down with you. Dimmable LED strips installed in a profile are simple to control and run at very low cost, and warm light genuinely supports the wind-down toward sleep.
For the entrepreneur who loves smart tech
A technology-minded user wants automation, voice control and convenience. A tunable white LED system with a smart controller delivers voice-assistant compatibility, automated circadian schedules and one-tap scenes, at a modest premium over a basic install. Keep the system on a secure home network and updated, and you gain a bedroom that lights itself appropriately from dawn to deep night.
For the lifestyle creator
A creator photographing the room wants flattering, natural-looking, on-trend light. High-CRI Sunlike strips render skin and materials with daylight accuracy for the best photographic results, while concealed headboard and coving strips create the soft, sourceless glow that reads as effortless and modern. Tunable white lets the same room shift between a bright daytime look and a warm, intimate evening scene, and slim profiles keep all the hardware invisible in shot.
Bedroom lighting trends shaping 2026
Understanding where bedroom lighting is heading helps you make choices that will still feel current years from now. The trends below are not fashions that will date, they are the maturing of lighting into a wellbeing-led, architecture-integrated discipline. Each one reinforces the layered, tunable, concealed approach this guide recommends.
Wellbeing and circadian-first design
The defining shift of 2026 is that lighting is now chosen for how it makes people feel and sleep, not only for how it looks. Circadian-first design (tunable white that follows the day) has moved from a luxury feature to a mainstream expectation, and it is the trend most likely to define the decade. Specifying tunable white from the start future-proofs any bedroom against this direction of travel.
Invisible, integrated light
The visible fixture is steadily giving way to integrated light. Trimless recessed lines, plaster-in profiles and concealed strips are increasingly the default for new and renovated bedrooms, because they let the architecture, not the hardware, be the statement. This is the single strongest aesthetic trend, and it is built entirely on the profile-and-strip systems described throughout this guide.
Layering and scene control
Single-switch rooms are being replaced by multi-circuit, scene-controlled spaces. The expectation now is that a bedroom can move between a bright morning scene, a relaxed evening scene and a minimal night scene at a tap or a word, which requires the independent layers and smart control this guide has emphasised from the start.
Material honesty and high CRI
As interiors lean toward natural materials (wood, stone, linen, wool) the demand for light that renders them faithfully has risen sharply. High-CRI and Sunlike-spectrum light, once reserved for galleries and retail, is now sought for premium bedrooms precisely because it makes natural materials and skin look their best. This trend rewards specifying high CRI early rather than treating it as an upgrade.
Efficiency and sustainability as defaults
Finally, low energy use and long life are no longer selling points but baseline expectations. Buyers now assume bedroom lighting will be efficient, dimmable and durable, and they increasingly value the longevity that a heat-managing aluminium profile provides. The sustainable choice and the high-quality choice have converged on the same matched profile-and-strip system.
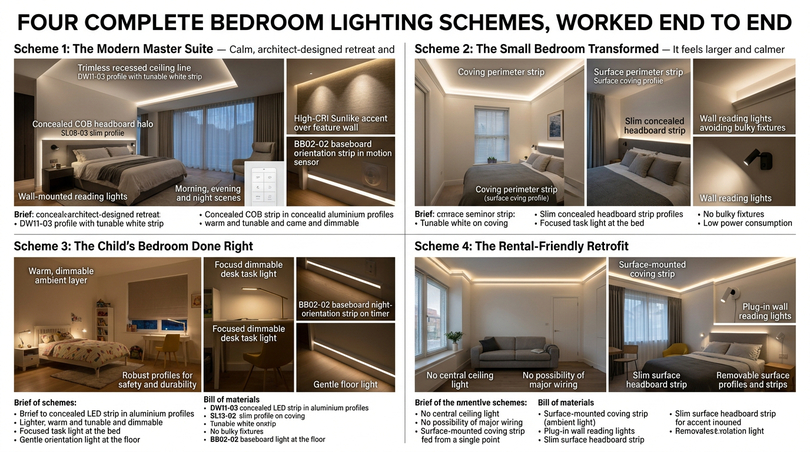
Four complete bedroom lighting schemes, worked end to end
To make everything concrete, here are four complete bedroom lighting schemes, each worked from brief to bill of materials. They show how the same principles and the same Lighting Line product families combine differently to suit different rooms and budgets. Use the closest one as a template and adjust to your room.
Scheme 1: the modern master suite
The brief is a large master bedroom that must feel like a calm, architect-designed retreat with full circadian control. The scheme uses a trimless recessed ceiling line in an DW11-03 profile with a tunable white strip for ambient and accent light, a concealed COB headboard halo in an SL08-03 slim profile, wall-mounted reading lights on each side, a high-CRI Sunlike accent over a feature wall, and an BB02-02 baseboard orientation strip on a motion sensor. All circuits run to a smart controller with morning, evening and night scenes.
Scheme 2: the small bedroom transformed
The brief is a compact bedroom that must feel larger and calmer without losing floor or surface space. The scheme uses a coving perimeter strip in a surface coving profile to wash the ceiling and lift the room, a slim concealed headboard strip in an SL13-0222 profile for a soft glow, and a pair of wall reading lights to keep the bedside table clear. Tunable white on the coving lets the small room shift from bright to intimate. With no bulky fixtures, the room reads as larger and entirely contemporary, and the whole scheme draws very little power.
Scheme 3: the child’s bedroom done right
The brief is a child’s room that is safe, warm at bedtime, and reassuring at night. The scheme uses a warm, dimmable ambient layer, a focused dimmable desk task light, and a low-power BB02-02 baseboard night-orientation strip on a timer. Everything is in robust profiles for safety and durability, the evening light is firmly warm, and the gentle floor light replaces a harsh plug-in night-light. As the child grows, the same scheme accepts a tunable white upgrade without rewiring.
Scheme 4: the rental-friendly retrofit
The brief is a room with no central ceiling light and no possibility of major wiring. The scheme uses a surface-mounted coving strip run fed from a single point for ambient light, plug-in wall reading lights, and a slim surface headboard strip for accent, a complete layered scheme achieved without touching the structure. The result, as so often with the no-ceiling-light problem, is better than the original fixture would have been, because every layer is now intentional and warm. When the tenancy ends, the surface profiles and strips can be removed cleanly.
Across all four schemes the pattern is identical and deliberate: concealed LED strip in aluminium profiles forms the ambient and accent backbone, warm and tunable and dimmable, with focused task light at the bed and gentle orientation light at the floor. Scale the components up or down, choose SMD for hidden runs and COB or Sunlike for visible ones, and any bedroom (large or small, new-build or rental, adult or child) can have lighting that is modern, restful, efficient and genuinely well made.
Your bedroom lighting buying and planning checklist
To close the practical guidance, here is a checklist that distils the whole guide into the decisions you actually need to make. Work through it in order and you will arrive at a complete, well-specified bedroom lighting scheme with no gaps and no over-buying.
Plan
Map the room and its zones, decide the three layers, choose where power enters and sketch your morning, evening and night scenes. The plan is the cheapest and most valuable part of the whole project — get it right on paper before buying anything.
Specify the light
Choose tunable white for circadian control, high CRI (90+, or Sunlike 97+ for premium), COB for visible close-range runs and SMD for hidden ones; and an opaque or satin diffuser for comfort. These four choices define the quality and feel of the result.
Specify the system
Match the profile to each application (drywall for trimless ceiling lines, slim surface and furniture for headboards and shelves, baseboard for orientation), size the driver with headroom, and choose a controller that supports your control method and tunable white. A complete, compatible kit prevents the mid-project surprises that derail installations.
Install with care
Measure twice, cut profiles with a fine non-ferrous blade and deburr, cut strips only on their marked points; match polarity and CCT channels, feed long runs from both ends, test at every stage and fit diffusers last. Careful installation is what turns good components into a result that looks professionally done.
Live with it and maintain it
Use scenes and dimming so the room runs warm and low in the evening and cool and bright in the morning, dust the diffusers occasionally and check connections after any building work. Looked after this way, a quality LED bedroom scheme will serve beautifully for many years.
Accessories, end caps and the finishing details that matter
The difference between a competent bedroom lighting installation and a flawless one usually lives in the small finishing components: the end caps, mounting brackets, corner pieces and cable management that nobody notices when they are right and everybody notices when they are wrong. This section gives these details the attention they deserve, because they are exactly where a careful installer separates their work from a rushed one.
End caps and clean terminations
Every profile run ends somewhere, and that ending should look intentional. End caps close the profile cleanly, hide the cut edge and the strip’s end, and give the run a finished, manufactured look; some are solid and some are drilled to pass a cable, so plan which you need at each end before ordering. Fitting end caps requires a properly deburred cut, which is one more reason the file is an essential tool. A run that simply stops at a ragged open end announces a DIY job; a capped, clean termination reads as professional.
Mounting brackets and secure fixing
Profiles must be held straight and secure for the line of light to look right. Use the correct mounting brackets or clips for each profile, fix at sensible intervals so the profile cannot sag or bow, and check the run is true with a level before final fixing. A perfectly straight strip in a slightly bowed profile will still read as crooked, so the fixing is as important as the cut. For surface and furniture profiles, ensure the mounting surface is clean and sound so adhesive or clips hold for the long term.
Corner connectors and changes of direction
Where a run turns a corner (around a coving perimeter, around a headboard, along a baseboard) you can either mitre the profile or use a corner connector and a flexible feed. Mitred profile corners give the cleanest architectural line, while flexible connectors between two straight profiles are simpler and forgiving on uneven walls. Choose based on how visible and how precise the corner needs to be: a feature coving wants a crisp mitre, while a hidden run can use a connector.
Cable management and hidden feeds
The magic of concealed lighting collapses the moment a feed cable is visible. Plan every cable exit in advance, route feeds behind furniture, through the structure or behind skirting, and use drilled end caps where a cable must leave the profile. The goal is that from any normal viewing position in the room, only light is seen and never a wire. This planning is invisible when done well, which is precisely the point.
Choosing diffuser finishes for each position
Diffuser choice deserves one more pass because it so strongly shapes comfort. For directly visible runs at close range (headboards, shelves, bedside) an opaque diffuser hides the LEDs completely and gives the softest, most comfortable line. For hidden coving and recessed runs where only reflected light is seen, a satin diffuser balances softness with output. A clear diffuser belongs only where maximum brightness outweighs comfort, which is rarely the case in a bedroom. Matching the diffuser finish to the viewing situation is the last decision in the chain and one of the most influential on how restful the room feels.
Bringing your bedroom lighting together
Everything in this guide points toward a single, coherent way of thinking about bedroom lighting: as a layered, tunable, carefully built system rather than a fixture to be bought and forgotten. The intro to any good scheme is the plan, the body is the layers and the components and the finish is the craft of cutting, connecting and concealing. When those three come together, the room does something a single light never can: it adapts to you across the whole day.
The practical throughline is consistent from the smallest room to the grandest master suite. Concealed LED strip in aluminium profiles, warm and tunable and dimmable, forms the ambient and accent backbone, focused task light serves the bed and dressing zones, gentle orientation light keeps the floor safe at night and smart scenes tie it all into a system that lights itself appropriately from morning to deep night. The specific profiles change (drywall for invisible ceiling lines, slim surface and furniture for headboards and shelves, baseboard for orientation) but the philosophy holds.
Choose high CRI for honest materials, opaque or satin diffusers for comfort, COB where the strip is seen and SMD where it is hidden, and install with the patience the workshop sections describe. Do that, and your bedroom lighting will not only look like the work of a professional: it will support your rest, flatter your room, sip energy, and last for years.
Frequently asked questions
The questions below gather the most common things people ask about bedroom lighting, with concise, expert answers. Click each question to expand the answer.
| Question |
|---|
Is LED light good for a bedroom?Yes. LED is the most efficient and flexible bedroom lighting available. With tunable white (CCT) LED strips in aluminium profiles you can move from cool morning light to warm evening light, supporting your circadian rhythm and improving comfort and sleep. |
What colour light is best for a bedroom?Warm white between 2700K and 3000K is best in the evening because it supports melatonin and relaxation. A cooler 4000K or higher is useful in the morning and for tasks. Tunable white strips give you both from one installation. |
Is warm or cool light better for a bedroom?Both, at different times. Warm light for relaxing and sleeping, cool light for waking and tasks. This is exactly why tunable white (CCT) technology is the recommended choice for modern bedrooms. |
Should a bedroom have a ceiling light?Not necessarily. A layered scheme of recessed strips, coving, wall lights and bedside lamps usually beats a single overhead fixture. If you do include ceiling light, prefer recessed or coving over a glaring central fitting, and never rely on it alone. |
How do I light a bedroom with no ceiling light?Combine a surface-mounted or coving LED strip run around the perimeter with wall lights and bedside lamps. This builds a full layered scheme without a central ceiling point, and is often better than the original ceiling light would have been. |
Are LED strip lights good in a bedroom?Yes, when installed in an aluminium profile with a diffuser. The profile manages heat and the diffuser turns dots into a smooth line of light, ideal for coving, headboards and under-bed orientation lighting. |
Are LED strip lights safe in a bedroom?Yes. Low-voltage LED strips run cool, and when mounted in an aluminium profile with a correctly sized driver, heat is well managed. Correct installation — proper profile, quality driver, sound connections — is the key to safety. |
Are LED lights bright enough for a bedroom?Easily. Modern LED strips exceed bedroom brightness needs; the real skill is restraining and dimming them. A bedroom benefits more from a wide dimming range than from raw output. |
Should bedroom lights be bright?They should be capable of bright but spend most time dim. Aim for roughly 1,500–3,000 lumens of total ambient capability, all dimmable, so you can range from a bright morning room to a soft evening retreat. |
Are spotlights or recessed lights good for bedrooms?They can work for dressing zones and walkways if dimmable and positioned away from the bed. Never place a bright downlight directly over the bed, where it glares into reclining eyes. Recessed linear strips are usually a gentler choice. |
How do I create mood lighting in a bedroom?Layer warm, dimmable light from hidden sources: a concealed headboard strip, a coving wash and low floor-level light, all at low levels. Hidden sources plus warm colour temperature plus dimming equals mood. |
How do I plan lighting for my bedroom?Think in three layers — ambient, task and accent — and give each its own circuit. Choose warm, high-CRI, dimmable, ideally tunable white sources, and group them into morning, evening and night scenes. |
What is the rule of thumb for bedroom lighting?There is no magic number. The real rule is: at least three independent layers, warm evening colour temperature, high CRI, and everything dimmable. Follow those and any room will be well lit. |
How bright should a bedroom light be in watts?Watts measure power, not brightness — focus on lumens and dimming instead. With efficient LED, even low wattage delivers ample light; a 4.8 W/m strip is plenty for floor orientation, while a dimmed ambient layer covers general needs. |
What is smart bedroom lighting?Lighting you control by app, voice or schedule, ideally tunable white so it shifts colour temperature automatically across the day. It enables one-tap scenes like a “good night” routine that dims, warms and leaves only floor light on. |
What size light fixture for a bedroom?For decorative fixtures, scale to the room and ceiling height, and always dim them. In modern schemes, concealed linear lighting in profiles removes the sizing question entirely — the light is set out by run length, not fixture size. |
Why do many prefer to avoid overhead lighting?A single overhead light flattens a room and glares from above. Layered, lower, warmer and indirect light feels more comfortable and more modern, which is why concealed and lamp-based schemes have become the preferred look. |
How do I cut and connect LED strips and profiles correctly?Cut profiles with a fine non-ferrous blade in a mitre box, deburr with a file, and use masking tape to protect the face. Cut strips only on their marked cut points, match polarity, and join by soldering or quality solderless connectors. Test before final fixing. |
Bedroom lighting: three layers for efficient results
Great bedroom lighting in 2026 is not about finding one perfect fixture: it is about building a layered, tunable, well-crafted system that serves your eyes, your sleep and the way your room feels at every hour. From the soft ambient wash that fills the room, to the focused task light beside the bed, to the hidden accent strips that make the architecture sing, every layer plays its part and the LED strip in an aluminium profile is the versatile core that makes nearly all of it possible.
The principles are simple and durable: think in three layers, keep evening light warm and dimmable, choose high-CRI and ideally tunable white strips, hide the source behind a satin or opaque diffuser, and install with care so every cut is clean and every connection sound. Do that, and your bedroom lighting will be modern, restful, efficient and built to last whether you are an architect specifying a master suite, a homeowner upgrading a single room, or a creator chasing the perfect natural glow.