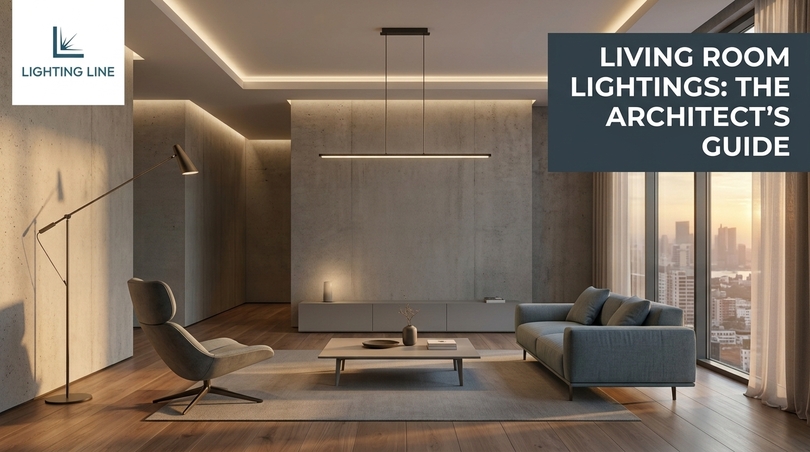
Living room lightings have stopped being an accessory and have become architecture. In the space of roughly a decade, the conversation among architects, interior designers and specification engineers has migrated away from “which ceiling fixture do I hang in the middle of the room” toward a far more interesting question: “how do we shape the light itself, so that the room reads the way the drawing intended?”. The single pendant over a coffee table (for a century the default answer to living room lighting) now looks like a symptom of a plan that was never lit, only wired. Today the discipline is closer to set design than to electrical fitting: we model brightness, we sculpt shadow, we choose a spectrum, and we hide the source so that only the effect survives.
This guide is written for the people who actually have to draw it, cost it and defend it in front of a client: architects, interior designers, lighting consultants, specification engineers, high-end contractors and the technically confident homeowner. It is built around linear LED technology (aluminium profiles and LED strips) because that is the toolkit that made contemporary living room lightings possible in the first place. A cove that glows without a visible source, a trimless line that reads as a slot cut into plaster, a wall washed with a perfectly even gradient, a floating sofa that appears to hover on a bed of light: none of these effects exist without an extruded aluminium channel, a diffuser with the right transmission curve, a strip with the right LED density, and a driver that dims to 1% without a flicker.
What follows is deliberately long, deliberately technical in places, and deliberately opinionated. You will find photometric targets expressed in lux and lumens rather than in adjectives: you will find complete bills of materials for entry-level, mid-range and premium schemes, voltage-drop arithmetic, UGR limits, CRI and R9 thresholds, dimming-protocol comparisons and a fault-finding table. You will also find the softer half of the discipline: the reason a 2700 K cove at 15% output makes a room feel like a home at 9 p.m., and why a 4000 K downlight at full output makes the same room feel like a dental surgery. Good living room lightings are 50% physics and 50% psychology, and this article refuses to separate them.
Every technical recommendation in this guide is anchored to real, orderable components from the Lighting Line aluminium profile catalogue and the Lighting Line LED strip catalogue, so that a scheme you read about here can be specified, quantified and ordered the same afternoon. Where a product code appears, it is a real reference with real dimensions, real PCB clearance and a real cut pitch — the numbers you need to put on a section drawing.
In this article…
- Why living room lightings changed: the shift from fixture to architecture
- The layer model: the grammar of living room lighting
- Photometrics for architects: lumens, lux, kelvin, CRI, UGR and flicker
- The aluminium profile as an architectural element
- Choosing the LED strip: SMD vs COB and the specification variables
- Diffusers, optics and the physics of a dot-free line
- Fourteen living room lighting schemes, detailed
- Room-size playbooks: small, medium, large, open-plan and vaulted
- Budget tiers: entry, mid-range and premium bills of materials
- Power, drivers, voltage drop and circuit design
- Dimming, control protocols and smart living room lighting
- Installation: sequence, tolerances, plasterwork and wire-free options
- Energy, running costs and EU regulatory compliance
- Style guide: living room lighting trends by interior language
- Living room ceiling lights, lounge lights and modern living room lights
- The twenty most common living room lighting mistakes
- Three case studies with measured results
- The architect’s specification checklist
- Cost, lifecycle and return on investment
- Troubleshooting and commissioning
- Glossary of lighting terms
- Frequently asked questions
- Bringing it together: from drawing to installed light
1. Why living room lightings changed: the shift from fixture to architecture
Before we discuss products, it is worth understanding why the market moved. The change in living room lightings was not driven by fashion alone, it was driven by a convergence of four independent forces (a technological one, a regulatory one, a behavioural one and an economic one) that all arrived within roughly the same fifteen-year window. Understanding those forces is what separates a designer who follows trends from a designer who can anticipate them, and it is what allows you to explain to a client why the scheme you are proposing will still look considered in 2035.
The short version: LEDs became small, efficient and good-looking enough to be hidden, halogen was legislated out of existence, people stopped using their living rooms the way their parents did and the cost of a linear metre of high-quality light collapsed. Each of these deserves unpacking, because each has a direct consequence for how you draw a section.
The technological driver: the source became small enough to disappear
A halogen lamp is a physical object with a physical size, a physical heat output and a physical socket. It cannot be concealed in a 10 mm slot. An LED die is roughly a millimetre across, and a modern COB (chip-on-board) strip presents a continuous emitting surface only 3 to 10 mm wide that can be hidden inside a plaster reveal with nothing showing but the light. This single fact is the origin of every contemporary living room lighting effect you have admired in a magazine.
The progression is easy to trace. Early SMD 3528 strips of the 2010s delivered around 4.8 W/m, a visible dot every 17 mm, a CRI in the seventies and a colour consistency that drifted visibly along a five-metre reel. A contemporary COB strip such as the 10 m 2700 K COB strip at 480 LED/m, 24 V, 10.5 W/m and 120 lm/Wdelivers a genuinely continuous line of light with CRI Ra>90 and an efficacy that would have been laboratory-grade a decade ago. The dots are gone; the discontinuity is gone, the colour drift is gone. What remains is a material (light as a building material) rather than a fitting.
The regulatory driver: Europe legislated the old answers away
The European single lighting regulation (EU) 2019/2020 progressively removed the least efficient lamp technologies from the market, and the amendments to the RoHS exemptions closed the door on most remaining compact and linear fluorescent formats from 2023 onwards. For the designer, the practical effect was brutal and clarifying: the incandescent and halogen sources that made “warm, dimmable, high-CRI” easy simply ceased to be specifiable. LED had to fill the gap not just on efficiency but on quality, and within a few product generations it did.
The regulation also introduced the reworked energy label (A to G) that appears against every strip in a compliant catalogue, you will see energy classes E, F and G against the Lighting Line COB references, which reflects the honest reality that very high-density, very high-CRI strips trade some raw efficacy for light quality. This is a trade an architect should make deliberately and be able to defend: a 15.5 W/m strip at CRI Ra>90 is not worse than a 6 W/m strip at CRI 80; it is a different instrument for a different job.
The behavioural driver: the living room became five rooms
The mid-century living room had one job: a family faced a single focal point for a few hours each evening. Today’s living room is a hybrid workspace at 10 a.m., a reading room at 3 p.m., a cinema at 9 p.m., a bar at 11 p.m. and a play area on Saturday morning. A single light source cannot serve five programmes, and this (more than any aesthetic argument) is why single-fixture living room lighting failed.
This is also the honest explanation behind the much-discussed generational rejection of the central ceiling fixture. It is not that younger occupants dislike brightness: it is that they have been raised on screen-based media, on photographed interiors and on the visual grammar of film, all of which train the eye to expect modelled, directional, low-glare light. A single overhead source produces flat illumination, unflattering downward shadows on the face, and a high luminance contrast against a dark ceiling. Every objection people raise to “the big light” is, in photometric terms, an objection to a single high-luminance source at a high vertical angle with no supporting layers. Add layers and the objection evaporates.
The economic driver: the collapsing cost of a linear metre
The final force is simple arithmetic. A designer specifying a perimeter cove in 2010 was quoting a bespoke fabrication with a fluorescent T5 and a visible socket shadow at every joint. A designer specifying the same cove today is quoting an extruded profile, a reel of strip, two end caps and a driver. The cost per linear metre of a professional, dot-free, high-CRI light line has fallen to roughly the price of a mid-range decorative table lamp, but it serves the whole room instead of one corner.
Indicative cost evolution of one metre of concealed linear light (professional grade, materials only)
| Era / technology | Typical source | Efficacy (lm/W) | CRI | Dot-free? | Indicative €/linear m, materials |
|---|---|---|---|---|---|
| c. 2005 – fluorescent cove | T5 HE 14 W | 85-95 | 80-85 | No (socket shadows) | €45-70 |
| c. 2012 – early SMD strip | SMD 3528, 60 LED/m | 60-75 | 70-80 | No (visible dotting) | €30-45 |
| c. 2018 – high-density SMD | SMD 2835, 120–240 LED/m | 95-115 | 80-90 | Partial (needs deep diffuser) | €22-38 |
| 2026 – COB linear | COB 480-840 LED/m | 100-130 | 90-93+ | Yes, fully continuous | €18-40 |
Figures are indicative professional trade ranges for materials (profile + strip + end caps + pro-rata driver), excluding installation, and are intended for comparative reasoning rather than quotation.
What this means for your next specification
The consequence of these four drivers is a simple design rule that will run through the rest of this guide: in contemporary living room lightings, the visible fixture is the exception and the concealed line is the default. Decorative pieces still matter enormously (a sculptural pendant or a beautiful floor lamp is often the emotional anchor of a room) but they should be understood as jewellery worn over a well-cut garment, not as the garment itself. The garment is the architectural layer: coves, slots, wall-washes, grazing, shelf lines, skirting lines and furniture lighting, all delivered by profile and strip.
If you take one operational instruction from this section, take this: draw the light before you choose the fittings. Mark on your plan where you want brightness, where you want shadow, what surfaces you want to be luminous, and which faces you want modelled. Only then open a catalogue. Designers who choose fittings first end up with a shopping list, designers who draw light first end up with a scheme.
2. The layer model: the grammar of living room lightings
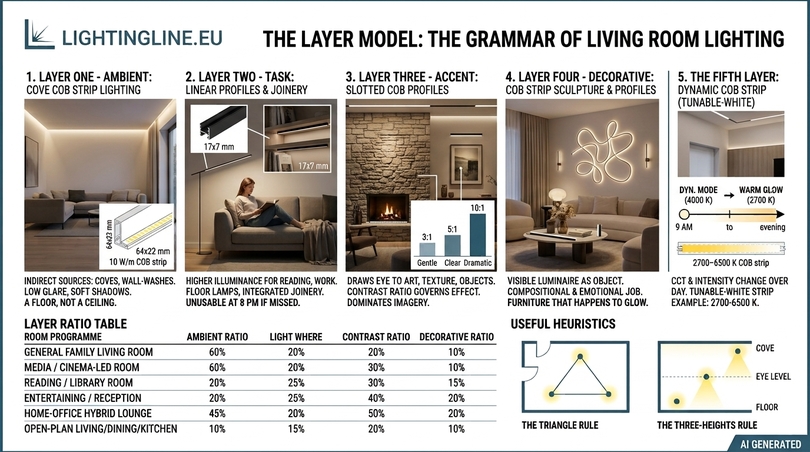
If there is one framework that separates competent living room lightings from amateur ones, it is the layer model. Every professional lighting design (whether for a 16 m² apartment lounge or a 90 m² open-plan reception) is built from four functional layers that are switched, dimmed and controlled independently. Get the layers right and almost any aesthetic language will work, get them wrong and no amount of expensive hardware will rescue the room.
The layers are not a stylistic preference: they are a response to how human vision actually works. The eye adapts to the brightest thing in the field of view, judges comfort by luminance ratios rather than absolute levels, reads three-dimensional form from directional shadow, and extracts emotional tone from colour temperature and the vertical distribution of brightness. Four layers exist because these four perceptual jobs cannot be done by one instrument.
Layer one – Ambient: the base luminance of the room
Ambient light is the general wash that establishes the room’s baseline brightness and allows safe circulation. In traditional living room lighting it came from a central pendant or a grid of downlights. In contemporary design it comes overwhelmingly from indirect sources: perimeter coves, wall-washes and uplight, because indirect ambient light produces the softest shadows, the lowest glare and the most flattering modelling of faces.
The critical property of a good ambient layer is that it should never be the brightest thing you can see. It is a floor, not a ceiling: set it so the room is comfortably navigable and then let accent and task layers create the visual interest above it. A cove running the full perimeter of a 25 m² living room with a 10 W/m warm white COB strip inside a 64×22 mm corner plasterboard profile will deliver a beautifully even ambient base at a fraction of the discomfort of an equivalent-lumen downlight grid.
Layer two – Task: light delivered where work happens
Task light serves specific visual activities: reading, needlework, board games, laptop work, or the increasingly common hybrid-office corner. The requirement is higher illuminance on a defined horizontal or near-horizontal plane, ideally delivered from a direction that does not put the occupant’s own shadow in the way and does not create veiling reflections on a glossy page or screen.
Task light is the layer most often forgotten in beautiful living rooms and most often missed by the occupants who live in them. A room that is gorgeous at 8 p.m. and unusable for reading at 8:05 p.m. has failed. The classic solutions are a floor lamp with a directional head beside the reading chair, a swing-arm wall light, and a discreet linear element integrated into joinery, a shelf edge or a reading niche. A short run of profile such as the 17×7 mm surface aluminium profile tucked under a shelf above a reading chair provides adjustable task illuminance without any visible fitting at all.
Layer three – Accent: the layer that creates interest
Accent light draws the eye: it picks out artwork, a textured wall, a plant, a stone fireplace, an alcove of books, a sculptural object. It is the layer responsible for the sense that a room has been designed rather than merely lit, and it is the layer that photographs best, which is why it dominates the imagery that shapes client expectations.
The governing number in accent design is the contrast ratio between the accented object and its background. A ratio of about 3:1 reads as gentle emphasis, 5:1 is a clear focal point, 10:1 is dramatic and theatrical, beyond roughly 20:1 the effect becomes harsh and the surrounding room starts to feel dark by comparison. In practice, the most sophisticated living rooms use a small number of strong accents rather than many weak ones.
Layer four — Decorative: the light you are meant to look at
The decorative layer is the visible luminaire as an object: the sculptural pendant, the alabaster wall sconce, the vintage floor lamp. Its lumen contribution is usually modest and sometimes negligible; its job is compositional and emotional. A decorative fitting should be treated as furniture that happens to glow, and it should almost never be asked to carry the ambient load.
When you separate decorative from ambient, something liberating happens: you can choose that beautiful low-output opal globe you love without worrying whether it lights the room, because the cove behind it is doing that job. This is exactly how high-end interiors achieve the paradox of rooms that look softly lit and yet are perfectly functional.
The fifth layer nobody names: dynamic light
An increasing number of specifications now include a fifth layer (dynamic or circadian light) where colour temperature and intensity change over the course of the day. A tunable-white strip such as the 10 m CCT 2700–6500 K COB strip at 600 LED/m, CRI Ra>90allows the same cove to deliver a crisp 4000 K morning wash and a 2700 K evening glow from identical hardware. For clients who work from home, this is the single upgrade with the most noticeable effect on daily experience.
The layer ratio table: how much of each?
The question every designer eventually asks is how the total lumen budget should be distributed. The table below gives working starting points. They are not rules (a cinema-focused room and a reading-focused room will diverge sharply) but they represent the distributions that consistently test well with occupants and that photograph convincingly.
| Room programme | Ambient | Task | Accent | Decorative | Design note |
|---|---|---|---|---|---|
| General family living room | 50% | 20% | 20% | 10% | Balanced, flexible, forgiving |
| Media / cinema-led room | 30% | 10% | 45% | 15% | Low ambient, strong bias light behind screen |
| Reading / library room | 40% | 35% | 15% | 10% | Task dominant, vertical light on spines |
| Entertaining / reception | 35% | 10% | 35% | 20% | Accent and decorative carry the mood |
| Home-office hybrid lounge | 45% | 35% | 15% | 5% | Needs a 4000 K daytime mode |
| Open-plan living/dining/kitchen | 45% | 25% | 20% | 10% | Zone independently, never one circuit |
The 5-7 rule and other useful heuristics
Practitioners and content creators frequently reference a “5-7 lighting rule”: a well-designed living room should contain at least five, and ideally seven, discrete light sources, distributed across the layers and across the height of the room rather than concentrated at ceiling level. It is not a standard published by any lighting body, but as a sanity check it is genuinely useful: rooms with five to seven independently controllable sources almost always feel better than rooms with one or two.
Two further heuristics worth internalising:
- The triangle rule: light sources should form triangles in plan rather than lines, so that shadows cross-fill and no seating position is lit from a single direction.
- The three-heights rule: every living room should carry light at three heights such as low (floor, skirting, under-furniture), middle (table lamps, sconces, shelf lines, around eye level) and high (cove, ceiling slot, uplight). A room lit only from the ceiling always feels institutional, a room lit at three heights always feels domestic.
Applying the layer model in practice: a worked example
Consider a rectangular 5.5 × 4.5 m living room (24.75 m²) with a 2.7 m ceiling, a sofa on the long wall, a television opposite, a reading chair in one corner and a bookcase on the short wall. A layered solution reads as follows:
- Ambient: perimeter cove on three walls, 14.5 linear metres, 2700 K COB at 10.5 W/m inside a plasterboard corner profile, dimmed 0–100% on its own channel. Roughly 1,600 lm reaching the room after cove losses.
- Task: 1.8 m of surface profile concealed beneath the bookcase’s third shelf aimed at the reading chair, plus a floor lamp with a directional head. Roughly 600 lm concentrated over 1.5 m².
- Accent: 2.4 m of recessed grazing line 150 mm from the fireplace wall to rake its stone texture; 1.2 m of shelf lighting inside the bookcase. Roughly 700 lm, highly directional.
- Decorative: one sculptural pendant off-centre over the coffee table at 200 lm, plus two table lamps at 300 lm each.
- Dynamic: the cove strip specified as tunable white so the room shifts from 4000 K at 9 a.m. to 2400 K after 21:00 automatically.
The total installed load of this scheme is under 70 W: less than a single old-fashioned incandescent lamp of the sort that used to light the same room badly and it produces at least six distinguishable “moods” from combinations of four dimmable channels.
3. Photometrics for architects: lumens, lux, kelvin, CRI, UGR and flicker
This is the section that turns living room lightings intuition into specification. Architects are comfortable specifying a U-value, an acoustic rating or a fire class, but light is too often specified in adjectives (“warm”, “bright”, “cosy”) which are unenforceable on site and unarguable in a dispute. Everything in this section can be written on a drawing, verified with a €200 meter, and made contractual.
You do not need to become a lighting engineer. You need to be fluent in about eight numbers. What follows is those eight numbers, what each one governs, the values that work in a living room, and the failure mode that occurs when each is specified badly.
Lumens and lux: the difference that costs projects money
A lumen is a quantity of light leaving a source while a lux is one lumen landing on one square metre of surface. Confusing them is the most common and most expensive error in domestic lighting specification, because lumens tell you what you bought and lux tells you what you got.
The relationship is governed by geometry and by losses. A 1,000 lm strip installed in a cove pointing at a white ceiling will return perhaps 550–700 lm to the room depending on the cove geometry, the ceiling reflectance and the diffuser transmission. The same 1,000 lm in a downlight with a 60° reflector will put far more of that flux on the floor but with entirely different perceptual quality. Always design in lux on the surfaces that matter, then work backwards to lumens.
Target illuminance values for living room lightings
| Zone / activity | Target horizontal lux | Target vertical lux (at 1.2 m) | Notes for the specifier |
|---|---|---|---|
| General ambient, evening relaxation | 50-100 lx | 30-50 lx | Deliberately low, comfort over quantity |
| General ambient, daytime / social | 150-200 lx | 75-100 lx | The “everything on” scene |
| Circulation and safe movement | 75-100 lx | – | Never let a scene drop below this with people moving |
| Reading (sustained, printed text) | 300-500 lx | – | Measured on the book, not the floor |
| Detailed task (craft, needlework) | 500-750 lx | – | High CRI essential for colour work |
| Laptop / hybrid working | 300-500 lx | 150-200 lx | Vertical light prevents screen-face contrast fatigue |
| Television viewing | 10-30 lx | Bias light behind screen | Never zero, zero ambient causes eye strain |
| Artwork accent | 3-5× surrounding level | 200-400 lx on the piece | Cap at 150 lx for light-sensitive works on paper |
| Dining within an open plan | 200-300 lx on table | – | Separate circuit from lounge zone |
Quick lumen budgeting by room area
For fast early-stage estimating, the following total installed lumen figures work well for living room lightings designed around the layer model. They assume light-toned finishes (ceiling reflectance ≈ 0.80, walls ≈ 0.55, floor ≈ 0.25). For dark schemes, increase by 30–50%.
| Room area | Total installed lumens (all layers) | Approx. installed watts (LED) | Suggested linear metres of profile | Independent dimmed channels |
|---|---|---|---|---|
| Up to 12 m² (small lounge) | 1,800-2,600 lm | 18-28 W | 7-10 m | 3 |
| 12–20 m² | 2,600-4,000 lm | 28-45 W | 10-16 m | 3-4 |
| 20–30 m² | 4,000-6,000 lm | 45-65 W | 16-24 m | 4-5 |
| 30–45 m² | 6,000-9,000 lm | 65-100 W | 24-36 m | 5-6 |
| 45–70 m² (open plan) | 9,000-14,000 lm | 100-160 W | 36-55 m | 6-8 |
| Over 70 m² | 200 lm/m² as a working rule | 2.2-2.5 W/m² | 0.8 m per m² | 8+ |
Note how low the wattage figures are. A 30 m² living room lit to a professional standard with linear LED draws less power than an old 100 W incandescent bulb. This is the argument that wins energy-conscious clients, and it is genuine rather than marketing.
Colour temperature: the single most emotionally consequential number
Correlated colour temperature (CCT), measured in kelvin, describes whether white light leans warm/amber or cool/blue. It is the specification variable that most directly controls whether a living room feels like a home or a waiting room. Counter-intuitively, low numbers are warm and high numbers are cool.
| CCT | Perceptual character | Living room application | Verdict |
|---|---|---|---|
| 2200 K | Candle / firelight amber | Late-evening scenes, cove at low output, fireplace zone | Excellent as a secondary scene |
| 2400-2500 K | Very warm, deeply relaxing | Dim-to-warm end point, hospitality-style lounges | Excellent for evening |
| 2700 K | Warm white, the incandescent reference | The default for the great majority of living room lightings | The safe, correct default |
| 3000 K | Warm-neutral | Contemporary interiors, cooler palettes, grey/marble finishes | Good; use with warm materials |
| 3500 K | Neutral | Rare in living rooms; sometimes for hybrid-work corners | Use sparingly |
| 4000 K | Cool white | Daytime mode in tunable systems only | Never as a fixed living room CCT |
| 5000 K+ | Daylight / clinical | Not appropriate for a living room | Avoid entirely |
Two disciplines matter more than the number itself. First, consistency: mixing 2700 K and 3000 K sources in one field of view produces a subtle, unresolvable wrongness that most clients cannot name but all of them feel. Second, the dimming curve: LEDs by default hold their CCT as they dim, whereas the incandescent lamps our visual instincts were formed around drop toward amber. Specifying a dim-to-warm strip, or a tunable-white strip programmed to follow an incandescent curve, resolves this and is one of the highest-impact upgrades available.
CRI, R9 and TM-30: whether your client’s sofa is the colour they chose
Colour Rendering Index (CRI Ra) scores how faithfully a source renders a set of reference colours against a reference illuminant, out of 100. For living room lightings, CRI Ra>90 should be treated as a minimum, not an aspiration, because a living room is full of the things CRI failure destroys: skin tones, timber grain, textiles, artwork, food and drink.
The number behind the number is R9, the saturated red rendering index, which is excluded from the Ra average. A strip can post Ra 90 with R9 of 10, and it will make terracotta look brown, oak look grey and human faces look ill. Insist on R9 > 50, and prefer R9 > 80 anywhere skin tone matters. The high-CRI COB references in the Lighting Line range (including the 5 m 3000 K COB strip at 480 LED/m in IP67 silicone) are built around Ra>90 precisely because architectural applications cannot tolerate the alternative.
| CRI Ra | Typical use | Living room verdict | Visible failure mode |
|---|---|---|---|
| < 80 | Industrial, utility, cheap consumer strip | Unacceptable | Greyed timber, muddy textiles, sallow skin |
| 80-85 | Budget commercial | Acceptable only in concealed cove at low output | Reds and terracottas visibly dulled |
| 90-92 | Architectural standard | The correct baseline for living rooms | Minor; acceptable across all finishes |
| 93-95 | Premium residential, galleries | Specify for artwork, timber-rich and skin-critical zones | None perceptible |
| 97+ | Museum, photographic, retail of colour goods | Overspecification for most homes | Efficacy penalty, higher cost |
Glare, UGR and the physics of visual discomfort
Glare is what happens when the luminance of a source is too high relative to the adapted state of the eye. Unified Glare Rating (UGR) is the standardised metric; office standards target UGR < 19. Living rooms have no mandatory UGR requirement, which is exactly why so many of them are uncomfortable.
The three practical anti-glare instruments in linear design are:
- recess depth: pushing the emitting surface back inside a profile so the strip is not visible from normal seating positions;
- diffuser selection: a frosted or opal diffuser lowers peak luminance dramatically at a modest efficiency cost
- orientation: aiming light at surfaces rather than at eyes.
A useful and easily remembered test: sit down in every seat in the room and look around. If you can see the emitting surface of any concealed source from a normal seated position, the detail has failed. This is a five-minute check that prevents the most common category of post-completion complaint.
Flicker, stroboscopic effect and why cheap drivers cause headaches
All LED systems modulate. What matters is the depth and frequency of that modulation. Low-frequency, high-depth flicker (typical of cheap PWM dimmers and poorly matched TRIAC drivers) produces measurable effects including headache, eye strain and the stroboscopic visibility of moving objects. In a living room, where occupants spend hours and where children play, flicker is a health-adjacent specification, not a luxury.
Specify to the following: PWM frequency above 3 kHz (ideally above 20 kHz), percentage flicker below 5% at full output and below 10% at minimum dim, and stroboscopic visibility measure (SVM) below 1.0. Reputable constant-voltage drivers from tier-one manufacturers meet these, anonymous drivers frequently do not. Because drivers are invisible and cheap to substitute on site, this is the item most often value-engineered away put the flicker specification on the drawing so it cannot be.
Binning, MacAdam ellipses and colour consistency along a run
Two strips nominally labelled 3000 K can be visibly different. The industry describes this tolerance in MacAdam ellipses (SDCM). Specify 3-step MacAdam or tighter for any application where two runs of strip meet, turn a corner, or appear in the same field of view. 5-step is acceptable only for fully separated, non-comparable runs. A cove that changes colour subtly at the corner is one of those defects that cannot be unseen once noticed.
Beam angle and distribution
Standard SMD strips emit at roughly 120°, COB strips typically achieve about 180°, which is part of why they fill a diffuser so evenly and produce a genuinely continuous line. For wall-washing you want wide distribution and the fixture set away from the wall and for grazing you want the source very close to the surface so that the grazing angle exaggerates texture. The same strip becomes a completely different design instrument depending on how far from the surface you mount it.
The eight numbers, summarised
| # | Parameter | Living room target | Failure mode if wrong |
|---|---|---|---|
| 1 | Illuminance (lux) | 50-200 lx ambient, 300-500 lx task | Gloomy or clinical |
| 2 | CCT | 2700 K default, 2200-3000 K range | Cold, unwelcoming, “office at home” |
| 3 | CRI Ra | > 90 | Materials and skin look wrong |
| 4 | R9 | > 50, ideally > 80 | Reds and wood tones dead |
| 5 | MacAdam SDCM | ≤ 3-step | Visible colour shift between runs |
| 6 | Flicker (PstLM / %) | < 5% at full, > 3 kHz PWM | Headaches, camera banding |
| 7 | Glare (visible source) | Zero visible emitters from any seat | Discomfort, cheap appearance |
| 8 | Dimming range | Smooth to ≤ 1% without snap-off | No evening scene possible |
4. The aluminium profile as an architectural element
Most people think of an aluminium LED profile as a channel that holds a strip but that description is true and completely inadequate. In contemporary living room lightings the profile performs at least five simultaneous functions, and understanding all five is what allows an architect to use it as a design instrument rather than as a bracket.
The profile is, first, a heat sink: LEDs lose efficacy and lifetime rapidly above a junction temperature of about 85 °C, and an extruded aluminium body conducts that heat away, typically extending useful life by a factor of two to three compared with a strip stuck to plasterboard. Second, it is an optical housing that holds the diffuser at a controlled distance from the emitters, the single variable that determines whether you see a line or a row of dots. Third, it is a mechanical protection that keeps the strip flat, straight and undamaged. Fourth, it is the architectural detail itself: a trimless recessed profile plastered into a ceiling reads as a slot cut into the building, not as a fitting. And fifth, it is the installation tolerance absorber that lets a real building with real out-of-true surfaces produce a line that looks machined.
This section walks through the families available in the Lighting Line profiles catalogue and explains which architectural effect each one exists to produce.
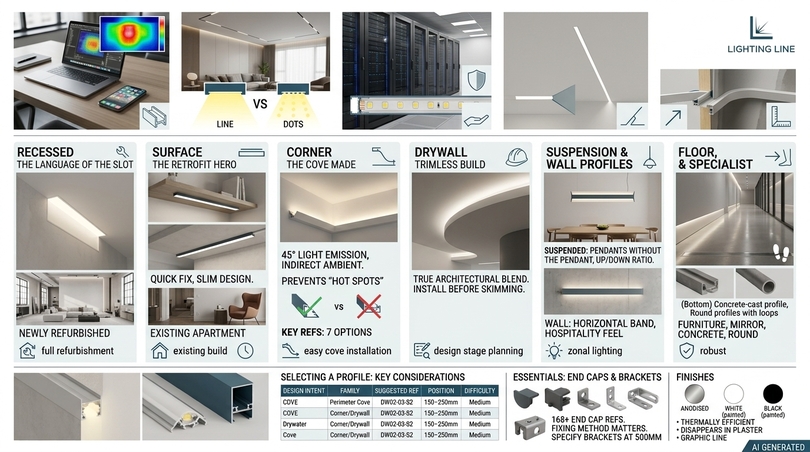
Recessed profiles: the language of the slot
Recessed profiles sit inside the substrate so that only the diffuser is flush with the finished surface. This is the vocabulary of contemporary minimalism: a continuous slot of light in a ceiling or wall, with no visible housing, no trim shadow and no fixture. It is also the most demanding family to install, because the substrate must be routed or framed to accept the profile and the finish must be brought cleanly to its edge.
Therecessed familyspans very shallow to very substantial. The 23×8 mm recessed profile (RE01-03) is the discreet workhorse for shelf edges, joinery reveals and shallow plasterboard bulkheads where depth is scarce. The 23×15 mm recessed profile (RE02-03) adds depth, which buys optical mixing distance and therefore a smoother line from a lower-density strip. For a genuinely architectural ceiling slot, the 67×22 mm recessed profile (RE04-07) gives a wide aperture that can carry substantial output and read as a deliberate architectural incision from across a large room.
Two further references solve specific problems: the 23×8 mm recessed profile without scaling (LLP-RE01B-03) removes the stepped flange for details where the plaster is brought directly to the aluminium and where a living room opens onto a terrace, a conservatory or a wet zone, the32×10 mm recessed waterproof profile in 3 m lengths (RE07-12-S3) allows a single visual language to cross the threshold without a change of detail.
When to choose recessed
- New build or full refurbishment where ceilings are being formed anyway
- Minimalist, Japandi, gallery-style or contemporary-classic interiors
- Any scheme where the client’s stated objective is “I don’t want to see any fittings”
- Ceiling heights of 2.4 m and above, where a slot reads as intentional rather than cramped
Surface profiles: the retrofit hero
Surface-mounted profiles fix directly to an existing ceiling, wall or joinery face. They are the family that makes living room lightings ideas achievable in an occupied apartment with a plastered ceiling and no appetite for demolition and modern surface profiles are slim enough that “retrofit” no longer means “compromise”.
The surface familycovers 24 references. The 8×10 mm profile (SL03-02) is almost invisible under a shelf or inside a cabinet. The 17×7 mm profile (SL17-03) and the 17×15 mm profile (SL05-03) are the general-purpose choices for shelf lines and joinery. The 27×12 mm profile (SL06-05) and 27×7 mm profile (SL07-05) widen the aperture where more output or better mixing is needed, while the substantial 36×26 mm profile (SL02-06) and 21×25 mm profile (SL01-01) become visible design objects in their own right: surface-mounted linear bars that can be run across a ceiling as a deliberate graphic gesture.
For curved elements (a rounded bulkhead, a circular cove, a serpentine joinery detail) the 18×6 mm flexible aluminium profile in 2 m lengths (SL04-04-S2) bends to follow the geometry while still providing the heat sinking and diffusion that a bare flexible strip cannot.
Corner profiles: the cove made simple
The 45° corner profile is arguably the most important single product in domestic architectural lighting, because it turns the most common effect (the perimeter cove that washes light up a wall or across a ceiling) into a five-minute installation rather than a carpentry project. Mounted in the junction between wall and ceiling, it throws light at 45°, producing the soft indirect ambient layer that underpins nearly every scheme in this guide.
The corner profile familyoffers seven references at different apertures. In a small room, a compact corner profile keeps the cove visually light; in a large room with a 3 m ceiling, a larger aperture is needed to throw light far enough across the ceiling plane to avoid a bright band near the wall and a dark centre.
The most common corner-cove error is mounting the profile too close to the ceiling: a 45° emitter sitting 30 mm below the ceiling will produce a hot, scalloped band, the same profile at 150-250 mm below the ceiling produces a smooth gradient. If you can only mount tight to the junction, choose a wider-beam COB strip and a heavily frosted diffuser to soften the result.
Plasterboard and drywall profiles: the trimless detail without the trimwork
The drywall family is the bridge between joinery-grade lighting and true architectural integration. These profiles are designed to be plastered into a plasterboard ceiling or wall so that the finished result is a slot of light with no visible metal, no trim and no shadow gap, the effect that clients describe as “how do they do that?”
The white-painted 16×12 mm corner plasterboard profile (DW01-03) is the entry point for delicate wall-to-ceiling lines. The 64×22 mm corner drywall profile in 2 m (DW02-03-S2) gives a generous indirect cove. For substantial architectural coves in taller rooms, the 42×32 mm white-painted plasterboard profile in 3 m (DW03-03-W3), the 35×49 mm drywall profile in 3 m (DW04-06-W3) and the 50×49 mm plasterboard profile in 3 m (DW05-07-W3)provide depth and throw.
Where the design calls for a shallow flush line rather than a cove, the 50×10 mm plasterboard profile in 3 m (DW06-02-W3)and the 62×12 mm drywall profile (DW07-01) deliver a wide, shallow aperture. And for the curved plasterboard bulkheads that define so many contemporary ceilings, the 57×10 mm flexible plasterboard profile (DW08-03-F) follows the radius while remaining plasterable.
Specification warning: plaster-in profiles must be installed before skimming, and the plasterer must understand that the aluminium flange is the screed edge. Retrofitting a trimless detail into a finished ceiling costs three to five times what it costs to build it in, which is why this decision must be made at design stage and marked clearly on the reflected ceiling plan.
Suspension profiles: linear pendants without the pendant
Suspended linear profiles hang from the ceiling on wires and typically emit both downward (task) and upward (indirect ambient). In a living room they are most powerful over a defined zone (a long dining table in an open plan, a console, a games table) where they simultaneously provide light and draw a line in space that organises the room. Thesuspension profile familycovers this application, and the dedicated suspension mounting brackets handle the hardware.
The most valuable property of a suspended up/down profile is the ratio between its two outputs.
A 70% up / 30% down split produces a room that feels softly and generously lit with a gentle pool below. A 30/70 split produces a strong task zone with a modest ambient contribution. Where the profile allows two separately driven strips, run them on two channels: the ability to dial that ratio on site is worth far more than any amount of specification guesswork.
Wall profiles: up, down and both
Wall-mounted profiles create the horizontal band of light that is one of the defining gestures of hospitality-influenced residential design. Mounted at roughly 1.8-2.0 m, a bidirectional wall profile throws a soft wash up toward the ceiling and down the wall face, producing a room that feels lit from within its own surfaces. The wall profile family serves this application, with matched wall mounting brackets for clean fixing.
In a living room this detail solves a genuine problem: it delivers ambient light without touching the ceiling at all, which makes it the answer of choice for apartments with concrete soffits, heritage cornices, structural slabs or landlord restrictions. It is also, in practice, one of the highest-impact interventions per euro spent.
Floor, baseboard and handrail profiles: light at low level
Light below knee height does something specific and valuable: it makes a room feel grounded and it provides orientation at night without waking anyone up. The floor profile family is engineered for walk-over applications with appropriately robust diffusers, the baseboard profile integrates a line of light into the skirting and the handrail profile lights stairs and mezzanine edges in open-plan living spaces.
A skirting-level circuit at 2200–2400 K, running at 5–10% output after midnight, is one of the most appreciated details in any home: cheap to install, invisible by day, and quietly transformative at 2 a.m.
Furniture, mirror and tiling profiles: integration into the object
Four smaller families handle integration into things rather than into the building. The furniture profile familyis dimensioned for cabinet carcasses, shelf boards and drawer edges, the backbone of shelf lighting and floating-furniture effects. The mirror profile creates a backlit or edge-lit mirror, which in a living room means a luminous over-mantel or a lit console mirror. The tiling profile familyintegrates light into tiled surfaces, useful for fireplace surrounds and feature walls. And the concrete profile is cast directly into poured slabs and walls, the ultimate expression of light as structure.
Round and architectural profiles: the sculptural register
The round profile family produces tubular light elements (circular in section, suspended or surface-mounted) that read as drawn lines in space rather than as channels. Combined with flexible references, they allow rings, arcs and continuous loops, which have become one of the signature gestures of contemporary modern living room lighting.
The architectural profile family gathers the larger-format and more specialised sections intended for schemes where the light line is a primary architectural move rather than a supporting detail.
Selecting a profile: the decision table
| Design intent | Profile family | Suggested reference | Typical mounting position | Difficulty |
|---|---|---|---|---|
| Perimeter cove, indirect ambient | Corner / drywall corner | DW02-03-S2 (64×22 mm) | 150–250 mm below ceiling | Medium |
| Trimless ceiling slot | Drywall | DW06-02-W3 (50×10 mm) | Plastered into ceiling | High |
| Shelf and joinery lines | Surface | SL17-03 (17×7 mm) | Under shelf front edge | Low |
| Concealed shelf line, flush | Recessed | RE01-03 (23×8 mm) | Routed into shelf underside | Medium |
| Wide architectural ceiling incision | Recessed | RE04-07 (67×22 mm) | Formed ceiling recess | High |
| Wall band, up and down | Wall | Wall profile family | 1.8–2.0 m AFFL | Medium |
| Suspended linear over table | Suspension | Suspension family | 700–800 mm above table | Medium |
| Curved bulkhead | Flexible surface / drywall | SL04-04-S2 or DW08-03-F | Follows radius | Medium-High |
| Skirting orientation light | Baseboard | Baseboard family | At skirting line | Medium |
| Floating furniture / plinth | Surface (slim) | SL03-02 (8×10 mm) | Recessed under plinth | Low |
| Threshold to terrace, wet-adjacent | Recessed waterproof | RE07-12-S3 (32×10 mm) | Floor or soffit | High |
End caps and mounting brackets: the 4% of the budget that decides the other 96%
Nothing announces an amateur installation faster than an unfinished profile end. Every run needs a matched end cap at both terminations: closed at the far end, cable-entry at the driver end. Lighting Line carries 168 end cap references across the end cap catalogue, organised to match every profile family: surface, recessed, corner, wall, drywall, suspension, roundand tiling.
Equally, the 58 references in the mounting brackets catalogueexist because fixing method determines both the achievable straightness of a long run and the ability to remove the profile later for maintenance. Specify brackets at 500 mm centres as standard, and at 300 mm centres for profiles over 30 mm wide or for any run that will be viewed along its length.
Finish: anodised, painted, black or custom
Profile finish is a design decision with consequences beyond appearance. Raw anodised aluminium is the most thermally efficient and the most neutral; white-painted profiles disappear into plasterboard ceilings and are the standard choice for the drywall family; black profiles create a deliberate graphic line and control glare by darkening the aperture surround, at the cost of a small reduction in reflected output. In a dark-toned or “dark academia” interior, a black profile with a deep-recessed diffuser produces a light line of extraordinary precision.
5. Choosing the LED strip: SMD vs COB and the specification variables
In living room lightings the profile shapes the effect and the strip determines its quality. The Lighting Line LED strip catalogue holds 175 references split between 78 SMD strips and 97 COB strips, and navigating that range intelligently requires understanding roughly nine variables. This section takes each in turn and gives a living-room-specific recommendation.
SMD versus COB: the fundamental choice
SMD (surface-mounted device) strips carry discrete LED packages at regular intervals along the PCB. COB (chip-on-board) strips carry a dense array of bare dies under a continuous phosphor layer, producing an unbroken emitting surface. For visible or semi-visible architectural lines in a living room, COB is almost always the correct answer, because it eliminates the dotting that betrays an installation as cheap.
| Attribute | SMD strip | COB strip | Living room implication |
|---|---|---|---|
| Light appearance | Discrete points; dotting visible through thin diffusers | Continuous line; no dotting at any diffuser depth | COB for any visible line |
| Beam angle | ≈ 120° | ≈ 180° | COB fills diffusers and coves more evenly |
| Required mixing distance | 10-20 mm to hide dots | 0 mm | COB enables far slimmer profiles |
| Peak efficacy | Up to ~150 lm/W (low density) | 100-130 lm/W typical | SMD slightly ahead on raw efficiency |
| Cut pitch | Typically 25–100 mm | As fine as 10 mm | COB fits awkward lengths precisely |
| Bending | Poor across the axis | Better tolerance of gentle curves | COB for curved coves |
| Cost | Lower | Moderate premium | Premium is small relative to total scheme |
| Best living room role | Deep coves, concealed uplight, RGB effects | Every visible line, shelf, slot, wall wash | Most schemes use both |
A pragmatic strategy used by many specifiers: COB for everything the eye can see or nearly see, SMD for deep concealed coves where the source is genuinely invisible and raw efficacy matters more than continuity. This keeps the visual quality high and the budget sensible.
LED density: the number behind smoothness and output
Density (LEDs per metre) governs both smoothness and maximum output. The Lighting Line COB range spans from 296 LED/m up to 1600 LED/m, with 480, 528, 600 and 840 LED/m as the most commonly specified values in residential architectural work.
| Density | Typical W/m | Smoothness | Best living room application |
|---|---|---|---|
| 296-400 LED/m | 5.5-8 W | Very good (COB) | Low-output accent, shelf lines, skirting |
| 480 LED/m | 6-11 W | Excellent | The all-round residential default |
| 528-600 LED/m | 7.5-15.5 W | Excellent | Coves in tall rooms, primary ambient, tunable white |
| 720-840 LED/m | 14-22 W | Excellent | High-output wall grazing, large-volume spaces |
| 1080-1600 LED/m | 22–40 W | Excellent | Specialist high-flux applications; heat management critical |
A crucial and frequently missed point: high density does not mean high output if you drive it correctly.
A 600 LED/m strip dimmed to 40% produces the same lumens as a 240 LED/m strip at full tilt, but with lower junction temperatures, longer life, better colour stability and smoother dimming. Over-specifying density and under-driving it is a legitimate professional technique, not waste.
Voltage: 12 V, 24 V, 48 V and 230 V
The catalogue offers 5 V, 12 V, 24 V, 48 V and 230 V options. For living room architectural lighting, 24 V is the correct default in the overwhelming majority of cases, and the reasoning is voltage drop: at the same power, a 24 V system draws half the current of a 12 V system, which means one quarter of the resistive loss in the cabling and roughly double the achievable run length before visible dimming at the far end.
| Voltage | Max practical single-feed run | Best for | Caution |
|---|---|---|---|
| 5 V | 1-2 m | Addressable pixel effects, furniture accents | Severe voltage drop; feed frequently |
| 12 V | 3-5 m | Small joinery runs, automotive-style installs | Avoid for room-scale coves |
| 24 V | 8-12 m | The residential architectural standard | Still feed both ends on long runs |
| 48 V | 20-30 m | Long perimeter coves, open-plan spaces | Fewer compatible accessories |
| 230 V | 50 m+ | Very long runs, garden/terrace continuity | Coarser cut pitch; safety and dimming constraints |
Colour options: fixed white, CCT, RGB, RGBW and Pixel
The range covers fixed whites at 2200 K, 2500 K, 2700 K, 3000 K, 4000 K and 6500 K, plus CCT (tunable white), RGB, RGB+3000 K, RGB+4000 K, RGB+CCT, pixel-addressable and a set of saturated single colours.
- Fixed 2700 K: the honest default. Most beautiful living rooms in the world are lit at 2700 K and nothing else.
- Fixed 2200/2500 K: for the late-evening layer, the fireplace zone and any scene designed to be experienced after 21:00.
- CCT tunable (2700-6500 K): the best single upgrade for homes used during the day. The CCT COB strip at 600 LED/m, CRI Ra>90, 7.7 W/mis a strong specification for a primary cove.
- RGB+CCT: full colour plus proper tunable white. Specify this rather than plain RGB for living rooms: pure RGB white is poor quality and clients will stop using the colour function within weeks but will use the white every day.
- Pixel / addressable: for media walls and dynamic effects. Superb for a dedicated cinema room, usually excessive for a family lounge.
Design counsel worth giving clients honestly: colour-changing light is thrilling for a fortnight and then it settles into warm white forever. Specify the warm white to be excellent and treat the colour as a bonus, never the other way round.
IP rating: more relevant indoors than people expect
IP20 is correct for most indoor living room applications and offers the best thermal performance and highest efficacy because there is no silicone jacket impeding heat transfer or absorbing light. However, IP65 and IP67 silicone-jacketed strips such as the 5 m 2700 K IP67 COB strip with extruded silicone tube earn their place indoors in three situations: where the strip will be plastered in and needs protection from wet trades, where the living room opens seamlessly onto a terrace and the line must cross the threshold; and where the run passes near a kitchen, a bar or a plant wall.
Cut pitch: the detail that decides whether the line fits
The catalogue’s cut pitches range from 10 mm to 125 mm. Fine cut pitch is not a minor convenience; it is what allows a run to terminate exactly at an architectural edge rather than 60 mm short of it. For any visible architectural line, specify a cut pitch of 25 mm or finer. The 2.5 cm and 2 cm cut pitches found on many Lighting Line COB references are precisely in the right range for domestic joinery.
Reading a strip specification line: a worked example
Take the reference COB LED strip 10 m, warm white 2700 K, CRI Ra>90, 480 LED/m, 24 V, 10.5 W/m, 120 lm/W and decode it for a design decision:
- 10 m reel: one reel covers a full perimeter cove in a mid-sized room without joints.
- 2700 K: the residential default; will flatter timber, textiles and skin.
- CRI Ra>90: architectural grade; materials will read correctly.
- 480 LED/m COB: continuous line, 180° emission, no dotting.
- 24 V: runs of 8-10 m from a single feed are realistic.
- 10.5 W/m: a 12 m run draws 126 W, so specify a 180 W driver (30% headroom).
- 120 lm/W: approximately 1,260 lm/m, or 15,120 lm across 12 m before cove and diffuser losses.
That last figure should stop you.
15.000 lm is far more than a 25 m² living room needs. This is the single most common specification error in linear lighting: running a high-output strip at full power because it is what the reel delivers. The correct response is either to select a lower-wattage reference such as the 6 W/m 2700 K COB strip, or to specify a high-output strip deliberately and dim it: which costs a little more but yields better colour stability, cooler running and a scheme with real headroom for bright daytime scenes.
Cutting, soldering and connectors
Strips must be cut only on marked cut points, and the copper pads must be joined either by soldering or with a properly rated connector. The PCB LED strip connectors in the accessories range allow solder-free joints: invaluable for fast installation and for narrow 3 mm PCB COB strips where soldering is fiddly.
Rule for corners: never bend a strip around an internal corner. Cut, and join with a short flying lead between two profile runs. A bent strip at a corner fails: sometimes immediately, sometimes eighteen months later, always at the worst possible time.
6. Diffusers, optics and the physics of a dot-free line
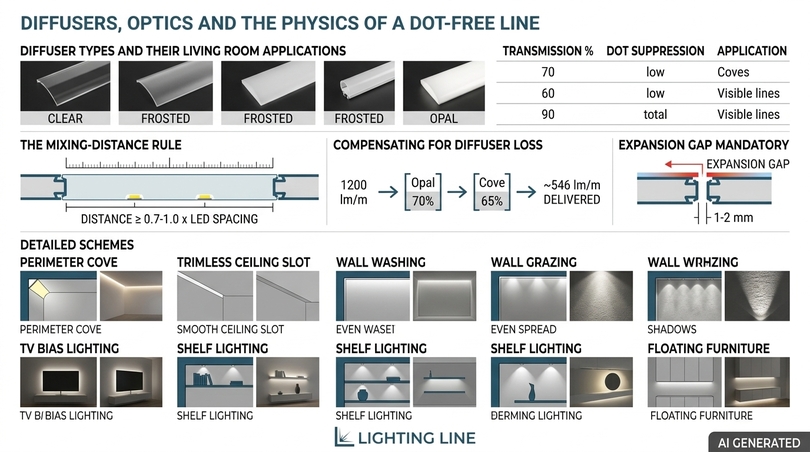
In living room lightings the diffuser is the component clients never discuss and designers most often get wrong. It is the last optical surface before the light reaches the eye, and it controls three things simultaneously: how smooth the line looks, how much light escapes, and how glaring the result is. The Lighting Line diffuser rangeholds 28 references precisely because these three variables trade against each other and no single diffuser is right for every job.
Understanding the trade is straightforward. A clear diffuser transmits roughly 92-95% of the light but hides nothing: every LED is visible and the glare is severe. A frosted diffuser transmits about 80-88% and softens dotting while an opal diffuser transmits about 65-78% and produces a genuinely uniform luminous surface. A deep-opal or “milky” diffuser may transmit only 55-68% but delivers the luminous-bar appearance that architectural work demands. Every step toward smoothness costs light, and the correct response is to choose the smoothness the design needs and then increase strip output to compensate, not to accept a visible row of dots because the diffuser was cheaper.
Diffuser types and their living room applications
| Diffuser type | Typical transmission | Dot suppression | Glare control | Living room application |
|---|---|---|---|---|
| Clear / transparent | 92-95% | None | Poor | Only where the strip is fully hidden and maximum output matters |
| Frosted / satin | 80-88% | Moderate | Fair | Coves, concealed uplight, shelf undersides |
| Opal | 65-78% | Excellent | Good | The residential default for any visible line |
| Deep opal / milky | 55-68% | Total | Very good | Trimless ceiling slots viewed directly |
| Micro-prismatic | 78-86% | Good | Very good | Task lines, reading zones, low-UGR requirements |
| Black / dark aperture | 50-60% | Excellent | Outstanding | Dark interiors, cinema rooms, high-contrast graphic lines |
| Lens / asymmetric | 80-90% | n/a | Good if shielded | rWall-washing where even vertical gradient matters |
The mixing-distance eule
For SMD strips, the rule of thumb is that the diffuser must sit at a distance from the emitters of at least 0.7 to 1.0 times the spacing between LEDs in order to hide the dots. A 60 LED/m strip has 16.7 mm spacing and therefore needs roughly 12-17 mm of mixing depth; a 240 LED/m strip has 4.2 mm spacing and needs only 3-4 mm. This single relationship explains why slim profiles demand high-density strips, and why a cheap 60 LED/m strip in an 8 mm profile will always look like a row of beads.
COB strips have no LED spacing to hide and therefore require no mixing distance at all, which is why COB unlocked the ultra-slim profiles that define current design. The 8×10 mm surface profile only works as an architectural line because COB exists.
Compensating for diffuser loss in your lumen budget
Work through the arithmetic once and you will never forget it. A 10 W/m strip producing 1,200 lm/m, inside an opal diffuser at 70% transmission, in a cove with a 0.80-reflectance ceiling and a cove efficiency of roughly 0.65, delivers to the room:
1,200 lm/m × 0.70 (diffuser) × 0.65 (cove efficiency) ≈ 546 lm/m
Across a 14 m perimeter that is approximately 7,640 lm: comfortably enough for a 30 m² room’s ambient layer with headroom to dim. Notice that 55% of the nominal lumens never reach the room. This is not waste, it is the price of indirect light, and it is exactly why cove strips must be specified at higher output than a naive lumen calculation suggests.
Diffuser length, expansion and the joint that shows
Polycarbonate and PMMA diffusers expand with temperature. Over a 3 m length, thermal expansion of several millimetres is normal. Never butt diffusers hard against each other or against end caps on long runs: leave a 1-2 mm expansion gap at each joint, hidden behind a bracket or at a natural break in the run. Installations that ignore this bow visibly within a season.
7. Fourteen living room lightings schemes, detailed
This section is the practical heart of the guide on living room lightings. Each scheme below is a discrete, buildable effect with its own purpose, its own detail, its own component list and its own common failure mode. Most good living rooms combine four to seven of them: taken together they constitute a complete vocabulary of contemporary living room lightings ideas, from the almost-free to the fully architectural.
The perimeter cove: the foundation scheme
What it does: throws indirect light onto the ceiling plane from a concealed line running around the room’s perimeter, creating a soft, glare-free ambient layer that makes the ceiling appear to float and the room appear taller.
The detail: either a plasterboard cove formed 150-250 mm below the ceiling with a 64×22 mm drywall corner profile concealed behind its upstand, or for retrofit a 45° corner profile fixed directly into the wall/ceiling junction. The upstand must be at least 50 mm taller than the top of the profile so the source is invisible from every seat.
Specification: 2700 K COB at 480–600 LED/m, opal or frosted diffuser, dimmed on its own channel, 24 V, fed from both ends on runs over 8 m.
Common failure: the cove is too close to the ceiling, producing a bright scalloped band rather than a smooth gradient, or the upstand is too low and occupants see the strip from the sofa. Both are geometry errors made at design stage and both are expensive to fix afterwards.
The trimless ceiling slot: the architectural statement
What it does: reads as a clean incision of light in an otherwise unbroken plaster ceiling. It is the most architecturally assertive move in the vocabulary and the one that most clearly separates designed spaces from decorated ones.
The detail: a plaster-in profile such as the 50×10 mm drywall profile or the 62×12 mm drywall profile installed into the plasterboard before skimming, with the plaster brought to the profile’s integral flange. Deep-opal diffuser mandatory, because the slot will be viewed directly from below.
Specification: 2700 K or 3000 K COB, 480-600 LED/m, deep-opal diffuser, maintenance access considered at design stage (a plastered slot is not removable – plan for a driver in an accessible location).
Common failure: the slot is drawn without reference to structure and collides with a joist or a service run. Coordinate the reflected ceiling plan with the structural and MEP drawings before the plasterboard is ordered.
Wall washing: making a room feel larger
What it does: distributes light evenly down a vertical surface from top to bottom, raising the perceived brightness and apparent size of the room dramatically. Vertical illuminance, not horizontal, is what the brain uses to judge how bright and how large a space is: which is why a wall-washed room at 100 lx feels bigger and brighter than a downlit room at 200 lx.
The detail: a recessed or surface linear run set 250–400 mm away from the wall face, ideally with an asymmetric lens or a shielded aperture to throw light outward rather than straight down. In a plasterboard ceiling a 23×15 mm recessed profile set at that offset gives a clean result.
Specification: high-CRI COB, 600 LED/m for a 2.7 m wall, asymmetric optic if available, continuous run wall-to-wall — a wall wash that stops short of the corners reads as a mistake.
Wall grazing: revealing texture
What it does: the opposite of wall washing. By placing the source within 50–100 mm of the surface, light strikes at an extreme angle and every irregularity casts a long shadow, dramatising stone, brick, plaster, timber slats and fluted panels.
The detail: a recessed or surface profile immediately adjacent to the wall face, aiming straight down. Use on textured surfaces only, grazing a flat painted wall exposes every plastering imperfection and will generate a snagging list you do not want.
Specification: higher output than wall washing (the grazing angle is inefficient), 2700-3000 K, CRI Ra>93 if the surface is timber or natural stone.
Television and media-wall bias lighting
What it does: places a low-level, neutral-CCT glow on the wall behind the screen. This reduces the contrast ratio between a bright screen and a dark surround, measurably lowering eye strain during long viewing sessions and improving perceived black levels.
The detail: a slim surface profile such as the 17×7 mm surface profilemounted on the back face of the screen or on the wall behind it, throwing light onto the wall, never into the room.
Specification: here (and almost uniquely) specify 6500 K, CRI Ra>90, because bias light should be neutral relative to the screen’s white point (D65) so it does not tint perceived colour. Target roughly 10% of the screen’s peak luminance. Dim it to taste on its own channel.
Common failure: using a warm 2700 K strip because the rest of the room is 2700 K. It will make the screen look blue and defeat the purpose. This is the one legitimate exception to CCT consistency in a living room.
Shelf and bookcase lighting
What it does: lights the contents of shelving from above, turning a bookcase or display unit from a dark rectangle into a luminous composition. This is among the highest-impact, lowest-cost interventions available.
The detail: a slim surface profile such as the 8×10 mm profilefixed to the underside of each shelf, set back 20-30 mm from the front edge so the source is not visible from a standing position. For a flush result, rout the shelf and use a 23×8 mm recessed profile.
Specification: low output (5-7 W/m is plenty), 2700 K, CRI Ra>90 for book spines and objects, all shelves on a single dimmed channel.
Floating furniture and plinth lighting
What it does: a strip recessed into the underside of a wall-hung media unit, a sofa plinth or a floating console makes the piece appear to hover. It also provides useful low-level orientation light at night.
The detail: the slimmest available profile set back 40–60 mm from the front edge of the plinth, aiming down at the floor. The setback is critical: too close to the edge and you see the source from across the room; too far back and the glow does not escape.
Specification: 2200-2700 K, low output, and consider putting this on a motion-triggered or scheduled night circuit at 5% output.
Skirting and floor-level lines
What it does: a continuous line at floor level grounds the room, emphasises its geometry and provides night-time orientation without disturbing sleep-adapted vision. In open-plan homes it also visually connects zones.
The detail: a baseboard profile integrated into the skirting, or a floor profile where the line crosses a threshold.
The reading light that isn’t a lamp
What it does: delivers 300-500 lx to a reading chair without introducing a visible fitting, preserving a minimal aesthetic while solving the task-light problem.
The detail: 1.5-2.0 m of surface or recessed profile concealed above and slightly behind the chair (in joinery, in a bulkhead, or beneath a shelf) aimed so the cone lands on the lap rather than the face.
Specification: 3000 K reads slightly crisper for text than 2700 K and is worth considering here, CRI Ra>90, micro-prismatic diffuser for glare control, independent dimmer.
Artwork accent
What it does: lifts a painting, photograph or object to 3-5 times the surrounding luminance, making it the focal point it was bought to be.
The detail: for a single piece, a short recessed run at 30° from vertical. For a gallery wall, a continuous run parallel to the wall. Cap illuminance at 150 lx for works on paper, textiles or anything light-sensitive, and confirm the source has no UV content: LED is inherently good here, which is one reason galleries converted so quickly.
Curtain pelmet lighting
What it does: a strip concealed in the curtain pelmet washes light down the fabric, emphasising its texture and drape and creating a luminous vertical plane that dramatically raises perceived room brightness.
The detail: profile mounted inside the pelmet, 80–120 mm in front of the curtain face so the wash is even rather than scalloped. This is one of the most underused moves in residential lighting and one of the most photogenic.
Slatted and fluted wall grazing
What it does: the timber-slat feature wall is one of the defining materials of the current decade, and it is transformed by light raking across it. Grazing turns a flat panel into a rhythmic field of light and shadow.
The detail: a recessed line in the ceiling 60–90 mm from the slat face, or a floor-recessed line uplighting the slats — the latter is more dramatic and reads beautifully at night.
Coffered and stepped ceilings
What it does: a stepped or coffered plasterboard ceiling with light concealed in each step produces layered, multi-plane illumination that gives a flat slab genuine architectural depth.
The detail: concealed profiles at each step, ideally on separate channels so the layers can be revealed progressively. Use the 42×32 mm plasterboard corner profile for deep steps.
Common failure: too many steps. Two levels read as architecture; four read as a hotel lobby from 2006.
The luminous ceiling plane
What it does: a large backlit stretched or perforated panel produces a uniform luminous surface — a sky. Powerful in windowless or basement living rooms.
The detail: a grid of strips at calculated spacing behind a translucent membrane, with cavity depth at least 0.7× strip spacing for uniformity. Tunable white is strongly recommended so the “sky” can shift through the day.
Scheme selection matrix
| Scheme | Impact | Cost | Retrofit-friendly | Best room size | Layer served |
|---|---|---|---|---|---|
| Perimeter cove | Very high | Medium | Yes (corner profile) | All | Ambient |
| Trimless ceiling slot | Very high | High | No | Medium–large | Ambient / accent |
| Wall washing | Very high | Medium-high | Partially | Small especially | Ambient |
| Wall grazing | High | Medium | Partially | All | Accent |
| TV bias light | Medium | Very low | Yes | All | Accent |
| Shelf lighting | High | Low | Yes | All | Accent |
| Floating furniture | Medium-high | Low | Yes | All | Accent / night |
| Skirting line | Medium | Medium | Partially | Medium-large | Ambient / night |
| Concealed reading light | High | Low | Yes | All | Task |
| Artwork accent | High | Low-medium | Partially | All | Accent |
| Curtain pelmet | High | Low-medium | Yes | All | Ambient / accent |
| Slatted wall grazing | Very high | Medium | Partially | Medium-large | Accent |
| Coffered ceiling | High | High | No | Large | Ambient |
| Luminous ceiling | Very high | Very high | No | Large / windowless | Ambient |
8. Room-size playbooks: small, medium, large, open-plan and vaulted
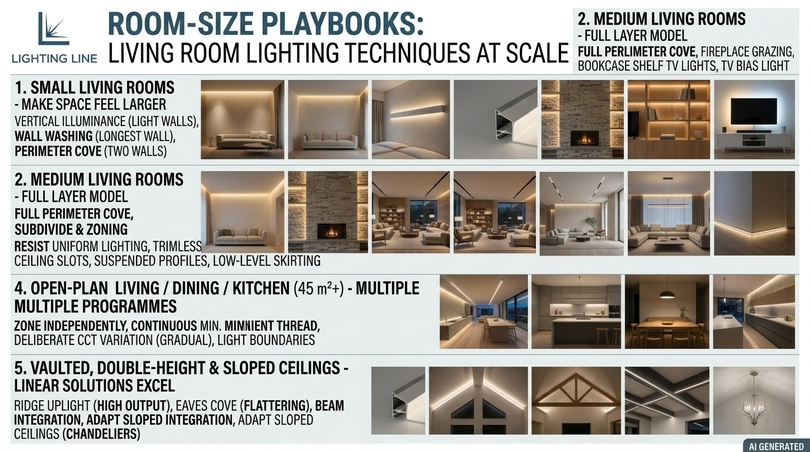
The same living room lightings techniques behave differently at different scales. A cove that transforms a 40 m² reception can overwhelm a 12 m² lounge; a scheme that reads as generous in a small room reads as timid in a large one. This section gives complete, opinionated playbooks for five room conditions, each with a recommended combination of schemes, an approximate lumen budget and the specific pitfalls of that scale.
Small living rooms (under 15 m²)
The governing objective in a small living room is to make the space feel larger, and the governing physics is vertical illuminance. Small rooms feel small because their walls are dark. Light the walls and the room grows.
The single most effective intervention in a small lounge is wall washing on the longest wall, which pushes the boundary visually outward. Add a perimeter cove on two sides rather than four to avoid a boxed-in reading, and keep everything else minimal: no bulky pendant at ceiling level, no downlight grid, no visible hardware.
Recommended small-room scheme
- Ambient: corner cove on two walls, 7-9 linear metres, 2700 K COB 480 LED/m at 6 W/m
- Accent: wall wash on the longest wall, or grazing on a textured feature
- Task: concealed shelf-mounted reading line
- Decorative: one small table lamp; skip the pendant entirely
- Budget: approximately 2,000-2,600 lm total, 20-26 W installed
Small-room pitfalls: a deep cove eats 200 mm of already-scarce ceiling height- use a shallow corner profile or a wall-mounted band at 1.8 m instead. Avoid four-sided coves in rooms under 3.2 m wide. And never use a ceiling grid of downlights: in a small room, downlights create a rigid pattern that fixes the room’s dimensions in the eye rather than dissolving them.
Medium living rooms (15-30 m²)
This is the most common condition in European housing and the one where the full layer model comes into its own without cost escalation. A medium room can carry a four-sided perimeter cove, two or three accents, a proper task solution and a decorative anchor, all on four or five dimmed channels.
Recommended medium-room scheme
- Ambient: full perimeter cove, 14-20 linear metres, 2700 K COB 480-600 LED/m
- Accent 1: grazing on the fireplace or feature wall
- Accent 2: shelf lighting in the bookcase / media unit
- Accent 3: TV bias light at 6500 K behind the screen
- Task: concealed reading line above the armchair
- Decorative: one sculptural pendant off-centre plus two table lamps
- Budget: approximately 4,000-6,000 lm total, 45-65 W installed, 4-5 channels
Large living rooms (30-50 m²)
Large rooms fail in a specific and predictable way: they become uniformly and boringly lit. The instinct is to add more light everywhere, the correct move is to subdivide the volume into two or three “rooms within the room” (a seating zone, a reading zone, a conversation or bar zone) and to light each with its own hierarchy so that the space reveals itself progressively rather than all at once.
Recommended large-room scheme
- Ambient: perimeter cove plus one or two trimless ceiling slots that align with the zoning, 26-36 linear metres total
- Zone definition: a suspended linear profile over the central seating group or games table
- Accent: wall grazing on at least two surfaces, artwork accents, curtain pelmet lighting on the window wall
- Low level: skirting line for night orientation and to describe the room’s geometry
- Task: two independent reading positions
- Budget: approximately 6,000-9,500 lm total, 65-105 W installed, 5-6 channels
Large-room discipline: resist the urge to light everything equally. A large room with three bright zones and two deliberately dim ones feels sophisticated; a large room lit evenly to 150 lx everywhere feels like a showroom.
Open-plan living / dining / kitchen (45 m² and above)
Open plan introduces a problem no single-room scheme faces: three programmes with three completely different lighting requirements share one volume. The kitchen needs 300-500 lx of crisp with functional light, the dining table needs a focused pool, the lounge needs 50-150 lx of soft, warm, layered light. If they are on one circuit, two of the three will always be wrong.
Open-plan rules
- Zone independently, always: minimum three dimmable groups, six to eight is better.
- Use a continuous ambient thread: one cove or one slot that runs through all three zones ties the space together even while the task layers differ. This is the single move that makes an open plan read as one designed volume rather than three rooms with a wall missing.
- Vary the CCT deliberately, not accidentally: 3000 K in the kitchen and 2700 K in the lounge works if the transition is gradual and there is no line of sight where both appear equally bright. If there is, use tunable white and match them in the evening.
- Light the boundaries: grazing the wall behind the sofa and washing the wall behind the kitchen run creates visual edges that give an open plan the containment it otherwise lacks.
- Consider 48 V for the long thread: a 30 m continuous run at 24 V requires multiple feeds; at 48 V it can often be done cleanly from fewer positions.
Vaulted, double-height and sloped ceilings
High and vaulted ceilings are the condition where linear lighting most decisively outperforms conventional fittings. A pendant hung in a double-height volume is either too low to be architectural or too high to be useful, a cove running along the ridge or the eaves line is neither.
Three strategies work reliably:
- Ridge uplight: a profile running along the ridge or apex, throwing light up onto the sloped planes, which then reflect it down as a large, diffuse source. Requires high output (12–16 W/m) because the throw distance is substantial and the reflected path is long.
- Eaves cove: a cove running along the base of the slope where wall meets ceiling, washing light up the pitch. This is the most flattering treatment of a vaulted ceiling and the one that best reveals timber structure.
- Beam integration: in rooms with exposed beams, a profile concealed on the top face of each beam uplights the ceiling between them, producing rhythm and revealing the structure without any visible fitting.
For sloped ceilings specifically: a chandelier or pendant on a sloped plane needs a sloped-ceiling adapter and careful setting-out, and it will nearly always look like an afterthought. Linear lighting that follows the slope reads as though the building was designed that way.
Rooms without overhead wiring
A very large share of European apartments (particularly pre-1970 stock with concrete soffits) simply has no ceiling rose and no realistic route to one. This is not a limitation, it is a design brief. The entire scheme can be delivered at wall and furniture level with results that are frequently better than a ceiling-based scheme.
- Wall band at 1.8-2.0 m using a bidirectional wall profile, fed from a socket circuit: this replaces the ambient layer entirely.
- Curtain pelmet lighting on the window wall: a large luminous vertical plane.
- Bookcase and joinery integration: shelf lines and plinth lines throughout.
- Floor-standing uplighters with a strip-lit inner column bouncing off the ceiling.
- Plug-in drivers with in-line dimmers or wireless control, so no fixed wiring is disturbed at all.
Every one of these can be installed by a competent person without altering fixed wiring, provided the driver is a plug-connected unit and the SELV output side is what runs around the room. Anything that involves altering the fixed installation (a new fused spur, a switched circuit, a driver wired into a lighting circuit) should be carried out by a qualified electrician and certified accordingly, and in many jurisdictions this is a legal requirement rather than a recommendation.
9. Budget tiers: entry, mid-range and premium bills of materials
One of the most useful things a living room lightings designer can do early in a conversation is show a client three versions of the same idea at three price points. It converts an abstract discussion about nice lighting into a concrete choice, and it almost always results in the client choosing the middle option, which is usually the right one. This section sets out three complete schemes for the same notional 25 m² living room (5.5 × 4.5 m, 2.7 m ceiling), with realistic component lists.
Costs are indicative European trade-level material estimates at the time of writing and exclude installation labour, VAT and project-specific variables. They exist to establish relative magnitude, not to serve as a quotation.
Tier one – Entry level: maximum effect, minimum intervention
The brief: no building work, no ceiling alteration, installable in a weekend, plug-connected wherever possible. This tier proves that the gap between “nothing” and “designed” is far smaller than most clients assume.
| Item | Suggested reference | Qty | Purpose | Indicative cost |
|---|---|---|---|---|
| Corner cove profile | 45° corner profile | 9 m | Two-wall indirect ambient | €90-130 |
| COB strip, warm white | 5 m 2700 K COB 480 LED/m 6 W/m | 2 reels | Cove + shelf | €70-110 |
| Slim surface profile | 8×10 mm surface profile | 3 m | Shelf / plinth lines | €25-40 |
| TV bias strip | 6500 K COB, low output | 2.5 m | Screen bias light | €20-30 |
| End caps | Matched end caps | 8 pr | Terminations | €20-35 |
| Mounting brackets | Bracket set | 30 | Fixing | €20-30 |
| Connectors | PCB connectors | 10 | Solder-free joints | €15–25 |
| Drivers | 24 V 100 W + 24 V 30 W, plug-connected, dimmable | 2 | Power | €60–100 |
| Wireless dimmer / controller | 2-channel RF or Zigbee | 1 | Control | €40–80 |
| Indicative materials total | €360–580 | |||
What you get: a two-wall cove producing a genuinely soft ambient layer, lit shelving, a bias-lit television and two dimmable channels. It will not be trimless and it will not be architectural, but it will comprehensively outperform the single pendant it replaces.
Tier two – Mid-range: the recommended specification
The brief: plasterboard work permitted, an electrician engaged, a proper control system, four to five channels. This is the tier this guide recommends for the great majority of residential projects, because it delivers 85% of the premium result for roughly 40% of the premium cost.
| Item | Suggested reference | Qty | Purpose | Indicative cost |
|---|---|---|---|---|
| Drywall corner cove profile | 64×22 mm drywall corner, 2 m | 18 m | Full perimeter cove | €290-400 |
| Primary cove strip | 10 m 2700 K COB 480 LED/m CRI Ra>90 | 2 reels | Ambient | €180-270 |
| Recessed profile | 23×15 mm recessed | 5 m | Wall wash + grazing | €80-120 |
| Surface profile | 17×7 mm surface | 6 m | Shelves, reading line, plinth | €60-90 |
| Opal diffusers | Opal diffuser range | 29 m | Glare control, smooth line | €90-150 |
| Accent strip | 2700 K COB 600 LED/m | 5 m | Grazing / artwork | €60-90 |
| Bias light strip | 6500 K COB | 2.5 m | TV bias | €25-35 |
| End caps, brackets, connectors | Matched sets | – | Terminations and fixing | €90-140 |
| Drivers | 24 V, 3× dimmable constant voltage | 3 | Power | €150-240 |
| Control system | Casambi / Zigbee / Matter, 5 channels | 1 | Scenes, app, voice | €250-450 |
| Indicative materials total | €1,275-1,985 | |||
Tier three – Premium: full architectural integration
The brief: trimless plaster-in details, tunable white throughout, DALI or Casambi control, commissioned scenes, no visible hardware anywhere. This is the specification for a significant refurbishment or new build where lighting is part of the architecture from day one.
| Item | Suggested reference | Qty | Purpose | Indicative cost |
|---|---|---|---|---|
| Plaster-in cove profile | 42×32 mm plasterboard, 3 m | 20 m | Trimless perimeter cove | €420-620 |
| Trimless ceiling slot | 50×10 mm drywall, 3 m | 9 m | Architectural slot | €230-340 |
| Wide architectural recess | 67×22 mm recessed | 5 m | Feature incision | €180-260 |
| Tunable white strip | 10 m CCT 2700-6500 K COB 600 LED/m | 4 reels | Dynamic ambient | €520-780 |
| High-CRI accent strip | CRI Ra>93 COB 2700 K | 10 m | Artwork and timber grazing | €150-230 |
| Flexible profile | 57×10 mm flexible plasterboard | 4 m | Curved bulkhead | €120-190 |
| Suspension profile + brackets | Suspension family | 2.4 m | Linear over table | €180-280 |
| Baseboard profile | Baseboard profile | 12 m | Night orientation line | €180-280 |
| Deep-opal + micro-prismatic diffusers | Diffuser range | 60 m | Optical control | €280-450 |
| End caps, brackets, connectors | Full matched sets | – | Terminations and fixing | €250-400 |
| DALI / Casambi drivers | Tunable-white capable, 8 channels | 8 | Power and control | €900-1,500 |
| Control system + commissioning | Scene programming, astronomical clock | 1 | Full automation | €900-2,000 |
| Indicative materials total | €4,310-7,330 | |||
Where to spend and where to save
| Component | Spend or save? | Reasoning |
|---|---|---|
| LED strip quality (CRI, binning) | Spend | Cannot be upgraded later; determines how every material in the room looks |
| Drivers | Spend | Flicker, dimming quality and failure rate all live here; cheapest single cause of complaints |
| Diffusers | Spend | The difference between a luminous bar and a row of dots |
| Profile finish (anodised vs painted) | Save | Rarely visible once installed correctly |
| Profile length (2 m vs 3 m) | Save | Buy to suit run lengths and minimise offcuts |
| Control system | Scale to use | A five-scene wireless system serves most families as well as a full DALI network |
| Number of channels | Spend | More channels = more rooms from one room; the cheapest form of flexibility |
| Decorative fittings | Save initially | Can be upgraded any time; the architectural layer cannot |
10. Power, drivers, voltage drop and circuit design
This is the section most likely to be skipped and most likely to cause a callback. Linear LED lighting is electrically simple but unforgiving of arithmetic errors: undersize a driver and it will run hot and fail early; overrun a strip length and the far end will be visibly dimmer and slightly cooler in colour; mismatch a dimmer and the client will get flicker that no amount of adjustment will cure.
Sizing the driver
The calculation is: total strip length (m) × strip power (W/m) = load, then add 20-30% headroom. Headroom matters because constant-voltage LED drivers run cooler, quieter and considerably longer when loaded at 70-80% of nominal rather than at 95%.
| Run length | Strip W/m | Calculated load | Driver with 25% headroom | Recommended standard size |
|---|---|---|---|---|
| 4 m | 6 W/m | 24 W | 30 W | 30 W / 24 V |
| 8 m | 6 W/m | 48 W | 60 W | 60 W / 24 V |
| 10 m | 10.5 W/m | 105 W | 131 W | 150 W / 24 V |
| 14 m | 10.5 W/m | 147 W | 184 W | 200 W / 24 V |
| 12 m | 15.5 W/m | 186 W | 233 W | 240 W / 24 V |
| 20 m | 7.7 W/m (CCT, two channels) | 154 W | 193 W | 2 × 100 W or 1 × 200 W dual-channel |
Tunable white caution: a CCT strip has two LED channels sharing one PCB. Its stated W/m is usually the combined maximum. Size the driver for the combined figure and confirm the controller can deliver full power to either channel individually.
Voltage drop: the physics of the dim far end
Current flowing through the copper of a strip’s PCB encounters resistance, and voltage falls along the run. Because LED output is a function of drive voltage, the far end of a long run is visibly dimmer and because phosphor-converted white shifts slightly with drive current, it may also be marginally different in colour. A 5% voltage drop is generally imperceptible; 10% is visible to a critical eye; 15% is obvious to anyone.
| System voltage | Single-end feed, max run | Both-ends feed, max run | Centre-feed, max run |
|---|---|---|---|
| 12 V | 3-5 m | 6-10 m | 6-10 m |
| 24 V | 8-10 m | 16-20 m | 16-20 m |
| 48 V | 20-25 m | 40-50 m | 40-50 m |
Three practical remedies, in order of preference:
- feed the run from both ends with a single driver, costs a cable, solves the problem completely;
- centre-feed, so each half is a half-length run;
- inject power at intervals along the run using a common bus cable.
The one thing you must not do is run a 15 m strip from one end at 24 V and hope.
Cable sizing on the low-voltage side
The SELV side is where installers most often use whatever cable is on the van. A 150 W load at 24 V draws 6.25 A (more than a domestic ring circuit carries per socket) and needs cable sized accordingly.
| Load at 24 V | Current | Run to driver ≤ 3 m | Run 3-8 m | Run 8-15 m |
|---|---|---|---|---|
| Up to 30 W | 1.25 A | 0.75 mm² | 1.0 mm² | 1.5 mm² |
| 30-60 W | 2.5 A | 1.0 mm² | 1.5 mm² | 2.5 mm² |
| 60-120 W | 5.0 A | 1.5 mm² | 2.5 mm² | 4.0 mm² |
| 120-200 W | 8.3 A | 2.5 mm² | 4.0 mm² | 6.0 mm² |
Driver location, ventilation and access
Drivers generate heat and eventually fail: they are, statistically, the component most likely to need replacing in a twenty-year installation. Three rules follow:
- First – Every driver must be accessible without demolition: a driver plastered into a ceiling void with no hatch is a future emergency.
- Second – Drivers need airflow: sealed joinery voids shorten their life significantly.
- Third – group drivers where practical: a small ventilated cupboard, the top of a wardrobe, a services riser so that maintenance is one visit rather than six.
Acoustic note: some drivers emit a faint high-frequency whine, particularly when dimmed. In a bedroom this is unacceptable and in a quiet living room it is noticeable. Locate drivers away from seating and specify units rated for domestic acoustic environments.
Circuit architecture: how many channels?
The number of independently dimmable channels is the single best predictor of how satisfied a client will be five years later. Each channel is a degree of freedom; each degree of freedom is another room the same room can become. Minimums by room size:
- Small room (< 15 m²): 3 channels – ambient cove, accent, task
- Medium room (15-30 m²): 4-5 channels – cove, accent 1, accent 2, task, bias/night
- Large room (30-50 m²): 5-6 channels, ideally zoned by seating group
- Open plan (45 m²+): 6-8 channels minimum, grouped by programme
11. Dimming, control protocols and smart living room lightings
Control is where good living room lightings become a good lighting experience. A beautifully specified scheme on a single on/off switch is a waste of money; a modest scheme with five well-programmed scenes feels luxurious. This section compares the protocols, explains which to use when, and addresses the integration questions that technically minded clients ask.
The protocol comparison
| Protocol | Dimming quality | Min. dim level | Wiring | Smart integration | Best for |
|---|---|---|---|---|---|
| TRIAC (mains phase-cut) | Fair to good | 5-10% | Existing 2-wire dimmer | Limited | Retrofit where rewiring is impossible |
| 0-10 V / 1-10 V | Good | 1-5% | Extra control pair | Via gateway | Simple reliable analogue dimming |
| PWM (constant voltage) | Very good | 0.1-1% | Between driver and strip | Via controller | Deep, smooth dimming of strips |
| DALI / DALI-2 DT8 | Excellent | 0.1% | 2-wire bus | Excellent | Premium projects, tunable white, many channels |
| Casambi (Bluetooth mesh) | Excellent | 0.1-1% | None (wireless) | Excellent (app) | Retrofit premium; no control cabling |
| Zigbee | Very good | 1% | Wireless + hub | Excellent | Consumer smart-home ecosystems |
| Matter / Thread | Very good | 1% | Wireless + border router | Excellent, cross-platform | Future-proof consumer integration |
| KNX | Excellent | 0.1% | Dedicated bus | Excellent | Whole-house integration, large properties |
Which to specify, honestly
For most residential living rooms, the correct answer is a quality PWM or 0-10 V driver controlled by a Zigbee or Matter interface, giving deep dimming, app and voice control, scene recall, and compatibility with whatever ecosystem the client already uses. It costs a fraction of DALI and delivers most of the benefit.
Specify DALI-2 DT8 when the project has more than eight channels, requires tunable white with precise CCT repeatability, needs commissioning documentation, or will be maintained by a facilities contractor rather than the occupant.
Specify Casambi when the project is a premium retrofit where running control cabling is impossible but DALI-grade dimming is expected. It is, for high-end apartment refurbishments, frequently the pragmatic winner.
Avoid mains TRIAC dimming of LED strips wherever you have any alternative: it is the leading cause of flicker complaints, minimum-level snap-off, audible buzz and driver-dimmer incompatibility. Where it is genuinely unavoidable, insist on a driver explicitly listed as compatible with the specific dimmer model, and test before the plaster goes on.
Designing scenes: the part that actually changes daily life
Hardware is necessary; scenes are what people experience. A well-commissioned living room has between five and eight scenes on a wall keypad and on the app, each tested at the actual time of day it is meant for. The single biggest commissioning error is programming scenes in the afternoon with daylight flooding the room: return at 21:00 and adjust.
| Scene | Ambient | Accent | Task | Bias / night | CCT | Purpose |
|---|---|---|---|---|---|---|
| Morning | 70% | 30% | 60% | 0% | 4000 K | Alertness; supports circadian entrainment |
| Day / work | 85% | 20% | 100% | 0% | 3500-4000 K | Hybrid working, vertical light on face |
| Afternoon | 50% | 40% | 40% | 0% | 3000 K | Transitional, comfortable |
| Evening / relax | 25% | 60% | 15% | 10% | 2700 K | The default evening state |
| Entertaining | 35% | 80% | 0% | 15% | 2500 K | Accent-led, flattering, sociable |
| Cinema | 5% | 15% | 0% | 40% | 2200 K + 6500 K bias | Low ambient, strong screen bias |
| Reading | 30% | 25% | 100% | 0% | 3000 K | Task-dominant, low surround glare |
| Night / orientation | 0% | 0% | 0% | 5% | 2200 K | Skirting only; preserves dark adaptation |
Automation, voice and the questions engineers ask
Technically literate clients and this guide assumes a good proportion of them, tend to ask five questions. Answered directly:
- Can it be fully automated? Yes. An astronomical clock adjusts scene transitions to actual sunset throughout the year, which is far better than fixed times. Occupancy sensing can trigger the night circuit. Both are standard in Zigbee, Matter, Casambi, DALI and KNX systems.
- Can it be voice-controlled? Yes, through any major assistant, provided the chosen protocol exposes the devices – Zigbee and Matter do so natively; DALI and Casambi require a gateway.
- Is smart lighting energy-efficient? The standby draw of a controller is typically 0.3-1 W. Against the savings from dimming (running a cove at 30% for four hours instead of 100% saves roughly 70% of that period’s energy) smart control is comfortably net-positive.
- Will it still work in ten years? Choose Matter or DALI-2 for the longest horizon, both being open standards with multi-vendor support. Avoid single-vendor proprietary ecosystems for anything plastered into a ceiling.
- What happens if the internet fails? Specify a system with local control. Zigbee, Matter/Thread, Casambi, DALI and KNX all operate locally, cloud-only systems leave a client sitting in the dark during an outage, which is an unacceptable failure mode for a primary living space.
The keypad still matters
A final piece of practical counsel that experienced designers repeat to every client: always install a physical keypad with the core scenes, regardless of how sophisticated the app is. Guests cannot use an app. Children cannot use an app. Nobody wants to unlock a phone to dim the lights. The app is an excellent secondary interface and a poor primary one.
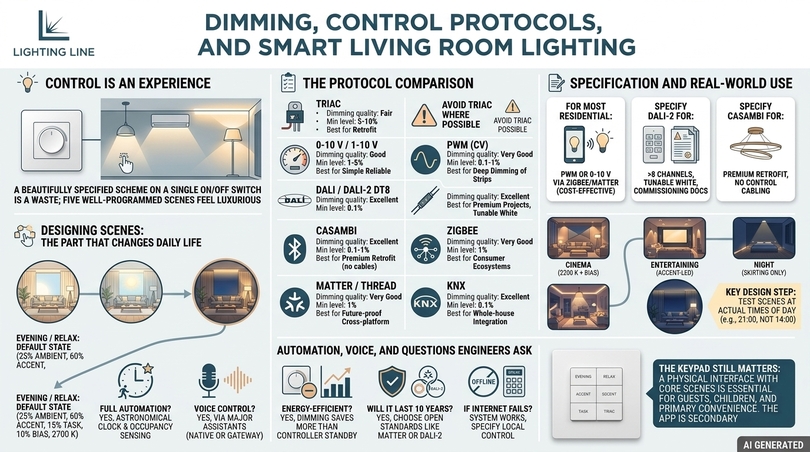
12. Installation: sequence, tolerances, plasterwork and wire-free options
A brilliant living room lightings specification installed badly produces a mediocre room. This section covers the sequence that keeps a linear lighting installation on programme, the tolerances that determine whether the result looks machined or homemade, and the honest boundary between what a capable homeowner can do and what legally and sensibly belongs to an electrician.
The correct sequence of operations
- Design and reflected ceiling plan: every profile run drawn to scale, with dimensions from finished surfaces, driver positions marked and channel allocations noted.
- Structural and services coordination: confirm no run collides with joists, ducts, pipework or downstands. This is where projects are saved.
- First fix wiring: mains to driver positions; SELV cabling to each run’s feed points, sized per section 10.3. Leave generous tails.
- Profile installation: plaster-in profiles fixed before boarding is completed; surface and recessed profiles after.
- Plastering and decoration: plaster-in profiles skimmed to their flange. Painting completed, including the inside of coves.
- Strip installation: strips fitted into profiles only after all wet trades are finished and the room is dry.
- Driver connection and testing: every run tested at full output before diffusers are fitted.
- Diffuser fitting and end caps: with expansion gaps.
- Commissioning: scene programming, ideally after dark, with the client present.
The single most common sequencing error is fitting strips before the plastering is complete.
Plaster dust is abrasive and hygroscopic, it destroys adhesive bonds, and it settles inside profiles where it will remain visible behind a diffuser forever.
Critical tolerances
| Item | Tolerance | Consequence of exceeding |
|---|---|---|
| Profile straightness over 3 m | ± 2 mm | Visible bow in the light line, unrecoverable once plastered |
| Joint gap between profile sections | < 0.5 mm | Dark line in the illuminated run |
| Diffuser expansion gap | 1–2 mm per 3 m | Bowing and rattle with temperature change |
| Cove upstand height above emitter | ≥ 50 mm | Source visible from seating, glare |
| Cove offset below ceiling | 150–250 mm | Scalloping and uneven ceiling gradient |
| Wall-wash offset from wall | 250–400 mm | Scalloped wash or dark upper wall |
| Grazing offset from wall | 50–100 mm | Loss of texture drama, flat wash instead |
| Shelf-line setback from front edge | 20–30 mm | Source visible from standing height |
| Bracket spacing | 500 mm (300 mm for wide profiles) | Sag between fixings on long runs |
Plaster-in details: getting the trades aligned
Trimless installation succeeds or fails on communication with the plasterer. Three instructions should appear explicitly on the drawing and be repeated verbally:
- The profile flange is the screed edge: plaster is worked up to and level with it, never over it.
- Mask the aperture before skimming: low-tack tape across the diffuser channel, removed after the final coat. Plaster inside the channel is extremely difficult to remove cleanly.
- Do not fix through the profile into the aperture: fixings must be in the designated flange positions only.
Wire-free and minimum-intervention options
Many clients ask directly whether they can have this kind of lighting without rewiring. The honest, complete answer:
- Plug-connected drivers: a dimmable 24 V driver with a moulded plug feeds the entire SELV installation from an existing socket. This is the single most useful retrofit tool, and it is how a great many apartment schemes are delivered.
- Wireless dimming: zigbee, Bluetooth-mesh or RF controllers between driver and strip give full scene control with no control cabling.
- Battery and rechargeable elements: suitable only for very short accent runs (a shelf, a niche). Runtime and output are limited; do not build an ambient layer this way.
- Track and magnetic systems: a single feed point supports repositionable elements, useful where the layout may change.
- Furniture-integrated lighting: if all light is in the joinery and the joinery plugs into a socket, no fixed wiring is touched at all.
The boundary, stated plainly: connecting SELV strips to a plug-connected driver is generally within the competence of a careful DIY installer. Anything that alters the fixed installation (new circuits, fused spurs, switched supplies, drivers wired directly into lighting circuits, or work in certain defined zones) requires a qualified electrician and, in most European jurisdictions, formal certification. When in doubt, engage an electrician; the cost of certification is trivial against the cost of an uncertified installation discovered during a property sale.
Thermal installation rules
- Never install a strip without a profile if it exceeds 5 W/m. The adhesive backing alone cannot dissipate the heat and life will be a fraction of rated.
- Do not cover profiles with insulation. Loft insulation over a ceiling-mounted profile is a thermal trap.
- Do not coil unused strip. A coiled reel at full power will overheat rapidly, cut to length or leave it on the reel unpowered.
- For strips above 14 W/m, prefer profiles with a larger aluminium cross-section and confirm ventilation of any enclosed void.
13. Energy, running costs and EU regulatory compliance
The energy argument for architectural LED living room lightings is strong, but it is frequently made badly with headline efficacy figures that have little to do with real-world consumption. The genuinely persuasive argument combines three factors: low installed power, low average dimmed output, and long service life.
What a properly designed living room actually consumes
Take the mid-range 25 m² scheme from section 9.2: roughly 55 W of installed load. In real use, the room is rarely at 100%. A realistic weighted profile might be four hours per evening at an average of 35% output, plus two hours of daytime use at 60% in winter months.
| Scenario | Installed load | Average output | Hours/day | kWh/year | Annual cost @ €0.28/kWh |
|---|---|---|---|---|---|
| Old scheme: 1 × 100 W incandescent + 2 × 60 W lamps | 220 W | 100% | 4 | 321 kWh | €90 |
| Basic LED retrofit: 3 × 9 W lamps | 27 W | 100% | 4 | 39 kWh | €11 |
| Layered linear scheme (this guide) | 55 W | 35% average | 5 | 35 kWh | €10 |
| Layered scheme, heavy daytime use | 55 W | 50% average | 8 | 80 kWh | €22 |
| Premium tunable scheme, 45 m² open plan | 140 W | 40% average | 7 | 143 kWh | €40 |
The headline for clients: a fully layered, professionally designed architectural lighting scheme for a living room typically costs between €10 and €25 per year to run. It is, in almost every household, a rounding error against heating and appliances and roughly a tenth of what the incandescent scheme it replaces cost to operate.
Dimming and energy: the linear relationship
Modern constant-voltage PWM dimming is approximately linear in power: 50% output draws approximately 50% power. (Note that perceived brightness is not linear – the eye’s response is roughly logarithmic, so 50% electrical output looks more like 70% brightness. This is why dimming saves more energy than clients expect it to.) A scheme that habitually runs at 30-40% consumes 60-70% less than its nameplate load.
Lifetime, L70 and real service life
LED lifetime is quoted as L70 or L80, the hours until output falls to 70% or 80% of initial. Quality strips in properly heat-sunk aluminium profiles are typically rated L70 at 50,000 hours or more. At five hours a day, 50,000 hours is roughly 27 years. In practice the driver, not the LED, determines service life, which is the strongest possible argument for specifying quality drivers and locating them accessibly.
| Installation condition | Effect on LED life | Practical outcome |
|---|---|---|
| In aluminium profile, ventilated | Baseline (L70 50,000 h+) | 20-27 years at typical domestic use |
| In aluminium profile, enclosed void | -20 to -30% | 15-20 years |
| Adhered to plasterboard, no profile | -50 to -70% | 5-10 years, colour shift likely |
| Coiled or covered by insulation | -80%+ | Premature failure, often within months |
| Driven at 50% via dimming | +30 to +50% | Materially extended life |
EU Compliance Points for Specifiers
- Energy labelling: under the current EU framework, light sources placed on the market carry an A-G class. Very high-density, high-CRI architectural strips commonly fall in classes E to G, this reflects the deliberate trade of raw efficacy for light quality and is not a defect.
- Ecodesign: Regulation (EU) 2019/2020 sets minimum efficacy and functional requirements; compliant products from established European suppliers will be documented accordingly.
- EPREL registration: light sources sold in the EU must be registered in the European Product Registry for Energy Labelling, giving specifiers a verifiable data source.
- SELV safety: 12 V and 24 V systems operate as Separated Extra-Low Voltage, which is inherently safer and simplifies certain installation situations – but the mains side of the driver is emphatically not SELV and is subject to normal electrical requirements.
- CE / UKCA marking and declarations of conformity: should be obtainable for every component in a specification. If a supplier cannot produce them, that is itself the answer.
The sustainability argument beyond energy
Two points that matter more than the electricity: aluminium profile is fully recyclable and, being mechanically fixed rather than glued into the building, is recoverable at end of life and a modular system in which the strip can be replaced within a retained profile means that a technology upgrade in 2040 will not require demolishing a ceiling. Specify replaceability deliberately: it is the most meaningful sustainability decision available in lighting design.
14. Style guide: living room lightings trends by interior language
In living room lightings, technique is universal but expression is not. The same cove profile and the same 2700 K strip produce entirely different results depending on how they are deployed, and part of an architect’s value is knowing which deployment belongs to which visual language. This section maps the schemes in section 7 onto the interior styles most frequently briefed in European residential work, and closes with an honest account of where the trends are heading.
Minimalist and contemporary
The defining objective is the total disappearance of hardware. Trimless plaster-in slots, perimeter coves with no visible upstand detail, and wall washes with no apparent source. Every fitting eliminated is a win. CCT at 2700-3000 K, CRI Ra>90, absolutely consistent across the room. Profiles: the drywall familyalmost exclusively. Decorative layer: one object, chosen as sculpture.
Japandi and warm minimalism
The Japanese-Scandinavian hybrid remains one of the most-requested languages, and it is unusually well served by linear lighting because it prizes materials, texture and calm over objects. Grazing on timber slats, low-level lines, paper-like diffusion and a CCT at the warm end 2400-2700 K. Avoid anything that reads as technological. Rice-paper and opal diffusion, very low glare, and a deliberately restrained lumen budget: Japandi rooms should be softer and dimmer than the norm.
Mid-century modern
Here the decorative layer is doing genuine work: the globe pendant, the arc floor lamp, the sputnik are period signatures and should be celebrated. Linear lighting’s job is to support them invisibly: a cove providing the ambient base so that the decorative pieces can be low-output and beautiful rather than bright and functional. Warm 2700 K, brass or black profile finishes where visible, shelf lighting in the sideboard and credenza.
Industrial and loft
Exposed structure invites grazing: brick, concrete, steel and timber all reward raking light. Black profiles as deliberate graphic elements, suspended linear runs, and visible surface-mounted bars that read as equipment rather than as decoration. Slightly cooler CCT – 3000 K suits the grey and steel palette. Higher contrast is appropriate; loft spaces tolerate and benefit from drama.
Contemporary classic and transitional
Cornices, panelled walls and traditional proportions can absorb linear lighting beautifully if it is concealed. Cove lighting behind an existing cornice is the signature move: it modernises the room’s light without touching its architecture, and it is one of the few genuinely respectful interventions available in a period property. Keep a decorative chandelier or pendant as the focal object, at low output, and let the cove carry the room.
Biophilic and plant-rich interiors
High CRI is non-negotiable here (Ra>93 with strong R9) because foliage greens and terracotta pots are exactly what poor colour rendering destroys. Uplighting plants from below produces dramatic leaf shadows on walls and ceilings and is among the most atmospheric effects available at almost no cost. Tunable white supports both the aesthetic and, in rooms with serious planting, the plants themselves.
Dark academia and saturated interiors
Dark walls absorb light – a deep green or oxblood room may reflect only 10-15% of incident light against 80% for white. Increase the lumen budget by 40-60% over the table in section 3.1, and shift the emphasis decisively toward accent and task rather than ambient, because in a dark room ambient light mostly disappears. Black profiles, deep-opal diffusers, 2400-2700 K, high contrast, and pools of light rather than washes.
Where living room lighting trends are actually heading
Stripping away marketing language, five directions are genuinely durable:
- The continued retreat of the ceiling fixture: ambient light is migrating downward and outward to walls, joinery, coves and floor level. The central pendant survives as decoration, not as illumination.
- Warmer, and warmer still: the centre of gravity has moved from 3000 K to 2700 K and is continuing toward 2400 K for evening scenes. Dim-to-warm behaviour is becoming an expectation rather than a luxury.
- Human-centric and circadian specification: tunable white is moving from premium to mainstream as clients who work from home discover the difference a 4000 K morning makes.
- Light as material, not object: the most significant shift: designers now specify luminous surfaces (glowing plaster reveals, backlit stone, luminous joinery) rather than fittings.
- Textural revelation: fluted timber, lime plaster, travertine, bouclé: the material palette of the decade is all about texture, and texture only exists under raking light. Grazing is no longer a specialist technique, it is a core skill.
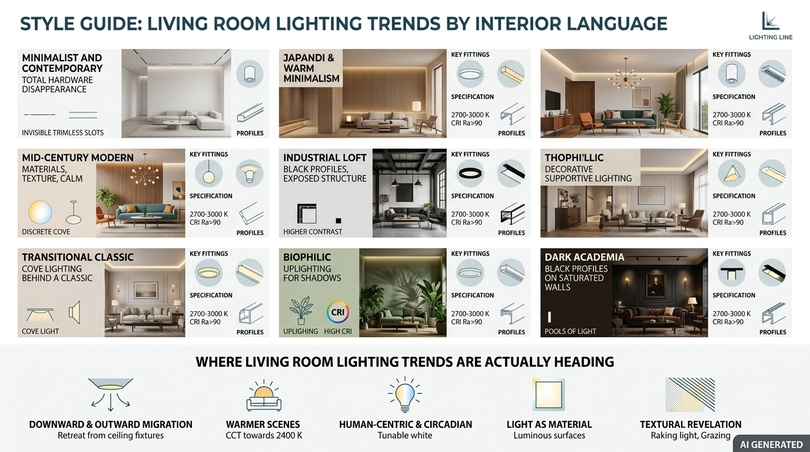
15. Living room ceiling lights, lounge lights and modern living room lights: translating what people ask for
Architects and clients do not speak the same language about light, and a great deal of project friction comes from that gap. A client asks for “modern ceiling lights”, the architect hears “a request for a fixture” and either supplies one or argues against it. Both are working from the same underlying desire: a room that feels contemporary, bright and considered and both would be better served by translating the request rather than answering it literally. This section is a translation table, and it doubles as a guide to the specific product decisions behind each of the most common requests in residential living room lightings.
“I want modern ceiling lights for the living room”
The contemporary answer is a ceiling that reads as luminous architecture (a trimless slot, a perimeter cove, or a stepped plane with concealed light at each level) rather than a fitting bolted to a plane. Modern living room lights, in the sense clients mean it, now means modern ceiling lighting rather than a modern ceiling fixture. Deliver it with a plaster-in profile such as the50×10 mm drywall profile and a deep-opal diffuser, and the client will describe the result as the most modern room in the house without a single visible luminaire.
“I want contemporary ceiling lights but I can’t touch the ceiling”
An extremely common constraint in apartments and rentals. The translation is straightforward: move the ceiling effect down to the wall. A bidirectional wall profile at 1.9 m throws light up onto the ceiling plane, producing exactly the luminous ceiling the client is imagining, while requiring nothing more than a wall fixing and a plug-connected driver. The ceiling still glows, it simply is not the thing that was drilled.
“I want living room ceiling lights ideas that aren’t spotlights”
The productive answer here is to show, not argue. The most persuasive alternatives to a downlight grid, in order of how reliably they impress clients, are: a perimeter cove, a trimless ceiling slot, a stepped or coffered ceiling with concealed light at each step and a suspended linear element defining a zone. All four are covered in detail in section 7, and all four use the same three components (profile, strip, diffuser) which makes them unusually easy to price comparatively.
“I want unusual or designer ceiling lighting”
“Unusual” is nearly always a request for a light effect that the client has not seen in a friend’s house. Linear lighting has an advantage here that decorative fittings cannot match: the effect is bespoke to the room’s geometry, so by definition nobody else has it. A light line following the exact plan of the room, a slot aligned precisely with a joinery run, a ring made from round profile or a curved bulkhead using the flexible plasterboard profile, each of these is genuinely unique in a way that a catalogue pendant never is.
“I want a chandelier or pendant in the living room”
Accept it gladly and reframe the job. A chandelier or a pendant is decorative-layer lighting, and decorative-layer lighting is a legitimate and valuable part of the model. The professional contribution is to ensure that the piece is not asked to illuminate the room: give it a concealed ambient layer to work against, run it at 20-40% output on its own dimmer, and place it over a defined zone rather than at the geometric centre of the plan. A chandelier supported by a cove looks expensive; a chandelier working alone looks like the only thing anyone could think of.
“I want lounge lighting ideas for a room with a low ceiling”
Low ceilings (2.3 m and below) punish anything that occupies vertical space. The correct moves are: a shallow corner cove rather than a deep dropped cove; wall washing to push the boundaries outward; light at low level to draw the eye downward; and absolutely no pendant. A slim reference such as the 17×7 mm surface profile or the 23×8 mm recessed profile delivers the effect without stealing height. In a low room, the ceiling should be the brightest surface and the least interrupted one.
“I want bright lights for the living room”
Almost always a complaint about distribution rather than a request for lumens. Before adding output, check three things: is there any vertical illuminance at all, is the ceiling dark and is there a visible high-luminance source causing the eye to adapt upward and everything else to look dim by comparison. In the case study in section 16, measured horizontal illuminance actually fell by 17% while the room was universally judged much better lit, because uniformity doubled and glare was eliminated. Brighter usually means more evenly and more vertically lit.
“I want ambient living room lighting / mood lighting”
This is the request that linear lighting answers most completely. Ambient and mood lighting in the sense clients mean it is indirect light at low colour temperature, dimmed, with no visible source: which is precisely the definition of a well-executed cove. Specify 2700 K COB, opal diffuser, upstand at least 50 mm above the emitter, and a dimmer that reaches 1%. Add a 2200 K skirting or plinth circuit for the late-evening layer and the request is fully satisfied.
“I want smart lights I can control from my phone”
Translate this into a protocol decision rather than a product decision. The client is asking for scenes, schedules and remote control, all of which are properties of the control system rather than of the luminaire. A quality PWM or 0-10 V driver behind a Zigbee or Matter interface delivers everything they are imagining, keeps the lighting hardware entirely conventional, and avoids locking the installation into a single manufacturer’s consumer ecosystem. Always pair it with a physical keypad.
“I want the lighting to look like a hotel”
A more common brief than one might expect, and a very specific one. Hospitality lighting has four recognisable characteristics: the ambient level is far lower than domestic norms, the colour temperature is warm, usually 2400-2700 K, every source is concealed and accent contrast is high, with strong pools of light on artwork, joinery and textured surfaces. Reproducing it is straightforward cut the ambient layer to roughly half what feels right, double the accent layer, and hide everything.
The translation table
| What the client asks for | What they actually want | What to specify |
|---|---|---|
| Modern ceiling lights | A ceiling that reads as contemporary and is well lit | Trimless slot or perimeter cove; no visible fitting |
| Living room ceiling lights ideas | Alternatives to a downlight grid | Cove, slot, stepped ceiling, suspended linear |
| Contemporary ceiling lights, no ceiling access | A luminous ceiling without drilling it | Bidirectional wall profile at 1.9 m, plug-connected |
| Unusual or designer ceiling lighting | An effect nobody else has | Geometry-following light lines; round or flexible profile |
| Living room chandelier | A focal object with presence | Chandelier at 20-40% plus a concealed ambient cove |
| Lounge lighting ideas, low ceiling | Height without losing light | Shallow corner cove, wall wash, slim surface profile |
| Bright lights for the living room | Even, glare-free, vertical light | Wall wash plus cove; eliminate visible sources |
| Ambient or mood lighting | Indirect warm light, dimmed, sourceless | 2700 K COB cove, opal diffuser, 1% dimming |
| Smart lights | Scenes, schedules, remote control | PWM or 0-10 V driver + Zigbee/Matter + keypad |
| Hotel-style lighting | Low ambient, warm, concealed, high contrast | Half the ambient, double the accent, hide everything |
| Cosy lighting | Warmth and contrast, not brightness | 2400 K, dimmed cove, light below eye level, pools not washes |
| Energy-efficient living room lighting | Low bills without a dim room | High-efficacy COB, dimmed, quality driver, layered scenes |
A note on vocabulary for specifiers
One small professional habit pays for itself repeatedly: when a client uses a product word, restate it as an effect word before responding. “You’d like modern ceiling lights so what you want is a ceiling that looks luminous and current, rather than a fitting hanging from it. Let me show you two ways to do that.” This single reframing converts a shopping conversation into a design conversation, and it is the moment at which most clients stop comparing fixtures and start engaging with the scheme.
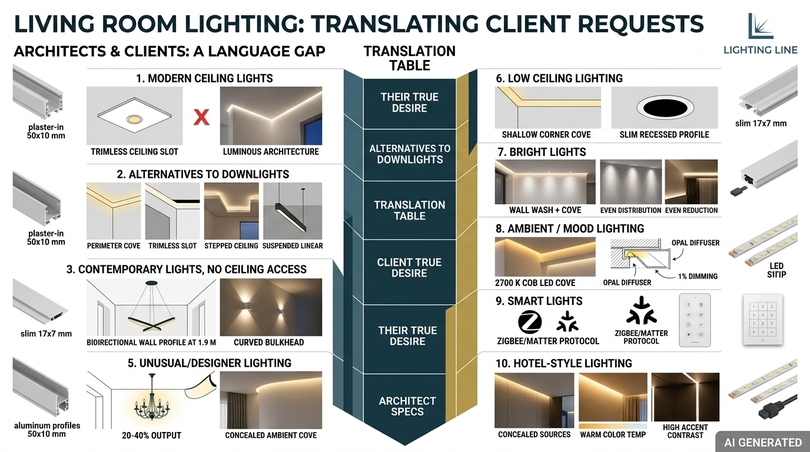
16. The twenty most common living room lightings mistakes
Every one of the following is drawn from recurring patterns in real projects. They are listed roughly in order of how frequently they occur and how expensive they are to correct after completion.
| # | Mistake | Why it fails | The fix |
|---|---|---|---|
| 1 | Relying on one central fixture | Flat light, harsh facial shadows, no flexibility | Build the four-layer model |
| 2 | Everything on one switch | One mood for five programmes | Minimum three dimmed channels |
| 3 | CCT too cool | Room reads clinical and unwelcoming | 2700 K default, 4000 K only in tunable daytime mode |
| 4 | Low-CRI strip to save money | Every material in the room looks wrong | CRI Ra>90, R9>50, non-negotiable |
| 5 | No task light | Beautiful room that nobody can read in | 300-500 lx at every reading position |
| 6 | Visible strip in a cove | Glare and a cheap appearance | Upstand ≥ 50 mm above emitter, test from every seat |
| 7 | Cove too close to ceiling | Scalloped hot band instead of a smooth gradient | 150-250 mm offset |
| 8 | Strip without profile | Overheating, early failure, colour shift | Always use an aluminium profile above 5 W/m |
| 9 | Driver oversized or undersized | Early failure, or inability to reach full output | Load at 70-80% of driver nominal |
| 10 | Voltage drop on a long run | Visibly dimmer far end | Feed both ends, use 24 V or 48 V |
| 11 | Cheap TRIAC dimming | Flicker, buzz, snap-off at low level | PWM, 0-10 V, DALI or Casambi |
| 12 | Inaccessible driver | Demolition required for maintenance | Group drivers in an accessible, ventilated location |
| 13 | Mixed CCTs in one view | Subtle, unresolvable visual discord | One CCT per sightline, tunable white if needed |
| 14 | Clear diffuser on a visible line | Dots and glare | Opal or deep-opal for any visible aperture |
| 15 | Grazing a flat painted wall | Reveals every plastering defect | Graze texture only, wash flat surfaces |
| 16 | Ignoring vertical illuminance | Room feels smaller and darker than it is | Wall wash at least one surface |
| 17 | Warm bias light behind a TV | Screen colour reads wrong | 6500 K bias light only |
| 18 | Strip installed before plastering | Dust contamination behind diffuser, adhesive failure | Strip after all wet trades |
| 19 | Scenes programmed in daylight | Evening levels are wrong for the rest of the installation’s life | Commission after dark |
| 20 | No physical keypad | Guests and children cannot operate the room | Always provide a wall keypad with core scenes |
17. Three case studies with measured results
Abstract principles about living room lightings persuade nobody. The three projects below are composite case studies assembled from typical European residential briefs, with the photometric outcomes that schemes of this type reliably produce. They are included because they demonstrate how the same toolkit adapts to radically different constraints, and because the before-and-after numbers make the argument more efficiently than any amount of description.
Case study A – 14 m² city apartment lounge, no ceiling access
The brief: a rented-then-purchased 1960s apartment with a concrete soffit, a single ceiling rose, a north-facing window and a client who works from home three days a week. No ceiling penetration permitted by the building management. Budget at entry tier.
The solution: the ambient layer was moved entirely off the ceiling. A bidirectional wall profile at 1.9 m ran the full length of the longest wall (4.2 m), fed from a plug-connected dimmable driver concealed behind the media unit. A 8×10 mm surface profilelit three bookcase shelves. A 2.2 m curtain pelmet line washed the window wall. A 6500 K bias strip sat behind the television. Total four channels on a Zigbee controller with a four-button keypad.
| Metric | Before | After | Change |
|---|---|---|---|
| Installed load | 1 × 12 W LED pendant | 38 W across 4 channels | +26 W |
| Average horizontal illuminance (evening scene) | 68 lx | 85 lx | +25% |
| Average vertical illuminance at 1.2 m | 21 lx | 62 lx | +195% |
| Illuminance at reading chair | 95 lx | 380 lx | +300% |
| CRI Ra | 82 | 92 | +10 |
| Independently dimmable scenes | 1 | 6 | +5 |
| Annual running cost @ €0.28/kWh | €5 | €9 | +€4 |
The lesson: the transformative figure is vertical illuminance, which nearly tripled. The client’s consistent report (that the room “feels twice the size”) is a direct perceptual consequence of that single number, not of the modest increase in horizontal light.
Case study B – 28 m² family living room, full refurbishment
The brief: a 1930s semi-detached house, living room opened to the rear garden with new bifold doors, plasterboard ceiling being replaced anyway, family of four, mixed use from homework to film nights. Mid-tier budget, electrician engaged.
The solution: a full perimeter cove using 64×22 mm drywall corner profile at 200 mm below ceiling on all four walls (19.4 m), carrying 2700 K COB at 480 LED/m. A grazing line 80 mm from the reinstated brick chimney breast. Shelf lighting in the alcove joinery both sides of the chimney. A concealed reading line above the armchair. 6500 K bias behind the screen. Five channels, PWM drivers, wall keypad plus app.
| Metric | Before (3 pendants + 6 downlights) | After | Change |
|---|---|---|---|
| Installed load | 102 W | 58 W | -43% |
| Ambient illuminance, all on | 210 lx (uneven) | 175 lx (even) | -17% but uniformity 0.4 → 0.8 |
| Evening scene illuminance | n/a (no dimming) | 55 lx | New capability |
| Vertical illuminance at 1.2 m | 48 lx | 96 lx | +100% |
| Visible glare sources from sofa | 6 downlights | 0 | Eliminated |
| CRI Ra | 80 | 92 | +12 |
| Annual running cost | €40 | €12 | -70% |
The lesson: note that measured horizontal illuminance actually fell while the room was universally judged better lit. This is the most important single finding in domestic lighting: uniformity, vertical illuminance and glare elimination matter far more than raw lux. Any client who insists on more light should be shown this table.
Case study C – 52 m² open-plan living/dining/kitchen, new build
The brief: a new-build open-plan ground floor with a double-height section over the dining area, a client who entertains frequently and a specification written at design stage. Premium tier, tunable white, DALI-2 DT8.
The solution: a continuous 2700-6500 K tunable cove thread running through all three zones (32 m), tying the volume together. Two trimless ceiling slots aligned with the kitchen island and the seating group. A suspended linear profile over the dining table. Wall grazing on the fluted timber feature wall. A baseboard line through the whole floor plate for night orientation. Eight DALI channels, astronomical-clock scene automation, commissioned after dark over two evenings.
| Metric | Value | Note |
|---|---|---|
| Total installed load | 146 W | 2.8 W/m² |
| Total installed lumens | 13,800 lm | 265 lm/m² |
| Kitchen task illuminance | 420 lx | Worktop, measured |
| Dining table illuminance | 265 lx | Suspended linear at 780 mm |
| Lounge evening scene | 62 lx horizontal / 78 lx vertical | Cove at 28%, accents at 55% |
| Night orientation scene | 4 lx at floor | Baseboard only, 2200 K, 5% |
| CCT range available | 2700-6500 K | Automated to sunset |
| Commissioned scenes | 9 | Keypad + app + voice |
| Annual running cost | €38 | Weighted average 40% output, 7 h/day |
The lesson: at 2.8 W/m², this is a substantially lower installed power density than a conventional downlight grid would have required for the same space, while delivering nine distinct spatial experiences from one set of hardware. Density of control, not density of fittings, is what makes a large open plan work.
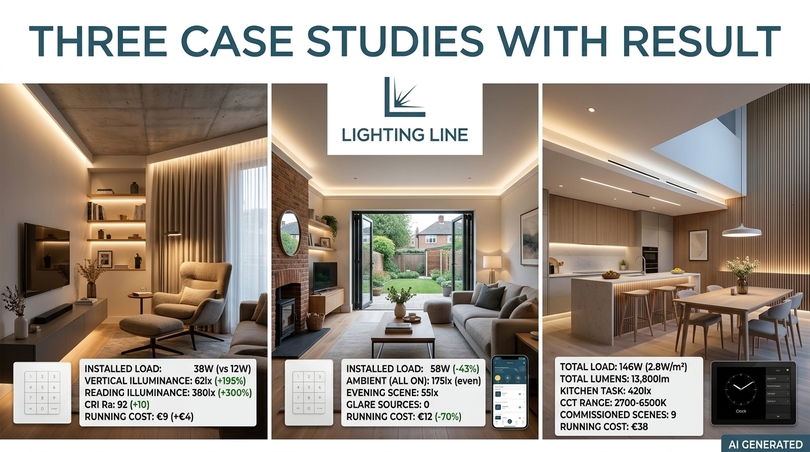
18. The architect’s specification checklist
This living room lightings checklist is intended to be worked through in order at the end of concept design and again before tender. Every line is something that, left unresolved, has caused a real project to go wrong.
Design stage
- Room programme agreed with the client: which five activities must this room support?
- Layer allocation set: ambient, task, accent, decorative, dynamic – with a target percentage for each
- Target illuminance defined for each zone, in lux, horizontal and vertical
- Total lumen budget calculated against room area and surface reflectances
- CCT strategy decided: fixed, dim-to-warm or tunable and consistent across sightlines
- Minimum CRI Ra and R9 stated on the drawing
- Number of dimmed channels agreed and allocated
- Seated-eye glare check performed against the reflected ceiling plan
Technical stage
- Profile family and reference selected for each run, with dimensions
- Strip reference selected: density, W/m, CCT, CRI, voltage, cut pitch, IP
- Diffuser type selected per run and transmission loss accounted for in the lumen budget
- Driver sized with 20–30% headroom; quantity and location fixed
- Voltage drop checked for every run over 6 m; feed strategy decided
- SELV cable sizes calculated per run
- Dimming protocol chosen and driver–controller compatibility confirmed in writing
- Flicker specification stated: PWM > 3 kHz, < 5% at full output
- MacAdam SDCM ≤ 3-step specified
- End caps and mounting brackets scheduled for every run
- Driver access route identified and marked on the drawing
Construction stage
- Structural and MEP coordination signed off against the reflected ceiling plan
- Plaster-in profiles installed before boarding is closed
- Profile apertures masked before skimming
- Cove interiors painted before strip installation
- All wet trades complete before strips are fitted
- Each run tested at full output before diffusers are fitted
- Diffuser expansion gaps left at every joint
- Bracket spacing verified: 500 mm standard, 300 mm for wide profiles
Handover
- Scenes commissioned after dark, with the client present
- Physical keypad labelled and demonstrated
- Driver locations documented with photographs and a simple schedule
- Strip references, CCT, CRI and reel batch recorded for future replacement matching
- Spare strip left on site: minimum 1 m per distinct reference
- Warranty documentation and declarations of conformity handed over
19. Cost, lifecycle and return on investment
Living room lightings are one of the few building interventions where the quality-of-life return is immediate and the financial return is genuine but secondary. Making both arguments accurately (rather than overstating the second9 is what earns an architect’s credibility.
Twenty-year cost of ownership comparison
| Approach | Initial cost | 20-yr energy | 20-yr replacement | Total 20-yr | Design quality |
|---|---|---|---|---|---|
| Single pendant, no dimming | €120 | €180 | €60 | €360 | Poor |
| Downlight grid, 8 × GU10 | €520 | €260 | €340 | €1,120 | Fair, glare issues |
| Entry linear scheme (§9.1) | €470 + €300 labour | €190 | €120 | €1,080 | Good |
| Mid-range linear (§9.2) | €1,600 + €1,400 labour | €240 | €260 | €3,500 | Excellent |
| Premium architectural (§9.3) | €5,800 + €4,500 labour | €420 | €500 | €11,220 | Outstanding |
The uncomfortable honesty a good specifier offers: the mid-range linear scheme does not pay for itself in energy savings against a downlight grid, and it never will. It pays for itself in the fact that the room is used more, enjoyed more, photographs better and (in most European markets) contributes materially to perceived property quality at sale. Sell it on that, not on kilowatt-hours.
Cost per square metre benchmarks
| Tier | Materials €/m² | Installed €/m² | Typical 25 m² room, installed |
|---|---|---|---|
| Entry / retrofit | €15-25 | €28-45 | €700-1,125 |
| Mid-range | €50-80 | €110-160 | €2,750-4,000 |
| Premium architectural | €170-290 | €380-560 | €9,500-14,000 |
The value engineering conversation
When a budget is cut, the order in which elements should be sacrificed is not obvious and is almost always got wrong on site. The correct order:
- Cut first: decorative fittings (addable later at any time)
- Then: the luxury of full tunable white; revert to fixed 2700 K
- Then: reduce the number of accent runs, keeping the strongest one
- Then: substitute surface-mounted for trimless plaster-in details
- Then: reduce channel count from six to four
- Never cut: strip CRI, driver quality, diffuser quality, or the seated-glare detail
The last line is the one to defend hardest: a scheme with fewer runs of excellent components will always outperform a scheme with many runs of poor ones, and the poor components are the ones that cannot be upgraded without reopening the ceiling.
20. Troubleshooting and commissioning
Most living room lightings faults fall into a small number of categories with identifiable causes. This table is intended for use on site.
| Symptom | Most likely cause | Secondary causes | Remedy |
|---|---|---|---|
| Far end of run visibly dimmer | Voltage drop | Undersized SELV cable, run too long for voltage | Feed both ends; increase cable size, move to 48 V |
| Visible dots through diffuser | Insufficient mixing distance for SMD density | Clear diffuser specified | Change to opal diffuser or COB strip |
| Flicker, visible or on camera | Incompatible dimmer / low PWM frequency | Driver overloaded, shared neutral | Replace with PWM > 3 kHz or 0-10 V / DALI driver |
| Lights snap off below ~20% | TRIAC dimmer minimum-load threshold | Driver minimum output limit | Change dimming protocol, add dummy load only as last resort |
| Audible buzz or whine | Driver or dimmer acoustic emission | Loose profile resonating | Relocate driver; substitute quieter unit, secure profile |
| Colour differs between two runs | Different production batches / loose binning | Different drive currents | Specify ≤ 3-step MacAdam; order all reels from one batch |
| Section of strip dead | Failed joint or damaged cut point | Over-bent at corner | Replace section, use connectors and flying leads at corners |
| Premature failure / dimming over months | Thermal – no profile, or enclosed void | Overdriven strip | Install in aluminium profile, ventilate, dim to reduce load |
| Diffuser bowing or rattling | No expansion gap | Bracket spacing too wide | Re-cut with 1-2 mm gaps; add brackets |
| Cove shows bright scalloped band | Profile too close to ceiling | Beam angle too narrow | Lower profile to 150-250 mm, use 180° COB |
| Client says “too dark” despite good lux | Vertical illuminance too low | All light directed downward | Add a wall wash or pelmet line |
| Client says “too bright” despite low lux | Visible high-luminance source | Diffuser too clear | Increase recess depth, change diffuser |
The commissioning protocol
- Test every run at 100% before diffusers are fitted, confirm no dead sections and no colour mismatch between reels.
- Measure illuminance at three points per zone with a calibrated meter and record against the design targets.
- Sit in every seat and confirm no emitting surface is visible.
- Sweep each channel from 100% to minimum and back, watching for snap-off, flicker and audible noise.
- Return after dark and programme scenes with the client in the room.
- Label the keypad in the client’s own words, not the designer’s.
- Photograph and document driver locations.
21. Glossary of lighting terms
| Term | Definition | Why it matters in a living room |
|---|---|---|
| Ambient light | The general background illumination of a space | The base layer, should never be the brightest visible thing |
| Beam angle | The angular spread of emitted light | COB’s 180° fills diffusers and coves evenly |
| Binning | Sorting of LEDs by colour and output tolerance | Determines whether two runs match visually |
| CCT | Correlated colour temperature, in kelvin | Controls whether a room feels warm or clinical |
| COB | Chip-on-board: continuous LED array under one phosphor layer | Produces dot-free lines, enables ultra-slim profiles |
| Constant voltage | Driver supplying fixed voltage, variable current | The standard for LED strips |
| Cove lighting | Concealed light throwing indirect illumination onto a ceiling | The foundation of most contemporary schemes |
| CRI (Ra) | Colour Rendering Index against a reference illuminant | > 90 required for materials and skin to look right |
| DALI | Digital Addressable Lighting Interface | Premium control with precise dimming and addressing |
| Diffuser | Translucent cover over the strip | Trades transmission for smoothness and glare control |
| Dim-to-warm | CCT falls toward amber as output is reduced | Mimics incandescent behaviour, highly valued in living rooms |
| Driver | Power supply converting mains to SELV DC | Determines flicker, dimming quality and service life |
| Grazing | Light striking a surface at an acute angle | Reveals texture in stone, timber, plaster |
| IP rating | Ingress protection against solids and liquids | IP20 indoors, IP65/67 for wet-adjacent or plastered runs |
| L70 | Hours until output falls to 70% of initial | The realistic definition of LED service life |
| Lumen | Total light output from a source | What you buy |
| Lux | Lumens per square metre landing on a surface | What you get |
| MacAdam ellipse (SDCM) | Measure of colour consistency tolerance | ≤ 3-step needed for matched runs |
| Micro-prismatic | Diffuser with a prismatic micro-structure | High transmission with good glare control |
| PWM | Pulse width modulation dimming | Deep, smooth dimming, frequency must exceed 3 kHz |
| R9 | Saturated red rendering index | Excluded from Ra, critical for skin and timber |
| SELV | Separated Extra-Low Voltage | The inherently safer 12/24/48 V side of the installation |
| SMD | Surface-mounted device LED package | Discrete emitters, needs mixing distance to hide dots |
| Task lighting | Light targeted at a specific activity | The most frequently omitted layer |
| Trimless | Fitting plastered flush with no visible frame | The most architectural linear detail available |
| Tunable white | Adjustable CCT from a single luminaire | Enables daytime and evening modes from one installation |
| UGR | Unified Glare Rating | No domestic requirement, which is why domestic glare is common |
| Uniformity (Uo) | Minimum illuminance divided by average | Higher uniformity often matters more than higher lux |
| Voltage drop | Loss of voltage along a conductor | Causes dim far ends on long runs |
| Wall washing | Even vertical illumination of a wall surface | The most reliable way to make a room feel larger |
Frequently asked questions about living room lightings
The questions below are the ones architects, designers and homeowners actually ask, answered directly and without hedging. Each answer is self-contained, so the section can be read in any order or consulted as a reference. Click any question to expand it.
What type of lighting is best for a living room?There is no single best type, the correct answer is a layered combination. A well-designed living room uses four layers: indirect ambient light (usually a concealed cove or wall wash), task light at each reading or working position, accent light on artwork, texture and joinery, and a decorative fitting as a focal object. Each layer is dimmed independently. If you had to choose only one thing to install, choose an indirect ambient cove using a warm 2700 K COB strip in an aluminium profile: it delivers the single largest improvement over a central pendant. |
What is the 5-7 lighting rule?It is an informal design heuristic stating that a well-lit living room should contain at least five, and ideally seven, discrete light sources distributed across different heights and layers, rather than one or two sources concentrated at ceiling level. It is not an official standard from any lighting body, but it is a genuinely useful sanity check: rooms with five to seven independently controllable sources almost always feel better than rooms with fewer. |
Are LED lights good for a living room?Yes, provided you specify quality rather than buying on price. The variables that matter are CRI Ra>90 with R9>50, a colour temperature of 2700 K for general use, smooth dimming to 1% or lower, and flicker below 5%. Cheap LED strip with CRI in the seventies and low-frequency flicker is genuinely worse than the halogen it replaced. High-CRI COB strip in an aluminium profile is better than anything that came before it. |
What colour light is best for a living room?2700 K warm white is the correct default. It matches the incandescent light our visual expectations were formed around and it flatters skin, timber, textiles and food. Go warmer (2200-2500 K) for late-evening scenes and fireplace zones. Use 3000 K where the material palette is cool (grey stone, pale marble, steel). Avoid 4000 K and above as a fixed living room colour; reserve it for the daytime mode of a tunable-white system. |
How many lumens do I need to light a living room?As a working rule, budget about 200 lumens per square metre across all layers for light-toned interiors. A 20 m² room therefore needs roughly 4,000 lm total, distributed across layers rather than concentrated in one fitting. Increase by 30-50% for dark walls and ceilings. Remember that a cove only delivers 50-65% of its nominal lumens to the room after diffuser and reflection losses, so cove strips must be specified higher than a naive calculation suggests. |
How many lights should a living room have?Think in independently dimmable channels rather than fittings. A small room needs three channels; a medium room four to five, a large room five to six, an open plan six to eight. Within each channel there may be one continuous run or several fittings. Channel count, not fitting count, is what determines how many different rooms the same room can become. |
Should a living room have a ceiling light?It should have ceiling-level light, but it does not need a ceiling fixture. Contemporary practice delivers ambient light from concealed coves, ceiling slots and wall washes rather than from a visible central luminaire. A decorative pendant is entirely welcome as a compositional object, but it should not be asked to carry the room’s illumination. If your ceiling cannot be altered at all, a wall-mounted bidirectional profile at 1.9 m replaces the ceiling layer completely. |
Are downlights good for a living room?Used sparingly and correctly, yes; used as a grid, no. Downlights excel at accenting a specific object or lighting a defined task surface. They fail as a general ambient solution because they produce downward-only light, harsh facial shadows, a dark ceiling and, in most domestic installations, significant glare from every seating position. If a client insists, use deep-baffled, high-CRI units in small numbers, on dimmers, positioned to light objects rather than to fill a grid. |
Are downlights still fashionable?The downlight grid (evenly spaced units across the whole ceiling) is comprehensively out of favour in contemporary residential design and has been for some years. Individual, carefully placed downlights used as accent tools remain entirely valid and appear in high-end schemes. The change is not about the fitting type but about the strategy: pattern-based ceiling lighting has been replaced by intent-based lighting. |
Are spotlights good for a living room?As accents, yes: a spotlight is the right tool for lifting a painting or a sculptural object to three to five times its surroundings. As a general lighting strategy, no, for the same reasons as downlights. A useful rule: if you can describe exactly what a spotlight is lighting, it belongs, if it is there to “brighten the room”, it should be a cove or a wall wash instead. |
Can you have spotlights and downlights in a living room?Yes, on their own dimmed channel, used for accent and task only, and always in combination with an indirect ambient layer. The failure mode is not the fitting but the absence of anything else. Downlights plus a cove is a good scheme; downlights alone is a poor one. |
Are there ceiling lights that don’t require wiring?There are several routes. Plug-connected drivers let an entire low-voltage strip installation run from an existing socket with no alteration to fixed wiring. Battery and rechargeable fittings work for short accent runs but not for an ambient layer. Wireless dimming removes the need for control cabling entirely. And moving the ambient layer to wall and joinery level avoids the ceiling altogether, often producing a better result than a ceiling-based scheme would have done. |
Do I need an electrician to install a light fitting?Connecting low-voltage LED strips to a plug-connected driver is generally within the competence of a careful DIY installer, since the SELV side is inherently low risk. Anything that alters the fixed electrical installation (a new circuit, a fused spur, a switched supply, or a driver wired directly into a lighting circuit) requires a qualified electrician, and in most European jurisdictions certification is a legal requirement rather than a preference. If in doubt, engage one: the cost of certification is trivial against the cost of an uncertified installation surfacing during a property sale. |
How much would an electrician charge to change a light fitting?Rates vary widely across Europe, but a straightforward like-for-like fitting swap is typically an hour’s labour plus call-out. A full linear lighting installation in a 25 m² living room (first-fix wiring, driver positions, profile fixing, strip installation, testing and commissioning) is usually costed as a multi-day package rather than hourly. Always obtain a fixed-price quotation against a drawing rather than an hourly estimate against a description. |
How do you light a living room with no overhead lighting?Move every layer down. A bidirectional wall profile at 1.8–2.0 m provides the ambient layer, throwing light both up to the ceiling and down the wall. A curtain pelmet line creates a large luminous vertical plane. Shelf and plinth lighting in the joinery handles accents. A floor-standing uplighter bouncing off the ceiling adds volume. All of this can run from plug-connected drivers with wireless dimming, touching no fixed wiring at all and the result is frequently softer and more sophisticated than a ceiling scheme. |
How do I make my living room feel cosy with light?Five moves, in order of effect: lower the colour temperature to 2400-2700 K; dim the ambient layer to 20-30% and let accent light carry the visual interest, add light below eye level (table lamps, plinth lines, skirting lines), eliminate every visible high-luminance source and create pools of light with dark space between them rather than uniform illumination. Cosiness is contrast and warmth, not brightness. |
How do I get better lighting in my living room on a small budget?In this order of value per euro: fit a dimmer to whatever you already have; add a two-wall corner cove with a 2700 K COB strip and a plug-connected dimmable driver, light one bookcase or joinery unit, add a 6500 K bias strip behind the television, add one directional floor lamp at the reading chair. The first three of those will transform a room for a few hundred euros in materials. |
What is the cheapest way to light a room well?Indirect light from a corner cove profile with a mid-output COB strip, on a dimmer, is the cheapest route to a genuinely good result, because it eliminates glare, produces excellent uniformity and needs no building work. Adding a second, low-cost layer (shelf lighting or a single accent) takes it from good to designed. The expensive routes are those involving ceiling alteration, which is why retrofit-friendly profiles are so valuable. |
Where should I put LED strips in my living room?The highest-value positions, in order: the wall-to-ceiling junction for a perimeter cove, under shelves in bookcases and media units, behind the television for bias light, under floating furniture and plinths, in the curtain pelmet; at skirting level for night orientation and adjacent to any textured wall you want to graze. Avoid sticking strips directly to plasterboard without a profile: thermal management and optical quality both depend on the aluminium. |
Can LED strips brighten a whole room?Comfortably, yes. A perimeter cove carrying a 10 W/m COB strip over 15 metres produces around 15,000 nominal lumens (far more than a living room requires) even after the 40-50% losses inherent in indirect lighting. The practical constraint is not output but restraint: most schemes should be specified higher and dimmed, rather than run at full power. |
Do I need an aluminium profile, or can I just stick the strip up?You need the profile. It performs five jobs: it sinks heat (doubling to tripling the strip’s useful life), it holds the diffuser at the correct distance to hide dots, it protects the strip mechanically, it creates the architectural detail itself, and it absorbs the irregularity of real building surfaces. Any strip above 5 W/m installed without a profile will run hot, shift colour and fail early. Adhesive-backed strip on plasterboard is the single most common cause of disappointing LED installations. |
What is the difference between SMD and COB LED strips?SMD strips carry discrete LED packages at intervals, producing visible dots unless the diffuser is far enough away. COB strips carry a dense array of bare dies under one continuous phosphor layer, producing an unbroken line with no mixing distance required and a wider 180° beam. For any line that is visible or semi-visible in a living room, COB is the correct choice. SMD remains useful in deep, fully concealed coves where raw efficacy matters more than continuity. |
What CRI should I specify for a living room?CRI Ra>90 as a minimum, with R9 above 50 and preferably above 80. Specify Ra>93 where artwork, natural timber, natural stone or skin tone are central to the scheme. R9 is the critical hidden number: a strip can post Ra 90 with R9 near zero, and it will make terracotta look brown, oak look grey and faces look unwell. |
12 V or 24 V – which should I use?24 V for essentially all living room work. At equal power it draws half the current of 12 V, which means one quarter of the resistive loss and roughly double the achievable run length before the far end visibly dims. Use 12 V only for very short joinery runs, and consider 48 V for continuous runs beyond about 20 metres, such as a thread running through a large open plan. |
How long can an LED strip run be before it dims at the end?At 24 V, roughly 8-10 metres from a single feed, or 16-20 metres fed from both ends. At 12 V, 3-5 metres single-feed. At 48 V, 20-25 metres single-feed. The remedies, in order of preference, are: feed from both ends with one driver, centre-feed the run, or inject power at intervals via a common bus cable. |
How do I size the driver?Multiply run length in metres by the strip’s watts per metre, then add 20-30% headroom. A 12 m run of 10.5 W/m strip is 126 W, so specify a 150 W or 180 W driver. Drivers loaded at 70-80% of nominal run cooler, quieter and far longer than drivers loaded at 95%. For tunable white, size for the combined two-channel maximum. |
Why do my LED lights flicker when dimmed?Almost always a dimming protocol problem. Mains phase-cut (TRIAC) dimmers are frequently incompatible with LED drivers and produce low-frequency, high-depth modulation that is visible directly, visible on camera and associated with headaches and eye strain. The fix is to move to PWM at above 3 kHz, 0-10 V, DALI or a Bluetooth-mesh system. Specify flicker performance on the drawing (below 5% at full output) so it cannot be value-engineered away on site. |
Why does one section of my cove look a different colour?Two likely causes. Either the reels came from different production batches with loose colour binning, or the affected section is running at a different drive voltage. Specify 3-step MacAdam (SDCM) or tighter for any runs that appear in the same field of view, and order all reels for one room from a single batch. If binning is correct, check for voltage drop or a poor joint. |
What is the best lighting for watching television?A low ambient level of roughly 10-30 lx (never total darkness, which causes eye strain) plus a bias light behind the screen. The bias light should be 6500 K neutral white at CRI Ra>90, set to about 10% of the screen’s peak luminance. This is the one place in a living room where a cool colour temperature is correct: a warm bias light will make the screen’s whites read as blue. |
How do I light a large living room without it feeling like a showroom?Stop lighting it evenly. Divide the volume into two or three zones with their own hierarchies, give each a focal accent, and leave deliberate darker transitions between them. A large room with three bright zones and two dim ones reads as sophisticated; the same room lit to a uniform 150 lx reads as commercial. Add a suspended linear element over the main seating group to define it in three dimensions. |
How do I light a small living room to make it feel bigger?Light the walls. Perceived room size is driven by vertical illuminance far more than by horizontal illuminance, so a wall wash on the longest wall does more for apparent size than any amount of ceiling light. Add a cove on two walls rather than four to avoid a boxed-in reading, avoid a downlight grid entirely, and keep hardware minimal. In tested cases, tripling vertical illuminance produces the consistent client report that the room “feels twice the size”. |
How do I light a room with a vaulted or sloped ceiling?Three reliable strategies: a ridge uplight running along the apex, throwing light onto the slopes which then act as a large diffuse reflector, an eaves cove at the base of the slope washing light up the pitch, which is the most flattering treatment and best reveals timber structure, or profiles concealed on the top face of exposed beams. All three require higher output than a flat-ceiling cove because the throw distances are longer. Avoid pendants on sloped planes: they almost always read as an afterthought. |
How should I position lighting in a living room?Start from the furniture plan, not the ceiling grid. Mark every seating position, every reading position, every surface you want to be luminous and every object you want emphasised. Arrange sources in triangles rather than lines so shadows cross-fill. Carry light at three heights: low, middle and high. Then sit in every seat and confirm no emitting surface is visible from any of them. |
How do I get warm, ambient light rather than harsh light?Four things do it. Make the light indirect, bounce it off a ceiling or wall rather than aiming it at people. Lower the CCT to 2400-2700 K. Use an opal or deep-opal diffuser to reduce peak luminance. And dim: a cove at 25% is warm and enveloping where the same cove at 100% is merely bright. Harshness is almost always a symptom of a visible high-luminance source rather than of too many lumens. |
How do you combine different lights in a living room?Keep the colour temperature consistent within any single sightline, put each layer on its own dimmer, and use the layer ratios as a starting point: roughly 50% ambient, 20% task, 20% accent, 10% decorative for a general family room. Combine freely across styles and eras (a vintage floor lamp beside a trimless plaster slot works perfectly) provided the CCT matches and no source glares. |
Do all the lamps in a living room need to match?The fittings do not need to match at all, and a room in which everything matches usually looks like a catalogue page. What must match is the light: keep the colour temperature consistent and the CRI high across every source in the same view. A brass table lamp, a paper shade and a concealed plaster slot will coexist beautifully at 2700 K: the same three at 2700 K, 3000 K and 4000 K will feel subtly wrong to everybody and explicable to nobody. |
Do people still use table lamps and floor lamps?Very much so, and their role has become clearer rather than diminished. With the ambient load carried by concealed architectural lighting, decorative lamps are free to be low-output, beautiful objects that add light at middle height: which is exactly what makes a room feel domestic rather than institutional. Two or three lamps in a medium living room is a sensible number. |
Can I put pendant lights in a living room?Yes, and they remain one of the most effective compositional devices available. The change is in their job: a pendant should be a focal object and a decorative layer, not the room’s ambient source. Hang it off-centre over a coffee table or a defined zone rather than dead centre in the room, keep its output modest, dim it, and let a cove or wall wash provide the general illumination. |
Do living rooms still have chandeliers?They do, particularly in period properties, double-height volumes and classically influenced interiors. A chandelier is decorative-layer lighting at its most explicit. Support it with concealed ambient light so it can be run at low output, and be careful with proportion: in a room with a standard 2.4-2.7 m ceiling, a chandelier competes with the architecture rather than complementing it. |
What are the latest trends in living room lighting?Five durable directions: the continued retreat of the visible ceiling fixture in favour of concealed linear light, a shift to warmer colour temperatures, from 3000 K toward 2700 K and 2400 K, the mainstreaming of tunable white and circadian scheduling, a conception of light as material (luminous surfaces rather than luminous objects) and the rise of textural revelation, with grazing on fluted timber, lime plaster and natural stone becoming a core technique rather than a specialist one. |
What are the three types of lighting in a living room?The classical answer is ambient, task and accent. In contemporary practice a fourth layer, decorative, is treated as distinct because its purpose is compositional rather than illuminative, and a fifth layer, dynamic or circadian light, is increasingly specified where tunable-white hardware is installed. Any scheme containing all of the first four will be comfortably better than most living rooms in Europe. |
Can smart lighting be integrated into my living room design?Yes, and it should be planned at design stage rather than added afterwards. For most homes, a quality PWM or 0-10 V driver controlled by a Zigbee or Matter interface delivers deep dimming, scene recall, app and voice control at a fraction of the cost of DALI. Specify DALI-2 DT8 for eight or more channels or precise tunable-white repeatability, and Casambi for premium retrofits where control cabling is impossible. |
How do I automate my living room lighting?Use an astronomical clock rather than fixed times, so scene transitions follow actual sunset throughout the year. Add occupancy or motion triggering for the night-orientation circuit only. Programme five to eight scenes and expose them on both a wall keypad and an app. Crucially, choose a system with local control: Zigbee, Matter/Thread, Casambi, DALI and KNX all work without internet, whereas cloud-only systems leave the room dark during an outage. |
Is smart lighting energy-efficient?Net positive, comfortably. A controller’s standby draw is typically 0.3-1 W, while the dimming it enables cuts consumption roughly in proportion to output — running a cove at 30% instead of 100% for four hours saves about 70% of that period’s energy. Since perceived brightness is roughly logarithmic, 50% electrical output looks closer to 70% brightness, which means dimming saves more than most people expect. |
How do I set up voice-controlled lighting?Choose a protocol that exposes devices natively to the major assistants – Zigbee and Matter do so directly; DALI and Casambi require a gateway. Then name scenes rather than channels, because evening is a far more useful voice command than channel three at twenty-eight percent. Always keep a physical keypad as the primary interface: guests, children and anyone whose hands are full cannot use voice or an app reliably. |
How can I customise lighting scenes for different moods?Programme five to eight scenes covering morning, day, afternoon, evening, entertaining, cinema, reading and night. Set each one after dark, in the actual room, with the client present: the commonest commissioning error is programming scenes in daylight. Vary not just intensity but the ratio between layers: an entertaining scene is accent-dominant, a reading scene is task-dominant, and a cinema scene is almost entirely bias light. |
What are the most energy-efficient lighting options for a living room?High-efficacy COB or SMD LED strip in an aluminium profile, dimmed, on a quality driver. A fully layered architectural scheme for a 25 m² living room draws 45-65 W installed and typically costs €10-25 per year to run. The efficiency comes from three compounding factors: low installed power, low average dimmed output and long service life, not from the headline lumens-per-watt figure alone. |
How long do LED strips last?Quality strips in a properly heat-sunk aluminium profile are typically rated L70 at 50,000 hours or more: roughly 27 years at five hours a day. Installed without a profile, expect a 50-70% reduction. Covered by insulation or coiled, expect failure within months. In practice the driver, not the LED, usually determines service life, which is the strongest argument for specifying quality drivers and locating them where they can be reached. |
What diffuser should I choose?Opal for any visible line: it transmits 65-78% and produces a genuinely uniform luminous surface. Deep opal for trimless ceiling slots viewed directly from below. Frosted for concealed coves where some light loss is unwelcome. Micro-prismatic for task lines where glare control matters and transmission should stay high. Clear only where the strip is completely hidden. Every step toward smoothness costs light; compensate with strip output rather than accepting visible dots. |
How far below the ceiling should a cove be?150–250 mm in a standard-height room. Closer than that and the light strikes the ceiling at too acute an angle, producing a bright scalloped band near the wall and a dark centre. The upstand that conceals the profile must also sit at least 50 mm above the emitting surface so the strip is invisible from every seated position – check this physically before the plasterboard is closed. |
What is the difference between wall washing and wall grazing?Distance. Wall washing places the source 250-400 mm from the wall and produces an even, gradient-free vertical illumination that raises perceived room size. Wall grazing places the source 50-100 mm from the wall so light strikes at an acute angle and every surface irregularity casts a long shadow, dramatising texture. Graze texture, wash flat surfaces. Grazing a flat painted wall will expose every plastering defect in it. |
Can LED profiles be used on curved surfaces?Yes, using dedicated flexible profiles. Flexible surface and plasterboard references bend to follow a radius while still providing heat sinking and diffusion that bare strip cannot. Pair them with COB strip, which tolerates gentle curvature better than SMD. Never bend a strip around a sharp internal corner, cut it and join the two runs with a short flying lead and a connector. |
Is it safe to install LED strip lighting myself?The low-voltage side is inherently low risk, and connecting SELV strips to a plug-connected driver is within the competence of a careful DIY installer. The mains side is not: anything that alters the fixed installation requires a qualified electrician and, in most European jurisdictions, certification. Observe the thermal rules regardless of who installs: profile mandatory above 5 W/m, no insulation over profiles, never power a coiled reel. |
How do I choose a ceiling light for my living room?Decide first whether you want a fitting or an effect. If you want an effect, specify a concealed profile and skip the fitting entirely. If you want a fitting as a focal object, choose it on proportion, material and the quality of light it emits at low output, not on lumen count: because a concealed ambient layer should be doing the illuminating. Check the diameter against the room: a pendant should read as deliberate at the scale of the space, not as an accessory. |
What lighting works best for an open-plan living, dining and kitchen space?Zone independently (minimum three dimmable groups, six to eight is better) and run one continuous ambient thread, such as a single cove or slot, through all three zones to tie the volume together. Light the boundaries with grazing and washing so the open plan acquires visual edges. Consider 48 V for a long continuous run to avoid multiple feed positions, and vary CCT between kitchen and lounge deliberately rather than accidentally. |
What is the best lighting for a room with dark walls?More of it, and differently distributed. A deep green or oxblood wall may reflect only 10-15% of incident light against 80% for white, so increase the lumen budget by 40-60% and shift the emphasis decisively toward accent and task rather than ambient: in a dark room, ambient light is largely absorbed. Black profiles with deep-opal diffusers, a 2400-2700 K colour temperature, high contrast and pools of light rather than washes will make a dark scheme sing. |
How do I light artwork in a living room?Aim for three to five times the surrounding luminance (typically 200–400 lx on the piece) from an angle of roughly 30° from vertical to avoid both glare on glazing and the viewer’s own shadow. Use CRI Ra>93 for anything where colour fidelity matters. Cap illuminance at 150 lx for works on paper, textiles and other light-sensitive media. LED’s negligible UV output is one reason galleries converted so rapidly. |
What does a complete living room lighting scheme cost?Indicatively, at European trade material rates plus installation: an entry-level retrofit scheme for a 25 m² room is roughly €700-1,125 installed; a mid-range scheme with plasterboard work, five channels and a proper control system is €2,750-4,000; a premium trimless architectural scheme with tunable white and DALI is €9,500-14,000. The mid-range tier delivers roughly 85% of the premium result for about 40% of the cost, which is why it is the recommended specification for most projects. |
If the budget is cut, what should I sacrifice first?In order: decorative fittings (addable later at any time), then full tunable white in favour of fixed 2700 K, then the number of accent runs, then trimless plaster-in details in favour of surface-mounted, then channel count. Never cut strip CRI, driver quality, diffuser quality or the seated-glare detail: those are the components that cannot be upgraded without reopening the ceiling, and they are the ones that determine whether the room looks designed or cheap. |
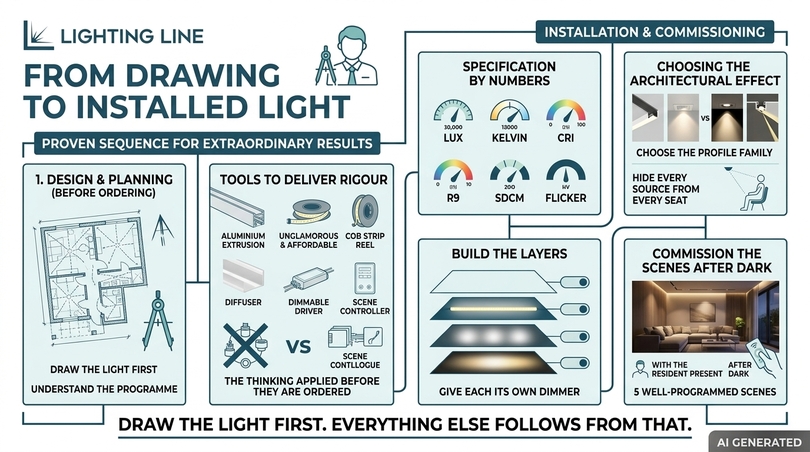
Bringing it together: from drawing to installed light
If this guide has a single thesis, it is that living room lightings deserve the same rigour an architect brings to structure, acoustics and thermal performance and that the tools to deliver that rigour are now unglamorous, affordable and available from a single catalogue. An aluminium extrusion, a reel of COB strip, a diffuser with the right transmission curve, a driver that dims cleanly and a controller with five well-programmed scenes: that is the whole kit. What separates an ordinary room from an extraordinary one is not the components but the thinking applied before they are ordered.
The sequence that reliably produces good work is the one this article has followed. Understand the programme. Draw the light before choosing the fittings. Build the four layers and give each its own dimmer. Specify in numbers (lux, kelvin, CRI, R9, SDCM, flicker) rather than in adjectives. Choose the profile family for the architectural effect you want, not for the strip you happen to have, hide every source from every seat. Then commission the scenes after dark, with the person who will live there sitting in the room.
Draw the light first. Everything else follows from that.
This article was developed with the support of artificial intelligence and subsequently reviewed, corrected, and validated by the LightingLine.eu technical team, which guarantees its reliability and compliance with official sources.