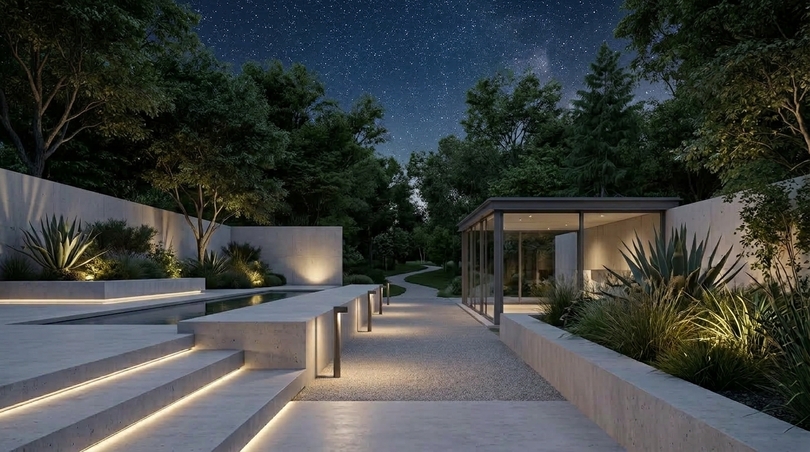
Garden lightings are no longer an accessory bolted on at the end of a landscape project: they are the fourth dimension of outdoor architecture, the one that decides what the garden becomes after sunset. For roughly half of the year in most of Europe, the garden is seen more often in darkness than in daylight: from a kitchen window at 7pm in November, from a terrace at 10pm in July, from a driveway at 6am in February. A planting scheme that is exquisite at noon can dissolve into a black mirror at night, while a modest courtyard, lit with intelligence, can read as the most sophisticated room of the house. This guide is written for the people who make that decision: landscape architects, garden designers, specifiers, professional gardeners, developers and the technically curious homeowner who wants the same result without guessing.
What follows is a complete design methodology, not a product list. We move from photometric first principles – lumens, lux, colour temperature, CRI, beam geometry, glare control through the linear lighting revolution that replaced bulky garden spike fixtures with slim aluminium extrusions and continuous LED lines, to three fully costed schemes for small, medium and large gardens at entry, mid and premium budget levels. Every technical recommendation is tied to hardware that actually exists and can be specified today from the Lighting Line aluminium profile catalogue and the customisable LED strip range.
The core argument of this guide is simple and, in our experience, still contrarian: the best garden lighting is the lighting you never see. You see the lit bark of a multi-stem birch, the grazed texture of a rendered wall, the glow under a floating step, the reflection of a warm line in still water. You do not see the fitting, the cable, the driver or the glare. Achieving that discipline is a matter of specification, not of budget – and linear LED systems, correctly detailed, make it achievable at every price point.
In this article…
- Why garden lightings became an architectural discipline
- The 2026 outdoor lighting market: data, trends and what clients now expect
- The architect’s method: the five-layer model of garden lighting design
- Photometric fundamentals: lumens, lux, kelvin, CRI, beam and glare
- The linear revolution: why profiles and strips replaced point fittings
- IP ratings, materials and durability decoded
- The lighting line profile system mapped to garden applications
- Choosing the LED strip: COB vs SMD, voltage, CRI, CCT and power
- Electrical design: 24V SELV, voltage drop, drivers and cabling
- Three gardens, nine schemes: small, medium and large at three budget tiers
- Style directions: six contemporary languages of garden light
- Element by element: paths, steps, decking, walls, pergolas, water, trees
- Energy, running costs and return on investment
- Light pollution, ecology, neighbours and regulations
- Smart control: scenes, astro timers, DALI, Casambi and home automation
- Lighting for photography, social content and evening hospitality
- Installation, commissioning and troubleshooting
- Maintenance, lifecycle and warranty strategy
- The specification checklist and schedule template
- Three project walkthroughs from brief to switch-on
- Twelve mistakes that ruin otherwise good garden lightings
- Frequently asked questions
- Glossary of garden lighting terms
- Specifying light that lasts twenty years
1. Why garden lightings became an architectural discipline
Thirty years ago, garden lighting in most European homes meant one thing: a bulkhead over the back door and, if the owner was ambitious, a pair of solar stakes flanking a path. The light was functional at best and hostile at worst: a flat white flood that erased depth, flattened planting and irritated the neighbours. What changed was not taste but technology: the arrival of efficient, dimmable, long-life, low-voltage LED sources small enough to hide inside a 7mm aluminium channel made it possible, for the first time, to draw with light instead of pointing at things with it.
That shift matters because it brought outdoor lighting into the same conceptual territory as architecture. A wall is not simply a wall once you can graze it with a continuous 2700K line from a recessed channel at its base: it becomes a surface with texture, weight and rhythm. A flight of steps is not simply circulation once each riser carries a 4mm line of warm light: it becomes a sculptural element that reads from fifty metres. Linear light describes form, while point light merely announces position and describing form is what architects and landscape architects are trained to do.
The three jobs garden lightings must do simultaneously
Every scheme we have ever specified has to satisfy three briefs at once, and the tension between them is where design skill lives. Getting one right at the expense of the others is the single most common failure in residential outdoor lighting.
The first job is safety and navigation: people must be able to walk from the gate to the door, from the terrace to the lawn, from the pool to the changing room, without stumbling. This is a question of vertical illuminance on hazards, of consistent light levels that do not force the eye to adapt every three metres, and of eliminating the deep shadows that a badly aimed spotlight creates immediately behind an obstacle.
The second job is atmosphere and hospitality: the garden at night should feel like an extension of the interior – warm, layered, generous, calm. This is where most standard outdoor lighting fails catastrophically: 6000K floodlights on PIR sensors produce the atmosphere of a petrol station forecourt. Atmosphere requires low levels, warm colour, high colour rendering, contrast, and above all restraint.
The third job is architectural expression: the lighting should reveal the design intent of the garden: the axis, the framed view, the specimen tree, the change of level, the boundary that should recede and the wall that should advance. A garden lighting scheme is fundamentally an editing exercise: deciding what disappears is as important as deciding what glows.
Why linear LED systems answer all three
Aluminium profiles with LED strips are unusual in that they serve all three briefs with a single family of components. A walkable floor-recessed channel along a path edge provides navigation without glare. The same channel, dimmed to 15% and run at 2700K, provides atmosphere. And because it follows the geometry of the path exactly, it expresses the architecture of the garden rather than interrupting it.
Compare this with the conventional spike-spotlight approach: a spike spot does one job: it puts a cone of light on an object. It cannot describe a line, it protrudes into planting, it is knocked out of alignment by a lawnmower or a dog, its cable is a trip hazard, and its visible body is a foreign object in a designed landscape. There are moments when a spot is exactly right (uplighting a mature tree canopy, for example) but as the backbone of a scheme it is a blunt instrument.
Who this guide is written for
| Profile | Primary objective | Priority sections |
|---|---|---|
| Landscape architect | Elegant, functional, energy-efficient exteriors that enhance the planting design | 3, 4, 7, 11, 12, 19 |
| Homeowner with a garden | A welcoming, atmospheric garden for summer evenings and gatherings | 3, 10, 12, 13, 15, 22 |
| Developer / investor | High-quality outdoor lighting that raises property value and differentiates the asset | 2, 10, 13, 15, 20 |
| Lifestyle content creator | Photogenic, controllable evening scenes for photography and video | 4, 11, 15, 16 |
| Professional gardener / installer | Durable, efficient, low-callback systems clients will not complain about | 6, 9, 17, 18, 21 |
| Electrical contractor | Compliant, well-documented, easily commissioned installations | 6, 9, 14, 17, 19 |
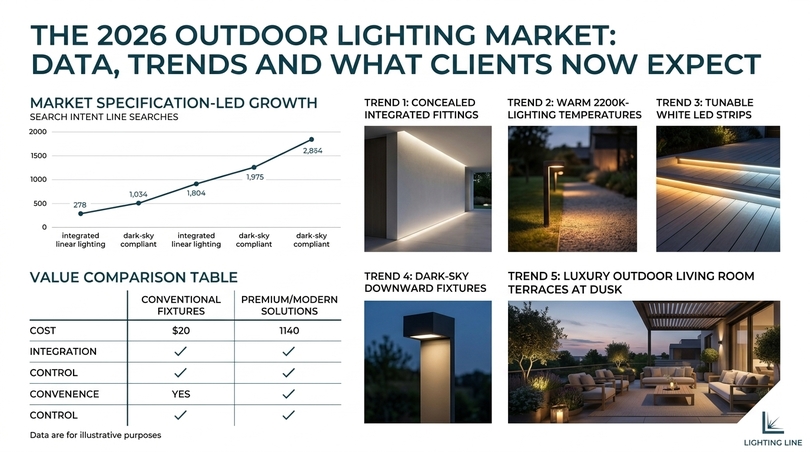
2. The 2026 outdoor lighting market: data, trends and what clients now expect
Before discussing design, it is worth establishing the commercial and behavioural context in which garden lightings are now specified. The category has moved from a low-consideration impulse purchase to a planned capital item within landscape budgets, and the data behind that shift explains why clients arrive with far more specific expectations than they did five years ago.
Search demand: what people actually look for
Analysis of European search behaviour across the outdoor and garden lighting cluster reveals a market split between two very different intents: the first group is shopping, the second group is specifying.
| Search theme | Indicative monthly volume | Competition (KD) | Dominant intent |
|---|---|---|---|
| LED strip lights | 60,500 | High (56) | Informational / transactional |
| Outdoor lighting | 33,100 | High (52) | Transactional |
| Garden lightings / garden lights | 18,100 | Medium (40–70) | Informational |
| Solar garden lights | 12,100 | High (64) | Informational |
| Outdoor lighting for gardens | 8,100 | Medium (54) | Commercial |
| Uplighting | 8,100 | Low (22) | Transactional |
| LED lighting profiles | 3,600 | Low (32) | Transactional / specification |
| Garden lighting ideas | 2,900 | Medium (48) | Informational |
| Driveway lighting | 1,900 | Low (31) | Transactional |
| Low voltage garden lights | 1,000 | Low (27) | Specification |
| Contemporary landscape lighting | 1,300 | Low (29) | Transactional |
The strategic reading of this table is that the specification-led segment is under-served.
Terms with a difficulty score below 35 and a cost-per-click above €1.00 – “led lighting profiles” at €1.43, “profile lighting” at €1.51, “led profile” at €1.63 – indicate buyers with high commercial intent and comparatively little authoritative content addressing them. That is precisely the audience an architect-grade guide should serve, and it is the audience most likely to convert from an informational visit into a project enquiry.
The five structural trends shaping garden lightings in 2026
Trend one: the disappearance of the fitting.
Across contemporary landscape practice the visible luminaire is in retreat. Recessed, concealed, integrated and grazing solutions dominate award-winning schemes. This is a direct driver of demand for aluminium extrusions, walkable channels and low-profile wall details.
Trend two: warm and warmer.
The market has decisively rejected cool white outdoors. Specification has settled around 2700K as the residential default, with 2200K (a candle-like amber) emerging strongly for planting, water and hospitality-influenced schemes. 3000K remains common for architectural surfaces and stone; 4000K is now largely restricted to functional and security applications.
Trend three: tunable and dynamic white.
CCT strips that shift between roughly 2700K and 6500K allow a single installation to serve a warm dinner scene and a cool task scene. Combined with dimming, this collapses what used to require two separate circuits into one.
Trend four: dark-sky consciousness.
Ecological awareness and, increasingly, local guidance have pushed designers toward downward-directed, shielded, dimmed and time-limited schemes. Curfew timers that drop the garden to 10% after 23:00 are becoming a standard specification line rather than an eccentricity.
Trend five: the outdoor room as hospitality space.
Post-pandemic investment in outdoor kitchens, covered pergolas, fire features and all-season terraces has extended garden use into spring and autumn evenings. Lighting is the enabling technology for that extension: a terrace without considered light is unusable after 18:00 in October, and clients now understand this instinctively.
What garden lighting does to property value and perception
Investors and developers ask a legitimate question: does this earn its cost? The honest answer is that outdoor lighting rarely appears as a discrete line in valuation methodology, but it consistently influences the two things that actually drive transaction outcomes: perceived quality and time on market. A property photographed at dusk with a coherent lighting scheme presents as a different asset class from the same property photographed flat at midday, and dusk photography has become standard practice at the premium end of the market precisely because it works.
| Effect | Mechanism | Who benefits most |
|---|---|---|
| Improved first impression | Dusk and evening kerb appeal; facade and entrance legibility | Vendors, developers, short-let operators |
| Extended usable hours | Terrace and outdoor kitchen usable from 17:00 in winter | Owner-occupiers, hospitality |
| Perceived security | Occupied appearance, eliminated hiding shadows | All, particularly second homes |
| Marketing differentiation | Evening photography and video assets | Developers, agents, creators |
| Lower running cost vs legacy | LED linear at 6–11W/m replaces halogen floods at 150W | All |
| Reduced maintenance calls | IP67 sealed strips in anodised channels vs lamped fittings | Landlords, facilities managers |
The counter-argument deserves equal space. Over-specified garden lightings can reduce value: an aggressive, cold, over-lit garden reads as institutional; a scheme with forty visible fittings reads as cluttered; and a system built from incompatible low-quality components creates a maintenance liability that a surveyor will flag. Restraint and component quality, not quantity, are what convert lighting spend into perceived value.
Key takeaway: garden lightings succeed or fail on three simultaneous jobs – safe navigation, evening atmosphere and architectural expression – and linear LED systems are the only hardware family that answers all three with a single component ecosystem.
3. The architect’s method: the five-layer model of garden lighting design
Ask ten designers how they approach a garden lighting scheme and you will get ten answers, but the good ones all share a structure: they never begin with fittings. They begin with a hierarchy of intentions, translate that hierarchy into layers of light, and only then choose hardware capable of delivering each layer. The five-layer model set out below is the framework we use on every project, from a four-metre Milanese courtyard to a two-hectare estate, and it scales without modification.
The virtue of a layered method is that it produces contrast. A garden lit to a uniform level is a garden with no depth: the eye has nothing to prioritise, and the scheme feels simultaneously bright and dull. Contrast ratios between three and ten to one between the brightest and darkest designed elements are what produce the sense of drama and calm that clients describe as “expensive”.
Layer one: circulation light
Circulation light answers a single question: can I move safely? It covers paths, steps, ramps, decking edges, thresholds, gates and driveways. It should be the lowest-drama layer in the scheme and, counter-intuitively, often the lowest in output. The human eye adapted to darkness needs remarkably little light to navigate – 3 to 10 lux on a path surface is entirely sufficient if it is uniform and glare-free. The failure mode is not insufficient light; it is glare, which destroys dark adaptation and makes everything beyond the lit zone appear black.
The linear solution is decisive here.
A continuous, recessed, downward-emitting line along a path edge produces even illuminance with no visible source. A 20x11mm walkable floor-recessed aluminium profile set flush into paving delivers exactly this, and because it is rated for foot traffic it can be positioned within the walking surface rather than beside it. For wider terraces, the 25x11mm walkable version offers a broader aperture and accepts a wider PCB for higher output.
Layer two: anchor light
Anchor light establishes the composition. It is the two, three or four elements in the garden that the eye should find first: a specimen tree, a water feature, a sculptural wall, a framed doorway. Anchors are the only layer in which real brightness is justified, and even here the target is contrast rather than absolute level. In a garden where circulation sits at 5 lux, an anchor at 30 to 50 lux will feel powerful.
The discipline of anchoring is subtraction. A garden with one anchor is dramatic, a garden with twelve anchors is a car park. When reviewing a draft scheme, we count the anchors and delete until fewer than five remain. Every anchor you remove makes the remaining ones stronger.
Layer three: surface and texture light
Surface light is where linear systems are unmatched and where most schemes discover their character. Grazing (placing a light source within 50 to 150mm of a vertical surface and washing it at an acute angle) reveals the texture of the material with extraordinary clarity. Rendered walls become velvet, split-face stone becomes a relief sculpture, corten steel becomes molten, timber cladding reveals every grain.
The distance between source and surface controls the entire effect and is the single most consequential dimension in a garden lighting drawing. Too close and the light scrapes so hard that it produces a hot band at the base and darkness above. Too far and the texture flattens into a wash. The table below gives the starting points we use on site before final adjustment.
| Surface | Offset from wall | Effect produced | Recommended CCT |
|---|---|---|---|
| Smooth render / plaster | 120–200 mm | Soft gradient wash, no texture emphasis | 2700K |
| Split-face or dry stone | 40–80 mm | Strong relief, deep shadow in joints | 2700–3000K |
| Brick | 60–100 mm | Mortar-line rhythm, warm tone enhancement | 2700K |
| Corten / weathering steel | 80–150 mm | Amplified rust colour and sheen | 2200–2700K |
| Timber cladding | 50–100 mm | Grain definition, board-joint rhythm | 2700K |
| Fair-faced concrete | 100–180 mm | Formwork pattern, monolithic reading | 3000K |
| Hedging (yew, beech, laurel) | 200–400 mm | Depth and volume, avoids leaf burn-out | 2700K, dimmed |
Layer four: ambient and fill light
Ambient light is the quiet layer that stops a scheme feeling like a series of disconnected spotlights floating in a void. It is the reflected glow from a lit wall, the light spilling from the house through glazing, the low illuminance under a pergola canopy, the moonlighting effect of a downlight concealed high in a tree. Ambient light is what makes people linger, and it is almost always the layer that is missing when a client says the garden “feels cold”.
Practically, ambient fill is achieved with very low output, very wide distribution and warm colour. A 6W/m COB strip at 20% dimming inside a pergola beam, or a single grazed boundary wall, will lift the whole space. Bounce is your friend: light a pale surface and let it become the source.
Layer five: accent, event and dynamic light
The fifth layer is occasional. It covers the party scene, the seasonal scene, the colour wash for an event, the RGB or RGB+CCT run that spends most of the year at 2700K and becomes something else for one evening in June. Dynamic light should never be the base scheme – a garden permanently bathed in blue is a novelty that ages in a week – but as a controllable overlay it is enormously valuable and it is the layer that clients enjoy most.
Modern RGB+CCT strips solve the historic objection that colour-capable products produced poor white. A contemporary RGB+CCT run delivers a genuine high-CRI white at 2700K for everyday use and the full gamut on demand, which means the party layer no longer requires separate hardware.
Assembling the layers: a worked hierarchy
| Layer | Target illuminance | Typical output | Control | Hardware family |
|---|---|---|---|---|
| 1. Circulation | 3–10 lux on surface | 4–7 W/m | Astro timer + curfew dim | Walkable floor-recessed profiles |
| 2. Anchor | 30–50 lux on object | 10–15 W/m or spot | Scene-controlled, dimmable | Recessed / architectural profiles, uplights |
| 3. Surface | 15–40 lux on plane | 6–11 W/m | Dimmable, scene-linked | Wall and corner profiles |
| 4. Ambient fill | 1–5 lux general | 4–6 W/m at 20–40% | Always-on, deeply dimmed | Surface and suspension profiles |
| 5. Accent / dynamic | Variable | 10–19 W/m | App or scene trigger | RGB / RGB+CCT strips in any profile |
Key takeaway: design garden lightings in five layers – circulation, anchor, surface, ambient fill and dynamic accent – and resist the urge to light everything. Contrast ratios of three to ten to one between the brightest and darkest designed elements are what make a garden feel considered.
4. Photometric fundamentals: lumens, lux, kelvin, CRI, beam and glare
Clients and contractors routinely conflate watts, lumens and lux, and the resulting specifications are either dramatically over-lit or unusable. This section is the technical spine of the guide: understand these six quantities and you can read any datasheet, predict any result and defend any specification. Everything that follows in this article assumes fluency with these terms, so it is worth reading even if the subject feels familiar.
Lumens versus lux versus watts
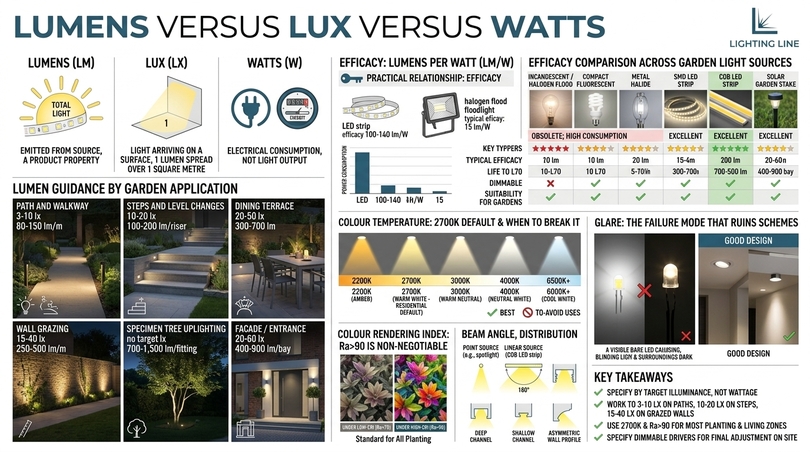
Lumens (lm) measure the total light a source emits. It is a property of the product, printed on the box, independent of where you put it. Lux (lx) measure the light arriving on a surface: one lux is one lumen spread over one square metre. Lux is a property of the design, not the product. Watts (W) measure electrical consumption and tell you nothing at all about light output except in combination with efficacy.
The practical relationship that matters is efficacy, expressed in lumens per watt (lm/W). A quality contemporary LED strip delivers between 100 and 140 lm/W. A halogen garden flood delivered roughly 15 lm/W. This ratio (roughly eight to one) is why a full linear garden scheme frequently consumes less electricity than the two halogen floods it replaces.
| Source | Typical efficacy | Life to L70 | Dimmable | Suitability for gardens |
|---|---|---|---|---|
| Incandescent / halogen flood | 12–18 lm/W | 2,000 h | Yes | Obsolete; heat and consumption prohibitive |
| Compact fluorescent | 50–65 lm/W | 8,000 h | Rarely | Poor cold-start behaviour outdoors |
| Metal halide | 75–95 lm/W | 15,000 h | No | Large landscape only; long restrike |
| SMD LED strip | 90–130 lm/W | 30,000–50,000 h | Yes | Excellent, all layers |
| COB LED strip | 100–140 lm/W | 30,000–50,000 h | Yes | Excellent; seamless line, no dotting |
| Solar garden stake | Not comparable (storage-limited) | Battery-limited, 1–3 yrs | No | Decorative marker only |
How many lumens does a garden actually need?
This is the most frequently asked technical question in the category, and the most frequently answered badly. There is no single lumen figure for a garden, because gardens are not rooms and the correct answer depends on the surface area being lit, the reflectance of the material and the adaptation state of the eye. What can be given is a defensible per-application table, which is what a specifier actually needs.
| Application | Target lux | Practical lumen guidance | Notes |
|---|---|---|---|
| Path and walkway | 3–10 lx | 80–150 lm per linear metre | Uniformity matters more than level |
| Steps and level changes | 10–20 lx | 100–200 lm per riser or nosing | Light the tread, never the eye |
| Dining terrace | 20–50 lx on table | 300–700 lm over the table zone | Dimmable is essential |
| Outdoor kitchen worktop | 150–300 lx | 800–1,500 lm over the run | Task layer, separately switched |
| Wall grazing (2.5m high) | 15–40 lx | 250–500 lm per linear metre | Depends heavily on surface reflectance |
| Specimen tree uplighting (6–10m) | – | 700–1,500 lm per fitting, 2–3 fittings | Narrow beam; aim through the canopy |
| Small tree / large shrub | – | 200–400 lm per fitting | One fitting is usually enough |
| Driveway | 5–15 lx | 120–250 lm per linear metre | Avoid pole-mounted glare toward road |
| Pool surround | 10–20 lx | 150–250 lm per linear metre | IP67 minimum; avoid reflected glare |
| Facade / entrance | 20–60 lx | 400–900 lm per bay | Vertical illuminance governs perception |
The single most useful rule of thumb we can offer is this: start at half the output you think you need, install it, look at it after dark, and then decide. Practically every garden we have surveyed as a remedial project was over-lit, never under-lit. Specifying dimmable drivers from the outset makes this correction free.
Colour temperature: the 2700K default and when to break it
Correlated colour temperature, measured in kelvin, describes whether light appears warm or cool. In gardens, warmth is almost always correct, because warm light flatters skin, complements the chlorophyll green of foliage, harmonises with natural materials and signals relaxation rather than task. The market has consolidated around 2700K as the residential outdoor standard and there is good reason for that consensus.
| CCT | Character | Best applications | Avoid for |
|---|---|---|---|
| 2200K | Amber, candle-like, very low blue content | Planting, water, hospitality terraces, dark-sky sensitive sites, near bedrooms | Task areas; renders whites yellow |
| 2700K | Warm white, the residential default | Paths, terraces, walls, trees, pergolas – almost everything | Nothing in a garden context |
| 3000K | Warm neutral, slightly crisper | Stone, concrete, pale render, contemporary architecture, pool surrounds | Soft planting schemes; can read clinical |
| 4000K | Neutral white | Security, workshops, garages, service areas | Any atmospheric or planting application |
| 6000–6500K | Cool white / daylight | Task inspection only | Gardens generally; causes glare and ecological disruption |
| CCT tunable 2700–6500K | Adjustable | Outdoor kitchens, multi-use terraces, studios and content spaces | Nothing, but costs more and needs a compatible controller |
The honest counter-position: some architects working in a strongly modernist idiom – white render, glass, polished concrete, clipped geometric planting – find 2700K excessively yellow against those materials and specify 3000K throughout. This is a legitimate aesthetic position, not an error. What is an error is mixing 2700K and 4000K in adjacent zones, which the eye reads instantly as a fault.
Colour Rendering Index: why Ra>90 is non-negotiable in planting
CRI describes how faithfully a light source renders colour compared with a reference. A garden is the most colour-critical environment in domestic lighting – it is filled with subtle greens, silvers, purples and bronzes that low-CRI light destroys. Under a CRI 70 source, a silver-leaved artemisia reads as dirty grey, a purple heuchera reads as brown, and a copper beech loses its entire reason for being in the scheme.
The practical threshold is Ra>90. The COB LED strip range is built around CRI Ra>90 as standard, with Ra>93 options for the most demanding applications. The cost premium for high CRI is small: the visual penalty for low CRI is permanent. There is no situation in a designed garden where we would knowingly specify below Ra>90 for any light falling on planting, skin or natural material.
Beam angle, distribution and the physics of linear light
Point sources have beam angles; linear sources have distributions. This distinction is more consequential than it sounds. A spotlight with a 24° beam produces a defined cone with a hot centre and a falling edge. A COB LED strip produces a near-Lambertian 180° distribution – an even, dotless line of light that the diffuser and profile then shape into whatever geometry the detail requires.
This is why the profile matters as much as the strip. A deep channel with a frosted diffuser and no reflector produces a narrow, controlled downward wash. A shallow channel with a clear cover produces a broad spread. An asymmetric wall profile throws light in one direction only, which is exactly what you want for a boundary wall you wish to graze without spilling into a neighbour’s bedroom. The extensive diffuser range is therefore a design tool, not an accessory.
Glare: the failure mode that ruins otherwise good schemes
Glare is the single most common defect in residential garden lightings, and it is almost always caused by a source being visible from a normal viewing position. The eye adapts to the brightest thing in its field of view; if that thing is a bare LED at 400 lumens, everything else in the garden goes black, and the scheme you carefully designed becomes invisible.
The remedies are structural, not cosmetic. Recess the source below the sightline. Use a deep profile so that the aperture shields the LED from oblique angles. Specify a frosted or opal diffuser rather than clear. Aim uplights so the beam does not cross a seating position. Where a source must be near eye level, dim it hard – a 6W/m strip at 20% is atmospheric; the same strip at 100% at eye level is an assault.
A practical test we apply before signing off any scheme: sit in every seat, stand at every door, and walk the full circulation route after dark. If you can see a light source directly from any of those positions, the detail is wrong, not the product.
Key takeaway: specify garden lightings by target illuminance, not by wattage. Work to 3-10 lux on paths, 10-20 lux on steps and 15-40 lux on grazed walls, at 2700K and CRI Ra>90, and specify dimmable drivers so the final level can be set on site after dark.
5. The linear revolution: why profiles and strips replaced point fittings
The shift from discrete luminaires to continuous linear systems is the defining technical story of the last decade in architectural lighting, and it arrived outdoors later than indoors only because of ingress protection. Now that IP67 silicone-encapsulated strips and waterproof aluminium channels are mature, mass-produced and affordable, the case for building a garden scheme around linear light rather than around fittings is close to overwhelming. This section sets out that case honestly, including the situations where a point fitting remains the better answer.
What a linear system actually Consists Of
Designers new to the category sometimes imagine an LED strip is a single product. It is in fact a five-component assembly, and specification failure at any one point compromises the whole. Understanding the anatomy is the precondition for specifying well.
| Component | Function | Failure if wrong | Catalogue reference |
|---|---|---|---|
| Aluminium profile | Structure, heat sinking, optical control, mechanical protection | Overheating, premature lumen depreciation, visible strip | Profiles |
| Diffuser | Hides dots, shapes distribution, controls glare | Visible dotting, harsh glare, cheap appearance | Diffusers |
| LED strip | Light generation: CCT, CRI, output, IP rating | Wrong colour, poor rendering, water ingress | LED Strips |
| End caps | Sealing, finish, cable entry | Water ingress at the most vulnerable point, unfinished look | End caps |
| Mounting brackets | Fixing, alignment, thermal separation from substrate | Sagging, misalignment, difficult maintenance | Mounting brackets |
| Connectors and driver | Power delivery and electrical safety | Voltage drop, flicker, corrosion, failure | PCB connectors |
The aluminium profile as a thermal machine
Designers often treat the extrusion as a cosmetic housing. It is not. An aluminium profile is first and foremost a heat sink, and the junction temperature of the LEDs is the primary determinant of how long the installation will last and how quickly its light output will decay. A strip run bare, stuck to a timber joist, can reach junction temperatures thirty degrees higher than the same strip mounted in a properly sized aluminium channel, and that difference can halve useful life.
The rule of thumb is straightforward: for continuous runs above 10W/m, use a profile with a substantial aluminium cross-section and ensure the strip is in full contact with the base. For the highest-output strips (15.5W/m and above) specify a deeper extrusion and avoid enclosing the profile inside insulating materials. Outdoors this is less critical than indoors because ambient temperatures are lower, but a south-facing terrace in a Mediterranean July is not a cool environment.
The continuous line as a compositional device
Beyond the technical, the linear system offers something no point fitting can: the ability to draw. A line of light follows a path, traces a retaining wall, underscores a floating step, outlines a pergola beam, defines the edge of a pool. Because the line is uninterrupted, the eye reads it as geometry rather than as a series of objects, and geometry is the language landscape architecture already speaks.
This is why COB technology has been so consequential outdoors. Traditional SMD strips place discrete diodes at intervals, and behind a shallow diffuser those intervals are visible as dots. A COB strip – chip-on-board, with a continuous phosphor layer – produces a genuinely seamless line even behind a clear cover and at close viewing distance. The COB strip at 480 LEDs per metre with CRI Ra>90 and 120 lm/W is representative of what the technology now delivers: high efficacy, high rendering and a perfectly uniform line.
When a point fitting is still the right answer
Intellectual honesty requires stating clearly where linear systems are the wrong tool. Tree uplighting is the clearest case: throwing light 8 metres into a canopy requires concentrated intensity and a narrow beam, which is a job for a directional in-ground or spike uplight, not a diffuse linear source. Long-throw facade lighting and security floodlighting are similar. Feature down-lighting from a tree or high structure ( “moonlighting”) also needs a controlled optic.
The productive conclusion is not “linear replaces everything” but “linear forms the backbone and points provide the accents”. In practice, our schemes run roughly 70–80% linear metreage for circulation, surface and ambient layers, with a small number of directional fittings reserved for anchors. That ratio inverts the traditional garden lighting specification, and it is the single change that most improves outcomes.
Key takeaway: build garden lightings around continuous linear runs for roughly 70–80% of the scheme and reserve directional fittings for a small number of anchors. Linear light describes form; point light only announces position.
6. IP Ratings, materials and durability decoded
Outdoor lighting fails for three reasons: water, corrosion and heat. Every other failure mode is downstream of these. This section is the one to read twice, because durability decisions made at specification stage cannot be corrected later without excavating paving and dismantling structures. Waterproof garden lightings are not a product category; they are the result of a coherent chain of decisions from strip encapsulation through to cable gland.
Reading the IP code correctly
The Ingress Protection code has two digits. The first describes solids, the second liquids. The most common and most expensive misunderstanding in the market is that a higher second digit is always better outdoors. It is not – it is a question of exposure, not of hierarchy.
| Rating | Protection | Correct garden use | Do not use for |
|---|---|---|---|
| IP20 | None against water | Fully enclosed dry interiors only | Any external location, including covered porches |
| IP44 | Splashing water from any direction | Fully covered porches, deep soffits, sheltered pergola undersides with solid roof | Exposed rain, wall grazing, anywhere with wind-driven rain |
| IP54 | Dust protected, splashing water | Sheltered wall fixtures under overhangs | Ground-level or irrigated positions |
| IP65 | Dust tight, low-pressure water jets | Exposed walls, pergolas, fences, facades, soffits, most above-ground exterior work | Anything that can be submerged or buried |
| IP66 | Dust tight, powerful water jets | Coastal exposure, areas cleaned with pressure washers | Submersion |
| IP67 | Dust tight, temporary immersion to 1m | Ground-recessed channels, decking, paving joints, pool surrounds, planters, irrigated beds | Permanent submersion |
| IP68 | Continuous immersion | Submerged pool, pond and fountain applications only | – |
The practical specification rule for gardens: IP65 as the minimum for anything above ground, IP67 for anything at or below ground level, in paving, in decking, in planters or within two metres of a pool or irrigation head. Products such as the 2700K COB strip in an IP67 extruded silicone tube exist precisely for this condition, and the tubular silicone encapsulation is markedly more robust in service than a simple coated strip.
Can IP44 be used outside? A precise answer
This question appears constantly and deserves a careful reply rather than a slogan. IP44 can be used outside only where the fitting is genuinely sheltered from direct and wind-driven rain – under a solid roof with generous overhang, inside a fully covered porch, in a soffit that does not receive splash-back. In most European climates, “sheltered” is a much smaller category than clients assume: a pergola with slatted timber is not shelter; a wall under a 200mm overhang is not shelter in a westerly gale; and a covered porch open on three sides is marginal at best.
Our practice position is simple: we do not specify IP44 in gardens.
The cost differential to IP65 is trivial, the failure consequence is total, and the diagnostic cost of tracing a water-ingress fault in a finished landscape is many multiples of the saving. Where a client insists on reusing existing IP44 fittings under a soffit, we document the exposure assumption in writing.
Encapsulation methods for LED strips
| Method | Typical rating | Optical effect | Durability outdoors | Best for |
|---|---|---|---|---|
| Bare PCB | IP20 | Best optics, no losses | None | Interior, inside sealed profiles only |
| Top-coated silicone | IP65 | Minimal loss, slight diffusion | Good; edges remain the weak point | Walls, pergolas, soffits within profiles |
| Silicone sleeve (tube over strip) | IP65–IP67 | Slight diffusion, softens dotting | Very good | Exposed above-ground runs |
| Extruded silicone tube (co-extruded) | IP67 | Excellent diffusion, dotless | Excellent; UV and hydrolysis resistant | Ground level, paving, decking, planters |
| Full resin fill | IP67–IP68 | Some yellowing risk over time in UV | Good but rigid; cannot be cut in situ | Submerged and permanently wet applications |
A critical detail that installers miss: cutting a waterproof strip destroys its waterproofing at the cut. Any field cut must be re-sealed with the manufacturer’s end cap and silicone sealant, and the cut end must be positioned where it is protected. The most reliable approach is to plan runs so that cuts occur at accessible, dry, serviceable locations and to order strips in lengths that minimise cutting altogether, which is where custom-length manufacturing earns its keep.
Aluminium finishes, corrosion and coastal exposure
Aluminium is the correct material for garden profiles because it combines thermal conductivity, corrosion resistance, extrudability and low weight. But not all aluminium finishes behave the same outdoors, and in coastal or de-icing-salt environments the finish decision is the durability decision.
Mill-finish aluminium forms a self-protecting oxide layer and performs acceptably inland, but will dull and pit over years in salt air. Anodised aluminium adds a controlled, hard, integral oxide layer and is markedly more durable; it is our default exterior specification. Powder-coated aluminium offers colour matching to architectural metalwork and good protection provided the coating is unbroken – cut ends and drilled holes must be sealed or they become corrosion initiation sites.
| Environment | Recommended finish | Fixings | Expected service life |
|---|---|---|---|
| Inland urban / suburban garden | Anodised or mill finish | A2 stainless | 20+ years |
| Rural, high rainfall | Anodised | A2 stainless | 20+ years |
| Coastal within 5 km | Anodised, thicker coating | A4 / 316 stainless | 15–20 years with rinsing regime |
| Poolside (chlorine) | Anodised, isolated from water contact | A4 / 316 stainless | 15+ years |
| Salt-treated driveways | Anodised, drained detail | A4 / 316 stainless | 15+ years |
| Colour-matched architectural | Powder coat over pre-treatment | Matching stainless | 15+ years, sealed cut ends |
The detail that causes most failures: water management
In nine out of ten waterproofing failureswe have investigated, the strip and profile were adequately rated and the failure occurred at a junction, a cable entry, a cut end or a buried connection sitting in standing water. IP67 means temporary immersion, not permanent submersion in a channel that has become a French drain.
The design response is drainage, not higher ratings. A recessed floor channel should sit in a bed that drains – a gravel sub-base, a weep hole, a fall to one end. A wall-mounted profile should be installed with its aperture facing downward or sideways, never upward where it becomes a gutter. Cable entries should approach from below or from the side, with a drip loop so water runs away from the gland rather than into it. Design the detail so that water is never asked to sit against a seal, and the seal will never be tested.
Key takeaway: waterproof garden lightings are the product of a chain of decisions, not a single rating. Specify IP65 above ground and IP67 at or below ground, anodise the aluminium, seal every field cut, and detail the installation so water is never asked to sit against a seal.
7. The lighting line profile system mapped to garden applications
This section translates the catalogue into a specification tool. Rather than listing products, it maps profile families to the garden conditions they solve, so that a designer working on a drawing can move directly from an element to a family to a part. Every family referenced below is available in multiple sizes, lengths and finishes, and all accept the same strip and diffuser ecosystem, which is what makes system-level specification possible.
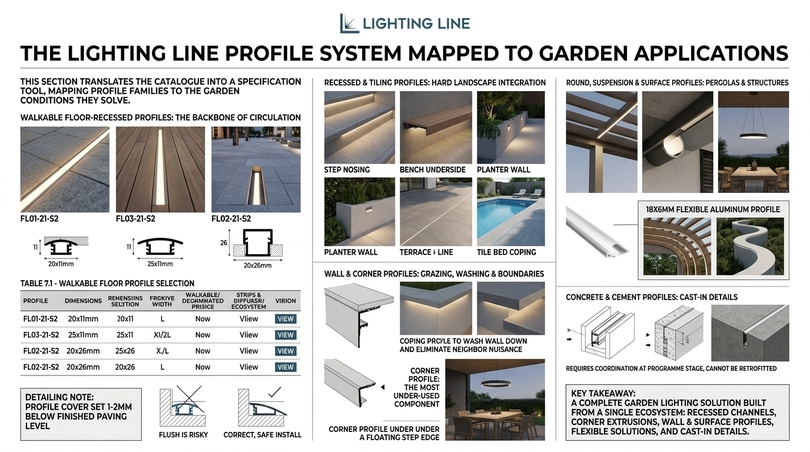
Walkable floor-recessed profiles: the backbone of circulation
The walkable floor family is, in our view, the most important single category for contemporary garden lighting, because it solves the circulation layer definitively. These extrusions are designed to be set flush into a paving build-up or decking substrate and to accept foot traffic across a reinforced cover. The result is a continuous line of light in the ground plane with no fitting visible, no trip hazard and no obstruction to maintenance machinery.
| Profile | Section | PCB capacity | Typical application | Link |
|---|---|---|---|---|
| FL01-21-S2 | 20×11 mm | Up to 10 mm | Narrow path edges, threshold lines, terrace perimeters | View |
| FL03-21-S2 | 25×11 mm | Up to 10 mm | Wider apertures, higher output paths, driveway margins | View |
| FL02-21-S2 | 20×26 mm | Up to 10 mm | Deeper build-ups, thicker paving, higher mechanical duty | View |
Detailing note: the profile should be bedded so its cover sits 1–2mm below the finished paving level. Flush is theoretically ideal but practically risky, because paving settles and a proud channel becomes a trip point and a target for mower damage. A slight recess also protects the cover from direct abrasion.
Recessed and tiling profiles: integration into hard landscape
The recessed profile family covers the broader condition of building light into a constructed element – a step nosing, a bench underside, a rendered reveal, a planter wall. For tiled and stone-clad terraces, the tiling family solves a problem that no surface-mounted fitting can: creating a light line exactly at a material junction. The waterproof floor profile for 12mm tile is designed to be incorporated into the tile bed itself, producing an integrated line at the perimeter of a terrace or around a pool coping.
Wall and corner profiles: grazing, washing and boundary treatment
The wall profile family and the corner profile family together handle the vertical dimension. Corner extrusions mount at 45° in the junction between a wall and a soffit, a fence post and a rail, or a step riser and tread, throwing light across the adjacent surface at a grazing angle with the source entirely concealed from view.
The corner profile is arguably the most under-used component in garden lighting.
Mounted at the top of a boundary wall under a coping, it washes the wall downward and keeps every lumen on your side of the boundary: an elegant technical answer to the neighbour-nuisance question. Mounted under the leading edge of a floating step, it lights the tread below and disappears completely.
Round, suspension and surface profiles: pergolas and structures
For pergolas, canopies, covered kitchens and garden buildings, the surface, round and suspension families provide the vocabulary. Surface profiles mounted along the underside of pergola beams produce ambient fill without any visible fitting. Round profiles read as a designed element in their own right where the structure is exposed. Suspension profiles allow a floating linear pendant over an outdoor dining table – provided the location is sheltered and the IP rating matches the exposure.
Where a structure is slim or curved, the 18x6mm flexible aluminium profile allows a continuous line to follow a curve: a circular terrace edge, a serpentine wall, a curved pergola rib – which rigid extrusions cannot do without segmenting.
Concrete and cement profiles: cast-in details
Where the landscape includes cast concrete – a poured seat, a retaining wall, a monolithic step block – a cast-in profile produces the most refined possible result: a light line that appears to be part of the structure because it literally is. The concrete profile family and the PVC profile for cement are formwork components: they are fixed into the shuttering, concrete is poured around them, and the aluminium carrier and strip are installed afterwards.
This detail requires coordination with the concrete contractor at programme stage and cannot be retrofitted, which makes it the clearest example of why lighting design must join a landscape project early rather than at handover.
Key takeaway: a complete set of garden lightings can be built from a single profile ecosystem – walkable floor channels for circulation, corner extrusions for grazing and step nosings, wall and surface profiles for boundaries and pergolas, flexible profiles for curves, and cast-in profiles for concrete.
8. Choosing the LED strip: COB vs SMD, voltage, CRI, CCT and power
The profile determines the geometry; the strip determines the light. A perfect detail fed by the wrong strip produces a disappointing result, and because the strip is the component most often chosen on price, it is the component most often responsible for a scheme that “looks cheap” without anyone being able to say why. This section gives a decision procedure rather than a catalogue.
COB versus SMD: the decision that sets the character
SMD strips mount individual surface-mount diodes at regular intervals on a flexible PCB. COB strips bond many small chips under a continuous phosphor layer, producing an unbroken emitting surface. The practical difference is visible dotting, beam angle and the ability to bend.
| Criterion | COB | SMD | Verdict for gardens |
|---|---|---|---|
| Light uniformity | Seamless, no dots at any distance | Dots visible without deep diffuser | COB for any visible line |
| Beam angle | ~180° Lambertian | ~120° typical | COB for washing, SMD for controlled throw |
| Cut interval | Fine (10–50 mm typical) | Coarser (25–100 mm) | COB for precise lengths |
| Bending | Bends readily along its axis | Bends but stresses solder joints | COB for curves |
| Efficacy at equal CRI | Up to ~140 lm/W | Up to ~130 lm/W | Broadly comparable |
| Colour options | Single CCT, CCT tunable, RGB, RGB+CCT | Widest range including pixel-addressable | SMD for dynamic and pixel effects |
| Cost per metre | Moderate premium | Lower entry point | COB justified where the line is seen |
Our default position: COB for every application where the light line itself is visible – step nosings, wall grazes, path channels, pergola beams, handrails. SMD where the source is deeply hidden and only its effect is seen, or where pixel-addressable dynamic effects are required. The SMD range and the COB range share the same profile ecosystem, so mixing technologies within one project creates no coordination problem.
Voltage: why 24V is the garden standard
Low-voltage strips are supplied at 5V, 12V, 24V or 48V while some mains-voltage strips run at 230V. For gardens, 24V is the correct default in the overwhelming majority of cases, and the reason is voltage drop over distance.
Voltage drop is proportional to current, and for a given power a 24V system draws half the current of a 12V system. That halves the drop and roughly doubles the usable run length before visible dimming at the far end. Gardens are, by definition, long: a 20-metre path run is unremarkable, and at 12V such a run will fade visibly unless it is injected from both ends and cabled heavily.
| Voltage | Max practical single-feed run | Safety classification | Garden verdict |
|---|---|---|---|
| 5V | 1–2 m | SELV | Addressable pixel effects only |
| 12V | 3–5 m | SELV | Short accents, avoid for path runs |
| 24V | 8–10 m (to 15 m with careful cabling) | SELV | Default choice for gardens |
| 48V | 20–30 m | SELV (upper limit) | Very long runs, large estates, driveway lines |
| 230V | 50 m+ | Mains – not SELV | Avoid in wet, accessible garden locations |
The safety argument reinforces the technical one. SELV (Separated Extra-Low Voltage) systems at 24V present no shock hazard in wet conditions, which is precisely the condition a garden guarantees. This is why 24V linear systems are, in practice, the safest garden lighting technology available and why they are so much more forgiving of imperfect installation than 230V alternatives.
Power per metre: matching output to Layer
Strip power ranges from roughly 5W/m to 40W/m. Higher is not better; higher is simply brighter and hotter. Selecting output should follow directly from the layer model set out in section 3, and in gardens the correct answer is usually far lower than instinct suggests.
| Layer / application | Recommended W/m | Approx. lm/m at 120 lm/W | Example product family |
|---|---|---|---|
| Ambient fill under pergola | 5–6 W/m | 600–720 lm/m | 480 led/m COB 6W/m IP67 |
| Path and terrace circulation | 6–8 W/m | 720–960 lm/m | 480 led/m COB 6–7.5W/m IP67 |
| Step nosing and handrail | 6–8 W/m | 720–960 lm/m | 480 led/m COB, fine cut interval |
| Wall grazing 2.0–2.5 m | 8–11 W/m | 960–1,320 lm/m | 480 led/m COB 10.5–11W/m |
| Wall grazing 3 m+ or high reflectance | 12–15.5 W/m | 1,440–1,860 lm/m | 528 led/m COB 15.5W/m |
| Outdoor kitchen task | 12–15 W/m | 1,440–1,800 lm/m | CCT tunable, high output |
| Feature / dynamic colour | 14–19 W/m | Variable by channel | RGB+CCT |
The most common specification error in this table is using wall-grazing output for path circulation. An 11W/m strip in a walkable path channel is roughly three times brighter than necessary and will produce an airstrip rather than a garden. If in doubt, specify the lower output and a dimmable driver.
Colour rendering and binning consistency
Two strips of nominally identical colour temperature from different production batches can differ visibly: one reading pink, the other green. This is a binning issue, described by the MacAdam ellipse standard. For a garden where several runs are seen simultaneously, batch consistency is as important as the nominal CCT, and it is a question to put to the supplier explicitly at order stage.
The practical mitigation is straightforward: order all strip for a project in a single batch, order 10–15% spare from that same batch and store it, and avoid mixing suppliers within a sightline. Custom-length manufacturing helps here, because a single continuous made-to-measure run eliminates both the joint and the batch question.
Tunable White, RGB and RGB+CCT in the garden
Tunable white strips such as the CCT 2700–6500K COB strip with CRI Ra>90 allow a single run to serve multiple moods. In an outdoor kitchen this is genuinely functional: 4000K for preparation, 2700K for dining. In planting areas it is largely unnecessary, because the correct answer is always warm.
RGB and RGB+CCT deserve a nuanced position. Used as a permanent state, colour in a garden is almost always a mistake – it reads as festive rather than architectural, and it destroys the colour of the planting it illuminates. Used as an occasional overlay on a scheme whose base state is high-CRI warm white, it is a legitimate and popular feature. The rule we give clients: specify RGB+CCT rather than RGB, keep the white channel as the daily default, and treat colour as an event.
Cut points, custom lengths and why they matter outdoors
Every strip can only be cut at defined intervals, from 10mm on fine-pitch COB to 125mm on some high-voltage products. Outdoors, each cut is a waterproofing liability and each joint is a potential failure point, so the ability to specify a continuous custom length is not a convenience – it is a durability strategy.
Lighting Line manufactures fully customisable strips, which allows a 7.4-metre terrace perimeter to be supplied as a single 7.4-metre run rather than as a 5m run plus a cut 2.4m section joined with a connector in a wet location. Eliminating in-ground joints is one of the highest-value decisions available at specification stage and it costs almost nothing.
Key takeaway: choose COB for any garden lightings where the light line is visible and SMD where the source is deeply concealed, work at 24V, match power per metre to the layer rather than to ambition, and order all strip from one batch with 10–15% spares.
9. Electrical design: 24V SELV, voltage drop, drivers and cabling
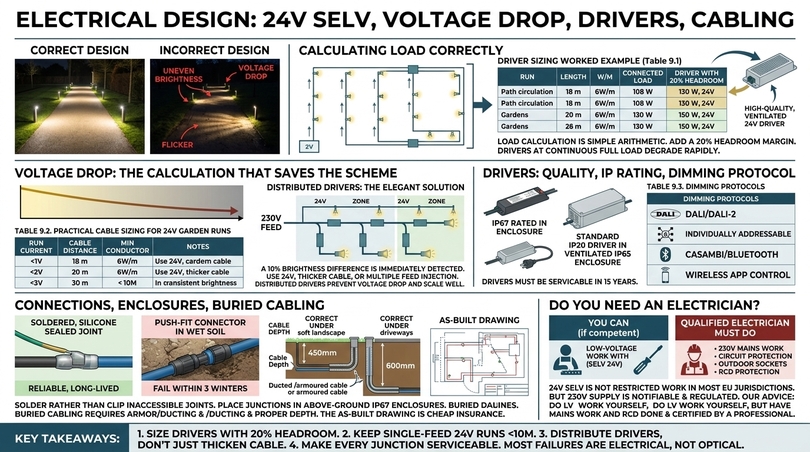
Garden lighting fails electrically more often than optically, and the failures are predictable: voltage drop causing uneven brightness, undersized drivers running hot and dying early, dimming incompatibility causing flicker, and cable joints corroding in wet ground. This section sets out the calculations and the decisions that prevent all four.
Calculating load correctly
Load calculation is simple arithmetic that is nonetheless routinely got wrong. Total the strip length in metres, multiply by the power per metre, then add a headroom margin. The margin is not optional: drivers run at continuous full load degrade rapidly, and outdoor ambient temperatures in a sealed enclosure can be high.
| Run | Length | W/m | Connected load | Driver with 20% headroom | Standard size to specify |
|---|---|---|---|---|---|
| Path circulation | 18 m | 6 | 108 W | 130 W | 150 W, 24V |
| Terrace perimeter | 12 m | 7.5 | 90 W | 108 W | 120 W, 24V |
| Boundary wall graze | 9 m | 11 | 99 W | 119 W | 120 W, 24V |
| Pergola ambient | 16 m | 6 | 96 W | 115 W | 120 W, 24V |
| Step nosings (8 risers) | 10 m | 6 | 60 W | 72 W | 75 W, 24V |
| Outdoor kitchen task | 4 m | 15 | 60 W | 72 W | 75 W, 24V |
Voltage drop: the calculation that saves the scheme
Voltage drop over a low-voltage run causes the far end of a strip to appear dimmer and slightly warmer in colour than the near end. On a straight path this is visible and unacceptable; the eye detects a 10% difference in brightness along a continuous line immediately.
The governing relationship is that drop equals current multiplied by cable resistance. Three levers control it: raise the voltage (24V rather than 12V), increase the conductor cross-section, or shorten the electrical distance by injecting power at multiple points.
| Run current | Cable distance driver to strip | Minimum conductor | Notes |
|---|---|---|---|
| Up to 2 A | Up to 10 m | 1.0 mm² | Short accent runs |
| 2–4 A | Up to 15 m | 1.5 mm² | Typical terrace run |
| 4–6 A | Up to 20 m | 2.5 mm² | Long path circulation |
| 6–8 A | Up to 25 m | 4.0 mm² | Consider a remote driver instead |
| Above 8 A | Any | Split the circuit | Two drivers is better than one heavy cable |
The elegant solution to long garden runs is not thicker cable but distributed drivers. Placing a 24V driver in a weatherproof enclosure close to each zone, fed by a single 230V spur, converts a voltage-drop problem into a cable-routing problem, which is far easier to solve. This is the standard approach on estates and large landscapes and it scales beautifully.
Drivers: constant voltage, IP rating and dimming protocol
LED strips require constant-voltage drivers – a 24V output regardless of load. Three driver specifications determine whether the installation will be silent, flicker-free and long-lived: quality of regulation, IP rating and dimming protocol compatibility.
For outdoor use, the driver should either be IP67-rated and located in an accessible but protected position, or a standard IP20 driver housed inside a weatherproof IP65 enclosure with ventilation and drainage. The second approach is generally preferable because it allows the driver – the component most likely to need replacement in fifteen years – to be serviced without disturbing the landscape.
| Protocol | How it works | Strengths | Limitations | Best for |
|---|---|---|---|---|
| Trailing-edge mains dimming | Dims the 230V supply to the driver | Simple, cheap, familiar | Flicker risk, poor low-end, driver must be rated | Small single-zone jobs |
| 0–10V / 1–10V | Low-voltage analogue control signal | Smooth, reliable, robust over distance | Extra control cable required | Mid-size schemes with a control panel |
| PWM on the DC side | Pulse-width modulation of the 24V output | Excellent depth, no flicker if frequency is high | Cable runs must be kept short | Zone-level dimming near the driver |
| DALI / DALI-2 | Digital addressable bus | Individually addressable, scene-capable, commissionable | Higher cost, needs commissioning skill | Large gardens, estates, commercial landscapes |
| Casambi / Bluetooth mesh | Wireless mesh with app control | No control cabling, easy retrofit, strong scene tools | Range limited by structures; app dependency | Retrofit and mid-to-high-end residential |
| Zigbee / Matter | Wireless home-automation ecosystems | Integrates with existing smart home | Ecosystem lock-in, hub dependency | Homeowners with existing automation |
Connections, enclosures and buried cabling
A soldered, heat-shrunk, silicone-sealed joint inside a profile will outlive the building. A push-fit connector buried in wet soil will fail within three winters. The difference in cost is a few euros and twenty minutes; the difference in outcome is total.
Practical rules we apply on every project: solder rather than clip wherever the joint will be inaccessible, place every unavoidable junction inside an IP67 enclosure mounted above ground or in an accessible chamber, use armoured or ducted cable for all buried runs at a minimum depth of 450mm under soft landscape and 600mm under driveways; and mark buried routes on an as-built drawing that is handed to the client. The as-built drawing is the cheapest insurance policy in the entire project, and its absence is why so many gardens are dug up unnecessarily.
Do you need an electrician?
This is a question with a precise answer that differs by jurisdiction, and it deserves care rather than a blanket statement. The 24V side of a garden lighting system is SELV and is, in most European jurisdictions, not restricted work – a competent person can lay strip, fit profiles and make low-voltage connections. The 230V side – the supply to the driver, the outdoor socket, the fused spur, the circuit protection – is a different matter.
In the United Kingdom, work involving new circuits and work in certain outdoor locations falls under Part P of the Building Regulations and is notifiable, which in practice means it should be carried out by a registered competent person or notified to building control. Across the EU, national wiring rules derived from the HD 60364 series apply comparable requirements, typically demanding RCD protection of 30mA for outdoor circuits and appropriate earthing. Our standard advice: do the low-voltage work yourself if you are competent and enjoy it, but have the mains supply, the RCD protection and the final certification carried out and documented by a qualified electrician. This is not liability-avoidance boilerplate; it is the difference between an insurable installation and an uninsurable one.
Key takeaway: most failures in garden lightings are electrical rather than optical. Size drivers with 20% headroom, keep single-feed 24V runs under ten metres, distribute drivers rather than thickening cable, and make every junction serviceable without excavation.
10. Three gardens, nine schemes: small, medium and large at three budget tiers
Abstract principles are useful, costed schemes are what get projects built. This section presents three garden typologies at three budget levels each, with component families, approximate metreage, control strategy and the design reasoning behind every decision. The purpose is not to prescribe but to demonstrate how the same layered method scales from a 25-square-metre courtyard to a one-hectare landscape, and how much can be achieved at the entry tier when the design thinking is sound.
All nine schemes share three constants: 24V SELV throughout, high-CRI warm white as the base, and dimmable control. These are not luxuries that rise with budget – they are the minimum conditions for a good result, and cutting any of them to save money produces a scheme that costs less and is worth less than nothing.
The small garden: courtyards, terraces and urban plots up to 60 m²
Small gardens are the hardest to light and the most rewarding when done well, because every element is seen at close range and there is nowhere to hide a mistake. The governing principle in a small garden is verticality: the floor area is too small to be interesting, so the design must exploit walls, boundaries and the single specimen plant. A small garden lit only on its floor plane feels like a corridor; a small garden with two lit vertical surfaces feels like a room.
The second principle is restraint in level. A courtyard enclosed by walls has high reflectance and very little competing light, so the eye adapts deeply. Output that would be barely noticeable in an open lawn will feel bright in a courtyard, and we routinely specify 4–6W/m dimmed to 40% in these spaces.
| Element | Entry tier | Mid tier | Premium tier |
|---|---|---|---|
| Circulation | 4 m surface profile under a bench or step, 6W/m COB IP65 | 6 m walkable floor-recessed 20×11 mm, 6W/m COB IP67 | 10 m walkable floor-recessed 25×11 mm, cast into paving, 6W/m COB IP67 custom length |
| Vertical surface | One 3 m boundary wall graze, corner profile, 8W/m | Two walls, 7 m total, corner profile with asymmetric diffuser, 10.5W/m | Three planes plus a water wall, 14 m, mixed 10.5 and 15.5W/m, batch-matched |
| Anchor | None (wall graze acts as anchor) | One specimen uplight, narrow beam, 2700K | Two uplights plus one concealed moonlight downlight |
| Ambient fill | – | 3 m under-bench line at 20% | Pergola or canopy line, 8 m at 6W/m dimmed to 20% |
| Dynamic | – | – | RGB+CCT overlay on one wall for events |
| Control | Astro timer plus manual dim | Two zones, wireless mesh, three scenes | Four zones, wireless mesh or DALI, six scenes, curfew automation |
| Indicative connected load | ~55 W | ~140 W | ~300 W |
| Typical running cost (4 h/day, €0.28/kWh) | €22/yr | €57/yr | €123/yr at full output; ~€60/yr as actually dimmed |
The design insight for small gardens: the entry-tier scheme above, which lights one wall well and nothing else, produces a better result than a mid-budget scheme that scatters six spike lights across a 40-square-metre plot. Concentration beats distribution at small scale. If your budget only allows one gesture, make it a wall graze on the boundary furthest from the house – it pushes the perceived depth of the garden outward and makes the space feel larger.
The medium garden: suburban and family plots, 60–400 m²
The medium garden is the most common brief and the one where the layer model earns its value most visibly. There is now enough space for genuine hierarchy – a terrace zone, a lawn, a path, a boundary, one or two specimen trees – and enough distance for contrast to operate. The critical discipline at this scale is zoning: a medium garden lit as a single circuit is never right, because the terrace and the far boundary need entirely different treatments and different hours of operation.
| Element | Entry tier | Mid tier | Premium tier |
|---|---|---|---|
| Terrace | 6 m perimeter surface profile, 6W/m IP65 | 12 m walkable floor-recessed perimeter, 6W/m IP67 | 18 m integrated tiling profile at the paving joint, custom continuous length |
| Steps and level change | 3 risers, corner profile under nosing, 6W/m | 6 risers plus ramp edge, 6W/m COB, fine cut interval | All level changes plus handrail profile, batch-matched, individually addressable |
| Path to lawn / gate | 8 m single-side floor-recessed | 16 m both sides or wider aperture 25×11 mm | 24 m twin-line with 48V long-run strategy |
| Boundary and walls | One 5 m graze | Three grazes, 16 m total, 10.5W/m | Five planes, 30 m, mixed output, asymmetric diffusers |
| Trees and planting | One uplight on the main specimen | Three uplights plus one moonlight downlight | Six uplights, two moonlights, seasonal re-aiming service |
| Pergola / structure | – | 10 m ambient line at 20% | 20 m ambient plus CCT tunable task over the outdoor kitchen |
| Water feature | – | – | IP68 submerged line plus IP67 coping graze |
| Control | Two zones, astro timer | Four zones, mesh, five scenes, curfew | Eight zones, DALI-2, ten scenes, astro + presence + curfew |
| Indicative connected load | ~130 W | ~420 W | ~950 W |
| Typical running cost (4 h/day, €0.28/kWh) | €53/yr | €172/yr | €388/yr at full; ~€170/yr as actually operated |
The zoning strategy we recommend at this scale separates the garden into a “hospitality zone” that operates whenever the terrace is in use, a “circulation zone” that operates from dusk until a curfew, and a “feature zone” that operates only during evening hours and switches off entirely at 23:00. This single decision typically cuts annual energy consumption by 40–55% compared with an all-on scheme, while improving the night-time appearance rather than degrading it.
The large garden: estates, rural plots and landscapes above 400 m²
Large landscapes invert the design problem. In a small garden you are fighting to create interest in a confined space; in a large one you are fighting the temptation to light everything, and the result of yielding to that temptation is a landscape that reads as an industrial site. The governing principle at scale is the lit journey: a sequence of illuminated events with genuine darkness between them. Darkness is a material, and on large sites it is the most valuable one you have.
Technically, large sites introduce three new problems: run length, distributed power, and maintenance access. All three are solved architecturally rather than by product selection: by locating driver enclosures in service positions along the route, by adopting 48V for the longest lines, and by designing every buried element to be serviceable from a chamber rather than by excavation.
| Element | Entry tier | Mid tier | Premium tier |
|---|---|---|---|
| Arrival and driveway | Two gate-post grazes plus 10 m edge line | 40 m driveway edge line, 48V, plus gate feature | 80 m twin driveway line, cast-in concrete profiles, entrance facade wash |
| Principal path network | 20 m floor-recessed on the main route only | 60 m across two routes | 140 m across the full network, 48V distributed, continuous custom lengths |
| Terrace and hospitality | 10 m perimeter | 25 m plus pergola ambient | 50 m plus outdoor kitchen, dining pendant line and fire terrace |
| Architectural surfaces | Two walls, 10 m | Six planes, 35 m | Twelve planes, 90 m, batch-matched, asymmetric optics |
| Trees and specimen planting | Three uplights | Ten uplights, three moonlights | Twenty-five uplights, eight moonlights, annual re-aim and canopy review |
| Water | – | Pond edge graze | Pool, rill and fountain, IP68 submerged plus IP67 coping |
| Control | Three zones, astro timer | Eight zones, DALI, seasonal scenes | Twenty zones, DALI-2 with gateway, astro, curfew, presence, remote diagnostics |
| Indicative connected load | ~400 W | ~1.4 kW | ~3.2 kW |
| Typical running cost (4 h/day, €0.28/kWh) | €164/yr | €572/yr | €1,308/yr at full; ~€520/yr with curfew and dimming |
A note on the economics that surprises most clients: even the premium large-estate scheme, with 3.2 kW connected load across 140 metres of path, 90 metres of wall grazing and thirty-three feature fittings, consumes less electricity annually than two traditional 500W halogen floodlights left on for the same hours. The energy argument for LED garden lightings is not marginal; it is roughly an order of magnitude.
How to phase a scheme when the budget is not available today
Most real projects cannot fund the premium tier immediately, and the correct response is phasing, not dilution. The decisive rule of phasing is that infrastructure comes first and light comes later: ducts, chambers, driver enclosures, cable routes and cast-in profiles must be installed while the ground is open, because retrofitting them means demolishing finished landscape.
| Phase | Scope | Why now | Approx. share of total cost |
|---|---|---|---|
| Phase 0 – during construction | Ducts, draw cords, chambers, cast-in profiles, driver enclosures, spare capacity | Impossible or ruinously expensive later | 15–20% |
| Phase 1 | Circulation layer: paths, steps, thresholds | Safety and daily utility, delivers value immediately | 25–30% |
| Phase 2 | Hospitality zone: terrace, pergola, outdoor kitchen | Highest hours of use, highest perceived benefit | 25% |
| Phase 3 | Architectural surfaces and boundary treatment | Transforms perceived depth and scale | 15–20% |
| Phase 4 | Feature planting, water, dynamic overlay | Refinement once the base scheme is proven | 10% |
The most frequent and most costly phasing error is installing lighting before the planting has matured.
Aim a tree uplight at a three-metre sapling and it will be wrong within five years. On young landscapes we install the infrastructure, light the hard landscape fully, and specify adjustable fittings with a documented re-aiming review at year three and year seven.
Key takeaway: the same layered method produces good garden lightings at every scale and budget. Concentrate spend on one grazed vertical surface and one circulation line before adding anything else, and phase the work so that ducts, chambers and cast-in profiles are installed while the ground is open.
11. Style directions: six contemporary languages of garden light
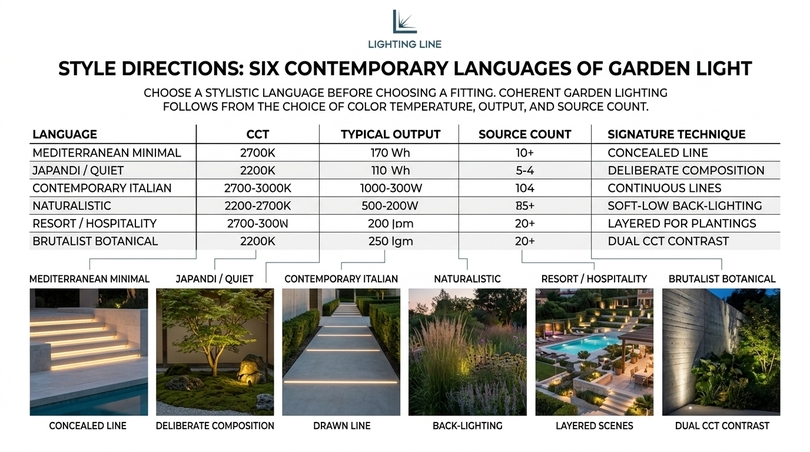
Every garden lighting scheme carries a style, whether or not the designer chose it consciously. This section sets out six coherent contemporary languages, each with its characteristic colour temperature, layer emphasis, hardware vocabulary and failure mode. Choosing a language before choosing a fitting is what distinguishes a designed scheme from an assembled one.
Mediterranean minimal
The dominant language in contemporary Southern European residential landscape: pale stone, olive and cypress, rendered walls, a pool, deep shade by day and a low warm glow by night. Its signature is the concealed line: light emerges from under coping stones, from step nosings, from the edge of a pool, and no fitting is visible anywhere.
Specification: 2700K throughout, CRI Ra>90 minimum, 6–8W/m, heavy use of walkable floor-recessed and tiling profiles, near-total absence of pole-mounted or spike fittings. Failure mode: under-lighting the vertical plane, which leaves the garden feeling like a floor with nothing above it. The corrective is one grazed wall.
Japandi and the quiet garden
Restraint taken further: gravel, moss, a single multi-stem, timber screens, water as a mirror. The Japandi language uses fewer light sources than any other (frequently three or four in an entire garden) and treats each as a deliberate compositional event. Levels are extremely low, 2200K is common and the space between lit elements is understood as a positive element rather than an absence.
Specification: 2200–2700K, 4–6W/m dimmed to 20–30%, flexible profiles following curved edges, corner profiles under timber screen rails, one uplight on the specimen. Failure mode: a client or contractor “topping it up” with additional fittings, which destroys the entire proposition. Document the intent explicitly.
Contemporary italian architectural
Sharper and more graphic than Mediterranean Minimal: fair-faced concrete, corten, clipped hedging as architecture, strong axial geometry. This language uses light as a drawing instrument – continuous unbroken lines that describe the plan, emphatic grazing that reveals material, and a willingness to leave whole areas dark for compositional reasons.
Specification: 2700–3000K, 10.5–15.5W/m for surfaces, cast-in concrete profiles, batch-matched custom lengths to avoid any visible joint, DALI control for precise scene balance. Failure mode: a visible discontinuity in a light line, which in this idiom reads as a construction defect rather than a lighting choice. Continuous manufacture is essential here.
Naturalistic and new perennial
Grasses, drifts, seed heads, seasonal decay treated as beauty. The lighting challenge is unique: the planting is translucent, so back-lighting and cross-lighting produce spectacular results that front-lighting cannot, and the scheme must survive a plant mass that triples in volume between April and September.
Specification: 2200–2700K, low output, sources set low and behind planting rather than in front of it, ground-level linear runs at bed edges, generous allowance for seasonal adjustment. Failure mode: fittings swallowed by growth by July. Mount linear runs on the hard edge of the bed, not within it.
Resort and hospitality
Borrowed from hotel landscape design and increasingly requested by residential clients: generous, layered, warm, theatrical, built around the pool and the dining terrace. The resort language is the one most concerned with how the garden photographs, and it deliberately builds redundancy into the scheme so that scenes can be reconfigured for different occasions.
Specification: 2700K base with RGB+CCT overlay capability, high layer count, pergola ambient fill, pool coping and submerged lines, extensive scene programming, tunable task lighting at the outdoor kitchen. Failure mode: over-lighting, which converts atmosphere into a showroom. The discipline is to program the scenes at 30–40% and reserve the upper range for cleaning and maintenance.
Brutalist botanical
An emerging language pairing heavy monolithic materials – board-marked concrete, monumental stone, steel – with exuberant planting. Light is used to set up the contrast: hard surfaces are grazed to emphasise mass and texture, while planting is lit softly and from within, so the garden reads as vegetation growing out of geology.
Specification: 3000K on concrete and stone, 2200–2700K on planting, high-output grazing at 15.5W/m against monolithic surfaces, cast-in profiles wherever concrete is poured, deliberate darkness between elements. Failure mode: a single colour temperature applied to both material families, which collapses the contrast that the language depends on.
| Language | CCT | Typical output | Source count (medium garden) | Signature technique |
|---|---|---|---|---|
| Mediterranean Minimal | 2700K | 6–8 W/m | Low, linear-dominant | Concealed line under coping and nosing |
| Japandi / Quiet | 2200–2700K | 4–6 W/m at 20–30% | Very low (3–6 sources) | Deliberate darkness as composition |
| Contemporary Italian | 2700–3000K | 10.5–15.5 W/m | Medium, precisely placed | Continuous unbroken drawn line |
| Naturalistic | 2200–2700K | 5–7 W/m | Medium-low | Back-lighting translucent planting |
| Resort / Hospitality | 2700K + RGB+CCT | 6–12 W/m | High, layered | Scene programming and redundancy |
| Brutalist Botanical | 3000K hard / 2200K soft | 15.5 W/m on surfaces | Medium | Dual CCT contrast between material families |
Key takeaway: choose a stylistic language before choosing a fitting. Mediterranean minimal, Japandi, contemporary Italian, naturalistic, resort and brutalist botanical each imply a different colour temperature, output and source count, and coherent garden lightings follow from that choice rather than preceding it.
12. Element by element: paths, steps, decking, walls, pergolas, water, trees
This is the working section of the guide: a detail-by-detail treatment of every element a garden lighting scheme has to resolve, with the specific technique, the profile family and the errors to avoid. Read it as a reference to return to at drawing stage rather than a narrative to read once.
Paths and walkways
The single most important circulation element, and the one where linear systems most clearly outperform alternatives. The objective is a continuous, low, glare-free wash across the walking surface, with no visible source and no scalloped pools of light.
Technique: a walkable floor-recessed channel set into the paving along one edge, emitting across the path rather than along it. For paths over 1.6 metres wide, twin lines on both edges give better uniformity than one brighter line. Output at 6W/m at 2700K, dimmed to 40–60% in most residential settings.
What to avoid: spike lights at three-metre centres, which produce the scalloping effect that reads as institutional; bollards taller than 600mm, which put the source near eye level; and any upward-emitting detail in a path, which guarantees glare for anyone walking toward it.
Steps, level changes and ramps
Steps are the highest-risk element in a garden at night and the most rewarding to light well. The rule is absolute: light the tread, never the riser face toward the viewer, and never the eye. A light source on the riser facing outward will be seen directly by anyone descending, destroying dark adaptation exactly when it is most needed.
Technique: a corner or recessed profile set under the nosing of each tread, throwing light downward and forward onto the tread below. Fine cut-interval COB strip allows the run to be cut to the exact tread width. Output 6W/m, 2700K, and the same level on every riser – inconsistency between steps is a genuine hazard.
For ramps and gently sloped routes, a continuous edge line along the low side gives the clearest reading of the gradient. Where a level change occurs without a handrail, the lit line is doing genuine safety work and should not be dimmed below 40%.
Decking and timber terraces
Timber decking offers a detail unavailable in paving: the channel can be routed into the board itself or into the fascia. A walkable floor-recessed profile set flush into a deck board produces the most refined result, while a channel under the deck edge fascia produces a floating effect where the deck appears to hover above the ground.
Specify IP67 throughout for decking, because water sits in and around timber for extended periods and the sub-deck void is frequently damp. Ensure the profile is fixed to a joist rather than to a single board, so that seasonal movement of the boards does not distort the line.
Retaining walls, boundaries and fences
Boundaries define the perceived size of a garden, and lighting them is the highest-leverage decision available in a small or medium plot. A lit boundary at the far end of a garden pushes the perceived depth outward; an unlit boundary makes the garden stop at the edge of the terrace.
Technique for retaining walls: a corner profile under the coping, grazing downward. This lights the wall, marks the level change, keeps all light within the property and never shows a source. Technique for fences: a surface or corner profile along the underside of the top rail, again grazing down the boards.
The neighbour consideration is a design constraint, not an afterthought. A downward-grazing detail on your side of a boundary emits essentially nothing beyond it. An uplight at the base of a boundary fence emits a substantial proportion of its output over the top. If there is any prospect of a neighbour dispute, the downward-grazing detail resolves it before it starts.
Pergolas, canopies and outdoor kitchens
Covered structures are the heart of the hospitality zone and typically justify more layers than anywhere else in the garden. A well-lit pergola has three separate circuits: an ambient wash that makes the structure glow, a task layer over the preparation and dining surfaces, and an accent layer on the planting or screen behind it.
Ambient: surface profiles along the underside of beams at 6W/m dimmed to 20–30%, 2700K. Task: CCT tunable strip at 12–15W/m over the worktop, switched separately, run at 4000K for preparation and 2700K for serving. Accent: a graze on the rear wall or screen.
IP rating deserves care here. A solid-roofed structure with generous overhang can accept IP65; a slatted pergola, a retractable canopy or an open-sided structure receives wind-driven rain and requires IP65 as an absolute minimum, with IP67 preferred for anything at or near the floor plane.
Water: pools, ponds, rills and fountains
Water is the most powerful element in a night garden because it doubles every light source through reflection and adds movement. The design consequence is that water features need roughly half the lighting you would expect, and that reflected glare is a serious risk if sources are placed opposite a viewing position.
Still water should generally not be lit at all – light the elements around it and let the surface become a mirror. This is the single most effective and least expensive water lighting technique in existence. Moving water benefits from light within or behind it, which catches the movement. Pool surrounds take an IP67 coping graze; submerged applications require IP68 and, in swimming pools, compliance with the relevant zone requirements for equipment in and around the pool.
Trees, shrubs and planting
Planting is where CRI earns its premium and where the largest number of schemes go wrong. The two governing errors are lighting everything and lighting from the front.
Uplighting is the standard technique for specimen trees: one to three narrow-beam fittings at the base, aimed up through the canopy rather than at it, so the light passes among the branches and reveals structure rather than painting a flat green disc. Moonlighting – a warm downlight concealed high in the canopy, casting branch shadows onto the ground – is the most beautiful effect available in garden lighting and by far the most under-used.
Back-lighting and silhouetting suit structural plants with strong outlines: a linear run at the base of a wall behind an acer, a phormium or a grass, rendering the plant as a black silhouette against a glowing plane. Cross-lighting from two low, opposed sources gives volume without the flatness of a single frontal source.
| Plant | Best technique | Output guidance | Notes |
|---|---|---|---|
| Mature tree 8–15 m | Uplight, 2–3 narrow beams | 700–1,500 lm each | Aim through the canopy, re-aim as it grows |
| Multi-stem 3–6 m | Uplight from two sides | 300–600 lm each | Emphasise stem structure, not leaf mass |
| Clipped topiary | Single low uplight or grazing line | 200–400 lm | Overlighting destroys the form |
| Ornamental grasses | Back-light or cross-light | Linear 5–6 W/m behind | Translucency is the whole effect |
| Hedging as architecture | Grazing linear at the base or top | 6–8 W/m | Read it as a wall, not a plant |
| Mixed perennial bed | Low linear at the bed edge | 5–6 W/m dimmed | Allow for seasonal volume change |
| Climbers on a wall | Wall graze from above | 8–10.5 W/m | Light the wall, the plant reads against it |
| Potted specimens | Concealed linear in or behind the pot | 4–5 W/m | Easy to reconfigure seasonally |
Facades, entrances and thresholds
The threshold between building and garden is the element a client sees most often and judges most quickly. Vertical illuminance on the door face (not horizontal illuminance on the mat) is what determines whether an entrance feels welcoming and whether a face is recognisable.
The contemporary detail is a concealed linear graze in the door reveal or under a canopy, rather than a pair of wall lanterns. Where existing wall fittings must be retained, replace their lamps with warm high-CRI equivalents and add a concealed line to do the real work.
Driveways, gates and arrival sequences
Driveway lighting is a distinct discipline because it must serve vehicles and pedestrians simultaneously and must not dazzle a driver approaching from the public road. The correct approach is a continuous low edge line that defines the geometry, rather than periodic bollards or, worst of all, floodlights aimed toward the entrance.
For long drives, 48V strip or distributed 24V drivers become necessary. The concrete profile family allows the line to be cast directly into a kerb or edging element, which is both the most refined and the most durable solution because there is no separate fitting to be struck by a vehicle.
Security without hostility
Security lighting and atmospheric lighting are usually treated as opposites, and the typical result is a beautiful garden ruined by one 4000K PIR floodlight. They can be reconciled, and the reconciliation is intelligent control rather than separate hostile hardware.
The approach: run the standard warm scheme at a low level throughout the evening, and on detection raise the same fittings to full output rather than triggering a separate floodlight. An occupied-looking, evenly lit, shadow-free garden is a far more effective deterrent than a single blinding flood that creates deep black shadows for someone to stand in. Eliminating hiding places matters more than raw brightness, and continuous linear light eliminates hiding places by design.
Patio lighting and outdoor dining areas
Patio lighting is the application clients ask about most and the one where generic advice does most damage. A patio is a room, and like any room it needs three separate layers rather than one bright source: a low ambient wash, a controllable level over the table, and something lit beyond the patio edge so the space does not feel enclosed by blackness. Most disappointing patio lights fail because they deliver only the second of these, and usually too much of it.
The linear approach to patio lights is a perimeter channel (a walkable floor-recessed profile set into the paving at the edge of the terrace) which does three jobs at once: it defines the geometry of the patio, provides safe circulation, and washes light upward across the ankles and lower planting without any fitting in view. Over the table itself, a suspended linear profile under a pergola or a graze on the wall behind the seating gives usable level without glare. Among outdoor patio lights, the single most valuable specification decision is dimmability, because the correct level for a lunch is not the correct level for a late dinner.
Patio lighting ideas that consistently work: run the perimeter line at 2700K and 6W/m dimmed to 35%; light the wall or screen behind the seating rather than the seating itself; leave the centre of the patio unlit and let the perimeter do the work; and add one lit element three to five metres beyond the patio edge so the eye travels outward. Patio lighting ideas that consistently fail: a single bright fitting above the table, coloured string lights as the primary source, and any floodlight aimed across the seating area.
Balcony, roof terrace and very small outdoor spaces
Balcony lights operate under constraints that do not apply elsewhere: there is no ground to recess into, fixings into the structure may be restricted, cable routes are limited, and every source is close to eye level and close to a neighbour. These constraints make linear concealment more valuable on a balcony than anywhere else, because there is simply nowhere to hide a conventional fitting.
The techniques that work: a slim surface profile fixed under the handrail or top rail of the balustrade, grazing downward onto the floor; a channel along the underside of a planter or bench; and a graze on the rear wall to create depth in what is often a two-metre-deep space. Output should be very low – 4–5W/m dimmed to 20–30% both because the space is small and reflective and because anything brighter becomes a nuisance to the apartment above. On a balcony, 2200K is frequently the better choice than 2700K, because the amber tone reads as intimate at close range and carries far less spill.
Porch lighting, front gardens and the public face
The front of a property is seen by more people than the back, judged more quickly and lit more badly. Conventional porch lights (a symmetrical pair of lanterns flanking the door) put a bare source at eye level on both sides of the face you are trying to see, which is precisely backwards. Porch lighting works when the source is concealed in the reveal or the canopy soffit and the light lands on the door face and the visitor, not in their eyes.
For front garden lighting ideas, the same restraint applies as at the rear, with one addition: whatever is installed will be seen from the street, so spill toward the highway and toward neighbouring windows is a genuine constraint. A recessed line under the porch canopy, a graze on the boundary wall or hedge, and a single low line marking the path from gate to door will outperform any arrangement of wall lanterns and spike lights, and will read as considered rather than defensive.
Festoon, fairy and string lights: where they fit
Festoon lighting, garden fairy lights and outdoor string lights occupy a real and legitimate place in the garden, and dismissing them would be dishonest – they are enormously popular because they work emotionally. The professional position is that they are a decorative layer, not a lighting layer: they are things to look at rather than things that illuminate, and problems arise only when they are asked to do the job of the circulation or task layer.
| Type | What it does well | What it cannot do | How to combine it |
|---|---|---|---|
| Festoon / string lights | Defines a canopy volume, signals celebration, photographs well | Provide usable illuminance, sources are visible and glary | Run at 20–30% over a linear ambient layer doing the real work |
| Fairy lights in planting | Sparkle and depth at close range | Reveal form or texture | Use behind a lit plane so it reads as depth, not as decoration |
| Lanterns and candles | Warmth, movement, intimacy at the table | Anything beyond one metre | Pair with a dimmed linear graze on the nearest vertical surface |
| Solar stakes | Marking an edge temporarily | Illuminating anything | Replace with a floor-recessed line where a cable route exists |
| Garden lamp posts / bollards | Legibility on long drives, traditional idiom | Avoiding glare; sources sit near eye level | Keep below 600 mm, fully shielded, or substitute an edge line |
The integration rule we give clients is simple: decorative sources should be dimmer than the architectural layer, never brighter. Festoon lighting at 20% over a terrace that is properly lit by a concealed perimeter line looks magical. The same festoon at full output with nothing else is a row of glare sources, and everything beyond it is black.
Key takeaway: resolve garden lightings element by element – paths, steps, decking, boundaries, pergolas, water, planting, facades and driveways each have a correct technique – and remember that the most powerful move available is often to leave something, such as still water, entirely unlit.
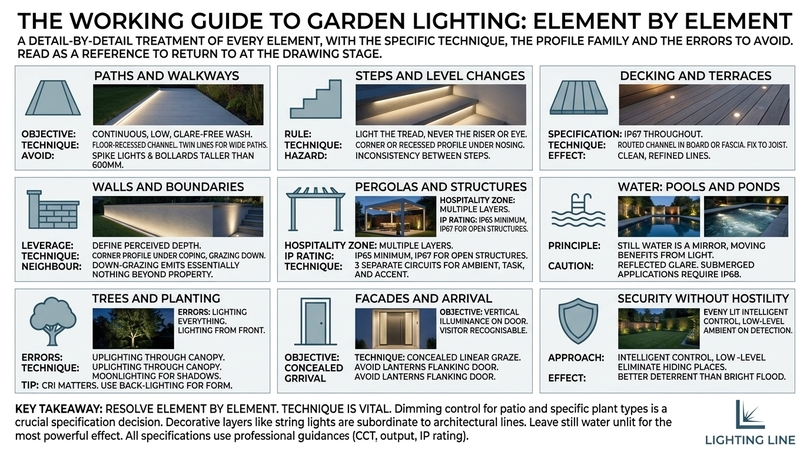
13. Energy, running costs and return on investment
“Are garden lights expensive to run?” is among the most searched questions in the category and one of the easiest to answer definitively with arithmetic. The short answer is no (a complete LED garden lighting scheme typically costs less to run than a single household appliance) but the long answer contains useful design leverage.
The basic calculation
Annual cost equals connected load in kilowatts, multiplied by hours of operation per day, multiplied by 365, multiplied by the unit electricity price. Everything else is refinement.
| Connected load | 2 h/day | 4 h/day | 6 h/day | 8 h/day |
|---|---|---|---|---|
| 50 W | €10 | €20 | €31 | €41 |
| 100 W | €20 | €41 | €61 | €82 |
| 200 W | €41 | €82 | €123 | €164 |
| 400 W | €82 | €164 | €245 | €327 |
| 800 W | €164 | €327 | €491 | €654 |
| 1,500 W | €307 | €613 | €920 | €1,226 |
Three qualifications make the real figures substantially lower than this table suggests. First, almost no scheme runs at 100% output: a dimmed system at 40% draws roughly 40% of the connected load. Second, a curfew that drops the garden to 10% after 23:00 removes most of the late-night hours. Third, seasonal variation means the northern-European garden runs far fewer hours in June than in December, and the annual average is well below the peak.
LED versus legacy: the comparison that ends the argument
| Approach | Connected load | Annual energy | 10-year energy cost | Lamp replacements in 10 yrs |
|---|---|---|---|---|
| Two 500W halogen floods | 1,000 W | 1,460 kWh | €4,088 | ~18 |
| Six 50W halogen spike lights | 300 W | 438 kWh | €1,226 | ~22 |
| Medium linear LED scheme (mid tier) | 420 W at 45% average | 276 kWh | €773 | 0 |
| Medium linear LED scheme with curfew | 420 W at 30% average | 184 kWh | €515 | 0 |
| Small linear LED scheme | 140 W at 45% average | 92 kWh | €258 | 0 |
The decisive column is the last one.
Energy savings are real but modest in absolute terms; the elimination of lamp replacement and of the labour, access and disruption that replacement entails in a mature landscape – is where the genuine lifecycle saving sits. A sealed IP67 strip inside an anodised channel has no serviceable parts and no scheduled maintenance for its entire 30,000-to-50,000-hour life.
Are solar garden lights worth it? An honest assessment
Solar garden lights are the highest-volume product in the category and the one about which we are asked most often. The honest professional position is that solar stakes are a decorative marker technology, not a lighting technology, and confusing the two is the source of most disappointment.
| Criterion | Solar stakes | Mains-fed 24V linear |
|---|---|---|
| Output | 5–30 lm typical, falls through the night | 600–1,800 lm/m, constant |
| Winter performance | Poor; short days and low sun angle limit charging | Unaffected |
| Colour quality | Usually low CRI, often cool white | CRI Ra>90 available as standard |
| Dimming and control | None | Full dimming, scenes, automation |
| Lifespan | 1–3 years, battery-limited | 15–20+ years |
| Installation cost | Nil | Significant; requires cabling |
| Running cost | Nil | €20–€170/yr typical |
| Best use | Temporary marking, rented property, zones with no cable route | Any permanent designed scheme |
Where solar genuinely earns its place: a distant boundary with no cable route, a rented garden where permanent work is not permitted, a temporary event, or a marker function where the light is meant to be seen rather than to illuminate. Where it does not: anywhere a client expects consistent, controllable, high-quality light across a designed landscape.
How cheaply can a garden be lit well?
Budget-constrained schemes fail when they buy many cheap things. They succeed when they buy few good things and place them with skill. Our minimum viable specification for a garden that looks genuinely designed is: one grazed vertical surface, one circulation line, high-CRI 2700K strip, a dimmable driver, and an astro timer. In a small garden that is roughly five metres of wall graze and six metres of path channel – a very modest component list that transforms the space.
What to cut when the budget is tight, in order: dynamic colour first, then feature uplighting, then ambient fill, then the number of grazed surfaces. What never to cut: CRI, IP rating, dimmability, and the quality of buried infrastructure. Those four determine whether the installation is still working and still beautiful in 2040.
Key takeaway: modern garden lightings are inexpensive to run. A small scheme costs roughly €20–€30 a year and even a large estate scheme, dimmed and curfewed, costs less than two legacy halogen floodlights. The dominant lifecycle saving is the elimination of lamp replacement, not the energy.
14. Light pollution, ecology, neighbours and regulations
Garden lighting now sits within a regulatory and ecological context that did not exist a decade ago, and specifiers who ignore it are exposed to complaints, enforcement and, increasingly, client dissatisfaction. The encouraging news is that every measure required to be a good ecological and neighbourly citizen also produces a better-looking garden, which is an unusual alignment of interests.
Do you need planning permission for external lighting?
In most European jurisdictions, ordinary domestic garden lighting on a single dwelling does not require planning permission. The significant exceptions are consistent enough to state as a checklist, and each of them should be verified locally before specification rather than after installation.
| Condition | Typical requirement | Action |
|---|---|---|
| Listed building or protected structure | Listed building consent for fixings to the fabric | Consult conservation officer before design freeze |
| Conservation area | Possible restrictions on visible fittings and columns | Favour concealed linear; check local policy |
| Area of outstanding natural beauty / dark-sky reserve | Strict limits on upward light and CCT | Specify 2200K, fully shielded, curfew |
| Lighting columns above a set height | May require permission | Avoid columns; use low linear alternatives |
| Commercial, multi-unit or public-facing landscape | Frequently subject to planning conditions | Prepare a lighting impact assessment |
| Protected species present (bats in particular) | Ecological constraint with legal force | Commission a bat survey; avoid lighting roosts and flight lines |
| New electrical circuit outdoors | Notifiable building work in some jurisdictions | Use a registered electrician; retain certification |
Is garden lighting notifiable work?
The distinction that matters is between the extra-low-voltage installation and the mains supply feeding it. Installing 24V strip, profiles and connectors is generally not notifiable work. Installing a new outdoor mains circuit, an external socket or a fused spur in an outdoor location frequently is.
In England and Wales, Part P of the Building Regulations applies to fixed electrical installations in dwellings and their gardens; new circuits are notifiable and should be carried out by a person registered with a competent person scheme or notified to building control. Scotland and Northern Ireland have parallel regimes. Across the EU, national implementations of the HD 60364 series impose comparable obligations, most commonly 30mA RCD protection for socket outlets and outdoor circuits. Verify the current position in your jurisdiction at design stage – requirements change, and this article reflects general practice rather than legal advice.
Can neighbours complain about garden lights?
Yes, and in several jurisdictions they have a statutory route to do so. In England and Wales, artificial light emitted from premises can constitute a statutory nuisance under the Environmental Protection Act 1990 if it is prejudicial to health or a nuisance, and a local authority can serve an abatement notice. Comparable civil and administrative remedies exist across Europe. Domestic solar stakes rarely reach that threshold; a 4000K floodlight aimed at a neighbour’s bedroom window very well might.
The design response is entirely within the specifier’s control, and it is identical to good practice: point light downward, shield the source, keep output low, choose warm colour temperatures, avoid any fitting that emits above the horizontal, and implement a curfew. A scheme built from downward-grazing linear runs on your own side of a boundary is essentially complaint-proof, because there is almost nothing to complain about.
Where a dispute does arise, the sequence is: speak to the neighbour directly, adjust aiming and output, offer a curfew, and only then escalate. Most conflicts are resolved by a fifteen-degree change of aim and a 30% reduction in output.
Ecology: lighting a living system
A garden is habitat, and artificial light at night measurably affects it. The three mechanisms that matter most are disruption of nocturnal insect navigation, suppression of bat foraging along lit corridors, and interference with plant and animal circadian and seasonal cues. Blue-rich light is the principal culprit in all three.
| Measure | Ecological benefit | Design consequence |
|---|---|---|
| Specify 2200–2700K | Sharply reduced blue content, far less insect attraction | Warmer, more attractive garden – no downside |
| Fully shielded, downward-only | No sky glow, no light into canopies | Eliminates glare, improves the scheme |
| Dim to the lowest usable level | Reduced total light dose | More contrast and atmosphere |
| Curfew after 23:00 | Restores dark hours for foraging species | Energy saving, no practical loss |
| Leave dark corridors along boundaries | Preserves bat and invertebrate routes | Creates the darkness that makes lit areas read |
| Avoid lighting water bodies and mature trees | Protects the richest habitat | Still water as a mirror is more beautiful anyway |
| Avoid upward tree uplighting where bats roost | Prevents roost abandonment | Substitute moonlighting from above |
The point worth emphasising to clients: every item in this table is something a good lighting designer would specify regardless of ecology, purely for visual quality. The ecologically responsible garden and the beautiful garden are, in lighting terms, the same garden.
Key takeaway: every measure that makes garden lightings a good ecological and neighbourly citizen – warm colour, downward shielding, low output, curfews and retained dark corridors – also makes the garden look better. Responsibility and quality point in the same direction here.
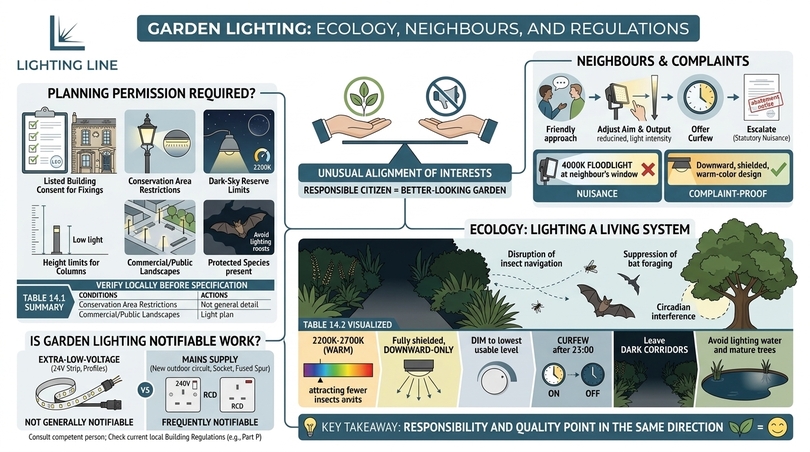
15. Smart control: scenes, astro timers, DALI, Casambi and home automation
Control is where a good scheme becomes a great one, and where a mediocre scheme can be substantially rescued. A garden with four zones and six scenes is functionally a different garden depending on the evening; a garden with one switch is the same garden every night, which is to say it is a garden nobody adjusts and eventually nobody turns on.
The minimum viable control strategy
Even the smallest scheme should have two elements: an astronomical timer that switches on at dusk and off at a defined hour, tracking the seasons automatically, and dimming on every circuit. These two items cost very little, are the difference between a scheme that is used and one that is not, and they deliver the majority of the available energy saving.
Zoning: the decision that matters more than the protocol
Clients fixate on the app; designers should fixate on the zones. A four-zone garden with a simple wall dimmer offers more useful control than a single-zone garden with the most sophisticated app on the market. Our standard residential zoning is: circulation, hospitality, architectural surfaces, and features.
| Zone | Contents | Typical schedule | Default level |
|---|---|---|---|
| Circulation | Paths, steps, thresholds, driveway | Dusk to 23:00, then 10% until dawn | 50% |
| Hospitality | Terrace, pergola, outdoor kitchen | Manual or presence-triggered | 35% |
| Architectural | Wall grazing, boundary, facade | Dusk to 23:00 | 60% |
| Features | Trees, water, sculpture | Dusk to 22:30 | 70% |
| Dynamic overlay | RGB+CCT runs | Event only | Off |
| Security response | All zones, raised on detection | Sensor-triggered, 3-minute timeout | 100% temporarily |
Scenes that clients actually use
Six scenes is the practical maximum before a client stops learning the system. Programming twenty scenes is a common commissioning error that results in the client using exactly one of them. The six we programme by default:
- Welcome: circulation and entrance at moderate level, everything else off; the scene that runs automatically at dusk.
- Dinner: hospitality at 30%, architectural at 40%, features off, warm and low.
- Entertain: all zones at 50–60%, dynamic overlay available.
- Ambient: architectural and features only, terrace dark, the scene for looking at the garden from indoors.
- Curfew: circulation at 10%, everything else off.
- Service: everything at 100%, for cleaning and maintenance.
The “ambient” scene deserves special attention because it addresses the use case designers most often forget: the garden is viewed from inside the house far more often than it is occupied. A scheme optimised only for people standing in the garden will disappoint for 80% of its operating hours.
Protocol selection in practice
For a small garden with two to four zones, a wireless mesh system such as Casambi or a Zigbee/Matter-based ecosystem is usually the right answer: no control cabling, straightforward retrofit, good app tools. For a medium garden being built from scratch, either wireless mesh or a wired 0–10V panel works well. For large landscapes, multiple driver locations and twenty-plus zones, DALI-2 remains the professional standard because it is addressable, diagnosable and vendor-neutral.
Whichever is chosen, three commissioning requirements are non-negotiable: every zone labelled clearly in the app and on the enclosure, a printed scene schedule handed to the client, and a documented manual override that works if the hub fails. A garden lighting system that cannot be operated when the internet is down is a design defect, not a feature.
Integration with home automation
Clients with existing home automation reasonably expect the garden to join it. The practical routes are a DALI gateway into the automation system, a Casambi gateway, or native Zigbee/Matter drivers. The integration decision should follow the existing house system rather than leading it – introducing a second ecosystem for the garden alone is a maintenance liability that outlives everyone’s enthusiasm for it.
Worthwhile automations, in order of value: astronomical dusk triggering; a curfew step-down; a “leaving the house” scene that raises circulation for ten minutes; presence-triggered terrace lighting; and holiday-mode randomisation that varies the scheme slightly each evening to suggest occupancy.
Key takeaway: zoning matters more than the control protocol. Four zones on a simple dimmer beat one zone on a sophisticated app, and an astronomical timer with a curfew delivers most of the available energy saving in garden lightings for very little cost.
16. Lighting for photography, social content and evening hospitality
An increasing share of garden lighting briefs now include an explicit content requirement: the garden must photograph well, on a phone, at dusk, without professional equipment. This is a legitimate design constraint with specific technical implications, and a scheme optimised for the eye is not automatically optimised for a camera sensor.
Why cameras see differently
The human eye has an enormous dynamic range and adapts continuously; a phone sensor does not. A contrast ratio that reads as dramatic to the eye reads as blown highlights and crushed blacks to a camera. Equally, the eye white-balances automatically, so a mixture of 2700K and 4000K that the eye tolerates appears as an obvious colour cast in a photograph.
| Issue | Effect on camera | Design response |
|---|---|---|
| High contrast ratio | Blown highlights, black voids | Reduce anchor levels; raise ambient fill |
| Mixed colour temperature | Visible colour cast, unfixable in edit | Single CCT per sightline; 2700K throughout |
| Low CRI sources | Muddy greens, orange skin tones | CRI Ra>90 minimum, Ra>93 preferred |
| Visible bare sources in frame | Flare, lens artefacts, distraction | Recess and shield every source |
| PWM dimming at low frequency | Banding on video, flicker on slow-motion | Specify high-frequency or flicker-free drivers |
| Flat frontal lighting on planting | No depth; subjects look pasted on | Back-light and cross-light instead |
| No light on faces | Silhouetted people in group shots | Add low warm vertical fill at seating areas |
The blue hour and why scheduling matters
The most photogenic twenty minutes of any garden day is the blue hour – the period after sunset when the sky retains deep blue luminance and artificial light has begun to read. During this window the ratio between sky and garden is naturally balanced and even a phone camera produces strong results.
The practical consequence is a control requirement: the scheme should switch on before the eye thinks it needs to, at roughly civil twilight rather than at full darkness. An astronomical timer with an offset of minus fifteen to minus twenty-five minutes from sunset achieves this automatically. Clients frequently describe this single setting as the best thing about their system, without ever knowing what it is.
Practical setups for evening content
For creators working with what the garden already has, three configurations cover almost every need.
The portrait setup: a warm wall graze behind the subject for separation, plus a low 2700K linear source in front at 20–30% for face fill – the linear source acts as a soft box.
The wide establishing shot: raise ambient fill, lower anchors, shoot during blue hour.
The detail shot: a single grazed texture at close range, which is where CRI Ra>93 and dotless COB output pay for themselves.
Colour should be used sparingly even in content work.
An RGB+CCT overlay at 10–15% behind planting adds a subtle atmospheric tint that reads as sophisticated; the same overlay at 100% reads as a nightclub. The rule that serves creators best is the same one that serves architects: the base scheme is warm white, and colour is an accent measured in percentages, not in saturation.
Key takeaway: cameras have far less dynamic range than the eye, so photogenic garden lightings need a single colour temperature per sightline, CRI Ra>90 or better, raised ambient fill, lowered anchors, no visible sources and flicker-free drivers.
17. Installation, commissioning and troubleshooting
A well-specified scheme installed carelessly will fail; an averagely specified scheme installed meticulously will last twenty years. This section is the site-level counterpart to the design sections, written for the person with the drill.
Sequence of works
Lighting installation must be interleaved with landscape construction rather than following it, and the sequence below is the one we issue to contractors at pre-start.
| Stage | Works | Hold point |
|---|---|---|
| 1. Setting out | Mark all profile runs, driver positions, cable routes on site | Designer walk-round before excavation |
| 2. Ducting | Lay ducts with draw cords, install chambers, set depths | Photograph and record before backfill |
| 3. Cast-in elements | Fix concrete and cement profiles into formwork | Check alignment before pour – irreversible |
| 4. Hard landscape | Set walkable and tiling profiles into paving build-up | Verify levels 1–2 mm below finish |
| 5. First fix | Pull cables, mount driver enclosures, terminate at chambers | Insulation resistance test on mains side |
| 6. Second fix | Install strip, diffusers, end caps, make LV connections | Continuity and polarity check before sealing |
| 7. Energisation | Power up zone by zone, check for flicker and voltage drop | Measure voltage at the far end of each run |
| 8. Commissioning | Programme zones, scenes, schedules; night-time aiming | Must be done after dark, with the client present |
| 9. Handover | As-built drawings, product schedule, spares, warranty pack | Client demonstration and sign-off |
The night commissioning visit
No garden lighting scheme has ever been correctly finished in daylight.
The final visit must happen after dark, with dimmers accessible and a willingness to change things. Typical adjustments: reducing output on the circulation layer by 20–30%, re-aiming uplights by a few degrees, discovering a glare source visible only from one chair, and rebalancing the ratio between the terrace and the boundary.
Budget two to three hours for a medium garden. This visit produces more improvement per euro than any other line in the project, and skipping it is the most common reason a technically correct installation underwhelms.
Troubleshooting guide
| Symptom | Most likely cause | Remedy |
|---|---|---|
| Far end of a run is dimmer | Voltage drop | Inject power at the far end, increase cable size, or split the circuit |
| Strip flickers when dimmed | Driver/dimmer incompatibility | Match protocol; use a driver rated for the dimmer type |
| Section has gone dark | Failed joint or water ingress at a cut | Open the nearest accessible junction, re-terminate and reseal |
| Colour differs between runs | Different production batches | Replace from a single batch, avoid mixing within a sightline |
| Condensation inside a profile | Sealed profile with no drainage or vapour path | Provide a weep hole at the low end, reseal cable entry with a drip loop |
| Driver running hot / failing early | Undersized or enclosed without ventilation | Resize to 20% headroom, ventilate and drain the enclosure |
| Scheme looks harsh despite correct products | Over-output and glare, not product failure | Dim to 40%, add shielding, recess sources further |
| Whole zone dead after rain | Water in an unsealed junction or RCD tripping | Locate the junction, test RCD, re-terminate in an IP67 enclosure |
| Dotting visible through diffuser | SMD strip with insufficient diffuser depth | Deeper opal diffuser or substitute COB strip |
| Lawn mower damage to a channel | Profile proud of finished level | Reset 1–2 mm below, edge with a mowing strip |
Key takeaway: garden lightings must be commissioned after dark with the client present. Budget two to three hours for a medium garden; this single visit produces more improvement per euro than any other line in the project.
18. Maintenance, lifecycle and warranty strategy
Linear LED systems are close to maintenance-free, which creates a paradox: because nothing needs doing, nothing gets done, and small problems accumulate unnoticed for years. A simple annual regime keeps a twenty-year installation looking as it did in year one.
The annual regime
Spring, before the growing season: clean all diffusers with water and a soft cloth – accumulated dust and algae can reduce output by 15–25%, which clients invariably interpret as LED failure. Check that no profile has been lifted by frost or root growth. Inspect end caps and cable entries.
Midsummer: review the scheme against the planting, which has now reached full volume. Re-aim uplights obscured by growth; adjust any linear run overhung by foliage.
Autumn: clear leaves from recessed channels and drainage weep holes, which is the single highest-value maintenance action for floor-recessed profiles. Verify driver enclosures are dry and their ventilation is clear.
Every three years: a full night review with the designer, checking output balance, colour consistency and whether the scheme still matches how the garden is actually used. Gardens change; schemes should change with them.
Lifecycle expectations
| Component | Expected life | Failure mode | Replacement difficulty |
|---|---|---|---|
| Anodised aluminium profile | 20–30 years | Mechanical damage only | High if cast in; design for it |
| Polycarbonate diffuser | 10–15 years | UV yellowing, abrasion | Low – slides out |
| LED strip (quality, well heat-sunk) | 30,000–50,000 h to L70 | Gradual lumen depreciation | Moderate – pull and replace in channel |
| Constant-voltage driver | 8–15 years | Capacitor ageing | Low if enclosure is accessible |
| Control gateway / hub | 5–10 years | Obsolescence more than failure | Low |
| Buried cable in duct | 30+ years | Rodent or excavation damage | Low if ducted with draw cord |
| Buried cable direct in ground | 10–20 years | Damage, degradation | Very high – avoid this detail |
The design lesson embedded in this table is that the short-lived components must be the accessible ones.
A driver in a serviceable enclosure and strip that can be withdrawn from its channel means a twenty-year refresh is a half-day job. A driver buried under paving and strip glued into a sealed cavity means the same refresh is a demolition project.
Warranty and spares strategy
Order 10–15% spare strip from the original production batch and store it indoors, labelled with the project and batch reference. This single measure solves the colour-matching problem permanently and costs a fraction of what a batch mismatch will cost to resolve in year six. Keep the product schedule, as-built drawings, driver specifications and commissioning record together in one handover pack, digital and printed.
Key takeaway: keep the short-lived components accessible. Well-detailed garden lightings need only annual diffuser cleaning and autumn leaf clearance, plus a driver replacement somewhere between year eight and year fifteen.
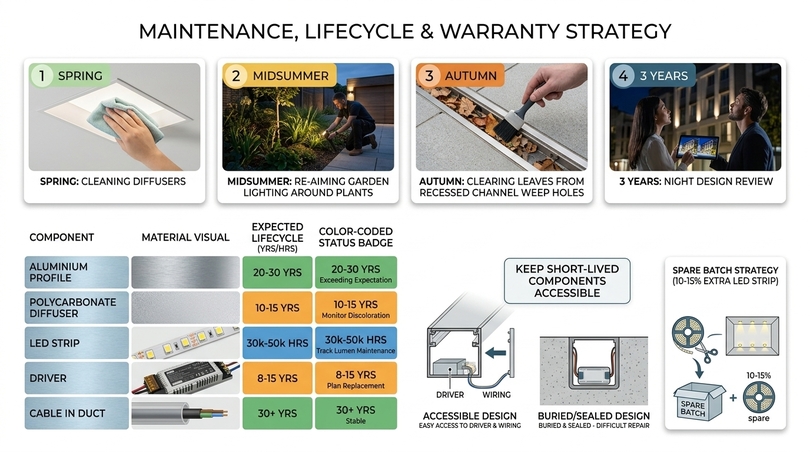
19. The specification checklist and schedule template
A garden lighting scheme becomes buildable when it exists as a schedule rather than as an idea. The checklist below is the one we run before issuing any drawing, and the schedule template that follows is the document that goes to the contractor. Together they eliminate the great majority of site queries and variations.
Pre-design checklist
Before drawing anything, confirm: the orientation and principal viewing positions, including from inside the house; the position of the incoming supply and available spare capacity; existing and proposed cable and drainage routes; the boundary condition and neighbouring windows; the mature dimensions of the planting, not the current ones; the client’s actual evening routine; whether the garden will be photographed; and whether any ecological or heritage constraint applies.
Design-stage checklist
| Check | Question to answer | Pass criterion |
|---|---|---|
| Layer balance | Are all five layers present and hierarchically distinct? | Fewer than five anchors; ambient fill included |
| Glare | Is any source visible from a seat, door or path? | No direct view of any LED from any normal position |
| Colour consistency | Is more than one CCT visible in any single sightline? | One CCT per sightline, or a deliberate documented contrast |
| IP rating | Is every component rated for its actual exposure? | IP65 above ground, IP67 at or below ground |
| Voltage drop | Is any 24V run longer than 10 m from a single feed? | Split, inject at both ends, or move the driver |
| Driver headroom | Does every driver have 20% spare capacity? | Yes, and it is accessible for replacement |
| Serviceability | Can every driver and junction be reached without excavation? | Yes, via enclosure or chamber |
| Boundary spill | Does any fitting emit toward a neighbour? | No upward or cross-boundary emission |
| Control | Are zones, scenes and curfew defined on the drawing? | Written schedule attached |
| Future planting | Will the scheme still work in ten years? | Adjustable fittings, documented review dates |
| Batch consistency | Is all strip from one order and batch? | Yes, plus 10–15% spares |
| Documentation | Will the client receive as-builts and a handover pack? | Specified as a deliverable |
The schedule template
Each row of a lighting schedule should carry enough information for the contractor to order and install without interpretation. The columns below are the minimum set, adding a photograph or section detail reference for each type removes almost all remaining ambiguity.
| Ref | Location | Profile | Strip | CCT / CRI | Length | IP | Zone | Driver |
|---|---|---|---|---|---|---|---|---|
| L01 | Main path, west edge | Walkable floor-recessed 20×11 | COB 480 led/m 6 W/m | 2700K / Ra>90 | 18.0 m continuous | IP67 | Circulation | 150 W 24V, enclosure A |
| L02 | Terrace steps, 6 risers | Corner profile under nosing | COB 480 led/m 6 W/m | 2700K / Ra>90 | 6 x 1.4 m | IP67 | Circulation | 75 W 24V, enclosure A |
| L03 | Boundary wall, north | Corner profile under coping | COB 480 led/m 10.5 W/m | 2700K / Ra>90 | 9.0 m continuous | IP65 | Architectural | 120 W 24V, enclosure B |
| L04 | Pergola beams, underside | Surface profile 17×7 | COB 480 led/m 6 W/m | 2700K / Ra>90 | 4 x 3.2 m | IP65 | Hospitality | 120 W 24V, enclosure B |
| L05 | Outdoor kitchen worktop | Recessed profile in canopy | COB CCT 600 led/m 7.7 W/m | 2700–6500K / Ra>90 | 3.6 m | IP65 | Hospitality (task) | 75 W 24V CCT, enclosure B |
| L06 | Pool coping, east | Tiling profile for 12 mm tile | COB 480 led/m 6 W/m silicone tube | 3000K / Ra>90 | 12.0 m continuous | IP67 | Features | 120 W 24V, enclosure C |
| L07 | Specimen multi-stem | Directional uplight, narrow | – | 2700K / Ra>90 | 2 no. | IP67 | Features | Enclosure C |
| L08 | Grass bed, rear edge | Flexible profile 18×6 | COB 480 led/m 6 W/m | 2200K / Ra>90 | 7.5 m curved | IP67 | Features | Enclosure C |
Key takeaway: garden lightings become buildable when they exist as a schedule. Every row should carry location, profile, strip, colour temperature and CRI, length, IP rating, zone and driver, so the contractor never has to interpret intent.
20. Three project walkthroughs from brief to switch-on
The following three walkthroughs are composite accounts drawn from typical projects. They are included because the reasoning sequence – how a brief becomes a set of decisions – is harder to teach than the technical content and is what most distinguishes experienced specifiers.
Project A: a 38 m² urban courtyard
The brief. A rear courtyard behind a terraced house, enclosed by three rendered walls of 2.4 metres, paved in pale limestone, with a single multi-stem amelanchier in a raised bed and a bench along one wall. The garden is seen from a glazed kitchen wall for roughly four hours every evening and occupied for perhaps twenty evenings a year. The client’s stated brief was “make it feel bigger and warmer”.
The diagnosis. The garden failed at night because it was lit only by spill from the kitchen, which meant the glazing acted as a mirror and the client saw their own reflection instead of the garden. The entire project therefore hinged on a single objective: put enough light on the far wall that it out-competes the interior reflection.
The scheme. A corner profile under the coping of the rear wall, 4.2 metres, 10.5W/m COB at 2700K Ra>90, grazing downward. A second, shorter graze on the return wall at 6W/m to give the corner depth. A walkable floor-recessed channel, 3.0 metres, along the edge of the raised bed at 6W/m, lighting the paving and marking the level change. One narrow uplight on the amelanchier, aimed up through the stems. A concealed 6W/m line under the bench at 20% as ambient fill. Total connected load 152 W; four zones on a wireless mesh; four scenes.
The outcome. With the rear wall at 60% the reflection problem disappeared entirely and the courtyard read as an extension of the kitchen. At commissioning the circulation line was reduced from 60% to 35% and the uplight from 100% to 45%; the client described the result as “twice the size and half the brightness”, which is precisely the intended effect.
Project B: a 260 m² suburban family garden
The brief. A rectangular plot with a raised timber terrace, a lawn, a path to a garden studio at the rear, mixed borders on both sides, two mature birches and a trampoline. The clients entertain frequently in summer, have two young children, and were explicit that they did not want “the garden to look like a hotel”.
The diagnosis: two conflicting requirements: safe circulation to the studio for children after dark, and a restrained atmosphere for adult evenings. The resolution was zoning and scheduling rather than compromise on either.
The scheme: circulation zone: 16 metres of walkable floor-recessed channel along the path to the studio, plus five step nosings on the terrace, all at 6W/m 2700K, scheduled dusk to 22:30 at 50% then 10% overnight. Hospitality zone: 14 metres of terrace perimeter channel and 12 metres of ambient line under the pergola at 6W/m, presence-triggered, default 30%. Architectural zone: two boundary fence grazes totalling 11 metres at 10.5W/m, off at 22:30. Features: two birch uplights and one concealed moonlight downlight in the larger birch. Total connected load 418 W; four zones; five scenes; DALI via a wireless gateway.
The outcome: the moonlighting downlight became the element the clients valued most, casting branch shadows across the lawn – an effect that cost less than 5% of the project and generated the majority of the client’s enthusiasm. The trampoline was deliberately left unlit, which the children found disappointing and the designers considered a success.
Project C: a 1.1-hectare rural property
The brief.
A converted farmhouse with a 90-metre gravel drive, a walled kitchen garden, a terrace overlooking open countryside, a pond, and mature specimen trees. The property sits in a designated dark-sky-sensitive area with an established bat population. The client wanted “an arrival that feels like a hotel and a garden that disappears into the landscape”.
The diagnosis.
The ecological constraint was the design generator rather than a limitation. A scheme that would satisfy the bat survey (warm, shielded, downward, curfewed, with dark corridors preserved) was also exactly the scheme that would produce the requested “disappearing” quality.
The scheme.
Arrival: 42 metres of cast-in concrete edge profile along the final drive approach at 6W/m 2200K, plus a facade graze on the farmhouse entrance at 3000K. Kitchen garden: 28 metres of walkable channel on the principal cross paths at 6W/m 2700K. Terrace: 22 metres of perimeter channel plus pergola ambient. Pond: unlit, with a single graze on the retaining wall opposite so the surface reads as a mirror. Trees: four uplights on specimens confirmed by the ecologist as non-roost, all shielded and curfewed. Dark corridors along both hedgerow boundaries left entirely unlit. Total connected load 1.38 kW; eleven zones; DALI-2; curfew to 10% at 22:30 and full off at 23:30 except the arrival route.
The outcome.
Annual measured consumption was 312 kWh – less than a single legacy 500W flood running the same hours – and the bat survey at year two recorded no reduction in foraging activity along the retained dark corridors. The unlit pond became the most photographed element of the property.
Key takeaway: the reasoning sequence matters more than the component list. In all three of the projects above, the decisive move in the garden lightings was identifying the single problem the scheme had to solve – a mirrored window, a conflict of uses, an ecological constraint – and letting that generate the design.
21. Twelve mistakes that ruin otherwise good garden lightings
The failures below account for the overwhelming majority of disappointing outcomes we have been asked to remedy. None of them is a product failure; all of them are decisions.
1. Over-lighting: by a wide margin the most common fault. Gardens need far less light than interiors because the eye is dark-adapted and there is no competing daylight. The fix is dimming, specified from the outset.
2. Cool colour temperature: 4000K and above outdoors produces a clinical, unwelcoming result, attracts insects and harms the perceived quality of planting. 2700K should be the default and departures should be deliberate.
3. Visible sources: any LED seen directly destroys dark adaptation and makes the rest of the scheme disappear. Recess, shield, or dim.
4. Uniformity instead of contrast: Lighting everything to the same level produces a flat, dull garden. Hierarchy is the whole point.
5. Lighting the floor and nothing else: a garden with only ground lighting reads as a corridor. Vertical surfaces create the sense of a room.
6. Ignoring the view from inside: the garden is watched from indoors far more than it is occupied. Design for the window first.
7. Low CRI: inexpensive strip with Ra 70–80 destroys the colour of the planting the garden exists for. Ra>90 is the minimum.
8. Wrong IP rating for the actual exposure: IP44 in a position that receives wind-driven rain, or IP65 in a channel that fills with water, both fail – just on different timescales.
9. Buried, unserviceable connections: every junction should be reachable. Direct-buried joints are a future excavation.
10. Voltage drop ignored: a twenty-metre 12V run will visibly fade. Use 24V, size the cable, or split the circuit.
11. No curfew: lighting a garden all night wastes energy, disturbs wildlife and neighbours, and offers no benefit to anyone asleep.
12. Commissioning in daylight: the scheme must be balanced after dark with the client present. Every project that skips this underperforms.
Key takeaway: none of the twelve failures above is a product failure. Bad garden lightings are the result of over-lighting, cool colour, visible sources, uniformity, unserviceable connections and commissioning in daylight – all of which are decisions, and all of which are free to avoid.
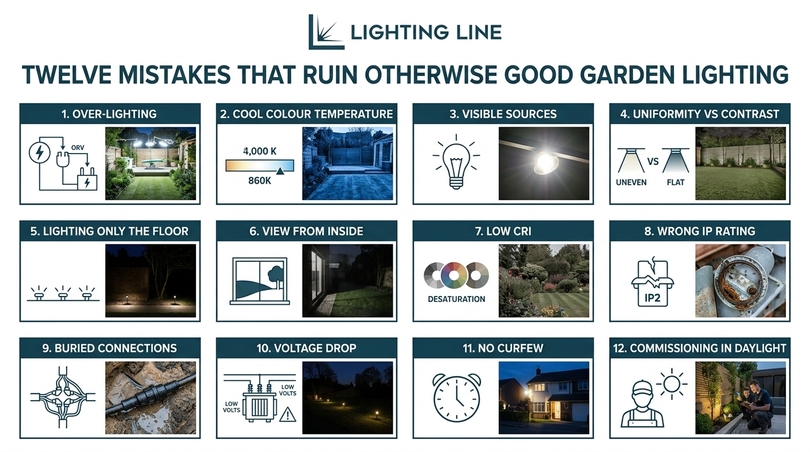
22. Frequently Asked Questions
The questions below are the ones we are asked most often by architects, homeowners, developers and installers, answered at the level of detail a professional would want. Each answer is self-contained, so the table can be read in any order.
| Question |
|---|
What is the best type of lighting for a garden?For the great majority of gardens, the best system is a layered arrangement of low-voltage 24V linear LED runs housed in aluminium profiles, at 2700K with a colour rendering index above Ra 90, dimmable and zoned. Linear light describes the geometry of the garden – paths, steps, walls, edges – without any visible fitting, which is what produces the refined, architectural result. Directional uplights are added sparingly for trees and specimen features. What is almost never best is a scatter of cool-white floodlights or a row of solar stakes, because neither can be dimmed, zoned or colour-controlled. |
How many lumens do I need for a garden?There is no single figure, because lumens describe the source and gardens are lit by surface. Work to target illuminance instead: 3–10 lux on paths, 10–20 lux on steps, 20–50 lux on a dining table, 15–40 lux on a grazed wall. In practical terms that is roughly 80–150 lumens per linear metre for path lighting and 250–500 lumens per linear metre for wall grazing. A specimen tree of 8–10 metres typically needs two or three fittings of 700–1,500 lumens each. Start lower than instinct suggests and dim upward. |
Are garden lights expensive to run?No. A small LED garden lighting scheme with around 140 W connected load, running four hours a day at 45% average output, consumes roughly 92 kWh a year – around €26 at €0.28/kWh. Even a large estate scheme with 1.4 kW connected load, dimmed and curfewed, typically lands between €300 and €600 a year. For comparison, two legacy 500 W halogen floodlights running the same hours cost around €409 a year on their own. The dominant lifecycle saving with LED is not energy but the elimination of lamp replacement. |
Do garden lights use a lot of electricity?Quality LED strip consumes between 5 and 15 watts per metre. A complete medium garden – 16 m of path, 11 m of wall grazing, 12 m of pergola ambient and a few feature fittings – totals around 400 W at full output, which is comparable to a desktop computer and considerably less than a kettle. Because schemes are normally dimmed to 30–50% and curfewed after 23:00, real consumption is typically a third of connected load. |
Can I install garden lighting myself?The 24V extra-low-voltage part – cutting and laying strip, fitting profiles, making low-voltage connections, sealing end caps – is well within the capability of a competent DIY installer and is not generally restricted work, because SELV at 24V presents no shock hazard. The 230V side is different: new outdoor circuits, external sockets and fused spurs are notifiable work in many jurisdictions and require RCD protection and certification. The sensible division is to do the low-voltage work yourself and have a qualified electrician provide, protect and certify the supply. |
Do I need an electrician to fit an outside light?For a plug-in or existing-circuit low-voltage fitting, generally no. For anything that involves a new circuit, a new outdoor socket, or altering the consumer unit, yes – and in England and Wales this falls under Part P of the Building Regulations, which makes it notifiable. Comparable rules apply across the EU under national implementations of HD 60364. Beyond legality, an electrician’s certificate is what an insurer will ask for after an incident. |
Do you need planning permission for external lighting?Ordinary domestic garden lighting usually does not require planning permission. Permission or consent is commonly needed where the property is a listed building, sits in a conservation area, lies within a dark-sky or protected landscape designation, or where lighting columns above a certain height are proposed. Commercial and multi-unit landscapes are frequently subject to planning conditions requiring a lighting impact assessment. Where protected species such as bats are present, ecological legislation applies independently of planning. Always verify locally before design freeze. |
Is garden lighting notifiable?The lighting itself is not; the electrical supply may be. Installing 24V strip and profiles is not notifiable. Installing a new outdoor mains circuit to feed the drivers generally is, in jurisdictions operating a building-control regime for domestic electrical work. The practical approach is to treat the mains supply as notifiable by default and have it installed and certified by a registered competent person. |
Can Neighbours complain about garden lights?Yes. In England and Wales, artificial light from premises can amount to a statutory nuisance under the Environmental Protection Act 1990, and a local authority can serve an abatement notice. Similar administrative and civil remedies exist across Europe. In practice, complaints arise from bright, cool-white, upward or cross-boundary emission – typically a floodlight aimed toward a neighbour’s window. Downward-grazing linear runs installed on your own side of a boundary emit almost nothing beyond it and effectively remove the grounds for complaint. If a dispute arises, adjusting aim and reducing output usually resolves it without escalation. |
Can Neighbours complain about solar lights?They can complain about anything, but low-output decorative solar stakes rarely reach a nuisance threshold because their output is a few tens of lumens and falls through the night. The realistic exception is a high-output solar security floodlight with a PIR sensor aimed at a boundary, which behaves exactly like a mains floodlight and attracts the same objections. The remedy is the same: re-aim downward, shield, and reduce sensitivity. |
Can a neighbour put lights on my fence?Not without permission if the fence is yours. Ownership of a boundary structure is a legal question determined by title deeds and local convention, and fixing anything to a structure you do not own is generally not permitted. The practical resolution is usually a conversation: a light mounted on a post on the neighbour’s own side, grazing downward, achieves the same effect without any fixing to your property. |
Can IP44 be used outside?Only in genuinely sheltered positions – under a solid roof with a generous overhang, in a fully covered porch, in a soffit protected from splash-back. IP44 protects against splashing water only, not against driven rain, hosing or standing water. In most European climates the category of “genuinely sheltered” outdoor location is much smaller than clients assume: a slatted pergola is not shelter, and a wall under a shallow overhang is not shelter in a westerly gale. Our practice does not specify IP44 in gardens at all, because the cost step to IP65 is trivial and the consequence of failure is total. |
What IP rating do I need for garden lighting?IP65 as a minimum for anything above ground – walls, fences, pergolas, soffits, facades. IP67 for anything at or below ground level, set into paving or decking, inside planters, within irrigated beds, or within about two metres of a pool. IP68 only for permanently submerged applications in ponds, pools and fountains. Note that IP67 means temporary immersion, not permanent submersion, so a recessed channel must still be detailed to drain. |
What is the 5’7″ lighting rule?It is a rule of thumb about eye height rather than a standard: light sources should generally be positioned below roughly 1.7 metres – about average adult eye level – or concealed above it, so that no one looks directly into a source at a normal viewing height. In garden terms it translates into two practical instructions: keep bollards and path lighting low and shielded, and if a source must sit at eye level, recess it deeply and dim it hard. The principle behind it – never let the eye see the LED – is sound and worth applying rigorously. |
Is bright white or daylight better for outdoors?Neither, for residential gardens. Bright white (4000K) and daylight (6000K+) both produce a clinical, commercial appearance, render planting poorly, attract insects because of their high blue content, and create glare. Warm white at 2700K is the correct residential default, with 2200K for ecologically sensitive and hospitality-influenced schemes and 3000K where pale stone and contemporary architecture dominate. Cool white has a legitimate but narrow role in workshops, garages and service areas. |
Are LED lights good for outdoor use?Yes, and they are now the only sensible choice. LED offers 100–140 lumens per watt against 12–18 for halogen, 30,000 to 50,000 hours to L70 against 2,000, full dimmability, instant start in cold weather, no UV emission to attract insects, and IP67 sealed constructions with no serviceable parts. The one caveat is that quality varies enormously: specify CRI Ra>90, a known IP rating, a properly sized aluminium heat sink and a quality constant-voltage driver, and the technology delivers everything it promises. |
Are LED garden lights expensive to run?No – they are the cheapest permanent garden lighting technology available. A 6 W/m strip lighting 18 metres of path draws 108 W at full output, which is around €44 a year at four hours daily. Dimmed to 50% with a curfew, that falls to roughly €18. Because there are no lamps to replace, the lifetime cost is dominated by the initial installation rather than by running or maintenance. |
Are solar garden lights worth it?As decorative markers, sometimes. As a lighting system, no. Solar stakes typically produce 5–30 lumens that decline through the night, use low-CRI cool-white LEDs, cannot be dimmed or zoned, perform badly between October and March when gardens most need light, and have a service life limited by their battery to one to three years. They earn their place where no cable route exists, in rented properties, or for temporary events. For any designed permanent scheme, a mains-fed 24V system is superior on every measure except installation cost. |
What is the downside of solar lights?Five downsides in order of importance: output is low and falls through the night as the battery depletes; winter performance is poor exactly when it is most needed; colour quality is usually poor, with low CRI and cool colour temperature; there is no dimming, zoning or scene control; and the battery limits service life to a few years, after which the whole unit is usually discarded. A sixth, often overlooked, is that panels need direct sun to charge, which is precisely what a mature planted garden does not offer at ground level. |
Do garden solar lights work in winter?Poorly. Charging depends on solar irradiance, which in northern Europe falls by 80–90% between June and December, while the hours of darkness requiring illumination roughly double. Low sun angles, overcast skies, shorter days and panels obscured by leaves or frost compound the problem. Expect very short run times or complete failure on winter evenings. This is the single strongest argument for mains-fed low-voltage lighting in any garden where reliability matters. |
How do I light a dark garden?Counter-intuitively, not by adding more light but by adding the right light in the right places. Start by grazing one vertical surface – the boundary furthest from the house – which pushes the perceived depth of the garden outward and gives the eye something to read. Add a continuous low line along the principal circulation route. Then add one anchor: a single lit tree or feature. Three moves at modest output will transform a dark garden far more effectively than a dozen floodlights, because the eye adapts to darkness and needs contrast, not quantity. |
How do I light my garden cheaply?Buy fewer, better components and place them well. The minimum viable specification is one grazed vertical surface, one circulation line, high-CRI 2700K strip, a dimmable driver and an astronomical timer – in a small garden, roughly five metres of wall graze and six metres of path channel. Cut the dynamic colour first, then feature uplighting, then ambient fill, then the number of grazed surfaces. Never cut CRI, IP rating, dimmability or the quality of buried infrastructure, because those four determine whether the installation is still working in twenty years. |
How do you uplight a garden?Place a narrow-beam fitting at the base of the subject and aim through the structure rather than at the mass – for a tree, that means the beam passing among the branches to reveal the architecture of the canopy from within, not painting a flat green disc. Use one to three fittings for a large specimen, positioned so their beams do not cross a seating or walking position. Set the fitting slightly away from the trunk rather than against it, shield it so the source is not visible, and plan to re-aim as the tree grows. Where bats are present, substitute a concealed downlight in the canopy instead. |
How do you use spotlights in the garden?Sparingly and precisely. Spotlights are the correct tool for anchors – a specimen tree, a sculpture, a feature wall at distance – and the wrong tool for circulation, terraces and general atmosphere. Limit the number to fewer than five in a typical garden, choose narrow beams rather than floods so light lands only on the subject, shield every one so the source cannot be seen from a seat or path, and dim them to 40–60%. A garden with twelve spotlights reads as a car park; a garden with three reads as designed. |
How do you illuminate plants without damaging them?LED sources emit no ultraviolet and very little heat at the distances used in gardens, so direct damage is not a practical concern. The genuine risks are biological rather than thermal: prolonged artificial light can disrupt flowering and dormancy cues in some species and affects the invertebrates that depend on the planting. The mitigations are the same as good design practice – warm colour temperature, low output, a curfew after 23:00, and leaving parts of the planting entirely unlit so the garden retains genuine dark periods. |
How can I light my garden without electricity?The honest answer is that you cannot light it well. The available options are solar stakes, battery units, candles and flame lanterns, and all are marker or event technologies rather than lighting systems. Where a cable route is genuinely impossible, the best compromise is a small number of good-quality rechargeable portable fittings used in the occupied zone, combined with candlelight, and acceptance that the rest of the garden stays dark. If a cable route is merely inconvenient rather than impossible, it is almost always worth the disruption once. |
How do I light my garden for a party?Raise ambient fill rather than adding anchors. Party lighting fails when people add bright sources; it succeeds when the general level rises evenly and warmly. Programme an “Entertain” scene at 50–60% across all zones, bring the pergola and terrace ambient up, add a low warm source near seating so faces are lit rather than silhouetted, and if an RGB+CCT overlay exists, run it at 10–20% behind planting for a subtle tint. Keep the circulation route clearly lit, because the highest risk at a garden party is someone missing a step. |
How do garden lights deter burglars?Through the appearance of occupancy and the elimination of concealment, not through brightness. A single bright floodlight creates deep black shadows immediately adjacent to it, which is exactly where someone can stand unseen. A garden lit evenly and continuously at a low level has no hiding places and looks occupied. The most effective configuration is a warm low-level scheme running all evening, raised to full output on sensor detection using the same fittings, plus a holiday-mode randomisation that varies the scene slightly each night. |
What is the brightest outdoor lighting, and do I need it?The brightest domestic options are high-output LED floodlights of 50–200 W, producing 5,000–25,000 lumens. In a designed garden you almost certainly do not need them. Their only legitimate residential roles are security response and genuine task work such as a workshop or a large hardstanding. Used as garden lighting they destroy dark adaptation, flatten every surface, generate neighbour complaints and produce the aesthetic of a commercial yard. If a client insists, wire them separately, keep them off the atmospheric scenes, and shield them thoroughly. |
What are the newest outdoor lighting trends?Five dominate current practice: the disappearance of the visible fitting in favour of recessed and integrated linear light; a shift to warmer colour temperatures, with 2200K gaining ground alongside the 2700K default; tunable white allowing one installation to serve several moods; dark-sky consciousness expressed through shielding, dimming and curfews; and the treatment of the covered terrace as a hospitality room with layered task, ambient and accent lighting. Underlying all five is a move from decorating with light to designing with it. |
What is the best garden lighting system for a large garden?A distributed 24V or 48V linear system with multiple driver locations, DALI-2 control and a lit-journey design approach. The technical requirements at scale are distributed power to defeat voltage drop, serviceable enclosures at each zone, and addressable control so that twenty-plus zones can be balanced and scheduled independently. The design requirement is restraint: sequence illuminated events along the route and leave genuine darkness between them, because a large landscape lit uniformly reads as infrastructure rather than as garden. |
Which type of landscape lighting is easiest to install?Surface-mounted aluminium profiles with IP65 strip, fixed to an existing wall, fence rail or pergola beam and fed from a nearby weatherproof driver. No excavation, no paving work, no cast-in coordination, and the whole run can be completed with hand tools in an afternoon. The harder installations – walkable floor-recessed channels, cast-in concrete profiles, tiling profiles in a paving bed – are more refined but must be coordinated with hard landscape construction and cannot practicably be retrofitted. |
How do I choose between COB and SMD LED strip?Choose COB wherever the light line itself will be visible – step nosings, path channels, wall grazes, pergola beams, handrails – because COB produces a genuinely seamless line with no dotting, a 180-degree distribution and fine cut intervals, and it bends along curves. Choose SMD where the source is deeply concealed and only its effect is seen, where a narrower distribution is wanted, or where pixel-addressable dynamic effects are required. Both families share the same profiles and diffusers, so mixing them within a project creates no coordination problem. |
Why is my LED strip dimmer at the far end?Voltage drop. Current flowing along the strip’s copper traces and the supply cable causes the voltage to fall with distance, and LED output falls with it – often with a slight warming of colour as well. Three remedies, in order of elegance: inject power at both ends of the run; increase the supply cable cross-section; or split the run into two circuits with separate drivers. Preventing it at design stage is easier: use 24V rather than 12V, keep single-feed runs under about 10 metres, and for very long lines consider 48V. |
How long do LED garden lights last?Quality LED strip in a properly sized aluminium profile is rated at 30,000 to 50,000 hours to L70 – the point at which output has fallen to 70% of its original value. At four hours a day that is twenty to thirty years. In practice the strip usually outlives the driver, which has a realistic service life of eight to fifteen years, and the polycarbonate diffuser, which may yellow after ten to fifteen years of UV exposure. Both are easily replaceable if the installation was designed for access, which is why serviceability matters more than headline lifespan. |
How do I control garden lighting remotely?Three routes cover almost every case. A wireless Bluetooth mesh system such as Casambi offers app control with no control cabling and is ideal for retrofit and mid-range residential work. A Zigbee or Matter ecosystem integrates the garden into an existing smart home. DALI-2 with a gateway is the professional standard for large schemes needing individual addressing and diagnostics. Whichever is chosen, insist on three things at commissioning: clear zone labelling, a printed scene schedule, and a manual override that works when the hub or internet does not. |
What are the best low-maintenance garden lighting options?Sealed IP67 LED strip inside anodised aluminium profiles, fed by drivers housed in accessible weatherproof enclosures. There are no lamps to change, no moving parts and no scheduled maintenance beyond cleaning the diffusers annually and clearing leaves from recessed channels each autumn. Avoid anything with a replaceable lamp, anything with a battery, and any buried connection that cannot be reached without excavation – those three decisions account for nearly all the maintenance burden in garden lighting. |
What are the best materials for durable outdoor lights?Anodised aluminium for profiles and housings, because it combines thermal conductivity with corrosion resistance and an integral hard oxide layer. A2 stainless fixings inland, A4/316 stainless within five kilometres of the coast or near chlorinated water. UV-stabilised polycarbonate for diffusers rather than acrylic, which embrittles. Co-extruded silicone encapsulation for strips rather than simple top-coating, because it resists hydrolysis and UV far better. Avoid mild steel, untreated aluminium at the coast, and any powder coating whose cut ends have not been sealed. |
How can outdoor lighting increase property value?Not as a discrete valuation line, but through two mechanisms that demonstrably affect transactions: perceived quality and time on market. A property photographed at dusk with a coherent lighting scheme presents as a different asset from the same property shot flat at midday, which is why dusk photography is now standard at the premium end. Lighting also extends the usable hours of terraces and outdoor kitchens, which is the feature buyers are actually paying for. The caveat is that over-lit, cold or cluttered schemes have the opposite effect – restraint and component quality are what convert spend into value. |
What is the return on investment for high-end garden lighting?Assessed properly, ROI comes from three streams. First, running-cost avoidance against legacy equipment: a linear LED scheme replacing halogen typically saves €200–€400 a year in a medium garden. Second, maintenance avoidance: no lamp replacements over a twenty-year life, which in a mature landscape means no access equipment, no disruption and no labour. Third, and largest but least quantifiable, asset positioning – extended usable hours, stronger marketing material and better first impressions. For rental and hospitality properties the third stream usually dominates and can pay back the whole installation within a few seasons. |
What lighting colours create the most appealing ambiance?Warm white between 2200K and 2700K, at high colour rendering, at low output. That combination flatters skin, complements foliage green, harmonises with stone and timber, and signals relaxation. Saturated colour should be treated as an event overlay rather than a base state: a permanent blue or purple garden reads as festive and ages within a week, while a 10–20% RGB tint behind planting on a single evening reads as sophisticated. If colour is wanted, specify RGB+CCT rather than RGB so the white channel remains the daily default. |
How can I make my garden look more attractive in evening photos?Four changes do most of the work. Shoot during the blue hour, roughly fifteen to twenty-five minutes after sunset, when sky and artificial light are naturally balanced – set the astro timer with a negative offset so the scheme is already on. Keep one colour temperature per sightline, because mixed CCT produces a colour cast no edit can fix. Reduce contrast by raising ambient fill and lowering anchors, since a phone sensor has far less dynamic range than the eye. And add a low warm source in front of seating so faces are lit rather than silhouetted. |
How do I troubleshoot a garden lighting fault after rain?Work from the supply outward. Check whether the RCD has tripped, which points to water in a mains junction or a damaged cable. If the RCD is fine and one zone is dead, the fault is almost always a low-voltage junction or a cut strip end that has taken water – open the nearest accessible enclosure, inspect for corrosion, re-terminate and reseal. If a run works but flickers, suspect a partially corroded connection rather than a driver. Condensation inside a profile usually means there is no weep hole at the low end. Keep the as-built drawing to hand; without it, tracing a buried fault becomes excavation. |
23. Glossary of garden lighting terms
The vocabulary below is the working language of exterior lighting specification. Fluency in these terms is what allows a designer, a contractor and a supplier to describe the same intention without ambiguity, and ambiguity is where most project variations originate.
| Term | Definition |
|---|---|
| Anodising | Electrochemical process that thickens the natural oxide layer on aluminium, producing a hard, integral, corrosion-resistant surface. The default exterior finish specification. |
| Astronomical timer | Controller that calculates sunrise and sunset for a given location and date, switching lighting automatically as the seasons change. |
| Beam angle | The angular width of a point source’s output, measured where intensity falls to 50% of centre. Narrow beams below 25 degrees suit tree uplighting; wide beams suit washing. |
| Binning | Sorting of LEDs by colour and output during manufacture. Tight binning ensures runs from the same order match visibly. |
| Blue hour | The period shortly after sunset when the sky retains deep blue luminance; the most photogenic window for garden photography. |
| CCT | Correlated colour temperature, in kelvin. Lower values are warmer. 2700K is the residential garden default. |
| COB | Chip-on-board. LED construction bonding many small chips under a continuous phosphor layer, producing a seamless dotless line. |
| Constant voltage driver | Power supply delivering a fixed voltage, typically 24V DC, regardless of load. The correct driver type for LED strip. |
| CRI / Ra | Colour rendering index. A measure of how faithfully a source renders colour. Ra>90 is the minimum for planting and skin. |
| Curfew | A scheduled reduction or extinction of lighting at a set hour, typically 22:30–23:30, for energy, ecology and neighbour amenity. |
| Cut point | The defined interval at which an LED strip can be cut without damaging a circuit segment. Finer intervals allow more precise lengths. |
| DALI / DALI-2 | Digital Addressable Lighting Interface. A digital control protocol allowing individual addressing, scene control and diagnostics. |
| Diffuser | The translucent cover of a profile. Controls glare, hides dots and shapes distribution. Available in clear, frosted and opal. |
| Efficacy | Light output per unit of power, in lumens per watt. Quality LED strip achieves 100–140 lm/W. |
| Grazing | Lighting a surface from very close range at an acute angle to reveal texture through shadow. |
| IP rating | Ingress protection code. First digit solids, second liquids. IP65 above ground, IP67 at ground level. |
| L70 | The operating hours at which an LED’s output has depreciated to 70% of initial. The standard lifetime metric. |
| Lumen (lm) | Total light emitted by a source. A property of the product. |
| Lux (lx) | Light arriving on a surface: one lumen per square metre. A property of the design. |
| MacAdam ellipse | Measure of colour consistency between LEDs. Lower step numbers indicate tighter matching. |
| Moonlighting | A concealed warm downlight high in a tree canopy, casting branch shadows on the ground below. |
| PWM | Pulse-width modulation. Dimming by rapidly switching the supply. High frequencies avoid visible flicker and camera banding. |
| RCD | Residual current device. Protective device, typically 30mA, required on outdoor circuits in most European jurisdictions. |
| SELV | Separated extra-low voltage. Systems at or below 50V AC / 120V DC presenting no shock hazard. 24V garden lighting is SELV. |
| Silhouetting | Lighting a surface behind a plant so the plant reads as a dark outline against a glowing plane. |
| SMD | Surface-mount device. LED construction placing discrete diodes at intervals on a flexible PCB. |
| Uplighting | Lighting a subject from below, typically a tree or architectural feature, using a narrow-beam directional fitting. |
| Voltage drop | The fall in voltage along a cable or strip caused by resistance, producing dimmer output at the far end of a run. |
| Walkable profile | An aluminium extrusion with a reinforced cover, designed to be set flush into a floor or paving and to accept foot traffic. |
24. Specifying light that lasts twenty years
If this guide has a single argument, it is that garden lightings are a design discipline rather than a shopping category, and that the difference between a garden that feels expensive at night and one that feels cheap has almost nothing to do with how much was spent. It has to do with restraint, hierarchy, colour quality, concealment of the source and the willingness to leave things dark. Every one of those is free.
The technical decisions that matter reduce to a short list. Work at 24V SELV, specify 2700K with a colour rendering index above Ra 90, use IP65 above ground and IP67 at ground level, size drivers with 20% headroom, keep single-feed runs under ten metres, make every junction serviceable, dim everything, zone the garden into at least three parts, and commission after dark with the client present. A scheme that observes those nine rules will be working, and will still look considered, twenty years from now.
The compositional decisions reduce to an even shorter list. Light one vertical surface before you light anything else. Keep the number of anchors below five. Let the circulation layer be the quietest thing in the garden. Design for the view from the kitchen window as much as for the view from the terrace. And treat darkness as a material you are spending, not an absence you are filling.
This article was developed with the support of artificial intelligence and subsequently reviewed, corrected, and validated by the LightingLine.eu technical team, which guarantees its reliability and compliance with official sources.