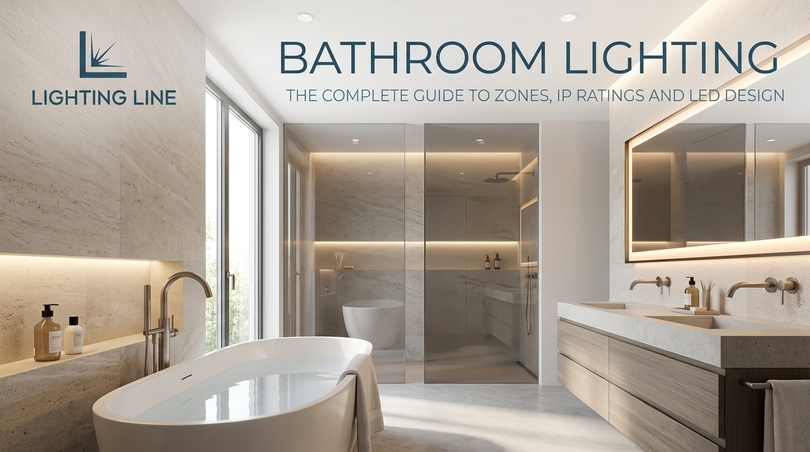
Bathroom lighting is the single most under-engineered element in modern interior design, and also the one that most visibly decides whether a room feels like a spa or a service corridor. Every other room in a home forgives a mediocre lighting scheme. A living room with flat, badly positioned light still works as a living room. A bathroom does not. It is the only space in a dwelling where water, electricity, reflective surfaces, steam, precision grooming tasks and statutory safety regulation all converge into a few square metres, and where the human face is examined at close range under artificial light several times a day. Get the bathroom lighting wrong and the consequences are immediate and daily: harsh shadows under the eyes, a mirror that lies about skin tone, glare bouncing off gloss tiles, a fitting that corrodes within eighteen months, or (at worst) an installation that fails to meet the requirements of IEC 60364-7-701 and its national implementations.
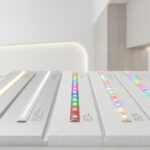
This guide has been written by the technical team at Lighting Line, a European manufacturer of Italian-designed aluminium profiles and fully customisable LED strips, and it approaches bathroom lighting the way a lighting engineer approaches it rather than the way a catalogue does. It explains the zoning rules first, because they constrain everything that follows. It explains the photometrics second, because lumens, colour temperature, colour rendering and beam geometry determine how the room actually looks. It explains the hardware third, because the profile, the diffuser and the thermal path matter more to the final result than the brand printed on the box. And it explains installation and maintenance last, because a bathroom lighting scheme that cannot be serviced is a scheme with an expiry date.
The central argument of this article is simple: the best bathroom lighting in 2026 is linear, integrated, low-voltage and built from components rather than bought as fittings. A continuous line of LED light housed inside an extruded aluminium profile, diffused through an opal lens, cut to the exact millimetre of your architecture, produces better light, lasts longer, glares less and costs less per lumen than any equivalent decorative fitting. This is a consequence of how thermal management, source size and glare control work. By the end of this guide you will be able to specify a complete bathroom lighting scheme (zone by zone, lumen by lumen, profile by profile) and know exactly why each decision was made.
In this article…
- Why bathroom lighting matters more than any other room
- The physics of a wet room: steam, gloss and reflection
- Bathroom lighting zones: zone 0, 1, 2 and beyond
- IP ratings decoded: IP44 vs IP65 vs IP67 for bathroom lighting
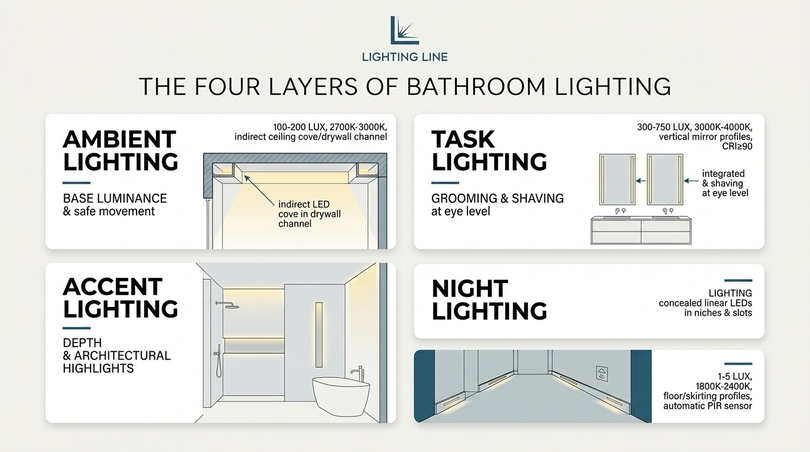
- The four layers of bathroom lighting
- Linear light: why LED strips and aluminium profiles outperform fittings
- Vanity and mirror lighting: the zero-shadow formula
- Bathroom ceiling lighting: recessed, plaster-in and trimless
- Bathroom wall lighting, cove and perimeter schemes
- Shower, niche and wet-zone bathroom lighting
- Floor, skirting and night bathroom lighting
- Warm or cool bathroom lighting?
- Lumens, lux and wattage: how bright should bathroom lighting be?
- CRI, R9 and flicker: the quality metrics nobody advertises
- Small bathroom lighting and bathrooms with no windows
- Modern bathroom lighting trends and designs for 2026
- Smart, tunable and circadian bathroom lighting
- Energy efficiency and real running costs
- Installation guide: fitting LED profiles in a bathroom
- Fifteen common bathroom lighting mistakes
- Three worked projects with full bills of materials
- Choosing the right profile from the lighting line catalogue
- Maintenance, troubleshooting and service life
- Regulations and compliance across Europe and the UK
- The specifier’s checklist
- Frequently asked questions about bathroom lighting
- Designing light, not buying fittings
1. Why bathroom lighting matters more than any other room
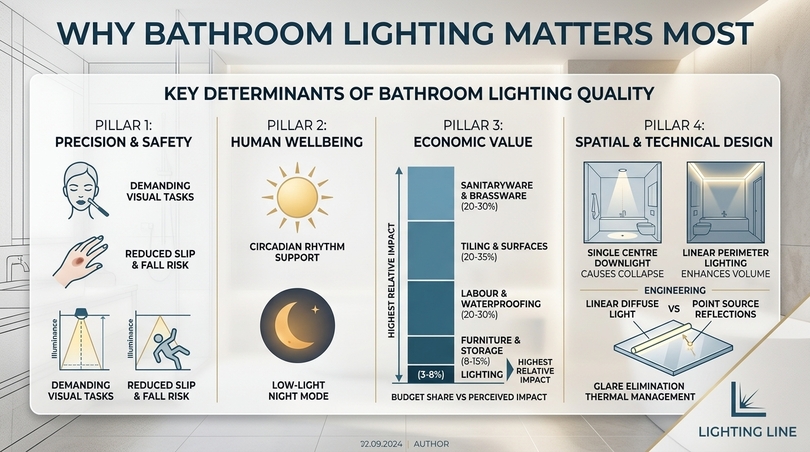
Before any discussion of fittings, profiles or colour temperature, it is worth establishing why this room deserves disproportionate attention. The bathroom occupies a small percentage of a dwelling’s floor area (typically between four and nine per cent in European housing stock) yet it concentrates a remarkable density of demanding visual tasks, safety hazards and emotional expectations. No other room asks light to do so many contradictory things in so little space.
Why bathroom lighting serves precision tasks at close range
Shaving, applying makeup, inserting contact lenses, checking a mole, flossing, reading a medicine label, trimming a fringe: these are all high-acuity tasks performed at a distance of twenty to fifty centimetres from a reflective surface. In occupational lighting terms they belong to the same difficulty class as fine assembly work or laboratory inspection. An office desk is typically designed for 500 lux. A bathroom mirror, if it is to support grooming without error, needs comparable vertical illuminance on the face and vertical illuminance, not horizontal, is the metric that matters. A ceiling downlight delivering 500 lux onto the floor may deliver as little as 80 lux onto a vertical face. This single measurement gap explains why so much bathroom lighting feels inadequate despite consuming plenty of energy.
The safety: wet floors, hard surfaces and ageing eyes
Bathrooms are consistently identified in European and North American injury data as one of the highest-risk rooms in the home for slips and falls, with the risk rising sharply with occupant age. The contributing factors are well documented: wet ceramic and porcelain surfaces, small circulation spaces, hard edges at hip and head height, thresholds at shower entries, and frequent transitions between darkness and bright light during the night. Good bathroom lighting reduces fall risk in three distinct ways: by providing adequate uniform illuminance so that water on the floor is visible as a specular highlight, by eliminating deep shadows at thresholds and shower trays and by offering a low-level night mode that removes the need for a sudden full-brightness switch-on at three in the morning.
The third point is frequently overlooked. Human dark adaptation takes twenty to thirty minutes to complete and is destroyed in under a second by a bright ceiling light. A person who wakes, switches on a 3,000-lumen ceiling fitting and then walks across a tiled floor is functionally dazzled for several seconds. A 3-lumen floor-level strip at 2200 K achieves navigation without disrupting adaptation or melatonin. This is one of the clearest cases where correct bathroom lighting design produces a measurable health and safety outcome rather than merely an aesthetic one.
The physiological argument: light, circadian rhythm and the morning routine
For most adults the bathroom is the first artificially lit space entered after waking and the last before sleep. That places it precisely at the two most sensitive points of the circadian cycle. Morning exposure to bright, blue-enriched light advances the circadian phase and improves alertness; evening exposure to the same light suppresses melatonin and delays sleep onset. A bathroom lighting scheme that delivers identical 4000 K light at 07:00 and 23:00 is working against the occupant twice a day. A scheme that can shift from a cool, high-illuminance morning setting to a warm, low-illuminance evening setting is the single most valuable functional upgrade available in a domestic bathroom, and it costs less to implement with LED strip and profile than with any other technology.
The economic argument: light as the cheapest renovation lever
Bathroom renovation budgets are dominated by sanitaryware, tiling and labour. Lighting typically absorbs between three and eight per cent of the total. Yet in post-completion satisfaction surveys carried out by design practices and trade bodies, lighting quality consistently ranks among the top three determinants of whether occupants describe the finished room as “luxurious” or merely “clean”. No other line item in a bathroom budget delivers as much perceived value per euro spent. A continuous perimeter of diffused linear light costs a fraction of an upgraded shower enclosure but changes the apparent volume, material quality and calm of the room far more dramatically.
| Budget line | Typical share of spend | Relative impact on perceived quality | Reversibility |
|---|---|---|---|
| Sanitaryware and brassware | 20-30% | High | Low |
| Tiling and surfaces | 20-35% | High | Very low |
| Labour and waterproofing | 20-30% | Invisible but critical | None |
| Furniture and storage | 8-15% | Medium | Medium |
| Bathroom lighting | 3-8% | Very high | Medium-high |
| Ventilation | 2-5% | Invisible but critical | Medium |
The design argument: light defines perceived volume
Small bathrooms are the norm across European housing, and the perception of space in a small room is governed almost entirely by two things: sightlines and luminance distribution. A room lit only from the centre of the ceiling collapses visually, because the brightest surface is directly overhead and the perimeter walls fall into relative gloom. The eye reads the room as smaller than it is. Reverse the distribution (light the walls and let the centre of the ceiling stay dark) and the same room reads as substantially larger. Wall-washing is the most powerful spatial tool in bathroom lighting, and it is almost impossible to achieve with point sources. It requires a linear source, which means a strip inside a profile.
2. The physics of a wet room: steam, gloss and reflection
A bathroom is not simply a small room that happens to contain water. From an optical and electrical standpoint it is a distinct environment with properties that change how light behaves and how equipment ages. Designers who transplant a bedroom lighting approach into a bathroom are usually surprised by glare, by uneven brightness and by premature failure. Understanding four specific physical characteristics of the wet room prevents all three problems.
Specular surfaces and the bathroom lighting glare multiplier
Most domestic interiors are dominated by diffuse surfaces: plaster, paint, textile, timber. These scatter incident light broadly and forgive imprecise aiming. A bathroom is dominated by specular and semi-specular surfaces: polished porcelain, glazed ceramic, glass screens, chromed brassware, and a large mirror. Specular surfaces do not scatter light; they reproduce the image of the source. A 25 mm bright LED point reflected in a gloss tile becomes a 25 mm bright dot in the field of view, at full source luminance. Multiply that by six downlights and two mirrors and the room contains dozens of high-luminance points competing for attention.
The engineering answer is to reduce source luminance while maintaining total flux: in other words, to spread the same lumens over a much larger emitting area. A 1.2 metre linear profile with an opal diffuser emitting 1,500 lumens has a surface luminance one to two orders of magnitude lower than a 1,500-lumen spotlight, because the light leaves through roughly 12,000 mm² of diffuser instead of a 30 mm lens. Its reflection in a gloss tile is a soft band rather than a searing dot. This is the fundamental reason why high-quality modern bathroom lighting is linear.
Humidity, condensation and the dew point
A hot shower raises local relative humidity to saturation within two to four minutes. Any surface below the dew point (typically an external wall, a window reveal, a metal fitting, or the cold ceiling above an unheated void) collects liquid condensation. This is not the same hazard as direct water jets, and it demands a different response. Condensation attacks through capillary ingress at joints, through corrosion of dissimilar metals, and through repeated wet-dry cycling of adhesives.
The practical consequences for bathroom lighting hardware are three:
- adhesive-only mounting of LED strip directly onto tile or plaster will eventually fail in a bathroom, because the adhesive is thermally cycled and humidity-cycled daily and mechanical retention inside a profile is essential;
- aluminium profiles with anodised surfaces resist this environment far better than painted steel or untreated extrusions;
- any electrical connection inside Zone 1 or Zone 2 must be either sealed or located outside the humid envelope, which in practice means putting drivers and connectors outside the bathroom or in a ventilated cupboard.
Thermal behaviour in a confined, humid space
LEDs are semiconductors, and their light output, colour stability and lifetime are all governed by junction temperature. Every 10 °C rise in junction temperature roughly halves useful life in the region that matters. A bathroom raises ambient temperature during use, reduces convective cooling because the air is still and saturated, and often encloses the light source in a sealed recess. This is exactly the condition in which unprofiled LED strip fails. Strip stuck to plasterboard has no heat path; strip mounted in a 1.5 mm-wall aluminium extrusion has an effective heat sink with hundreds of times the thermal conductivity. The difference between a bathroom lighting installation that lasts three years and one that lasts fifteen is very often nothing more than the presence of an aluminium profile.
Acoustic and atmospheric perception
Hard, reflective bathroom surfaces also produce a long reverberation time, which the brain associates with institutional environments. There is a well-documented cross-modal effect in which warmer, lower-intensity, non-uniform lighting measurably softens the perceived harshness of an acoustically live room. In practical terms, a bathroom lit with a single bright cool downlight feels clinical partly because of what it sounds like and the same room with layered, warm, low-glare bathroom lighting feels calm even though the acoustics are unchanged. This is why the spa aesthetic depends on indirect light far more than on materials.
| Parameter | Living room | Kitchen | Bathroom | Design consequence |
|---|---|---|---|---|
| Dominant surface finish | Diffuse | Mixed | Specular | Source luminance must be low |
| Peak relative humidity | 40-60% | 50-70% | 95-100% | Sealed or SELV solutions required |
| Statutory zoning | None | None | Zones 0/1/2 | IP rating is mandatory, not optional |
| Critical illuminance plane | Horizontal | Horizontal | Vertical (face) | Downlights alone are insufficient |
| Typical mounting depth available | 150-300 mm | 100-200 mm | 8-40 mm | Slim profiles and plaster-in solutions |
| Night-time low-light use | Rare | Occasional | Daily | Dedicated night circuit needed |
3. Bathroom lighting zones: zone 0, 1, 2 and beyond
Every serious conversation about bathroom lighting begins with zoning, because the zones determine which products are legally and physically permissible in each part of the room. The framework originates in IEC 60364-7-701, the international standard covering electrical installations in locations containing a bath or shower, and is transposed into national rules across Europe: most familiarly into BS 7671 in the United Kingdom, and into the CEI 64-8 series in Italy. The zones are defined by proximity to water, not by how wet a surface happens to get in practice, and they apply regardless of how careful the occupant is.
The important conceptual point is that the zones are volumes, not areas. A zone extends upward, outward and sometimes through partitions. A designer who thinks in floor plan alone will misclassify wall lights and ceiling recesses routinely. What follows is a plain-language description of each zone together with what it means for real bathroom lighting decisions.
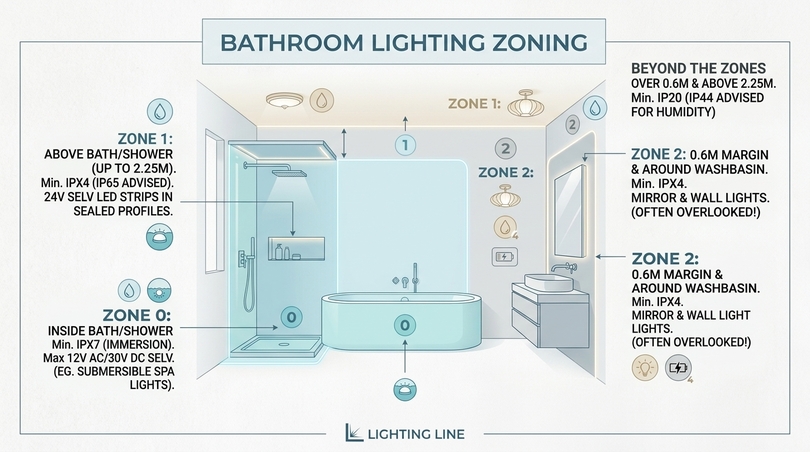
Zone 0 – inside the bath or shower basin
Zone 0 is the interior of the bath tub or the shower tray itself: the volume that will contain water during normal use. Any equipment installed here must be rated at least IPX7, meaning protection against temporary immersion, and must be supplied by SELV at a maximum of 12 V AC or 30 V DC ripple-free, with the safety source located outside the zones. In practice, domestic bathroom lighting almost never places equipment in Zone 0. The rare exceptions are purpose-built submersible spa luminaires and certain integrated whirlpool systems. Standard LED strip, even IP67-rated LED strip, is not a Zone 0 product, and should never be specified as one.
Zone 1 – directly above the bath or within the shower enclosure
Zone 1 is the volume above Zone 0, extending to 2.25 metres above the finished floor level, and bounded horizontally by the perimeter of the bath or tray. In a shower without a tray, Zone 1 is generally taken as a 1.2 metre radius from the fixed water outlet. Equipment here requires a minimum of IPX4 protection, rising to IPX5 wherever water jets are used for cleaning: which is why many specifiers simply default to IP65 in showers. Where a fitting in Zone 1 operates at mains voltage, it must be protected by a 30 mA RCD, and SELV supply at 12 V is frequently preferred.
Zone 1 is where the argument for low-voltage LED strip inside a waterproof aluminium profile becomes overwhelming. A 24 V SELV strip housed in a sealed extrusion presents no shock hazard even in the presence of water, generates negligible heat, occupies a few millimetres of depth, and can follow the geometry of a niche or a ceiling recess without any of the compromises of a bulky sealed downlight. The Lighting Line 32×10 mm recessed waterproof aluminium profile in 3-metre lengths (reference RE07-12-S3) is designed precisely for this application, and the tiling profile family extends the same logic to tiled wet-room construction.
Zone 2 – the 0.6 metre margin around Zone 1
Zone 2 extends 0.6 metres horizontally beyond the boundary of Zone 1 and up to 2.25 metres above floor level. It also includes the region around a washbasin: specifically the volume within 0.6 metres of the tap, in most national interpretations. The minimum requirement is IPX4. This is the zone in which the majority of real-world bathroom lighting decisions are made, because it contains the vanity, the mirror, and most of the wall surface that a designer wants to illuminate.
The washbasin rule surprises many homeowners: a mirror light positioned above a basin is very often in Zone 2 and therefore requires an IP44 minimum rating. This is the single most common compliance failure in domestic bathroom lighting, because decorative mirror lights sold for bedroom dressing tables are frequently IP20 and carry no warning that they are unsuitable. Using an enclosed, sealed profile with a low-voltage strip sidesteps the problem entirely.
Outside the zones
Beyond 0.6 metres from Zone 1 and the basin, and above 2.25 metres, the statutory IP requirement falls away and standard IP20 equipment becomes permissible – provided the installation still complies with general requirements, including RCD protection and correct earthing and bonding. Even here, specifying IP20 in a bathroom is usually a false economy. The steam that reaches a ceiling cornice is the same steam that reaches the shower wall, and condensation does not read the regulations. Our standing recommendation for any bathroom lighting scheme is IP44 as an absolute floor anywhere in the room, IP65 in and around the shower, and IP20 accepted only for fully enclosed cove installations that are demonstrably outside the humid envelope.
Zones in wet rooms, walk-in showers and open-plan bathrooms
Contemporary bathroom design increasingly dissolves the boundary between wet and dry. A walk-in shower with no door, a freestanding tub in the middle of the floor, or an en-suite that opens directly into a bedroom all complicate zoning. The governing principle is that where no physical barrier interrupts the spread of water, the zone must be measured from the outlet and extended accordingly. A rainfall head mounted centrally over an open wet area generates a Zone 1 volume that may swallow half the room. In these projects, designing the entire bathroom lighting scheme to IP65 is not paranoia; it is the only defensible approach.
| Zone | Physical definition | Minimum IP | Voltage guidance | Suitable Lighting Line approach |
|---|---|---|---|---|
| Zone 0 | Interior of bath or shower tray | IPX7 | SELV 12 V max, source remote | Purpose-built submersible only |
| Zone 1 | Above Zone 0 to 2.25 m, 1.2 m radius from a trayless outlet | IPX4 (IPX5 if jetted) | SELV 24 V strongly preferred | Waterproof recessed and tiling profiles |
| Zone 2 | 0.6 m beyond Zone 1 to 2.25 m, 0.6 m around basin taps | IPX4 | SELV or RCD-protected mains | Mirror, wall and drywall profiles |
| Outside zones | All remaining volume | IP20 permitted | Standard domestic circuits | Any profile; IP44 still advised |
Why zoning should shape the design, not restrict it
Designers often experience zoning as a constraint that removes options. The opposite is true once you stop thinking in fittings. Zoning penalises point sources and rewards integrated linear light. A sealed profile carrying a 24 V SELV strip is simultaneously compliant in Zone 1, invisible when switched off, capable of any length, dimmable, and serviceable. Almost every restriction the zones impose is a restriction on bulky, mains-voltage, replaceable-lamp fittings. The regulations are, in effect, pushing bathroom lighting toward exactly the technology that produces the best visual result anyway.
4. IP ratings decoded: IP44 vs IP65 vs IP67 for bathroom lighting
The IP code is the most quoted and least understood specification in bathroom lighting. It appears on every product page and in every regulation, yet the majority of purchasers treat it as a single quality score rather than as two independent measurements. Understanding the two digits properly resolves nearly every common question about which light is safe where, and it explains why a higher number is not automatically a better choice.
What the two digits actually measure
IP stands for Ingress Protection, defined in IEC 60529. The first digit describes protection against solid objects and dust; the second describes protection against water. They are tested independently. An IP44 product resists solid objects larger than 1 mm and splashing water from any direction. An IP65 product is fully dust-tight and resists low-pressure water jets. An IP67 product is dust-tight and withstands temporary immersion to one metre for thirty minutes.
An X in either position means the property was not tested, not that it failed. IPX4 is therefore a perfectly valid rating for a bathroom fitting even though it says nothing about dust and regulations for bathroom lighting are written in terms of IPX4 and IPX5 precisely because dust ingress is not the relevant hazard in a wet room.
| Code | Solid protection | Water protection | Typical bathroom application | Verdict |
|---|---|---|---|---|
| IP20 | Fingers >12.5 mm | None | Dry ceiling coves outside all zones | Acceptable only outside zones |
| IP44 | Objects >1 mm | Splashing from any direction | Mirror, vanity, general wall lighting | Minimum standard for Zone 2 |
| IP54 | Dust protected | Splashing from any direction | Ceiling near shower, ventilated recesses | Good general-purpose choice |
| IP65 | Dust tight | Low-pressure jets | Shower ceiling, niches, wet rooms | Recommended default for Zone 1 |
| IP67 | Dust tight | Immersion to 1 m, 30 min | Floor profiles, thresholds, steps | For horizontal wet surfaces |
| IP68 | Dust tight | Continuous immersion | Submerged spa and pool features | Specialist only |
Do all bathroom lights need to be IP44?
No but the exceptions are narrower than most people assume. Strictly, IP44 is required inside Zone 1 and Zone 2, and outside those volumes IP20 is permitted. However, three practical factors push the sensible answer toward “yes, effectively”. First, the basin rule extends Zone 2 to most of the vanity wall. Second, condensation does not respect zone boundaries, and repeated wetting of an IP20 fitting shortens its life even where it is technically legal. Third, resale, insurance and building-control scrutiny all favour a consistent specification. Treating IP44 as the floor for all bathroom lighting is simpler to document, cheaper to standardise and more durable in service.
Is IP44 or IP65 better for bathrooms?
Better is the wrong frame; correct is the right one. IP65 is not a superior version of IP44 in every respect. Fully sealed enclosures trap heat, which raises LED junction temperature and can shorten life in a confined recess. Sealed diffusers are harder to clean internally if condensation ever does penetrate. Sealed profiles cost more per metre and require matched end caps and gaskets. The correct approach is to match the rating to the zone rather than to over-specify uniformly. Use IP65 in the shower and above the bath; use IP44 at the mirror, on the walls and at the ceiling elsewhere; reserve IP67 for floor-level and threshold installations where standing water is plausible.
What IP ratings mean for LED strip in bathroom lighting
LED strip is sold in several distinct constructions, and the marketing language is often loose. The three constructions that matter are bare IP20 strip, silicone-coated IP65 strip, and fully encapsulated IP67 strip. Bare strip has the best thermal performance and the thinnest profile but no water protection at all. Silicone-coated IP65 strip, of the kind available in the Lighting Line SMD range, adds a conformal layer over the emitters that resists splashing and jets while remaining flexible and cuttable at the marked points. Fully encapsulated strip is sealed inside a silicone tube and is appropriate for immersion-risk locations, at the cost of light output, cutting flexibility and heat dissipation.
For the overwhelming majority of bathroom lighting projects, the optimal combination is an IP65 silicone-coated strip inside a waterproof aluminium profile with sealed end caps. The profile provides the mechanical and thermal function; the strip coating provides redundancy; the end caps and gaskets complete the envelope. This assembly outperforms a single-component sealed fitting on every metric that matters, and it can be cut to any length on site.
A note on IK ratings and mechanical protection
IP is not the only ingress code. IK, defined in IEC 62262, measures resistance to mechanical impact on a scale from IK00 to IK10. It rarely appears in domestic specifications but becomes relevant in two bathroom contexts: floor-level and step lighting, where a dropped object or a foot strike is likely, and commercial or hospitality washrooms subject to heavy use. Aluminium profiles inherently deliver good impact resistance, which is a further argument for integrated linear bathroom lighting in public and hospitality projects.
5. The four layers of bathroom lighting
A bathroom needs four distinct layers, and the failure of most domestic schemes is not that they use the wrong products but that they attempt to make one layer do all four jobs. A single central ceiling fitting is being asked to provide ambient fill, task illumination at the mirror, decorative emphasis and night-time orientation simultaneously and it cannot succeed at any of them.
The four layers are independent in function, independent in control and ideally independent in circuit. Once separated, each can be optimised without compromising the others, and the room gains the ability to present several completely different characters at different times of day. This is the structural foundation of every high-end bathroom lighting scheme, whether the budget is four hundred euros or forty thousand.
Layer one: ambient bathroom lighting
Ambient light establishes the base luminance of the room and allows safe movement. Its defining quality should be softness and uniformity, not intensity. A good ambient layer produces very few hard shadows, illuminates the walls as well as the floor, and never becomes the brightest visible element. The best ambient bathroom lighting is indirect: light thrown onto a ceiling or wall surface and reflected back into the room. Perimeter coves, ceiling-level wall grazing and drywall-integrated channels all achieve this. A continuous run of warm-white strip inside a drywall profile along two walls of a small bathroom produces a shadowless ambient field that no combination of downlights can match.
Target illuminance for the ambient layer alone is 100 to 200 lux at floor level. This sounds low, and it is deliberately low: the ambient layer is the canvas, not the picture. When the ambient layer is set too bright, every other layer becomes invisible and the room flattens.
Layer two: task bathroom lighting
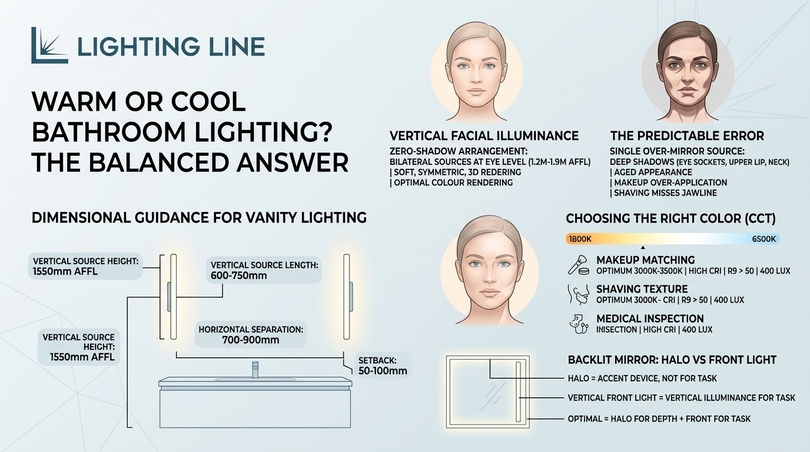
Task light serves the mirror, the vanity and, in larger bathrooms, a makeup station or a reading position beside a tub. Its defining quality is directionality and vertical delivery. Task bathroom lighting must reach the face, not the countertop. The single most important geometric principle in the whole of bathroom lighting design is that light for grooming should arrive from both sides of the face at roughly eye height, because that is the only arrangement that eliminates the under-eye, under-nose and under-chin shadows produced by overhead sources.
Target vertical illuminance on the face is 300 to 500 lux for general grooming and 500 to 750 lux for precision work such as makeup application or close shaving. Colour rendering matters more here than anywhere else in the home, a point developed in detail in section 14.
Layer three: accent and architectural bathroom lighting
Accent light creates hierarchy, reveals material and generates the sense of depth that separates a designed bathroom from a serviced one. It is the layer responsible for the shower niche that glows, the floating vanity that appears to hover, the textured feature wall that reads as stone rather than as a flat plane. Accent bathroom lighting is where linear LED and aluminium profiles are not merely better than the alternative — they are the only practical option, because the effects depend on concealing a continuous source within millimetres of a surface.
The classic accent moves in a bathroom are a strip under the vanity unit washing the floor, a strip inside a shower niche washing the back tile, a strip behind a mirror producing a halo, and a strip in a slot at the wall-ceiling junction grazing the tile downward. Each requires a different profile geometry, and all four are achievable from a single catalogue family.
Layer four: night and orientation bathroom lighting
The night layer is the most neglected and the most appreciated once installed. Its job is to allow a half-awake person to enter, orient and use the room without destroying dark adaptation. The correct specification is extremely low output (two to ten lumens per metre) at a very warm colour temperature of 2200 K to 2700 K, mounted low, and triggered automatically. A PIR sensor with a dusk override, or a simple low-level scene on a dimmer, both work.
Floor-level and skirting-level installation is ideal because it puts light where the feet are, keeps the source far below eye level, and illuminates the floor plane where water may be present. A floor profile or a baseboard profile carrying a heavily dimmed strip achieves this with almost no energy consumption and transforms the night-time experience of the room.
| Layer | Function | Target level | CCT | Preferred technology | Control |
|---|---|---|---|---|---|
| Ambient | Base luminance, safe movement | 100-200 lux horizontal | 2700-3000 K | Indirect cove or drywall channel | Dimmable, main switch |
| Task | Grooming, shaving, makeup | 300-750 lux vertical on face | 3000-4000 K, CRI ≥90 | Vertical mirror-side profiles | Separate circuit, dimmable |
| Accent | Depth, material, hierarchy | 2-3× adjacent surface | 2700-3000 K | Concealed linear in niches and slots | Scene-controlled |
| Night | Orientation without dazzle | 1-5 lux at floor | 1800-2400 K | Floor or skirting profile | PIR or timed scene |
Circuiting the four layers
Layer separation is meaningless if all four are on one switch. The minimum viable circuit strategy for a domestic bathroom is three: ambient plus accent on one dimmable circuit, task on a second, and night on a third with automatic control. A more sophisticated scheme places all four on a scene controller and offers three or four presets (Morning, day, evening, night) each of which mixes the layers at different levels and, if the strips are tunable white, at different colour temperatures. Scene control is what converts a technically good bathroom lighting installation into one that people describe as remarkable.
6. Linear light: why LED strips and aluminium profiles outperform fittings
This section makes the technical case that runs through the entire guide. It is not a preference or a stylistic position. It is the consequence of four measurable properties: emitting area, thermal path, geometric freedom and serviceability. Understanding these properly explains why architectural lighting practices specify linear systems for premium bathroom lighting almost without exception, and why the domestic market is following.
The anatomy of a linear bathroom lighting profile system
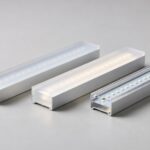
An architectural linear lighting installation consists of five components. The extruded aluminium profile provides mechanical support, thermal dissipation, optical alignment and, where required, the recess detail that makes the light appear as part of the architecture rather than as an object attached to it. The diffuser (usually opal, frosted or milky polycarbonate) converts the array of discrete emitters into a continuous luminous band and controls glare. The LED strip supplies the light at a chosen colour temperature, colour rendering class, power density and cutting pitch. End caps and mounting brackets close and fix the assembly. The driver converts mains to 12 V or 24 V SELV and, where required, provides the dimming interface.
Lighting Line manufactures all five categories as a coordinated system: 126 profile references across sixteen families, 27 diffuser options, 168 end cap references, 58 mounting bracket references and a strip range spanning SMD and COB technologies. The coordination matters more than any individual component, because a profile whose internal channel does not match the strip width, or whose end cap does not seal against the chosen diffuser, produces exactly the failures that give integrated bathroom lighting a bad reputation.
Emitting area and the glare equation
Discomfort glare scales with source luminance, which is luminous intensity divided by apparent emitting area. Consider two ways of putting 1,200 lumens into a bathroom. A compact downlight emits through an aperture of perhaps 50 mm diameter, roughly 1,960 mm². A one-metre profile with an 18 mm-wide opal diffuser emits through 18,000 mm². The linear solution spreads the same flux over more than nine times the area, cutting source luminance by an order of magnitude. In a room full of mirrors and gloss tile, that difference is not subtle; it is the difference between a room that feels serene and a room that makes people squint.
Thermal path and bathroom lighting service life
LED lifetime is specified as L70 or L80, the operating hours after which output falls to 70% or 80% of initial. Manufacturers quote figures such as 50,000 hours, but those figures assume a specified case temperature. Raise the temperature and the number collapses. Aluminium has a thermal conductivity of roughly 200 W/m·K; plasterboard is around 0.25, and polycarbonate around 0.2. Mounting strip directly on plasterboard or inside a plastic channel is, thermally speaking, mounting it inside an insulator.
A correctly sized aluminium profile with the strip bonded to the base draws heat away from the PCB continuously, keeping junction temperature within specification. In a humid bathroom where ambient temperature rises during use and air movement is minimal, this is not a marginal improvement. It is frequently the difference between reaching the quoted lifetime and losing a third of it.
Power density and heat: why watts per metre is a design decision
Lighting Line strips are available across a wide power band, from 4.8 W/m up to 24 W/m. There is a common assumption that higher power is better. In bathroom lighting the opposite is usually true. A lower power density spread over a longer run produces the same total flux with lower surface temperature, lower glare and better uniformity. Six metres at 9.6 W/m delivers more usable light in a small bathroom than two metres at 24 W/m, at identical total wattage, because the light is distributed rather than concentrated.
| Application | Suggested power density | Approximate output | Typical profile depth | Notes |
|---|---|---|---|---|
| Night and orientation light | 4.8 W/m, heavily dimmed | Under 50 lm/m in use | 8–10 mm | Very warm CCT, low mounting |
| Accent in niches and under vanity | 9.6 W/m | 800-1,000 lm/m | 10–15 mm | Opal diffuser essential |
| Mirror and vanity task light | 14.4 W/m | 1,300-1,600 lm/m | 15–22 mm | CRI Ra>90 strongly advised |
| Indirect ceiling cove | 14.4–19.2 W/m | 1,300-2,000 lm/m | 15–25 mm | Output is reflected, so budget extra |
| Main ambient in large bathrooms | 19.2–24 W/m | 2,000-2,600 lm/m | 22 mm and above | Requires generous heat sinking |
SMD versus COB: which strip for a bathroom?
SMD strips place discrete surface-mount emitters at intervals along the board – typically 60, 120, 160 or 240 LEDs per metre. COB strips use a continuous phosphor-coated line of chips, producing an unbroken luminous band with no visible dots even at very short viewing distance. In bathroom lighting the choice is governed almost entirely by viewing distance and diffuser depth.
Where the strip sits deep inside a profile with a thick opal diffuser and is viewed from more than a metre away, a 120 or 240 LED/m SMD strip is indistinguishable from COB and usually more efficient per watt. Where the strip is close to the eye – a mirror-side vertical, a niche viewed from thirty centimetres, a handrail, or any shallow profile with a thin lens – COB is decisively better because the dotting of SMD becomes visible and cheapens the result. Our default recommendation is COB for mirror, niche and furniture applications; high-density SMD for coves, ceilings and long ambient runs.
Cutting pitch, binning and colour consistency
Two specifications that rarely appear in consumer discussions determine whether a multi-run installation looks professional. Cutting pitch defines the granularity at which a strip can be shortened: Lighting Line strips offer pitches from 2.5 cm to 6.25 cm depending on model, and a fine pitch is essential when a niche or a mirror requires an exact length. Binning defines colour consistency between production units, expressed in MacAdam ellipses or steps. A 3-step strip guarantees that two separate runs of the same product will appear identical to the eye; unbinned product frequently does not, and a bathroom with a visibly greener strip on one wall than the other is a failure no amount of design can rescue. Every Lighting Line SMD strip in the catalogue is specified at 3-step consistency, which is the correct standard for architectural bathroom lighting.
Serviceability: taking a twenty-year view of bathroom lighting
Integrated fittings with non-replaceable LED modules fail as units. When the module dies, the fitting is scrapped, and if the model has been discontinued, the visual consistency of the whole scheme is compromised. A profile system separates the wearing part from the architectural part. The extrusion, the diffuser and the recess detail are permanent: the strip inside is a consumable that can be replaced in minutes with a current-production equivalent, without disturbing plaster, tile or paint. For bathroom lighting embedded in a tiled wall or a plastered ceiling slot, this distinction is worth a great deal over the life of the room.
7. Vanity and mirror lighting: the zero-shadow formula
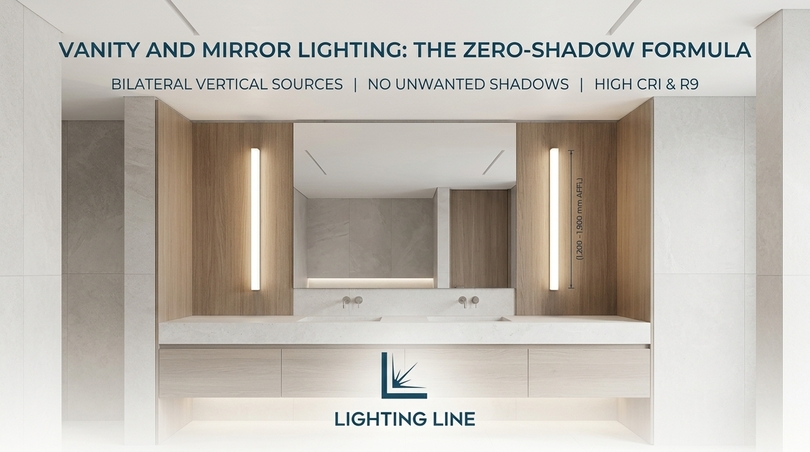
If a bathroom lighting scheme succeeds at the mirror, occupants will forgive almost everything else. If it fails at the mirror, no amount of ambient sophistication will rescue it, because the mirror is where the room is judged. This is the location where vertical illuminance, colour rendering, source position and glare control all have to be correct simultaneously, and where the overwhelming majority of domestic installations get it wrong in the same predictable way.
The predictable error is a single light source above the mirror. A downlight, a spot, a bar light or an over-mirror fitting all produce the same result: light arrives from above at a steep angle, the brow casts a shadow into the eye sockets, the nose casts a shadow across the upper lip, and the chin casts a shadow onto the neck. The face appears older, more tired and more asymmetric than it is. Under this light, makeup is systematically over-applied in the shadowed regions and shaving misses the jawline. The fix is geometric, not photometric: adding more lumens from the same position makes the shadows harder, not softer.
The physics of facial illumination in bathroom lighting
A human face is a complex convex form with deep recesses. Shadow depth is determined by the angular relationship between the source, the feature and the eye. When light arrives from directly overhead, the angle of incidence on the eye socket approaches 90° and the recess receives almost no direct light. When light arrives horizontally at eye level, the same recess is fully illuminated. The zero-shadow arrangement is two vertical linear sources, one on each side of the mirror, spanning roughly from 1.2 m to 1.9 m above finished floor level. Each source illuminates the side of the face that the other source shadows, and the result is a soft, symmetric, three-dimensional rendering with no deep recesses.
This arrangement has been the standard in theatrical dressing rooms, professional makeup studios and film production for a century. The bulb-surround Hollywood mirror is a crude approximation of it. A pair of opal-diffused vertical LED profiles is the refined modern version: same geometry, vastly better colour rendering, no heat, no maintenance and a fraction of the energy.
Dimensional rules for mirror bathroom lighting
The following dimensions produce reliable results in domestic bathrooms and should be treated as defaults rather than as absolutes.
| Parameter | Recommended value | Acceptable range | Reason |
|---|---|---|---|
| Vertical source centre height | 1,550 mm AFFL | 1,450-1,650 mm | Aligns with average adult eye height |
| Vertical source length | 600-750 mm | 450-900 mm | Covers the full head range for seated and standing users |
| Horizontal separation between sources | 700-900 mm | 600-1,100 mm | Wider separation flattens; narrower creates hot spots |
| Setback from mirror face | 50-100 mm | 30-150 mm | Prevents the source appearing in the reflection |
| Over-mirror bar height (if used) | Top of mirror + 50 mm | – | Supplementary only, never sole task source |
| Under-mirror wash height | 1,050-1,150 mm AFFL | – | Fills under-chin shadow, optional third element |
Backlit mirror bathroom lighting: halo versus front light
Backlit mirrors (where a strip is concealed behind the mirror panel and throws light onto the wall to create a halo) are among the most popular contemporary bathroom lighting effects, and among the most frequently misused. A backlit mirror is an accent device, not a task device. The light it produces travels away from the face; almost none of it returns as useful vertical illuminance. A bathroom with only a backlit mirror will look beautiful in photographs and perform poorly for shaving.
The correct implementation combines both: a halo strip behind the panel for atmosphere and apparent depth, and separate front-facing vertical sources for task. Where the mirror is a bespoke unit, the Lighting Line aluminium profile for mirror (reference MR01-03, accepting PCB widths up to 12 mm in 2-metre lengths) is designed specifically to carry the strip around the perimeter of a mirror panel while providing the mechanical edge detail. It is the single most directly relevant profile in the catalogue for mirror-integrated bathroom lighting.
Choosing colour temperature and CRI at the mirror
The mirror is the one location in the home where colour rendering has a practical consequence rather than an aesthetic one. Makeup matched under a low-CRI source will appear wrong in daylight. A skin lesion assessed under a source with poor red rendering may be misjudged. For mirror bathroom lighting, specify CRI Ra ≥ 90 and pay particular attention to R9, the saturated red index that determines how accurately skin tone, blood flow and cosmetic pigments are reproduced. Many products advertising Ra 90 have R9 values below 20; a good architectural strip will exceed R9 50.
On colour temperature, the evidence points to 3000 K to 3500 K as the optimum for domestic grooming. 2700 K is flattering but pushes cosmetics toward over-warm selection. 4000 K is accurate but reads clinical in a residential setting and can make skin appear sallow. The best solution where budget allows is tunable white: 4000 K for morning precision and 2700 K for evening wind-down, on the same fixture. Lighting Line offers strips across 2700 K, 3000 K, 3500 K, 4000 K, 5000 K and 6500 K, and dual-channel tunable configurations can be produced to order.
Which lights make you look good in a bathroom?
This question appears constantly in search data and deserves a direct answer. The lights that make people look best are large, diffuse, positioned at eye level on both sides of the face, at 3000-3500 K, with CRI Ra above 90 and R9 above 50, dimmed to produce roughly 400 lux vertically. Every element of that specification matters. Large and diffuse softens shadows and removes catchlight harshness. Bilateral positioning removes under-eye shading. The colour temperature range flatters most skin tones without distorting cosmetic colours. High CRI and R9 reproduce the reds of healthy skin. And dimming matters because over-illumination exaggerates texture and pore visibility.
Lighting for makeup, shaving and medical inspection
These three tasks have subtly different optimal conditions, and a well-specified bathroom lighting scheme can serve all three from the same hardware with different settings.
- Makeup application benefits from the highest colour fidelity and a colour temperature close to the environment in which the makeup will be seen. Someone who works in a daylit office should match at 4000 K: someone dressing for an evening event should match at 2700–3000 K. Tunable white solves this properly.
- Shaving requires grazing light to reveal stubble texture, which means the bilateral vertical sources should not be so diffuse that all modelling disappears. A modest asymmetry, or the addition of a small over-mirror element, restores useful texture.
- Skin and medical inspection such as checking moles, rashes, wound healing requires maximum CRI, high R9, and the highest available illuminance. A boost setting that drives the mirror circuit to full output at 4000 K serves this need and is genuinely valuable in households with dermatological concerns.
Under-vanity and cabinet bathroom lighting
A strip mounted under a wall-hung vanity unit performs three jobs at once: it creates the floating effect that defines contemporary bathroom design, it provides a portion of the night-orientation layer, and it washes the floor so that water is visible. Use a shallow profile, mount it toward the front edge of the underside, and aim the emission back toward the wall rather than outward into the room, which prevents the source being visible to anyone standing at the basin. The furniture profile family is dimensioned for exactly this application, and the shallow recessed 23×8 mm profile (RE01-03) suits routed housings in cabinet carcasses.
Inside cabinets and behind mirror doors, the same logic applies with the addition of automatic switching. A door-contact switch or a small PIR turns the cabinet strip on when the door opens, which is both energy-efficient and, in practice, a detail that people notice and comment on.
8. Bathroom ceiling lighting: recessed, plaster-In and trimless
Ceiling lighting in a bathroom carries the ambient layer and, in poorly designed rooms, is asked to carry everything else. The discussion below assumes it is doing its proper job (providing soft, uniform, low-glare fill) and examines the three construction approaches available, together with the specific constraints imposed by bathroom ceilings, which are frequently shallow, frequently damp above, and almost always shared with extract ventilation.
The problem with conventional bathroom downlights
Bathroom ceiling lighting has been dominated for two decades by arrays of small recessed downlights, usually four to eight IP65 fittings in a grid. The approach has real advantages (low cost, familiar installation, high zone compliance) and three serious drawbacks. First, each downlight is a high-luminance point reflected in every gloss surface. Second, the grid produces scalloped pools of light on the floor with darker bands between, giving the uneven spotty appearance that characterises budget bathroom lighting. Third, downlights deliver horizontal illuminance and almost no vertical illuminance, which means they contribute nothing useful at the mirror while producing the worst possible facial shadows.
A grid of downlights is not wrong so much as insufficient. Where downlights are retained, they should be reduced in number, dimmed, positioned to graze walls rather than to fill the centre of the room, and always supplemented by linear task and accent layers.
Plaster-in and trimless linear ceiling bathroom lighting details
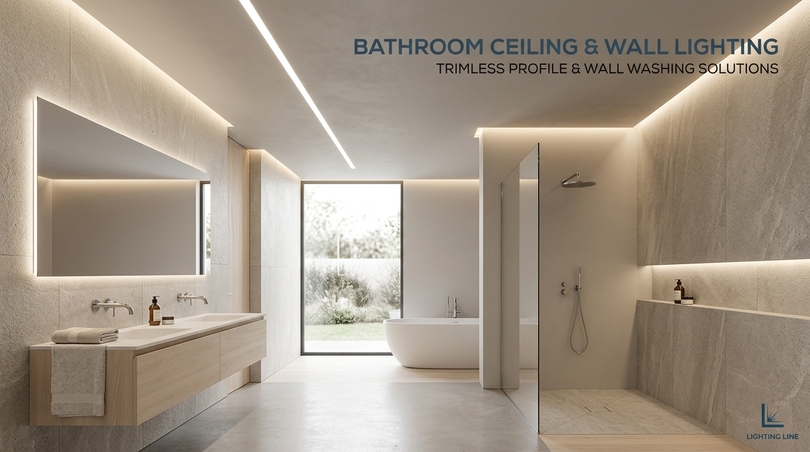
The premium contemporary alternative is a continuous linear slot integrated into the plasterboard ceiling. A drywall profile is fixed to the ceiling framing before boarding, the plasterboard is cut around it, and the joint is skimmed so that the profile flange disappears into the finished surface. The result is a line of light with no visible frame at all: the light appears to emerge from the plaster itself.
This detail is the single most effective way to make a modest bathroom read as architecturally designed: it works in three configurations: a single slot running the length of the room parallel to the vanity; a perimeter slot at the wall-ceiling junction washing the walls downward; and a slot directly above the shower delivering compliant Zone 1 light without any visible fitting. Lighting Line carries fifteen drywall profile references, with matched end caps and mounting brackets.
Surface-mounted ceiling profiles for solid slabs
Where the ceiling is a concrete slab and no void exists, recessing is impractical. Surface-mounted profiles solve this with a shallow extrusion fixed directly to the soffit. Modern surface profiles are slim enough (often under 12 mm deep) that they read as a deliberate architectural line rather than as a compromise. The surface profile range includes 24 references, and the concrete profile is designed for casting directly into poured slabs where the building is new.
An often-overlooked variant is the suspended profile, which hangs on wires below the ceiling and can emit both upward and downward. In a bathroom with a high ceiling, a suspended linear luminaire over a freestanding bath produces an indirect ceiling wash plus a soft downward component: an elegant solution provided the unit is outside Zone 1 or appropriately rated.
Corner and cove bathroom lighting details
The junction between wall and ceiling offers the most efficient location for indirect bathroom lighting, because a source placed there illuminates both planes and remains invisible from every normal viewing position. Corner profiles are extruded at 45° specifically for this detail and are among the most cost-effective ways to transform a small bathroom. Seven references are available, in configurations that emit upward onto the ceiling, downward onto the wall, or both.
Ventilation coordination
Every bathroom ceiling contains an extract fan, and the interaction between lighting and ventilation is a practical matter that plans frequently ignore. Do not place a linear profile immediately adjacent to an extract grille, because the airflow carries humid air along the ceiling surface and concentrates condensation at the nearest cold object. Maintain at least 300 mm of separation, and where a slot detail runs past a fan, ensure the profile is sealed at both ends. Similarly, plan the strip run so that the driver is not located in the path of the humid airflow.
9. Bathroom wall lighting, cove and perimeter schemes
Wall lighting is the most underused layer in domestic bathroom design and the one with the highest return on investment in perceived space. The reason is straightforward: the human visual system estimates room size largely from the luminance of vertical surfaces. Bright walls signal a large room, dark walls signal a small one. Because bathrooms are almost always the smallest room in a dwelling, illuminating the walls is the most direct available lever on how large the room feels.
There are three distinct wall lighting techniques, and they produce very different results. Wall washing floods a surface evenly from a source set away from it, minimising texture and maximising apparent brightness. Wall grazing places the source very close to the surface so that light travels almost parallel to it, exaggerating every texture and joint. Wall accenting picks out a defined area. In a bathroom, washing enlarges the room, grazing dramatises tile or stone, and accenting creates focus.
Wall washing: bathroom lighting for apparent volume
To wash a bathroom wall, place a linear source at the ceiling line, set back 200 to 300 mm from the wall face, emitting downward with a wide distribution. The setback is what distinguishes a wash from a graze; too close and the wall becomes a study in grout lines. A washed wall in a two-square-metre bathroom can increase perceived volume by a margin that occupants consistently describe as “it feels like a different room”, and it does so at a cost of roughly 15 W for a three-metre run.
The 48×18 mm wall profile (WL01-03) and the 24×24 mm wall profile (WL02-03) are both dimensioned for this application, with the larger section accommodating higher-output strip where the wall is tall or the finish is dark.
Grazing textured tile, stone and micro-cement
Where a bathroom features a textured feature wall (split-face stone, ribbed ceramic, fluted panel, brushed micro-cement) grazing converts a flat surface into a relief. The source is mounted within 50 to 100 mm of the wall face and emits along it. The effect is strong and should be used on one surface only; a room with every wall grazed becomes visually exhausting. Grazing is the technique that makes a modest tile look expensive, and it is essentially free once the profile is in place.
Dual-emission wall profiles
A profile that emits both upward and downward from a wall-mounted position is the modern equivalent of the traditional wall sconce, and it solves the sconce’s chief problem: that a point source at head height is a glare source. The 31×70 mm dual-emission wall profile (WL04-05) throws a soft band of light up the wall toward the ceiling and a second band down toward the floor, producing an elegant hourglass of light with no visible source. Mounted vertically on either side of a mirror, it simultaneously serves as an architectural feature and as a component of the task layer.
Perimeter cove bathroom lighting in dropped ceilings
Where a bathroom has a dropped ceiling (common where soil pipes or ductwork must be concealed) the step between the dropped and original levels creates a natural cove. A strip mounted in the cove throwing light upward onto the higher ceiling produces the single softest, most flattering ambient bathroom lighting available. The cove must be at least 150 mm deep and the strip must be set back at least 80 mm from the lip, or the lip itself will appear as a bright edge and the effect is ruined.
Vertical light lines as architectural punctuation
A single vertical line of light running floor to ceiling at a corner, or flanking a door, provides rhythm and height in a way that no horizontal element can. In bathrooms with high ceilings this is particularly effective because it emphasises the dimension the room actually has. Use a narrow profile with a strongly diffused lens, at low power density, and always in pairs or in a considered rhythm: a single vertical line placed arbitrarily reads as an error.
Handrails, grab rails and accessible bathroom lighting
Accessible and age-in-place bathroom design frequently specifies grab rails at the bath, shower and WC. An illuminated handrail (a strip housed inside a handrail profile) serves three functions at once: it marks the rail position in low light, it provides a low-glare night layer, and it removes the institutional appearance that plain stainless rails carry. This is one of the clearest cases where good bathroom lighting design directly improves accessibility outcomes without any of the visual compromise usually associated with adapted bathrooms.
10. Shower, niche and wet-zone bathroom lighting
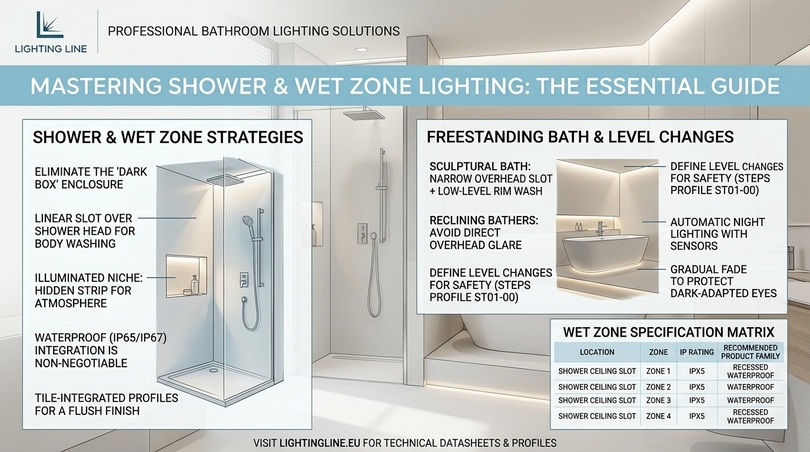
The shower is the most technically demanding location in the room and the one where the gap between a competent and an exceptional bathroom lighting scheme is widest. It sits squarely in Zone 1, it is enclosed and therefore prone to appearing as a dark box, it is where facial illumination matters for washing, and it is where every specification error is punished by water.
Why enclosed showers go dark
A shower enclosure is typically 900 to 1,200 mm square, with three tiled walls, a glass screen and a solid or semi-solid ceiling above. Light from the main room reaches it only through the screen, and the screen is frequently fogged with condensation during use. Meanwhile the enclosure’s own surfaces are often dark tile, absorbing most of what does arrive. The result is that the shower is commonly the darkest part of a bathroom while being the place where the occupant most needs to see. Dedicated shower lighting is not a luxury; it is a functional requirement.
Ceiling bathroom lighting solutions inside the shower enclosure
The standard approach is one or two IP65 downlights in the shower ceiling. This works but produces the classic single-point problem: strong downward light, deep facial shadow, and a bright reflection in every wet surface. The superior approach is a linear slot running the full depth of the enclosure, positioned just inside the screen line. This delivers light down the plane of the body rather than onto the crown of the head, illuminates the back wall, and produces no single glare point. The 32×10 mm recessed waterproof profile is the correct component, paired with IP65 silicone-coated strip and sealed end caps.
The illuminated niche: shower bathroom lighting detail
The shower niche (a recessed shelf for bottles, formed during tiling) is the single most photographed detail in contemporary bathroom design, and lighting it is what makes it read as designed rather than as storage. The correct placement is a strip concealed behind the front lip of the niche at the top, emitting downward onto the back wall. This washes the tile, backlights the bottles, and hides the source completely from every viewing angle.
Common errors are worth naming. Placing the strip at the back of the niche puts the source directly in the eye line. Placing it at the bottom emitting upward produces an uplit horror-film effect on anything stored there. Using an unrated strip in what is unambiguously a Zone 1 location is both non-compliant and short-lived. And using a warm-white strip against a cool grey tile produces a muddy colour cast: niche lighting should be colour-matched to the tile, with cooler tile favouring 3000 K and warmer stone favouring 2700 K.
Tiling profiles and integrated wet-room details
Where a wet room is built from scratch, the opportunity exists to integrate the lighting into the tiling system itself rather than adding it afterward. Tiling profiles are extruded with a flange that is bedded into the tile adhesive, so the finished result is a continuous line of light flush with the tile face and sealed at the junction. Lighting Line offers profiles dimensioned for 8 mm tile (TI02-10-W3, white painted, 3 metres), 11 mm tile (TI03-10) and 12 mm tile in a waterproof floor version (TI01-11-S3).
The tile thickness must be matched exactly, because the flange depth determines whether the diffuser sits flush, proud or recessed relative to the finished surface. This is a detail that must be resolved at specification stage with the tiler, not discovered on site.
Steam rooms and high-temperature applications
Where a shower doubles as a steam room, the environment becomes considerably more hostile: sustained saturation, temperatures above 40 °C, and continuous condensation. Standard IP65 strip is not adequate. The correct approach is fully encapsulated IP67 or IP68 strip, a sealed profile with gasketed end caps, low power density to limit additional heat load, and a driver located well outside the enclosure with the run kept short to limit voltage drop. Colour temperature should be warm (2700 K or below) because steam scatters short wavelengths preferentially and cool light in a steam environment produces a hazy, blue-grey fog.
Bath and freestanding tub lighting
A freestanding bath is a sculptural object and should be lit as one. The most effective technique is a narrow linear source in the ceiling directly above the long axis of the tub, dimmed heavily, combined with a floor-level strip that grazes the underside and outer curve. This produces a form-revealing rim light that separates the tub from the floor. Avoid a bright downlight centred over the bath: it puts maximum luminance directly in the eye line of a person lying down, which is the exact opposite of what a bathing position requires.
For baths against a wall, a horizontal linear source at approximately 600 mm above the rim, washing the wall behind, produces excellent atmosphere and is far outside the direct eye line of a reclining bather. Where the fitting falls within Zone 1 or Zone 2, IP44 is the minimum and IP65 is the sensible choice.
| Location | Zone | Minimum IP | Recommended strip | Recommended profile family | CCT |
|---|---|---|---|---|---|
| Shower ceiling slot | 1 | IPX5 | IP65 silicone, 9.6–14.4 W/m | Recessed waterproof | 3000 K |
| Shower niche | 1 | IPX5 | IP65 COB, 9.6 W/m | Tiling or recessed | 2700-3000 K |
| Above freestanding bath | 1 | IPX4 | IP65 silicone, 9.6 W/m | Drywall or surface | 2700 K |
| Wall beside bath | 2 | IPX4 | IP65 COB, 9.6 W/m | Wall or corner | 2700 K |
| Mirror verticals | 2 | IPX4 | IP65 COB, 14.4 W/m, CRI 90+ | Mirror or wall | 3000-3500 K |
| Shower threshold floor | 1–2 | IPX7 | Encapsulated IP67, 4.8 W/m | Floor or tiling | 2200-2700 K |
| Perimeter cove | Outside | IP44 advised | IP20 or IP65, 14.4 W/m | Corner or drywall | 2700-3000 K |
11. Floor, skirting and night bathroom lighting
Light at low level does work that light at high level cannot. It reveals the floor plane where water collects, it marks thresholds and level changes, it provides orientation without dazzle, and it produces the low, grazing illumination that reads as calm rather than as functional. In bathrooms it is also the layer most likely to be appreciated by older occupants, by parents of young children and by anyone who has ever stubbed a toe at 3 a.m.
Skirting and plinth bathroom lighting integration
The simplest low-level installation runs a strip in a recess at the base of the wall, either behind a shadow-gap skirting detail or inside a dedicated baseboard profile. The light washes the floor outward for 400 to 800 mm and stops, producing a soft band around the room perimeter.
Floor-recessed profiles and walkable installations
Where light is required in the floor itself (marking a threshold, illuminating a step into a sunken shower, or defining a walkway in a large bathroom) a walkable floor profile is required. These are heavier extrusions with thick, impact-resistant diffusers and, critically, a minimum of IP67 because they will stand in water.
Step and level-change bathroom lighting
Level changes in bathrooms (a step into a wet area, a raised platform under a tub) are a genuine trip hazard and should always be lit. The 30×27 mm steps profile (ST01-00) is extruded with a nosing geometry that conceals the strip under the tread edge and throws light onto the riser below, so the step edge is defined by a bright line against a darker face. This is a textbook example of lighting that is simultaneously a design feature and a safety intervention.
Sensors, timers and automatic night operation
The night layer only earns its cost if it operates automatically. Three control strategies work in bathrooms. A PIR sensor with a photocell override switches the low-level circuit on when movement is detected and ambient light is below a threshold; this is the most common and most robust. A time-based scene sets the night layer active between fixed hours; simple but less responsive. A door-contact trigger is unobtrusive and reliable where the bathroom door is consistently closed.
Whichever is chosen, there are two details that separate a good implementation from an irritating one. First, the night circuit must never trigger the main circuit; they must be genuinely independent. Second, the fade should be gradual (a 1 to 2 second ramp rather than an instant switch) because an instant switch at low level still startles a dark-adapted eye.
12. Warm or cool bathroom lighting?
Should bathroom lights be warm or cool? This is the most frequently asked question in the category and the one most often answered badly, because the honest answer is that it depends on what the light is for, when it is used, what the surfaces are, and who is using the room. What follows is a complete framework that produces a defensible answer for any specific project rather than a generic recommendation.
Correlated colour temperature (CCT) describes the appearance of a white light source on a scale in kelvin, running from the amber of candlelight at around 1800 K through to the blue-white of overcast daylight above 6500 K. Counter-intuitively, lower numbers are warmer and higher numbers are cooler, because the scale derives from the temperature of a theoretical black-body radiator rather than from perceived warmth.
The kelvin scale applied to bathrooms
| CCT | Appearance | Bathroom application | Effect on skin | Effect on white tile |
|---|---|---|---|---|
| 1800–2200 K | Candle, amber | Night layer, floor strips | Very warm, low detail | Reads cream |
| 2700 K | Warm incandescent | Evening ambient, bath, spa mode | Flattering, softens texture | Reads warm white |
| 3000 K | Warm white | General ambient, accent, niches | Natural and warm | Neutral warm |
| 3500 K | Neutral warm | Vanity task, mixed-use bathrooms | Accurate without coldness | Clean white |
| 4000 K | Neutral white | Morning task, makeup, inspection | Accurate, can read pale | Crisp, slightly cool |
| 5000–6500 K | Cool white to daylight | Rarely appropriate domestically | Clinical, blue cast | Blue-grey |
The surface-matching rule for bathroom lighting
Colour temperature does not act in isolation; it interacts with every surface in the room. Warm light on a cool grey tile produces a muddy, dirty appearance because the warm spectrum has little to reflect. Cool light on a warm travertine or brass produces a flat, lifeless result for the same reason. The rule is straightforward: match the light to the dominant surface temperature.
- Warm palettes – travertine, beige porcelain, oak, brass, bronze, terracotta — are best served by 2700 K to 3000 K.
- Cool palettes – grey porcelain, concrete effect, chrome, black matt, white gloss — are best served by 3000 K to 4000 K.
- Green and blue tile (zellige, subway, glass mosaic) usually reads best at 3000 K, where the warmth prevents the surface from becoming icy.
- Marble and natural stone with strong veining benefit from 3000 K with high CRI, which reveals the veining without the yellowing that 2700 K introduces.
Mixing colour temperatures within one bathroom
Mixing CCT is permissible and often desirable, but only under a clear rule: mix by layer, never within a layer. Two strips in the same cove at different colour temperatures will read as a fault. A 2700 K cove combined with a 3500 K mirror light reads as intentional, because the eye understands that different jobs are being done. In practice, the most successful mixed schemes keep ambient and accent at one temperature and allow the task layer to be one step cooler.
The maximum acceptable separation is roughly 1000 K. A 2700 K ambient beside a 4000 K task light is jarring; a 3000 K ambient beside a 4000 K task light is comfortable. Where a greater range is desired, tunable white is the correct technology rather than fixed sources at different temperatures.
Tunable white and the case for dynamic bathroom lighting
Tunable white uses two LED channels at different colour temperatures (typically 2700 K and 6500 K) mixed by the driver to produce any intermediate value. In a bathroom this permits a single installation to serve a cool, alerting 4000 K morning setting and a warm, calming 2400 K evening setting. Because the bathroom is the first and last artificially lit room of the day, it is the room where tunable white delivers the greatest physiological benefit per euro invested.
The technology has become substantially more affordable and now requires only a compatible driver and a controller. Lighting Line produces custom strip configurations, including tunable arrangements, to order; the practical constraint is that the profile must accommodate a wider PCB, which is why several catalogue families accept boards up to 12 mm.
A direct answer to the warm-or-cool question
For a domestic bathroom used by adults, the default that works in the widest range of situations is 3000 K for ambient and accent layers, and 3500 K for the mirror task layer, everything dimmable, with a 2200 K night layer. For a family bathroom with heavy morning use, shift the task layer to 4000 K. For a guest cloakroom used almost entirely in the evening, run everything at 2700 K. For a wet room in a cool grey palette, run 3000 K throughout. And in any project where the budget permits, replace the fixed choice with tunable white and let the occupant decide.
13. Lumens, lux and wattage: how bright should bathroom lighting be?
Brightness is the specification most often guessed at and most easily calculated. The confusion arises because three different units are used interchangeably in consumer discussion (watts, lumens and lux) and only one of them describes what a person actually experiences. This section explains the relationship and provides a working method for calculating the correct output for any bathroom.
The three units of bathroom lighting and what each means
Watts measure energy consumed, not light produced. The equivalence people remember from incandescent lamps (60 W equals a certain brightness) has no meaning for LEDs, whose efficacy varies from under 80 lm/W in poor products to over 180 lm/W in the best. Lumens measure total light emitted by a source. Lux measures light arriving on a surface, and lux is what determines whether the room is bright enough. One lux equals one lumen per square metre.
Is 40 W or 60 W better for a bathroom?
This question, which appears constantly in search data, is a legacy of incandescent thinking. The correct translation is that a 40 W incandescent produced roughly 400 to 450 lumens and a 60 W produced roughly 700 to 800 lumens. In LED terms, a 60 W-equivalent output of around 800 lumens is the more useful reference for a small bathroom’s general light, but the answer depends entirely on room size and on how many sources share the load. With a proper layered scheme, no single source needs to produce 800 lumens, because the layers add together, which is precisely the advantage of layering.
Target illuminance levels for bathroom lighting
| Activity or area | Target illuminance | Measurement plane | Notes |
|---|---|---|---|
| General circulation and ambient | 150-200 lux | Horizontal at floor | Uniform, low contrast |
| Mirror and vanity, general grooming | 300-500 lux | Vertical at face | Bilateral sources essential |
| Makeup and precision grooming | 500-750 lux | Vertical at face | CRI Ra ≥ 90 required |
| Shower interior | 150-250 lux | Horizontal at tray | Avoid single overhead point |
| Bath and relaxation mode | 50-100 lux | Horizontal | Dimmed ambient and accent only |
| Night orientation | 1-5 lux | Horizontal at floor | Very warm CCT, low mounting |
| Cleaning and maintenance mode | 300-400 lux | Horizontal | All layers at full output |
A worked bathroom lighting calculation method
The following four-step method produces a defensible lumen budget for any bathroom and takes about five minutes.
- Step one – measure the floor area. A typical small bathroom of 2.0 × 2.2 m has an area of 4.4 m².
- Step two – multiply by target illuminance. For a 200 lux ambient target: 4.4 × 200 = 880 lux-square-metres, which is 880 lumens arriving at the floor plane.
- Step three – divide by the room utilisation factor. Not all emitted light reaches the working plane; some is absorbed by walls, ceiling and fittings. For a light-coloured bathroom with indirect sources, a utilisation factor of 0.5 is realistic; for dark tile it may fall to 0.35. At 0.5: 880 ÷ 0.5 = 1,760 lumens must be emitted.
- Step four – divide by the maintenance factor. Allow for lumen depreciation and dust over the installation’s life, typically 0.8. 1,760 ÷ 0.8 = 2,200 lumens of installed ambient output.
At 1,000 lm/m from a 9.6 W/m strip, that is 2.2 metres of ambient run, consuming about 21 W. Add a mirror task layer of two 700 mm verticals at 14.4 W/m (roughly 2,000 lumens, 20 W) and accent runs of perhaps 1.5 m at 9.6 W/m, and the complete bathroom lighting scheme totals approximately 55 W installed, of which typical evening use will draw 15 to 25 W after dimming.
Why installed wattage is not running wattage
A common objection to layered bathroom lighting is that four circuits must consume more energy than one. In practice the opposite holds, for a straightforward reason: layered schemes are dimmed, single-source schemes are not. A room with one 30 W ceiling fitting runs at 30 W whenever the light is on. A room with 55 W installed across four layers typically runs the ambient at 40%, the accent at 30% and the task only when someone is at the mirror: an average draw well below 20 W. Over a year, the layered scheme consumes less while delivering a vastly better result.
Voltage drop: the calculation nobody does
Low-voltage strip suffers voltage drop along its length, and the consequence is visible: the far end of a long run is dimmer and, in warm-white strips, noticeably warmer in colour. At 12 V the practical maximum single-feed run is around 5 metres, at 24 V it roughly doubles to 10 metres, though the exact figure depends on power density and copper weight. This is the principal technical reason to prefer 24 V for bathroom lighting wherever the run exceeds three metres, and why the Lighting Line range offers both 12 V and 24 V configurations. For runs beyond the limit, feed from both ends or inject power at the midpoint.
14. CRI, R9 and flicker: the quality metrics nobody advertises
Two lamps with identical lumen output and identical colour temperature can render a bathroom entirely differently. The difference lies in metrics that rarely appear on packaging and almost never appear in consumer reviews, but which determine whether the room looks expensive or cheap. This section covers the four that matter most.
Colour rendering index in bathroom lighting, and its limitations
CRI, expressed as Ra, compares how a source renders eight pastel reference colours against a reference illuminant, on a scale to 100. Ra 80 is the minimum acceptable for domestic use; Ra 90 is the correct specification for any bathroom lighting that will illuminate a face. The gap between them is visible: at Ra 80, skin looks slightly flat and cosmetic colours shift, at Ra 90 and above, skin has depth and cosmetics match their appearance in daylight.
Lighting Line publishes CRI for every strip in the catalogue, with both Ra>80 and Ra>90 options available across the range, and the higher grade should always be selected for mirror and vanity applications.
R9 and why red matters most in a bathroom
The eight colours used to calculate Ra are all desaturated pastels; none is a saturated red. R9, the ninth supplementary index, measures saturated red rendering, and it is the single most important index for skin. Haemoglobin gives skin its life, and a source with poor R9 renders skin grey, tired and unhealthy regardless of its Ra value. A product claiming Ra 90 with R9 of 12 will make everyone in the bathroom look ill. Specify R9 above 50 for vanity lighting and above 90 where colour-critical work such as professional makeup will be performed.
MacAdam ellipses and batch consistency
Discussed briefly in section 6, colour consistency deserves emphasis here because it is the defect most visible in a finished bathroom. A MacAdam ellipse, or SDCM step, describes the region of colour space within which the human eye cannot detect a difference. A 3-step binning specification means any two units will look identical: a 5-step or unbinned product means two runs on adjacent walls may visibly differ in tint. In a room where a mirror multiplies every surface, that inconsistency is unmissable.
Flicker, stroboscopic effect and bathroom lighting driver quality
LEDs respond to current almost instantaneously, so any ripple in the driver output appears as modulation of light output. Low-frequency, high-depth flicker causes headaches, eye strain and, in sensitive individuals, worse. It is also invisible to most people as flicker: it is perceived only as discomfort, which makes it insidious. Flicker is a driver problem, not an LED problem, and it is the primary reason to avoid the cheapest available power supply for a bathroom lighting installation.
Two metrics describe it: percent flicker (modulation depth) and the stroboscopic visibility measure, SVM. Specify drivers with flicker below 5% and, where dimming is used, verify that flicker does not rise at low dim levels: many low-cost PWM drivers are acceptable at full output and severe at 10%. The IEC 61000-3-2 and the EU Ecodesign regulation for light sources both address flicker limits, and compliant product should be requested by name.
Efficacy, energy class and the EU label
Since the 2021 rescaling of the EU energy label, light sources are classified from A to G on a demanding scale where very few products achieve A or B. Most high-quality LED strip falls in classes E and F, and this is normal rather than a defect — the rescaled bands were deliberately set so that headroom remained for future improvement. Lighting Line publishes the Ecodesign energy class on every strip product page. When comparing products, compare lumens per watt at the same CRI and CCT, because raising CRI from 80 to 90 costs roughly 10 to 20 per cent of efficacy and a product that appears more efficient is often simply rendering colour worse.
15. Small bathroom lighting and bathrooms with no windows
The majority of bathrooms in European housing are small, and a very large proportion (particularly en-suites, cloakrooms and apartment bathrooms) have no window at all. These constraints are usually treated as problems to be minimised. They are better treated as a brief. A windowless bathroom is the only room in a house where the designer has complete control over the light, with no daylight to compete with or compensate for. Handled correctly, this produces results that a daylit room cannot achieve.
The core small bathroom lighting principle: light the surfaces, not the volume
The instinct in a small bathroom is to add more downlights to “fill” the space. This is precisely wrong, and it is the reason small bathrooms so often feel like lifts. Filling the volume with light from above flattens the room and drives every surface to similar luminance, removing the depth cues the eye uses to judge distance. The correct strategy is the opposite: light the vertical surfaces brightly and let the centre of the room be relatively dark.
A perimeter wash from a corner or drywall profile at the wall-ceiling junction achieves this directly. The walls become the brightest surfaces, the eye reads them as distant, and the room expands. Add a mirror (itself effectively a second washed wall) and a small bathroom can be made to feel two or three times its actual volume.
How to light a bathroom with no windows
A windowless bathroom needs three things that a daylit one does not.
- First, a daylight-referenced morning setting: without daylight, the occupant’s circadian system receives no cue at all from the room. A morning scene at 4000 K and high output substitutes for the missing daylight and measurably improves alertness. This is one of the strongest practical arguments for tunable white bathroom lighting.
- Second, higher colour rendering than a daylit room requires: in a room with a window, daylight corrects the eye’s impression of colour and masks a mediocre artificial source. Without it, the artificial source is the sole reference, and any deficiency in rendering is permanently visible. Ra 90 is not optional in a windowless bathroom.
- Third, a deliberate variation in luminance: daylight varies constantly, artificial light usually does not, and unvarying light is one of the reasons windowless rooms feel oppressive. Scene control that shifts the balance between layers through the day restores some of that variation.
What is the best light for a small bathroom?
The direct answer: a continuous linear source at the perimeter providing indirect ambient light, plus two vertical task sources at the mirror, plus one accent element and no more than two downlights, if any. This specification uses less energy than a conventional six-downlight grid, produces higher vertical illuminance, eliminates glare in the mirror, and makes the room feel larger. It is also, in most projects, cheaper, because profile and strip cost less per metre than six IP65 fittings plus their installation.
Bathroom lighting for dark colour schemes
Dark tile, charcoal micro-cement and black fittings have been dominant in bathroom design for several years, and they change the lighting calculation substantially. Dark surfaces absorb rather than reflect, which means the utilisation factor discussed in section 13 falls from around 0.5 to as low as 0.3. A dark bathroom needs roughly 50 to 70 per cent more installed lumens than a light one to reach the same illuminance, and almost all of it must be delivered directly rather than by reflection, because there is nothing to reflect from.
In dark schemes, grazing becomes more important than washing. A dark textured surface grazed at an acute angle produces a dramatic result at low power, whereas the same surface washed frontally simply disappears. Accent lighting also carries more weight, because contrast is the only available tool for creating hierarchy.
Very small spaces: cloakrooms and WCs under stairs
In a cloakroom of one to two square metres, a single well-placed linear element can carry the entire scheme. The most effective configuration is a vertical strip beside the mirror doubling as the room’s only light source, supplemented by a low-level strip under the basin. Total installed load for such a room is typically under 15 W. Avoid ceiling downlights entirely in spaces this small; the ceiling is too close and the resulting glare angle is unavoidable.
Mirror strategy in constrained rooms
In a small bathroom the mirror should be treated as an optical device, not as a fitting. Extending the mirror across the full width of the wall and up to the ceiling doubles the apparent width of the room and reflects the perimeter lighting back, effectively doubling its apparent extent. A full-wall mirror with an integrated backlit halo and vertical task strips is the single highest-impact intervention available in a small bathroom, and requires no structural change.
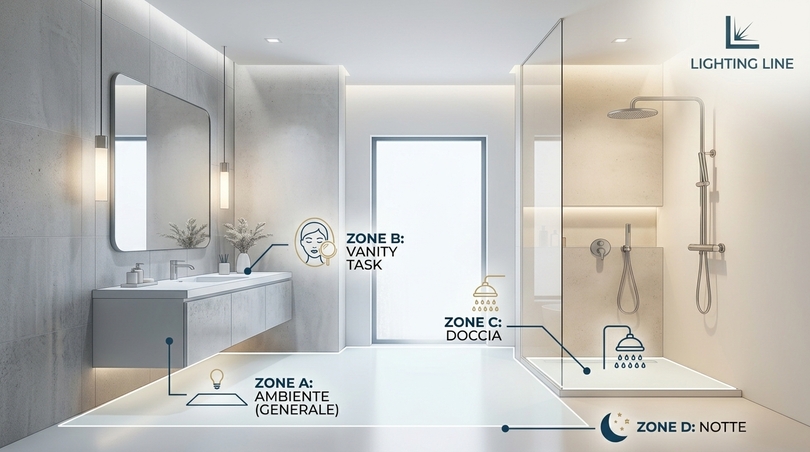
16. Modern bathroom lighting trends and designs for 2026
Trend discussion in lighting is frequently superficial, cataloguing finishes and shapes that will date within three years. The trends that matter are the ones driven by underlying shifts in technology, regulation and how people use their homes. The following developments are all visible across European specification practice and all have substance behind them.
The disappearance of the fitting in modern bathroom lighting
The dominant direction in contemporary bathroom lighting is the removal of the visible luminaire altogether. Trimless plaster-in slots, tile-integrated profiles, backlit mirrors and concealed coves all share the same objective: light without an object producing it. This is not a stylistic fashion but a consequence of LED miniaturisation making it possible for the first time. A light source five millimetres deep can be integrated into architecture in ways that a lamp and reflector never could.
Warm dimming and the return of incandescent behaviour
Warm-dim strips reduce colour temperature as they dim, from 3000 K at full output down to 1800 K at the low end, reproducing the behaviour of a dimmed incandescent lamp. The effect is instantly familiar and deeply comfortable, and it has moved rapidly from high-end hospitality into domestic bathroom specification. In a bathroom, warm dimming means a single circuit can serve both a crisp daytime function and a candlelit evening bath without any control complexity.
COB and the death of the visible dot
Five years ago, visible LED dotting was an accepted compromise in strip lighting. COB technology has effectively eliminated it, and specification practice has followed: any strip visible at close range in a premium project is now expected to be dot-free. Lighting Line’s COB range, at 98 references, now exceeds the SMD range in the catalogue, which is itself a reliable indicator of where the market has moved.
Colour and material integration
Where a fitting is visible, the trend is toward finish matching rather than contrast. Profiles are being specified in black anodised, brushed brass, bronze and white painted finishes to coordinate with brassware rather than to stand apart from it. The white painted tiling profile exemplifies this: it disappears into a white tiled wall entirely.
Wellness, spa and circadian bathroom lighting design
The most substantial trend is the reframing of the bathroom as a wellness space rather than a utility. In lighting terms this means low-level evening scenes, warm colour temperatures, indirect distribution, zero visible glare and, increasingly, circadian tuning. The measurable design markers of a spa bathroom are consistent: no source visible from a reclining position, maximum surface luminance below roughly 500 cd/m², colour temperature at or below 2700 K in evening mode, and illuminance under 100 lux. These are achievable in any bathroom with the right hardware and cost very little.
Sustainability, repairability and the component approach
European regulation and consumer sentiment are both moving toward repairability and away from sealed disposable units. A profile-and-strip system is inherently repairable: the strip is a serviceable consumable inside a permanent architectural element. This aligns bathroom lighting specification with wider right-to-repair and circular-economy direction, and it is likely to become a regulatory expectation rather than a preference.
What is the newest trend in lighting overall?
Across all rooms, the clearest current direction is the shift from illumination to atmosphere control — from asking how much light a room has to asking what state the room should be in. Scene-based control, tunable white, warm dimming and multi-layer design are all expressions of the same idea. The bathroom, because it is used at both extremes of the day and for both functional and restorative purposes, is where this shift produces the most obvious benefit.
17. Smart, tunable and circadian bathroom lighting
Smart lighting in bathrooms has a poor reputation, largely deserved, because early implementations prioritised app control over reliability and produced systems that failed exactly when a half-asleep person needed them to work. A well-designed smart bathroom lighting system is judged by how rarely anyone needs to think about it.
The reliability principle for smart bathroom lighting
The governing rule for bathroom automation is that the wall switch must always work, regardless of network state. Any system where a router failure leaves the bathroom dark has failed on its most basic obligation. This means dimming and scene logic should live in the driver or in a hard-wired controller, with the network layer providing convenience on top rather than carrying the primary function.
Control protocols suited to bathrooms
| Method | Dimming quality | Reliability | Cost | Best suited to |
|---|---|---|---|---|
| Mains trailing-edge dimmer | Fair, driver dependent | High | Low | Single-circuit retrofits |
| PWM low-voltage dimming | Good, watch flicker at low end | High | Low | Simple strip installations |
| 0–10 V / 1–10 V | Good, smooth | Very high | Medium | Hard-wired multi-circuit schemes |
| DALI-2 | Excellent, addressable | Very high | Medium-high | Whole-home and commercial projects |
| Casambi / Bluetooth mesh | Excellent | High, no router needed | Medium | Retrofit scene control |
| Wi-Fi smart drivers | Variable | Network dependent | Low | Convenience layers only |
Sensors that actually improve a bathroom
Three sensor applications earn their place. A PIR with photocell driving the night layer, as described in section 11. A humidity sensor linked to extract ventilation and, optionally, to a mirror demister: not strictly lighting, but frequently wired into the same control zone. And a door contact for cabinet interiors. Occupancy sensing for the main lights is popular but often unsatisfactory in bathrooms, because people remain still for long periods and the lights time out at inopportune moments; if used, set a generous timeout of at least fifteen minutes.
Building a circadian bathroom lighting schedule
A practical circadian schedule for a domestic bathroom uses four scenes. Morning, from wake time to 10:00, runs the task layer at 4000 K and full output with the ambient layer at 70%, a deliberate alerting signal. Day, to 18:00, runs 3500 K at moderate output. Evening, to bedtime, drops to 2700 K with ambient at 30%, accent at 40% and task available on demand. Night runs the floor layer only at 2200 K and 5% output, PIR-triggered. The entire schedule can be implemented on a single Bluetooth mesh controller with no cloud dependency.
Voice control and its limits
Voice control is genuinely useful in a bathroom, because hands are frequently wet or occupied. It is also the layer most likely to fail. Treat it as an accelerator on top of reliable physical controls, never as a replacement. A bathroom lighting scheme in which the only way to get light is to speak is a badly designed bathroom lighting scheme.
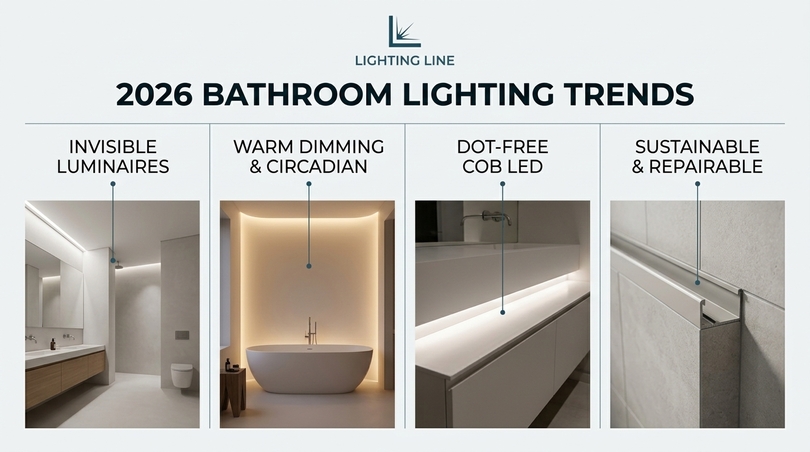
18. Energy efficiency and real running costs
Energy performance is frequently claimed and rarely calculated. This section provides actual numbers for a typical European bathroom so that the efficiency argument for LED bathroom lighting can be assessed rather than assumed. The figures use a mid-range European domestic electricity price and typical usage patterns, substitute local values as required.
The baseline bathroom lighting energy comparison
| Scheme | Installed load | Average draw in use | Daily hours | Annual kWh | Annual cost at €0.25/kWh |
|---|---|---|---|---|---|
| Two 60 W incandescent fittings | 120 W | 120 W | 2.0 | 87.6 | €21.90 |
| Six 35 W halogen downlights | 210 W | 210 W | 2.0 | 153.3 | €38.33 |
| Six 7 W LED downlights, undimmed | 42 W | 42 W | 2.0 | 30.7 | €7.67 |
| Four-layer LED profile scheme, dimmed | 55 W | 19 W | 2.5 | 17.3 | €4.33 |
| Night layer only, 4.8 W/m at 10%, 6 h/night | 2 W | 0.2 W | 6.0 | 0.44 | €0.11 |
The layered scheme uses more hours and more installed capacity than the undimmed LED downlight grid, yet consumes 44 per cent less energy, because dimming and layer independence mean full output is almost never required. This is the central and counter-intuitive efficiency finding of good bathroom lighting design: adding circuits reduces consumption.
Lifetime cost and replacement labour
Purchase price is a small component of lifetime cost in a bathroom, because access is difficult and labour is expensive. Replacing a failed sealed downlight in a tiled ceiling may require an electrician visit, scaffolding in a high room, and occasionally making good. Over a twenty-year horizon, a profile system in which the strip can be withdrawn and replaced without disturbing the ceiling has a total cost of ownership substantially below that of sealed fittings, even where the initial outlay is higher.
| Cost element | Six sealed IP65 downlights | Four-layer profile scheme |
|---|---|---|
| Hardware | €180-€300 | €320-€550 |
| Drivers and controls | Included | €60-€180 |
| Installation labour | €150-€250 | €250-€450 |
| Energy over 20 years | €153 | €87 |
| Expected replacements | 1-2 full sets | 1 strip replacement |
| Replacement labour | €300-€600 | €80-€150 |
| Indicative total | €783-€1,303 | €797-€1,417 |
The totals are comparable, which is the point worth understanding: the superior scheme is not meaningfully more expensive over the life of the room, and it delivers a categorically better result throughout. The apparent price premium at purchase is recovered in energy and replacement labour.
Practical bathroom lighting efficiency measures
- Specify higher efficacy at lower CRI only where colour does not matter: coves and night layers can run Ra 80 at a meaningful efficiency gain, while mirror lighting stays at Ra 90.
- Size the driver correctly: a driver loaded at 50 to 80 per cent of rating runs at peak efficiency and lowest temperature; one loaded at 15 per cent wastes a surprising proportion of its input.
- Use 24 V rather than 12 V: for any run over three metres to halve conductor losses.
- Put the night layer on a sensor: rather than relying on people to switch it off.
- Do not over-specify lumens: the single largest energy saving available in bathroom lighting is designing to 200 lux instead of 400.
19. Installation guide: fitting LED profiles in a bathroom
This section sets out the practical sequence for installing an integrated bathroom lighting scheme. It is written for competent installers and informed homeowners, and it assumes throughout that all mains-side work is carried out by a qualified electrician in accordance with national regulations. The low-voltage side of an LED profile installation is well within the reach of a capable DIY installer; the mains side and the zoning compliance are not.
Do you need an electrician to fit a bathroom light?
In most European jurisdictions, and specifically in the United Kingdom under Part P of the Building Regulations, new circuits and most alterations within a bathroom are notifiable work that must be carried out or certified by a competent person. Like-for-like replacement of an existing fitting on an existing circuit is generally permitted, but anything involving a new cable route, a new circuit, or a change of position usually is not.
The practical division of labour we recommend is this: the electrician provides a switched, RCD-protected supply at the correct location, installs and terminates the driver, and certifies the installation. The installer or homeowner cuts, assembles and mounts the profile and strip on the low-voltage side. This split keeps costs sensible while keeping compliance intact.
Can I change a bathroom light fitting myself?
If the replacement occupies the same position, uses the same circuit, and carries an IP rating equal to or higher than the zone requires, then in most jurisdictions yes, subject to the power being isolated at the consumer unit and the work being done competently. If the new fitting has a lower IP rating than the original, or moves into a different zone, or requires a new cable, the answer is no. When in doubt, the cost of a short electrician visit is trivial compared with the consequences of a non-compliant installation in a wet room.
Sequence of work for a bathroom lighting installation
- Design and set out: mark every profile run on the actual walls and ceiling with tape before any cutting. Stand in the room, sit on the WC, stand at the mirror, and check that no source will be in a normal eye line. This step takes twenty minutes and prevents the most common and most expensive errors.
- Coordinate with trades: drywall profiles must be fixed before boarding. Tiling profiles must be set out with the tiler and bedded during tiling. Concrete profiles must be placed before the pour. Retrofitting any of these after the fact is either impossible or destructive.
- Run cabling: low-voltage cable from the driver location to each run, sized for the current and the distance. Leave generous tails at both ends. Route cables away from the extract duct and away from any point where a fixing might later be driven.
- Cut the profile: use a fine-tooth blade in a mitre saw, cut square, and deburr both the cut face and the internal channel. Aluminium swarf inside the channel will short a strip.
- Cut the strip: only at the marked cutting points. Note the pitch — 2.5 cm, 5 cm or 6.25 cm depending on model — and plan runs to land on a cut point. Never cut between marks.
- Bond the strip: clean the profile channel with isopropyl alcohol, remove the adhesive backing and press the strip firmly along its full length. Full contact across the whole base is what delivers the thermal performance; a strip bonded only at the ends will run hot.
- Solder or connect: soldered joints outperform clip connectors in humid environments and should be the default in a bathroom. Where connectors are used, choose IP-rated types and seal the joint with heat-shrink.
- Fit the diffuser: slide rather than snap where the profile permits; sliding avoids stressing the lens. Trim flush at both ends.
- Seal the ends: fit gasketed end caps and, in Zone 1 and Zone 2, apply a bead of neutral-cure silicone at the profile-to-substrate junction. Neutral cure, not acetic cure, acetic silicone corrodes aluminium and attacks solder joints.
- Install the driver: outside the zones, in a ventilated location, accessible for future replacement. A driver buried in a sealed ceiling void is a future service call waiting to happen.
- Test before making good: power up and inspect every run for dead sections, colour inconsistency, visible dotting through the diffuser and any light leak at joints. Correcting these before plastering and tiling costs minutes; correcting them afterward costs days.
Waterproofing details that matter in bathroom lighting
Three junctions deserve particular attention in a wet-zone installation. The end cap seal must be continuous; a gasket that is pinched or omitted at one corner will admit moisture by capillary action. The cable entry should pass through a gland or a silicone-filled grommet, and the cable should be arranged with a drip loop below the entry so that any water running along it falls away rather than in. The profile-to-tile junction in tiling profiles must be sealed with the same waterproofing system used for the tanking, not merely with decorative sealant.
Driver location and access
The most common long-term maintenance complaint in integrated bathroom lighting is inaccessible drivers. Drivers have a shorter service life than LEDs (typically 30,000 to 50,000 hours against 50,000 or more) so the driver will almost certainly need replacing before the strip does. Locate drivers in an adjacent cupboard, in a ceiling void with an access panel, behind a removable vanity panel, or in the loft — never sealed permanently into a tiled or plastered enclosure.
Testing, certification and handover
On completion, the electrician should provide certification covering RCD operation, earthing and bonding continuity, insulation resistance and correct zone compliance. For the low-voltage installation, record the strip reference, colour temperature, CRI, power density and cut pitch for every run, and keep the record with the property documentation. Five years later, when one run needs replacing, that record is the difference between a five-minute order and a colour mismatch.
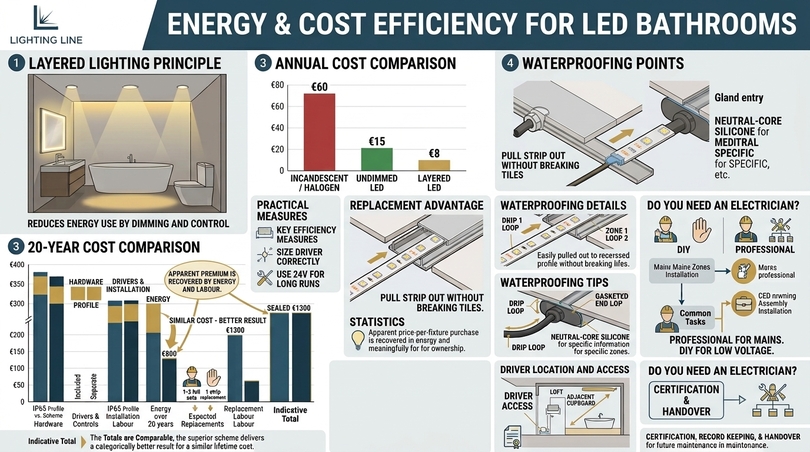
20. Fifteen common bathroom lighting mistakes
The following errors appear repeatedly in projects across every budget level. Each is easy to avoid at design stage and expensive to correct afterward. They are ordered roughly by how often we encounter them.
Relying on a single central ceiling fitting
One source cannot serve four layers. This produces flat light, deep facial shadows, glare in the mirror and no atmosphere at any time of day. It is the root cause of most bathroom lighting dissatisfaction.
Lighting the mirror from above only
Overhead-only mirror light produces the under-eye shadow that makes people look tired and causes systematic errors in grooming.
Ignoring the zones and the basin rule
Installing an IP20 decorative fitting above a basin is both non-compliant and short-lived. The basin extends Zone 2 further than most people expect.
Choosing colour temperature by preference rather than by surface
Warm light on grey tile looks dirty; cool light on travertine looks dead. Match the light to the material.
Specifying CRI 80 for the vanity
The one location where colour rendering has a functional consequence is the one where it is most often economised on.
Omitting dimming
A bathroom without dimming has exactly one mode. Dimming is the cheapest upgrade available and the one most consistently regretted when omitted.
Mounting strip without a profile
No heat path, no glare control, visible dotting, adhesive failure in humidity. Bare strip adhered to plasterboard in a bathroom is a temporary installation whether or not it was intended as one.
Using acetic-cure silicone against aluminium
It corrodes the extrusion and attacks solder joints over time. Always use neutral cure.
Burying the driver
The component most likely to fail first is placed where it cannot be reached. See section 19.5.
Over-illuminating
Many bathrooms are lit to 400 lux or more when 200 would be better. Over-illumination exaggerates skin texture, increases glare from gloss surfaces, wastes energy and destroys atmosphere.
Mixing colour temperatures within a layer
Two different whites in the same cove reads as a fault, not as a design choice.
Placing a strip where its reflection is visible in the mirror
Always check reflections from standing and seated positions during set-out. A source that is beautifully concealed from direct view may be fully exposed in the mirror.
Forgetting the night layer
The layer that costs the least and is appreciated the most is the one most frequently value-engineered out.
Running 12 V over long distances
Visible dimming and colour shift along the run. Use 24 V beyond three metres.
Buying unbinned strip
Colour inconsistency between runs in a mirrored room is unmissable and uncorrectable without replacement.
21. Three worked projects with full bills of materials
Theory becomes useful only when it produces a specification. The three projects below cover the most common bathroom typologies in European housing and are presented with enough detail to be adapted directly. Dimensions, lumen budgets and component families are all derived from the methods set out earlier in this guide.
Project A – Compact windowless en-suite, 1.8 × 2.0 m
Brief: a windowless en-suite off a bedroom, containing a 900 mm quadrant shower, a wall-hung basin with a 600 mm mirror, and a WC. Light-grey porcelain tile to full height. Used primarily morning and night, adjacent to a sleeping area so night performance matters more than usual.
Strategy: no downlights at all. A perimeter corner profile provides indirect ambient; two vertical profiles flank the mirror; one waterproof recessed profile lights the shower; a skirting-level strip provides the night layer. Because the room adjoins a bedroom, the night layer is PIR-controlled at 2200 K and the main circuit fades in over two seconds.
| Layer | Component | Quantity | Strip specification | Load |
|---|---|---|---|---|
| Ambient | Corner profile, ceiling perimeter, two walls | 3.6 m | 3000 K, Ra>90, 9.6 W/m, IP65 | 35 W |
| Task | Mirror profile, vertical pair | 2 × 0.7 m | 3500 K, Ra>90 COB, 14.4 W/m, IP65 | 20 W |
| Shower | 32×10 mm recessed waterproof profile | 0.9 m | 3000 K, Ra>80, 9.6 W/m, IP65 | 9 W |
| Night | Baseboard profile, two walls | 3.2 m | 2200 K, 4.8 W/m, IP65 | 15 W installed, 1.5 W in use |
| Control | 24 V driver 100 W, Bluetooth mesh dimmer, PIR | 1 set | – | – |
| Total installed load | 79 W | |||
| Typical evening draw | 16 W | |||
Project B – Family bathroom with bath and separate shower, 2.6 × 3.2 m
Brief: a main family bathroom with a 1,700 mm bath against one wall, a separate 900 mm walk-in shower with a niche, a double vanity with a 1,400 mm mirror, and a window. Warm travertine-effect porcelain. Heavy morning use by several people, evening use for children’s bathing.
Strategy: a trimless drywall slot provides the main ambient line; a second slot lights the shower; the niche is lit from behind its top lip; the double vanity uses three vertical elements rather than two, so that each of two users is lit bilaterally; a strip under the vanity provides night orientation and the floating effect. Tunable white is specified on the vanity circuit because morning and evening requirements differ sharply.
| Layer | Component | Quantity | Strip specification | Load |
|---|---|---|---|---|
| Ambient | Drywall trimless profile, main axis | 3.0 m | 3000 K, Ra>90, 14.4 W/m, IP44 | 43 W |
| Ambient | Corner profile, wall wash behind bath | 2.6 m | 2700 K, Ra>90, 9.6 W/m, IP65 | 25 W |
| Task | Wall profile, three verticals at vanity | 3 × 0.75 m | Tunable 2700–6500 K COB, 14.4 W/m, IP65 | 32 W |
| Shower | 32×10 mm recessed waterproof profile | 1.2 m | 3000 K, Ra>80, 14.4 W/m, IP65 | 17 W |
| Accent | Tiling profile in shower niche | 0.6 m | 2700 K, Ra>90 COB, 9.6 W/m, IP65 | 6 W |
| Accent / night | Furniture profile under vanity | 1.6 m | 2200 K, 4.8 W/m, IP65 | 8 W |
| Control | 2 × 24 V drivers, tunable-white controller, 4-scene panel | 1 set | – | – |
| Total installed load | 131 W | |||
| Typical evening draw | 28 W | |||
Project C – Luxury wet room with freestanding bath, 3.4 × 4.0 m
Brief: an open wet room with a freestanding bath as the centrepiece, an open rainfall shower with no screen, a full-wall backlit mirror over a stone basin, a bench, and a level threshold. Dark charcoal micro-cement with a stone feature wall. Designed as a wellness space, evening use dominates.
Strategy: because there is no screen, the entire room is treated as Zone 1 and everything is IP65 minimum, with IP67 at floor level. The dark palette requires roughly 60 per cent more installed lumens than an equivalent light room. The stone feature wall is grazed rather than washed. The bath is lit by a narrow overhead line plus a floor-level graze that produces a rim light around its form. A full-wall mirror carries both a halo and front-facing task verticals.
| Layer | Component | Quantity | Strip specification | Load |
|---|---|---|---|---|
| Ambient | Drywall trimless perimeter slot | 6.4 m | 2700 K warm-dim, Ra>90, 19.2 W/m, IP65 | 123 W |
| Feature | Wall profile grazing stone wall | 3.4 m | 3000 K, Ra>90, 14.4 W/m, IP65 | 49 W |
| Task | Mirror profile, halo perimeter | 4.2 m | 2700 K COB, 9.6 W/m, IP65 | 40 W |
| Task | Wall profile, two mirror verticals | 2 × 0.8 m | Tunable 2700-6500 K COB, 14.4 W/m, IP65 | 23 W |
| Shower | Recessed waterproof ceiling slot | 1.5 m | 3000 K, Ra>90, 14.4 W/m, IP65 | 22 W |
| Bath | Recessed waterproof overhead line | 1.8 m | 2700 K warm-dim, 9.6 W/m, IP65 | 17 W |
| Floor | Waterproof tile floor profile, bath surround and threshold | 4.6 m | 2200 K, 4.8 W/m, IP67 | 22 W |
| Control | 3 × 24 V drivers, DALI-2 or Bluetooth mesh, 6-scene panel | 1 set | – | – |
| Total installed load | 296 W | |||
| Typical evening spa scene draw | 34 W | |||
The comparison across the three projects is instructive
Installed load rises steeply with room size and material darkness, but actual consumption in normal use rises far more slowly, because larger schemes are dimmed harder and use a greater proportion of accent rather than ambient light. A 296 W installation drawing 34 W in its most-used scene is not a contradiction; it is what proper layering and scene control produce.
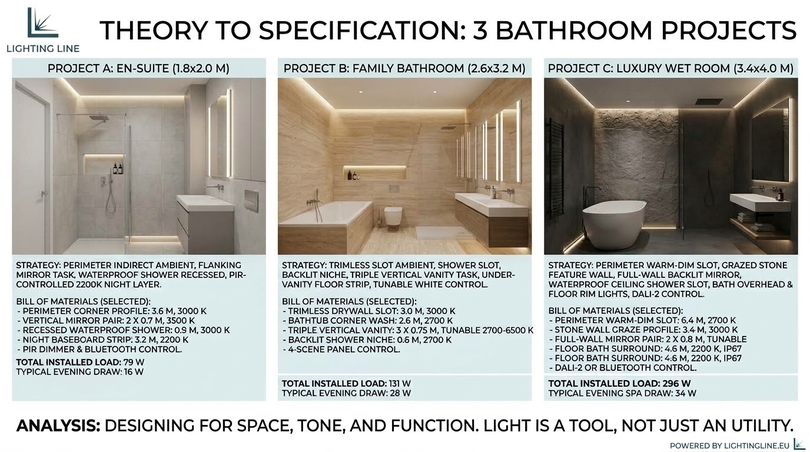
22. Choosing the right profile from the Lighting Line catalogue
The Lighting Line catalogue contains 126 profile references organised into sixteen families, together with 27 diffuser options, 168 end cap references, 58 mounting bracket references and a strip range covering both SMD and COB technologies. This section maps those families onto bathroom applications so that specification becomes a matter of selection rather than search.
The profile family map for bathrooms
| Family | References | Primary bathroom use | Typical zone |
|---|---|---|---|
| Recessed | 17 | Ceiling slots, shower lines, cabinet routing | 1, 2, outside |
| Surface | 24 | Concrete soffits, retrofit ceiling and wall lines | 2, outside |
| Drywall | 15 | Trimless plaster-in ceiling and wall slots | 2, outside |
| Corner | 7 | Wall-ceiling cove, indirect ambient, perimeter wash | 2, outside |
| Wall | 5 | Mirror verticals, dual-emission sconce lines | 2 |
| Tiling | 4 | Tile-integrated wet-room lines, niches, thresholds | 1, 2 |
| Floor | 3 | Walkable threshold and wet-floor lines | 1, 2 |
| Mirror | 1 | Mirror perimeter halo and edge detail | 2 |
| Furniture | 4 | Under-vanity, cabinet interiors, shelving | 2, outside |
| Baseboard | 1 | Skirting-level night layer | 2, outside |
| Handrail | 1 | Illuminated grab rails, accessible design | 1, 2 |
| Round | 4 | Circular and curved decorative lines | Outside |
| Suspension | 3 | Pendant linear over freestanding bath or vanity | Outside |
| Concrete | 1 | Cast-in lines for new-build slabs | Outside |
| Architectural | 8 | Large-section feature lines, commercial washrooms | 2, outside |
| Diffusers | 27 | Opal, frosted and clear lens options for all families | All |
Selecting the diffuser
Diffuser choice is as consequential as profile choice and receives far less attention. Opal diffusers scatter most strongly, hide dotting best and cost the most light, typically 20 to 35 per cent of output. Frosted diffusers scatter moderately and lose 10 to 20 per cent. Clear lenses lose almost nothing but hide nothing either.
In bathroom lighting the rule follows viewing distance. Anything visible within a metre of the eye needs opal; anything above 2.2 m or concealed in a cove can use frosted; clear is appropriate only where the strip itself is never directly visible. The Lighting Line diffuser range includes matched options for every profile family, which removes the fit problems that arise when profile and lens are sourced separately.
End caps, brackets and the parts people forget
A profile installation is only as good as its terminations. The catalogue carries 168 end cap references and 58 bracket references precisely because each profile geometry requires its own. In a bathroom, specify closed end caps rather than cable-entry caps wherever a cable does not pass, and always order spares: a missing end cap discovered on installation day stops the job.
For strip interconnection, the PCB connector range covers the standard widths, though as noted in section 19 soldered joints remain preferable inside wet zones.
Custom strip manufacture
Lighting Line operates its own production capability for fully customisable LED strips, which matters in bathroom projects for three reasons.
- First, exact lengths, a mirror vertical of 742 mm cannot be achieved by cutting a standard product at a 50 mm pitch.
- Second, specific colour temperature and CRI combinations that are not stocked as standard.
- Third, tunable and warm-dim configurations matched to a particular profile width.
For a specifier working on a high-value bathroom, the ability to order the exact strip rather than the nearest available one is frequently the difference between the design intent and a compromise.
The complete technical documentation is available in the downloadable Profiles Catalogue and LED Strip Catalogue, and the technical team provides project support on selection, lumen budgeting and compliance.
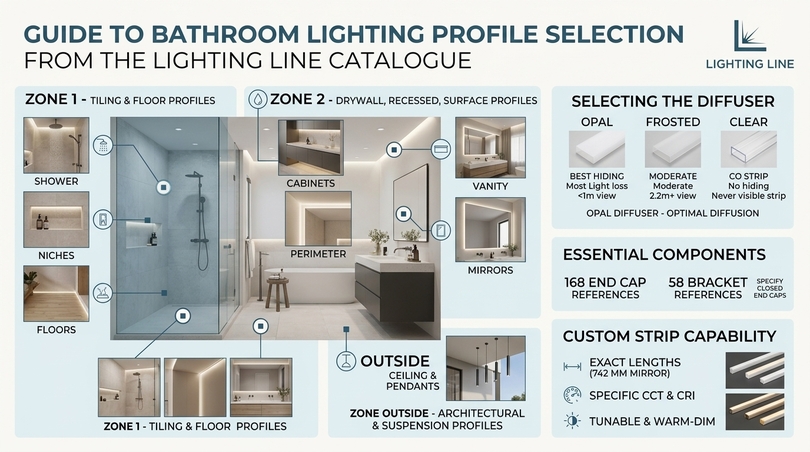
23. Maintenance, troubleshooting and service life
A bathroom lighting installation is a system with a service life, not a permanent fixture, and planning for maintenance at design stage prevents nearly every long-term complaint. This section covers cleaning, expected failures and diagnosis.
Cleaning bathroom lighting diffusers
Diffusers accumulate a film in bathrooms, a combination of condensed water, aerosolised toiletries and airborne dust. This film reduces output measurably, often by 10 to 20 per cent within two years. Clean diffusers with a damp microfibre cloth and a mild neutral detergent, never with solvent, alcohol or abrasive cleaner, all of which craze polycarbonate. Twice-yearly cleaning is sufficient in most domestic bathrooms.
Expected service life of each component
| Component | Typical service life | Failure mode | Replacement difficulty |
|---|---|---|---|
| Aluminium profile | Indefinite | Corrosion only if untreated and unsealed | High – architectural |
| Polycarbonate diffuser | 15–25 years | Yellowing, crazing from solvent | Low – slides out |
| LED strip | 30,000–50,000 h | Gradual lumen depreciation, occasional segment failure | Low – withdraw and replace |
| Driver | 30,000–50,000 h | Electrolytic capacitor degradation | Low if accessible, high if buried |
| Soldered joints | Indefinite if sealed | Corrosion if exposed to condensation | Medium |
| Adhesive bond | 10+ years inside a profile | Creep and detachment if unprofiled | Low |
Diagnosing common bathroom lighting faults
- Whole run dead: check the driver output with a meter before anything else. Driver failure accounts for the majority of total-run failures.
- One segment dead: a failed LED or a cracked solder joint at a cut point. Bypass or replace the segment.
- Far end dimmer than near end: voltage drop. Feed from both ends, or move to 24 V.
- Flicker at low dim levels: driver-dimmer incompatibility. Verify the dimmer is rated for the driver’s load type and minimum load.
- Colour shift over time in one run only: localised overheating, usually from incomplete adhesive contact or an obstructed profile.
- Buzzing: almost always the driver or dimmer, not the LEDs. Magnetostriction in a cheap transformer, or PWM frequency in the audible band.
- Condensation inside the diffuser: a seal failure. Locate the entry point, dry the profile completely, reseal with neutral-cure silicone.
Planning for replacement at design stage
Three decisions taken at design stage make future maintenance trivial rather than destructive. Keep the driver accessible. Use slide-out rather than snap-in diffusers where the profile allows. Document every strip reference. None costs anything at the time, and together they convert a fifteen-year maintenance event from a tiling job into a ten-minute task.
24. Regulations and compliance across Europe and the UK
Compliance is not optional and it is not uniform across borders. The purpose of this section is to give a working understanding of the framework rather than legal advice; the applicable national standard and a qualified local electrician remain the authority in every case.
The international baseline: IEC 60364-7-701
The zoning framework described in section 3 originates in IEC 60364-7-701, part of the international standard series for low-voltage electrical installations, covering locations containing a bath or shower. It establishes the zone definitions, the minimum IP requirements per zone, the SELV requirements, and the requirement for supplementary equipotential bonding. Nearly every European national standard is a transposition of it, which is why the zone concepts are recognisable across jurisdictions even where details differ.
United Kingdom: BS 7671 and Part P
In the UK, BS 7671 (the IET Wiring Regulations) implements the zoning framework, and Part P of the Building Regulations makes certain bathroom electrical work notifiable. The practical UK-specific points for bathroom lighting are that 30 mA RCD protection is required for circuits serving the location, that supplementary bonding may be omitted only where specific conditions on RCD protection and main bonding are met, and that most new work in a bathroom must be certified by a registered competent person or notified to building control. The commonly cited “zone 1 requires IP44” shorthand is broadly correct but is a simplification of the actual clauses.
Italy: CEI 64-8
The Italian implementation is found in the CEI 64-8 series, which follows the same zone structure and adds national requirements on documentation and on the dichiarazione di conformità issued on completion. Italian practice places particular emphasis on the certified declaration of conformity, which must be issued by a qualified installer and is required for property transactions.
Germany, France, Spain and the Nordics
Germany applies DIN VDE 0100-701, France NF C 15-100, and Spain the REBT (Reglamento Electrotécnico para Baja Tensión). All three follow the IEC zone model with national variations chiefly in bonding requirements, socket-outlet rules and documentation. The Nordic countries apply their own national adaptations of the same base standard. For a manufacturer supplying across Europe, the practical consequence is that a product rated IP65 with SELV 24 V supply satisfies the strictest common denominator in every one of these jurisdictions, which is a further argument for the low-voltage profile approach.
Product-level compliance: CE, UKCA, RoHS and Ecodesign
Beyond installation rules, the products themselves carry obligations. CE marking (and UKCA for Great Britain) covers the Low Voltage Directive and Electromagnetic Compatibility Directive. RoHS restricts hazardous substances. The EU Ecodesign Regulation 2019/2020 and the Energy Labelling Regulation 2019/2015 govern efficacy, energy class declaration and, importantly, flicker limits. LM-80 compliance, published on Lighting Line strip product pages, documents measured lumen maintenance over time and is the credible basis for any lifetime claim. A supplier who cannot produce LM-80 data is quoting a lifetime figure with nothing behind it.
What this means in practice for a homeowner
A homeowner specifying bathroom lighting needs to get four things right and can safely delegate the rest. First, confirm the IP rating matches the zone. Second, ensure the circuit is RCD-protected. Third, use a qualified electrician for the mains side and obtain the certificate. Fourth, keep the documentation. Everything else (bonding calculations, cable sizing, notification) is the installer’s professional responsibility.
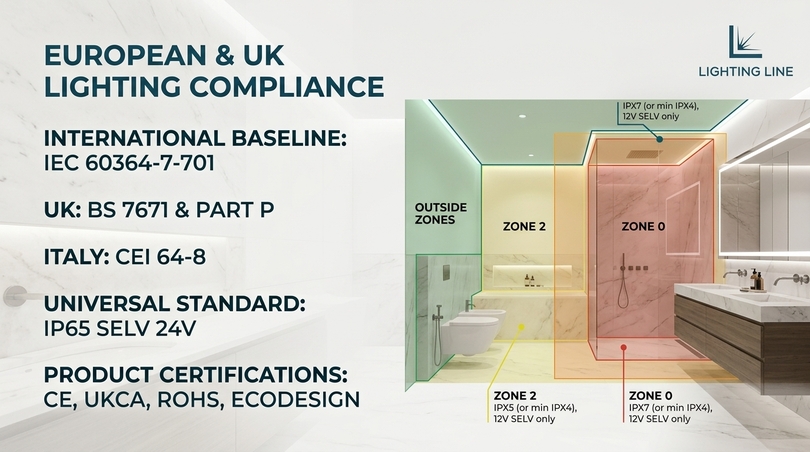
25. The specifier’s checklist
The following checklist condenses this guide into a sequence that can be worked through for any project. It is ordered so that each answer constrains the next, which is how professional specification actually proceeds.
Room and use
- What are the room dimensions and ceiling height?
- Is there a window? If not, is tunable white affordable in this project?
- Who uses the room, at what times, and for which tasks?
- Are there accessibility or age-related requirements?
- Is the dominant surface palette warm or cool, light or dark?
Zoning and compliance
- Mark Zone 0, 1 and 2 on the plan and on the elevations, including the 0.6 m volume around the basin.
- Confirm the minimum IP for every proposed position.
- Confirm SELV where appropriate and locate the driver outside the zones.
- Confirm RCD protection and identify who will certify.
Bathroom lighting layer design
- Ambient: which surfaces will be lit indirectly, and from where?
- Task: are there two vertical sources at the mirror at 1.45–1.65 m centre height?
- Accent: which one or two features justify emphasis?
- Night: is there a low-level layer with automatic control?
- Are the four layers on at least three independent circuits?
Photometric specification
- Calculate the ambient lumen budget using area, target lux, utilisation and maintenance factors.
- Specify CRI Ra ≥ 90 and R9 ≥ 50 for all task lighting.
- Select colour temperature per layer, matched to the surface palette, with no more than 1000 K separation.
- Specify 3-step MacAdam binning throughout.
- Confirm driver flicker below 5% across the full dimming range.
Bathroom lighting hardware selection
- Select the profile family per position from the mapping in Table 17.
- Select diffuser opacity by viewing distance.
- Confirm the strip PCB width fits the profile channel.
- Confirm the cutting pitch allows the required lengths.
- Select 24 V for any run over three metres.
- Order end caps, brackets and spares.
Installation and handover
- Coordinate drywall, tiling and concrete profiles with the relevant trade before their work begins.
- Set out with tape and check reflections from seated and standing positions.
- Locate drivers where they remain accessible.
- Use neutral-cure silicone only.
- Test every run before making good.
- Record all strip references and retain the electrical certificate.
26. Frequently asked questions about bathroom lighting
The questions below are the ones most frequently put to our technical team and most frequently searched online. Each answer is written to stand alone, so the section can be read selectively. Click a question to expand the answer.
| Question |
|---|
What is the best type of lighting for a bathroom?The best bathroom lighting is layered: soft indirect ambient light from a linear source at the ceiling or perimeter, bilateral vertical task light at the mirror, concealed accent light in niches and under furniture, and a very low warm night layer at floor level. No single fitting type can perform all four roles. In hardware terms, LED strip inside aluminium profiles outperforms discrete fittings on glare, uniformity, service life and integration. |
Is IP44 or IP65 better for bathrooms?Neither is universally better; each suits a different zone. IP44 is the minimum for Zone 1 and Zone 2 and is appropriate at the mirror, on walls and at the ceiling away from the shower. IP65 is the sensible default inside the shower and above the bath. IP67 belongs at floor level and thresholds. Over-specifying IP65 everywhere traps heat and adds cost without benefit. |
Do all bathroom lights need to be IP44?Strictly, only those inside Zone 1 and Zone 2. Outside the zones IP20 is permitted. In practice we recommend IP44 as the floor throughout, because the basin rule extends Zone 2 further than most people expect and because condensation shortens the life of unrated equipment regardless of what the regulations permit. |
Should bathroom lights be warm or cool?Both, at different times and for different layers. Use 2700–3000 K for ambient and accent, 3000–3500 K for the mirror task layer, and 2200 K for the night layer. Shift the task layer to 4000 K where morning precision matters. Match the colour temperature to the surface palette: warm light suits travertine and brass, cooler light suits grey porcelain and chrome. |
Should bathroom vanity lights face up or down?Ideally neither. The best vanity bathroom lighting is a pair of vertical sources on each side of the mirror emitting horizontally toward the face. Where an over-mirror bar is unavoidable, aiming it downward with a strongly diffused lens is preferable to aiming it up, but it should always be supplemented by side sources to eliminate under-eye shadow. |
Is 40 or 60 watts better for a bathroom?The question belongs to the incandescent era. What matters is lumens and their distribution. A 60 W incandescent equated to roughly 800 lumens; in a layered LED scheme that total is distributed across several sources, so no single element needs that output. Calculate the lumen budget from room area and target illuminance rather than from wattage equivalence. |
Are LED lights good for bathrooms?They are the best available technology for bathrooms by a considerable margin. LEDs run cool, operate at SELV voltages that are inherently safer near water, dim smoothly, are available at high colour rendering, occupy minimal depth, and can be formed into continuous lines that eliminate glare. Their only genuine weakness (sensitivity to heat) is solved by mounting them in aluminium profiles. |
Can I change a bathroom light fitting myself?Generally yes for like-for-like replacement in the same position on the same circuit with an equal or higher IP rating, provided the circuit is isolated at the consumer unit. No for new circuits, new cable routes, changes of position, or any reduction in IP rating. In the UK, Part P makes most such work notifiable. When in doubt, use an electrician. |
Do you need an electrician to fit a bathroom light?For the mains side, in most European jurisdictions, yes and certification is usually required. The low-voltage side of a profile-and-strip installation can reasonably be assembled by a competent installer or homeowner. The efficient arrangement is for the electrician to provide and certify a switched RCD-protected supply and terminate the driver, with the profile work handled separately. |
How do I light a bathroom with no windows?Light the vertical surfaces rather than filling the volume, specify Ra 90 or better because there is no daylight to correct the eye’s impression, and provide a bright cool morning scene at around 4000 K to substitute for the missing daylight cue. Add scene control so the light varies through the day, since unvarying light is a major contributor to the oppressive feeling of windowless rooms. |
What is the best lighting for a small bathroom?A continuous perimeter line providing indirect ambient light, two vertical task sources at the mirror, one accent element, and no more than two downlights if any. Lighting the walls rather than the centre of the room makes a small bathroom feel substantially larger. A full-width mirror amplifies the effect further. |
What does Zone 1 and Zone 2 mean in bathroom lighting?Zone 1 is the volume directly above the bath or inside the shower, up to 2.25 m above the floor. Zone 2 extends 0.6 m beyond Zone 1 and also covers the volume within 0.6 m of a basin tap. Zone 1 requires IPX4 as a minimum, rising to IPX5 where jets are used; Zone 2 requires IPX4. Both are volumes, not floor areas. |
What lights make you look good in a bathroom?Large, diffuse sources at eye level on both sides of the face, at 3000–3500 K, with CRI Ra above 90 and R9 above 50, dimmed to roughly 400 lux vertically. Bilateral positioning removes under-eye shadow, high R9 reproduces the red tones that make skin look healthy, and dimming prevents over-illumination from exaggerating texture. |
What are common bathroom lighting mistakes?The most frequent are relying on one central ceiling fitting, lighting the mirror only from above, ignoring the zones around the basin, specifying CRI 80 at the vanity, omitting dimming, mounting LED strip without a profile, burying the driver where it cannot be reached, and over-illuminating the room. Section 20 covers fifteen in detail. |
What is the current trend in bathroom lighting?The disappearance of the visible fitting. Trimless plaster-in slots, tile-integrated profiles, backlit mirrors and concealed coves all aim to produce light without a visible object. Alongside this, warm dimming, dot-free COB strip, tunable white and scene-based control are moving from high-end hospitality into mainstream domestic specification. |
How bright should bathroom lighting be?Around 150–200 lux for ambient circulation, 300–500 lux vertically on the face for grooming, 500–750 lux for makeup and precision work, 150–250 lux in the shower, 50–100 lux for a relaxation scene, and 1–5 lux for night orientation. Calculate the required lumens from room area, target lux, a utilisation factor of roughly 0.5, and a maintenance factor of 0.8. |
Do I need IP44 or IP65 for a shower?IPX4 is the regulatory minimum inside a shower, rising to IPX5 where water jets are used for cleaning. Because shower cleaning routinely involves a jet and because condensation is severe in an enclosure, IP65 is the practical recommendation for any luminaire inside a shower. |
Can LED strip be used in a shower?Yes, provided it is IP65 silicone-coated or IP67 encapsulated, housed in a waterproof aluminium profile with sealed end caps, supplied at SELV 24 V from a driver located outside the zones. This assembly is fully compliant in Zone 1 and outperforms sealed downlights on glare and uniformity. |
What is the best colour temperature for a bathroom mirror?3000–3500 K for general domestic use. 4000 K where morning precision or makeup matching for a daylit environment matters. 2700 K reads flatteringly but causes cosmetics to be selected too warm. Tunable white removes the compromise entirely and is the best option where budget allows. |
Why do my bathroom lights look different colours?Almost always binning. LED strip produced without a tight colour consistency specification varies between production batches, and the difference is obvious when two runs are visible together, especially in a room full of mirrors. Specify 3-step MacAdam binning and order all strip for a project from the same batch where possible. |
Why is the end of my LED strip dimmer than the start?Voltage drop along the run. At 12 V the practical single-feed limit is around 5 m; at 24 V roughly 10 m. Solutions are to feed from both ends, inject power at the midpoint, or move to 24 V. The effect also shifts colour slightly warmer at the far end, which is a useful diagnostic clue. |
Is COB or SMD better for bathroom lighting?COB is better wherever the strip is visible at close range (mirror verticals, niches, shallow profiles, furniture lighting) because it produces a continuous dot-free line. High-density SMD is equally good and usually more efficient where the strip sits deep in a profile behind a thick opal diffuser, such as ceiling coves and long ambient runs. |
How do I stop condensation forming inside a light profile?Seal the envelope completely: gasketed end caps with no pinched corners, a cable gland or silicone-filled grommet at the entry, a drip loop below the entry point, and neutral-cure silicone at the profile-to-substrate junction. If condensation has already formed, dry the profile fully before resealing or it will simply be trapped. |
Where should the LED driver be located in a bathroom installation?Outside the zones, in a ventilated, accessible location an adjacent cupboard, a ceiling void with an access panel, behind a removable vanity panel, or in the loft. Drivers have a shorter service life than the LEDs they power, so an inaccessible driver guarantees a destructive maintenance event later. |
Can I put a chandelier or pendant in a bathroom?Only outside Zone 1 and Zone 2, or with an appropriate IP rating. A pendant above a freestanding bath is frequently inside Zone 1 and must be rated accordingly. Height matters too: any pendant must be above 2.25 m or treated as being within the zone it occupies. Check the position against the elevations, not the plan. |
How do I light a shower niche properly?Conceal an IP65 COB strip behind the front lip at the top of the niche, emitting downward onto the back wall. Never place the strip at the back or at the bottom. Match the colour temperature to the tile (3000 K for cool tile, 2700 K for warm stone) and use a tiling or recessed profile that integrates with the tile thickness. |
Is a backlit mirror enough light for a bathroom?No. A backlit mirror throws light away from the face and contributes almost nothing to vertical illuminance. It is an excellent accent and atmosphere device, and should be combined with front-facing vertical task sources at the sides of the mirror. |
What causes flicker in bathroom LED lighting?Ripple in the driver output, not the LEDs themselves. Low-cost drivers frequently exhibit acceptable flicker at full output and severe flicker when dimmed. Specify drivers with under 5% flicker across the whole dimming range, and verify dimmer-driver compatibility rather than assuming it. |
How long do LED strips last in a bathroom?Typically 30,000 to 50,000 hours to L80 when correctly heat-sinked in an aluminium profile. In practice the driver usually fails first. Strip mounted without a profile in a humid bathroom can lose a third or more of that life because junction temperature runs high and the adhesive bond degrades. |
Can bathroom lighting be dimmed?Yes, and it should be. Dimming is the cheapest single upgrade available and the one most consistently regretted when omitted. Use a driver and dimmer that are verified compatible, check flicker at low levels, and give each layer its own dimmed circuit so that scenes can be composed. |
What is the best lighting for applying makeup?Two diffuse vertical sources at eye height on each side of the mirror, CRI Ra 90 or above with R9 above 50, at a colour temperature matching the environment where the makeup will be seen, around 4000 K for daytime and office settings, 2700–3000 K for evening. Tunable white allows both from the same fixture. |
Are there lighting options that help with skin conditions?High colour rendering, and specifically high R9, makes it substantially easier to assess redness, inflammation and pigmentation accurately, because saturated red is reproduced faithfully rather than being rendered grey. A high-output 4000 K inspection setting at the mirror is genuinely useful in households with dermatological concerns. This is an aid to visibility, not a medical device or a substitute for clinical assessment. |
How do I light a bathroom at night without waking up fully?A dedicated night layer at floor or skirting level, 1–5 lux, 1800–2400 K, triggered by a PIR sensor with a photocell override, fading in over one to two seconds. It must be on a circuit entirely independent of the main lights. This preserves dark adaptation and avoids the melatonin suppression caused by a bright ceiling light. |
What lighting is best for a bathroom used by older people?Higher illuminance than for younger occupants (ageing eyes need roughly twice the light at 60 as at 20) combined with rigorous glare control, because sensitivity to glare rises with age. Uniform distribution, illuminated grab rails, clearly lit level changes, and an always-available night layer are the key interventions. |
Can I install LED profiles in an existing tiled bathroom?Surface-mounted profiles, yes, on walls and ceilings. Recessed, drywall and tiling profiles generally require the finish to be opened, so they belong in a renovation rather than a retrofit. A good retrofit strategy is surface profiles for ambient and mirror lighting plus a furniture profile under the vanity, which delivers most of the benefit without touching the tile. |
What is the difference between wall washing and wall grazing?Washing places the source 200–300 mm away from the surface and floods it evenly, minimising texture and maximising apparent brightness, this is what makes a small bathroom feel larger. Grazing places the source within 50–100 mm so light travels nearly parallel to the surface, exaggerating texture, this is what makes stone and ribbed tile look dramatic. |
Do I need a special dimmer for bathroom LED lighting?You need a dimmer matched to the driver, which is usually a trailing-edge type for mains dimming or a dedicated PWM, 0–10 V, DALI or Bluetooth mesh controller for low-voltage dimming. Leading-edge dimmers designed for incandescent loads frequently cause flicker, buzzing and premature driver failure with LED loads. |
How much does a good bathroom lighting scheme cost?For a small en-suite, hardware for a full four-layer profile scheme typically falls between €300 and €600 including drivers and controls, with installation additional. A large luxury wet room may reach €1,500 to €3,000 in hardware. Against total bathroom renovation budgets these figures represent a small share of spend and a disproportionate share of the final result. |
What IP rating do I need for lights above a bath?Directly above a bath up to 2.25 m is Zone 1, requiring IPX4 as a minimum. Because a rainfall head or a hand shower attachment may be present and because steam concentrates at ceiling level, IP65 is the practical recommendation. Beyond 2.25 m the zone requirement falls away but IP44 remains advisable. |
Can I use standard LED strip lights in a bathroom if they are inside a profile?Inside the zones, no the strip itself should be IP65 as well as the profile, because the profile is not a guaranteed watertight enclosure unless it is a dedicated waterproof type with gasketed end caps. Outside the zones, in a fully enclosed dry cove, IP20 strip inside an aluminium profile is acceptable, though IP65 remains the safer specification in any bathroom. |
How do I choose between 12 V and 24 V for bathroom lighting?Choose 24 V for almost every bathroom application. It halves the current for the same power, which halves conductor losses, roughly doubles the maximum single-feed run length to about 10 m, and reduces the visible dimming and colour shift along long runs. 12 V remains useful only for very short runs in tight cabinet spaces. |
Does bathroom lighting affect property value?Lighting is consistently cited by estate agents and designers as one of the elements that most strongly shapes the impression a bathroom creates during a viewing, and bathrooms are among the rooms buyers weigh most heavily. While no single upgrade guarantees a valuation change, a well-executed layered scheme is among the lowest-cost ways to make a bathroom present as recently and thoughtfully renovated. |
27. Designing Light, Not Buying Fittings
The argument of this guide has been consistent from the first section: bathroom lighting improves when it stops being treated as a shopping decision and starts being treated as a design problem. The question is never which fitting to buy. It is which jobs light must do in this particular room, for these particular people, at these particular times and then which components deliver those jobs with the least glare, the best colour, the longest life and the fewest compromises.
Answered that way, the conclusions follow almost mechanically. Four layers, because one source cannot serve four purposes. Linear rather than point sources, because specular bathroom surfaces punish high luminance and reward large emitting areas. Aluminium profiles, because LED lifetime is a thermal question and aluminium is the only readily available heat path. Low voltage, because SELV is inherently safer near water and because the zoning regulations are effectively written to favour it. Ra 90 and R9 above 50 at the mirror, because that is where colour rendering has a functional rather than decorative consequence. Dimming and scene control, because a bathroom is used at both extremes of the day and one setting cannot serve both.
None of this requires an unusual budget
The complete four-layer scheme for a small en-suite uses less than eighty watts of installed capacity and consumes under twenty watts in normal evening use. The hardware costs a fraction of the sanitaryware in the same room. What it requires is a decision taken early enough that the drywall profiles can be fixed before boarding and the tiling profiles set out with the tiler, which is the single most important piece of practical advice.
Lighting Line manufactures the complete component system described here: 126 aluminium profile references across sixteen families, 27 diffuser options, 168 end cap references, 58 mounting bracket references, and a fully customisable LED strip range spanning SMD and COB technologies at colour temperatures from 2700 K to 6500 K, in IP20 and IP65 constructions, with CRI options to Ra>90 and 3-step colour consistency throughout. Every profile family in the catalogue has a defined role in a bathroom, and the technical team supports specifiers on selection, lumen budgeting and compliance.
Begin with the zones, work through the four layers, calculate the lumen budget, and select the profile last
Done in that order, excellent bathroom lighting is not difficult, it is simply a sequence of decisions that most projects never get around to making.
Explore the complete range: aluminium profiles · LED strips · diffusers · end caps · mounting brackets · download the profiles catalogue · download the LED strip catalogue
This article was developed with the support of artificial intelligence and subsequently reviewed, corrected, and validated by the LightingLine.eu technical team, which guarantees its reliability and compliance with official sources.