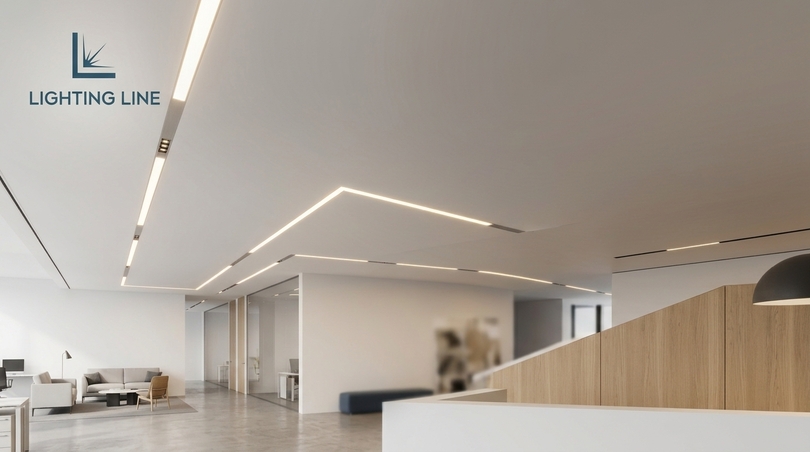
Ceiling lightings are the single most influential design decision in any interior. Before a wall colour is chosen, before a sofa is delivered, before a kitchen island is measured, the ceiling lighting layout has already decided how tall the room will feel, how accurate the colours will look, how comfortable the space will be at eight in the evening, and how much electricity the building will consume for the next fifteen years. Everything else in an interior is seen because of the ceiling lightings above it. Get the ceiling lighting right and a modest room reads as architecture; get it wrong and an expensive renovation reads as a corridor.
This guide has been written by the technical team behind LightingLine.eu for the people who actually specify, install and live with ceiling lightings every day: architects working on retrofit and new-build, interior designers matching ceiling lights to a scheme, electrical retailers who need to explain the difference between a downlight and a ceiling light to a customer at the counter, hospitality owners lighting guest rooms and common areas, and homeowners who simply want to know which ceiling light fixtures are worth the money. It covers the complete type of ceiling lightings, the photometric numbers that matter, the LED profiles and linear systems available on catalogue.lightingline.eu, room-by-room lumen tables, wiring and regulation, running costs calculated to the cent, and more than sixty direct answers to the questions people genuinely ask.
In this article…
- Key takeaways: ceiling lightings at a glance
- What are ceiling lightings? Definition, function and the layers of light
- The complete taxonomy: every type of ceiling lighting explained
- LED profiles and linear ceiling lightings: the architectural layer
- Materials, finishes and design language of ceiling light fixtures
- The numbers that matter: lumens, kelvin, CRI, UGR, beam angle and flicker
- Energy efficiency and real running costs of LED ceiling lightings
- Sizing and layout: how many ceiling lights, how big, how far apart
- Room by room: living room, kitchen, bedroom, hallway, bathroom, office and hospitality
- Low ceilings and high ceilings: two completely different problems
- Smart ceiling lightings: protocols, dimming and scene control
- Are ceiling light fittings universal? Caps, roses, cut-outs and standards
- Installation, wiring, regulations and what an electrician costs
- Ceiling lighting trends for 2026
- Market data, statistics and survey evidence
- How to buy ceiling lightings on LightingLine.eu
- Maintenance, troubleshooting and lifetime management
- Frequently asked questions about ceiling lightings
- A repeatable method for specifying ceiling lightings
1. Key takeaways: ceiling lightings at a glance
We want start with the twelve statements below summarise the entire guide. Every one of them is expanded, evidenced and quantified in the sections that follow.
| # | Conclusion | Detail |
|---|---|---|
| 1 | Ceiling lightings are the primary lighting layer in almost every building | The ceiling is the only surface visible from every position and obstructed by nothing |
| 2 | There are twelve families of ceiling lightings, not one | Flush, semi-flush, pendant, chandelier, recessed downlight, spotlight, track, magnetic track, LED profile, panel, uplighter, fan light |
| 3 | Use ceiling lightings in layers, on separate dimmable circuits | Ambient 40–60%, task 20–35%, accent 10–20%, decorative 5–15% of total lumens |
| 4 | Total lumens = target lux × floor area ÷ 0.6 | 150 lux living room, 300 lux kitchen, 100 lux bedroom, 500 lux at a desk |
| 5 | Downlight spacing = ceiling height ÷ 2 | 1.2 m on a 2.4 m ceiling; first row at half that distance from the wall |
| 6 | Fitting diameter in cm = room length + width in metres | Over a table, use one half to two thirds of the table width instead |
| 7 | LED ceiling lightings cut lighting energy by 80–90% versus halogen | Payback on a domestic downlight retrofit is typically 8–18 months |
| 8 | Specify Ra 90 with R9 above 50, and one colour temperature per room | 2700 K living and sleeping, 3000 K kitchen and bath, 4000 K work |
| 9 | Ceiling light fittings are not universal, but their interfaces are standardised | Check void depth, cut-out, baseplate diameter, weight, drop, IP and fire rating |
| 10 | An LED profile is mandatory for permanent strip installations | It is the heatsink; without it, rated life typically falls from 50,000 to under 20,000 hours |
| 11 | Dimming to 1% matters more than any additional fitting | Match driver and dimmer protocol; never load a driver above 80% of its rating |
| 12 | Nearly every expensive ceiling lighting mistake costs nothing to prevent | Thirty minutes with a floor plan is the highest-return activity in the project |
2. What are ceiling lightings? Definition, function and the layers of light
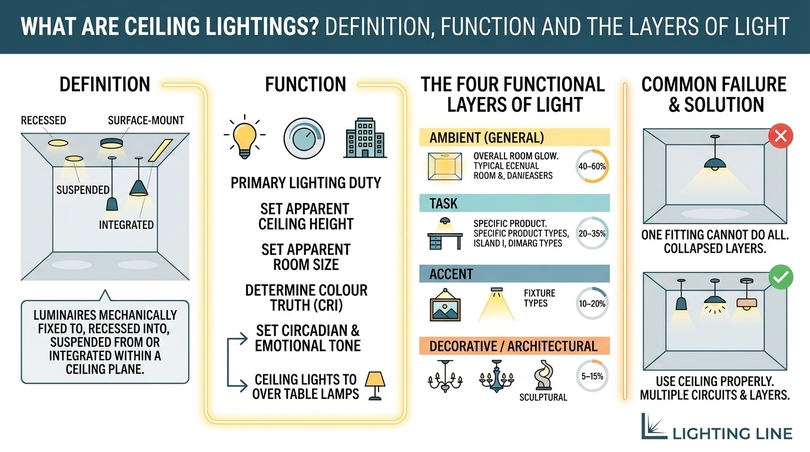
The phrase ceiling lightings covers every luminaire that is mechanically fixed to, recessed into, suspended from or integrated within a ceiling plane. That single definition contains an enormous range of products (a €12 opal flush ceiling light for a utility room and a €4,000 suspended linear system over a boardroom table are both ceiling lightings) but it also contains a useful engineering truth: because the ceiling is the only surface in a room that is visible from every position and obstructed by nothing, ceiling lighting is the only lighting layer that can serve an entire space simultaneously. That is why ceiling lightings carry the primary lighting duty in almost every building typology on earth, and why table lamps, floor lamps and wall lights are supplements rather than substitutes.
It helps to be precise about vocabulary, because the market uses several terms interchangeably and this causes genuine purchasing errors. In UK and Irish usage, ceiling lights, ceiling lighting, ceiling light fittings and ceiling light fixtures all describe the same category while fitting is the British term and fixture the American one. Light fittings for ceilings and lighting for ceilings are the same thing again. Ceiling lightning is simply a very common misspelling and Overhead lights and overhead lighting are functional synonyms. Ceiling mounted lights, ceiling mounted lighting and ceiling mount light fixtures specifically exclude recessed products, since a recessed downlight sits in the ceiling rather than on it. When someone asks what the lights in the ceiling are called, the answer is normally recessed downlights also called downlighting, can lights, pot lights, high hats or hi-hats depending on the country.
The four functional layers of light
Professional lighting design does not think in products, it thinks in layers. There are four, and ceiling lightings can deliver all four: which is precisely why the ceiling deserves a plan rather than a single central fitting. Understanding these four layers is the difference between a room that merely has light in it and a room that is genuinely lit.
| Layer | Purpose | Typical ceiling lighting products | Share of total room lumens |
|---|---|---|---|
| Ambient (general) | Baseline visibility and safe circulation; establishes the perceived brightness of the room | Flush and semi-flush ceiling lights, LED ceiling panels, recessed downlights on a regular grid, opal surface luminaires | 40–60% |
| Task | Concentrated light on a working plane at the correct illuminance for the activity | Directional downlights, adjustable ceiling spotlights, track lighting, pendant lights over islands and desks, linear LED profiles above worktops | 20–35% |
| Accent | Contrast and hierarchy; draws the eye to art, texture, joinery or architecture | Narrow-beam adjustable downlights, gimbal spots, track spotlights, wall-washers, framing projectors | 10–20% |
| Decorative / architectural | The luminaire itself as an object, or light used to describe form | Chandeliers, sculptural pendants, cove lighting with LED profiles, perimeter uplight, starlight ceiling lights | 5–15% |
The single most common failure in domestic ceiling lighting is that all four layers are collapsed into one product. A single central pendant is asked to be ambient light, task light for reading, accent light for the artwork and decorative object all at once. It cannot be. The result is the flat, shadowless, faintly institutional quality of light that a widely discussed generational preference now rejects outright. The solution is not to abandon the ceiling, it is to use the ceiling properly with two to four separately switched or dimmed circuits.
Why ceiling lightings outperform lamps for general illumination
There is a persistent belief that lamps are cheaper to run than overhead lights. Measured against equal delivered illuminance on the working plane, this is false for modern LED ceiling lightings and true only for legacy halogen or incandescent overhead fittings. The reason is geometry, not wattage. A ceiling luminaire is typically 1.6–2.0 m above the working plane and distributes light across a wide area with a high utilisation factor; a table lamp is 0.4 m above the working plane, illuminates roughly one square metre usefully, and sends a large proportion of its output into a shade where it is absorbed as heat.
The arithmetic is worth doing once, because it settles the argument permanently. To reach an average of 150 lux across a 20 m² living room you need roughly 4,500–5,000 delivered lumens. A modern LED ceiling light array supplying that draws about 40–45 W in total. To reach a comparable perceived brightness with table and floor lamps you typically need five to seven lamps; at 8–10 W each that is 40–70 W, plus the fact that the illuminance between the lamps collapses to below 50 lux. Lamps are not cheaper, they are simply switched on selectively, and that selective use is what produces the saving. The correct conclusion is therefore not “avoid ceiling lightings” but “put ceiling lightings on dimmers and separate circuits so they can be used selectively too.”
What ceiling lightings actually do to a space
Beyond illuminance, ceiling lighting performs four perceptual jobs that architects and interior designers rely on daily. First, it sets apparent ceiling height. Light thrown onto the ceiling plane (from an uplighter, a cove, a perimeter LED profile or a semi-flush fitting with an open top) makes a ceiling read as higher, because the eye interprets a bright surface as receding. Conversely, a dark ceiling with narrow downlights compresses the room. Second, it sets apparent room size. Illuminating the vertical surfaces (the walls) makes a room feel larger; a wall-washing downlight positioned 0.8–1.0 m from the wall does more for perceived spaciousness than three extra central fittings.
Colour truth and circadian tone
Third, ceiling lightings determine colour truth. The colour rendering index of your ceiling light fixtures decides whether a grey sofa reads as grey or as brown, whether skin tones look healthy, and whether a paint sample chosen in the showroom survives contact with the home. Fourth, they set circadian and emotional tone. A 2700 K warm ceiling light in a bedroom and a 4000 K neutral ceiling light in a kitchen are not stylistic preferences; they are physiological decisions about melatonin, alertness and comfort. All four of these levers are available in the ceiling. None of them is available from a single fixed, undimmed central fitting.
2. The complete taxonomy: every type of ceiling lighting explained
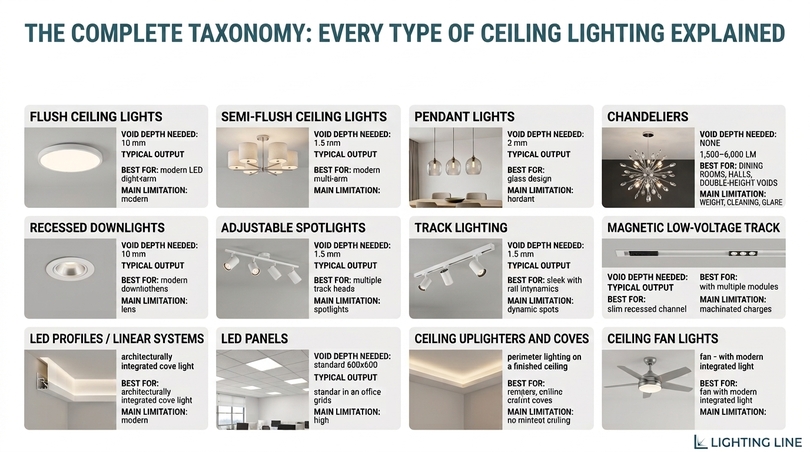
Retailers group ceiling lightings by style; engineers group them by mounting method and photometric distribution. The second grouping is the one that prevents mistakes, because mounting method determines whether a product will physically fit your ceiling, and photometric distribution determines whether it will actually light your room. The taxonomy below is organised by mounting, with the design categories nested inside. Every family in this list is represented on catalogue.lightingline.eu, and for each one we give the ceiling depth required, the typical output, the correct application and the honest limitation.
Overview table: the twelve families of ceiling lightings
| Family | Mounting | Void depth needed | Typical output per unit | Best for | Main limitation |
|---|---|---|---|---|---|
| Flush ceiling lights | Surface, no drop | None | 800–3,500 lm | Low ceilings, hallways, bedrooms, utility | Flat, low-contrast light |
| Semi-flush ceiling lights | Surface, 100–300 mm drop | None | 1,200–4,000 lm | Standard 2.4 m ceilings, hallways, dining | Needs ≥2.3 m headroom |
| Pendant lights | Suspended from ceiling rose | None | 400–2,500 lm | Islands, dining tables, stairwells | Localised; not ambient |
| Chandeliers | Suspended, multi-lamp | None | 1,500–6,000 lm | Dining rooms, halls, double-height voids | Weight, cleaning, glare |
| Recessed downlights | Recessed, cut-out | 60–120 mm | 350–1,200 lm | Kitchens, bathrooms, circulation, retail | Grid fatigue, ceiling penetration |
| Adjustable spotlights / gimbals | Recessed or surface | 0–110 mm | 350–900 lm | Accent, wall-washing, art | Requires aiming discipline |
| Track lighting | Surface or recessed track | 0–40 mm | Modular, 400–1,500 lm/head | Retail, galleries, flexible interiors | Visible track; industrial read |
| Magnetic low-voltage track | Surface, recessed or suspended | 0–35 mm | Modular, 200–1,800 lm/module | Contemporary residential, hospitality | Higher initial cost, driver sizing |
| LED profiles / linear systems | Recessed, surface, suspended | 0–35 mm | 350–1,600 lm per linear metre | Architectural lines, coves, joinery | Requires planning at build stage |
| LED panels | Recessed grid or surface | 0–70 mm | 2,700–5,500 lm | Offices, clinics, commercial | Institutional appearance |
| Ceiling uplighters and coves | Perimeter or suspended | Varies | Indirect, 500–1,200 lm/m | Raising apparent ceiling height | Needs clean ceiling surface |
| Ceiling fan lights | Suspended, motorised | None | 800–2,200 lm | Warm climates, conservatories, large rooms | Requires ≥2.6 m ceiling |
Flush ceiling lights: the workhorse of low ceilings
A flush ceiling light sits directly against the ceiling plane with no measurable drop, which makes it the default answer whenever headroom is scarce. Modern flush ceiling lightings have improved dramatically: the generation of shallow opal discs sold a decade ago produced roughly 60–70 lumens per watt with a colour rendering index in the low 70s, while a current integrated LED flush ceiling light delivers 110–130 lm/W at CRI 90 or above, with tunable colour temperature and phase-cut dimming as standard on mid-range products.
The category divides into three sub-types that behave very differently. Opal diffuser flush lights emit a broad, near-Lambertian distribution and are the correct choice for corridors, landings, utility rooms, wardrobes and small bedrooms where uniformity matters more than modelling. Slim LED disc flush lights, typically 15–40 mm deep, are the modern replacement for the fluorescent bulkhead and are the most efficient ceiling lightings per euro on the market. Decorative flush fittings (ribbed glass, fluted acrylic, fabric drums, rattan and capiz shell) trade some efficiency for a strong stylistic contribution and suit boutique hospitality and characterful residential schemes.
The honest limitation of flush ceiling lights is contrast. Because the source is at ceiling level and emits uniformly downward and sideways, shadows are soft and the room reads as evenly bright but visually flat. In any room where you want atmosphere rather than mere visibility, flush ceiling lightings should provide the ambient layer only, with a second dimmable circuit supplying accent or decorative light.
Semi-flush ceiling lights: the best compromise on a standard ceiling
A semi-flush ceiling light hangs 100–300 mm below the ceiling, and that small gap changes everything photometrically. Because light escapes upward as well as downward, the ceiling plane is illuminated and the room immediately reads as taller and softer. On the 2.35–2.55 m ceilings typical of European apartments and post-war UK housing, semi-flush ceiling lightings deliver most of the visual benefit of a pendant without the head-strike risk.
Semi-flush is also where the decorative market is currently most active: drum shades, smoked and ribbed glass globes, brass and antique-brass frames, opal schoolhouse forms, and multi-arm designs with three to six lamps. For hallways, landings and dining areas in homes with standard ceilings, a semi-flush ceiling light with a 200 mm drop and an upward light component is very often the single best specification decision available, and it is the product family we most frequently recommend to clients replacing a tired flush fitting who want a visible improvement without rewiring.
Pendant lights: localised, directional, deliberate
Pendant lights are suspended ceiling lightings intended to light a defined zone rather than a room. Their correct application is always a horizontal surface with a fixed position: a kitchen island, a dining table, a reception desk, a bedside, a stair void. Using pendants as general ambient light is the most common specification error in contemporary residential design, because a pendant with a solid opaque shade delivers a narrow cone of light and leaves the rest of the room in relative darkness.
The key dimensions are fixed by ergonomics rather than taste. Over a dining table, the underside of the shade should sit 750–900 mm above the tabletop. Over a kitchen island, 700–800 mm above the worktop, which usually means 1,600–1,700 mm from finished floor level. For a group of three pendants over a 2.4 m island, space them at 700–800 mm centres and keep the outermost fittings at least 300 mm inboard of the island ends. Multiply-pendant clusters and three-light pendant fixtures on a single canopy are the practical solution when the ceiling has only one existing outlet, since they convert a single ceiling rose into three light points without additional wiring.
Chandeliers: the decorative maximum
A chandelier is a multi-lamp suspended ceiling light in which the fitting is intended to be a primary visual object. Contemporary chandeliers span crystal, sputnik, drum, linear-bar, cluster-globe, rattan and paper forms, and the category has broadened considerably: flush mount chandeliers and semi-flush crystal ceiling lights now allow the chandelier language to be used on 2.4 m ceilings, and small chandeliers for nurseries, bathrooms and dressing rooms are a genuine growth segment.
Two technical points decide whether a chandelier succeeds. The first is load: anything above 5 kg requires a structural fixing to a joist or a purpose-installed noggin, and above 10 kg the ceiling construction must be verified, a plasterboard ceiling on 400 mm centres will not carry a 15 kg crystal chandelier on a standard ceiling rose. The second is lamp choice: a chandelier with eight exposed candle lamps at 470 lm each produces 3,760 lm of largely unshielded light, which is glaring at eye level in a room with a 2.4 m ceiling. Specify low-output, high-CRI filament-style LED lamps at 200–300 lm each and put the circuit on a dimmer; the chandelier should sparkle, not floodlight.
Recessed downlights: the most used and most misused ceiling lighting
Recessed downlights (the little lights in the ceiling, also called downlighting, can lights, pot lights or high hats) are the highest-volume ceiling lighting product in Europe and the one most often specified badly. A downlight is by definition a directional, narrow-to-medium beam source; it is task and accent equipment, not ambient equipment. When a room is lit exclusively with a symmetrical grid of downlights, the result is bright floors, dark walls, scalloped shadows on faces and the characteristic “airport lounge” quality that clients describe as harsh without being able to say why.
Used correctly, downlights are superb. The current generation of fire-rated LED downlights integrates the driver, offers a 65–75 mm cut-out, is IP65 rated from below, provides switchable colour temperature between 2700 K, 3000 K and 4000 K, and dims smoothly to 1% on a trailing-edge dimmer. Better products add a recessed lens that sets the source 15–20 mm back from the ceiling plane, cutting direct glare and producing a discreet dark aperture rather than a bright dot, this is the single most visible quality differentiator in the category.
The correct method is to place downlights where light is needed, not where the ceiling grid suggests. Wall-wash positions 0.8–1.0 m off the wall, task positions directly over the front edge of a worktop rather than over its centre; accent positions aimed at art or texture. A 20 m² kitchen properly lit needs six to eight downlights placed by function, not twelve placed by symmetry. Trimless and plaster-in recessed lighting takes this further, removing the visible bezel entirely so that only an aperture remains: the most refined expression of downlighting currently available, and a specification we recommend wherever the ceiling is being newly plastered.
Adjustable spotlights, gimbals and ceiling-mounted spot bars
An adjustable ceiling light (a gimbal downlight, a surface-mounted spot bar, or a ceiling-mounted spotlight on a swivel) is the tool for accent and wall-washing. Tilt range is the specification that matters: 20° is decorative, 30–40° is genuinely useful for wall-washing, and 90° rotation allows aiming in any direction. Surface-mounted spot bars with two, three, four or five heads are the fastest way to convert a single ceiling rose into a directional multi-point scheme without any structural work, which makes them the most cost-effective retrofit in the whole of ceiling lighting.
Track lighting and magnetic track systems
Track lighting places a powered rail on or in the ceiling and lets luminaires be positioned anywhere along it. Traditional three-circuit mains track remains the standard for retail, galleries and workshops, where flexibility is worth more than discretion. The significant development of the last five years is 48 V magnetic track, in which a slim recessed, surface or suspended channel carries low voltage and modules (spots, floods, linear bars, pendants, wall-washers) attach magnetically and can be repositioned in seconds without tools.
Magnetic track has moved from commercial into premium residential because it resolves the central tension of ceiling lighting: it delivers downlight-level control with the visual discipline of a single architectural line, and it is reconfigurable when the furniture changes. A 2 m recessed magnetic track carrying three 7 W spots, one 10 W linear module and one pendant module replaces what would otherwise be six separate ceiling penetrations. The critical design step is driver sizing and location: a remote 48 V driver must be accessible for maintenance, and total connected load should not exceed roughly 80% of driver capacity.
LED panels and surface luminaires
LED ceiling panels (600×600 mm, 1200×300 mm, 300×300 mm and round surface variants) are the workhorse of commercial ceiling lighting. Modern panels deliver 3,600–4,400 lm at 30–36 W, which is 110–130 lm/W, with UGR values below 19 for screen-based workplaces. For offices, clinics, classrooms, back-of-house and retail stockrooms, a UGR<19 panel remains the most cost-effective compliant solution available. Surface-mounted versions with a 30–40 mm frame allow the same product to be used on solid concrete ceilings where recessing is impossible.
Ceiling uplighters, coves and indirect ceiling lightings
A ceiling uplighter throws light upward onto the ceiling so that the ceiling itself becomes the luminaire. Indirect ceiling lighting is the single most effective technique for making a room feel larger and calmer, because it eliminates visible sources from the field of view and replaces point glare with a large, low-luminance emitting surface. It is delivered by plaster uplighters, perimeter coves built from plasterboard shadow gaps, suspended linear systems with an up-component, and LED profiles fixed to the top of joinery or a dropped bulkhead.
Two rules govern success. The ceiling must be flat and well finished, because grazing light reveals every trowel mark and joint. And the LED source must be set back at least 60–80 mm from the ceiling and shielded, or a hard bright line will appear at the point closest to the source. Where the ceiling is imperfect, use a diffused profile and increase the setback to 100 mm.
Specialist ceiling lightings: starlight, plug-in, non-electric and fan lights
Starlight ceiling lights (fibre-optic or micro-LED point arrays set into a plasterboard or stretch ceiling) are a growing niche in cinema rooms, children’s bedrooms and premium hospitality. Plug-in ceiling lights solve the rental problem: a fitting with a hook, a swag chain and a flex terminating in a plug allows a pendant or ceiling lamp to be hung where there is no ceiling outlet at all. Non-electric ceiling lights (a shade or shade-only fitting attached to an existing pendant set) are a decorative upgrade rather than a lighting change. Ceiling fan lights combine air movement with a light source and require a minimum 2.6 m ceiling for blade clearance of 2.1 m above floor level, downrods adjust the drop on higher ceilings.
3. LED profiles and linear ceiling lightings: the architectural layer
If there is one part of the ceiling lighting market that has changed the practice of architecture in the last decade, it is the aluminium LED profile. A profile is an extruded aluminium channel that houses an LED strip, dissipates its heat and carries a diffuser, converting a flexible tape into a finished architectural luminaire with a defined optic, a controlled luminance and a lifetime that matches the building. Profiles turn light into a line, and a line into geometry. They are how a ceiling stops being a surface with lights on it and becomes a designed plane.
This section is deliberately the most detailed in the guide, because LED lighting profiles are simultaneously the highest-value and the least understood category on the market. The section covers the profile families available on catalogue.lightingline.eu, how to select the right one, how to calculate strip power and driver capacity, how to specify diffusers, and the installation details that separate a professional result from an amateur one.
The profile families in the LightingLine catalogue
Profiles are classified by how they meet the ceiling. Each family solves a different architectural problem, and the choice is normally made at the design stage rather than the purchasing stage.
| Profile family | Typical section (W×H) | Installation | Ceiling application | Max recommended strip power |
|---|---|---|---|---|
| Surface profile, low | 17×7 to 23×10 mm | Screwed or taped to finished ceiling | Retrofit lines, joinery edges, shelf and wardrobe lighting | 9.6 W/m |
| Surface profile, standard | 23×15 to 30×20 mm | Screwed to ceiling or bulkhead | Continuous ceiling runs, cornice lines, cove edges | 19.2 W/m |
| Recessed profile with flange | 24×14 to 35×25 mm | Routed groove or plasterboard slot | Flush ceiling lines in plasterboard or timber | 19.2 W/m |
| Plaster-in / trimless profile | 50–65 mm total width incl. wings | Set into plasterboard, skimmed flush | Seamless recessed lines with no visible frame | 19.2 W/m |
| Corner profile (45°) | 16×16 to 20×20 mm | Internal corner, ceiling-to-wall junction | Perimeter wall-washing, indirect cove effect | 14.4 W/m |
| Suspended linear profile | 35×35 to 70×75 mm | Steel cable or rod suspension | Direct/indirect linear luminaires over tables and desks | 2 × 19.2 W/m (up + down) |
| Deep architectural profile | 50×35 to 80×60 mm | Recessed or surface | High-output runs, high ceilings, commercial spans | 28.8 W/m |
| Shadow-gap / step profile | Variable, L-section | Ceiling perimeter reveal | Floating ceiling effect, shadow-gap illumination | 14.4 W/m |
| IP65 sealed profile | 25×15 to 35×25 mm | Silicone end caps and gasketed diffuser | Bathrooms, wet rooms, covered outdoor soffits | 14.4 W/m |
Why the profile matters more than the strip
The most persistent misconception in linear LED lighting is that the strip determines the result. It does not; the profile does. Three mechanisms explain why.
Thermal management
Thermal management. LED junction temperature governs both lumen maintenance and colour stability. A high-density strip run bare on a plasterboard ceiling can reach a junction temperature 25–35 °C higher than the identical strip mounted in an aluminium profile with thermal tape. That temperature difference typically converts an L80 rating of 50,000 hours into fewer than 20,000 hours and produces visible colour drift within two years. Aluminium extrusion is not decoration; it is the heatsink on which the strip’s published lifetime depends.
Optical control
Optical control. A bare strip is a row of visible point sources with a luminance of tens of thousands of candelas per square metre, intensely glary and visually cheap. A diffuser converts that into a continuous luminous line at a comfortable luminance. The degree of diffusion is a specification choice, and it directly trades efficiency for appearance.
Mechanical protection and serviceability
Mechanical protection and serviceability. A profile protects the strip from impact, dust and cleaning, and allows the strip to be replaced at end of life without damaging the ceiling. This is the difference between a luminaire and a consumable.
| Diffuser type | Light transmission | Dot suppression | Minimum strip-to-diffuser distance for a seamless line | Recommended use |
|---|---|---|---|---|
| Clear / transparent | 92–95% | None, dots fully visible | Not applicable | Hidden coves, maximum output, indirect only |
| Frosted (light diffusion) | 82–88% | Partial | 12–15 mm | Indirect lines, shelf and joinery lighting |
| Opal (standard diffusion) | 68–78% | Good | 8–10 mm | General ceiling lines, visible runs |
| Deep opal / milky | 58–68% | Excellent | 6–8 mm | Direct-view lines at eye level, premium finish |
| Black louvre / anti-glare | 55–65% | Excellent, with cut-off | 10 mm | Over desks and screens, UGR-sensitive spaces |
The single most useful rule in this table is the strip-to-diffuser distance. If you want a perfectly continuous line with no visible dots, either use a COB (chip-on-board) strip, which has no discrete dots at all, or choose a profile deep enough to give the stated separation for your chosen diffuser. Attempting to hide dots with a shallow profile and an opal cover produces a scalloped line and costs 30% of the output for nothing.
Choosing the LED strip for a ceiling profile
Once the profile is fixed, the strip is selected on five parameters. Every one of these appears on the product data of LED strip lights kits in the catalogue, and every one of them changes the result visibly.
| Parameter | Options | What it changes | Recommendation for ceiling lightings |
|---|---|---|---|
| LED density | 60, 120, 240, 320, 480 LED/m; COB continuous | Dot visibility, uniformity, output | ≥120 LED/m for indirect; COB for visible or shallow runs |
| Power | 4.8, 9.6, 14.4, 19.2, 24 W/m | Delivered lumens and heat | 9.6–14.4 W/m for domestic cove; 19.2 W/m for high ceilings |
| Voltage | 12 V, 24 V, 48 V, 230 V | Voltage drop, max run length | 24 V for runs to 10 m; 48 V above; avoid 12 V beyond 5 m |
| Colour temperature | 2200, 2700, 3000, 4000, 6500 K; CCT-tunable; RGB; RGBW | Atmosphere and colour rendering | 2700 K residential, 3000 K hospitality, 4000 K task and commercial |
| CRI | Ra 80, Ra 90, Ra 95+, R9 > 50 | Colour truth, especially reds and skin | Ra 90 minimum for any visible living space |
| IP rating | IP20, IP44, IP65, IP67 | Moisture and dust resistance | IP20 in profile for dry rooms; IP65 for bathrooms and soffits |
Calculating power, voltage drop and driver capacity
This is the arithmetic that prevents the two classic linear-lighting failures, a line that fades along its length, and a driver that fails after eight months. Work through it in four steps.
Step one: total load. Multiply the run length in metres by the strip power in watts per metre. A 6.4 m perimeter cove using a 14.4 W/m strip draws 92 W.
Step two: driver headroom. Never load a driver beyond 80% of its nominal rating; continuous operation at 100% is the leading cause of premature driver failure. For 92 W of load, specify a 120 W driver, not a 100 W one.
Step three: voltage drop. A 24 V strip fed from one end loses roughly 0.4–0.6 V per metre at 14.4 W/m, which becomes visible as dimming beyond 8 m. The fix is not a bigger driver but a better feed topology: inject power at both ends of a long run, or split the run into two circuits fed from a central point. A 10 m run fed from the centre behaves like two 5 m runs and shows no visible gradient.
Step four: dimming compatibility. Confirm the driver’s dimming protocol before purchase — mains phase-cut (trailing edge), 1–10 V, DALI-2, Casambi Bluetooth or Zigbee. A driver and a dimmer from different protocol families will either not dim, flicker at low levels or buzz. This single check eliminates the great majority of dimming complaints.
| Application | Run length | Strip | Total load | Driver | Feed strategy |
|---|---|---|---|---|---|
| Bedroom perimeter cove | 14 m | 24 V, 9.6 W/m, 2700 K, Ra 90 | 134 W | 2 × 100 W | Split into two 7 m circuits |
| Kitchen ceiling recessed line | 3.6 m | 24 V, 14.4 W/m, 3000 K, Ra 95 | 52 W | 1 × 75 W | Single end feed |
| Open-plan living shadow gap | 22 m | 24 V, 9.6 W/m, 2700 K, Ra 90 | 211 W | 3 × 100 W | Three zones, central feed each |
| Suspended office linear | 2 × 2.4 m | 48 V, 19.2 W/m up + down | 184 W | 1 × 240 W | Central feed, DALI dimming |
| Bathroom mirror and ceiling line | 4.2 m | 24 V IP65, 14.4 W/m, 4000 K | 60 W | 1 × 100 W IP20 remote | Driver outside zone, end feed |
Installation detailing that separates professional from amateur
Six details account for almost all the visible quality difference in installed LED profile ceiling lightings.
Setback from the illuminated surface
In a cove, the strip must be set back from the illuminated ceiling by at least 60 mm, and ideally 80–100 mm, or a hot line appears at the wall–ceiling junction. The cove opening should be at least twice the strip-to-ceiling distance.
Corners and mitres
Mitre the extrusion at 45° and use a corner connector, or specify a purpose-made corner joint. A butt joint at a corner leaves a dark 20 mm gap that is visible from across the room. On plaster-in profiles, ensure the corner is bridged with mesh tape before skimming to prevent hairline cracking.
End caps
Always fit them. An open profile end shows the raw strip, the wiring and the aluminium interior, and is the most common giveaway of a self-installed run.
Thermal interface
Use a genuine thermally conductive adhesive rather than the low-grade 3M-imitation backing supplied with cheap strips. The difference in junction temperature is 8–12 °C, which is directly a difference in lifetime.
Driver access
Every driver must remain accessible for replacement. Drivers are the shortest-lived component of an LED installation; burying one above a skimmed plasterboard ceiling converts a €30 maintenance job into a €600 one.
Colour binning consistency
Order all strip for a single visible run from one production batch. MacAdam ellipse tolerance of 3 steps or better should be specified for continuous lines; between batches, colour differences of 5–6 steps are common and will be plainly visible where two runs meet at a corner.
Where profiles beat conventional ceiling lightings
Profiles are the correct answer whenever light needs to describe the architecture rather than merely occupy the ceiling. Specifically: perimeter coves in living rooms and bedrooms, where indirect light raises the apparent ceiling; recessed lines in hallways, which draw the eye along the axis and make circulation feel intentional; shadow-gap lighting around a dropped ceiling raft, which makes the raft appear to float; continuous lines above kitchen wall units, which give a soft night-light layer at very low power; suspended direct/indirect linear luminaires over dining tables and desks, which combine task and ambient light in one element; and step or skirting profiles that light circulation routes at low level.
Profiles are the wrong answer when the room needs concentrated task illuminance on a small area: a linear cove will never deliver the 500 lux required at a chopping board as efficiently as a well-aimed 8 W downlight. The professional scheme uses both: profiles for the architectural and ambient layers, downlights or track for the task and accent layers, and a decorative pendant or chandelier where an object is wanted. On catalogue.lightingline.eu these families are stocked to be combined, sharing colour temperatures and CRI bins so that a single scheme reads as one coherent light rather than three unrelated products.
4. Materials, finishes and design language of ceiling light fixtures
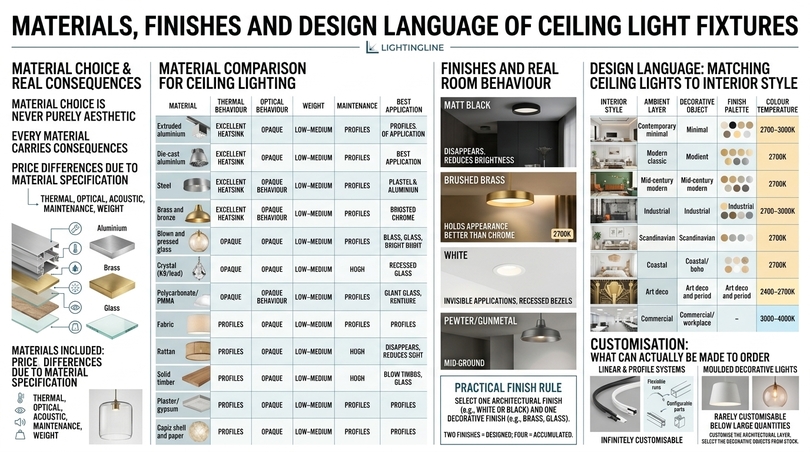
Material choice in ceiling lightings is never purely aesthetic. Every material carries thermal, optical, acoustic, maintenance and weight consequences, and the reason two visually similar ceiling lights can differ by a factor of four in price is almost always found in the material specification rather than the styling. This section sets out what each material does, where it belongs, and what it costs you in performance.
Material comparison for ceiling lighting
| Material | Thermal behaviour | Optical behaviour | Weight | Maintenance | Best application |
|---|---|---|---|---|---|
| Extruded aluminium | Excellent heatsink | Opaque, carries diffusers and optics | Low–medium | Very low, wipe clean | Profiles, downlight bodies, track, panels |
| Die-cast aluminium | Very good | Opaque | Medium | Low | Downlights, spotlights, high-output fittings |
| Steel (powder-coated) | Moderate | Opaque | Medium–high | Low, chip-resistant | Frames, semi-flush bodies, industrial pendants |
| Brass and bronze | Moderate | Opaque, warm reflected tone | High | Patina develops unless lacquered | Decorative pendants, semi-flush, chandeliers |
| Blown and pressed glass | Neutral | Clear, opal, smoked, ribbed, fluted | High | Periodic cleaning, fragile | Pendants, globes, schoolhouse flush lights |
| Crystal (K9 / lead) | Neutral | High refraction, sparkle, dispersion | Very high | Labour-intensive cleaning | Chandeliers, crystal ceiling lights |
| Polycarbonate / PMMA | Poor conductor; needs airflow | Excellent diffusers, UV-stable grades available | Very low | Very low, can yellow if low grade | Diffusers, panel covers, profile lenses |
| Fabric (linen, cotton, silk) | Requires clearance from source | Warm, soft, high absorption | Low | Dust attraction, not washable | Drum shades, semi-flush, bedroom pendants |
| Rattan, bamboo, wicker | Requires clearance | Patterned shadow casting | Low | Dusting, not for humid rooms | Boho and coastal pendants, ceiling lamps |
| Solid and veneered timber | Requires clearance | Opaque, warm reflected tone | Medium | Low | Wooden ceiling lights, linear pendants |
| Plaster / gypsum | Neutral | Matt, paintable, seamless | High | Paintable in situ | Plaster-in profiles, plaster uplighters, trimless |
| Capiz shell and paper | Requires clearance and low-heat source | Translucent, luminous, textured | Very low | Fragile, dusting only | Decorative pendants, nursery and boutique |
Finishes and how they behave in a real room
Matt black has dominated contemporary ceiling lighting for a decade because it disappears against a shadow gap and reads as architectural rather than decorative; its cost is that it shows dust and reduces the perceived brightness of the fitting’s own body. Brushed brass and antique brass have replaced polished chrome as the default warm metal, and they hold their appearance better under warm-white light: 2700 K light on chrome reads slightly green, while the same light on brass reads intentional. White remains the correct choice for any fitting that should not be seen: recessed bezels, profile flanges, panel frames. Pewter, gunmetal and antique copper occupy the mid ground and suit period properties where black is too graphic.
A practical finish rule for whole-house schemes: select one architectural finish for everything functional (usually white or matt black) and one decorative finish for the objects (brass, copper, glass, rattan). Two finishes read as designed; four read as accumulated.
Design language: matching ceiling lights to interior style
| Interior style | Ambient layer | Decorative object | Finish palette | Colour temperature |
|---|---|---|---|---|
| Contemporary minimal | Trimless downlights, recessed LED profiles | Single sculptural pendant or none | White, matt black | 2700–3000 K |
| Modern classic | Semi-flush ceiling lights, discreet downlights | Drum chandelier, glass globe pendants | Brushed brass, opal glass | 2700 K |
| Mid-century modern | Track lighting, flush discs | Sputnik chandelier, globe pendant cluster | Brass, walnut, opal | 2700 K |
| Industrial | Surface spot bars, exposed track | Cage pendants, metal dome shades | Gunmetal, black, raw steel | 2700–3000 K |
| Scandinavian | Flush opal ceiling lights, cove profiles | Paper or timber pendant | White, pale oak | 2700 K |
| Coastal / boho | Semi-flush opal, concealed profiles | Rattan and capiz pendants | Natural fibre, white | 2700 K |
| Art deco and period | Concealed downlights, plaster uplighters | Tiered glass chandelier, fluted shades | Antique brass, smoked glass | 2400–2700 K |
| Commercial / workplace | UGR<19 panels, linear suspended systems | Feature pendant at reception only | White, matt black | 3000–4000 K |
Customisation: what can actually be made to order
Architects and designers regularly ask whether ceiling lighting can be customised, and the honest answer is that it depends entirely on the family. Linear and profile systems are almost infinitely customisable, because they are cut to length: run length, colour temperature, CRI, diffuser type, finish, suspension height and driver protocol are all specification choices rather than fixed product attributes. Magnetic track is similarly configurable, since the track length and the module mix are chosen independently.
By contrast, moulded decorative ceiling lights are rarely customisable below significant order quantities, though finish and shade variants are frequently available as catalogue options, and shade-only replacement is a standard route to adaptation. For projects, the practical strategy is to customise the architectural layer (profiles, linear runs, trimless apertures) and select the decorative objects from stock. This gives a bespoke result on a stock lead time, which is almost always what the programme actually requires.
5. The numbers that matter: lumens, kelvin, CRI, UGR, beam angle and flicker
Almost every disappointing ceiling lighting installation can be traced to a number that was never checked. Watts tell you what a fitting costs to run; they tell you nothing about what it does. The six parameters in this section are what actually determine whether a room is comfortable, whether colours are true, whether the light flickers imperceptibly enough to avoid headaches, and whether the fitting will still look the same colour in five years. Every one of these values is published on quality product data sheets, and their absence from a data sheet is itself informative.
Lumens: the only honest measure of light output
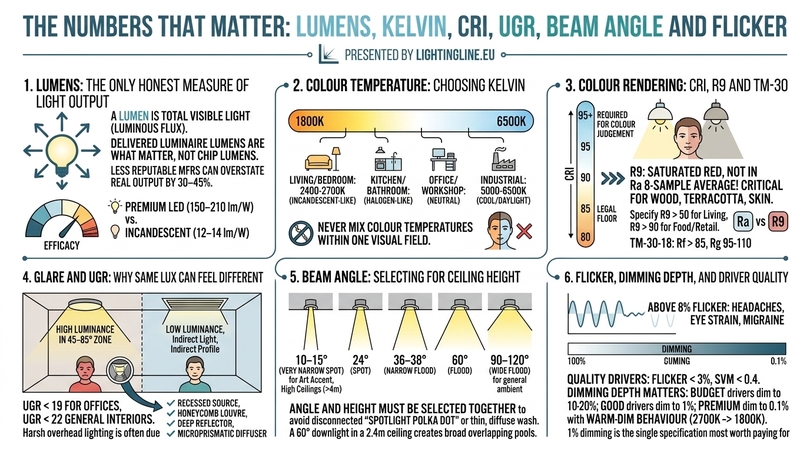
A lumen is a unit of luminous flux: the total quantity of visible light a source emits. Luminaire lumens, not chip lumens, are what matter, because a fitting with a deep opal diffuser might emit only 65% of the light its LEDs produce. Reputable manufacturers publish delivered luminaire lumens; less reputable ones publish raw LED lumens, which can overstate real output by 30–45%.
Efficacy (lumens per watt) is the efficiency figure. The progression over twenty years is dramatic and worth stating precisely, because it reframes every running-cost calculation.
| Technology | Typical efficacy | Watts for 800 lm | Rated life | Dimming | Status in EU |
|---|---|---|---|---|---|
| Incandescent (GLS) | 12–14 lm/W | 60 W | 1,000 h | Excellent | Withdrawn |
| Mains halogen | 16–20 lm/W | 42 W | 2,000 h | Excellent | Withdrawn (most types) |
| Compact fluorescent | 50–60 lm/W | 14 W | 8,000 h | Poor | Withdrawn |
| Linear fluorescent T8 | 80–90 lm/W | 10 W | 15,000 h | Requires ballast | Withdrawn Aug 2023 |
| Early LED (2012) | 60–75 lm/W | 11 W | 25,000 h | Variable | Superseded |
| Current mainstream LED | 100–130 lm/W | 7 W | 30,000–50,000 h | Good to excellent | Standard |
| Premium LED / high-efficacy | 150–210 lm/W | 4–5 W | 50,000–100,000 h | Excellent | Available |
The practical consequence is that a modern LED ceiling light replaces a 60 W incandescent at 6–8 W, a saving of 87–90% for identical light. That is the entire basis of the case for LED ceiling lightings, and it is not marketing: it is measured photometry backed by two decades of ratified test standards.
Colour temperature: choosing kelvin by room and by hour
Correlated colour temperature describes the apparent warmth or coolness of white light. It has no relationship to brightness and no relationship to efficiency in modern products. Colour temperature is the single most emotionally consequential specification in ceiling lighting, and the most commonly got wrong.
| CCT | Appearance | Reference | Recommended rooms | Avoid in |
|---|---|---|---|---|
| 1800–2200 K | Amber, candlelight | Candle flame | Bars, restaurants, decorative filament lamps, late-evening scenes | Any task area |
| 2400–2700 K | Very warm white | Incandescent lamp | Living rooms, bedrooms, hospitality, dining, boutique retail | Detailed task areas |
| 3000 K | Warm white | Halogen | Kitchens, bathrooms, hallways, high-end retail, hotel corridors | Bedrooms if very warm mood is wanted |
| 3500 K | Neutral warm | — | Home offices, utility, garages, showrooms | Bedrooms, living rooms |
| 4000 K | Neutral white | — | Offices, workshops, clinics, classrooms, supermarkets | Any residential living or sleeping space |
| 5000–6500 K | Cool white / daylight | Overcast daylight | Industrial, inspection, medical, task-critical work | Almost all interiors, especially evening use |
Two rules resolve nearly all colour temperature disputes. The first: never mix colour temperatures within a single visual field. Two ceiling lights at 3000 K and 4000 K in the same room will always look like a fault, even to people who cannot name what is wrong. The second: match the CCT to the time of day the room is principally used. A north-facing home office used from 9 a.m. to 5 p.m. benefits from 4000 K; a living room used from 6 p.m. to 11 p.m. does not, and the popular advice to install “bright daylight” ceiling lightings in a lounge is the most reliable way to make an expensive interior feel like a waiting room.
CCT-tunable ceiling lightings (switchable between 3000 K and 4000 K on the fitting, or continuously tunable from 2200 K to 6500 K under control) resolve the conflict where a room genuinely serves two purposes. Human-centric or circadian schemes take this further, shifting from 4000 K in the morning to 2200 K at night automatically, and are now standard practice in hospitality and care environments.
Colour Rendering: CRI, R9 and TM-30
The colour rendering index measures how faithfully a light source reveals colours compared with a reference source of the same colour temperature, on a scale to 100. Ra 80 is the legal floor for most indoor applications; Ra 90 is the point at which interiors stop looking subtly wrong; Ra 95 is required where colour judgement is part of the activity.
The critical detail that most buyers miss is R9 — the saturated red rendering value, which is not included in the Ra 8-sample average. An LED ceiling light can score Ra 82 while scoring R9 of zero or even negative, which is why some LED installations make timber look grey, terracotta look brown, and skin look ill. Specify R9 > 50 for any living space and R9 > 90 for retail displaying food, textiles or cosmetics. TM-30-18, with its Rf (fidelity) and Rg (gamut) metrics, is the more complete modern framework; where it is published, look for Rf > 85 and Rg between 95 and 110.
Glare and UGR: why the same lux can feel different
Unified Glare Rating quantifies discomfort glare from a luminaire in a defined space. The threshold that matters is UGR < 19 for offices and screen-based work, and UGR < 22 for general interiors and circulation. The way a ceiling light achieves a low UGR is by reducing luminance in the 45–85° zone, either with a recessed source, a honeycomb louvre, a deep reflector, or a microprismatic diffuser.
This is the technical explanation for the widespread dislike of overhead lighting. A bright, shallow, wide-emitting ceiling light at 2.4 m puts a high-luminance source directly in the peripheral field of a seated person, producing exactly the low-grade discomfort that people describe as “harsh” or “clinical.” Recessing the source 15–20 mm, using an opal rather than clear diffuser, or converting to indirect light via a profile eliminates it entirely, without reducing the amount of light in the room.
Beam angle: the parameter nobody checks and everybody should
| Beam angle | Classification | Pool diameter at 2.0 m below fitting | Application |
|---|---|---|---|
| 10–15° | Very narrow spot | 0.35–0.53 m | Art accent, sculpture, high ceilings above 4 m |
| 24° | Spot | 0.85 m | Accent, feature joinery, retail display |
| 36–38° | Narrow flood | 1.30–1.38 m | Task downlighting over worktops, general downlights on 2.4–2.7 m ceilings |
| 60° | Flood | 2.31 m | General ambient downlighting, wide spacing, low ceilings |
| 90–120° | Wide flood / Lambertian | 4.0 m+ | Flush ceiling lights, panels, general ambient |
The practical rule is that beam angle and ceiling height must be selected together. A 60° downlight in a 2.4 m kitchen creates broad overlapping pools and a soft, even result. The same 60° downlight in a 4 m atrium delivers a thin, diffuse wash and wastes most of its light on the walls. Conversely a 24° spot on a 2.4 m ceiling produces hard, disconnected circles on the floor, the “spotlight polka dot” effect that clients complain about.
Flicker, dimming depth and driver quality
Flicker is the invisible parameter with the most measurable human impact. All LEDs modulate at the driver’s switching frequency; the question is by how much and how fast. Percent flicker above 8% at frequencies below 90 Hz is associated with headaches, eye strain and, in sensitive individuals, migraine and photosensitive responses. IEEE 1789 provides the reference limits, and quality drivers achieve percent flicker below 3% with a stroboscopic visibility measure (SVM) below 0.4.
Dimming depth is the lowest output a fitting reaches without dropping out, flickering or shifting colour. Budget drivers dim to 10–20%; good drivers dim to 1%; premium drivers dim to 0.1% with warm-dim behaviour, in which colour temperature falls from 2700 K to 1800 K as output is reduced, mimicking incandescent behaviour. For bedrooms, hospitality and any evening-use living space, 1% dimming is the single specification most worth paying for, because the difference between 10% and 1% is the difference between a room that can be dim and a room that cannot.
| Protocol | Wiring | Typical dimming depth | Scene control | Best for |
|---|---|---|---|---|
| Trailing-edge phase cut | Existing two-wire | 5–1% | No | Retrofit residential, single-circuit rooms |
| 1–10 V analogue | Two extra control cores | 10–1% | Limited | Simple commercial installations |
| DALI-2 / D4i | Two-core control bus | 1–0.1% | Full addressable | Offices, hospitality, large projects |
| Bluetooth mesh (e.g. Casambi) | None beyond power | 1–0.1% | Full, app-based | Retrofit projects, boutique hospitality |
| Zigbee / Matter | None beyond power | 1% | Full, ecosystem-integrated | Smart homes, voice control |
| PWM (low voltage strips) | Driver-side | 1–0.1% | Via controller | LED profiles and strip runs |
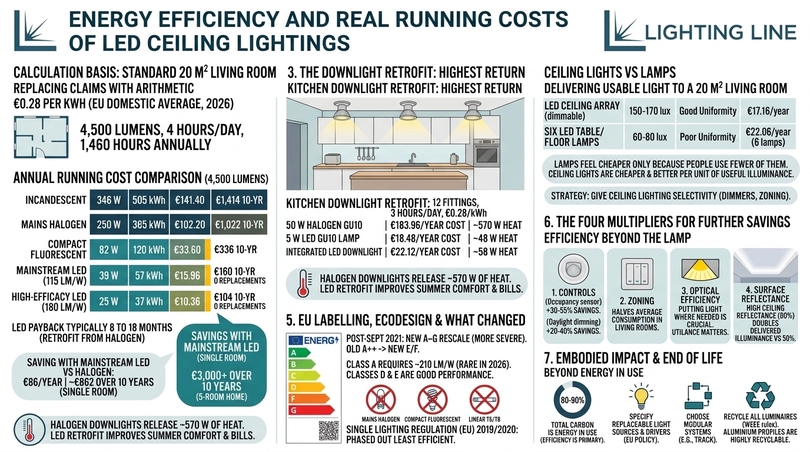
6. Energy efficiency and real running costs of LED ceiling lightings
Energy efficiency is the reason most people replace ceiling lightings, and it is also the area where the most inaccurate claims circulate. This section replaces claims with arithmetic. Every figure below is calculated from published efficacy values and an electricity price of €0.28 per kWh, which is a representative 2026 European domestic average; substitute your own tariff and the ratios stay identical even though the absolute numbers change.
Are LED ceiling lights cheap to run? The calculation
Consider a standard 20 m² living room requiring roughly 4,500 delivered lumens for comfortable general use, operated for an average of 4 hours per day, 365 days a year, 1,460 hours annually.
| Technology | Power required | Annual kWh | Annual cost | 10-year energy cost | Lamp replacements in 10 years |
|---|---|---|---|---|---|
| Incandescent | 346 W | 505 kWh | €141.40 | €1,414 | ~15 |
| Mains halogen | 250 W | 365 kWh | €102.20 | €1,022 | ~7 |
| Compact fluorescent | 82 W | 120 kWh | €33.60 | €336 | ~2 |
| Mainstream LED (115 lm/W) | 39 W | 57 kWh | €15.96 | €160 | 0 |
| High-efficacy LED (180 lm/W) | 25 W | 37 kWh | €10.36 | €104 | 0 |
Replacing halogen ceiling lightings with mainstream LED saves €86 per year in this single room and roughly €862 over ten years once lamp replacement is included. Extend that across a typical five-room home and the ten-year figure exceeds €3,000. This is why the question “are LED ceiling lights worth it?” no longer has a serious counter-argument: the payback period on a full LED ceiling lighting retrofit in a home with halogen downlights is typically eight to eighteen months.
The downlight retrofit: the highest-return change in any home
Homes built or renovated between 1998 and 2012 frequently contain twelve to twenty 50 W GU10 halogen downlights in kitchens and bathrooms. This is the single largest avoidable electrical load in most European housing stock.
| Scenario | Load per fitting | Total load | Annual kWh | Annual cost | Annual saving | Heat released into room |
|---|---|---|---|---|---|---|
| 50 W halogen GU10 | 50 W | 600 W | 657 kWh | €183.96 | — | ~570 W |
| 5 W LED GU10 retrofit lamp | 5 W | 60 W | 66 kWh | €18.48 | €165.48 | ~48 W |
| Integrated LED fire-rated downlight | 6 W (dim-to-warm, Ra 90) | 72 W | 79 kWh | €22.12 | €161.84 | ~58 W |
Note the last column. Twelve halogen downlights release approximately 570 W of heat into the ceiling void — comparable to a small electric heater running whenever the lights are on. This is why halogen downlights compromise loft insulation, why fire-rated enclosures were needed, and why the LED retrofit improves summer comfort as well as electricity bills.
Are lamps cheaper to run than overhead lights? Settled
The comparison that circulates widely on social media compares an old overhead fitting with a modern lamp, which is not a fair test. Compared like for like, with both on LED, ceiling lightings win on energy per unit of useful illuminance because their mounting height gives a higher utilisation factor.
| Approach | Fittings | Total power | Average illuminance achieved | Uniformity | Cost per year (4 h/day) |
|---|---|---|---|---|---|
| LED ceiling light array (dimmable) | 1 flush + 4 downlights | 42 W | 150–170 lux | Good (0.6+) | €17.16 |
| LED profile cove + 2 accent spots | 9 m profile + 2 spots | 103 W at full | 110–130 lux, very soft | Excellent (0.7+) | €42.07 at full; €14 at typical 33% dim |
| Six LED table and floor lamps | 6 lamps | 54 W | 60–80 lux average, 200+ lux local | Poor (0.2) | €22.06 |
The honest conclusion: lamps feel cheaper because people switch on two of six, not because lamps are efficient. The correct strategy is to give ceiling lightings the same selectivity (dimmers, multiple circuits, and scene control) at which point ceiling lighting is both cheaper and better.
EU energy labelling, ecodesign and what changed
Since September 2021 the EU energy label for light sources uses the rescaled A–G classes, and the rescale was severe: a lamp that was A++ under the old label typically sits at class E or F under the new one, not because it became worse but because the scale was reset to leave room for future improvement. Class A on the current label requires above roughly 210 lm/W, which almost no consumer product yet achieves; class D and E represent genuinely good performance in 2026.
The Single Lighting Regulation (EU) 2019/2020 progressively removed the least efficient sources: mains halogen for general lighting, compact fluorescent, and (since August 2023) linear T5 and T8 fluorescent tubes. The practical implication for building owners is that fluorescent replacement is no longer optional maintenance but a scheduled conversion, and the conversion is best taken as an opportunity to upgrade to LED panels or linear systems with proper dimming rather than to fit tube-shaped LED replacements into old fittings with old optics.
Efficiency beyond the lamp: the four multipliers
Choosing an efficient LED ceiling light is the first step, not the whole answer. Four further multipliers typically deliver as much saving again.
Controls
Occupancy sensing in circulation, storage and sanitary areas typically reduces consumption by 30–55%. Daylight-linked dimming on perimeter zones saves 20–40% in daylit rooms. Neither requires the lighting itself to change.
Zoning
Splitting a room’s ceiling lightings into two or three separately switched circuits means the full load is rarely used. This alone typically halves average consumption in living rooms.
Optical efficiency
A luminaire that puts light where it is needed at 100 lm/W outperforms one that sprays light everywhere at 130 lm/W. Utilance is the forgotten half of efficiency.
Surface reflectance
A ceiling at 80% reflectance versus 50% changes the delivered illuminance of an indirect scheme by a factor approaching two. Painting a ceiling brilliant white before installing a cove or uplighter is the cheapest lighting upgrade in existence.
Embodied Impact and End of Life
Energy in use dominates the lifecycle impact of ceiling lightings, typically representing 80–90% of total carbon over a 15-year life, which means efficiency remains the primary lever. However, the balance shifts as grids decarbonise and as products become more efficient, and two design choices now matter measurably: specifying luminaires with replaceable light sources and replaceable drivers (a requirement reinforced by recent EU repairability policy), and choosing modular systems (profiles, magnetic track) that can be reconfigured rather than replaced when a space changes use. Under WEEE rules, all luminaires must be routed to appropriate recycling, aluminium profile bodies are among the most readily recycled components in the building services sector.
7. Sizing and layout: how many ceiling lights, how big, how far apart
This is the section to read if you read nothing else. Almost every complaint about a finished lighting scheme (too dark, too bright, too patchy, too glary) is a quantity or a spacing error, not a product error. The method below is the one professional lighting designers use, reduced to arithmetic you can do on a phone. It works for every room type and every ceiling lighting family.
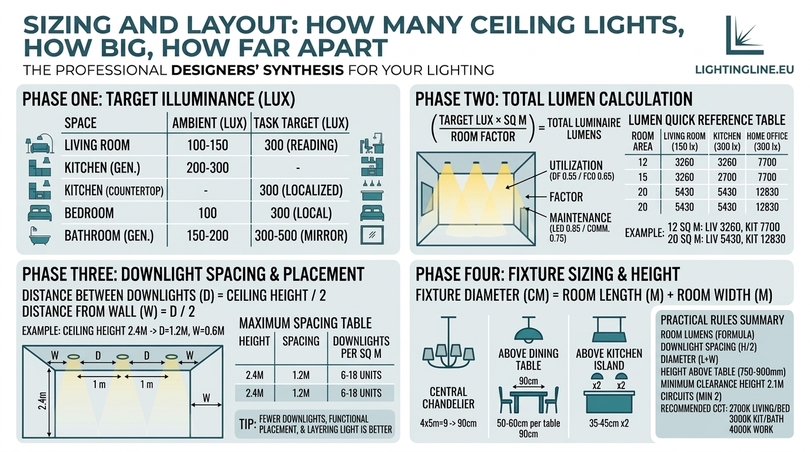
Step one: establish the target illuminance
Illuminance, measured in lux (lumens per square metre), is the quantity of light arriving at a surface. European standard EN 12464-1 sets maintained illuminance for workplaces; residential practice uses a slightly different and more forgiving set of values because domestic rooms serve multiple purposes.
| Space | Ambient target (lux) | Task target (lux) | Evening / scene target (lux) | Reference plane |
|---|---|---|---|---|
| Living room | 100–150 | 300 (reading) | 30–60 | 0.8 m |
| Kitchen, general | 200–300 | — | 80 | 0.85 m worktop |
| Kitchen, worktop and hob | — | 400–500 | 150 | 0.85 m worktop |
| Dining room | 100–150 | 200 at table | 50 | 0.75 m table |
| Bedroom | 100 | 300 (reading, local) | 10–30 | 0.8 m |
| Bathroom, general | 150–200 | — | 30 | Floor |
| Bathroom, mirror | — | 300–500 vertical | — | Face height, vertical |
| Hallway, landing, stairs | 100–150 | — | 30 | Floor |
| Home office | 300 | 500 at desk | — | 0.75 m desk |
| Utility, garage, workshop | 200–300 | 500–750 | — | 0.85 m / floor |
| Retail, general sales | 300–500 | 1,000+ on display | — | Floor / display |
| Office (EN 12464-1) | 300 surround | 500 task area | — | 0.75 m |
| Hotel guest room | 100 | 300 desk / mirror | 10–30 | 0.8 m |
| Hotel / B&B reception, lounge | 150–200 | 300 at desk | 60 | 0.8 m |
Step two: convert lux to lumens with the room factor
The core formula is straightforward:
Total luminaire lumens = (Target lux × Floor area in m²) ÷ (Utilisation factor × Maintenance factor)
For a typical domestic room with light walls and a white ceiling, use a utilisation factor of 0.55 for downlights and 0.65 for wide-distribution flush ceiling lights, use 0.35–0.45 for indirect cove lighting, which is inherently less efficient but visually superior. Use a maintenance factor of 0.85 for LED in clean domestic environments and 0.75 for kitchens and commercial spaces.
Worked example. A 4.5 × 4.0 m living room is 18 m². Target 150 lux ambient. Using flush and semi-flush ceiling lightings: 150 × 18 ÷ (0.65 × 0.85) = 4,887 lumens. That might be delivered by one 2,400 lm semi-flush fitting plus four 620 lm downlights, or by a 3,000 lm ceiling light plus 5 m of 14.4 W/m cove profile.
The quick reference table: lumens by room size
| Room area | Living room (150 lx) | Kitchen (300 lx) | Bedroom (100 lx) | Hallway (120 lx) | Home office (300 lx) |
|---|---|---|---|---|---|
| 6 m² | 1,630 lm | 3,850 lm | 1,090 lm | 1,300 lm | 3,850 lm |
| 9 m² | 2,440 lm | 5,770 lm | 1,630 lm | 1,950 lm | 5,770 lm |
| 12 m² | 3,260 lm | 7,700 lm | 2,170 lm | 2,600 lm | 7,700 lm |
| 16 m² | 4,340 lm | 10,260 lm | 2,900 lm | 3,470 lm | 10,260 lm |
| 20 m² | 5,430 lm | 12,830 lm | 3,620 lm | 4,340 lm | 12,830 lm |
| 25 m² | 6,790 lm | 16,030 lm | 4,530 lm | 5,420 lm | 16,030 lm |
| 30 m² | 8,140 lm | 19,240 lm | 5,430 lm | 6,510 lm | 19,240 lm |
| 40 m² | 10,860 lm | 25,650 lm | 7,240 lm | 8,680 lm | 25,650 lm |
Kitchen figures assume the full 300 lux is provided by ceiling lightings alone. In practice, kitchens should be lit in two layers: ceiling lightings to 200 lux general, plus under-cabinet LED profiles delivering the additional 200–300 lux on the worktop. That split reduces the ceiling requirement by roughly a third and produces a far better result, because worktop light then comes from in front of the user rather than behind, eliminating body shadow.
Step three: spacing and position
The spacing rule for recessed downlights is derived from ceiling height: divide the ceiling height in metres by two, and use the result as the spacing in metres. A 2.4 m ceiling gives 1.2 m spacing; a 2.7 m ceiling gives 1.35 m; a 3.0 m ceiling gives 1.5 m. Keep the first row at half that distance from the wall (0.6 m for a 2.4 m ceiling) unless you are deliberately wall-washing, in which case use 0.8–1.0 m from the wall with a wall-wash optic.
| Ceiling height | Spacing | Distance from wall | Downlights in 12 m² (3×4 m) | Downlights in 20 m² (4×5 m) | Downlights in 30 m² (5×6 m) |
|---|---|---|---|---|---|
| 2.30 m | 1.15 m | 0.58 m | 8 | 12 | 20 |
| 2.40 m | 1.20 m | 0.60 m | 6–8 | 12 | 18 |
| 2.70 m | 1.35 m | 0.68 m | 6 | 9–12 | 15 |
| 3.00 m | 1.50 m | 0.75 m | 4–6 | 9 | 12 |
| 3.50 m | 1.75 m | 0.88 m | 4 | 6 | 9 |
These are maxima for uniform ambient coverage, not prescriptions. The better contemporary practice is to fit fewer downlights, place them functionally, and add a second layer (profile, cove, semi-flush or pendant) for ambient fill. A kitchen with six well-placed downlights and 4 m of under-cabinet profile is a far better room than the same kitchen with fourteen downlights on a symmetric grid.
Step four: sizing the fitting itself
The diameter rule for a central ceiling light or chandelier is quick and reliable: add the room’s length and width in metres, and the resulting number in centimetres is an appropriate fitting diameter. A 4 × 5 m room gives 9, meaning a 90 cm chandelier or a 45–55 cm flush fitting depending on whether you want a statement or a background element.
| Room dimensions | Statement chandelier Ø | Flush / semi-flush Ø | Pendant over table Ø | Max drop on 2.4 m ceiling |
|---|---|---|---|---|
| 3 × 3 m | 60 cm | 30–40 cm | 30–35 cm | 25 cm |
| 3 × 4 m | 70 cm | 35–45 cm | 35–40 cm | 25 cm |
| 4 × 5 m | 90 cm | 45–55 cm | 40–50 cm | 30 cm |
| 5 × 6 m | 110 cm | 55–65 cm | 50–60 cm | 30 cm |
| 6 × 8 m | 140 cm | 2 × 55 cm | 3 × 30 cm cluster | 35 cm |
For a pendant or chandelier over a dining table, a second rule applies and takes precedence: the fitting should be between one half and two thirds of the table width, and never wider than the table minus 30 cm on each side. A 90 cm wide table takes a 45–60 cm fitting. For rectangular tables above 1.8 m, use a linear bar pendant or two to three smaller pendants rather than one round fitting.
The rule of thumb summary card
| Question | Rule |
|---|---|
| How many lumens does the room need? | Target lux × m² ÷ 0.55 (spots) or ÷ 0.65 (diffuse) |
| How far apart should downlights be? | Ceiling height ÷ 2 |
| How far from the wall? | Half the spacing; 0.8–1.0 m if wall-washing |
| What diameter fitting? | Room length (m) + width (m) = diameter in cm |
| How high above a dining table? | 750–900 mm from tabletop to shade underside |
| How high above a kitchen island? | 700–800 mm from worktop to shade underside |
| Minimum headroom under any ceiling light? | 2.10 m to the lowest point in circulation areas |
| How many circuits per living room? | Minimum two, ideally three, all dimmable |
| What CRI? | Ra 90 minimum in any occupied living space, R9 > 50 |
| What colour temperature? | 2700 K living and sleeping, 3000 K kitchen and bath, 4000 K work |
8. Room by room: living room, kitchen, bedroom, hallway, bathroom, office and hospitality
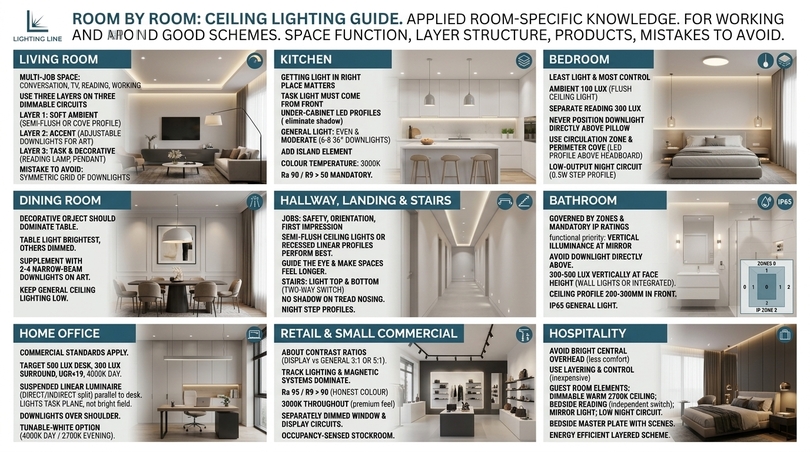
Rules of thumb get you to a workable scheme; room-specific knowledge gets you to a good one. Each room below is treated the same way: what the space is actually for, the layer structure that works, the products from the ceiling lighting families that deliver it, and the mistake to avoid. Together these nine rooms cover the great majority of residential and small-commercial ceiling lighting projects.
Living room ceiling lightings
The living room is the hardest room to light because it does the most jobs: conversation, television, reading, hosting, and (increasingly) working. A single central ceiling light cannot serve any of them well, and the widespread dissatisfaction with living room overhead lighting is a direct consequence of trying. The correct structure is three layers on three dimmable circuits.
Layer one: soft ambient light
Either a semi-flush ceiling light with an upward component, or a perimeter LED profile cove at 9.6 W/m in 2700 K, Ra 90. This is the layer that sets the mood and should be capable of dimming to 1%. On a 2.4 m ceiling, a semi-flush is the simpler retrofit; where the ceiling is being rebuilt or a shadow gap is possible, the cove is the superior result and makes the ceiling read 200–300 mm higher than it is.
Layer two: accent light
Two to four adjustable downlights or track spots at 24–36°, aimed at artwork, a fireplace, bookshelves or a textured wall. This layer creates the contrast that makes a room look designed. It is the layer most often omitted and the one that contributes most to perceived quality.
Layer three: task and decorative light
A reading position needs 300 lux locally: either a directional downlight over the armchair or a floor lamp. A decorative pendant or small chandelier can be included as an object, but it should be dimmable and low-output.
The mistake to avoid: installing eight to twelve downlights in a symmetric grid across a living room ceiling. It produces even, flat, glary light with dark walls and is the primary cause of the complaint that modern lighting feels cold. If downlights are the only option available, reduce the count by a third, choose 60° optics with a recessed lens, and add wall-washing positions 0.8 m off the main walls.
Kitchen ceiling lightings
The kitchen is the one room where getting the light in the right place matters more than how much of it there is. The governing constraint is body shadow: any light source behind the user throws their own shadow onto the work surface. This single fact dictates the entire strategy.
Task light must come from in front
Position downlights over the front edge of the worktop, roughly 250–300 mm out from the wall units, not centred on the 600 mm worktop depth. Better still, provide worktop light from under-cabinet LED profiles at 14.4 W/m, 3000 K, Ra 90, fitted at the front edge of the wall unit underside with an opal diffuser. Under-cabinet profiles eliminate shadow entirely and are the highest-satisfaction upgrade in kitchen lighting.
General light: even and moderate
General light should be even and moderate: six to eight 36° downlights or two to three LED surface luminaires deliver 200 lux across the floor, which is enough for circulation and cleaning. Add a fourth element over the island: three pendants at 700–800 mm above the worktop on 700–800 mm centres, or a single linear bar pendant for a contemporary look.
Colour temperature for kitchen ceiling lightings
Colour temperature: 3000 K. It renders food accurately, avoids the clinical quality of 4000 K, and blends with adjoining living space at 2700 K without an obvious step. Ra 90 with R9 > 50 is not optional in a kitchen — it is the difference between raw meat looking fresh and looking grey.
Bedroom ceiling lightings
The bedroom needs the least light and the most control. The target is 100 lux ambient, dimming to 10 lux or lower for evening, with separately controlled reading light at 300 lux. A flush or semi-flush ceiling light at 1,600–2,400 lm on a trailing-edge dimmer serves the ambient layer; 2700 K, or 2200 K if the room is used late.
Never position a downlight directly above the pillow. Anyone lying in bed will look straight into it. Place ceiling lightings on the room’s circulation axis and around the perimeter, and keep the bed zone lit by wall lights, bedside pendants or a perimeter cove. A perimeter LED profile above a headboard bulkhead, at 9.6 W/m and 2200–2700 K, is the most requested bedroom lighting detail in contemporary residential work, and it dims beautifully.
For children’s bedrooms, add a very low-output night circuit (a 0.5 W step profile or a dimmed strip at 1%) rather than a plug-in night light. For guest bedrooms and B&B rooms, a two-scene arrangement (bright for dressing, low for evening) controlled from a single wall plate is worth more to guests than any additional fitting.
Dining room ceiling lightings
The dining room is the one space where the decorative object should dominate. A pendant, chandelier or linear bar over the table, hung 750–900 mm above the tabletop, sized to half to two thirds of the table width, on a dimmer, at 2700 K or lower. The table light should be the brightest thing in the room and everything else should be dimmed below it, that contrast is what makes a dining room feel like an occasion.
Supplement with two to four narrow-beam downlights aimed at the table edges or a sideboard, and keep general ceiling lighting low. A dining room lit to a uniform 200 lux feels like a canteen; the same room at 60 lux ambient with 200 lux on the table feels like a restaurant.
Hallway, landing and stair ceiling lightings
Circulation lighting has three jobs: safety, orientation and first impression. Hallways are also where semi-flush ceiling lights and recessed linear profiles perform best, because a continuous line along the axis of a corridor guides the eye and makes a narrow space feel longer and more deliberate.
For a standard hallway, space flush or semi-flush ceiling lights at 2.0–2.5 m centres, or run a recessed profile the length of the corridor at 9.6 W/m. On stairs, provide light at both top and bottom with two-way switching, ensure no fitting casts a shadow onto a tread nosing, and consider low-level step profiles for night use. Where the hallway is double height, a long drop pendant or a cluster of staggered globes is the standard solution; the lowest point must remain at least 2.1 m above the highest stair tread within its footprint.
Bathroom ceiling lightings
Bathrooms are governed by zones, and the zone determines the required IP rating. This is a safety requirement, not a recommendation.
| Zone | Definition | Minimum IP | Suitable ceiling lightings |
|---|---|---|---|
| Zone 0 | Inside the bath or shower basin | IP67, 12 V SELV | Not applicable to ceiling fittings |
| Zone 1 | Above bath or shower to 2.25 m | IP65 (IP44 minimum where no jets) | Sealed IP65 downlights, IP65 flush ceiling lights, IP65 profiles |
| Zone 2 | 0.6 m beyond zone 1, and around basins | IP44 | IP44 flush and semi-flush ceiling lights, downlights |
| Outside zones | Remainder of the room | IP20 (IP44 recommended) | Any ceiling light, though IP44 is prudent given steam |
The functional priority in a bathroom is vertical illuminance at the mirror, not horizontal illuminance on the floor. A downlight directly above a mirror lights the top of the head and casts the face into shadow: the single most common bathroom lighting error. Provide 300–500 lux vertically at face height using wall lights either side of the mirror, an integrated mirror light, or a ceiling profile positioned 200–300 mm in front of the mirror face rather than above it. Then add IP65 ceiling lightings for general and shower illumination at 3000 K, Ra 90.
Home office ceiling lightings
The home office is the residential room where commercial standards apply. Target 500 lux at the desk with 300 lux surround, UGR below 19, and 4000 K during working hours. The most effective residential solution is a suspended linear luminaire with a direct/indirect split — roughly 30% up, 70% down — positioned parallel to and slightly in front of the desk edge, which lights the task plane without placing a bright source in the visual field above the screen.
Where a linear pendant is not possible, use two or three 36° downlights positioned so the light arrives over the user’s shoulder rather than from directly overhead, and avoid placing any ceiling light directly behind a monitor, since it will reflect off the screen. A tunable-white ceiling light that runs 4000 K by day and 2700 K in the evening converts the same room from workspace to living space and is the most useful single specification in a dual-purpose room.
Retail and small commercial ceiling lightings
Retail lighting is about contrast ratios, not absolute levels. The merchandising rule is 3:1 between display and general ambient, rising to 5:1 for hero product. Track lighting and magnetic track systems dominate because they allow the accent layer to be re-aimed as the merchandise changes; general levels come from linear systems or panels.
For an electronics or lighting retailer, three specification decisions differentiate the store: Ra 95 with R9 > 90, so that product colour is honest; 3000 K throughout, which is warmer than the 4000 K default and reads as premium; and separately dimmed window and display circuits so the shop can present differently by day and by night. Occupancy-sensed stockroom and back-of-house lighting typically pays for itself in under a year.
Hospitality: bed and Breakfast, guest houses and small hotels
Guest accommodation has a specific, well-documented lighting problem: guests almost universally rate rooms lit primarily by a bright central overhead fitting as less comfortable than rooms lit by multiple low-level sources, regardless of the quality of the furniture. The remedy is layering and control, and it is inexpensive.
In each guest room, provide four elements: a dimmable warm ceiling light at 2700 K for general use; a bedside reading light per occupant with independent switching; a mirror or dressing light with good vertical illuminance; and a very low night circuit for the route to the bathroom. Put all of it on a single bedside master plate with two or three preset scenes. The scene control is what guests remember, the ability to turn everything off from the bed is consistently among the most-mentioned positives in accommodation reviews.
In common areas (breakfast room, lounge, reception) use warm 2700 K light, decorative pendants over tables at low output, LED profile coves for ambient, and accent downlights on art and texture. Aim for an average of 100–150 lux with strong local contrast rather than a uniform 300 lux. Energy performance follows automatically: a layered, dimmed, sensor-assisted hospitality scheme typically runs at 40–55% of the consumption of an equivalent uniformly-lit one, while scoring far better on guest satisfaction.
9. Low ceilings and high ceilings: two completely different problems
Ceiling height changes not just which ceiling lightings will physically fit, but which photometric strategy will work. A low ceiling is a glare and headroom problem; a high ceiling is a delivery and maintenance problem. They require opposite solutions, and applying the wrong one is why so many double-height rooms are underlit and so many low-ceilinged rooms feel oppressive.
Ceiling lightings for low ceilings (under 2.4 m)
On a 2.2–2.4 m ceiling the source is close to eye level, which magnifies glare, and any fitting with a drop reduces usable headroom. The strategy is to lower luminance rather than lower output, and to spread the source rather than concentrate it.
What works on a low ceiling
What works: slim LED flush ceiling lights with deep opal diffusers, which present a large low-luminance surface; recessed downlights with a set-back lens and 60° optics at closer spacing; recessed LED profiles, which add zero drop and create a horizontal line that visually widens the room; plaster-in trimless apertures, which read as part of the ceiling; and semi-flush fittings with a maximum 200 mm drop and an upward light component that puts light on the ceiling and makes it recede.
What fails on a low ceiling
What fails: long pendants, chandeliers with a drop over 250 mm, exposed filament lamps at eye level, narrow-beam spots that create hard pools, and clear-glass fittings of any kind. Above all, avoid a single high-output central fitting, at 2.3 m it will be the brightest object in the room from every seated position.
The counter-intuitive move that works best on low ceilings is indirect light. A perimeter cove or a set of ceiling uplighters throwing light onto a brilliant-white ceiling produces a large, soft, low-luminance emitting plane; the ceiling stops being a lid and starts being a source. In a 2.3 m room this can add 200–300 mm of perceived height, which no other intervention achieves.
Ceiling lightings for high and double-height ceilings
Illuminance falls with the square of the distance, so a fitting that delivers 200 lux from 2.4 m delivers only 55 lux from 4.5 m. This is the core arithmetic of high-ceiling lighting and the reason so many atriums, converted barns, churches and double-height living rooms feel gloomy despite having plenty of fittings.
| Mounting height above floor | 10° very narrow | 24° spot | 38° narrow flood | 60° flood |
|---|---|---|---|---|
| 2.4 m | ~1,900 lx | ~380 lx | ~150 lx | ~62 lx |
| 3.0 m | ~1,150 lx | ~230 lx | ~91 lx | ~38 lx |
| 4.0 m | ~620 lx | ~124 lx | ~49 lx | ~20 lx |
| 5.0 m | ~390 lx | ~78 lx | ~31 lx | ~13 lx |
| 6.0 m | ~270 lx | ~54 lx | ~21 lx | ~9 lx |
Three strategies solve high ceilings
First, narrow the beam: at 4 m and above, specify 24° or narrower optics for downlights, which multiplies centre-beam illuminance by six compared with a 60° flood. Second, bring the light down: long-drop pendants, suspended linear systems and multi-tier chandeliers positioned 2.4–3.0 m above the floor restore normal photometric geometry and dramatically reduce the required output. Third, light the walls: in a tall room, vertical illuminance does more perceptual work than horizontal illuminance, and wall-washing from a high-level track transforms the space at a fraction of the energy needed to raise floor lux.
Maintenance must be designed in
A fitting at 6 m needs scaffold or a mobile tower for relamping, which costs more than the fitting. Specify sealed integrated LED luminaires with L90 at 50,000 hours, or use winch-lowered pendants, or place all high-level equipment on the walls where a ladder reaches. This is the single most frequently ignored consideration in high-ceiling lighting and the source of the most expensive regrets.
Sloped, vaulted and pitched ceilings
Sloped ceilings introduce a geometry problem: a standard downlight installed in a pitched ceiling aims its beam at an angle rather than downward, producing an oval pool and grazing light on one wall. The solutions are sloped-ceiling downlights with an angled inner housing, gimbal downlights with 30–40° tilt, or surface-mounted spots on an adjustable bracket. For pendants and chandeliers on a slope, specify a swivel canopy rated to the pitch, most standard canopies allow 15–30°, while sloped-ceiling adaptors allow up to 45°. Track lighting mounted along the ridge, or a set of profiles run parallel to the eaves, are often the most elegant answers in a converted loft.
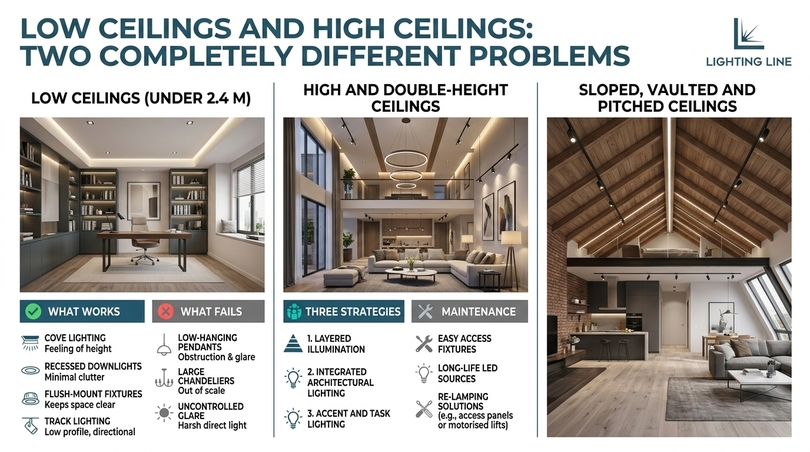
10. Smart ceiling lightings: protocols, dimming and scene control
Smart lighting has moved from novelty to infrastructure. The value is not voice control; it is the ability to have several different lighting states in the same room without adding fittings. A living room with three dimmable circuits and four stored scenes is functionally four different rooms, and that is the argument for smart ceiling lightings in one sentence.
The protocol landscape
| Protocol | Type | Wiring impact | Scale | Reliability | Best suited to |
|---|---|---|---|---|---|
| Wi-Fi (per-fitting) | Wireless, IP | None | Small (router-limited) | Moderate, router-dependent | Single rooms, renters, quick retrofit |
| Zigbee | Wireless mesh | Hub required | Up to ~200 devices | High | Whole-home smart lighting |
| Thread / Matter | Wireless mesh, IP | Border router required | Large | High, cross-ecosystem | New smart homes wanting vendor independence |
| Bluetooth mesh (Casambi and similar) | Wireless mesh | None; driver-level | Large | Very high | Retrofit projects, hospitality, listed buildings |
| DALI-2 / D4i | Wired bus | 2 control cores throughout | 64 addresses per line, scalable | Highest | Offices, hotels, commercial, large residential |
| KNX | Wired bus | Dedicated bus cable | Very large | Highest | High-end residential, integrated building control |
| Phase-cut + smart dimmer module | Retrofit wireless behind switch | Neutral usually required | Per circuit | High | Making existing ceiling lightings smart cheaply |
The most common architectural error in smart lighting is making the lamps smart instead of the circuits. Smart bulbs stop working when someone uses the wall switch, and they multiply cost in any room with more than four light points. For anything beyond a single fitting, put the intelligence at the driver, the dimmer module or the DALI bus, and leave the wall switch as a scene selector. This is more robust, cheaper at scale, and comprehensible to guests and visitors.
What smart ceiling lightings should actually do scenes
Four presets per living space (Bright, Evening, Dining, Night) cover almost every real requirement. Scenes should be reachable from a physical wall plate, not only an app; a lighting system that requires a phone will be abandoned within a month.
Tunable white and circadian scheduling
Automatically shifting from 4000 K in the morning to 2700 K at dinner to 2200 K late evening measurably improves reported sleep quality and is now standard in hospitality and care settings. In a home office it is the difference between a room that supports concentration and one that does not.
Occupancy and absence detection
In hallways, bathrooms, utility rooms and stores, presence detection with a 5–10 minute hold typically halves consumption and eliminates the most common domestic complaint about smart lighting, which is having to find a switch in the dark.
Daylight linking
Perimeter ceiling lightings dimmed against a photocell save 20–40% of their consumption in daylit rooms and, more importantly, prevent the jarring experience of full artificial light at midday.
Practical guidance for specifiers
Choose the protocol before choosing the fittings, not after
Retrofitting DALI into a completed installation means rewiring, retrofitting Bluetooth mesh does not, which is precisely why Bluetooth mesh dominates renovation work in existing and protected buildings. For new build and major refurbishment, DALI-2 or KNX remains the professional default because it is deterministic, vendor-neutral and maintainable in fifteen years’ time.
Verify driver and dimmer compatibility as a pair
Manufacturers publish compatibility matrices, a five-minute check prevents the most common post-installation failure, which is flicker or drop-out below 20% output. Always specify the driver and the control from a tested combination, and always order one spare driver per project, drivers are the component most likely to need replacement, and a discontinued driver can force the replacement of an entire run of profile lighting.
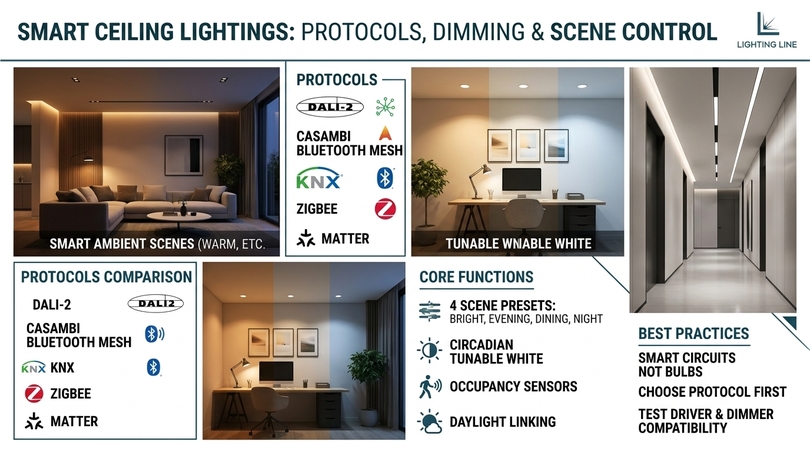
11. Are ceiling light fittings universal? Caps, roses, cut-outs and standards
This is the section that saves returns. The short answer is that ceiling light fittings are not universal, but the interfaces between them are highly standardised and if you know the four interfaces, you can predict compatibility before you buy. The four are: the lamp cap, the ceiling connection, the recessed cut-out, and the electrical supply and control. Get all four right and almost any ceiling light will install in almost any ceiling.
Lamp caps and bases
| Cap | Description | Typical use in ceiling lighting | Notes |
|---|---|---|---|
| E27 | Edison screw, 27 mm | Pendants, flush and semi-flush fittings, ceiling lamps | The most common European ceiling light cap |
| E14 | Small Edison screw, 14 mm | Chandeliers, candle lamps, small pendants | Check maximum lamp length in enclosed shades |
| B22 / BC | Bayonet, 22 mm | UK and Irish pendants and ceiling roses | Common in UK stock; adaptors to E27 available |
| B15 / SBC | Small bayonet | Older chandeliers and decorative fittings | Declining availability |
| GU10 | Twist-lock mains spot, 10 mm pins | Downlights, spotlights, track heads | Mains voltage; direct halogen replacement |
| GU5.3 / MR16 | Two-pin, 12 V | Older downlights with transformers | Requires LED-compatible driver; often best replaced entirely |
| G9 | Two-loop capsule | Compact chandeliers, small pendants, flush fittings | Heat-sensitive in enclosed fittings; use quality LED |
| G4 | Two-pin miniature, 12 V | Very small decorative fittings | Low output; check driver compatibility |
| Integrated LED | Non-replaceable module | Panels, profiles, modern flush lights, most downlights | Check that driver is replaceable; check L-rating |
The critical warning concerns enclosed fittings
Many LED lamps are marked “not for use in enclosed luminaires,” because trapped heat raises junction temperature and destroys the lamp long before its rated life. If your ceiling light has a sealed glass or opal shade, specify a lamp explicitly rated for enclosed use, or choose an integrated LED fitting designed as a thermal system.
The ceiling connection: roses, plates and brackets
In UK and Irish installations the standard interface is the ceiling rose, a plastic housing containing a terminal block with loop-in wiring: permanent live, neutral, switched live and earth. Most modern ceiling lightings do not use a ceiling rose directly; instead the rose is removed, the loop wiring is retained in a junction box or a suitable enclosure, and the fitting’s own baseplate is screwed to the ceiling with the correct fixings. The single most common DIY error is disturbing the loop-in wiring without recording which cable is which, and the single best precaution is to photograph the terminals before disconnecting anything.
In much of continental Europe, ceiling supply arrives at a connection box with a terminal block, sometimes with a plug-and-socket ceiling connector (DCL), and fittings attach to a bracket or hook. Where a hook is present, the fitting weight capacity is usually stated in the installation instructions; assume 5 kg unless documented otherwise.
Baseplate diameter is the practical compatibility issue in retrofits. If the previous fitting had a 200 mm plate and the new one has an 80 mm plate, the ceiling will show the old paint outline or a cut hole. Either choose a plate at least as large as the previous one, or specify a ceiling plate cover, or budget for making good and painting.
Recessed cut-outs: the numbers that decide a retrofit
| Cut-out diameter | Common bezel diameter | Typical output | Void depth required | Comment |
|---|---|---|---|---|
| 55–58 mm | 70–80 mm | 350–500 lm | 50–70 mm | Small aperture, discreet, low ceilings |
| 65 mm | 85 mm | 500–700 lm | 60–90 mm | The current de facto residential standard |
| 68–70 mm | 85–95 mm | 500–900 lm | 60–100 mm | Very widely stocked; replaces GU10 halogen cans |
| 75–80 mm | 95–110 mm | 700–1,100 lm | 80–110 mm | Higher output, commercial and high ceilings |
| 90–110 mm | 110–140 mm | 900–1,600 lm | 90–130 mm | High-ceiling and retail applications |
| Trimless / plaster-in | No visible bezel | 350–900 lm | 80–120 mm plus plaster housing | Must be installed before skimming |
Adjustable spring-clip bezels are the retrofit solution
Many current downlights accept cut-outs from 65 to 80 mm with the same product, which allows a direct swap of older 70 mm halogen cans without patching. Where the new cut-out is smaller than the existing hole, use an oversized bezel or a downlight conversion plate; where it is larger, the hole must simply be enlarged with a hole saw.
Always verify the void depth before ordering
A 100 mm-deep fitting will not go into a 70 mm void, and a concrete soffit has no void at all — in which case the answer is a surface-mounted spot, a surface profile, a track system or a suspended fitting, not a recessed one.
Fire rating, insulation contact and acoustic performance
Cutting a hole in a ceiling compromises its fire compartmentation, so any downlight installed in a ceiling that separates storeys, or forms part of a fire-rated construction, must be a fire-rated fitting, normally 30, 60 or 90 minutes, with an intumescent seal that closes the aperture under heat. This is a legal requirement in most European jurisdictions for domestic ceilings between floors, and a building control matter, not a preference.
Insulation contact rating (IC-rated, or “IC-F” for insulation coverable) determines whether loft insulation may be laid over the fitting. Non-IC fittings require a 100 mm clearance zone in all directions, which creates a thermal bypass and a cold spot. Specifying IC-rated fire-rated downlights removes the conflict between lighting and insulation entirely and is the correct choice in any top-floor ceiling.
Acoustic performance is the third and least-considered factor. Multiple downlight apertures reduce the airborne sound insulation of a separating floor; acoustic hoods restore it. In apartments and in any converted property with separating floors, specify acoustic hoods or use surface-mounted ceiling lightings and profiles instead.
Are ceiling light fittings a standard size? A direct answer
Ceiling light fittings are not a standard size, and there is no single dimension you can rely on. What is standardised is the electrical interface (lamp caps, terminal blocks, mains voltage and earthing) which is why any competent electrician can install almost any fitting. What is not standardised is the mechanical interface: baseplate diameter, fixing centres, drop, weight, cut-out and void depth all vary by product. Consequently, the correct pre-purchase checklist is short and always the same:
| # | Check | Where to find it | Failure if ignored |
|---|---|---|---|
| 1 | Ceiling void depth vs fitting depth | Product data sheet, measure with a wire probe | Fitting will not seat |
| 2 | Cut-out diameter vs existing hole | Data sheet | Visible gap or need to enlarge |
| 3 | Baseplate diameter vs old fitting footprint | Data sheet and measurement | Paint shadow or exposed hole |
| 4 | Fitting weight vs ceiling construction | Data sheet, joist location | Structural failure |
| 5 | Drop vs headroom (min 2.10 m) | Data sheet | Head strike, non-compliance |
| 6 | IP rating vs bathroom zone | Data sheet | Safety and regulatory breach |
| 7 | Fire rating and IC rating | Data sheet | Building control failure, insulation conflict |
| 8 | Lamp cap and enclosed-fitting suitability | Data sheet | Premature lamp failure |
| 9 | Dimmer and driver protocol match | Manufacturer compatibility list | Flicker, buzz, no dimming |
| 10 | CCT and CRI consistency with existing fittings | Data sheet | Visible colour mismatch |
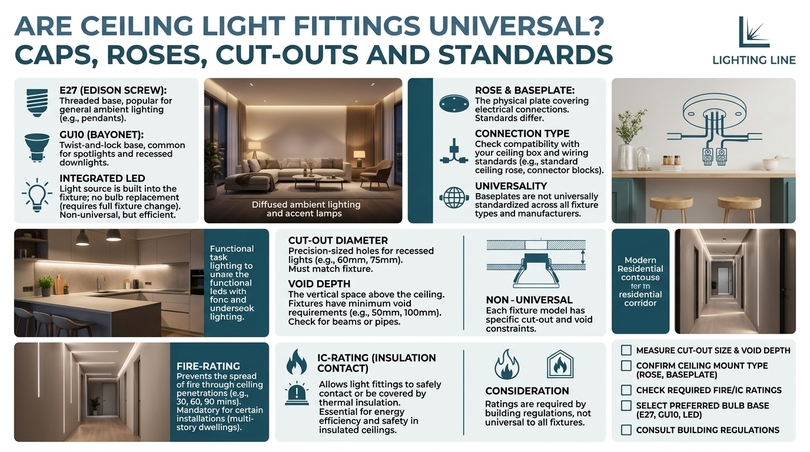
12. Installation, wiring, regulations and what an electrician costs
Installation is where the majority of questions about ceiling lightings arise, and where the gap between what is technically possible and what is legally permitted is widest. This section sets out the practical procedure, the regulatory position in the UK and the EU, the situations that absolutely require a qualified electrician, and realistic costs. Nothing here replaces the advice of a competent person for your specific installation; it is intended to let you have an informed conversation with one.
Can I fit a ceiling light myself?
In the UK, replacing a like-for-like ceiling light fitting on an existing circuit is not notifiable work under Part P of the Building Regulations, and a competent householder may legally do it in most rooms. The critical exceptions are bathrooms and shower rooms, where work in the defined zones is notifiable, and any work involving new circuits, new cabling routes, consumer-unit changes or alterations in special locations. In Ireland, all fixed electrical work is subject to the national rules and a Registered Electrical Contractor is required for anything beyond simple replacement. In Italy, Germany, France and most of continental Europe, fixed installation work is reserved to qualified installers who must issue a declaration of conformity: in Italy this is the “dichiarazione di conformità” under “DM 37/08”, and it is required for anything beyond ordinary maintenance.
The honest guidance is this: swapping a pendant for a semi-flush ceiling light on an existing rose is within the competence of a careful, methodical person with a voltage tester who follows the correct isolation procedure. Installing new downlights in a previously unlit ceiling, running a new circuit, adding lighting in a bathroom, or wiring a dimming system is not, and the modest cost of an electrician buys both a safe result and, importantly, the certificate that your insurer and any future buyer will ask for.
Replacing a ceiling light fitting: the correct procedure
Step 1 – Isolate the circuit
Step 1 – Isolate: switch off the lighting circuit at the consumer unit, lock off or affix a warning label, and confirm dead at the fitting with an approved voltage indicator that you have proved on a known live source. Turning off the wall switch is not isolation; the permanent live in a loop-in rose remains energised.
Step 2 – Record the existing wiring
Step 2 – Record: photograph the terminal block from two angles before touching anything. In a loop-in ceiling rose you will typically find three or four cables sharing terminals: permanent lives together, neutrals together, switched live to the lamp terminal, and earths to the earth terminal. Label each conductor with tape.
Step 3 – Assess the fixing and the ceiling construction
Step 3 – Assess the fixing: establish whether you are fixing into a joist, into a noggin, or into plasterboard alone. Plasterboard fixings such as spring toggles are acceptable for light fittings up to roughly 3–5 kg depending on the fixing and board thickness; above that, a timber noggin between joists is required. Never hang a chandelier from plasterboard alone.
Step 4 – Terminate correctly
Step 4 – Terminate correctly: maintain the loop connections in a suitable enclosure — either the new fitting’s own terminal housing if it has sufficient terminals, or a properly rated junction box that remains accessible, or a maintenance-free connector rated to the relevant standard. Sleeve any bare earth conductor in green-and-yellow.
Step 5 – Verify and test
Step 5 – Verify: test insulation resistance and polarity if you have the instruments and competence; otherwise, at minimum, confirm that the fitting operates only from its intended switch and that no exposed metalwork is live. Restore the circuit and check operation across the full dimming range.
Installing a ceiling light where there is no existing wiring
This is a genuinely common situation, a bedroom with no ceiling point, a room where the existing point is in the wrong place, an extension. There are four legitimate routes, in increasing order of cost and permanence.
Plug-in ceiling lights
A pendant with a swag hook and a plug-terminated flex, hung from a ceiling hook and routed to a wall socket. No electrical work, fully reversible, ideal for rented property. The flex should be run neatly along the ceiling and down a corner, or concealed in a slim surface trunking. Output is limited only by the fitting.
Battery and rechargeable ceiling lightings
Modern rechargeable ceiling fittings and magnetic-mount pucks now offer 400–1,200 lm with 6–20 hours of runtime. Useful for wardrobes, alcoves and temporary situations, but not a substitute for a lit room.
Spurring from an existing lighting circuit
An electrician runs a cable from the nearest ceiling rose or a junction box to the new position, usually across a ceiling void or under floorboards above. This is the standard solution and is normally straightforward where there is access from above.
Surface conduit or trunking
Where no void access exists (a solid concrete soffit, a listed building, a ground-floor flat below a neighbour) light-gauge surface trunking painted to match the ceiling, or a decorative surface conduit, provides a compliant route. In contemporary interiors this can be made a design feature by combining it with a surface-mounted LED profile or a surface track, which conceals the supply within the lighting element itself.
What does an electrician charge?
| Task | Typical time | UK indicative cost | Eurozone indicative cost | Notes |
|---|---|---|---|---|
| Replace a ceiling light, like for like | 30–45 min | £60–£110 | €70–€130 | Often a minimum call-out charge |
| Replace 6 downlights with LED | 1.5–2.5 h | £120–£220 | €140–€260 | Cheaper as part of a larger visit |
| Install new ceiling point where none exists | 2–4 h | £150–£350 | €180–€400 | Depends heavily on access; making good extra |
| Install 8–10 new downlights in a kitchen | 5–8 h | £400–£800 | €480–€950 | Includes cutting, wiring, testing |
| Install LED profile run with driver and dimmer | 3–6 h | £250–£600 | €300–€700 | Plus joinery or plastering where recessed |
| Hang a heavy chandelier with noggin | 2–3 h | £150–£300 | €180–€350 | Two operatives if over 15 kg |
| Full room rewire for lighting with dimming | 1–2 days | £600–£1,400 | €700–€1,600 | Excludes making good and decoration |
| Test and certification | — | £80–£180 | €90–€200 | Required for notifiable work |
Two cost-management tactics work reliably
First, batch the work: an electrician charging a minimum call-out for one fitting will do six for barely more, so accumulate jobs. Second, have the fittings, drivers, dimmers and fixings on site and verified before the electrician arrives — waiting for a missing driver is the most common source of an unplanned second visit.
Can ceiling lights be wall mounted, and vice versa?
Sometimes, and the determining factor is thermal design and IP orientation rather than the wiring. Many flush ceiling lights are explicitly rated for wall or ceiling mounting and are sold as such; a flush disc luminaire mounted on a wall becomes a serviceable bulkhead light. However, a fitting designed only for ceiling mounting may rely on convection upward through vents that will not function on a vertical surface, causing overheating, and its IP rating may be validated only for downward orientation, which matters in a bathroom.
Conversely, mounting a wall light on a ceiling is usually inadvisable: uplighter wall fittings will point straight at the ceiling from 50 mm away and create a hot spot, and open-topped wall fittings will collect dust and insects. The rule is simple: check the product data for the stated mounting orientations, and if only one is listed, treat that as a constraint rather than a suggestion.
Lightning, surges and protection
A question that arises surprisingly often is whether lightning can damage a ceiling fan or a ceiling light. It can, and the mechanism is almost always a conducted surge on the mains rather than a direct strike. LED drivers and electronic dimmers are considerably more vulnerable to transient overvoltage than the incandescent lamps they replaced. In areas with frequent electrical storms, or in properties with overhead supply, a type 2 surge protection device at the consumer unit is inexpensive insurance and protects the entire lighting installation as well as everything else in the building. For high-value installations (large profile runs, DALI systems, extensive magnetic track) surge protection is a routine specification rather than an optional extra.
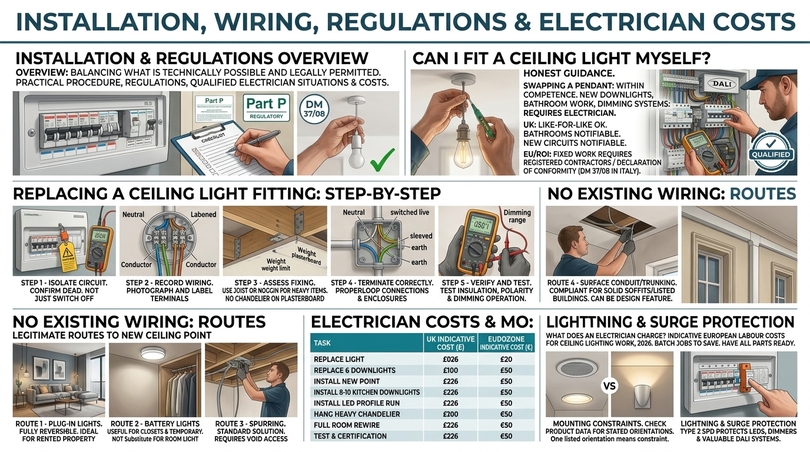
13. Ceiling lighting trends for 2026
Trends in ceiling lightings matter commercially (they determine resale appeal, hospitality bookings and retail differentiation) but they also matter technically, because the current cycle is being driven by genuine changes in what LED can do rather than by styling alone. Nine trends define specification in 2026, and each has a functional justification behind the aesthetic one.
The nine defining trends
1. The retreat from the downlight grid: the most significant shift is subtractive: fewer downlights, better placed, supplemented by indirect and decorative layers. Specifiers are cutting downlight counts by 30–50% and reinvesting in profiles and semi-flush fittings. The driver is comfort — the recognition that uniform overhead illumination is what people are actually objecting to when they say they dislike overhead lighting.
2. Linear and profile architecture: LED lighting profiles have moved from a specialist detail to a mainstream residential expectation. Shadow-gap perimeters, recessed ceiling lines, floating rafts and plaster-in trimless runs are appearing in mid-market renovations, not only premium ones, because the cost per metre has fallen while the quality of extrusions and diffusers has risen sharply.
3. Magnetic 48 V track in the home: once a retail technology, magnetic track is now specified in apartments and open-plan houses because it consolidates many ceiling penetrations into one clean line and allows reconfiguration without redecoration.
4. Warm-dim and ultra-warm colour: 2200 K is displacing 2700 K in evening-use spaces, and warm-dim drivers that shift from 2700 K to 1800 K as they dim are becoming a mainstream premium feature. The motivation is explicitly a reaction against cool, flat LED light.
5. Sculptural and oversized decorative fittings: where a decorative fitting is used at all, it is larger and more expressive: alabaster and opal globes, ribbed and fluted glass, paper and rice-paper forms, linear bar pendants, and oversized drum shades. The logic is that if the ceiling has fewer fittings, each one can matter more.
6. Natural and tactile materials: rattan, bamboo, paper, linen, alabaster, travertine and ceramic are displacing polished metal in decorative ceiling lights, part of a wider warm-minimalist movement in interiors.
7. Trimless, plaster-in and invisible detailing: the removal of visible hardware (trimless downlights, plaster-in profiles, recessed magnetic track) is the clearest marker of a premium contemporary scheme.
8. Wireless mesh control as standard: bluetooth mesh and Matter-compatible control is now specified by default in renovation work, because scene control has become an expectation rather than a luxury.
9. Repairability and modularity: regulatory pressure and buyer awareness are pushing toward luminaires with replaceable drivers and light sources. Modular systems (track, profiles, cut-to-length linear) hold their value because they can be reconfigured rather than discarded.
| Rising in 2026 | Fading | Reason |
|---|---|---|
| Perimeter coves and indirect profiles | Uniform downlight grids | Glare comfort and perceived ceiling height |
| 2200–2700 K and warm-dim | 4000 K in living spaces | Reaction against clinical LED light |
| Trimless and plaster-in apertures | Wide chrome bezels | Visual quietness of the ceiling plane |
| Magnetic 48 V track | Bulky mains three-circuit track in homes | Slimmer profile, modular, reconfigurable |
| Alabaster, opal, rattan, paper | Polished chrome and clear crystal droplets | Warm-minimalist material direction |
| Linear bar pendants over tables | Three identical small globe pendants | Cleaner line, better coverage of rectangular tables |
| Ra 90–95 as baseline | Ra 80 as acceptable | Colour truth expectations in interiors |
| Scene control from wall plates | App-only smart bulbs | Usability and guest comprehension |
| Starlight and fibre-optic ceilings in media rooms | Colour-changing RGB as a whole-room solution | Considered accent rather than novelty |
What is not a trend, and will not become one
Three things recur in trend coverage and should be treated sceptically. Full-colour RGB ceiling lightings as the primary light source in living areas remain a novelty: colour-changing light is excellent as an accent behind a television or in a cove, and poor as ambient light, because saturated colour has a colour rendering index that is not meaningfully defined. Very high colour temperatures marketed as “daylight” for domestic use continue to be sold and continue to be a mistake outside of task-critical work. And extremely thin “invisible” fittings that sacrifice thermal mass will continue to trade a slim appearance for shortened life; aluminium is in the product for a reason.
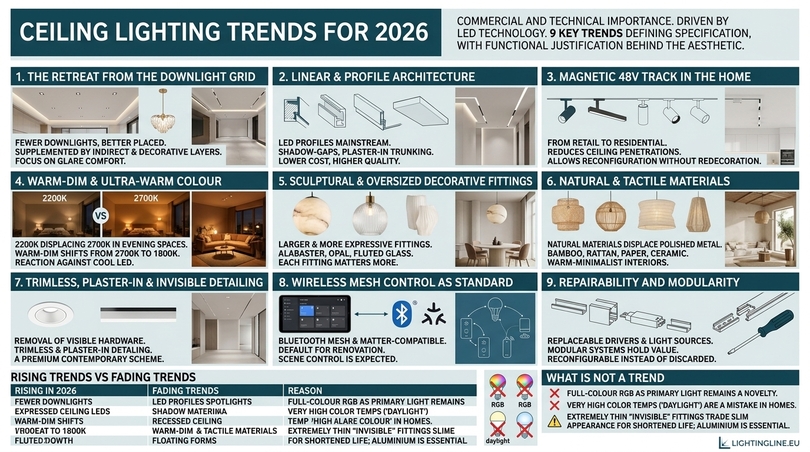
14. Market data, statistics and survey evidence
Specification decisions are stronger when they are informed by what the market is actually doing. The figures below are drawn from published industry reporting, European regulatory data and the aggregated technical experience of the LightingLine team; where they are estimates, they are presented as such.
Market structure and growth
| Metric | Indicative value | Direction of travel |
|---|---|---|
| LED share of new luminaire sales in the EU | Above 90% | Approaching saturation |
| Share of European lighting sales that are ceiling-mounted or recessed | Roughly 45–55% | Stable; the largest single category |
| Annual growth of the architectural linear and profile segment | Estimated 8–12% CAGR | Fastest-growing ceiling lighting category |
| Annual growth of connected and smart lighting | Estimated 15–20% CAGR | Strong; driven by retrofit control modules |
| Share of EU electricity historically consumed by lighting | Fell from ~15% to below 8% | Falling further as LED conversion completes |
| Typical energy reduction from a halogen-to-LED ceiling retrofit | 80–90% | Consistent across studies |
| Typical payback period for a domestic downlight retrofit | 8–18 months | Shortens as tariffs rise |
| Typical additional saving from adding controls | 25–50% | Largest untapped saving remaining |
What buyers actually prioritise
Across enquiries handled by our technical team, the priorities that drive ceiling lighting purchases cluster consistently. Energy efficiency is almost always stated first, but the decision is usually made on appearance and comfort. The pattern is worth understanding because it explains why a technically excellent product with poor glare control loses to a slightly less efficient product that looks and feels better.
| Buyer | First stated priority | Actual deciding factor | Most common regret |
|---|---|---|---|
| Homeowner, renovation | Energy efficiency and price | Appearance and perceived warmth of light | Too many downlights; no dimming |
| Architect | Efficiency, integration, compliance | Detailing quality and delivery certainty | Driver access not designed in |
| Interior designer | Style match and trend alignment | Colour temperature and CRI consistency | Mixed colour temperatures across a scheme |
| Electrical retailer | Margin and availability | Ease of explaining the product to customers | Stocking too many overlapping ranges |
| Hospitality owner | Guest comfort and running cost | Simplicity of control for guests | Overhead light too bright, no scene control |
| Commercial fit-out | Compliance (UGR, lux, EPC) | Whole-life cost and maintenance access | Non-replaceable drivers at height |
The cost of the common mistakes, quantified
| Error | How it presents | Cost to correct after completion | Cost to avoid at design stage |
|---|---|---|---|
| No dimming on the main circuit | Room only has one brightness | €120–€400 per circuit | €25–€60 per circuit |
| Too many downlights | Flat, glary, “airport” light | €400–€1,200 (blanking and making good) | Zero — simply specify fewer |
| Wrong colour temperature | Living room feels clinical | €200–€900 (relamping or refitting) | Zero — specify 2700 K |
| Ra 80 instead of Ra 90 | Finishes and skin look wrong | Full refit of affected fittings | 5–15% product premium |
| Inaccessible driver | Ceiling must be opened at first failure | €300–€900 | Zero — design an access point |
| Downlight over the pillow or the mirror | Glare in bed, shadowed face | €150–€500 per position | Zero — move the position on the plan |
The pattern in that table is the single most valuable insight in this guide: nearly every expensive ceiling lighting mistake costs nothing to avoid and a great deal to correct. Thirty minutes with a floor plan, a pencil and the tables in section 7 is the highest-return activity in the entire project.
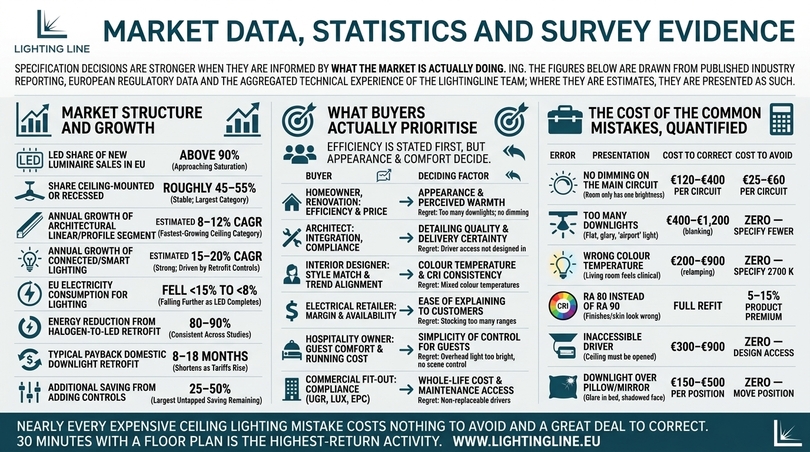
15. How to buy ceiling lightings on LightingLine.eu
Knowing what you need is most of the work, the remainder is converting a specification into an order that arrives complete. The LightingLine catalogue is organised around the technical logic used throughout this guide (by mounting method and function rather than by style alone) so that a specification worked out on a floor plan translates directly into a basket.
The catalogue structure
On catalogue.lightingline.eu the ceiling lighting families map to the taxonomy in section 2: flush and semi-flush ceiling lights; pendant lights and chandeliers; recessed downlights, including fire-rated, IP65 and trimless options; adjustable spotlights and surface spot bars; track lighting and 48 V magnetic track systems; LED panels and surface luminaires; and the full range of aluminium LED profiles with their diffusers, end caps, brackets, corner joints and drivers. Each product page carries the parameters this guide has told you to check: delivered luminaire lumens, efficacy, CCT, CRI and R9, beam angle, UGR where applicable, IP and IK rating, cut-out and void depth, weight, dimming protocol and driver specification.
A repeatable ordering method
| Step | Action | Reference in this guide |
|---|---|---|
| 1 | Measure the room and set the target illuminance | Section 7.1 |
| 2 | Calculate total lumens required | Section 7.2–7.3 |
| 3 | Decide the layer structure and the number of circuits | Section 1.1 and section 8 |
| 4 | Select families for each layer and check ceiling constraints | Sections 2, 3 and 11 |
| 5 | Fix CCT, CRI and beam angles consistently across the scheme | Section 5 |
| 6 | Size drivers, dimmers and control protocol | Sections 3.4 and 10 |
| 7 | Add accessories: end caps, corner joints, brackets, suspension kits, spare driver | Section 3.5 |
| 8 | Confirm batch consistency for continuous runs and place a single consolidated order | Section 3.5 |
Two ordering habits prevent nearly all delivery problems. Order profile runs, diffusers and end caps together as a single line, because a run delivered without its end caps cannot be finished. And always order 8–10% extra profile length for cutting waste and mitres; offcuts are unavoidable and a 200 mm shortfall on a 12 m perimeter halts the whole installation.
Buying for different roles
Architects and specifiers should work from the technical data sheets and request photometric IES files where a calculation is needed; the catalogue’s parameters are published precisely so that a DIALux or Relux model can be built without contacting a sales desk. Interior designers should lock colour temperature and CRI across an entire scheme before selecting individual products, and should treat finish as the last decision rather than the first. Retailers should focus on the families that are easiest to explain at a counter (CCT-switchable downlights, dimmable flush ceiling lights, LED strip lights kits with matched drivers) since explainability drives sell-through more strongly than specification. Hospitality owners should buy control before buying additional fittings; a dimmer and a scene plate improve a guest room more than a second luminaire.
16. Maintenance, troubleshooting and lifetime management
LED ceiling lightings are frequently sold as maintenance-free, which is not quite true: they are relamping-free, which is a different claim. Over a fifteen-year life, an LED installation will need cleaning, driver replacement, occasional recommissioning and eventual light-source replacement, and planning for that is what keeps a scheme looking as good in year ten as in year one.
What actually fails, and when
| Component | Typical service life | Symptom | Remedy |
|---|---|---|---|
| Driver / power supply | 5–10 years (electrolytic capacitor limited) | Flicker, failure to start, buzzing, total loss of a run | Replace with equivalent output and dimming protocol |
| Dimmer / control module | 8–12 years | Flicker at low output, unstable minimum, buzzing | Replace with a driver-compatible unit |
| LED module (lumen depreciation) | 30,000–50,000 h to L80 | Gradual dimming; colour drift over years | Replace module or luminaire |
| Diffuser | 10–20 years | Yellowing (low-grade PMMA), dust accumulation | Clean; replace diffuser strip |
| Adhesive strip mounting | 2–8 years in warm locations | Strip sagging out of profile | Refit with thermally conductive tape or clips |
| Solder joints on strip cuts | Variable | Section of run dark | Re-solder or replace section, avoid clip connectors on long runs |
Troubleshooting guide
| Symptom | Most likely cause | Check first |
|---|---|---|
| LED ceiling light flickers when dimmed | Dimmer and driver protocol mismatch, or load below dimmer minimum | Dimmer minimum load, trailing vs leading edge |
| LEDs glow faintly when switched off | Induced voltage on a shared cable, or a switched neutral | Confirm switch is in the live, fit a load-correction capacitor |
| One downlight out of a row is dead | Failed integrated driver or loose push connector | Swap the connector, test the fitting on another supply |
| Whole profile run is dead | Driver failure or overload | Measure driver output, check total load against rating |
| Profile run fades along its length | Voltage drop | Feed from both ends or split the run |
| Colour differs between two runs | Different production batches | Match MacAdam bin, replace the odd run |
| Buzzing from ceiling lights | Dimmer/driver incompatibility or magnetic transformer | Change to a compatible trailing-edge dimmer |
| Downlights repeatedly failing early | Overheating from insulation contact or enclosed fitting | Verify IC rating and clearance, check enclosed-rated lamps |
| Ceiling light works only intermittently | Loose terminal or damaged flex at the rose | Isolate and inspect terminations |
| Bathroom fitting misting internally | Insufficient IP rating for the zone | Replace with correctly rated IP65 fitting |
Cleaning and planned maintenance
Dust reduces output measurably. A diffused ceiling light in a domestic room loses roughly 5–10% of its output per year to accumulated dust, and considerably more in kitchens where grease binds it. Clean opal diffusers and glass shades every six months with a damp microfibre cloth on an isolated fitting; never use solvents on polycarbonate, which crazes. Crystal chandeliers should be cleaned annually with a dedicated crystal spray and a drip cloth; do not dismantle unless you have photographed the arrangement first.
Plan for the driver. Record the model, output, current and dimming protocol of every driver in a project, note where each one is located, and keep one spare per driver type. This single habit converts the most disruptive failure in LED lighting into a fifteen-minute job. For commercial installations, add drivers to the planned preventative maintenance schedule at year seven rather than waiting for failure at year eight.
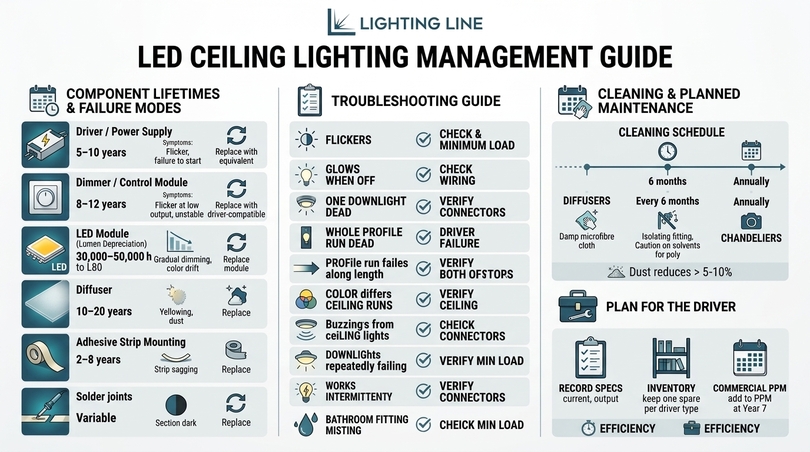
17. Frequently asked questions about ceiling lightings
The questions below are the ones our technical team is asked most often, by homeowners, architects, interior designers, retailers and hospitality operators. Each answer is written to be complete on its own, so that you can read a single entry without having read the rest of the guide. Click any question to expand it.
| Question and answer |
|---|
Are LED ceiling lights good?Yes, and by a wide margin. Modern LED ceiling lightings deliver 100–130 lumens per watt against 12–14 for incandescent and 16–20 for halogen, last 30,000–50,000 hours instead of 1,000–2,000, dim smoothly to 1% with the right driver, and are available with Ra 90–95 colour rendering that is indistinguishable from halogen to the eye. The historic objections — cold light, poor dimming, flicker, colour drift — were valid for products sold before roughly 2015 and have been engineered out of quality current products. The only remaining caution is that cheap LED ceiling lights still exhibit those faults, so specification matters more than technology choice. |
Are LED ceiling lights better than the alternatives?On every measurable axis except initial purchase price, yes: efficacy, lifetime, controllability, colour temperature choice, physical form factor and heat output. The comparison is no longer close, and every competing technology for general ceiling lighting has been withdrawn from the EU market. The real question in 2026 is not LED versus something else, but which LED — the difference between an Ra 80 LED ceiling light with a 20% dimming floor and an Ra 95 fitting that dims to 1% is enormous, and far larger than any remaining difference between LED and halogen. |
Are LED ceiling lights cheap to run?Very. At an electricity price of €0.28/kWh, a 7 W LED ceiling light running four hours a day costs about €2.86 a year. The 60 W incandescent it replaces costs about €24.53 for the same light. A twelve-downlight kitchen converted from 50 W halogen to 5–6 W LED saves roughly €165 per year. Payback on a domestic retrofit is typically eight to eighteen months. |
What are the disadvantages of LED ceiling lights?There are four honest ones. Driver dependency: the electronic driver is the shortest-lived component and, if it is inaccessible, its failure becomes expensive. Dimming complexity: LED requires a matched dimmer and driver, unlike incandescent which dimmed with anything. Quality variance: the market contains excellent and very poor products at similar prices, and the difference is only visible in the data sheet. Non-replaceable modules: many integrated fittings must be replaced whole at end of life, which is why replaceable-source designs matter. None of these outweighs the benefits, but all four are avoidable at specification stage. |
Are LED ceiling lights worth it?Yes, in essentially every scenario. Where halogen or fluorescent ceiling lightings are still installed, the retrofit pays for itself within two years and often within one. Where the existing lighting is already LED but is early-generation, the case is weaker on energy but often strong on comfort — replacing Ra 80, 4000 K, 20%-floor downlights with Ra 90, 2700 K, 1%-dimming fittings transforms a room even though the energy saving is modest. |
Are ceiling lights universal? Are all ceiling light fittings the same?No. The electrical interface is standardised — mains voltage, earthing, lamp caps such as E27, B22 and GU10 — which is why any electrician can wire almost any fitting. The mechanical interface is not standardised: baseplate diameter, fixing centres, weight, drop, recessed cut-out and required void depth all vary by product. Before buying, check void depth, cut-out diameter, baseplate size against the old fitting’s footprint, weight against the ceiling construction, and drop against available headroom. |
Are light fittings a standard size?Not as complete products. Certain components are effectively standardised: 65 mm and 68–70 mm are the dominant recessed downlight cut-outs, E27 and GU10 are the dominant lamp caps, and ceiling roses follow a small number of common patterns. But overall fitting dimensions, canopy sizes and fixing centres vary freely between manufacturers, which is why a like-for-like swap sometimes leaves a visible paint outline. |
Are ceiling light fixtures easy to replace?A like-for-like replacement on an existing ceiling rose is a 30–45 minute job for a competent person, provided the circuit is properly isolated and the loop wiring is photographed before disconnection. It becomes harder when the new fitting has a smaller baseplate than the old one, when the ceiling is plasterboard and the new fitting is heavy, when the existing wiring is old and brittle, or when the room is a bathroom, where the work is notifiable in the UK and reserved to qualified installers in most of continental Europe. |
Are lamps cheaper to run than overhead lights?Not per unit of useful light. Ceiling lightings sit higher, spread light more efficiently and have a much better utilisation factor. Six LED table lamps drawing 54 W deliver less average illuminance to a 20 m² room than a 42 W LED ceiling array. Lamps appear cheaper because people habitually switch on two out of six, which is selectivity, not efficiency. Give ceiling lightings dimmers and multiple circuits and they become both cheaper and better. |
Can I fit a ceiling light myself?In the UK, replacing an existing ceiling light on an existing circuit outside a bathroom is generally permitted for a competent householder and is not notifiable under Part P. In Ireland and in most of continental Europe — including Italy, where DM 37/08 applies — fixed electrical work is reserved to a registered installer who must issue a declaration of conformity. In every jurisdiction, new circuits, new cable routes, bathroom work and consumer-unit changes require a qualified electrician. If in doubt, employ one: the certificate matters to your insurer and to any future buyer. |
Can I install a ceiling light without existing wiring?Yes, by four routes. A plug-in ceiling light with a swag hook and a flex to a wall socket requires no electrical work at all and is ideal for rented property. A rechargeable or battery ceiling fitting suits alcoves and temporary needs. An electrician can spur a new cable from the nearest existing ceiling point, which is the standard permanent solution. Where there is no void — a concrete soffit, a flat below a neighbour — surface trunking or a surface-mounted profile or track carries the supply within the lighting element itself. |
Do I need an electrician to change a ceiling light fitting?Legally, it depends on jurisdiction and location, as set out above. Practically, you need one whenever the existing wiring is unclear or damaged, the fitting is heavy enough to need a structural fixing, the room is a bathroom or shower room, new cabling is required, a dimming system is being installed, or you are not fully confident about safe isolation. An electrician will also test and certify the work, which a self-installation cannot provide. |
How much does an electrician charge to install a ceiling light?A straightforward like-for-like replacement typically costs £60–£110 in the UK or €70–€130 in the eurozone, often subject to a minimum call-out. Installing a new ceiling point where none exists is usually £150–£350 or €180–€400 depending on access. Fitting eight to ten new kitchen downlights runs to £400–£800 or €480–€950. Batching several jobs into one visit reduces the per-item cost substantially. |
Can ceiling lights be wall mounted? Can you mount a wall light on the ceiling?Many flush ceiling lights are explicitly rated for wall or ceiling mounting and can be used either way — check the data sheet, which will list permitted orientations. A fitting rated for ceiling use only may rely on upward convection that will not work on a wall, and its IP rating may only be validated downward. Mounting a wall light on a ceiling is generally inadvisable: uplighter shades will scorch the ceiling from close range and open-topped fittings collect dust. |
How do you fit a ceiling rose?Isolate the circuit at the consumer unit and prove dead. Fix the rose base to a joist or noggin with appropriate screws — plasterboard alone is not sufficient for a pendant with a shade. Bring the loop-in cables through the base and terminate them in the correct banks: permanent lives together, neutrals together, switched live to the lamp terminal, earths to the earth terminal, with the bare earth sleeved green and yellow. Attach the pendant flex to the lamp and neutral terminals with the flex passing over the cord grips so that the weight is taken by the grip and not the conductors. Fit the cover, restore power and test. |
How do you replace a ceiling light fitting step by step?Isolate at the consumer unit and prove dead with an approved tester. Photograph the terminal block from two angles. Label each conductor with tape. Unscrew the old fitting and support its weight before releasing the final fixing. Establish whether the new fitting can be fixed to the existing points or needs new ones, and whether a joist or noggin is available. Terminate the loop wiring correctly, either in the new fitting’s terminal housing or in an accessible junction box. Fix the new baseplate, attach the fitting, fit the lamp, restore power and test across the full dimming range. |
How do I know what ceiling light to buy?Work through five decisions in order. First, function: is this ambient, task, accent or decorative light? Second, quantity: use the lumen tables — target lux multiplied by floor area, divided by roughly 0.6. Third, physical fit: void depth, cut-out, baseplate diameter, weight and available headroom. Fourth, light quality: 2700 K for living and sleeping, 3000 K for kitchens and bathrooms, 4000 K for work, with Ra 90 minimum and R9 above 50. Fifth, control: dimmable, and on which protocol. Style is the sixth decision, not the first. |
How do you choose ceiling lights for a living room?Do not choose one light; choose three layers on three dimmable circuits. A soft ambient layer from a semi-flush ceiling light with an upward component or a perimeter LED profile cove at 2700 K. An accent layer of two to four adjustable spots aimed at art, a fireplace or bookshelves. A task or decorative layer for reading positions. Aim for roughly 5,000 lumens total in a 20 m² room but expect to run it at 20–40% most evenings. Avoid a symmetric grid of downlights, which is the single most common cause of a living room that feels cold. |
How do you illuminate a high ceiling or uplight a ceiling?Three strategies work together. Narrow the beam: at 4 m and above, use 24° or narrower optics, which multiply centre-beam illuminance by around six compared with a 60° flood. Bring the light down: long-drop pendants and suspended linear systems positioned 2.4–3.0 m above the floor restore normal photometric geometry. Light the walls: in a tall room, vertical illuminance does more perceptual work than floor lux. To uplight a ceiling specifically, use plaster uplighters, a perimeter cove with the LED source set back 60–100 mm, or a suspended linear luminaire with an upward component, and paint the ceiling brilliant white to maximise reflectance. |
What is the most efficient ceiling light?By raw efficacy, a high-efficacy LED panel or a bare linear LED module at 150–210 lm/W. By useful efficiency in a real room, a well-aimed directional LED downlight with the correct beam angle, because it puts light where it is needed rather than spraying it everywhere. The most efficient overall system is not a single product but a layered scheme with dimming, zoning and — in circulation and utility spaces — occupancy sensing, which typically halves consumption again. |
What is the rule for ceiling lights?Several rules apply together. Spacing: ceiling height divided by two. Distance from walls: half the spacing, or 0.8–1.0 m if wall-washing. Diameter: room length in metres plus width in metres, expressed in centimetres. Height above a dining table: 750–900 mm to the shade underside. Height above a kitchen island: 700–800 mm above the worktop. Minimum headroom in circulation: 2.10 m. Lumens: target lux times floor area divided by about 0.6. Circuits: at least two per living room, all dimmable. |
What is the rule of thumb for ceiling lights?If you remember only one, remember this: ceiling height divided by two gives downlight spacing, and room length plus width in metres gives fitting diameter in centimetres. Those two numbers prevent the majority of layout mistakes on their own. |
What are the different types of ceiling lights?Twelve families cover the market: flush ceiling lights, semi-flush ceiling lights, pendant lights, chandeliers, recessed downlights, adjustable spotlights and gimbals, track lighting, magnetic 48 V track, LED profiles and linear systems, LED panels and surface luminaires, ceiling uplighters and coves, and ceiling fan lights. They differ by mounting method — surface, recessed or suspended — and by photometric distribution, which is direct, indirect or direct/indirect. |
What are the three types of ceiling lights?Grouped by mounting, there are three: surface-mounted ceiling lightings that sit on the ceiling plane (flush and semi-flush), recessed ceiling lightings that sit within the ceiling (downlights, panels, recessed profiles), and suspended ceiling lightings that hang below it (pendants, chandeliers, linear systems). Grouped by function, the three are ambient, task and accent. |
What are the four types of lighting?Ambient or general lighting, which provides baseline visibility; task lighting, which concentrates light on a working plane; accent lighting, which creates contrast and hierarchy; and decorative lighting, in which the luminaire itself is the visual object. A complete scheme uses all four, and ceiling lightings can deliver every one of them. |
What are the little lights in the ceiling called?Recessed downlights. They are also known as downlighting, recessed spotlights, can lights, pot lights, high hats or hi-hats, and — in professional specification — recessed luminaires. Very small versions used for accenting are usually called mini downlights or recessed spots. Where the bezel is concealed within the plaster they are called trimless or plaster-in downlights. |
What is a flush ceiling light?A ceiling light that mounts directly against the ceiling with no measurable drop. Flush ceiling lightings are the standard answer for low ceilings, hallways, landings, small bedrooms and utility rooms. A semi-flush ceiling light is the related type that hangs 100–300 mm below the ceiling, which allows some light to reach the ceiling plane and makes the room read as taller. |
What is the difference between a downlight and a ceiling light?A ceiling light is any luminaire fixed to the ceiling; a downlight is a specific type — a recessed, directional fitting that projects light downward in a defined beam. All downlights are ceiling lightings, but most ceiling lightings are not downlights. The practical difference is distribution: a flush ceiling light spreads light widely and softly, while a downlight concentrates it into a beam of 24° to 60°. |
What is the difference between a pendant light and a ceiling light?A pendant is a suspended ceiling light on a rod, chain or flex, designed to light a defined zone such as a table or island. A ceiling light in the general sense includes surface, recessed and suspended fittings. The functional distinction matters: a pendant delivers localised light and is a poor source of ambient illumination, while a flush or semi-flush ceiling light distributes light across the whole room. |
What is a ceiling light fitting called in technical terms?A luminaire. In UK usage it is a light fitting; in US usage a light fixture. Specific types have their own names: flush and semi-flush luminaires, recessed downlights, suspended pendants, chandeliers, track spots, linear luminaires and LED profiles. A ceiling lantern is a decorative enclosed pendant with a glazed frame, typically used in halls and porches. |
What is a spotlight in the ceiling?A directional ceiling light with a narrow to medium beam, used for task or accent lighting. It may be recessed as a gimbal downlight, surface-mounted on a plate or bar with two to five heads, or mounted on a track. The defining characteristic is that it can be aimed. Beam angles of 24° suit accenting; 36–38° suit general task downlighting. |
What kind of ceiling light gives the most light?For raw output in a domestic setting, a large LED panel or a high-output surface luminaire delivers the most lumens per fitting — 3,600 to 5,500 lm is typical. For the brightest perceived room, however, the answer is a layered scheme: a diffuse ambient source plus wall-washing, because illuminating the walls makes a room read far brighter than the same lumens directed at the floor. For the most light on a specific surface, a narrow-beam downlight positioned correctly beats any wide-distribution fitting. |
What type of ceiling light is best for a living room?A semi-flush ceiling light with an upward light component, or a perimeter LED profile cove, both at 2700 K with Ra 90 and dimmable to 1% — supported by two to four adjustable accent spots on a separate circuit. This combination gives soft ambient light that can be dimmed for evening, plus the contrast that makes a room look designed. A single central pendant or a symmetric downlight grid will not achieve either. |
What are the best lighting options for low ceilings?Slim LED flush ceiling lights with deep opal diffusers; recessed downlights with set-back lenses and 60° optics; recessed or plaster-in LED profiles, which add zero drop; and semi-flush fittings with a maximum 200 mm drop that put light onto the ceiling. The counter-intuitive best option is indirect light: a perimeter cove or ceiling uplighters onto a brilliant-white ceiling can add 200–300 mm of perceived height. Avoid long pendants, clear glass and narrow-beam spots. |
What type of lighting is best for high ceilings?Narrow-beam downlights of 24° or less, long-drop pendants and suspended linear systems that bring the source down to 2.4–3.0 m, and high-level wall-washing that puts light on vertical surfaces. Always design for maintenance: at 5–6 m a fitting needs a tower to service, so specify sealed integrated LED luminaires rated L90 at 50,000 hours, or use winch-lowered pendants. |
Which colour light is best for a ceiling?2700 K warm white for living rooms, bedrooms, dining rooms and hospitality; 3000 K warm white for kitchens, bathrooms and hallways; 3500–4000 K neutral white for home offices, workshops and commercial interiors. Avoid 5000–6500 K in any domestic living space. Never mix colour temperatures within one visual field. Where a room serves two purposes, use tunable-white ceiling lightings that shift from 4000 K by day to 2700 K in the evening. |
Which ceiling light brand is best?Judge products, not brands. The parameters that separate good from poor ceiling lightings are published on the data sheet: delivered luminaire lumens rather than chip lumens, efficacy above 100 lm/W, Ra 90 with R9 above 50, a stated UGR where relevant, percent flicker below 3%, a dimming floor of 1%, a named and replaceable driver, and honest lifetime data expressed as L80 or L90 at a stated number of hours. Any brand that publishes all of these is a serious brand; any that publishes none is not. |
What are the latest trends in ceiling lighting for 2026?Fewer and better-placed downlights; architectural LED profiles and shadow-gap lines; 48 V magnetic track in residential settings; warmer colour, with 2200 K and warm-dim displacing 2700 K in evening spaces; sculptural oversized decorative fittings; natural materials such as rattan, paper, alabaster and ceramic; trimless and plaster-in detailing; wireless mesh scene control from physical wall plates; and modular, repairable systems with replaceable drivers. |
What ceiling lights are trending and in fashion now?Linear bar pendants over dining tables, large opal and alabaster globes, ribbed and fluted glass, rattan and paper shades, matt black and brushed brass finishes, recessed profile lines and coves, trimless downlights, and low-output decorative fittings used as objects rather than as light sources. What is fading: uniform downlight grids, polished chrome, clear crystal droplets, cool white light in living spaces, and app-only smart bulbs. |
What should I use instead of ceiling lights?The question usually means “instead of a single harsh overhead fitting,” and the best answers are still ceiling-mounted: an indirect perimeter cove using LED profiles, wall-washing downlights that light vertical surfaces, or a dimmable semi-flush at very low output. Supplement with wall lights, floor lamps and table lamps for the lower layers. Abandoning the ceiling entirely leaves a room with poor uniformity and forces lamps into service as general lighting, which they do badly. |
Why does Gen Z hate overhead lighting?The objection is not to ceiling lightings as such but to a specific configuration: a single bright, undimmed, cool-white fitting at 2.4 m that places a high-luminance source directly in the peripheral visual field of a seated person. That produces measurable discomfort glare, poor modelling and flat, shadowless light. The technical remedies are all available in the ceiling — dimming, warmer colour, recessed or diffused sources, multiple circuits and indirect light — which is why well-designed ceiling lighting attracts no such objection. |
Why are ceiling lights so expensive?Price in ceiling lightings tracks four things: the quality of the LED binning and the resulting CRI and colour consistency; the driver, which in a good fitting costs more than the LEDs; the materials and thermal design, particularly the mass of aluminium available as a heatsink; and the optics, since a well-controlled low-glare distribution requires engineering that a bare diffuser does not. A €15 downlight and a €70 downlight differ in all four. The compensating fact is that ceiling lighting is amortised over fifteen years and consumes electricity every day, so the whole-life cost difference is much smaller than the purchase price difference. |
How many downlights do I need in a room?Space them at ceiling height divided by two — 1.2 m apart on a 2.4 m ceiling — with the first row at half that distance from the wall. That gives roughly six to eight in a 12 m² room, twelve in a 20 m² room and eighteen in a 30 m² room. Those figures are maxima for uniform ambient coverage. Better practice is to fit about a third fewer, place them by function rather than symmetry, and add a second layer such as a profile or a semi-flush fitting for ambient fill. |
How high should a pendant hang over a dining table or island?Over a dining table, 750–900 mm from tabletop to the underside of the shade. Over a kitchen island, 700–800 mm above the worktop, which is usually 1,600–1,700 mm from the floor. For a group over an island, space them at 700–800 mm centres and keep the end pendants at least 300 mm inboard of the island ends. The fitting should be one half to two thirds of the table width. |
What size ceiling light do I need for my room?Add the room’s length and width in metres; the resulting number in centimetres is an appropriate diameter for a central fitting. A 4 × 5 m room gives 9, so a 90 cm chandelier as a statement or a 45–55 cm flush fitting as a background element. Over a table, the different and overriding rule is one half to two thirds of the table width. |
What is a good CRI for ceiling lights, and does it matter?Ra 90 is the minimum for any occupied living space, and it matters a great deal. Below Ra 90, timber tends toward grey, terracotta toward brown and skin toward ill. The parameter most often overlooked is R9, the saturated red value, which is excluded from the Ra average: a fitting can score Ra 82 with an R9 of zero. Specify R9 above 50 for homes and above 90 for retail displaying food, textiles or cosmetics. |
Why do my LED ceiling lights flicker when dimmed?Almost always a mismatch between the dimmer and the driver. LED loads require a trailing-edge (resistive/capacitive) dimmer in most cases, not the leading-edge type used with old halogen transformers, and the total connected load must exceed the dimmer’s stated minimum — a dimmer rated from 10 W will misbehave with a single 6 W fitting. Check the manufacturer’s compatibility list, confirm the protocol, and verify that the load sits comfortably within the dimmer’s range. |
Why do my LED ceiling lights glow faintly when switched off?Usually induced voltage on a cable running alongside a live conductor, or a switch wired into the neutral rather than the live. Confirm that the switch interrupts the live conductor. If the wiring is correct, a small load-correction capacitor fitted across the fitting will absorb the induced current and stop the glow. |
What IP rating do I need for bathroom ceiling lights?Zone 1 — directly above the bath or shower up to 2.25 m — requires IP65 in practice. Zone 2, extending 0.6 m beyond zone 1 and around basins, requires IP44 minimum. Outside the zones, IP20 is permitted but IP44 is prudent because of steam. Any fitting installed above a shower should be IP65 and, if it is recessed, also fire-rated where it penetrates a separating ceiling. |
Do downlights need to be fire-rated?Yes wherever the ceiling forms part of a fire-resisting construction, which in practice means any ceiling between storeys in a dwelling, and any ceiling in a compartmented commercial building. A fire-rated downlight contains an intumescent seal that closes the aperture under heat, restoring the 30, 60 or 90 minute rating that the hole would otherwise destroy. Specify IC-rated (insulation-coverable) versions in top-floor ceilings so that loft insulation can be laid over them without a clearance zone. |
What is an LED profile and do I need one for strip lighting?An LED profile is an extruded aluminium channel that houses an LED strip, acts as its heatsink and carries a diffuser. You need one for any permanent installation. Without it, junction temperature rises 25–35 °C, which typically converts a 50,000-hour rating into fewer than 20,000 hours and causes visible colour drift within two years; the bare strip is also glary and mechanically vulnerable. The profile is what turns a consumable tape into an architectural luminaire. |
How do I stop seeing dots in my LED strip ceiling line?Three options. Use a COB strip, which has a continuous phosphor line and no discrete dots at all. Increase the distance between strip and diffuser — 8–10 mm for an opal diffuser, 12–15 mm for a frosted one. Or increase LED density to 240 or 320 LEDs per metre. Combining a shallow profile with a light-frosted cover is the configuration that produces visible scalloping, and it also wastes output. |
How long can an LED strip run be in a ceiling profile?At 24 V and 14.4 W/m, a single-end feed becomes visibly dimmer beyond about 8 m. The solution is topology rather than a larger driver: feed a 10 m run from the centre and it behaves as two 5 m runs with no visible gradient, or inject power at both ends. For runs beyond 15 m, split into separate circuits or move to a 48 V system. Never load a driver beyond 80% of its rating. |
Can I put ceiling lights in a rented flat?Yes, without electrical work, using plug-in ceiling lights: a pendant with a ceiling hook and a flex terminating in a plug, with the flex run neatly to a socket. Rechargeable ceiling fittings and magnetic pucks cover alcoves and wardrobes. Shade-only replacements on an existing pendant set change the appearance of a room entirely and are fully reversible. Any change to fixed wiring requires the landlord’s permission and, in most jurisdictions, a qualified installer. |
How do I light a room with no ceiling light at all?Combine three things. A plug-in ceiling pendant or a surface-mounted track fed from a socket gives you an overhead layer. Wall-mounted plug-in fittings or clamp spots give directional light. Floor and table lamps fill the rest. Where the ceiling is accessible from above, having an electrician spur a permanent point is usually inexpensive and is the better long-term answer, since it allows dimming and proper switching. |
Are smart ceiling lights worth the extra cost?The dimming and scene control is worth it; the app is not the point. A room with three circuits and four stored scenes is functionally four rooms. Put the intelligence at the driver, the dimmer module or the control bus rather than in individual smart bulbs, which stop working when someone uses the wall switch and multiply cost in rooms with several light points. Always keep a physical wall plate: a lighting system that requires a phone will be abandoned. |
How often do LED ceiling lights need replacing?The LED module typically reaches L80 — 80% of initial output — after 30,000–50,000 hours, which at four hours a day is 20–34 years. In practice the driver fails first, usually at five to ten years, and is the component to plan for. Record every driver’s model, output and dimming protocol, note its location, keep one spare per type, and ensure it remains accessible. That single habit is the difference between a fifteen-minute repair and opening a ceiling. |
Can lightning damage a ceiling light or ceiling fan?Yes, though almost always through a conducted mains surge rather than a direct strike. LED drivers and electronic dimmers are considerably more susceptible to transient overvoltage than the incandescent lamps they replaced. In storm-prone areas or properties with an overhead supply, a type 2 surge protection device at the consumer unit is inexpensive and protects the whole installation. For large profile runs, DALI systems or extensive magnetic track, surge protection should be treated as standard specification. |
18. A repeatable method for specifying ceiling lightings
Ceiling lightings reward method far more than they reward budget. The most impressive lighting schemes we see are rarely the most expensive, they are the ones where somebody spent half an hour with a floor plan before anybody bought anything. Everything in this guide reduces to a sequence that can be applied to any room in any building, and it is worth restating in full, because the sequence is the deliverable.
Decide what the room is for, hour by hour. A living room used from six in the evening has different requirements from a home office used from nine in the morning, and a dual-purpose room needs tunable white rather than a compromise colour temperature. Set the target illuminance from the tables in section 7 – 150 lux for a living room, 300 lux for a kitchen, 500 lux at a desk and convert it to total lumens by multiplying by floor area and dividing by roughly 0.6. Choose the layers: ambient, task, accent and decorative, and give each one its own dimmable circuit, because the ability to run a room at 20% is worth more than any additional fitting. Select the families that deliver each layer, checking void depth, cut-out, weight, drop, IP rating and fire rating before anything else. Fix the light quality across the whole scheme: one colour temperature per visual field, Ra 90 minimum, R9 above 50, beam angles matched to ceiling height. Size the drivers and the control, never above 80% load, always with an accessible location and a spare on the shelf. Then, and only then, choose how it looks.
Applied consistently, that sequence produces rooms that are comfortable at every hour, cost 80–90% less to light than they would have done fifteen years ago, and require almost no intervention for a decade. It also avoids the six errors quantified in section 14.3, the ones that cost nothing to prevent and a great deal to correct.
Two closing observations are worth carrying away. The first is that the direction of travel in ceiling lighting is subtractive: fewer fittings, better placed, with more control. The uniform downlight grid is being dismantled across European specification practice, replaced by a smaller number of well-aimed sources plus indirect light from LED profiles and coves. If you are planning a renovation, resist the instinct to add fittings and invest instead in placement, dimming and the architectural line.
The second is that the ceiling is the only surface in a building that can carry light to every part of a room without obstruction, which makes it the most valuable square metres in the interior. Treated as a plane to be designed rather than a place to hang a lamp, the ceiling does more for a space than any other single element. The products, the data and the technical support to do that well are all in the LightingLine catalogue, and our team is available to review a layout, size a driver, or check a compatibility question before you order rather than after.
Quick reference summary
| Decision | Default answer | When to deviate |
|---|---|---|
| Total lumens | Target lux × m² ÷ 0.6 | Divide by 0.4 for indirect cove schemes |
| Colour temperature | 2700 K living and sleeping; 3000 K kitchen and bath; 4000 K work | Tunable white in dual-purpose rooms |
| Colour rendering | Ra 90, R9 > 50 | Ra 95, R9 > 90 in retail and food areas |
| Downlight spacing | Ceiling height ÷ 2 | Wider with a second ambient layer |
| Beam angle | 36–38° on 2.4–2.7 m ceilings | 24° or less above 4 m; 60° for low-ceiling ambient |
| Circuits per living room | Three, all dimmable | Two as an absolute minimum |
| Dimming floor | 1% | 0.1% with warm-dim in bedrooms and hospitality |
| Driver loading | Maximum 80% of rating | Never exceed; always keep a spare |
| Profile diffuser | Opal, 8–10 mm from strip | Clear for hidden coves; COB for shallow runs |
| Strip specification | 24 V, 120+ LED/m or COB, 9.6–14.4 W/m, Ra 90 | 48 V and 19.2 W/m for long or high runs |
| Bathroom IP | IP65 zone 1, IP44 zone 2 | IP44 everywhere as a prudent default |
| Fire rating | Required in all separating ceilings | Add IC rating in top-floor ceilings |
This article was developed with the support of artificial intelligence and subsequently reviewed, corrected, and validated by the LightingLine.eu technical team, which guarantees its reliability and compliance with official sources.