When it comes to outdoor lighting, “waterproof” isn’t just a feature—it’s the fundamental requirement that determines whether your investment lasts one season or twenty years. Unlike indoor lighting where aesthetics reign supreme, exterior illumination demands rigorous protection against relentless environmental assault: driving rain, freezing ice, corrosive salt air, UV degradation, and pervasive dust.
This definitive guide shifts the focus squarely onto waterproof profile, providing you with an exhaustive, step-by-step masterclass in selecting, installing, and maintaining outdoor lighting that genuinely survives—and thrives—in the demanding UK climate. We’re moving beyond basic IP ratings to explore the engineering principles, installation nuances, and material science that separate truly weatherproof systems from those that merely claim to be.
Whether you’re installing outdoor wall lighting on a coastal home battered by salt spray, embedding outdoor led strip lighting in a poolside patio, or mounting outdoor sensor lighting in snow-prone areas, this guide addresses the waterproofing challenges specific to each scenario. We’ll leverage technical insights and robust product principles to ensure every connection, seam, and material choice contributes to a hermetic seal against moisture ingress.
In this article…
- The waterproofing imperative: why moisture protection is non-negotiable
- IP ratings decoded: beyond IP65 to true environmental protection
- Material science: choosing fixtures that withstand the elements
- Waterproof installation: techniques for permanent moisture exclusion
- Application-specific waterproofing: coastal, pool, snow & driveway
- Maintenance & testing: ensuring long-term waterproof integrity
- Waterproof lighting FAQs: your critical protection questions
The waterproofing imperative: why moisture protection is non-negotiable
Before examining IP ratings or installation techniques, we must understand why waterproofing matters at a fundamental level. Outdoor lighting failures are rarely about the light source itself—modern LEDs are incredibly robust. Instead, 85% of premature failures stem from moisture ingress, corrosion, and material degradation. Water doesn’t just cause short circuits; it initiates complex chemical and physical processes that systematically destroy lighting systems from within.
The physics of water ingress: how moisture defeats outdoor lighting
Water penetration follows the path of least resistance through capillary action, pressure differentials, and thermal cycling. When a light fixture heats up during operation and cools at night, it creates internal pressure changes that literally “breathe” moist air inside through microscopic gaps. This moisture then condenses on internal surfaces. The real damage occurs through:
Electrolytic corrosion: when water meets different metals (aluminium housing with brass screws, for example), it creates a galvanic cell that accelerates corrosion. This is particularly aggressive in coastal outdoor lighting where salt acts as an electrolyte.
Printed circuit board (PCB) degradation: modern LED outdoor lighting contains delicate driver circuits. Moisture causes copper traces to oxidize, solder joints to fail, and components to short. The first sign is often flickering, then complete failure.
Gasket and seal degradation: many cheap “waterproof” fixtures use rubber gaskets that harden, crack, or compress permanently after one season of thermal cycling. UV exposure accelerates this process dramatically.
Ice expansion damage: in colder UK regions, water that seeps into fixtures freezes and expands with tremendous force—up to 2,000 kg/cm²—cracking housings, breaking glass, and deforming metal.
Cost of failure: why waterproofing is your primary investment
The financial implications of inadequate waterproofing extend far beyond replacing a single fixture. Consider this cascade of failures:
| Failure point | Immediate repair cost | Hidden/long-term costs | Prevention solution |
|---|---|---|---|
| Corroded circuit board | £80-£200 per fixture replacement | Electrician call-out (£60-£100/hr), potential water damage to building structure, system downtime during repair | IP67-rated sealed driver compartment with conformal coating |
| Failed cable gland/connection | £20-£50 materials + labour | Risk of electrical short causing circuit breaker issues, potential fire hazard in extreme cases | Double-sealed cable glands with strain relief, waterproof connectors |
| Cracked housing from ice | Full fixture replacement £100-£400 | Water entry into wall cavity, insulation damage, mould growth behind fixtures | Frost-proof materials, proper drainage channels, ice-resistant design |
| Corroded mounting hardware | £30-£80 per fixture removal/reattachment | Fixture falling risk, damage to property or injury, complete reinstallation required | Stainless steel 316 hardware, anti-corrosion coatings, sacrificial anodes in coastal areas |
The critical insight: investing an additional 20-30% in proper waterproofing during initial installation typically extends system life by 300-500%. For outdoor lighting for homes in the UK’s variable climate, this isn’t optional—it’s essential engineering.
IP ratings decoded: beyond IP65 to true environmental protection
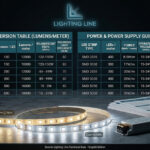
The Ingress Protection (IP) rating system is your primary tool for specifying waterproof performance, but most people misunderstand its limitations and practical applications. An IP rating alone doesn’t guarantee long-term durability—it’s a laboratory test under specific conditions. True waterproofing requires understanding what these ratings mean in real-world scenarios.
IP rating deep dive: what the numbers actually test
First digit (solid particle protection): often overlooked but critical for long-term waterproofing. Dust (IP5X) can compromise seals over time, while dust-tight (IP6X) ensures no particulate ingress that could prevent proper sealing.
Second digit (liquid ingress protection): the waterproofing standard. The tests are specific:
- IPX4 (splashing): tested with water splashed from any direction for 10 minutes. Not suitable for most permanent outdoor lighting except deeply sheltered areas.
- IPX5 (water jets): 12.5mm nozzle from 3 meters, 1 minute per square meter. Simulates heavy rain and garden hose spray.
- IPX6 (powerful water jets): 12.5mm nozzle from 3 meters, 100 liters/minute, 3 minutes per square meter. Suitable for coastal and exposed locations.
- IPX7 (temporary immersion): 30 minutes at 1 meter depth. Important for fixtures that may flood or be submerged temporarily.
- IPX8 (continuous immersion): depth and duration specified by manufacturer. For pond lights, fountain lighting, etc.
The IP rating reality check: what manufacturers don’t tell you
Critical consideration 1: IP ratings are tested on NEW fixtures with perfect gaskets. They don’t account for:
- UV degradation of rubber seals over 2-5 years
- thermal cycling expanding/contracting materials
- installation errors compromising seals
- maintenance neglect allowing debris buildup
Critical consideration 2: multiple exposure factors require combined ratings. A light might need:
- IP66 for water jet protection
- plus IK08 for impact resistance (hail, debris)
- plus specific corrosion resistance (salt spray testing)
- plus UV resistance rating for plastic components
| Application | Minimum IP rating | Recommended IP rating | Additional protections needed | Typical failure without protection |
|---|---|---|---|---|
| General garden path lights | IP44 | IP65 | UV-stabilized polycarbonate, frost-proof design | Condensation inside lens, yellowing plastic |
| Outdoor wall lighting (exposed) | IP54 | IP66 | Stainless steel fixings, thermal-break design | Water tracks behind fixture, wall staining |
| Outdoor sensor lighting (PIR floodlights) | IP65 | IP66 | Heated lens option for snow areas, insect screen | False triggers from condensation on sensor |
| Coastal outdoor lighting | IP66 | IP68 + Corrosion Rating | Marine-grade aluminium, cathodic protection | Salt corrosion destroying housing in 12-18 months |
| Deck & step lighting | IP65 | IP67 | Self-draining design, non-slip glass | Water pooling in fixture, ice damage in winter |
| Underwater/pool lighting | IP68 | IP68 (specific depth rating) | Pressure testing, double o-ring seals | Electrical failure creating shock hazard |
The professional approach: always specify one IP rating higher than theoretically necessary. If IP65 should suffice, choose IP66. This buffer accounts for manufacturing tolerances, installation variables, and material aging. For outdoor lighting UK installations, where weather extremes are guaranteed, this conservative approach pays dividends in longevity.
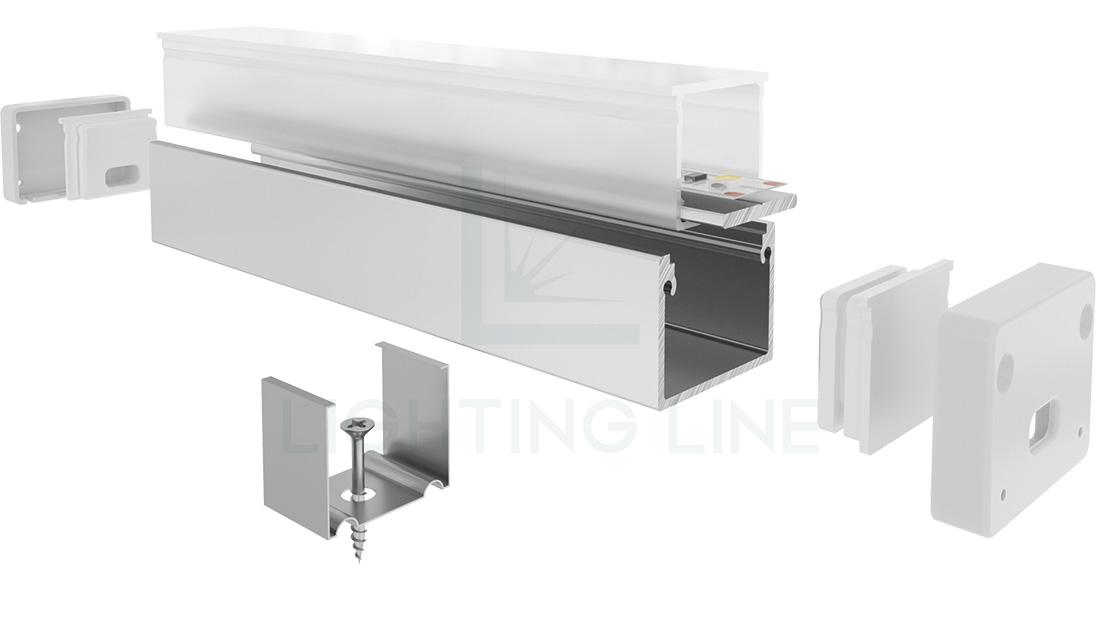
Material science: choosing fixtures that withstand the elements
An IP rating tells you how well a fixture keeps water out, but material selection determines how well the fixture itself survives constant exposure. The right materials resist corrosion, UV degradation, thermal stress, and physical impact—often long after the waterproof seals have begun to degrade.
Housing materials: from die-cast aluminium to marine-grade composites
Die-cast aluminium (ADC12/A380): the industry standard for good reason. It’s lightweight, excellent heat dissipation for LEDs, and naturally corrosion-resistant when properly finished.
Critical detail: look for powder-coated finishes (minimum 60μm thickness) rather than paint. Powder coating provides superior adhesion and corrosion protection.
Stainless steel (304 vs 316):
- 304 stainless: good for most applications. Contains 18% chromium, 8% nickel. Resists rust in normal conditions.
- 316 stainless (marine grade): contains 2-3% molybdenum. Essential for coastal outdoor lighting, pool areas, and regions using road salt. The molybdenum dramatically increases resistance to chloride corrosion.
Copper & brass: naturally corrosion-resistant and develop a protective patina. Often used for traditional outdoor wall lighting designs. Ensure internal components are also protected—brass exterior with steel screws inside will still corrode.
Engineering polymers: high-quality polycarbonate or ABS with UV stabilizers can outperform metals in certain applications. Look for materials rated for continuous outdoor use (often indicated by UV-stabilized or “outdoor grade”).
Critical component materials: where waterproofing often fails
Gaskets & seals
| Material | Best for | Temperature range | UV resistance | Typical lifespan outdoor |
|---|---|---|---|---|
| Silicone rubber | General purpose, wide temp range | -55°C to +230°C | Excellent | 10-15 years |
| EPDM rubber | Weather resistance, ozone areas | -40°C to +150°C | Good | 8-12 years |
| Neoprene | Oil/fuel exposure areas | -40°C to +120°C | Fair (needs protection) | 5-8 years |
| Fluorosilicone | Chemical/fuel resistance, extreme | -55°C to +200°C | Excellent | 12-20 years |
Glass & lenses
- Tempered glass: 4-5 times stronger than annealed glass. When it breaks, it crumbles into small pieces rather than sharp shards.
- Polycarbonate: virtually unbreakable but prone to scratching. Look for hard-coat versions with UV protection.
- Glass types: clear, frosted, or prismatic diffusers. Ensure any coatings are on the INSIDE surface where they’re protected.
Fasteners & hardware: this is where many otherwise good fixtures fail. Demand:
- stainless steel 304 or 316 screws and bolts
- nylon locking nuts or thread-locking compound
- non-corrosive wall plugs (plastic or stainless)
- spring washers to maintain tension as materials expand/contract
The LED driver: the most vulnerable component
The driver (transformer/power supply) is the heart of your LED system and the most moisture-sensitive component. Even if water never touches it, high humidity can cause failure.
Driver protection levels:
- potting/encapsulation: the entire circuit board is immersed in a waterproof resin compound. This is the gold standard for outdoor lighting drivers.
- conformal coating: a thin protective chemical coating applied to the PCB. Good but less robust than potting.
- Separate waterproof enclosure: the driver is mounted in its own IP66+ rated box. This allows for replacement but adds complexity.
Location strategy: whenever possible, mount drivers in protected locations—under eaves, in garages, in waterproof outdoor cabinets. Even IP67-rated drivers last longer when not directly exposed.
Waterproof installation: techniques for permanent moisture exclusion
The finest waterproof fixture will fail if installed incorrectly. Installation technique is arguably more important than the IP rating itself. This section details professional methods that ensure decades of reliable service, addressing exactly “how to install outdoor lighting” with waterproof integrity.
Pre-installation: planning for water management
Principle 1: water always flows downhill. Design your installation so every component sheds water naturally:
- mount fixtures with a slight downward tilt (2-3°) away from the wall;
- ensure cable entries are at the LOWEST point of the fixture;
- create “drip loops” in cables before they enter fixtures;
- never create pockets where water can pool.
Principle 2: thermal management affects waterproofing. LEDs generate heat, causing expansion/contraction:
- allow for thermal movement—don’t over-tighten fixtures;
- use flexible cable connections near heat sources;
- consider ventilation paths to prevent condensation buildup.
Step-by-step waterproof installation protocol
Step 1: surface preparation & mounting
- clean mounting surface thoroughly—dirt prevents proper sealing;
- apply clear silicone sealant to the backplate BEFORE mounting;
- use stainless steel wall plugs appropriate for your wall material;
- torque screws to manufacturer specification—over-tightening compresses gaskets permanently.
Step 2: cable gland installation (critical step)
| Cable type | Gland type | Installation tip | Common istake |
|---|---|---|---|
| Round flexible cable | Neoprene compression gland | Cut gland neck to exact cable diameter | Using wrong size—allows water “wicking” along cable |
| Armoured cable | Double-seal armoured gland | Properly earth the armouring to gland | Not tightening compression nuts sufficiently |
| Low voltage landscape cable | Multi-cable IP68 gland | Use sealing compound in gland for multiple cables | Pulling cables too tight—stresses seal |
Step 3: electrical connection waterproofing
- heat shrink butt connectors: with adhesive lining that melts to form waterproof seal;
- waterproof lever connectors: gel-filled for water exclusion;
- soldered & silicone filled: most permanent—solder connection then pot in silicone;
- ALWAYS test connections with a tug test before final assembly.
Step 4: gasket & seal integrity check
- clean gasket surfaces with isopropyl alcohol;
- check gasket isn’t twisted or pinched;
- apply silicone grease to rubber gaskets (not petroleum-based);
- assemble in correct sequence—don’t trap wires under gasket.
Specialized waterproofing techniques for challenging installations
For below-grade (buried) installations:
- use direct-burial cable rated for the purpose
- install in conduit even if not required—allows for replacement
- bury junction boxes with proper drainage below them
- mark all buried cables with warning tape 150mm above
For timber/masonry interfaces:
- use compression seals between different materials
- allow for wood movement—use slotted holes
- consider thermal breaks between metal fixtures and wood
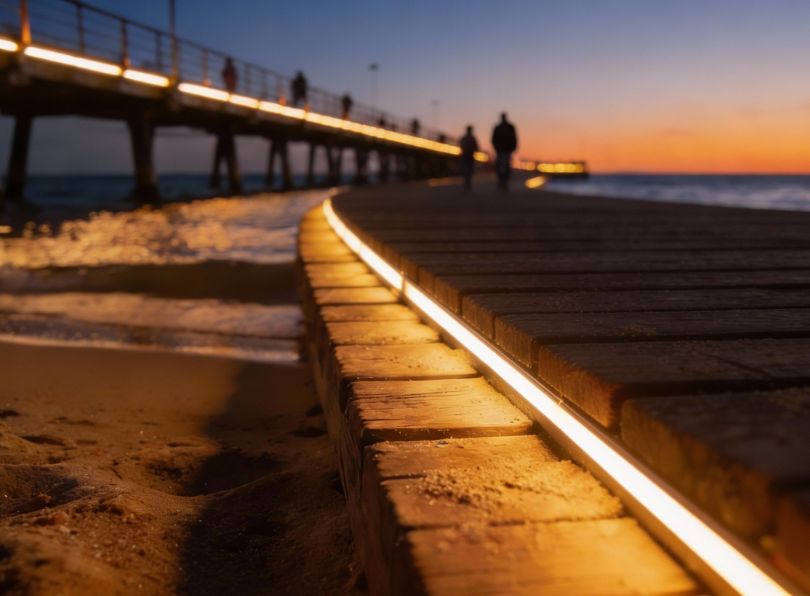
Application-specific waterproofing: coastal, pool, snow & driveway
Different environments present unique waterproofing challenges. A one-size-fits-all approach guarantees failure in demanding applications. Here we address the specialized requirements for extreme conditions.
Coastal & marine environment lighting
The challenge: salt spray is exponentially more corrosive than fresh water. It penetrates microscopic gaps and accelerates galvanic corrosion between dissimilar metals.
Specialized solutions:
| Component | Minimum specification | Ideal specification | Maintenance schedule |
|---|---|---|---|
| Housing material | Marine-grade aluminium | 316 Stainless steel or copper | Annual inspection |
| Finish/coating | Powder coat (80μm+) | Anodized + powder coat | Re-coat every 5-7 years |
| Fasteners | 316 Stainless | 316 Stainless with Dacromet coating | Check torque annually |
| Seals/gaskets | EPDM or Silicone | Fluorosilicone | Replace every 3-5 years |
| Additional protection | Cathodic protection possible | Sacrificial zinc anodes | Replace anodes as consumed |
Installation note: position coastal lighting to minimize direct spray exposure. Under eaves is preferable to fully exposed. Rinse fixtures
with fresh water monthly during salt season.
Snow & ice region lighting
The challenge: freeze-thaw cycles, ice expansion, snow load, and de-icing salt spray.
Specialized designs needed:
- heated lenses: prevents snow/ice buildup on critical fixtures
- ice-phobic coatings: reduces ice adhesion strength
- snow load rating: structural strength to support snow accumulation
- freeze-proof drains: prevents water pooling that then freezes
- cold-temperature rated components: electronics rated below -20°C
Driveway & path lighting (high traffic areas)
The challenge: water pressure from vehicle tires, de-icing chemicals, physical impact risk.
Robust solutions:
- IP69K rating: for high-pressure, high-temperature washdown
- impact resistance (IK10): maximum protection against physical impact
- chemical-resistant seals: for de-icing salt and automotive fluids
- recessed installation: minimizes exposure to physical damage
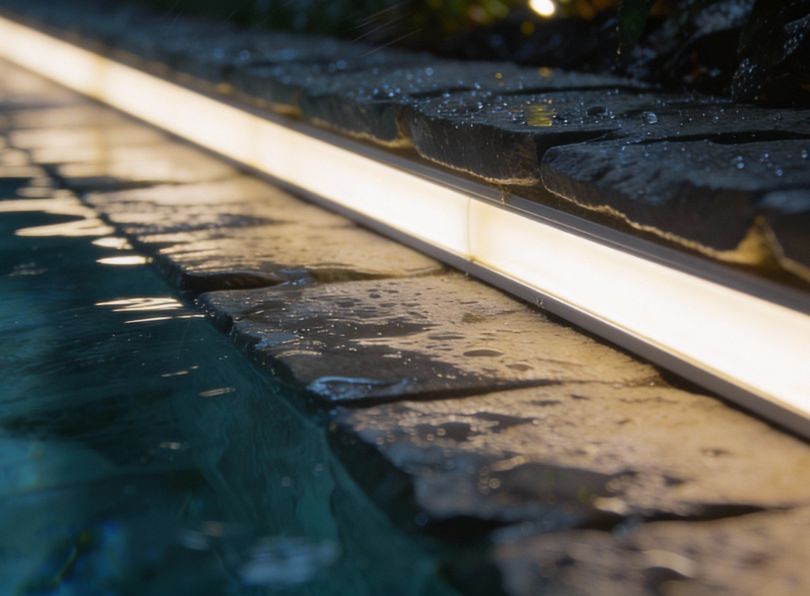
Pool & water feature lighting
- IP68 with depth rating: not just “IP68″—must specify depth and duration (e.g., “IP68 to 2 meters continuous”)
- double o-ring seals: primary and secondary sealing system
- pressure equalization: some designs allow pressure equalization to prevent vacuum lock
- chemical resistance: all materials must withstand pool chemicals
- low voltage ONLY: maximum 12V for submerged lights in pools
Professional tip: before final installation, pressure test pool lights in a bucket of water for 24 hours. Check for bubbles indicating leaks.
Maintenance & testing: ensuring long-term waterproof integrity
Waterproofing isn’t a “set and forget” feature—it requires periodic verification and maintenance. A simple annual check can extend fixture life by decades.
Annual waterproofing inspection protocol
| Check item | Method | Acceptable condition | Corrective action if failed |
|---|---|---|---|
| Gasket integrity | Visual inspection, flexibility test | Supple, no cracks or permanent compression | Replace with manufacturer gasket |
| Drainage channels | Check for debris blockage | Clear, water flows freely | Clean with compressed air |
| Sealant condition | Check for gaps/cracks | Continuous bead, adherent | Remove old, reapply silicone |
| Corrosion signs | White powder, discoloration | No corrosion visible | Clean, treat, consider replacement |
| Lens condensation | Operate then check for fogging | No moisture inside | Identify and repair leak source |
| Mounting security | Gentle pressure test | No movement | Tighten or replace hardware |
Waterproof testing methods for existing installations
Simple hose test: use garden hose on shower setting from 1 meter distance, moving systematically across fixture. Check for water entry.
Condensation test: run fixture for 2 hours at night, then immediately inspect for condensation inside when cool.
Thermal imaging: can identify moisture inside fixtures through temperature differentials.
Dielectric strength test: professional electricians can test insulation resistance to identify moisture compromise.
When to replace vs. repair waterproof components
Replace immediately:
- cracked or brittle gaskets
- corroded fasteners
- damaged cable glands
- any sign of water inside electrical compartment
Can be repaired:
- minor sealant gaps
- clogged drainage channels
- surface corrosion on non-critical areas
- loose mounting hardware
Waterproof lighting FAQs: your critical protection questions
This section addresses the most crucial waterproofing questions with detailed, technically accurate answers.
IP rating & specification questions
Is IP65 truly waterproof enough for UK outdoor lighting?
Answer – IP65 protects against low-pressure water jets from any direction, which covers typical rain and garden hose spray. For most UK applications, IP65 is the minimum acceptable standard. However, for exposed coastal locations, areas with driven rain, or where fixtures may face pressure washing, upgrade to IP66 or IP67. The key distinction: IP65 = water jets (6.3mm nozzle), IP66 = powerful water jets (12.5mm nozzle). For peace of mind in typical UK weather, IP65 suffices; for guaranteed long-term performance, specify IP66.
What’s the difference between waterproof, water-resistant, and weatherproof?
Answer – these are marketing terms without standard definitions. Always rely on IP ratings instead. Generally:
- “water-resistant” usually means IPX4 or less—protection from splashes only
- “weatherproof” suggests suitable for outdoor conditions but may not have specific testing
- “waterproof” should indicate at least IPX7 (temporary immersion) but is often misused
The professional approach: ignore these terms and check the actual IP rating on the technical specifications sheet.
Is IP44 suitable for any outdoor use?
Answer – IP44 protects against splashing water from any direction. It is suitable ONLY for fully sheltered locations—under deep eaves (minimum 600mm overhang), in covered walkways, or enclosed porches where no direct rain ever hits the fixture. For any fixture exposed to sky, even partially, IP44 is insufficient for UK conditions and will likely fail within 1-3 years.
Installation & maintenance questions
How do I waterproof electrical connections for outdoor lighting?
Answer – use a layered approach.
- Primary connection: use heat-shrink butt connectors with adhesive lining.
- Secondary protection: enclose in waterproof junction box (IP67 minimum).
- Drainage management: install connection at highest point with drip loop below.
- Environmental sealing: use self-amalgamating tape over the entire assembly.
- Location Strategy: Place connections in protected locations whenever possible.
Critical: never use standard electrical tape outdoors—it degrades quickly and traps moisture.
Can I make a non-waterproof light fixture suitable for outdoor use?
Answer – not recommended and potentially dangerous. While you can:
- apply silicone sealant to seams;
- add a waterproof gasket;
- use waterproof coatings on electronics.
The fixture wasn’t designed for thermal cycling, UV exposure, or condensation management. Internal components may corrode, creating fire or shock hazards. Always use properly rated outdoor fixtures.
How often should I check waterproof seals on outdoor lighting?
Answer
- Monthly: visual check for obvious damage or condensation.
- Seasonally (4x year): clean drainage channels, check for insect nests.
- Annually: full inspection per our checklist above.
- After extreme weather: check following storms, heavy snow, or freezing events.
Properly installed IP65+ fixtures with quality materials typically require only annual detailed inspection.
Problem-solving & troubleshooting
What does condensation inside my outdoor light mean?
Answer – condensation indicates:
- breached seal: most common—gasket failure, cracked lens, or poor cable gland;
- breathing: fixture “breathes” moist air in during thermal cycles;
- internal moisture source: water trapped during installation or manufacturing.
Immediate action:
- turn off power to fixture;
- allow to dry completely (may take days in dry environment);
- identify and repair leak source;
- consider adding silica gel desiccant packets inside if design allows.
Persistent condensation will destroy electronics rapidly.
Why is my outdoor LED light flickering after rain?
Answer – flickering indicates moisture has reached the LED driver or connections. The moisture creates intermittent connections or affects driver circuitry. This is a serious warning sign of waterproofing failure. Immediately:
- turn off power to the circuit;
- inspect all connections for moisture;
- check cable entries and seals;
- if moisture is found, dry thoroughly before re-energizing;
- consider professional inspection—moisture in electrical systems can be dangerous.
How can I protect outdoor lighting from freezing damage?
Answer – multi-layered approach.
| Protection method | Application | Effectiveness | Cost |
|---|---|---|---|
| Self-draining design | All outdoor fixtures | Prevents water accumulation | Low (design feature) |
| Heated lens option | Critical path/step lights | Prevents snow/ice buildup | Medium |
| Ice-phobic coatings | Lenses and horizontal surfaces | Reduces ice adhesion | Low-medium |
| Thermal break design | Wall-mounted fixtures | Reduces heat transfer to wall | Medium |
| Freeze-resistant materials | All components | Prevents material cracking | Varies |
Outdoor lighting: beyond the purchase of a simple waterproof profile
Waterproofing outdoor lighting isn’t about finding a single perfect solution—it’s about implementing multiple redundant protection layers. Start with the right IP rating for your environment, select materials proven in similar conditions, install with meticulous attention to drainage and sealing details, and maintain with regular inspections. When every layer contributes to moisture exclusion, you achieve the reliability that defines professional-grade outdoor lighting systems.
Remember: in exterior illumination, waterproofing isn’t an accessory—it’s the foundation upon which all other benefits depend. Invest in proper protection, and your lighting will deliver decades of reliable service.